1
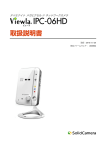
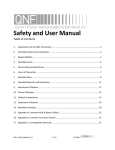
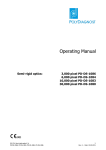
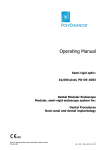
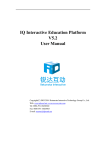
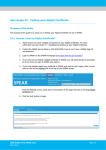
SOIL PH
METER
Model : PH-212
TABLE OF CONTENTS
1. FEATURES................................................................ 1
2. SPECIFICATIONS...................................................... 1
2-1 Meter..................................................................1
2-2 Soil pH Electrode................................................. 3
3. FRONT PANEL DESCRIPTIONS................................... 4
3-1 Display................................................................4
3-2 Power On/OFF Button.......................................... 4
3-3 Hold Button.........................................................4
3-4 pH Electrode BNC Socket......................................4
3-5 Battery compartment/Cover..................................4
3-6 CAL. ( pH 7 ) Adjust VR........................................4
3-7 SLOPE ( pH 4/pH 10 ) Adjust VR...........................4
3-8 Electrode BNC Plug............................................. 4
3-9 Electrode Handle................................................ 4
3-10 Electrode Sensing Head ( Spear Tip
Head )............................................................ 4
3-11 Protection bottle for Electrode
4. MEASURING PROCEDURE.......................................... 6
5. pH CALIBRATING PROCEDURE...................................7
5-1 Calibrating Consideration......................................7
5-2 Requiring Equipment for Calibration...................... 7
5-3 Two Points Calibration..........................................7
5-4 Single Point Calibration........................................ 8
6. REPLACEMENT OF BATTERY......................................8
7. ELECTRODE STORAGE, CLEANING and
RECONDITIONING....................................................9
8. OPTIONAL ELECTRODES........................................... 11
1. FEATURES
* Kits with pH meter, soil pH electrode,
pH 4.0 /pH 7.0 standard buffer solution and
carrying case.
* Spear Tip pH electrode ( included ), ideal for
penetration pH measurement into soil, meats,
cheese and other type of measurements requiring
sample penetration. The electrode features a very
durable glass measuring spear packaged in a
rugged virtually unbreakable epoxy body.
* Build in Slop ( pH 4, pH 10 ) and Cal. ( pH 7 )
adjust VR.
* Large LCD display.
* Easy operation, compact size.
* Water resistance on the front panel.
* Full line optional general purpose pH electrodes.
* Application : Agriculture, Gardening, Food
industrial, Education, School, Colleges, Laboratory,
Industrial and Quality control.
2. SPECIFICATIONS
2-1 Meter
Display
Measurement
Range
Resolution
13 mm ( 0.5" ) LCD, 3 1/2 digits.
0 to 14 pH x 0.01 pH
0.01 pH
1
Accuracy
Input
Impedance
Temperature
Compensation
Sampling
Time
Hold Function
Operating
Temperature
Operating
Humidity
Calibration
Knob
Power Supply
Power
Consumption
Dimension
Weight
pH electrode
(Optional)
± 0.07 pH(pH5 to pH 9)
± 0.1 pH(pH4 to pH4.9, pH9.1 to pH10)
± 0.2 pH(pH1 to pH3.9, pH10.1 to pH13)
* Meter only.
* 23 ± 5 ℃
10^12 ohms.
Not necessary to make adjustment.
Approx. 0.4 second.
To freeze the display reading value.
0 to 50 ℃ ( 32 to 122 ℉ )
Less than 80% RH.
External pH 4 ( slope adj.) &
pH 7 (Cal. adj.).
006P DC 9V battery.
Approx. 2.0 mA.
135 x 60 x 33 mm,
( 5.3 x 2.4 x 1.3 inch ).
196 g/0.43 LB ( including battery ).
Any connector pH Electrode with
BNC connector.
2
Standard
Accessories
Instruction Manual......................... 1 PC.
Soil pH electrode,
PE-06HD........................................ 1 PC.
pH 4.0 buffer solution.................... 1 PC.
pH 7.0 buffer solution.................... 1 PC.
Screw driver................................... 1 PC.
Carrying case................................ 1 PC.
2-1 Soil pH Electrode ( included )
pH Measuring
Range
pH Operation
Temperature
pH Electrode
Structure
Reference
of pH
Electrode
Zero Potential
for pH Value
Repeatability
Response time
Body Material
Connector
Mechanical
Protection
Weight
Dimensions
1 to 13 pH ( typical 0 to 14 pH ).
5 to 60 ℃ ( 41 to 140 ℉ ).
Combination type.
Ag/AgCl, Double Junction.
7± 1 pH.
0.05 pH.
≧ 2 minutes.
Epoxy.
BNC.
With protection bottle ( soaker
bottle ) on the electrode head.
68 g ( including cable & socket ).
Body length - 160 mm.
Body Dia.
- 12 mm.
Cable length - 1000 mm.
3
3. FRONT PANEL DESCRIPTION
Fig. 1
4
3-1 Display
3-2 Power On/OFF Button
3-3 Hold Button
3-4 pH Electrode BNC Socket
3-5 Battery compartment/Cover
3-6 CAL. ( pH 7 ) Adjust VR
3-7 SLOPE ( pH 4/pH 10 ) Adjust VR
3-8 Electrode BNC Plug
3-9 Electrode Handle
3-10 Electrode Sensing Head ( Spear Tip Head )
3-11 Protection bottle for Electrode
5
4. MEASURING PROCEDURE
After the instrument and pH electrode are calibrated,
then the unit is now ready for measuring.
* The calibration procedure, please refer charpter 5,
page 6.
1)Connect the combination pH Electrode to the " BNC
socket " ( 3-4, Fig. 1 ).
2)Power on the instrument by using " Power ON/OFF
Button ".
3)Place the electrode into the measured soil or other
type penetration material ( such as cheese, meats... )
or solution, then the instrument will display the pH
value.
* Electrode ( attached ) is the
rough and durable penetration
electrode. However user should
operate the electrode very carefully.
* The electrode is the consumer
accessory, after the electrode is
used, if the damage of the
Electrode Sensing Head ( Spear
Tip Head ), it is without warranty.
4)After make the measurement, please rinse the electrode
in distilled water.
6
5. pH CALIBRATING PROCEDURE
5-1 Calibrating Consideration
These pH meter already calibrated by mV signal that
simulated from the ideal pH Electrode mV output base on
25 ℃ environment. However
a) An ideal electrode will produce 0 mV at pH 7.00,
but most electrodes are slightly off.
b)The measuring environment temperature may not near
25 ℃ ( 15 to 35 ℃).
It is necessary to make the following calibration procedures
( 5-3 or 5-4 ), if the user need to keep instrument
combined electrode within high accuracy.
5-2 Requiring Equipment for Calibration
1)Combination pH Electrode ( included )
2)Two buffer solutions ( included ) : pH 7.00 & pH 4.00
( or pH 10.00 ).
5-3 Two Points Calibration
1)Connect the combination pH Electrode to the " BNC
Socket " ( 3-4, Fig. 1 ) and place electrode into buffer
pH 7.00 solution.
2)Power on the instrument by pushing the " Power ON/OFF
Button " ( 3-2, Fig. 1 ).
3)Adjust " CAL. ( pH7 ) Adjust VR " ( 3-6, Fig. 1 ) until the
display reading values same as 7.00 exactly.
4)Rinse the electrode in distilled water.
5)Place electrode into buffer pH 4.00 ( pH 10.00 ) solution.
Adjust " SLOP(pH4/pH10) Adjust VR " ( 3-7, Fig. 1 ) until
the display reading values same as 4.00 ( 10.00 ) exactly.
6)Repeat above 2) to 5) procedures two times at least.
7
5-4 Single Point Calibration
1)Connect the combination pH Electrode to the " BNC
Socket " ( 3-4, Fig. 1 ) and place electrode into a
standard buffer solution ( for example pH 7.00 or other
larger values as possible ).
2)Power on the instrument by pushing the " Power ON/OFF
button " ( 3-2, Fig. 1 ).
3)Adjust " CAL. ( pH7 ) Adjust VR " ( 3-6, Fig. 1 ) until the
display reading values same as the values of above
standard buffer solution exactly.
6. REPLACEMENT OF BATTERY
1)When the left corner of LCD display show "
",
It is necessary to replace the battery. However, in-spec
measurement may still be made for several hours after
Low Battery Indicator appears before the instrument
become inaccurate.
2)To replace the battery, remove the " Battery Cover "
( 3-5, Fig. 1 ) on the rear cabinet.
3)Take out the battery, install a new one ( 006P DC 9V )
and reinstall the battery5
8
7. ELECTRODE STORAGE, CLEANING
and RECONDITIONING
7-1 Electrode Storage
When pH readings are made infrequently, for example,
several days or weeks apart, the electrode can be stored
simply by replacing it in its soaker bottle. First, slide the
cap onto the electrode, then the o-ring, then insert the
electrode into the bottle and firmly tighten the cap. If
the solution in the soaker bottle is missing, fill the bottle
with pH 4 buffer.
7-2 Electrode Cleaning
Coating of the pH bulb can lead to erroneous readings
including shortened span. The type of coating will
determine the cleaning technique. Soft coatings can be
removed by vigorous stirring or by use of a squirt bottle.
Organic chemical or hard coatings should be chemically
removed. Only in extreme cases should the bulb me
mechanically cleaned as abrasion can lead to permanent
damage. If cleaning does not restore performance,
reconditioning may be tried.
9
7-3. RECONDITIONING
When reconditioning is required due to electrode aging ,
the following chemical treatments can be tried. They are
presented in the order of the severity of their attack on
the pH glass and may not improve ( and in some case
actually further deteriorate ) electrode performance.
Note :
Use proper precautions when handling these
hazardous chemicals. Ammonium bifluoride and HF
(hydrofluoric acid) are extremely hazardous and
should only be used by qualified personnel.
1)Immerse the electrode tip in 0.1N HCI for 15 seconds,
rinse in tap water and then immerse tip in 0.1N NaOH
for is seconds and rinse in tap water. Repeat this
sequence three times and then recheck the electrode
performance. If performance has not been restored, try
Step 2.
2)Immerse the tip in a 20% solution of NH4F.HF
(ammonium bifluoride) for 2 or 3 minutes, rinse in tap
water and recheck performance. If performance has
not been restored, try Step 3.
3)Immerse electrode tip in 5% HF for 10 to 15 seconds,
rinse well in tap water, quickly rinse in 5N HCI, rinse
well in tap water and recheck performance. If
performance has not been restored it is time to get
another epoxy body, sealed reference combination pH
electrode.
10
8. OPTIONAL ACCESSORIES
pH ELECTRODE
Model : PE-03
General purpose pH electrode with BNC connector.
Range : 1 to 13 pH ( typical 0 to 14 pH ).
Epoxy body, Body size : 12 mm dia. x 160 mm.
Cable length : 1 meter.
pH ELECTRODE
Model : PE-11
General purpose & high quality pH electrode with
BNC connector.
Range : 1 to 13 pH ( typical 0 to 14 pH ).
Epoxy body, Body size : 9.5 mm dia. x 120 mm.
Cable length : 1 meter.
11
0412-PH-212