1
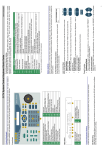
307Z
4CH H.264 Network DVR
Quick Start
Please read instructions thoroughly before operation and retain it for future reference.
The image shown above may differ from the actual product appearance.
724_Quick_V0.9
CONNECTIONS AND SETUP
1. FRONT AND REAR PANELS
1.1 Front Panel
1)
“LED LIGHT”:
POWER: DVR is powered on.
HDD: HDD is reading or recording
ALARM: Once the alarm is triggered
TIMER: When timer recording is turned on
PLAY: Under playing status
2)
“MENU”:
Press “MENU” button to enter the main menu.
3)
“ENTER”:
Press “ENTER” button to confirm the setting.
Press “ENTER” to change the position of the channel display.
Press “▲ / ▼ / ◄ / ► “ to select the channel which you would like to change.
Press “PAUSE/+” or “STOP/-” to select the channel which you would like to show.
4)
“SLOW”:
Under the playback mode, press “SLOW“ button to show slow playback.
5)
“ZOOM”:
Press “ZOOM” button to enlarge the picture of selected channel (under the live mode).
6)
7)
“
”
Press “
“ button to show the 4 channel display mode.
Press “
” button to change the setting in the menu.
“SEQ”
Press “SEQ” button to activate the call monitor function and press “SEQ” button again to escape the call
monitor mode.
Press “SEQ” button to change the setting in the menu.
8)
“POWER”:
Press this button to turn on / off the DVR.
(Under the recording mode, please stop recording before turning off the DVR).
9)
“CH1 ” “CH2 ” “CH3 ” “CH4 ”:
Press “1 ” “2 ” “3 ” “4 ” buttons to select the channel to display.
10) “PLAY”:
Press this button to playback the recorded data.
11) “UP / PAUSE , DOWN / STOP, LEFT / FAST REWIND, RIGHT / FAST FORWARD“ :
Press “▲ / ▼ / ◄ / ► “ to move the cursor up / down / left / right.
Under the playback mode, press “ PAUSE/+” button to pause playback.
724_Quick_V0.9
CONNECTIONS AND SETUP
Under the playback mode, press “ STOP/-” button to stop playback.
Under the playback mode, press “FF “ button to fast forward.
Under the playback mode, press “REW “ button to fast rewind.
ZOOM
SLOW
12) “
”:
AUDIO
Press these two buttons to select live or playback sounds of the audio channels.
Icon “
” means: Live audio of the 1st audio channel / Icon “
” means: Playback audio of the 1st audio channel
Icon “
” means: Live audio of the 2nd audio channel / Icon “
” means: Playback audio of the 2nd audio channel
Icon “
” means: Live audio of the 3rd audio channel / Icon “
” means: Playback audio of the 3rd audio channel
Icon “
” means: Live audio of the 4th audio channel / Icon “
” means: Playback audio of the 4th audio channel
Icon “
” means: The audio channel is not selected.
SEQ
13) “
P.T.Z.
:
Press these two buttons at the same time to enter / exit the PTZ control mode.
In the PTZ control mode,
* Zoom in : Press "+" button
* Zoom out: Press "-" button
* Adjust PTZ angle: Press "UP, DOWN, LEFT, RIGHT" buttons
14) Switch to PAL System:
Press the “POWER” button on the DVR front panel to shutdown. Then, press and hold “►“ first, and press the
“POWER” button to switch to PAL system.
(Press the buttons until the monitor shows video images)
Switch to NTSC System:
Press the “POWER” button on the DVR front panel to shutdown. Then, press and hold “◄ □“ first, and press the
“POWER” button to switch to NTSC system.
(Press the buttons until the monitor shows video images)
15) Press “MENU” + “ENTER” buttons on the DVR front panel to lock keys and to log in another username.
16) “LIST” (Event List Search):
To quick search the recorded files by event list, press this button to show all types of the event lists.
ALARM: List the information of the alarm-trigger-recorded files.
MANUAL: List the information of the manual-recorded files. The DVR will save one recorded file once any recording setting is changed
MOTION: List the information of the motion-trigger-recorded files.
SYSTEM: List the information of the system-recorded files. The DVR system will save one recorded file every one hour.
TIMER: List the information of the timer-recorded files.
17) “SNAP”:
Press “SNAP” to take a snapshot.
18) “EJECT”:
For Model 2, press the “EJECT” button to open / close the DVD Writer.
724_Quick_V0.9
CONNECTIONS AND SETUP
19) “USB”:
Support firmware update and file backup.
1.2 Rear Panel
4
2
HI-IMPEDANCE
1
LOOP
INPUT
1
LOOP
INPUT
LOOP
2
INPUT
3
LOOP
INPUT
3
4
MONITOR
CALL
4
5
1
IN
6
3
2
4
OUT
RISK OF ELECTRIC SHOCK
DO NOT OPEN
AUDIO
VGA
7
1)
IR
WARNING : TO REDUCE THE RISK OF ELECTRIC SHOCK,
DO NOT REMOVE COVER (OR BACK).
NO USER-SERVICEABLE PARTS INSIDE.
REFER SERVICING TO QUALIFIED
SERVICE PERSONNEL.
LINK
ACT.
EXTERNAL I/O
8
9
DC 19V
LAN
10
11
12
75Ω / HI-IMPEDANCE:
When using Loop function, please switch to HI-IMPEDANCE. When you don’t use Loop function, please switch to
75Ω.
2)
INPUT (1 ~ 4CH): Connect to video sources, such as cameras.
LOOP (1 ~ 4CH): Video output.
Note: The DVR will automatically detect the video system of the camera, please make sure that the
cameras are properly connected to the DVR and power-supplied before the DVR is turned on.
3)
MONITOR
Connect to a CRT monitor for video output.
4)
CALL
Connect to a call monitor.
5)
Audio IN (1 / 2 / 3 / 4)
Connect to audio sources, such as cameras equipped with the audio function.
When users start recording, the audio input will also be recorded with corresponding video channel.
Note: The audio source connected to the “Audio 1” will be recorded with the video of the “CH1”.
The audio source connected to the “Audio 2” will be recorded with the video of the “CH2”.
The audio source connected to the “Audio 3” will be recorded with the video of the “CH3”.
The audio source connected to the “Audio 4” will be recorded with the video of the “CH4”.
6)
Audio OUT
Connect to a monitor or speaker with 1 mono audio output.
7)
VGA
Connect to the TFT monitor directly
8)
IR
Connect the IR receiver extension line for remote control.
9)
EXTERNAL I/O
Insert the supplied 15PIN DSUB to this port for connecting external devices (external alarm, etc).
For detailed I/O port PIN configuration, please refer to “APPENDIX 1” in the user manual.
10)
LAN
Connect to Internet by LAN cable.
11)
LINK / ACT LED light:
When the Internet is activated, the LED light will be on.
12)
DC 19V
Connect to the supplied adapter.
724_Quick_V0.9
BASIC OPERATION
2. BASIC OPERATION
2.1 Live Page
In this live page of the DVR, you can see the live viewing of 1 or 4-cut screen.
Icon
Function
Icon
Function
Icon
Function
Icon
Function
Key lock
Key unlock
1st live audio
channel
2nd live audio
channel
3rd live audio
channel
4th live audio
channel
1st playback
audio channel
2nd
playback
audio channel
3rd playback audio
channel
4th playback
audio channel
Audio channel
unselected
Digital
mode
Digital zoom
unselected
HDD overwritten
Timer
recording
Motion
Recording
Alarm
zoom
2.2 Recording
When the HDD overwritten function is activated, this device will overwrite 8GB data from the oldest for continuous
recording without notice.
1)
Continuous Recording Icon
When the DVR is properly connected with camera, you can see the icon “
2)
” (recording) on the screen.
Event Recording Icon
When the motion / alarm detection is activated, once motion or external alarm happens, you will see the icon
“
3)
” (motion) or “
” (external alarm) on the screen.
Timer Recording Icon
When the timer record is activated, you will see the icon “
” (timer) on the screen.
Note: The audio source connected to the “Audio 1” will be recorded with the video of the “CH1”.
The audio source connected to the “Audio 2” will be recorded with the video of the “CH2”.
The audio source connected to the “Audio 3” will be recorded with the video of the “CH3”.
The audio source connected to the “Audio 4” will be recorded with the video of the “CH4”
724_Quick_V0.9
BASIC OPERATION
4)
HDD Overwritten Icon
HDD Overwritten function can be set to ON / OFF. When this function is enabled (ON), the “
” icon will display on
the monitor screen. The HDD capacity information can be set to be in red text when the capacity reaches below certain
level.
2.3 Playback
Press the “PLAY” button on the DVR control panel, and the device will playback the latest recorded video.
Note: There must be at least 8192 images of recorded data for playback to work properly. If not, the
device will stop playback. For example, if the IPS is set to 30, the recording time should be at least
273 seconds (8192 images / 30 IPS) for the playback to work properly.
Note: The playback at the local site might not be so smooth if there’s any remote surveillance
simultaneously going on.
1)
Fast Forward / Fast Rewind
You can increase the speed for fast forward and rewind on this device. In the playback mode:
Press “FF” once to get 4X speed forward and press twice to get 8X speed, etc. And the maximum speed is 32X.
Press “REW” once to get 4X speed rewind and press twice to get 8X speed, etc. And the maximum speed is 32X.
Note: During playback, the image size of the recording (Frame or CIF) will be shown on the screen.
2)
Pause / Image Jog
Press “PAUSE” button to pause the playback.
In the Pause mode:
Press “FF” button once to get one frame forward.
Press “REW” button once to get one frame rewind.
3)
Stop
Pressing “STOP” button under playback mode, the screen of this device will return to live monitoring mode.
4)
Slow Playback
Press “SLOW” button to get 1/4X speed playback and press twice to get 1/8X speed playback.
5)
Audio Playback (
/
)
Use these two buttons to select the live or playback sound of the audio channels.
Live audio of the 1st audio channel
Playback audio of the 1st audio channel
Live audio of the 2nd audio channel
Playback audio of the 2nd audio channel
Live audio of the 3rd audio channel
Playback audio of the 3rd audio channel
Live audio of the 4th audio channel
Playback audio of the 4th audio channel
The audio channel is not selected.
2.4 Key Lock and Unlock
1)
Key Lock On
Press “MENU” + “ENTER” buttons on the DVR front panel to lock keys.
Auto key lock: Refer to Section “8.2 System Info” in the user manual.
2)
Key Lock Off
Enter the DVR password to exit “Key Lock” mode.
Note: For the password setting, please refer to the section 4.4 Password Setting“” in the user manual.
724_Quick_V0.9
APPENDIX 6 DEFAULT VALUE
2.5 Upgrade
‧ Firmware / Multilanguage OSD Upgrade
1)
Use USB to upgrade firmware or OSD
Step 1. Format the USB memory device as FAT 32 format first.
Step 2. Get the upgrade files from your distributor and save the upgrade files in your USB flash device
(do not change the file name).
Step 3. In the “
enter.
” (SYSTEM INFO) menu, move the cursor to “UPGRADE”, and press the “ENTER” button to
Step 4. Select “YES”, and press the “ENTER” button again to confirm upgrade.
2)
Use AP software to remotely upgrade firmware or OSD
Step 1. Save the upgrade files at your PC (do not change the file name) and then login to the AP software.
Step 2. Press “
” (Miscellaneous Control) button to show the Miscellaneous Control panel. In the
Miscellaneous Control panel, press “
” (Tools) button on the Miscellaneous Control panel to enter the
AP upgrade window.
Step 3. Enter the user name, password, IP address and port number of the DVR.
Step 4. Press “Add” to select the provided firmware and OSD files.
Step 5. Then press “Upgrade Firmware” button to start upgrade.
2.6 Search
1)
Search by List
Press “LIST” button on the DVR control panel to show the list for all types of the recorded files. Choose the list
you want to view and press the “ENTER” button to start playback.
2)
ALARM
List the information of the alarm-trigger-recorded files.
MANUAL
List the information of the manual-recorded files. The DVR will save one recorded file once
any recording setting is changed
MOTION
List the information of the motion-trigger-recorded files.
SYSTEM
List the information of the system-recorded files. The DVR system will save one recorded file
every one hour.
TIMER
List the information of the timer-recorded files.
Search by Time
In the “ ” (EVENT INFO) menu list, move the cursor to “QUICK SEARCH”, and press the “ENTER” button to
enter the quick search menu. You can search any specific events by time (Year / Month / Day / Hour / Min) and
directly play the file you find.
3)
Search the Record Event by Log on the AP Software
Press “
” (Miscellaneous Control) button to show the Miscellaneous Control panel. In the Miscellaneous
” (Status List) button to enter the “Status List” page. In this page, you can see the list of
Control panel, press “
three different types of recording (User / Motion / Alarm) and press “Play” button to directly playback the file.
4)
Search by Event
In the “ ” (EVENT INFO) menu list, move the cursor to “EVENT SEARCH”, and press the “ENTER” button to
enter the event search menu. You can search any specific motion or alarm events and directly play the file you
find.