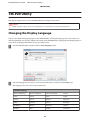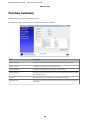
1
Software User's Manual
M00083001 EN
TM-P20 Software Installer
Software User's Manual
Cautions and Trademarks
Cautions and Trademarks
Cautions
❏ No part of this document may be reproduced, stored in a retrieval system, or transmitted in any form or by any
means, electronic, mechanical, photocopying, recording, or otherwise, without the prior written permission of
Seiko Epson Corporation.
❏ The contents of this document are subject to change without notice. Please contact us for the latest information.
❏ While every precaution has taken in the preparation of this document, Seiko Epson Corporation assumes no
responsibility for errors or omissions.
❏ Neither is any liability assumed for damages resulting from the use of the information contained herein.
❏ Neither Seiko Epson Corporation nor its affiliates shall be liable to the purchaser of this product or third parties for
damages, losses, costs, or expenses incurred by the purchaser or third parties as a result of: accident, misuse, or
abuse of this product or unauthorized modifications, repairs, or alterations to this product, or (excluding the U.S.)
failure to strictly comply with Seiko Epson Corporation's operating and maintenance instructions.
❏ Seiko Epson Corporation shall not be liable against any damages or problems arising from the use of any options
or any consumable products other than those designated as Original EPSON Products or EPSON Approved
Products by Seiko Epson Corporation.
Trademarks
EPSON is a registered trademark of Seiko Epson Corporation.
Exceed Your Vision is a registered trademark or trademark of Seiko Epson Corporation.
®
®
®
Microsoft , Windows , and Windows Vista are registered trademarks of Microsoft Corporation.
Wi-Fi , WPATM, and WPA2TM are either registered trademarks or trademarks of Wi-Fi Aliance .
®
®
The Bluetooth® word mark and logos are registered trademarks owned by Bluetooth SIG, Inc. and any use of such
marks by Seiko Epson Corporation is under license.
IOS is a trademark or registered trademark of Cisco in the U.S. and other countries and is used under license.
QR Code is a registered trademark of DENSO WAVE INCORPORATED in Japan and in other countries.
All other trademarks are the property of their respective owners and used for identification purpose only.
ESC/POS Command System
Epson ESC/POS is a POS printer command system that includes patented or patent-pending commands. ESC/POS is
compatible with most Epson POS printers and displays.
ESC/POS is designed to reduce the processing load on the host computer in POS environments. It comprises a set of
highly functional and efficient commands and also offers the flexibility to easily make future upgrades.
2
TM-P20 Software Installer
Software User's Manual
Cautions and Trademarks
©Seiko Epson Corporation 2014. All rights reserved.
For Safety
Key to Symbols
The symbols in this manual are identified by their level of importance, as defined below. Read the following carefully
before handling the product.
!Caution:
Provides information that must be observed to avoid damage to your equipment or a malfunction.
Note:
Provides important information and useful tips.
Restriction of Use
When this product is used for applications requiring high reliability/safety such as transportation devices related to
aviation, rail, marine, automotive etc.; disaster prevention devices; various safety devices etc.; or functional/precision
devices etc., you should use this product only after giving consideration to including fail-safes and redundancies into
your design to maintain safety and total system reliability. Because this product was not intended for use in
applications requiring extremely high reliability/safety such as aerospace equipment, main communication
equipment, nuclear power control equipment, or medical equipment related to direct medical care etc., please make
your own judgment on this product's suitability after a full evaluation.
Aim of the Manual
This manual provides information on how to use TM-P20 Software & Documents Disc for the product users or
development engineers who use the software.
3
TM-P20 Software Installer
Software User's Manual
Contents
Contents
Uninstall the EpsonNet Config. . . . . . . . . . . .
Uninstalling the Epson TM Virtual Port
Driver. . . . . . . . . . . . . . . . . . . . . . . . . . . . . .
Uninstalling the Epson Monitoring Tool. . . . .
Uninstalling the Epson Deployment Tool. . . . .
Uninstalling the Epson TM Bluetooth
Connector. . . . . . . . . . . . . . . . . . . . . . . . . . .
Uninstalling the OPOS ADK. . . . . . . . . . . . . .
Uninstalling the OPOS ADK for .NET. . . . . . .
Uninstalling the JavaPOS ADK. . . . . . . . . . . .
Cautions and Trademarks
Cautions. . . . . . . . . . . . . . . . . . . . . . . . . . . . . . . .
Trademarks. . . . . . . . . . . . . . . . . . . . . . . . . . . . .
ESC/POS Command System. . . . . . . . . . . . . . . . .
For Safety. . . . . . . . . . . . . . . . . . . . . . . . . . . . . . .
Key to Symbols. . . . . . . . . . . . . . . . . . . . . . . . .
Restriction of Use. . . . . . . . . . . . . . . . . . . . . . . . .
Aim of the Manual. . . . . . . . . . . . . . . . . . . . . . . .
.2
.2
.2
.3
.3
.3
.3
Overview
. 50
. 50
. 50
. 51
. 51
. 51
. 52
. 52
Using the Printer Driver
Printer Driver Access Methods and the
Application Range. . . . . . . . . . . . . . . . . . . . . . . .
Accessing from the Printer Driver's Print
menu. . . . . . . . . . . . . . . . . . . . . . . . . . . . . . .
Accessing from the Printer Driver's Properties
...................................
Accessing from the Application's Print Setting
Menu. . . . . . . . . . . . . . . . . . . . . . . . . . . . . . .
Language for Displaying Properties. . . . . . . . . . .
How to Use the Basic Functions. . . . . . . . . . . . . .
Paper Feed and Cut Setting. . . . . . . . . . . . . . .
Peripheral Device's Action Settings. . . . . . . . .
Advanced Method. . . . . . . . . . . . . . . . . . . . . . . .
TM-P20 Software & Documents Disc
TM-P20 Software Installer. . . . . . . . . . . . . . . . . . . . 6
Drivers and Utilities to be Installed. . . . . . . . . . . 6
Support OS. . . . . . . . . . . . . . . . . . . . . . . . . . . . . . . 7
Restrictions on Using Multiple Drivers on the
Same System. . . . . . . . . . . . . . . . . . . . . . . . . . . . . . 8
How to Access the Manuals. . . . . . . . . . . . . . . . . . . 9
Differences Depending on the OS. . . . . . . . . . . . . . 9
Viewing the User's Manual. . . . . . . . . . . . . . . . . . 10
Getting the URL of Epson Support Website. . . . . . 11
. 54
. 54
. 55
. 55
. 55
. 56
. 56
. 58
. 59
Installation
Installation Types. . . . . . . . . . . . . . . . . . . . . . . .
Easy Install. . . . . . . . . . . . . . . . . . . . . . . . . . . . .
Wi-Fi Network Connection Setting. . . . . . . . .
Bluetooth Connection Setting. . . . . . . . . . . . .
USB Wired Connection Setting. . . . . . . . . . . .
Installing Advanced Printer Driver Ver.5
Manual. . . . . . . . . . . . . . . . . . . . . . . . . . . . . .
Custom Install. . . . . . . . . . . . . . . . . . . . . . . . . .
Displaying the Select Software Screen. . . . . . . .
Installing the Printer Driver. . . . . . . . . . . . . . .
Installing the OPOS ADK. . . . . . . . . . . . . . . .
Installing the OPOS ADK for .NET. . . . . . . . .
Installing the JavaPOS ADK. . . . . . . . . . . . . .
Register a Printer Using SetupPOS. . . . . . . . . .
Using TM Bluetooth Connector for Paring. . . .
Installing the Utility. . . . . . . . . . . . . . . . . . . .
Update Mode. . . . . . . . . . . . . . . . . . . . . . . . . . .
Uninstallation. . . . . . . . . . . . . . . . . . . . . . . . . . .
Uninstalling the Windows Printer Driver. . . . .
Uninstalling the TM-P20 Utility. . . . . . . . . . .
TM-P20 Utility
. 13
. 13
. 15
. 24
. 28
Changing the Display Language. . . . . . . . . . . . . . . 61
Function Summary. . . . . . . . . . . . . . . . . . . . . . . . 62
Epson TM Utility
. 30
. 31
. 31
. 33
. 36
. 37
. 38
. 40
. 42
. 43
. 46
. 48
. 49
. 49
Application Development Information
How to Control the Printer. . . . . . . . . . . . . . . . .
Driver. . . . . . . . . . . . . . . . . . . . . . . . . . . . . .
ePOS-Print SDK. . . . . . . . . . . . . . . . . . . . . . .
ESC/POS Commands. . . . . . . . . . . . . . . . . . .
Storing Logos. . . . . . . . . . . . . . . . . . . . . . . . . . .
For Windows PC. . . . . . . . . . . . . . . . . . . . . .
For iOS/Android. . . . . . . . . . . . . . . . . . . . . . .
Download. . . . . . . . . . . . . . . . . . . . . . . . . . . . . .
4
. 66
. 66
. 67
. 68
. 68
. 68
. 69
. 69
TM-P20 Software Installer
Software User's Manual
Overview
Overview
TM-P20 provides the various drivers and utilities for Windows operating systems and smart devices.
You can install the drivers and utilities for Windows using TM-P20 Software & Documents Disc. For the installation,
see “Installation” on page 13.
For the provided drivers and utilities for Windows, see “Drivers and Utilities to be Installed” on page 6.
The following driver (SDK) and utility are provided for smart devices.
❏ ePOS-Print SDK
ePOS-Print SDK is a Software Development Kit (SDK) for developers creating applications that can print from
EPSON TM printers. For details, see “ePOS-Print SDK” on page 67.
❏ Epson TM Utility
A wizard guides you through connecting an iOS or Android device to your printer. You can also check and change
the printer's settings. For details, see “Epson TM Utility” on page 64.
5
TM-P20 Software Installer
Software User's Manual
TM-P20 Software & Documents Disc
TM-P20 Software & Documents Disc
This chapter describes how to use the TM-P20 Software & Documents Disc.
TM-P20 Software Installer
TM-P20 Software Installer allows you to install various drivers and utilities for the TM-P20 to Windows PC.
Drivers and Utilities to be Installed
Drivers
❏ Advanced Printer Driver
Windows printer driver. The following versions are provided.
❏ Advanced Printer Driver Ver.5.xx
❏ UPOS
Stands for Unified Point of Service. This is the standard specification of POS market, which defines drivers for
controlling POS peripheral devices in various operation environments. The following ADK (Application
Development Kit) are provided.
❏ OPOS ADK
❏ OPOS ADK for .NET
❏ JavaPOS ADK for Windows
Utilities
❏ TM-P20 Utility
A utility for checking and changing various printer settings. Use this utility to:
❏ Check the current settings
❏ Test operation
❏ Store logos
❏ Set paper saving
❏ Set printing control
❏ Set communication interfaces
❏ Save / restore settings
6
TM-P20 Software Installer
Software User's Manual
TM-P20 Software & Documents Disc
❏ EpsonNet Config
A network setting tool for Epson network products. In the case of this printer, you can use this tool to check and/or
set network parameters by connecting the Wi-Fi model to a computer for setup via the USB interface.
❏ Epson Monitoring Tool
Use to check a list of status for the Epson printers connected to the network. You can also update certificates for
multiple printers used for WPA-Enterprise in a batch.
❏ Epson TM Bluetooth Connector
Use to pair a Bluetooth printer and associate the generated Bluetooth port with that used by the driver and
applications.
❏ Epson Deployment Tool
Use to make network and printer settings simultaneously, via USB. Allows you to make settings efficiently at the
time of introducing TM printers for the first time, or when configuring multiple TM printers at the same time.
❏ Epson TM Virtual Port Driver
This is a serial / parallel-USB / Ethernet change driver for accessing a USB / Ethernet interface from a POS
application as virtual serial/parallel ports. You can use the USB / Ethernet-connected printer from the application
as though the printer is serial printer. Because the tool performs the conversion automatically, you do not need to
change the application's ESC/POS commands that controls the printer connected via serial / parallel port.
Support OS
The following lists the supported operating systems for running the TM-P20 drivers and utilities.
❏ Windows 8.1 (32 bit / 64 bit *1)
❏ Windows 8 (32 bit / 64 bit *1)
❏ Windows 7 SP1 (32 bit / 64 bit *1)
❏ Windows Vista SP2 (32 bit / 64 bit *1)
❏ Windows XP SP3 (32 bit)
❏ Windows Server 2012 R2(64 bit *1)
❏ Windows Server 2012 (64 bit *1)
❏ Windows Server 2008 R2 SP1 *1
❏ Windows Server 2008 SP2 (32 bit / 64 bit *1)
❏ Windows Embedded for Point of Service *2
❏ Windows Embedded POSReady 2009 *2
*1 The OPOS ADK can be used under 64-bit OS as long as the system meets the operating requirements. For more
details, see the release note before installing the OPOS ADK.
*2 Epson Monitoring Tool is not supported.
7
TM-P20 Software Installer
Software User's Manual
TM-P20 Software & Documents Disc
Restrictions on Using Multiple Drivers on the Same
System
TM-P20 Software Installer may not install the driver, or if the driver can be installed, the combination of the existing
driver and the newly installed driver may not be supported. Refer to the following table.
TM-P20 Software Installer
Before TM-P20 driver is installed
A
B
C
D
Advanced Printer Driver Ver.3
-
-
-
-
Advanced Printer Driver Ver.4.00 to 4.08
-
-*
-*
-*
Advanced Printer Driver Ver.4.09 or 4.17
-
-
-
-
Advanced Printer Driver Ver.4.50 to 4.53
-
✓
✓
✓
Advanced Printer Driver Ver.4.54 or later
✓
✓
✓
✓
OPOS ADK Ver.2.67 former
-
!
-
-
OPOS ADK Ver.2.68 or later
✓
!
✓
-
OPOS ADK for .NET Ver.1.11.8 former
-
-
!
-
OPOS ADK for .NET Ver.1.11.20 or later
✓
✓
!
-
JavaPOS ADK Ver.1.11.18 former
-
-
-
!
JavaPOS ADK Ver.1.11.20 or later
✓
-
-
!
TM-S1000 Driver
✓
✓
✓
-
TM-S9000/2000 Driver
✓
✓
✓
-
TM-J9000 OPOS ADK
✓
✓
✓
-
TM-J9000 Advanced Printer Driver
✓
✓
✓
-
TM-J9000 Status API
✓
✓
✓
-
TMCOMUSB Ver.2
-
-
-
-
TMCOMUSB Ver.3 and Ver.4. or Epson TM Virtual Port Driver Ver.5 to
Ver.7.00
-
✓
✓
✓
Epson TM Virtual Port Driver Ver.7.10a or later
✓
✓
✓
✓
Epson InkJet Printer Driver
✓
✓
✓
✓
8
TM-P20 Software Installer
Software User's Manual
TM-P20 Software & Documents Disc
A : Advanced Printer Driver Ver.5.x
B : OPOS ADK Ver.2.7x (TM-P20)
C : OPOS ADK for .NET Ver.1.12.x (TM-P20)
D : JavaPOS ADK for Windows Ver.1.13 (TM-P20)
✓ : Supported
- : Not supported
* : Can not be installed.
! : TM-P20 Software Installer starts in update mode. The installer shows the version of driver already installed on the
computer and allows you to select whether to update the driver or not.
How to Access the Manuals
The manuals of the drivers and utilities are also installed.
To see the manuals, access the manual data as follows.
❏ Advanced Printer Driver Ver.5
Start - All Programs / All apps(Windows 8/8.1) - EPSON - EPSON Advanced Printer Driver 5 - EPSON APD5
TM-Txx Manual
The Easy Install does not install the manuals. Install the manuals separately after finishing the Easy Install.
U See “Installing Advanced Printer Driver Ver.5 Manual” on page 30
❏ OPOS ADK
Start - All Programs / All apps(Windows 8/8.1) - OPOS - Manual
❏ OPOS ADK for .NET
Start - All Programs / All apps(Windows 8/8.1) - EPSON OPOS for .NET - Manual
❏ JavaPOS ADK for Windows
Start - All Programs / All apps(Windows 8/8.1) - Epson JavaPOS ADK - Documentation
❏ TM-P20 Utility
Except Windows 8/8.1:
Start - All Programs - EPSON - TM-P20 Software - TM-P20 Utility User's Manual
Windows 8/8.1:
Start - All apps - EPSON TM-P20 - EPSON TM-P20 Utility User's Manual
❏ Epson Monitoring Tool
Start - All Programs / All apps(Windows 8/8.1) - Epson - Epson Monitoring Tool - Epson Monitoring Tool
User's Manual
Differences Depending on the OS
The content of the descriptions of some operations in this book may be different depending on the OS. See the
following.
Item
Description
Screens shown
Screens in Windows 7 are used for the descriptions in this manual.
9
TM-P20 Software Installer
Software User's Manual
TM-P20 Software & Documents Disc
Item
Description
Confirmation and setting of the printer
driver
Windows 8/8.1
Desktop - Sidebar Settings - Control Panel - Hardware and Sound Devices and Printers
Windows 7
Start - Control Panel - Hardware and Sound - Devices and Printers
Right click the printer driver, and select the Printer properties.
Windows Vista
Start - Control Panel - Hardware and Sound - Printers
Right click the printer driver, and select the Properties.
Windows XP
Start - Control Panel - Printers and Faxes Right click the printer driver, and
select the Properties.
Starting the TM-P20 Utility
Windows 8/8.1
Start - All apps - EPSON TM-P20 - EPSON TM-P20 Utility
Windows 7
Start - All Programs - EPSON - TM-P20 Software - TM-P20 Utility
Windows Vista
Start - All Programs - EPSON - TM-P20 Software - TM-P20 Utility
Windows XP
Start - All Programs - EPSON - TM-P20 Software - TM-P20 Utility
Uninstall a program
Windows 8/8.1
Desktop - Sidebar Settings - Control Panel - Uninstall a program
Windows 7
Start - Control Panel - Uninstall a program
Windows Vista
Start - Control Panel - Uninstall a program
Windows XP
Start - Control Panel - Add or Remove Programs
Viewing the User's Manual
❏ Software User's Manual (this manual):
Explains about TM-P20 Software & Documents Disc, how to install the driver, how to use the utilities, and so
on.
❏ User's Manual:
Describes how to set up TM-P20 hardware, what are included in the box, how to handle the hardware, compliant
safety standards, safety precautions, and so on.
❏ Technical Reference Guide:
Provides all information necessary to develop, design, and/or install a system that uses TM-P20, or to develop or
design a printer application for TM-P20.
The following is how to view the manuals.
10
TM-P20 Software Installer
Software User's Manual
TM-P20 Software & Documents Disc
A
Insert the TM-P20 Software & Documents Disc to the computer. The TM-P20 Software Installer is
automatically read and the EPSON TM-P20 Software Installer screen appears. Click the Manuals button.
When the TM-P20 Software Installer is not automatically read, double click the TMInstallNavi.exe icon in the
TM-P20 Software & Documents Disc.
B
The Manuals screen appears. Click the manual button you want to see.
Getting the URL of Epson Support Website
The website provides a variety of product information and the latest driver download service.
11
TM-P20 Software Installer
Software User's Manual
TM-P20 Software & Documents Disc
A
Insert the TM-P20 Software & Documents Disc to the computer. The TM-P20 Software Installer is
automatically read and the EPSON TM-P20 Software Installer screen appears. Click the Support button.
When the TM-P20 Software Installer is not automatically read, double click the TMInstallNavi.exe icon in the
TM-P20 Software & Documents Disc.
B
The Support Information screen appears. Click the button of your area. The Website of Epson support is
displayed.
12
TM-P20 Software Installer
Software User's Manual
Installation
Installation
This chapter describes how to install the printer drivers and conduct a test print after the installation. The
uninstallation procedure is also provided.
U See “Uninstallation” on page 48
!Caution:
❏ Install with administrator privileges.
❏
Close all running applications before the installation.
Installation Types
You can select the installation type from the following.
❏ Easy Install: U See “Easy Install” on page 13
This is a standard installation, which installs the TM-P20 printer driver and TM-P20 Utility. If you are using a
Wi-Fi network connection, EpsonNet Config and Epson Monitoring Tool are also installed. If you are using a
Bluetooth connection, Epson TM Bluetooth Connector is also installed.
❏ Custom Install: U See “Custom Install” on page 31
You can select printer drivers and utilities you want to install. Select this installation type if you want to install the
OPOS driver, JavaPOS driver, the printer driver manual, sample programs, and tools for developing programs.
❏ Update mode: U See “Update Mode” on page 46
If the printer driver and/or UPOS is already installed, the driver version is displayed and you can select whether to
update the driver or not.
Easy Install
!Caution:
❏ When installing, connect just one printer to the computer. Do not connect multiple printers.
❏
A
Turn off the printer and then start the installation.
Insert the TM-P20 Software & Documents Disc into the computer. The TM-P20 Software Installer is
automatically read and the EPSON TM-P20 Software Installer screen appears. Click the Install Now button.
Note:
The displayed language can be changed from Select language.
13
TM-P20 Software Installer
Software User's Manual
Installation
When the TM-P20 Software Installer is not automatically read, double click the TMInstallNavi.exe icon in the
TM-P20 Software & Documents Disc.
B
The License Agreement screen appears. Read the content and select the I accept the terms in the license
agreement. Then click the Next button.
C
The Select Installation Type screen appears. Click the Easy Install button.
14
TM-P20 Software Installer
Software User's Manual
Installation
D
The Connection Type screen appears. Click the type of the connection and proceed to the step for each
connection described below.
Wi-Fi Network connection
Click the Wi-Fi button, and make settings using EpsonNet Config. Proceed to
“Wi-Fi Network Connection Setting” on page 15.
Bluetooth connection
Click the Bluetooth button, and make settings using TM Bluetooth Connector.
Proceed to “Bluetooth Connection Setting” on page 24.
USB wired connection
Click the USB port button to install driver and utility. Proceed to “USB Wired
Connection Setting” on page 28
Wi-Fi Network Connection Setting
A
After step 4 in “Easy Install” on page 13, connect the printer and computer using a USB cable, load paper, and
then turn on the printer, and then click the Next button on TM-P20 Software Installer screen.
15
TM-P20 Software Installer
Software User's Manual
Installation
B
Click the Run EpsonNet Config button to configure the network for the printer.
Install EpsonNet Config by following the instructions on the screen if it is not installed.
C
From the “Filter” pull-down list of the EpsonNet Config, select All or USB-connected devices.
Make sure that "TM Printer" appears on the screen.
If the "TM Printer" does not appear, click the Refresh button.
!Caution:
If the "TM Printer" is not displayed in the EpsonNet Config, refer the followings:
❏
If the computer and printer are connected via a USB hub, connect them directly.
❏
Confirm that the “EPSON USB Controller for TM-/BA/EU Printers” pop-up window appears at the
bottom right of the screen.
❏
Press the Feed button to finish printing, and the self-test mode terminates.
❏
Use EpsonNet Config ver.4.5.3 or later.
16
TM-P20 Software Installer
Software User's Manual
Installation
Note:
The followings are the default settings. Change the settings for your environment if required.
Wireless setting
❏
SSID: EPSON_Printer
❏
Network mode: Infrastructure
❏
Security level: WPA2 personal
❏
Security key: EpsonNet
TCP/IP setting
❏
IP address: Automatic DHCP
D
Select the printer you want to configure, then click the Configuration button.
E
The Device Properties screen appears. Select the Network Interface - Network - Basic (Wireless).
F
Set the Wi-Fi network connection.
G
If the communication mode is Ad Hoc.
Proceed to Step 7.
If the communication mode is Infrastructure.
Proceed to Step 8.
When the communication mode is Ad Hoc, the Wi-Fi network settings are as follows. When finished
configuring the settings, go to step 9.
Setting
Description
Communication Mode:
Select Ad Hoc.
SSID:
Set the SSID.
The maximum is 32 alphanumeric characters.
Channel:
Select the channel.
Transmission Rate:
Select the transmission rate.
17
TM-P20 Software Installer
Software User's Manual
Installation
Setting
Description
Security Level:
Select the security level.
If the Security Level is WEP-64bit(40bit) or WEP-128bit(104bit):
H
Setting
Description
Input using hex
Check the checkbox choosing the WEP Key to be input as a hexadecimal
number.
WEP Key:
The WEP Key length varies depending on the Security Level.
For WEP-64bit(40bit), ASCII 5 characters
For Hex WEP-64bit(40bit), 10 places
For WEP-128bit(104bit), ASCII 13 characters
For Hex WEP-128bit(104bit), 26 places
Key Index:
Select the key index.
When the communication mode is Infrastructure, the Wi-Fi network settings are as follows. When finished
configuring the settings, go to step 9.
Setting
Description
Communication Mode:
Select Infrastructure.
SSID:
Set the SSID.
The maximum is 32 alphanumeric characters.
18
TM-P20 Software Installer
Software User's Manual
Installation
Setting
Description
Transmission Rate:
Select the transmission rate.
Security Level:
Select the security level.
If the Security Level is WEP-64bit(40bit) or WEP-128bit(104bit):
Setting
Description
Input using hex
Check the checkbox choosing the WEP Key to be input as a hexadecimal
number.
WEP Key:
The WEP Key length varies depending on the Security Level.
For WEP-64bit(40bit), ASCII 5 characters
For Hex WEP-64bit(40bit), 10 places
For WEP-128bit(104bit), ASCII 13 characters
For Hex WEP-128bit(104bit), 26 places
Key Index:
Select the key index.
Detailed
Display the Detailed Security Settings screen.
Select the AP Authentication Method from Open System or Shared Key in
the Detailed Security Settings screen.
If the Security Level is WPA-PSK(TKIP) or WPA-PSK(AES):
Setting
Description
PSK (Pre-shared Key):
Input the Pre-shared Key. ASCII 8 to 63 characters
19
TM-P20 Software Installer
Software User's Manual
Installation
Setting
Description
Reenter PSK (Pre-shared Key):
Input the Pre-shared Key again.
If the Security Level is WPA-Enterprise (TKIP) or WPA-Enterprise(AES):
Setting
Description
Authentification Method:
Specify the authentification method.
I
Select the Network Interface - TCP/IP - Basic.
J
Set the IP Address, the Subnet Mask and the Default Gateway.
Setting
Description
Automatic/Manual
Select Manual.
IP Address
Set the IP Address.
Subnet Mask
Set the Subnet Mask.
Default Gateway
Set the Default Gateway.
20
TM-P20 Software Installer
Software User's Manual
Installation
K
After setting the TCP/IP, click the Transmit button.
The settings are applied to the printer and the printer automatically restarts.
Note:
The network communication has not been activated yet.
L
Disconnect the USB cable.
M
Turn off the printer, and then turn it back on. The network communication will be activated.
N
Return to the Software Installer screen and specify the printer that you have configured, and then click the Next
button.
O
The Start Installation screen appears. The driver and utility to be installed are listed.
Click the Install button to start the installation.
Follow the on-screen instruction to install driver and utility.
21
TM-P20 Software Installer
Software User's Manual
Installation
P
When the installation is completed, the Installation Finished screen appears.
When conducting test print
Click the Printing Test button. When the test print is finished, click
the Finish button to end the installation.
When exiting the installation
Uncheck the Run TM-P20 Utility. Then click the Finish button to
end the installation.
When setting the printer using TM-P20 Utility
continuously
Check the Run TM-P20 Utility checkbox (the box is checked by
default). Click the Finish button to end the installation. The
TM-P20 Utility starts to run.
U See “TM-P20 Utility” on page 61
This is the end of the printer driver installation. For information on how to print using the printer driver.
U See “Using the Printer Driver” on page 54
Confirming the Settings
The settings of the printer can be confirmed with one of the following methods.
!Caution:
Avoid using these methods during data transmission.
With Dynamic Status Sheet
A
Make sure that no USB cable is connected.
B
With the roll paper cover open, keep pressing the Feed button until the buzzer sounds.
C
Close the roll paper cover. Dynamic Status Sheet is printed.
22
TM-P20 Software Installer
Software User's Manual
Installation
D
Confirm that "Link Status" value is "Connect" and that "TCP/IP Status" is properly set.
With EpsonNet Config (Web Version)
A
From a computer on the same network with the printer, start a Web browser and enter the printer IP address in
the address bar.
B
If the printer is properly connected to the network, the window to enter a user name and password appears.
C
Enter a user name and password. The both defaults are “epson”. EpsonNet Config (Web Version) starts up.
D
Confirm the settings from “Basic information” or “TCP/IP”.
23
TM-P20 Software Installer
Software User's Manual
Installation
Bluetooth Connection Setting
A
After step 4 in “Easy Install” on page 13, load paper, turn on the printer, and then click the Next button on
TM-P20 Sofware Installer screen.
B
Click the Run TM Bluetooth Connector button to pair the computer and the printer. Epson TM Bluetooth
connector installation starts if it is not installed.
C
Follow the on-screen instruction to install Epson TM Bluetooth Connector. After the installation, Epson TM
Bluetooth Connector starts.
24
TM-P20 Software Installer
Software User's Manual
Installation
D
Select Search all printers around this computer and click Search.
!Caution:
If "ERROR " is displayed after you clicked Search on TM Bluetooth Connector, check the followings.
❏
The Bluetooth adapter is available.
❏
Bluetooth is ON in the Windows settings.
If the device is not displayed on TM Bluetooth Connector, check the followings.
❏
The printer power source is 10 m or less away from the computer power source.
❏
There is no other wireless device, such as a microwave oven and cordless telephone, that can interfere
with the Bluetooth printer.
❏
The printer and the computer are in the same room.
❏
The TM Bluetooth Connector search time is not set short.
❏
The printer to be detected is not communicating with any computer.
Note:
If the printer has not detected after clicking the Search button, check the manufacturer of the Bluetooth software.
1. Open the Control Panel.
2. In the search box on the Control Panel, enter "Bluetooth", and then click Change Bluetooth settings.
3. In the Bluetooth Settings dialog box, click the Hardware tab, and then search for the Microsoft Bluetooth
Enumerator. If it is not found, the Bluetooth software cannot detect the EPSON Bluetooth printer, and you may
not be able to connect to the computer.
25
TM-P20 Software Installer
Software User's Manual
Installation
E
Select the printer to be paired (Not been paired yet) and click Connect.
F
If the window to enter a passkey appears, enter a passkey and click OK.
Initial passkey: 0000
G
The "Assign port" window appears. Select the port to be used from the pull-down list and click OK.
H
The "Connection complete" window appears. Click Test Buzzer or Test Printing to check operation.
The printer buzzer sounds or printing starts.
!Caution:
If TM Bluetooth Connector Status is " x" after pairing, check the followings.
❏
The printer power source is 10 m or less away from the computer power source.
❏
There is no other wireless device, such as a microwave oven and cordless telephone, that can interfere
with the Bluetooth printer.
❏
The printer and the computer are in the same room.
❏
The TM Bluetooth Connector search time is not set short.
❏
The printer to be detected is not communicating with any computer.
If TM Bluetooth Connector Status is " Not been paired yet", check the following.
❏
I
The printer is not paired. Perform pairing again.
Click the "x" button of TM Bluetooth Connector to exit.
26
TM-P20 Software Installer
Software User's Manual
Installation
J
Return to the Software Installer screen and select the assigned port for the printer driver on the screen, and then
click the Next button.
K
The Start Installation screen appears. The driver and utility to be installed are listed.
L
When the installation is completed, the Installation Finished screen appears.
Click the Install button to start the installation.
When conducting test print
Click the Printing Test button. When the test print is finished, click
the Finish button to end the installation.
When exiting the installation
Uncheck the Run TM-P20 Utility. Then click the Finish button to
end the installation.
When setting the printer using TM-P20 Utility
continuously
Check the Run TM-P20 Utility checkbox (the box is checked by
default). Click the Finish button to end the installation. The
TM-P20 Utility starts to run.
U See “TM-P20 Utility” on page 61
27
TM-P20 Software Installer
Software User's Manual
Installation
This is the end of the printer driver installation. For information on how to print using the printer driver.
U See “Using the Printer Driver” on page 54
USB Wired Connection Setting
A
After step 4 in “Easy Install” on page 13, connect the printer and computer using a USB cable, load paper, and
then turn the printer on. Click the Next button.
Note:
The windows may not switch after clicking the Next button while the computer is searching the printer.
28
TM-P20 Software Installer
Software User's Manual
Installation
B
The Start Installation screen appears. The driver and utility to be installed are listed.
C
When the installation is completed, the Installation Finished screen appears.
Click the Install button to start the installation.
When conducting test print
Click the Printing Test button. When the test print is finished, click
the Finish button to end the installation.
When exiting the installation
Uncheck the Run TM-P20 Utility. Then click the Finish button to
end the installation.
When setting the printer using TM-P20 Utility
continuously
Check the Run TM-P20 Utility checkbox (the box is checked by
default). Click the Finish button to end the installation. The
TM-P20 Utility starts to run.
U See “TM-P20 Utility” on page 61
This is the end of the printer driver installation. For information on how to print using the printer driver.
U See “Using the Printer Driver” on page 54
29
TM-P20 Software Installer
Software User's Manual
Installation
Installing Advanced Printer Driver Ver.5 Manual
The Easy Install does not install the Advanced Printer Driver manual.
To see the manual, install it separately.
A
Insert the TM-P20 Software & Documents Disc into the computer. The TM-P20 Software Installer is
automatically read and the EPSON TM-P20 Software Installer screen appears. Click the Install Now button.
When the TM-P20 Software Installer is not automatically read, double click the TMInstallNavi.exe icon in
the TM-P20 Software & Documents Disc.
B
The License Agreement screen appears. Read the content and select the I accept the terms in the license
agreement. Then click the Next button.
C
The Update Software screen appears. Click the Next button.
D
The Select Software screen appears. Check the Sample and Manual checkbox and click the Next button.
E
The Start Installation screen appears. Click the Install button.
F
The EPSON APD5 Sample&Manual - InstallShield Wizard screen appears, click the Next button.
G
The License Agreement screen appears. Read the content and select the I accept the terms in the license
agreement. Then click the Next button.
H
The Ready to Install the Program screen appears. Click the Install to install the sample programs and manual
of Advanced Printer Driver.
I
The InstallShield Wizard Complete screen appears. Click the Finish button.
Clear the checkbox for the drivers or utilities that you do not install here.
30
TM-P20 Software Installer
Software User's Manual
Installation
J
The Installation Finished screen appears. Click the Finish button to finish the installation.
This is the end of the installation of the Advanced Printer Driver manual.
Custom Install
!Caution:
❏ When installing, connect just one printer. Do not connect multiple printers.
❏
When you are prompted whether to restart the computer during the installation, select No and continue the
installation. Restart the computer and the printer after all the installation is finished. If you select Yes and
restart the computer during the installation, the rest of the drivers will not be installed.
The following items can be installed with the Custom Install. The TM-P20 Software & Documents Disc is required for
Custom Install.
❏ Advanced Printer Driver Ver.5
❏ Sample and Manual
❏ OPOS ADK
❏ OPOS ADK for .NET
❏ JavaPOS ADK
❏ TM-P20 Utility
❏ EpsonNet Config
❏ Epson Monitoring Tool
❏ Epson Deployment Tool
❏ Epson TM Bluetooth Connector
❏ Epson TM Virtual Port Driver
Displaying the Select Software Screen
The TM-P20 Software & Documents Disc is required for Custom Install. You can select items you want to install in
Select Software screen. Follow the steps below to display the Select Software screen.
A
Insert the TM-P20 Software & Documents Disc into the computer. The TM-P20 Software Installer is
automatically read and the EPSON TM-P20 Software Installer screen appears. Click the Install Now button.
Note:
The displayed language can be changed from Select language.
31
TM-P20 Software Installer
Software User's Manual
Installation
When the TM-P20 Software Installer is not automatically read, double click the TMInstallNavi.exe icon in the
printer driver CD.
B
The License Agreement screen appears. Read the content and select the I accept the terms in the license
agreement. Then click the Next button.
C
The Select Installation Type screen appears. Click the Custom Install button.
D
The Select Printer Language (Resident Character) screen appears. Select the language of your printer and
click the Next button.
Note:
The language can be checked in Resident Character that is printed in the self test. To start the self test, turn on
the power button while holding down the FEED button with the paper roll cover closed. Continue holding down
the FEED button until printing starts.
E
The Select Software screen appears. Check the items you want to install from the list.
After this step, follow the installation procedure for each item.
32
TM-P20 Software Installer
Software User's Manual
Installation
Installing the Printer Driver
The printer driver can also be installed with Easy Install in the TM-P20 Software & Documents Disc. Easy Install
installs all items of the printer driver, and Custom Install allows you to select items you want to install from the
following.
❏ Advanced Printer Driver Ver.5
❏ Sample and Manual
Follow the steps below to execute the printer driver installation.
A
Insert the TM-P20 Software & Documents Disc into the computer and follow the steps.
U See “Displaying the Select Software Screen” on page 31
B
Select the Advanced Printer Driver Ver.5 .xx. Clear the check box for the items you do not want to install. Click
the Next button.
C
The Check Install screen appears. Check the Warning.
Check the computer environment and click Next to continue the installation.
Note:
In the Warning, the versions of Epson driver/tool that can coexist with the APD5 are listed.
D
The License Agreement screen is displayed. After checking the contents and selecting Agree, click Install.
Installation of Advanced Printer Driver Ver.5 begins.
E
The Printer Registration screen appears.
F
The Register, Change and Delete EPSON TM Printer screen is displayed.
Here, connect the printer to the computer and turn the printer's power on. Click Next.
From 1. Select Printer, select <New Printer>.
33
TM-P20 Software Installer
Software User's Manual
Installation
G
Set the followings from 2. Printer.
Item
Description
Name
Specify the printer driver name.
Do not use Unicode/2-byte characters for the name.
H
Select a port (USB/Ethernet/Bluetooth) to use from Port Type under 3.Communication Settings. Necessary
settings are done according to the interface.
Port type
Item
USB
Description
Communicate with USB port. Set the following communication setting.
USB Port
Ethernet
Specify the USB port used for connecting the printer. Usually, no setting is
required.
Communicate with Ethernet port. Set the following communication setting.
Ethernet Port
Specify the Ethernet port used for connecting the printer. Usually, no setting is
required.
IP Address
Set the IP address of Ethernet port the TM printer is connected.
Set to Printer
Setup the IP address to the printer itself.
Bluetooth
Communicate with Bluetooth port. Set the following communication setting.
Port
Specify the Bluetooth port used for connecting the printer. Usually, no setting is
required.
34
TM-P20 Software Installer
Software User's Manual
Installation
I
Set the followings from 4. Apply and click Save Setting.
Item
Description
Set as Default Printer
Check when configuring the printer as that normally used from
the Windows applications.
J
When the printer is registered, the screen comes up as shown below.
K
After confirming the test page printing of Windows, click Next under 5. Complete.
L
The Installation Complete screen appears.
M
When the installation is completed, the Installation Finished screen appears.
Click Yes. Test page printing of Windows is carried out.
Click Close to finish the installation.
When conducting test print:
35
TM-P20 Software Installer
Software User's Manual
Installation
Click the Printing Test button. When the test print is finished, click the Finish button to end the installation.
This is the end of the printer driver installation.
Installing the OPOS ADK
A
Insert the TM-P20 Software & Documents Disc into the computer and follow the steps.
U See “Displaying the Select Software Screen” on page 31
B
Check the OPOS ADK Ver.x.xx. Clear the check box for the items you do not want to install. Click the Next
button.
C
The Start Installation screen appears. The driver and utility to be installed are listed. Click the Install button to
start the installation.
D
The Choose Setup Language appears. Select your language, and click the Next button.
E
The EPSON OPOS ADK for TM-P20 Version x.xx xxx appears. Click the Next button.
F
The Software License Agreement screen appears. Read the content and select the I accept the terms in the
license agreement. Then click the Next button.
G
The Select Registry File screen appears. Click the Next button.
H
The Setup Type screen appears. Select Developer and then click the Next button.
Click the Browse button to change the default installation location.
I
The Start Copying Files screen appears. Click the Next button.
J
The Port selection screen appears. Select the port. Click the Next button to start the installation.
36
TM-P20 Software Installer
Software User's Manual
Installation
K
The InstallShield Wizard Complete screen appears. Click the Finish button.
L
When the installation is completed, the Installation Finished screen appears. Then click the Finish button to
end the installation.
This is the end of the OPOS ADK installation.
Installing the OPOS ADK for .NET
Note:
To install the OPOS ADK for .NET, Microsoft .NET Framework and Microsoft POS for .NET are required.
Install Microsoft .NET Framework and Microsoft POS for .NET Ver.1.11 beforehand.
A
Insert the TM-P20 Software & Documents Disc into the computer and follow the steps.
U See “Displaying the Select Software Screen” on page 31
B
Select the OPOS ADK for .NET Ver.x.xx.x. Clear the check box for the items you do not want to install. Click
the Next button.
C
The Start Installation screen appears. The driver and utility to be installed are listed. Click the Install button to
start the installation.
D
Install the EPSON OPOS ADK for .NET.
The EPSON OPOS ADK for .NET x.xx.x - InstallShield Wizard screen appears.
Select the language, and then click the Next button.
E
The Welcome to the InstallShield EPSON OPOS ADK for .NET screen appears. Click the Next button.
F
The License Agreement screen appears. Read the content and select the I accept the terms in the license
agreement. Click the Next button.
37
TM-P20 Software Installer
Software User's Manual
Installation
G
The Setup Type screen appears. Select Developer and then click the Next button.
Click the Browse button to change the default installation location.
H
The Setup Type screen appears. Select the port and click the Next button.
I
The Start Copying Files screen appears. Click the Next button to start the installation.
J
The InstallShield Wizard Complete screen appears. Click the Finish button.
K
When the installation is completed, the Installation Finished screen appears. Then click the Finish button to
end the installation.
This is the end of the OPOS ADK for .NET installation.
Installing the JavaPOS ADK
Note:
To install the JavaPOS ADK, Java Runtime Environment and Java Advanced Imaging API are required.
Make sure to install the above software before installing JavaPOS ADK.
A
Insert the TM-P20 Software & Documents Disc into the computer and follow the steps.
U See “Displaying the Select Software Screen” on page 31
B
Select the JavaPOS ADK Ver.x.xx.x. Clear the check box for the items you do not want to install. Click the Next
button.
C
The Start Installation screen appears. The driver and utility to be installed are listed. Click the Install button to
start the installation.
38
TM-P20 Software Installer
Software User's Manual
Installation
D
The EPSON JavaPOS ADK x.xx.x screen appears. Select the language and then click the OK button.
E
The Introduction screen appears. Click the Next button.
F
The License Agreement screen appears. Read the content and select the I accept the terms in the License
Agreement. Click the Next button.
G
The Choose JVM screen appears. Click the Next button.
H
The Choose Install Set screen appears. Select Developer and then click the Next button.
I
The Choose Folder Location screen appears. Click the Next button.
J
The Choose your communication screen appears. Select the port and click the Next button.
K
The Location for jpos.xml screen appears. Click the Next button.
L
The Pre-Installation Summary screen appears. Click the Install button to start the installation.
M
The Installation Complete screen appears. Click the Done button.
If a message to ask you to restart the computer appears, select No, I will restart my system myself.
39
TM-P20 Software Installer
Software User's Manual
Installation
N
When the installation is completed, the Installation Finished screen appears. Then click the Finish button to
end the installation.
This is the end of the JavaPOS ADK installation.
Register a Printer Using SetupPOS
After installing UPOS, register a printer using SetupPOS.
Follow the steps below. (The following explanation takes OPOS ADK as an example.)
A
Right-click POSPrinter at the left side of the window and select Add New Device....
The "Add New Device [Select DeviceNameKey]" window appears.
40
TM-P20 Software Installer
Software User's Manual
Installation
B
From the "Select Device Name" pull-down list, select the printer type to be used. Click Next.
C
Click Make Port.
D
The "TMPORT Making" window appears. Select "Port Type" and "Physical Port (Only COM and LPT)".
For Bluetooth connection, select Bluetooth for Port Type and COMx for Physical Port.
The port name to be newly added is displayed in “Make Port Name”. Remember this port name.
41
TM-P20 Software Installer
Software User's Manual
Installation
E
Click OK. The screen returns to the "Add New Device [Communication Settings]" window.
F
Click Finish. The printer is added.
Note:
To use Bluetooth with UPOS, you need to associate the port using Epson TM Bluetooth Connector. For details, see
“Using TM Bluetooth Connector for Paring” on page 42.
Using TM Bluetooth Connector for Paring
A
Follow the steps below to execute the utility installation.
B
Turn on the printer.
C
Select Search all printers around this computer and click Search.
D
Select the printer to be paired (
E
If the window to enter a passkey appears, enter a passkey and click OK.
Not been paired yet) and click Connect.
42
TM-P20 Software Installer
Software User's Manual
Installation
F
The Assign port window appears. Select the port to be used from the pull-down list and click OK.
❏ If started from the APD installer, port setting automatically starts without displaying the "Assign port"
window.
❏ APD print queue : ESDPRTxxx (TM-P20: Queue name)
❏ UPOS : ESDPRTxxx (UPOS for TM-P20)
❏ ESC/POS command : Displayed virtual COM port (e.g. COM4)
G
The Connection complete window appears. Click Test Buzzer or Test Printing to check operation. The printer
buzzer sounds or printing starts.
H
Click Back to Main to return to the main window.
I
Click the "x" button of TM Bluetooth Connector to exit.
Installing the Utility
The utility can also be installed with Easy Install on the TM-P20 Software & Documents Disc.
Easy Install installs TM-P20 Utility for a USB connection. For a Wi-Fi network connection, it installs TM-P20 Utility,
EpsonNet Config, Epson Monitoring Tool, and TM Bluetooth Connector. For a Bluetooth connection, it installs
Epson TM Bluetooth Connector.
Custom Install allows you to select utilities you want to install from the following.
❏ TM-P20 Utility Ver.x.xx
❏ EpsonNet Config Ver.x.xx
❏ Epson Monitoring Tool Ver.x.xx
❏ Epson Deployment Tool Ver.x.xx
❏ Epson TM Bluetooth Connector Ver.x.xx
❏ Epson TM Virtual Port Driver Ver.x.xx
43
TM-P20 Software Installer
Software User's Manual
Installation
Follow the steps below to execute the utility installation.
A
Insert the TM-P20 Software & Documents Disc into the computer and follow the steps.
U See “Displaying the Select Software Screen” on page 31
B
Select the utilities you want to install from the list. Clear the check box for the items you do not want to install.
Click the Next button.
C
The Start Installation screen appears. The drivers and utilities to be installed are listed. Click the Install button
to start the installation.
Follow the on-screen instruction of each utilities to install.
D
TM-P20 Utility is installed.
E
EpsonNet Config is installed.
F
Epson Monitoring Tool is installed.
The windows of language selection, License Agreement, and registering in the Windows Firewall exceptions
are displayed. Follow the on-screen instructions to install.
G
Epson Deployment Tool is installed.
The windows of License Agreement and registering in the Windows Firewall exceptions are displayed. Follow
the on-screen instructions to install.
H
Epson TM Bluetooth Connector is installed.
I
Install the Epson TM Virtual Port Driver.
J
The Welcome to the EPSON TM Virtual Port Driver Ver.x.xx Setup Wizard screen appears. Click the Next
button.
K
The License Agreement screen appears. Read the content and select the I accept the terms in the license
agreement. Then click the Next button.
L
The Ready to Install the Program screen appears. Then click the Install button.
The EPSON TM Virtual Port Driver Ver.x.xx - InstallShield Wizard screen appears. Select the language used
for installation and click the OK button.
44
TM-P20 Software Installer
Software User's Manual
Installation
M
When the following screen appears, click the Restart Later button.
Note:
If you restart your PC at this point, the installation process may not be completely performed. Be sure to select the
Restart Later button.
N
The InstallShield Wizard Complete screen appears. Click the Finish button.
If the restart of your PC is requested, select Yes, I want to restart my computer now. and click the Finish
button.
If you restarted the computer, there's no need to proceed to Step 12, but the installation is complete.
!Caution:
If the restart of your PC is requested on the InstallShield Wizard Complete screen, be sure to select Yes, I
want to restart my computer now.
O
When the installation is completed, the Installation Finished screen appears.
When exiting the installation:
Uncheck the Run TM-P20 Utility (the box is unchecked by default). Then click the Finish button to end the
installation.
When setting the printer using TM-P20 Utility continuously:
45
TM-P20 Software Installer
Software User's Manual
Installation
Check the Run TM-P20 Utility checkbox. Click the Finish button to end the installation. The TM-P20 Utility
starts to run.
U See “TM-P20 Utility” on page 61
This is the end of the utility installation.
Update Mode
!Caution:
❏ When installing, connect just one printer. Do not connect multiple printers.
❏
When you are prompted whether to restart the computer during the installation, select No and continue the
installation. Restart the computer and the printer after all the installation is finished. If you select Yes and
restart the computer during the installation, the rest of the drivers will not be installed.
The update mode allows you to update the printer driver already existing on the system, or check to see if the selected
newer version of printer driver can exist with the existing printer driver on the same system.
When the Advanced Printer Driver, OPOS ADK, OPOS ADK for .NET, JavaPOS ADK, and Epson TM Virtual Port
Driver are already installed, the driver installation is carried out in the update mode.
A
Insert the TM-P20 Software & Documents Disc into the computer. The TM-P20 Software Installer is
automatically read and the EPSON TM-P20 Software Installer screen appears. Click the Install Now button.
Note:
The displayed language can be changed from Select language.
When the TM-P20 Software Installer is not automatically read, double click the TMInstallNavi.exe icon in the
TM-P20 Software & Documents Disc.
B
The License Agreement screen appears. Read the content and select the I accept the terms in the license
agreement. Then click the Next button.
46
TM-P20 Software Installer
Software User's Manual
Installation
C
The Update Software screen appears. The system is checked and existing driver and its version are displayed.
Click the Next button.
D
The Select Printer Language (Resident Character) screen appears. Select the language of your printer and
click the Next button.
E
The Select Software screen appears. Check the checkbox for the drivers and utilities you want to install and
uncheck the checkbox for those you do not need.
Items that require updating are automatically selected.
47
TM-P20 Software Installer
Software User's Manual
Installation
F
The installer checks the validity of the update or the combination of the drivers. A warning message is displayed
if the combination can cause the printer to malfunction. Check the screen for the warning message, and click
the Next button.
When you click the Next button with the warning message displayed, a warning screen appears. Click the OK
button to proceed to Step 6.
G
The Start Installation screen appears. Check that the listed items to be installed are correct, and click the Install
button.
H
When the installation is finished, the Installation Finished screen appears. Click the Finish button to end the
installation.
Uninstallation
❏ Uninstall the printer driver
❏ Uninstall the TM-P20 Utility
❏ Uninstall the EpsonNet Config
❏ Uninstall the Epson TM Virtual Port Driver
❏ Uninstall the Epson Monitoring Tool
❏ Uninstall the Epson Deployment Tool
❏ Uninstall the Epson TM Bluetooth Connector
❏ Uninstall the OPOS ADK
❏ Uninstall the OPOS ADK for .NET
❏ Uninstall the JavaPOS ADK
48
TM-P20 Software Installer
Software User's Manual
Installation
Uninstalling the Windows Printer Driver
!Caution:
Do not delete the printer driver in Start - Control Panel - Hardware and Sound - Printers.
U See “Differences Depending on the OS” on page 9
Even though the icon (the printer driver) disappears from the screen, the printer driver is not uninstalled.
A
Quit all applications running on the computer.
B
Select Start - Control Panel - Uninstall a program - EPSON Advanced Printer Driver for TM-P20 Ver.5 and
click Uninstall.
C
The uninstallation confirmation screen appears. Click the Yes button.
D
The uninstallation confirmation screen for model specific utility is displayed. Click Yes when not using the
model specific utility with other drivers and applications. Click No when not uninstalling.
The Advanced Printer Driver Ver.5 is uninstalled.
The Advanced Printer Driver Ver.5 utility is uninstalled.
E
The Uninstallation Complete screen is displayed. Uninstallation is complete after clicking Finish.
Uninstalling the TM-P20 Utility
A
Quit all applications running on the computer.
B
Select Start - Control Panel - Uninstall a program - EPSON TM-P20 Utility. Click Uninstall.
For information of the differences in screen selections based on the OS versions.
U See “Differences Depending on the OS” on page 9
When the User Account Control screen appears, click the Continue button.
C
The TM-P20 Utility uninstallation confirmation screen appears. Click the Yes button.
49
TM-P20 Software Installer
Software User's Manual
Installation
D
The uninstallation of the TM-P20 Utility starts.
E
The Uninstall Complete screen appears. Click the Finish button to finish the uninstallation.
Uninstall the EpsonNet Config
A
Select Start - Control Panel - Uninstall a program - EpsonNet Config. Click Uninstall.
For information of the differences in screen selections based on the OS versions.
U See “Differences Depending on the OS” on page 9
When the User Account Control screen appears, click the Continue button.
B
The EpsonNet Config uninstallation confirmation screen appears. Click the Yes button.
C
The uninstallation of the EpsonNet Config starts.
D
The Uninstall Complete screen appears. Click the Finish button to finish the uninstallation.
Uninstalling the Epson TM Virtual Port Driver
A
Select Start - Control Panel - Uninstall a program - EPSON TM Virtual Port Driver. Click Uninstall.
For information of the differences in screen selections based on the OS versions.
U See “Differences Depending on the OS” on page 9
When the User Account Control screen appears, click the Continue button.
B
The Epson TM Virtual Port Driver uninstallation confirmation screen appears. Click the Yes button.
C
The uninstallation of the Epson TM Virtual Port Driver starts.
D
When uninstallation is complete, the window automatically closes.
Uninstalling the Epson Monitoring Tool
When uninstalling this tool, also uninstall EpsonNet SDK for Windows, unless you are using it with another
application. Follow the steps below to uninstall this tool.
A
Select Start - Control Panel - Uninstall a program - Epson Monitoring Tool. Click Uninstall.
For information of the differences in screen selections based on the OS versions.
U See “Differences Depending on the OS” on page 9
50
TM-P20 Software Installer
Software User's Manual
Installation
When the User Account Control screen appears, click the Continue button.
B
The Uninstall Confirmation window appears. Click on the Yes button. This tool will be uninstalled.
C
The Uninstall Complete window appears. click on the Finish button.
Uninstalling the Epson Deployment Tool
When uninstalling this tool, also uninstall EpsonNet SDK for Windows, unless you are using it with another
application. Follow the steps below to uninstall this tool.
A
Select Start - Control Panel - Uninstall a program - Epson Deployment Tool. Click Uninstall.
For information of the differences in screen selections based on the OS versions.
U See “Differences Depending on the OS” on page 9
When the User Account Control screen appears, click the Continue button.
B
The Uninstall Confirmation window appears. Click on the Yes button. This tool will be uninstalled.
C
The Uninstall Complete window appears. click on the Finish button.
Uninstalling the Epson TM Bluetooth Connector
When uninstalling this tool, also uninstall EpsonNet SDK for Windows, unless you are using it with another
application. Follow the steps below to uninstall this tool.
A
Select Start - Control Panel - Uninstall a program - Epson TM Bluetooth Connector. Click Uninstall.
For information of the differences in screen selections based on the OS versions.
U See “Differences Depending on the OS” on page 9
When the User Account Control screen appears, click the Continue button.
B
The Uninstall Confirmation window appears. Click on the Yes button. This tool will be uninstalled.
C
The Uninstall Complete window appears. click on the Finish button.
Uninstalling the OPOS ADK
A
Quit all applications running on the computer.
51
TM-P20 Software Installer
Software User's Manual
Installation
B
Select Start - Control Panel - Uninstall a program - EPSON OPOS ADK Version x.xx. Click Uninstall.
For information of the differences in screen selections based on the OS versions.
U See “Differences Depending on the OS” on page 9
When the User Account Control screen appears, click the Continue button.
C
The EPSON OPOS ADK uninstallation confirmation screen appears. Click the Yes button.
D
The Information screen appears. Click the Yes button.
E
The ADK Selection screen appears. Click the Next button.
F
The Confirm Deletion screen appears. Click the Start button.
G
The uninstallation of the EPSON OPOS ADK starts.
H
The Uninstall Complete screen appears. Click the Finish button.
When Yes, I want to restart my computer now. is selected, the computer will restart.
Uninstalling the OPOS ADK for .NET
A
Quit all applications running on the computer.
B
Select Start - Control Panel - Uninstall a program - EPSON OPOS ADK for .NET x.x.x. Click Uninstall.
For information of the differences in screen selections based on the OS versions.
U See “Differences Depending on the OS” on page 9
When the User Account Control screen appears, click the Continue button.
C
The EPSON OPOS ADK for .NET uninstallation confirmation screen appears. Click the Yes button.
D
The uninstallation of the EPSON OPOS ADK for .NET starts.
E
The completion screen appears. Click the Finish button to complete the uninstallation.
Uninstalling the JavaPOS ADK
A
Quit all applications running on the computer.
52
TM-P20 Software Installer
Software User's Manual
Installation
B
Select Start - Control Panel - Uninstall a program - EPSON JavaPOS ADK. Click Uninstall.
For information of the differences in screen selections based on the OS versions.
U See “Differences Depending on the OS” on page 9
When the User Account Control screen appears, click the Continue button.
C
The Uninstall Epson JavaPOS ADK screen appears. Click the Uninstall button.
D
The uninstallation of the EPSON JavaPOS ADK starts.
E
The completion screen appears. Click the Done button to finish the uninstallation.
53
TM-P20 Software Installer
Software User's Manual
Using the Printer Driver
Using the Printer Driver
This chapter explains how to use the major functions of the printer driver.
Printer Driver Access Methods and the Application
Range
Depending on how you access the printer driver, the application range of the settings you make on the printer driver
varies.
❏ Accessing the printer driver from the printer driver's Print menu
The print settings you made on the printer driver are applied to the print settings of the all users configured on the
computer. You must have administrative privileges to make the settings.
❏ Accessing the printer driver from the printer driver's Properties
The print settings you made on the printer driver are applied to your print settings only. They are not applied to
the settings of other users. This method is recommended.
❏ Accessing the printer driver from the application's print setting menu
The print settings you made on the application are applied to the application only. The settings are canceled when
you quit the application. When you start the application again, the print settings configured in the printer driver's
properties are applied.
Accessing from the Printer Driver's Print menu
54
TM-P20 Software Installer
Software User's Manual
Using the Printer Driver
Accessing from the Printer Driver's Properties
Accessing from the Application's Print Setting Menu
Language for Displaying Properties
The language used in the Advanced Printer Driver screen and Help can be selected from 24 languages. Selecting the
language that is easiest for you to understand will help you correctly configure the settings in the Advanced Printer
Driver. The language that initially appears is set based on the language information in your operating system.
55
TM-P20 Software Installer
Software User's Manual
Using the Printer Driver
A
Select the Language tab from Printing Preferences.
B
Select the language that you wish to use in the screens and Help from the Select language pull-down list. When
finished, click the OK button.
The languages that can be selected are shown below.
Selectable languages
Chinese-Hong Kong
Chinese-Simplified
Chinese-Traditional
Croatian
Czech
Danish
Dutch
English
Finnish
French
German
Hungarian
Italian
Japanese
Korean
Norwegian
Portuguese
Russian
Slovenian
Spanish
Swedish
Thai
Turkish
Vietnamese
How to Use the Basic Functions
U “Paper Feed and Cut Setting” on page 56
Paper Feed and Cut Setting
It sets the timing of auto-cut and paper feed before and after the printing.
A
Select Feed and Cut tab from printing preferences.
56
TM-P20 Software Installer
Software User's Manual
Using the Printer Driver
B
Select a cut and paper feed method displayed in the Preset option list and click OK.
Select using the illustration of paper feed and cut displayed in Illustration for your reference.
Note:
No Feed: Paper is not fed after printing a document.
Customization of Paper Feed and Cut
Customization is possible, when no preset function is desired, such as specifying the amount of paper feed and
modifying the timing control.
Follow the steps below.
A
Select Custom from the list of Preset option.
B
Select the control timing from Detail option tab to setup the action.
Settings are described below.
57
TM-P20 Software Installer
Software User's Manual
Using the Printer Driver
Item
Timing
Action
C
Description
Start of Document
At the beginning of document printing
Start of Page
At the beginning of each page in the document
End of Page
At the end of each page in the document
End of Document
At the end of document printing
Feed to cut position before
cutting
When checked, paper is fed to the cutting position.
Feeding amount
The amount of paper feed can be specified by inches.
Feed paper to the print
starting position
When checked, paper is fed to the head position.
Eject single-cut sheets
When checked, single cut sheets are printed.
Click OK.
Peripheral Device's Action Settings
It sets peripheral device's actions such as the buzzer.
!Caution
Option buzzer can be operated only with the APD5 utility.
U See “Buzzer” on page 59
How to Setup
Follow the steps below.
A
Select Peripherals tab from Printing Preferences.
B
From the Peripherals pull down list, select the combination of peripheral device to be connected to the printer.
58
TM-P20 Software Installer
Software User's Manual
Using the Printer Driver
C
Select the timing to set the peripheral device settings.
U See “Setting of Peripheral Device” on page 59
D
Confirm Current settings and click OK.
Setting of Peripheral Device
Settings may be different depending on peripheral devices.
Buzzer
Settings of buzzer are described below.
Peripherals
Setting Value
Description
Built-in Buzzer
Turn off
Built-in buzzer does not sound.
Turn on
Built-in buzzer sounds.
Advanced Method
The printer driver also provides the following useful functions.
See the Advanced Printer Driver Ver.5 settings guide for details on using each function.
❏
Specifying a paper name and paper size
❏
Printing using the Barcode font
❏
Printing using a 2D-Code
❏
Setting an external optional buzzer
❏
Printing by registering a logo to the printer
❏
Sending commands
❏
Printing a device font in a .NET environment
59
TM-P20 Software Installer
Software User's Manual
Using the Printer Driver
❏
Printing start position settings
❏
Printing the 80 mm width layout with 58 mm width
❏
Setting an alias name to a font
❏
Creating an emulation font
❏
Replacing the function of a device font
❏
Printing control settings
60
TM-P20 Software Installer
Software User's Manual
TM-P20 Utility
TM-P20 Utility
This chapter explains how to use the TM-P20 Utility that configures this printer.
!Caution:
While saving the settings, do not turn off the printer or terminate the connection with the printer.
Changing the Display Language
You can select from 24 display languages for the TM-P20 Utility. Selecting the language that is easiest for you to
understand will help you correctly configure the settings in the TM-P20 Utility. The language that initially appears is
set based on the language information in your operating system.
A
Start the TM-P20 Utility, and then click the Select Language button.
B
Select the language that you want to use from the pull-down list, and then click the OK button.
The languages that can be selected are shown below.
Selectable languages
Chinese-Hong Kong
Chinese-Simplified
Chinese-Traditional
Croatian
Czech
Danish
Dutch
English
Finnish
French
German
Hungarian
Italian
Japanese
Korean
Norwegian
Portuguese
Russian
Slovenian
Spanish
Swedish
Thai
Turkish
Vietnamese
61
TM-P20 Software Installer
Software User's Manual
TM-P20 Utility
Function Summary
TM-P20 Utility provides the following functions.
For details on using each function, see the TM-P20 Utility User's Manual.
Item
Description
Current Settings
Displays the setting content for the printer that is currently connected.
Storing Logos *1
Configures the logos to be stored on the printer.
Paper Reduction *2
Configures printing that reduces margins or line-spacing.
Printing Control
Configure print control options such as the paper width, print density, and print
speed for the printer.
Interface *3
This utility allows you to make printer communication settings.
Backup/Restore
Allows you to save the printer settings to a file and to restore the stored settings to
the printer.
62
TM-P20 Software Installer
Software User's Manual
TM-P20 Utility
Item
Description
Operation Check
Allows you to check the printer operation and communication between the
printer and the driver.
*1 The utility allows you to print your logo already stored on the printer, but you cannot edit and restore it as a file.
*2 The paper reduction settings may not reduce paper usage as specified when you print images such as logos or coupon tickets, or
print in page mode. The followings are examples that the paper reduction settings are not reflected.
- Windows printer driver: When printing TrueType fonts, specifying reduced printing, specifying "horizontal" print direction,
specifying flip vertical, specifying barcode rotation and so on.
- UPOS: Printing in page mode, printing with rotation setting, printing with bitmap Images/Barcode/Characters horizontally
aligned, and so on.
- ESC/POS command: Printing images such as logos or coupon tickets, printing in page mode, printing with rotation setting, and so
on.
*3 This utility does not setup the ports on the computer. Therefore, the utility may not be able to communicate with the printer when
trying to setup the printer. In this situation, change the printer driver settings or any other necessary settings on the computer so
that they match the settings made on the printer.
63
TM-P20 Software Installer
Software User's Manual
Epson TM Utility
Epson TM Utility
You can download the Epson TM Utility for free from the App Store or from Google Play.
A wizard guides you through connecting an iOS or Android device to your printer. You can also check and change the
printer's settings from the iOS or Android device.
It also comes with the following demo print functions.
❏ Printing sample receipts
❏ Printing customized receipts
❏ Displaying the printer status
❏ Selecting printers using an NFC or QR code
Search for "Epson TM Utility" in the App Store or Google Play, and then install the application with the following
icon.
Epson TM Utility provides the following functions.
64
TM-P20 Software Installer
Software User's Manual
Epson TM Utility
Item
Description
Printer Status
Check the printer's status (cover open or closed, paper availability, drawer open or
closed, and amount of battery remaining).
Printer Settings
Check or change the registered logo, print control (paper width, print density,
print speed, and so on) settings and so on.
Sample Receipts
Print sample receipts.
Custom Receipts
Print receipts with the following custom settings.
How to Use NFC/QR Code *1
❏
Printing a logo
❏
Printing a barcode
❏
Automatic cutting settings
❏
Drawer settings
Print demonstration using an NFC or QR code.
❏
Quick pairing by NFC/QR code
This allows you to read an NFC tag built into a printer or a QR code with the
camera on a smart device which then triggers an operation and connects the
smart device to the printer.
❏
Easy print by NFC/QR code
This allows you to read an NFC tag built into a printer or a QR code with the
camera on a smart device which then triggers an operation and prints.
Wi-Fi Setup Wizard
A wizard guides you through making network settings for Wi-Fi models.
Bluetooth Setup Wizard
A wizard guides you through connecting to Bluetooth models.
*1 Not all devices support NFC.
65
TM-P20 Software Installer
Software User's Manual
Application Development Information
Application Development Information
This chapter explains how to control this printer and gives information useful for printer application development.
How to Control the Printer
The printer is controlled by the drivers or ESC/POS commands.
Driver
Printer Driver
This is an Windows driver (APD = EPSON Advanced Printer Driver) which allows you to control POS operations,
such as printing logos and barcodes, controlling paper cutting function and cash drawer. See this manual for more
details about the printer driver. The driver includes Status API which allows you to monitor the printer status, and to
send the ESC/POS commands.
See the following manuals and sample programs provided with EPSON Advanced Printer Driver Ver.5 for further
details on using the driver and how to develop an application using the Status API functions.
❏ Install Manual
❏ Printer Manual
❏ Printer Specification for TM-P20
❏ Status API Manual
UPOS
This stands for Unified Point of Service. It is the standard specification of POS market, which defines drivers for
controlling POS peripheral devices in various operation environments. Using the driver, you can develop POS system
efficiently because you do not need to newly create commands. The following TM-P20 drivers that conform to UPOS
are provided. Use one of them in accordance with your system environment.
❏ EPSON OPOS ADK
Suitable for an application that operates the printer under 32-bit version of Windows.
❏ EPSON OPOS ADK for .NET
Suitable for an application that operates the printer under Windows .NET environment.
❏ EPSON JavaPOS ADK for Windows
Suitable for an application that operates the printer under Windows Java environment.
See the following document for the information about how to create an environment and develop an application.
EPSON OPOS ADK
❏ OPOS Installation Manual
66
TM-P20 Software Installer
Software User's Manual
Application Development Information
❏ User's Manual
❏ Application Development Guide
❏ UnifiedPOS Retail Peripheral Architecture*
❏ Sample Program Guide
EPSON OPOS ADK for .NET
❏ OPOS ADK for .NET Installation Guide
❏ UnifiedPOS Retail Peripheral Architecture*
❏ User's Reference (SetupPOS)
❏ Application Development Guide (POSPrinter TM-P20)
EPSON JavaPOS ADK for Windows
❏ JavaPOS ADK Installation Guide
* This guide describes general information on how to control printers using the OPOS ADK (in the chapter POS
Printer and Appendix-A). It does not describe Epson's specific functions.
ePOS-Print SDK
ePOS-Print SDK is a Software Development Kit (SDK) for developers creating applications that can print from
EPSON TM printers. Applications can be developed using the API provided by the ePOS-Print SDK. The following
SDK is provided. Use the kit that best suits the type of application being developed.
❏ ePOS-Print SDK for iOS
Use this to develop applications that print from iOS devices.
❏ ePOS-Print SDK for Android
Use this to develop applications that print from Android devices.
❏ ePOS-Print SDK for Windows store application
Use this to develop Windows store applications that print from Windows 8.1 devices.
* Windows RT (ARM) is not supported.
❏ ePOS-Print SDK for JavaScript
Use this to develop Web applications.
See the following document for the information about how to create an environment and develop an application.
❏ ePOS-Print SDK for iOS
❏ User's Manual
❏ Application Development Environment - Setup Guide
❏ Sample Programs
67
TM-P20 Software Installer
Software User's Manual
Application Development Information
❏ ePOS-Print SDK for Android
❏ User's Manual
❏ Application Development Environment - Setup Guide
❏ Sample Programs
❏ ePOS-Print SDK for Windows store application
❏ User's Manual
❏ Application Development Environment - Setup Guide
❏ Sample Programs
❏ ePOS-Print SDK for JavaScript
❏ User's Manual
❏ Sample Programs
ESC/POS Commands
The ESC/POS command is the printer command system developed by EPSON. This allows you to directly control the
all functions of the printer. Using the commands with the driver, you can use a function that is not provided by the
driver.
Compared to using the drivers, using the commands is difficult because you need to have knowledge about the detailed
printer specifications and how to combine the commands.
In order to use the ESC/POS commands, you must sign our non-disclosure contract and get ESC/POS application
programming guide. For more details, please contact your dealer.
Storing Logos
The procedure to store logos differs by your system configuration as follows.
For Windows PC
When using the Advanced Printer Driver only
Use TM-P20 Utility to store logos.
68
TM-P20 Software Installer
Software User's Manual
Application Development Information
When using the OPOS and Advanced Printer Driver on the same system
❏ OPOS setting
Using the OPOS SetupPOS, select Bitmap tab on the Device Specific Settings screen, and uncheck the
checkbox for NVRAM.
❏ Storing logos in the printer
Use TM-P20 Utility to store logos in the printer.
For iOS/Android
Use TM Utility for iOS/Android to store logos.
Download
Drivers, utilities, and manuals can be downloaded from one of the following URLs.
For customers in North America, go to the following web site:
http://www.epsonexpert.com/ and follow the on-screen instructions.
For customers in other countries, go to the following web site:
https://download.epson-biz.com/?service=pos
Select the product name from the "Select any product" pull-down menu.
69