1
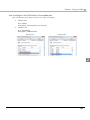
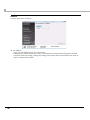
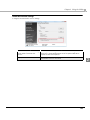
Utility User's Manual Overview Descriptions of the TM-T88V Utility features, operating environment, and installation/uninstallation Using the Utility Descriptions of how to use the TM-T88V Utility M00022904 Rev. E Cautions • No part of this document may be reproduced, stored in a retrieval system, or transmitted in any form or by any means, electronic, mechanical, photocopying, recording, or otherwise, without the prior written permission of Seiko Epson Corporation. • The contents of this document are subject to change without notice. Please contact us for the latest information. • While every precaution has taken in the preparation of this document, Seiko Epson Corporation assumes no responsibility for errors or omissions. • Neither is any liability assumed for damages resulting from the use of the information contained herein. • Neither Seiko Epson Corporation nor its affiliates shall be liable to the purchaser of this product or third parties for damages, losses, costs, or expenses incurred by the purchaser or third parties as a result of: accident, misuse, or abuse of this product or unauthorized modifications, repairs, or alterations to this product, or (excluding the U.S.) failure to strictly comply with Seiko Epson Corporation’s operating and maintenance instructions. • Seiko Epson Corporation shall not be liable against any damages or problems arising from the use of any options or any consumable products other than those designated as Original EPSON Products or EPSON Approved Products by Seiko Epson Corporation. Trademarks EPSON and ESC/POS are registered trademarks of Seiko Epson Corporation in the U.S. and other countries. MS-DOS, Microsoft, Win32, Windows, Windows Vista, and Windows Server are either registered trademarks or trademarks of Microsoft Corporation in the United States and other countries. Copyright © 2010, 2011 Seiko Epson Corporation. All rights reserved. 2 For Safety Key to Symbols The symbols in this manual are identified by their level of importance, as defined below. Read the following carefully before handling the product. Provides information that must be observed to avoid damage to your equipment or a malfunction. Provides important information and useful tips. Restriction of Use When this product is used for applications requiring high reliability/safety such as transportation devices related to aviation, rail, marine, automotive etc.; disaster prevention devices; various safety devices etc; or functional/precision devices etc, you should use this product only after giving consideration to including fail‐safes and redundancies into your design to maintain safety and total system reliability. Because this product was not intended for use in applications requiring extremely high reliability/safety such as aerospace equipment, main communication equipment, nuclear power control equipment, or medical equipment related to direct medical care etc, please make your own judgment on this product’s suitability after a full evaluation. 3 About this Manual Aim of the Manual This manual presents information that is necessary information for using the TM‐T88V Utility. Manual Content The manual is made up of the following sections: 4 Chapter 1 Overview Chapter 2 Using the Utility Contents ■ For Safety...............................................................................................................................3 Key to Symbols ....................................................................................................................................... 3 ■ Restriction of Use ..................................................................................................................3 ■ About this Manual ................................................................................................................4 Aim of the Manual................................................................................................................................. 4 Manual Content .................................................................................................................................... 4 ■ Contents ................................................................................................................................5 Overview ........................................................................................7 ■ Overview ...............................................................................................................................7 ■ Support OS ............................................................................................................................7 ■ Installation .............................................................................................................................8 ■ Uninstallation.........................................................................................................................8 ■ Differences Depending on the OS ......................................................................................8 Using the Utility ...............................................................................9 ■ Starting the TM-T88V Utility ...................................................................................................9 Adding a Communication Port and Starting the TM-T88V Utility ................................................... 11 ■ Current Settings...................................................................................................................14 ■ Operation Check................................................................................................................17 ■ Storing Logos.......................................................................................................................18 Adding a Logo..................................................................................................................................... 20 ■ Paper Reduction Settings...................................................................................................24 ■ Automatic Paper Cut Settings ...........................................................................................26 ■ Printing Control Settings .....................................................................................................28 ■ Font ......................................................................................................................................29 ■ Optional Buzzer...................................................................................................................30 ■ Communication I/F Settings ..............................................................................................32 ■ Setting Backup/Restore .....................................................................................................37 Saving the Printer Settings to a File .................................................................................................... 37 Restore the Settings to the Printer...................................................................................................... 38 ■ Acknowledgements ...........................................................................................................40 5 6 Chapter 1 Overview Overview This chapter describes the specifications of TM-T88V Utility. Overview TM-T88V Utility is a dedicated utility for the TM-T88V printer to check and configure the TM-T88V’s parameters. It also allows you to configure the IP address of a printer through the Ethernet connection. The utility has the following functions: ❏ For general users Operation Check (page 17) 1 Storing Logos (page 18) Paper Reduction Settings (page 24) Automatic Paper Cut Settings (page 26) ❏ For printer administrators Printing Control Settings (page 28) Font Settings (page 29) Optional Buzzer (page 30) Communication I/F Settings (page 32) Setting Backup/Restore (page 37) Support OS ❏ Windows 7 SP1 (32 bit / 64 bit) ❏ Windows Vista SP2 (32 bit / 64 bit) ❏ Windows XP SP3 (32 bit) ❏ Windows 2000 SP4 *1 ❏ Windows Server 2008 R2 SP1 ❏ Windows Server 2008 SP2 (32 bit / 64 bit) ❏ Windows Embedded for Point of Service ❏ Windows Embedded POSReady 2009 * The USB printer class TM-T88V is not supported. 7 Installation Execute the Setup.exe of this product. Install it with the administrator authority. Uninstallation Uninstall the utility as follows. 1 2 3 Select [Start]-[Control Panel]-[Uninstall a program]. (Reference page of other OS.) "Uninstall or change a program" window appears. Doubleclick "Install Assistant." "Uninstall Confirmation" window appears. click the [Yes] button. The TM-T88V Utility will be uninstalled. 4 "Uninstall Complete" window appears. click the [Finish] button. Differences Depending on the OS The content of the descriptions of some operations in this book may be different depending on the OS. See the following. Item Screens shown Description Screens in Windows Vista are used for the descriptions in this manual. Windows 7 [Start] - [Control Panel] - [Uninstall a program] Uninstall Windows Vista [Start] - [Control Panel] - [Uninstall a program] Windows XP [Start] - [Control Panel] - [Add or Remove Programs] Windows 2000 [Start] - [Settings] - [Control Panel] - [Add or Remove Programs] 8 Chapter 2 Using the Utility Using the Utility This chapter explains how to use the TM-T88V Utility. While saving the settings, do not turn off the printer or terminate the connection with the printer. Starting the TM-T88V Utility Activate the TM-T88V Utility as follows. 1 2 Select [Start] - [All Programs] - [EPSON] - [TM-T88V Software] - [TM-T88V Utility]. The following screen appears. Select the printer to use and click the [OK] button. If you wish to change the language that appears in the TM-T88V Utility, click the [Select Language] button. If the printer is not displayed, click the [Add Port] button. Then go to the following section; Adding a Communication Port and Starting the TM-T88V Utility (p.11). 2 • Click the [Add Port] button when you want to newly configure a port of the printer. Adding a Communication Port and Starting the TM‐T88V Utility (p.11) • To delete a port, select the port and click the [Delete Port] button. 9 3 The TM-T88V Utility is started. When the communication with the printer is established, the printer settings obtained from the printer are displayed in the [Printer settings] screen. When executing TM-T88V Utility for the first time, it does not boot if the communication with the printer cannot be established. Once the communication is established, the utility can boot using the previous printer setting information even if it is offline. To recognize the connected printer when connected via USB, run the [Test Printing] after running TMT88V Utility, or check the serial number on one of the sides of the printer and the serial number of TMT88V Utility. 10 Chapter 2 Using the Utility Adding a Communication Port and Starting the TM-T88V Utility Add a communication port as follows: 1 2 3 Select [Start] - [All Programs] - [EPSON] - [TM-T88V Software] - [TM-T88V Utility]. The following screen appears. Click the [Add Port] button. The [Add Port] screen appears. Configure the port to be added. Then, click the [OK] button. 2 • If the communication with the port failed, an error message appears. In such case, you cannot add the port. Check the connection to the printer, the DIP Switch status, or the port settings on the driver. • Clicking the [Communication test] button displays the communication result on the screen. It does not conduct a test print. 11 ❏ Serial Setting Description Port: Selects the serial port of the computer you use. Search Searches for available serial ports. Communication speed: Configures the communication speed. Parity: Configures the parity. Data Bit: Configures the bit length. Stop Bit: Configures the stop bit. Virtual Port Settings Starts the Virtual Port Settings tool. For details, see the manual for the Virtual Port Settings tool. Communication test Runs a communication test. ❏ Parallel Setting Description Port: Selects the parallel port of the computer you use. Search Searches for available parallel ports. Virtual Port Settings Starts the Virtual Port Settings tool. For details, see the manual for the Virtual Port Settings tool. Communication test Runs a communication test. ❏ USB Setting Description Port: Selects the USB port you use. Search Searches for the available USB port(s). Communication test Runs a communication test. If connected via USB, printers cannot be added under the environment where both Printer Class printers and Vendor Class printers exist. In such a case, first turn off the existing printers, and then start the utility. ❏ Ethernet Setting Description IP Address: Configures the IP address of the printer you use. Search Searches for the TM-T88V printers on the network and displays their IP addresses. Advanced settings (TMNet WinConfig) Activates the TMNet WinConfig. Make the network settings of the printer using the TMNet WinConfig. Communication test Runs a communication test. If no TM-T88V with its IP address configured is displayed even after clicking the [Search] button, enter the IP address of TM-T88V directly to “IP Address:”. 12 Chapter 2 Using the Utility 4 5 The following screen appears again. Select the added port and click the [OK] button. The TM-T88V Utility is started. 2 13 Current Settings Allows you to check the printer settings and the maintenance counter. Setting 14 Description Storing Logos Displays the number of stored logos and their sizes. Paper Reduction Settings Displays the paper reduction settings. Automatic Paper Cut Settings Displays the settings of the automatic paper cut function. Printing Control Displays the paper width and the print density settings. Font Displays code page of the printer font, and international character set. Optional Buzzer Displays the buzzer settings. Communication I/F Displays the communication setting of the port. Details Displays the information of USB or Ethernet interface, maintenance counters, and dip switches. Details (p.15) Chapter 2 Using the Utility Details Interface Information When a serial or parallel connection is used, interface information does not appear. The maintenance counters and dip switches settings are displayed instead. ❏ USB I/F Setting Description USB Device: Displays the product name. USB Device Version: Displays the product version. USB ID: Displays the serial number. USB Information: Displays the character string configured to the interface for identification purpose. 2 ❏ Ethernet I/F Setting Description Ethernet I/F: Displays the product name. MAC address: Displays the MAC address setting of the interface. Hardware version: Displays the hardware version of the interface. Software version: Displays the software version of the interface. 15 Maintenance counter Allows you to check the following counters and to reset some of them. The cumulative counter cannot be reset. ❏ Length of paper feed [km] ❏ Number of autocutter operations [Times] DIP Switch 1, 2 Allows you to check dip switch 1 and 2 settings obtained from the printer. The images of the dip switches whose setting could not be obtained are grayed out. Dip switch 2-7 and 2-8 images are always grayed out because their settings cannot be obtained from the printer. When the printer is offline, the settings previously obtained from the printer are displayed. 16 Chapter 2 Using the Utility Operation Check Allows you to check the printer operation and communication between the printer and the driver. Configure as follows. 1 Click the [Operation Check] menu. 2 Click the button of the item you want to check. 2 You can check the followings. ❏ Unit Test Setting Description Communication Test Checks if the communication between the computer and the printer is normal. Test Printing Makes a test print. To see if the printer prints correctly. Print Logo Prints the logo stored on the printer. Print Font Prints the fonts installed on the printer. Open Drawer Opens the drawer connected to the printer. Test Buzzer Sounds an external optional buzzer that is connected to the printer. ❏ Driver Test Setting Description Select the driver to test Selects the driver you want to check. Test Printing Makes a test print. To see if the printer prints correctly. For Windows 2000, the Test Printing is not available. 17 Storing Logos Allows you to configure the logos to be stored on the printer. This section describes how to configure logos to be stored on the printer. The utility allows you to print your logo already stored on the printer, but you cannot edit and restore it as a file. When using the OPOS to store your logo, see chapter 5, “Storing Logos”. [Storing Logos] has the following functions. Setting Key Code List Displays the logos registered in the printer and the logos to be added in the printer. The logos registered in the printer have at the beginning of the Key-code. Add Adds logo data on the list. Edit Edits the halftone and brightness settings of the selected logo data. Delete Deletes the selected logo data from the list or deletes logos stored on the printer. Test print Prints the selected logos. Change Logo Mode Displays “Select Mode for Storing Logo” screen to allow you to change the setting mode of the [Storing Logos]. The current setting is displayed below [Storing Logos]. First Key-code Selection Mode 18 Description Specifies the logo identifying code. Chapter 2 Using the Utility Setting Automatically set the key-code for the logo to be stored. Description If this is turned on, automatically sets Key-codes to the logos to be registered. If turned off, sets Key-codes when adding or editing logos. Advanced Printer Driver Control Font Setting Mode The Advanced Printer Driver allows you to assign a control font (h to l) to your logo instead of using a key code. Key-code Nonuse Mode (not recommended) Not recommended. Key-code Management Get KeyCode You can check the Key-code of the logo stored in the printer, or delete the logos. Obtains registered Key-code numbers. Preview Displays the logo image to be stored on the printer. Logo images stored on the printer are not displayed. Logo Indicator Indicator: Registerable memory size in the printer for logos Additional logo data: Size of logos displayed on the list Used amount: Size of registered logos Save to File Saves the configured logo data as a file to store it to the printer. The data can also be stored as a bmp file. Store to Printer Stores the configured logo data to the printer. 19 2 Adding a Logo When storing multiple logos, it is recommended to add them to the printer altogether at once. When saving the logo to be stored to the printer setting file, see Setting Backup/Restore (p.37). Add a logo as follows. 1 2 20 Click the [Add] button. If the logo mode is [Advanced Printer Driver Control Font Setting Mode], select a Key-code to register the logo, then click the [Add] button. Specify the image data to be used as a logo. A file size of 2047 (W) x 831 (H) pixels (dots) or less can be specified, and the format can be bmp, jpeg, gif, or png. If the logo width is greater than the paper width (greater than 512 dots for 80 mm width, or greater than 360 dots for 58 mm width), a warning message will appear. Click the [OK] button and reduce the logo size in the [Logo Edit] screen of step 3. Chapter 2 Using the Utility 3 The [Logo Edit] screen appears. Click the [Monochrome] or [Multi-tone] button to select the format of the image to be printed. The [Multi-tone] button does not appear when the mode for storing logo is set to [Key-code Nonuse Mode (not recommended)]. Colors are reduced to 2 colors with [Monochrome] selected and to 16 colors (shades) in grayscale with [Multi-tone] selected. 4 Edit the logo image while checking the image previewed on the upper portion of the screen. When finished, click the [OK] button. You can edit the followings. Setting Description Image width Specifies the width to which the image is resized (in mm). Resize Specifies whether or not the image is resized. If the image width is greater than the paper width and resizing is not specified, the part of the image that exceeds the paper width will be cut off. 21 2 Setting 5 Description Half toning Configures the halftone setting of the image. Select from [Dithering] / [Error diffusion] /[None] when [Monochrome] is selected in Step 3 and from [Dithering] / [None] when [Multi-tone] is selected. Brightness Configures the brightness of the image. Select from 5 levels when [Monochrome] is selected in Step 3 and from 15 levels when [Multi-tone] is selected. If the logo mode is [First Key-code Selection Mode] and [Automatically set the keycode for the logo to be stored.] is not turned on, the "Key-code Settings" screen is displayed. Set a Key-code and click the [OK] button. If the logo mode other than [First Key-code Selection Mode] is selected or [Automatically set the keycode for the logo to be stored.] is turned on, the "Key-code Settings" screen is not displayed. 6 7 22 The logo data is added on the list. When storing multiple logo data, repeat Step 1 through 5. After storing all the logo data to be added to the printer, check the indicator on the right side of the screen to see if the data size is acceptable to be stored on the printer, and then click the [Store to Printer] button. Chapter 2 Using the Utility 8 The logo data is stored to the printer. The logo data are also saved in the logo store file (TLG file). This file is used when creating the printer setting file. Logo Store File Because the logo store file (TLG file) is automatically saved when adding logos to the printer, the logo store file only contains the logo data last added to the printer. When saving multiple logo data in the printer setting file, add all the logo data to the printer altogether at once. When saving the data already stored on the printer, follow the procedure below. 1 2 3 2 Prepare all the logo data to add to the printer. Delete all the logo already stored on the printer. See Storing Logos (p.18). Store all the logos and add them to the printer altogether at once. In this way, the logo store file (TLG file) containing all the logo data is created. See Adding a Logo (p.20). 23 Paper Reduction Settings The paper reduction settings may not reduce paper usage as specified when you print images such as logos or coupon tickets, or print in page mode. The followings are examples that the paper reduction settings are not reflected. ❏ Windows printer driver: Printing with the settings that enable [Print all text as graphic images], such as rotation setting, watermark setting, and barcode rotation setting* ❏ Mac printer driver: All printing using the Mac printer driver.* ❏ Linux printer driver: All printing from the Linux printer driver.* ❏ UPOS: Printing in page mode, printing with rotation setting, printing with bitmap Images/Barcode/Characters horizontally aligned, and so on. ❏ ESC/POS command: Printing images such as logos or coupon tickets, printing in page mode, printing with rotation setting, and so on. * The printer drivers have a function that allows you to reduce the top and bottom margins. Use the function if you want to save paper. For more details, see the manual of the printer driver. Allows you to configure the paper reduction settings. Configure as follows. 1 2 Click the [Paper Reduction] menu. Configure the following items referring to the preview on the right portion of the screen. Setting 24 Description Extra Upper Space Reduction: Selects whether to reduce the upper margin or not. Enable this to cut out the extra upper margin that is created before the first print data is printed. Extra Lower Space Reduction: Selects whether to reduce the lower margin or not. Enable this to cut out the lower margin that is created from the time the last line is printed until the paper is automatically cut. Line Space Reduction Rate: Selects a reduction ratio of line spacing during printing. The minimum pitch is two dots. If reduction results in a line spacing of less than 2 dots, the line spacing will be reset to 2 dots. Chapter 2 Using the Utility Setting 3 Description Line Feed Reduction Rate: Selects a reduction ratio of line spacing of blank lines. This setting is ignored for the portion set to be cut out by the Extra Upper Space Reduction setting. When you advance the paper by inserting line feeds in order to cut the paper manually, you may not be able to advance the paper until the last line reaches the cut position because of this reduction setting. Barcode Height Reduction Rate: Selects a reduction ratio of barcode height. The barcode height cannot be reduced to less than 30-dots height. This setting can cause the barcode size to fall outside the barcode standards. Click the [Set] button. The settings are reflected to the printer. 2 25 Automatic Paper Cut Settings Allows you to configure whether to cut paper and print a logo when the cover is closed. Configure as follows. 26 1 Click the [Automatic Paper Cut] menu. 2 Click the item you want to check. Not use this function Disables the automatic paper cut function. Go to Step 4. Cut paper when the cover is closed. Executes automatic paper cut when the cover is closed. Go to Step 4. Print logo when paper is cut. Prints the logo when executing the automatic paper cut. Go to Step 3. Chapter 2 Using the Utility 3 Configure the [Print logo when paper is cut.]. Setting Top Logo Description Sets the logo that is printed at the top of the paper. ❏ Key-code: Selects the Key-code of the logo to be printed. ❏ Alignment: Selects the logo print position. Bottom Logo Sets the logo that is printed at the bottom of the paper. ❏ Key-code: Selects the Key-code of the logo to be printed. ❏ Alignment: Selects the logo print position. Condition Sets the condition for top logo printing. ❏ When paper is cut by command: The checkmark cannot be removed from this checkbox. ❏ When cover is closed: Sets whether the top logo is printed when the cover is closed. ❏ When printer is powered on: When you select this, the printer is reset every time the printer setting is changed, paper is automatically cut and [Top Logo] is printed. Extra Upper Space Reduction: 4 Selects whether to reduce the top margin when printing the logo configured at [Top Logo]. Selecting this may cause a white line appear on the top logo (13 mm away from the top of the logo). Run the Test Printing to see if the logo is printed properly. Selecting this may cause a white line appear on the logo (13 mm away from the top of the logo). Make sure to conduct a test print to see if the print result is acceptable for you. Click the [Set] button. The settings are reflected to the printer. 27 2 Printing Control Settings Allows you to configure the printing control settings of the printer. Configure as follows. 1 Click the [Printing Control] menu. 2 Configure the following printing control items. Setting Description Paper width: Selects the paper width. Print density: Selects the print density. Multi-tone print density: Selects the multi-tone print density level. Print speed: Selects the print speed. Power Supply Unit Capacity: Selects the capacity level of the power supply unit connected to the printer. • When you change the paper width • When changing the paper width from 80 mm to 58 mm, attach the Roll Paper Guide to the printer. • Changing the paper width from 58 mm to 80 mm may produce unexpected printout results. Make sure you test print after changing the width. • If a power‐related trouble occurs, such as a sudden power shutoff during printing, lower the [Power Supply Unit Capacity] level. If the trouble still occurs, lower the [Print speed]. If you make any of the following settings different from that of the printer driver, the printer driver setting is used. • Paper width • Print density • Print speed 3 28 Click the [Set] button. The settings are reflected to the printer. Chapter 2 Using the Utility Font Allows you to configure the printer font and international character set. Configure as follows. • When using the Advanced Printer Driver Ver. 4.xx, [Code‐page:] and [International character set:] settings become disabled. • When using the OPOS ADK, the code page configured in OPOS becomes enabled. 1 Click the [Font] menu. 2 Configure the following. Setting 3 2 Description Code-page: Selects the Code Page of the printer font. International character set: Selects an international character set. Font A Replacement: Font A can be replaced with Font B. When the paper width is changed, this enables the layout to be maintained without making changes in your application. Click the [Set] button. The settings are reflected to the printer. Click the [Test print] button to print the configured printer font pattern. 29 Optional Buzzer Allows you to configure whether an external optional buzzer is used and the buzzer pattern settings. Configure as follows. 30 1 Click the [Optional Buzzer] menu. 2 Select whether or not the external buzzer is used. Disable Buzzer Do not use the external buzzer. Go to step 4. Enable Buzzer Use the external buzzer. Go to step 3. Chapter 2 Using the Utility 3 Specify when the external buzzer sounds and the buzzer pattern. Setting 4 Description When an error occurs: Configure the buzzer setting when an error occurs. When automatic paper cut activates: Configure the buzzer setting when automatic paper cutting takes place. To test the buzzer sound, click the [Test] button. When specified pulse 1 (2 pin) occurs: Configure the buzzer setting when the specified pulse is generated. To test the buzzer sound, click the [Test] button. When specified pulse 2 (5 pin) occurs: Configure the buzzer setting when the specified pulse is generated. To test the buzzer sound, click the [Test] button. Click the [Set] button. The settings are reflected in the printer. 31 2 Communication I/F Settings This utility allows you to make printer communication settings. The port setting of the computer is not made, so making the printer settings may cause a communication error with the printer. In such case, change the printer driver settings or any other necessary settings on the computer so that they match with the settings made on the printer. 1 2 3 32 Click the [Communication I/F] menu. The type of port currently used for communicating with the printer is automatically detected and displayed on the "Communication I/F Settings" screen. Make the communication settings. Serial Configures the serial communication. p. 33 USB Configures the USB communication. p. 34 Ethernet Configures the IP address. p. 36 Click the [Set] button. The settings are reflected to the printer. Chapter 2 Using the Utility Serial Configures the serial communication. ❏ When the communication speed is 38400 bps or lower Referring to the preview on the right of the screen, change the DIP switch setting on the printer. Turn off the printer power when changing DIP switch settings. ❏ When the communication speed is 38400 bps or higher Turn off the printer power. After turning on the printer DIP switches 1 ‐ 7 and 1 ‐ 8, turn the printer back on. Then start TM‐T88V Utility. 2 Setting Description Communication speed: Selects the communication speed. The available settings vary depending on whether [Depend on DIP Switch] is selected or not. Depend on DIP Switch Selects which communication speed setting to use between DIP switch setting and memory switch setting. Place a checkmark to use the DIP switch setting. Deselect it to use the memory switch setting. Parity: Configures the parity. Data Bit: Configures the data bit. Stop Bit: Configures the stop bit. 33 USB Configures the USB class. • When using the UPOS or Advanced Printer Driver Ver. 3.04, select [Vender Class]. • When you do not need to use the [Printer Class], using [Vender Class] is recommended. • To change to [Printer Class], the Built‐in USB and USB Plus Power must have been installed. ❏ Printer Class: Configures the printer to the printer class. ❏ Vender Class (Default Setting): Configures the printer to the vender class. If you change the USB class from [Vender Class] to [Printer Class], the printer becomes a Printer Class device. The computer detects the printer as a new Printer Class device and creates a new port. Using the newly created port, you can print but cannot use the EPSON Status API. The existing port still allows you to both print and use the EPSON Status API, so you can delete the newly created queue and use the existing queue instead. 34 Chapter 2 Using the Utility How to distinguish the EPSON Status API available port Select [Properties]-[Ports] and check the “Port” and “Description”. • Printer Class Port: USBxxx Description: Virtual printer port for USB • Vender Class Port: ESDPRTxxx Description: USB TM‐T88V Printer Class Vender Class 2 35 Ethernet Changes the printer's IP address. ❏ IP Address: Type a new IP address to be set to the printer. Changing the printer IP address causes a communication error between the printer and the computer. After the setting, change the setting of the printer driver and UPOS to the same as that you made on the printer. 36 Chapter 2 Using the Utility Setting Backup/Restore Allows you to save the printer settings to a file and to restore the stored settings to the printer. Saving the Printer Settings to a File Save the settings as follows: 1 Click the [Backup/Restore] menu. 2 2 Select the setting items to be saved as a file from the [Option]. ❏ Stored logo data: Saves the logo data stored on the printer. In this step, data is not acquired from Logo the printer, but the data in the logo store file (TLG file) is saved. See Store File (p.23) for the details. ❏ Printer settings: Saves all the set values of the printer. 3 • Font settings (font replacement, code page, and international character set settings) • Print control settings (paper width, print speed, density, etc.) • Paper save setting • Automatic cutting setting Click the [Backup] button. A backup confirmation message will appear. Click the [Yes] button. If [Stored logo data] was selected in step 2. Go to step 4. If [Stored logo data] was not selected in step 2. Go to step 5. 37 4 The “Select Logo File” screen appears. The most recently saved logo filename will appear. Click the [OK] button. If you wish to change the file to be saved, click the [Browse] button. 5 Specify the filename and backup location in the next screen and save the file. Restore the Settings to the Printer Restore the settings as follows: 1 2 3 4 38 Click the [Backup/Restore]. Click the [Browse] button, and specify the printer setting file to be restored. Click the [Restore] button. A restore confirmation message will appear. Click the [Yes] button. If the restore is successful, the message below will appear. Chapter 2 Using the Utility Automatic Restore Settings Configures the automatic restore settings. Setting Description Automatically restore the settings when replaced with a new printer. To have printer settings automatically restored using the previously created backup file when the printer fails and is replaced with a new printer. Display the restoration result. To display the success/failure result on the screen when automatic restore is executed. 2 39 Acknowledgements “TM-T88V Utility” incorporate compression code from the Info-ZIP group. ------------------------------------------------------------------------------------------This is version 2007-Mar-4 of the Info-ZIP license. The definitive version of this document should be available at ftp://ftp.info-zip.org/pub/infozip/license.html indefinitely and a copy at http://www.info-zip.org/pub/infozip/license.html. Copyright (c) 1990-2007 Info-ZIP. All rights reserved. For the purposes of this copyright and license, "Info-ZIP" is defined as the following set of individuals: Mark Adler, John Bush, Karl Davis, Harald Denker, Jean-Michel Dubois, Jean-loup Gailly, Hunter Goatley, Ed Gordon, Ian Gorman, Chris Herborth, Dirk Haase, Greg Hartwig, Robert Heath, Jonathan Hudson, Paul Kienitz, David Kirschbaum, Johnny Lee, Onno van der Linden, Igor Mandrichenko, Steve P. Miller, Sergio Monesi, Keith Owens, George Petrov, Greg Roelofs, Kai Uwe Rommel, Steve Salisbury, Dave Smith, Steven M. Schweda, Christian Spieler, Cosmin Truta, Antoine Verheijen, Paul von Behren, Rich Wales, Mike White. This software is provided "as is," without warranty of any kind, express or implied. In no event shall Info-ZIP or its contributors be held liable for any direct, indirect, incidental, special or consequential damages arising out of the use of or inability to use this software. Permission is granted to anyone to use this software for any purpose, including commercial applications, and to alter it and redistribute it freely, subject to the above disclaimer and the following restrictions: 40 1. Redistributions of source code (in whole or in part) must retain the above copyright notice, definition, disclaimer, and this list of conditions. 2. Redistributions in binary form (compiled executables and libraries) must reproduce the above copyright notice, definition, disclaimer, and this list of conditions in documentation and/or other materials provided with the distribution. The sole exception to this condition is redistribution of a standard UnZipSFX binary (including SFXWiz) as part of a self-extracting archive; that is permitted without inclusion of this license, as long as the normal SFX banner has not been removed from the binary or disabled. 3. Altered versions--including, but not limited to, ports to new operating systems, existing ports with new graphical interfaces, versions with modified or added functionality, and dynamic, shared, or static library versions not from Info-ZIP--must be plainly marked as such and must not be misrepresented as being the original source or, if binaries, compiled from the original source. Such altered versions also must not be misrepresented as being Info-ZIP releases--including, but not limited to, labeling of the altered versions with the names "Info-ZIP" (or any variation thereof, including, but not limited to, different capitalizations), "Pocket UnZip," "WiZ" or "MacZip" without the explicit permission of Info-ZIP. Such altered versions are further prohibited from misrepresentative use of the Zip-Bugs or Info-ZIP email addresses or the Info-ZIP URL(s), such as to imply Info-ZIP will provide support for the altered versions. 4. Info-ZIP retains the right to use the names "Info-ZIP," "Zip," "UnZip," "UnZipSFX," "WiZ," "Pocket UnZip," "Pocket Zip," and "MacZip" for its own source and binary releases.