1
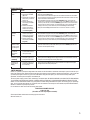
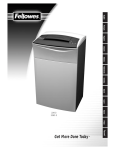
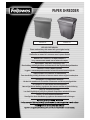
PAPER SHREDDER
P400C-2
P600C-2
USE AND CARE MANUAL
Please read and keep this manual with your original receipt
MODE D’EMPLOI ET D’ENTRETIEN
Veuillez lire ce manuel et le conserver avec la preuve d’achat
MANUAL DEL USUARIO Y DE MANTENIMIENTO
Lea y conserve este manual con su factura de compra
BEDIENUNGS- UND WARTUNGSANLEITUNG
Diese Anleitung vollständig durchlesen und zusammen mit dem Originalkaufbeleg aufbewahren
MANUALE D’USO E MANUTENZIONE
Leggete e conservate questo manuale insieme alla vostra ricevuta originale
HANDLEIDING VOOR GEBRUIK EN ONDERHOUD
Deze handleiding volledig doorlezen en bewaren samen met uw originele aankoopbon
ANVÄNDAR- OCH UNDERHÅLLSMANUAL
Läs den här manualen och förvara den tillsammans med det ursprungliga kvittot
BETJENINGS- OG VEDLIGEHOLDELSESHÅNDBOG
Læs venligst denne håndbog, og opbevar den sammen med den originale kvittering
KÄYTTÖ- JA HUOLTO-OHJEET
Lue nämä käyttöohjeet ja säilytä ne yhdessä alkuperäisen maksukuitin kanssa
BRUKS- OG VEDLIKEHOLDSHÅNDBOK
Vennligst les denne håndboken og oppbevar den sammen med kvitteringen.
English
Assembly Instructions . . . . . . . . . . . . . . . . . . . . . . . . . . . . . . . . . . . . . . . . . . . . . . . . . . . . . . . . . . . . . . . . . . . . . . . . .3
Important Safeguards / Technical Specifications . . . . . . . . . . . . . . . . . . . . . . . . . . . . . . . . . . . . . . . . . . . . . . . . . . . . .4
Troubleshooting / Warranty . . . . . . . . . . . . . . . . . . . . . . . . . . . . . . . . . . . . . . . . . . . . . . . . . . . . . . . . . . . . . . . . . . . . .5
Français
Assemblage . . . . . . . . . . . . . . . . . . . . . . . . . . . . . . . . . . . . . . . . . . . . . . . . . . . . . . . . . . . . . . . . . . . . . . . . . . . . . . . . .3
Précautions importantes / Spécifications techniques . . . . . . . . . . . . . . . . . . . . . . . . . . . . . . . . . . . . . . . . . . . . . . . . .6
Dépannage / Garantie . . . . . . . . . . . . . . . . . . . . . . . . . . . . . . . . . . . . . . . . . . . . . . . . . . . . . . . . . . . . . . . . . . . . . . . . .7
Español
Instrucciones para el montaje . . . . . . . . . . . . . . . . . . . . . . . . . . . . . . . . . . . . . . . . . . . . . . . . . . . . . . . . . . . . . . . . . . .3
Normas de seguridad importantes / Especificaciones técnicas . . . . . . . . . . . . . . . . . . . . . . . . . . . . . . . . . . . . . . . . .8
Búsqueda y corrección de fallas / Garantía . . . . . . . . . . . . . . . . . . . . . . . . . . . . . . . . . . . . . . . . . . . . . . . . . . . . . . . .9
Deutsch
Anweisungen zum Zusammenbau . . . . . . . . . . . . . . . . . . . . . . . . . . . . . . . . . . . . . . . . . . . . . . . . . . . . . . . . . . . . . . .3
Wichtige Sicherheitshinweise / Produktspezificationen . . . . . . . . . . . . . . . . . . . . . . . . . . . . . . . . . . . . . . . . . . . . . . .10
Fehlersuche / Garantie . . . . . . . . . . . . . . . . . . . . . . . . . . . . . . . . . . . . . . . . . . . . . . . . . . . . . . . . . . . . . . . . . . . . . . .11
Italiano
Istruzioni assemblaggio . . . . . . . . . . . . . . . . . . . . . . . . . . . . . . . . . . . . . . . . . . . . . . . . . . . . . . . . . . . . . . . . . . . . . . . .3
Importanti precauzioni / Specificazioni tecniche . . . . . . . . . . . . . . . . . . . . . . . . . . . . . . . . . . . . . . . . . . . . . . . . . . . .12
Localizzazione guasti / Garanzia . . . . . . . . . . . . . . . . . . . . . . . . . . . . . . . . . . . . . . . . . . . . . . . . . . . . . . . . . . . . . . . .13
Nederlands
Montage . . . . . . . . . . . . . . . . . . . . . . . . . . . . . . . . . . . . . . . . . . . . . . . . . . . . . . . . . . . . . . . . . . . . . . . . . . . . . . . . . . . .3
Belangrijke veiligheidsmaatregelen / Technische specificatietabel . . . . . . . . . . . . . . . . . . . . . . . . . . . . . . . . . . . . . .14
Problemen oplossen / Garantie . . . . . . . . . . . . . . . . . . . . . . . . . . . . . . . . . . . . . . . . . . . . . . . . . . . . . . . . . . . . . . . . .15
Svenska
Sammansättning . . . . . . . . . . . . . . . . . . . . . . . . . . . . . . . . . . . . . . . . . . . . . . . . . . . . . . . . . . . . . . . . . . . . . . . . . . . . .3
Viktig säkerhetsinformation / Hanteringsguide . . . . . . . . . . . . . . . . . . . . . . . . . . . . . . . . . . . . . . . . . . . . . . . . . . . . .16
Felsökning / Garanti . . . . . . . . . . . . . . . . . . . . . . . . . . . . . . . . . . . . . . . . . . . . . . . . . . . . . . . . . . . . . . . . . . . . . . . . .17
Dansk
Monteringsinstruktioner . . . . . . . . . . . . . . . . . . . . . . . . . . . . . . . . . . . . . . . . . . . . . . . . . . . . . . . . . . . . . . . . . . . . . . . .3
Vigtige sikkerhedsanvisninger / Produktanvendelsesguide . . . . . . . . . . . . . . . . . . . . . . . . . . . . . . . . . . . . . . . . . . .18
Problemløsning / Garanti . . . . . . . . . . . . . . . . . . . . . . . . . . . . . . . . . . . . . . . . . . . . . . . . . . . . . . . . . . . . . . . . . . . . . .19
Suomi
Kokoonpano . . . . . . . . . . . . . . . . . . . . . . . . . . . . . . . . . . . . . . . . . . . . . . . . . . . . . . . . . . . . . . . . . . . . . . . . . . . . . . . .3
Tärkeitä varotoimia / Tuotteen käyttöominaisuudet . . . . . . . . . . . . . . . . . . . . . . . . . . . . . . . . . . . . . . . . . . . . . . . . . .20
Vianmääritys / Takuu . . . . . . . . . . . . . . . . . . . . . . . . . . . . . . . . . . . . . . . . . . . . . . . . . . . . . . . . . . . . . . . . . . . . . . . . .21
Norsk
Montering . . . . . . . . . . . . . . . . . . . . . . . . . . . . . . . . . . . . . . . . . . . . . . . . . . . . . . . . . . . . . . . . . . . . . . . . . . . . . . . . . . .3
Viktig om sikkerhet / Veiledning for bruk . . . . . . . . . . . . . . . . . . . . . . . . . . . . . . . . . . . . . . . . . . . . . . . . . . . . . . . . . .22
Feilsøking / Garanti . . . . . . . . . . . . . . . . . . . . . . . . . . . . . . . . . . . . . . . . . . . . . . . . . . . . . . . . . . . . . . . . . . . . . . . . . .23
2
P400C-2
P600C-2
Rear View
Vue postérieure
Vista posterior
Hinteransicht
Veduta parte posteriore
Achteraanzicht
Sedd bakifrån
Bagside
Takanäkymä
Sett bakfra
English
1. Paper Entry
2. Basket
3. Auto-start sensor
4. Power switch
5. Shredder head
6. Viewer (P600C-2 only)
Français
1. Entrée du papier
2. Corbeille
3. Cellule de démarrage automatique
4. Interrupteur principal
5. Tête de coupe
6. Regard (P600C-2 uniquement)
Español
1. Entrada de papel
2. Cesto
3. Sensor de autoarranque
4. Interruptor de alimentación
5. Cabezal destructor
6. Ventana (sólo P600C-2)
Deutsch
1. Papiereinzugschacht
2. Papierkorb
3. Automatische Start/Stopp Funktion
4. Netzschalter
5. Aktenvernichterkopf
6. Fenster (Nur P600C-2)
Italiano
1. Ingresso carta
2. Cestino
3. Sensore avvio automatico
4. Interruttore corrente
5. Testa distruggi documenti
6. Finestrino (solo P600C-2)
Nederlands
1. Papierinvoer
2. Opvangbak
3. Autostart sensor
4. Netschakelaar
5. Snijkop
6. Venster (alleen P600C-2)
Svenska
1. Pappersinmatning
2. Korg
3. Sensor för automatisk start
4. Strömbrytare
5. Skärhuvud
6. Tittglugg (bara P600C-2)
Dansk
1. Papirindtag
2. Kurv
3. Auto-start sensor
4. Afbryder
5. Makulatorhoved
6. Inspektionsrude (kun P600C-2)
Suomi
1. Paperinsyöttö
2. Roskakori
3. Automaattisen käynnistyksen tunnistin
4. Virtakytkin
5. Paperinsilppurin etuosa
6. Tarkastusaukko (vain P600C-2)
Norsk
1. Papiråpning
2. Kurv
3. Autostart-sensor
4. Strømbryter
5. Makuleringsenhet
6. Vindu (kun P600C-2)
3
IMPORTANT SAFEGUARDS
• NEVER insert hands or fingers into paper entry as serious personal injury may result.
• This machine is NOT a toy. Keep children and pets away from shredder at all times, as serious injury may result. ALWAYS unplug
shredder when not in use and before moving or cleaning the shredder.
• Keep loose objects (jewellery, ties, long hair etc.) away from shredder. These items and others like them may cause serious injury if
they accidentally fall into the paper entry.
• Do NOT use this product if it or the power cord has been damaged in any way.
OPERATING CAUTIONS
• Do not exceed recommended sheet capacity or running time (see Product Usage Guide below).
• This personal shredder is intended for paper only. Do not attempt to shred any hard materials (except staples).
• Do not shred plastic (P600C-2 will shred credit cards), continuous forms, adhesive labels, transparencies, newsprint or cardboard.
• Do not place shredder near or over a heat source or water.
• Do not insert aerosol cleaners or lubricants into or around the shredder and NEVER use flammable synthetic oil or petroleum based
lubricants. Some agents may combust, causing serious injury.
• Do not open the cover for any reason. Doing so can expose you to dangerous voltages and will void your warranty.
POWERCORD CARE
• Place power cord in an easily accessible position, because it is the main disconnect switch.
• Do not place machine where adults, children or animals may walk on the cord.
• Do not rest anything on the power cord.
• If an extension cord is used, be sure that all products plugged into it do not exceed the ampere rating.
OPERATION
1. Assemble shredder (see page 3).
2. Ensure shredder is in OFF (O) position. Plug shredder into proper power supply outlet. Switch on at outlet (where applicable).
3. Move power switch to AUTO (I) position. The shredder will start when paper is fed into paper entry.
This product features an auto-start switch. This switch will turn on the cutter blades whenever anything is inserted into the paper entry
(whilst the power switch is in the AUTO (I) position).
4. Remove foreign objects and slide paper straight into paper entry until shredder begins to operate. If folding paper to fit entry, adjust
sheet capacity accordingly.
5. The shredder stops automatically when shredding is completed.
6. Continue shredding as desired to a MAXIMUM shredding time of 5 to 7 minutes. At this time the shredder MUST be allowed to “cool
down” for a MINIMUM of 15 minutes. The shredder is fitted with a Thermal Overload Protection, which prevents the motor from overheating and lengthens product life. This causes the shredder to shut down automatically.
7. When shredding is finished or the shredder has entered the “cool down” period, move power switch to OFF (O) position and unplug.
MAINTENANCE
Model P400C-2 / P600C-2 requires regular oiling of cutting blades. Failure to do so may result in a reduction of shredding efficiency. We
recommend the use of Fellowes shredder lubricant (order number 35250) or a vegetable-based oil in a non-aerosol container with an
extension nozzle.
TO OIL: Move power switch to OFF (O) position. Squeeze the lubricant over the full width of the cutters from the top of the shredder.
Move the power switch to REVERSE (R) position and allow it to run for at least 3 seconds.
PRODUCT USAGE GUIDE
Recommended Daily Usage
Sheet Capacity (A4/70gsm)
Sheet Capacity (A4/80gsm)
Shred Size/mm
Entry Width/mm
Max Running Time/min
4
P400C-2
10-25 shredding passes
5
4
3.9 x 50
240
5-7 on / 15 off
P600C-2
10-25 shredding passes
7
6
3.9 x 50
230
5-7 on / 15 off
TROUBLESHOOTING
Symptom
Cause
Solution
Shredder will not
operate.
1. Shredder is not plugged in.
2. Power switch is in the OFF
(O) position.
3. Shredder head is not situated on
basket correctly – red LED is lit
(P400C-2 only).
4. Shredder is jammed due to
excessive paper (see Product
Usage Guide).
5. Shredder has exceeded the
maximum run time and has
entered the cool down period
(see Product Usage Guide).
1. Plug in shredder.
2. Move power switch to AUTO (I) position.
3. Lift the shredder head off the basket and align the slot on the shredder head with the tab on the wastebasket. Use caution when removing and re-positioning the shredder head as the P400C-2 / P600C-2 has sharp
edges on the underside of the shredder head.
4. Ensure wastebasket is empty then move power switch to REVERSE (R) position. This will reverse the
jammed paper out of the shredder. If the shredder jams in reverse, move to AUTO (I) and allow to run for 5
seconds. If jam does not clear, move switch to REVERSE (R) again and allow to run for 5 seconds. Repeat
this process until jam is cleared. If necessary, turn off the shredder and use care to grasp the paper and
carefully pull out to clear jam. Once cleared move power switch to AUTO (I) to continue shredding.
5. Move power switch to OFF (O) and allow shredder motor to cool down for a minimum of 15 minutes.
Shredder suddenly
stops whilst
shredding.
1. Shredder has exceeded the
maximum run time and has
entered the cool down period
(see Product Usage Guide).
2. Shredder is jammed due to
excessive paper (see Product
Usage Guide).
1. Move power switch to OFF (O) and allow shredder motor to cool down for a minimum of 15 minutes.
2. Ensure wastebasket is empty then move power switch to REVERSE (R) position. This will reverse the
jammed paper out of the shredder. If the shredder jams in reverse, move to AUTO (I) and allow to run for 5
seconds. If jam does not clear, move switch to REVERSE (R) again and allow to run for 5 seconds. Repeat
this process until jam is cleared. If necessary, turn off the shredder and use care to grasp the paper and
carefully pull out to clear jam. Once cleared move power switch to AUTO (I) to continue shredding.
Performance has
diminished, or shredder makes a squeaking or rubbing noise .
1. Cutting blade needs to be oiled.
1. Move power switch to OFF (O). Squeeze the recommended lubricant (see MAINTENANCE) over the full
width of the cutters from the top of the shredder. Move the power switch to REVERSE (R) and allow to run
for at least 3 seconds. Repeat as necessary.
Shredder continues
to operate after
paper has been
shredded.
1. Shredder is designed to run-on
for several seconds in order to
clear any excess paper.
1. No corrective action required – this is normal.
Shredder only operates 1. A small piece of paper may be
in REVERSE (R).
blocking the auto-start sensor.
Shredder runs continuously when in
AUTO (I).
1. A small piece of paper may be
causing the auto-start feature
to run continuously.
1. Move the power switch to OFF (O) position and unplug the shredder. Turn the shredder head over and use
a toothpick to clear the blockage at the auto-start (centre) location.
1. Move the power switch to OFF (O) position and unplug the shredder. Use a toothpick to clear the paper
blockage at the auto-start sensor (centre) location.
.LIMITED WARRANTY
Fellowes, Inc. (“Fellowes”) warrants the cutting blades of the machine to be free from defects in material and workmanship for 3 years from the date of purchase by the original consumer. Fellowes warrants all other parts of the machine to be free of defects in material and workmanship for 1 year from the date
of purchase by the original consumer. If any part is found to be defective during the warrant period, your sole and exclusive remedy will be repair or
replacement, at Fellowes’ option and expense, of the defective part.
This warranty does not apply in cases of abuse, mishandling or unauthorised repair. ANY IMPLIED WARRANTY, INCLUDING THAT OF MERCHANTABILITY OR FITNESS FOR A PARTICULAR PURPOSE, IS HEREBY LIMITED IN DURATION TO THE APPROPRIATE WARRANTY PERIOD SET FORTH
ABOVE. In no event shall Fellowes be liable for any consequential or incidental damages attributable to this product. This warranty gives you specific legal
rights. You may have other legal rights that vary. The duration, terms and conditions of this warranty are valid worldwide, except where different limitations,
restrictions or conditions may be required by local law.
For more details or to obtain service under this warranty, please contact:
EUROPEAN CONSUMER HELPLINE
00 800 1810 1810
(Accessible via most major telephone networks)
OR the nearest Fellowes location listed on the back page of this user manual.
Warrantor: Fellowes, Inc.
5
Declaration of Conformity
Fellowes, Inc.
Yorkshire Way, West Moor Park
Doncaster, South Yorkshire, DN3 3FB England
declares that the products
Models P400C-2 and P600C-2
conform with the requirements of the Low Voltage Directive (73/23 EEC) and the
Electromagnetic Compatibility Directive (89/336 EEC) and the following harmonized
European Normes (EN Standards) and IEC Standards.
Safety: EN60950 ‘Information Technology Equipment’
Standard
Severity Level
Performance Criteria
EMC:
EN 55014-2:1997
Category I device
N/A
EN 55104-1:1993,
+A1:1997, +A2:1999
Household Limits
N/A
EN 61000-3-2:1995
+A1:1998, +A2:1998
Class A
N/A
EN 61000-3-3:1995
Section 5
N/A
Itasca, Illinois, USA
02 May 2001 (P400C-2)
15 April 2001 (P600C-2)
_____________________
Anthony Storrie
Maschinenlärminformations-Verordnung - 3.GSGV
Der arbeitsplatzbezogene Emissionswert (LpA) beträgt:
Modellnummer
im Leerlauf
unter Last
P400C-2
71 dB(A)
75 dB(A)
P600C-2
69 dB(A)
77 dB(A)
Fellowes Locations
Australia
Benelux
Canada
France
Germany
Italy
Japan
Korea
Poland
Singapore
United Kingdom
011-613 93303211
011-31-3473-77988
905-475-6320
+ 33 (0) 2-99-22-71-22
+ 49 (0) 5131-4977-0
+ 39 (0) 071-730041
011-81-3-5496-2401
82-2-3464-2884
+ 48-22-837-7356
65-6221-3811
+ 44 (0) 1302-836836
© 2001 Fellowes. Printed in China. Form No. 30115B