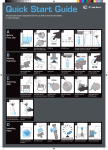
1
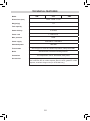
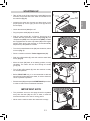
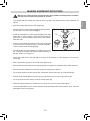
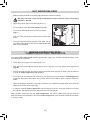
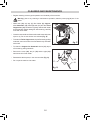
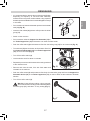
IMPORTANT SAFEGUARDS
When using electrical appliances, basic safety precautions should always be followed, including
the following:
1 Read all instructions.
2 Do not touch hot surfaces. Use handles or knobs.
3 To protect against fire, electric shock and injury to persons do not immerse cord, plugs or
appliance in water or other liquid.
4 Close supervision is necessary when any appliance is used by or near children.
5 Unplug from outlet when not in use and before cleaning. Allow to cool before putting on or
taking off parts, and before cleaning the appliance.
6 Do not operate any appliance with a damaged cord or plug or after the appliance
malfunctions or has been damaged in any manner. Return appliance to the nearest
authorized service faciliy for examination, repair or adjustment.
7 The use of accessory attachments not recommended by the appliance manufacturer may
result in fire, electric shock or injury to persons.
8 Do not use outdoors.
9 Do not let cord hang over edge of table or counter, or touch hot surfaces.
10 Do not place on or near a hot gas or electric burner, or in a heated oven.
11 Always attach plug to appliance first, then plug cord into the wall outlet. To disconnect,
turn any control to “OFF”, then remove plug from wall outlet.
12 Do not use appliance for other than intended household use.
SAVE THESE INSTRUCTIONS
16
A A short power-supply cord (or detachable power supply cord) is to be provided to reduce
risks resulting from becoming entangled in or tripping over a longer cord.
B Longer detachable power supply cords or extension cords are available and may be used if
care is exercised in their use.
C If a longer detachable power supply or extension cord is used:
1 the marked electrical rating of the detachable power supply or extension cord should be
at least as great as the electrical rating of the appliance.
2 if the appliance is of the grounded type, the extension cord should be a grounding type
3-wire cord.
3 the longer cord should be arranged so that it will not drape over the counter top or
tabletop where it can be pulled on by children or tripped over.
17
ENGLISH
SHORT CORD INSTRUCTIONS
CONTENTS
MACHINE FUNCTION .................................................................................................................... 19
MACHINE USE ............................................................................................................................... 19
SAFETY INSTRUCTIONS .............................................................................................................. 19
TECHNICAL FEATURES ................................................................................................................ 20
STARTING UP ................................................................................................................................ 21
MAKING ESPRESSO ..................................................................................................................... 22
MAKING ESPRESSO WITH PODS ................................................................................................ 23
HOT WATER DELIVERY ................................................................................................................ 24
MAKING CAPPUCCINO
MAKING CAPPUCCINO WITH “TURBO-CAPPUCCINO” DISPOSITIVE ................................... 24
MAKING CAPPUCCINO WITH “CAPPUCCINO AUTOMATIC” DISPOSITIVE ........................... 25
CLEANING AND MAINTENANCE.................................................................................................. 26
DESCALING ................................................................................................................................... 27
TROUBLESHOOTING ............................................................................................................ 28
18
MACHINE FUNCTION
This machine is designed for the home preparation of espresso coffee using coffee blends, for the production of hot water or steam, and the preparation of hot milk.
The user must carefully read and understand the operating instructions in this manual for proper
operation of the machine.
MACHINE USE
The SIM-STE-SMO coffee maker is able to prepare:
• beverages deriving from ground coffee.
•
hot water and steam for heating milk or preparing hot beverages.
•
beverages based on coffee and milk.
WARNING
To ensure your machine works well and to avoid any damage to you or your property,
some simple safety precautions are listed below. It is recommended that you follow them
carefully:
•
Read this manual carefully and keep it ready for future use.
•
Do not touch hot surfaces.
•
In order to avoid fire, electric shocks or personal injury, do not dip the machine, the power cord and
other electrical components into water.
•
Install the machine in a safe place, well away from any direct heat source and out of children’s reach.
•
Before disconnecting the machine from the mains, make sure that all switches are off.
•
When the machine is not in use, or before cleaning it, unplug the machine.
•
Do not operate the machine when it is not working correctly, or when the power cable/plug is damaged.
•
Should the power cable be damaged, it must be replaced by the manufacturer or his customer service
department.
•
Do not use the machine outdoors.
•
Do not use the machine for other uses than it is intended for.
•
Before operating, make sure that the water level in the tank (12) is adequate and the hot water/steam
knob (13) is closed.
•
In order to avoid any damage, only use manufacturer’s parts.
•
Do not remove the filter holder while coffee is being made.
•
Observe the descaling suggestions.
•
The coffee machines “SIM - STE - SMO” are intended for domestic use only and not for professional
use; behave accordingly.
•
Before FIRST USE, make sure that the mains voltage shown on the data plate under or on the back
of the machine corresponds to the voltage used in the Country.
•
In the case of a fire, use a carbon dioxide (CO²) based extinguisher. Do not use water or powder
extinguishers.
19
ENGLISH
The espresso is prepared by forcing water heated to the proper temperature through ground coffee.
TECHNICAL FEATURES
Model
Dimensions (mm)
SIM
STE
L 220 - H 295 - P 270
Weight (kg)
5,5
Tank capacity
2,8 lt
Steam delivery
5 minutes
Power cord
L =160 cm ca.
Max. pressure
15 bar
Power supply
230V-50Hz. / 120V-60Hz
Absorbed power
Thermostats
Boiler
SMO
950 Watt
Service type for coffee and steam temperature; safety thermostat
Stainless steel, with 900 W heating element
Protections
Thermoprotection 100°C, thermostat, safety valve
Accessories
Measuring spoon, pressurized filter holder (mechanical), Turbo Cappuccino,
User’s manual, filter for coffee capsules, filter for coffee, gasket for coffee
capsules, Automatic Cappuccino (for STE-SMO only).
20
STARTING UP
Take off the cover (1) and remove the tank (12) from the
machine; fill the tank with fresh water and reinsert it into
the machine (Fig. A).
•
Immerge the pipes into the tank and place them in the
proper place up on the right, put the cover (1) back on
the tank (12).
•
Check the switches (2-3-4) are off.
•
Plug the power cable (9) into the mains.
•
Push the main switch (2). “La Pavoni” logo turns on to
indicate that the machine is under voltage (Fig. B). The
“Simpaticone (STE)” and “Simpaticissimo (SMO)” models
are equipped with an active cup-heater (16) which begins
working when turning the machine on, and automatically
keeps the cup temperature constant.
•
Turn the hot water/steam knob (13) anti-clockwise, about
one turn (Fig. C).
•
Place a container under the Turbo Cappuccino (14).
•
Push the coffee switch (3), and wait until the water flows
evenly (Fig. D).
•
Move the knob (13) back to its starting position, turning
clockwise. The water will now flow through the boiler
group (11).
•
Turn off the coffee switch (3). Now the machine is ready
for normal operation.
•
Before FIRST USE only, it is recommended to add two
spoonfuls of bicarbonate to the water, in order to clean the
circuit of possible impurities.
•
Rinse the tank (12) and repeat the STARTING UP procedure,
in order to clean off the bicarbonate residues.
1
12
ENGLISH
•
fig. A
fig. B
fig. C
IMPORTANT NOTE
•
The procedure set out on this page should be repeated
every time the tank (12) runs out of water, or after the
machine has been out of use for a long period.
•
Never use the machine when the water tank is empty.
fig. D
21
MAKING ESPRESSO
Warning: the coffee emerges from the spout of the
portafilter at a temperature of 75-85°C exercise
care to avoid being scalded or burned.
•
The special pressurized filter holder ensures the preparation
of a good and creamy genuine espresso coffee.
•
Insert the filter holder (6) without filter (17) in the boiler
group (11) and turn it from left to right until it locks, in order
to pre-heat it. Leave the filter holder handle (Fig. E).
•
The handle will now automatically turn slightly back to the
left. This little movement ensures the perfect operation of
the filter holder, for a long time.
•
Check the water level in the tank (12) is enough for the
amount of coffee wanted.
•
Push the main switch (2).
•
Wait until the warning light in the coffee switch (3) turns on
(Fig. F).
•
Now the machine has reached the right temperature to
pump water.
•
Remove the filter holder from the boiler group (11) and
insert the big filter for coffee (17) into the filter holder (6).
•
Fill the filter (17) with one or two measuring spoons of
ground coffee according to the number of coffees to be
prepared (fig. G).
fig. E
fig. F
about 1 measure = 1 coffee
about 2 measures = 2 coffees
•
The quantity and pressing of the coffee powder directly
affect the quality and flavour of the espresso.
•
Slightly press the coffee with the measuring spoon (fig. H),
then clean the filter holder brim of any coffee residues.
•
Install the filter holder (6) in the boiler group (11), as described above.
•
Put two pre-heated cups under the filter holder.
•
Push the coffee switch (3). When the required amount of
coffee has run into the cups, turn the coffee switch off.
•
After having made coffee, remove the filter holder and
empty the coffee grounds. Then, rinse the filterholder under
running water.
22
fig. G
fig. H
MAKING ESPRESSO WITH PODS
The pressurized filter holder may also be used to prepare the espresso with coffee capsules, as
follows:
•
Remove the filter (17) from the filter holder (6).
•
Place the insert for coffee capsules (15) into the filter holder,
the face with four fins on the top (Fig. I).
fig. I
•
Install the small filter for coffee capsules (8) into the filter
holder (6). In order to obtain a good hot coffee from the
first cup, it is recommended to pre-heat the filter holder,
filter and cups.
15
•
Insert the filter holder (6) under the boiler group (11) and
turn it from left to right until it locks, in order to pre-heat it.
Leave the filter holder handle (Fig. E).
8
6
17
•
The handle will now automatically turn slightly back to the
left. This little movement ensures the perfect operation of
the filter holder, for a long time.
•
Check the water level in the tank (12) is enough for the amount of coffee wanted. Push the main
switch (2).
•
Wait until the warning light in the coffee switch (3) turns on.
•
Now the machine has reached the right temperature to prepare the espresso with coffee capsules.
•
Remove the filter holder from the boiler group (11), swinging it to the left.
•
Put a coffee capsule into the special filter. Handle the capsule with care, to avoid damaging it.
•
Insert the filter holder (6) into the boiler group (11) and turn it from left to right until it locks.
•
Put a cup under the filter holder. Push the coffee switch (3).
•
When the required amount of coffee has run into the cup, turn the coffee switch (3) off.
•
Once the preparation is over, remove the filter holder and discard the coffee capsule. Then, rinse the
filterholder under running water.
23
ENGLISH
Warning: the coffee emerges from the spout of the portafilter at a temperature of 75-85°C
exercise care to avoid being scalded or burned.
HOT WATER DELIVERY
Make sure that the water in the tank (12) is above the minimum marking.
Warning: hot water comes out at a temperature of 90°C exercise care to avoid being
scalded or burned.
•
Check the warning light in the switch (3) to be on.
•
Put a container under the Turbo Cappuccino (14).
•
Turn the hot water/steam knob (13) anti-clockwise
(Fig. L).
•
Push the coffee switch (3) and wait until the water is delivered.
•
Once you have the required amount of hot water, turn off
the coffee switch (3), and close the hot water/steam knob
(13), turning clockwise.
fig. L
MAKING CAPPUCCINO WITH
“TURBO-CAPPUCCINO” DISPOSITIVE
The special Turbo Cappuccino makes a typical Italian cappuccino. Thanks to its special design, it can
be positioned as convenient.
•
Check the warning light in the switch (3) to be on.
•
Push the steam switch (4): its warning light turns on, while the one in the coffee switch (3) turns off
(Fig. M).
•
After 30 seconds average, the warning light in the coffee switch (3) turns on again: now the machine
is ready for Turbo Cappuccino (14) operation.
•
Pour some 100 ml of cold milk into a narrow jug, not higher than 10 cm and dip the Turbo Cappuccino
nozzle into the liquid to be heated, 3-4 cm deep; open the knob (13) to get the required amount of
steam.
•
When the heating is achieved, or the milk is frothed to 2 to 3 times the original depth, close the knob
(13) and turn off the steam switch (4).
•
In order to clean the Turbo Cappuccino and to recharge the circuit, swing the nozzle over the drip
tray (7) and, after opening the knob (13), push the coffee switch (3).
Wait until water comes out from the Turbo Cappuccino. Turn off the coffee switch (3) and close the
knob (13). After each preparation, remove the Turbo Cappuccino outer chromed brass body and clean
it, using hot water.
24
MAKING CAPPUCCINO WITH
“CAPPUCCINO AUTOMATIC” DISPOSITIVE
Just pushing one button, the special feature Cappuccino
Automatic prepares hot and frothy milk which, added to
the previously prepared coffee, makes a genuine “Italian
cappuccino”.
•
To fit the Cappuccino Automatic onto the machine, do as
follows:
fig. O
ENGLISH
•
- Remove the Turbo Cappuccino off its seat, keeping it
horizontal (Fig. O).
- Replace it with the Cappuccino Automatic device, making
sure it goes to the end on the steam pipe.
•
The machine is now ready for use (switches 3 and 4 turned
on), proceed as follows:
•
Quicky open and close, the hot water/steam knob (13), two
or three times, until the Cappuccino Automatic device
only dispenses steam.
•
Insert the suction pipe (19) into an appropriate container,
or directly into the cold milk carton, placed besides the
machine (Fig. N).
•
Place the cup containing previously prepared coffee under
the Cappuccino Automatic nozzle (10) and open the hot
water/steam knob (13). Hot and frothy milk is automatically
dispensed into the cup.
fig. M
fig. N
•
It’s possible to vary the frothing: to increase froth volume,
pull the pin (18) upwards.
•
To stop the preparation, close the hot water/steam knob
(13) and turn off the steam switch (4).
•
After each preparation, the Cappuccino Automatic should
be cleaned of milk residues.
•
Place a container with water besides the machine, and dip
the suction pipe into it (19) (Fig. N).
•
Operate as for cappuccino preparation, letting the water to flow into an appropriate container or directly
into the drip tray (7).
•
After you have used the Cappucino Automatic (10), return the machine to the normal operation state,
as follows: swing the Cappuccino Automatic (10) over the drip tray (7), turn the hot water/steam
knob (13) anti-clockwise, push the coffee switch (3), then wait until the water flows evenly.
•
Turn off the coffee switch (3) and close the hot water/steam knob (13): the machine is now ready for
coffee preparation.
25
17
10
18
CLEANING AND MAINTENANCE
•
Regular cleaning ensures good operation and durability of the machine.
Warning: prior to any cleaning or maintenance operation, take the power plug (9) out of the
mains.
•
Water tank (12), drip tray (7), filter holder (6), Cappuccino Automatic (10), filters (8) and (17) and the Turbo
Cappuccino (14), should be regularly cleaned with water
and normal dish-washer detergent. After cleaning, carefully
rinse with fresh water.
•
Clean the outer surfaces of the machine with a wet cloth, then
wipe to dry. Do not use alcohol nor solvents (Fig. P).
•
To clean the Turbo Cappuccino, slip it off its seat by pulling
outwards, remove its outer chromed brass body and wash
with water.
•
To clean the Cappuccino Automatic device (10), slip it
off its seat by pulling outwards.
•
Remove the cover (20), the pin (18) and the pipe (19);
wash them all in fresh water.
•
Reassemble all the parts, in the reverse order (Fig. Q).
•
Do not put the machine into water.
fig. P
17
fig. Q
26
19
18
DESCALING
It is recommended to descale the machine decalcification
depending on frequency of use and water hardness,
however do so every three months at least, using a specific
descaler product available from household appliance shops
or chemists.
•
Pour a solution of water and descaler product into the water
tank (12) (Fig. R).
•
Insert the filter holder (6) (without coffee) under the boiler
group (11).
•
Switch on the machine.
•
Put a container under the Cappuccino Automatic (10) or
the Turbo Cappuccino (14) and another one under the filter holder.
•
Push the coffee switch (3) and let water to flow from the boiler group (11) for 10-15 seconds (Fig. S).
•
Turn the knob (13) anti-clockwise, and let water to flow from
the Cappuccino Automatic (10) or the Turbo Cappuccino
(14), for 10-15 seconds (Fig. S).
•
Turn off the coffee switch (3).
•
Let the solution work for about 15 minutes.
•
Repeat this procedure until the water in the tank goes down
to the minimum level.
•
Remove and rinse the tank, fill it with fresh water and
reinstall it in the machine.
•
Push the coffee switch (3) and let water to flow freely from the boiler group and from the Cappuccino
Automatic device (10) or the Turbo Cappuccino (14), in order to flush out the residues of descaler
solution.
•
Turn off the coffee switch (3).
ENGLISH
•
fig. R
fig. S
Warning: in case of heavy scaling, using a screwdriver to unscrew the mounting screw of the filter plate in
the boiler group (11), and clean off any scaling (Fig. T).
fig. T
27
TROUBLESHOOTING
A The machine doesn’t work and the warning light in the main switch (2) is off:
1) there is no current.
2) the plug (9) is not correctly connected to the mains socket.
3) the safety thermostat should be reset.
B The warning light in the main switch is on, but the water doesn’t warm up:
1) the heating element in the boiler (11) is disconnected or burnt out.
2) the service thermostats are defective.
C Coffee doesn’t come out from the filter holder:
1) no water in the tank.
2) coffee is ground too fine.
3) Too much coffee in the filter holder.
4) Coffee is pressed down too much.
5) Steam switch (4) is on.
6) Circuit has not been recharged (see SETTING UP).
7) Boiler group (11) is scaled up.
D Coffee comes out drop by drop:
1) Coffee is ground too fine.
2) Coffee is pressed down too much.
E Coffee flows out too quickly and has no cream:
1) Coffee is ground too coarse.
2) Coffee is not pressed down enough.
3) Too little coffee in the filter holder.
4) Coffee blend is stale or not suitable for the machine.
F Coffee comes out by the filter brim:
1) Filter holder is not correctly positioned.
2) too much coffee in the filter holder.
3) filter brim is not clean.
4) group rubber gasket is worn out.
G Coffee comes out cold:
1) machine is not at the correct temperature.
2) filter holder has not been pre-heated.
3) cups have not been pre-heated.
H Big noise from the pump:
1) no water in the tank.
Warning: if any fault affecting the heating element or the thermostats, or faults not listed
above occurs, please contact the nearest service center.
Moreover, the Manufacturer reminds you that any attempt to repair or to carry out unauthorized
maintenance, or such work carried out by unauthorized personnel voids the machine guarantee
and excludes any liability of the Manufacturer for any damage to persons or property.
28
29
ENGLISH