1
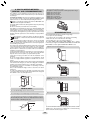
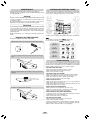
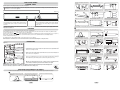
MAINTENANCE AND USER‘S GUIDE
Congratulations on purchasing this fridge, which has been designed using the
latest technologies for an easy-to-use, environmentally friendly appliance.
We recommend you read this guide and the technical datasheet carefully to find
out everything you need to know about your new fridge.
EN
A SPACE IS NEEDED BETWEEN
„GENERAL“ AND „RECOMMENDATIONS“
Do not install the appliance outside.
The appliance works properly at the following temperature ranges:
Climatic class: SN +10 +32°C
Climatic class: N +16 +32°C
Climatic class: ST +18 +38°C
Climatic class: T +18 +43°C
Climatic class: N/ST +16 +38°C
(See appliance‘s rating plate)
This appliance is only intended for storing foods. Any other use is
considered hazardous and the manufacturer may not be held liable for
any damages.
Conformity declaration: the parts of this appliance intended to come
into contact with foodstuffs conform to the directive 89/109/EEC and the
Italian Law decree no. 108 of 25/01/92 implementing this directive.
Appliance conforming to the European directives 2004/108/EC and
2006/95/EC and subsequent amendments.
The dealer shall be notified of any damage within 7 days from purchasing
the appliance.
We also recommend you read the terms of the warranty.
This appliance is not intended for use by persons (including children) with
reduced physical, sensory or mental capabilities, or lack of experience
and knowledge, unless they have been given supervision or instruction
concerning use of the appliance by a person responsible for their safety.
Children should be supervised to ensure that they do not play with the
appliance.
This appliance is marked according to the European directive
2002/96/EC on Waste Electrical and Electronic Equipment
(WEEE).
By ensuring this product is disposed of correctly, you will help
prevent potential negative consequences for the environment
and human health, which could otherwise be caused by inappropriate
waste handling of this product.
The symbol on the product indicates that this product may not be treated
as household waste. Instead it shall be handed over to the applicable
collection point for the recycling of electrical and electronic equipment.
Disposal must be carried out in accordance with local environmental
regulations for waste disposal.
For more detailed information about treatment, recovery and recycling of
this product, please contact your local city office, your household waste
disposal service or the shop where you purchased the product.
Leave the power plug accessible even after the installation of the
apparatus.
Do not use electrical devices inside the food compartments, except
for the ones equipped with the apparatus or available from our service
centres.
Before plugging in the appliance, make sure the voltage on the rating plate
is the same as the voltage in your home. The rating plate is inside the
appliance, in the bottom left-hand corner of the fridge compartment.
The manufacturer may not be held liable for any damage caused by
unearthed wiring systems.
After you have installed the fridge, wait for at least two hours before
turning it on.
To ensure your appliance works as efficiently as possible, leave at least
a 5 cm gap between the fridge and the wall and between the fridge and
items behind or above it (see diagram below).
RECOMMENDATIONS
We recommend the following, for greater energy saving:
- Do not put hot foods in the fridge.
- Do not pack foods close together as this prevents air circulating.
- Make sure foods do not touch the back of the fridge.
- If the electricity goes off, do not open the fridge door.
The fridge makes some noises when working. This is entirely
normal and you might hear HUMMING, GURGLING, RUSTLING AND
WHISTLING, as well as slight CLICKING OR JUMPING noises.
Adjust the feet to level the appliance.
Make sure glass containers do not touch in the appliances.
Install the fridge leaving a gap between it and other furniture or
appliances.
What to avoid...
Do not install the fridge close to sources of heat.
Make sure accessories are installed properly.
Do not alter plugs or use adapter plugs or extension leads.
If you have purchased a stainless steel fridge, it will have a peel-off
film protecting the surface. Do not use sharp implements to remove
the film, as these could damage the steel.
If you have followed the instructions, but your product continues to make
irritating noises, other than those resulting from a normal functioning,
please contact the technical support service.
1 EN
MAINTENANCE
STORING AND FREEZING FOODS
Proper maintenance will ensure a long life for your appliance.
Remember to remove the plug before you clean/defrost the fridge, change
the fridge light bulb, etc.
To make sure foods retain their flavour and substance and stay fresh,
store them in the fridge compartment as shown in the figure below. Wrap
foods in tin foil or cling film or put them in closed containers.
Cleaning
Clean the outside of the fridge at regular intervals with a damp cloth. Use
a solution of bicarbonate of soda and water to clean the inside. Do not
use abrasive products.
An outlet for draining water is located in the middle of the back of the
fridge. Make sure this outlet is not obstructed; clean regularly.
FRIDGE AR
EA
Defrosting
It is recommended to defrost the refrigerator each time an excessive layer
of frost is formed, then leave the doors open with the apparatus switched
off and avoid using sharp or mechanical objects (knives, scissors, etc)
to remove the ice from the internal parts, in order to avoid damaging the
refrigerating circuit.
NOTE: a small amount of ice on the back of the fridge compartment is
normal.
Replacing the fridge light bulb
To replace the light bulb in the fridge compartment:
Adjust the thermostat to „0“ and remove the plug from the socket.
Frozen foods can be stored for approximately one month in compartments
.
See the table for storing foods in
Foods can only be frozen in
compartments.
compartments.
2-3
MONTHS
4-6
MONTHS
6-8
MONTHS
10 - 12
MONTHS
Use a flat screwdriver to lift up the grid and remove the see-through
cover.
Trouble-shooting
Please contact our service department if you have any difficulties. However
you can often solve small or apparently alarming problems yourself. In fact
problems may be caused by incorrect use or installation or by unsuitable
ambient conditions and in these cases you will be charged.
Remove the light bulb and replace with the same type and same
watt bulb.
THE FRIDGE DOES NOT WORK
- Make sure the plug is inserted properly in the socket.
- Make sure the thermostat is not set to „0“ or Stop.
- Make sure the electricity is working.
THE FRIDGE IS NOT COLD ENOUGH
- Make sure the thermostat is set properly. Adjust to higher settings.
- Make sure the fridge doors have not been left open for too long.
- Make sure you haven‘t stored too much food in the fridge.
- Make sure you haven‘t put hot foods in the fridge.
THERE IS TOO MUCH FROST
- Make sure the door has not been left open for too long. Unplug the
fridge, defrost and then turn it back on.
- Make sure the thermostat is not set at a temperature which is too cold
(high settings). Adjust to lower settings.
Re-fit the cover and plug in the appliance.
THERE IS TOO MUCH CONDENSATION
- Make sure the door has not been left open for too long.
- Make sure you haven‘t stored too many fresh foods in the fridge.
- Make sure you haven‘t put hot foods in the fridge.
THERE IS WATER IN THE FRIDGE COMPARTMENT
- A few drops of water on the sides of the fridge compartment is normal,
particularly when a room is humid/damp.
- Make sure the water outlet is not obstructed.
THE LIGHT DOES NOT WORK
- Make sure the plug is inserted in the socket properly.
- Make sure the electricity is working.
- Follow the instructions in the technical datasheet to replace the bulb.
If the problem continues, contact our service department, giving the
appliance number and serial number on the rating plate.
2 EN
Z STUDIO > 11-2007 – 41015133/A
FROST FREE COMBIS
Z STUDIO > 07-2005 – 41017221
GB
FROST FREE COMBIS
Take off the bottom right-hand hinge by removing
the screws, pin and washers, then remove the
lower door.
Remove the caps (A) and (B), loosen the screws
and partially remove the panel.
Unscrew the right hinge.
Mark and break the left-hand slot on the panel, in
the insert area.
Flip the top left-hand hinge found in the
accessories kit.
Remount the hinges and doors working from
bottom to top,
Fit the panel, and secure with the screws and
caps.
To reverse the handles: remove the outer caps
from the right-hand side of the doors.
Unscrew the handles from the left-hand side and
move them to the right-hand side, then position
the outer caps on the left-hand side of the doors.
CONTROL PANEL
Open the top door of the fridge in order to access the control panel.
Turn on the knob to switch on the appliance and set the temperature of the freezer compartment and Fridge. (Recommended setting – 2-3).
Turn the knob to “0” to turn off the appliance.
(Figure 1)
The green “ON” light shows that the unit is working. This light
is on irrespective of the knob setting, except for when the
knob is set to 0.
The orange light comes on when the thermostat knob is turned
to SUPER. In this case the compressor continues to function
as normal.
Important: Some appliances will start to function at least 6 minutes after the plug has been connected to the power supply outlet and the
temperature has been set.
B
FREEZING
The preservation of frozen foods is guaranteed in all of the freezer’s compartments.
During maximum capacity of the freezer, it is advised to remove the drawers and to place the food directly on the shelves for optimal freezing.
In some products there is a
Put the appliance in an upright position and wait two hours before turning it on.
Place the appliance on the floor or at a 45° angle,
as it is necessary to work on the bottom of the
appliance.
Remove the lower plinth by pulling out the
3 protective plugs and by loosening the screws.
Drill the plinth on the marked left hand-side area.
section in the top part, (see quick guide).
drawer, turn the thermostat clock-wise to SUPER position, and the orange light will come on (see figure 1).
Place the foods to be frozen in the
After 24 hours, freezing is completed. Therefore, reset the thermostat to position 2-3. The SUPER function is automatically disabled
from the circuit board after 26 hours.
The rating plate states the maximum quantity of foods that can be frozen, (see figure 2).
N.B. For better air circulation, leave some room in between the foods and avoid blocking the cooling air outlets.
Take off the bottom right-hand hinge by removing
the screws, pin and washers, then remove the
lower door.
Remove the screws from the central hinge and
remove the top door.
Unscrew the hinge from the fridge door and mount
the one supplied on the other side.
Mark and break the left-hand slot on the panel, in
the insert area.
With this panel type, remove the label and screws,
then partially remove the panel.
Remove the screws from the top right hinge and
invert the position of the pin, then reassemble it on
the left-hand side.
With another panel type, break the plastic
membrane and screw the hinge on the left-hand
side of the panel.
Insert the pin in the hinge and the spacer in the
insert. Reassemble the hinges and doors
working from bottom to top.
Remove the plug on the left-hand side and insert
it on the right-hand side of the central and lower
inserts. Invert the bushing in the lower insert.
DEFROSTING
(Figure 2)
A small amount of frost or drops of water on the back of the freezer compartment when
the freezer is working is normal.
Make sure the water outlet is always clean. Make sure foods do not touch the back or
sides of the freezer compartment.
The freezer compartment does not need to be defrosted because this product is equipped
with an automatic system which prevents frost from being formed (frost free).
1)
break
the
plastic membrane
spacer
2) Insert the pin
NB. This is the rating plate. If you need to contact our Service Department in the
event of faults, remember to give them the information on the plate.
Screw the panel back on and place the outer
label back on. Put the appliance in the upright
position and wait two hours before turning it on.
plug
To reverse the handles: remove the outer caps
from the right-hand side of the doors.
Important: If the room temperature is very warm, the appliance may work continuously and a layer of frost will deposit on
the back of the fridge compartment. In this case, turn the knob to lower settings (1-2).
REVERSING THE OPENING OF THE DOORS
In order to reverse the opening of the doors, follow the indications in relation to the insert and hinge type your product is made up of.
A
Place the appliance on the floor or at a 45° angle,
as it is necessary to work on the bottom of the
appliance.
Remove the lower plinth by pulling out the 3
protective plugs and by loosening the screws.
1 GB
bushing
Drill the plinth on the marked left hand-side area.
2 GB
Unscrew the handles from the left-hand side and
remount them on the right-hand side of the product.
Place the plugs on the left-hand side.
TOTAL NO FROST
I prodotti total No frost sono costituiti da un sistema
di aereazione composto da 2 bocchette regolabili
manualmente
Si consiglia di tenere le bocchette parzialmente
e completamente aperte
FROST FREE PLUS
The Frost Free Plus system uses the two manually
adjustable vents to circulate cold air evenly around
the fridge.
It is recommended that the vents are kept partially or
completely open
VÖLLIG FROSTFREI
Die völlig frostfreien Produkte bestehen aus einer
Lüftungsanlage, die sich aus zwei von Hand
einstellbaren Düsen zusammensetzt
Es wird empfohlen, die Öffnungen jeweils teilweise und
vollständig geöffnet zu halten.
NO FROST TOTAL
Los productos Total No frost estan compuestos por
un sistema de ventilación formado por dos difusores
ajustables manualmente.
Es recomendable mantener las aberturas parcial o
totalmente abiertas
NO FROST TOTAL
Os equipamentos No Frost são compostos por um
sistema de ventilação que inclui 2 bocais manualmente
ajustáveis.
É recomendável manter as aberturas parcial ou
totalmente abertas.
NO FROST TOTAL
Les produits total No Frost sont constitués d‘un
système de ventilation qui comprend 2 sorties d’air
froid, réglables manuellement.
Il est recommandé de maintenir les ouvertures
partiellement et complètement ouvertes.
ΠΛΗΡΩΣ ΑΥΤΟΜΑΤΗ ΑΠΟΨΥΞΗ
Τα προϊόντα με πλήρως αυτόματη απόψυξη αποτελούνται
από ένα σύστημα αερισμού το οποίο περιλαμβάνει
2 ακροφύσια που ρυθμίζονται χειροκίνητα
Συνιστάται να διατηρείτε τα ανοίγματα εν μέρει και
πλήρως ανοικτά
CAŁKOWICIE AUTOMATYCZNE ROZMRAŻANIE
Produkty z systemem całkowicie automatycznego
rozmrażania zawierają system wentylacyjny, w którego
skład wchodzą dwie ręcznie regulowane dysze
Zaleca się, aby otwory pozostawały częściowo lub
całkowicie otwarte
TOTAL FROST FREE
Výrobky s označením Total No frost jsou vybaveny
systémem větrání, který je tvořen 2 ručně nastavitelnými
větracími otvory.
Doporučujeme nechat tyto otvory částečně a úplně
otevřené.
TOTAAL 'FROST FREE'
De 'totaal frost free' producten hebben een
ventilatiesysteem dat twee handmatig verstelbare
openingen bevat
Het is aan te bevelen om de openingen gedeeltelijk of
compleet open te houden
TOTAL FROST FREE
Total frost free -tuotteissa on ilmanvaihtojärjestelmä,
joka muodostuu kahdesta manuaalisesti säädettävästä
suuttimesta
Suosittelemme pitämään aukot osittain ja täysin
auki.
TOTAL FROST FREE
Total frost free-produktene har et ventilasjonssystem
som består av to manuelt justerbare munnstykker
Det anbefales å holde åpningene delvis og komplett
åpne
HELT FROSTFRI
Helt frostfria produkter består av ett ventilationssystem
som består av 2 manuellt justerbara munstycken
Vi rekommenderar att öppningarna hålls delvis och
helt öppna
TOTAL FROSTFRI
Totalt frostfrie produkter består af et ventilationssystem,
som indeholder 2 manuelt justerbare dyser
Det anbefales at holde åbningerne delvist og
fuldstændigt åbne
Art. 41018333 - Z STUDIO - ED. 01-06