1
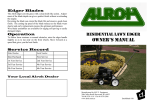
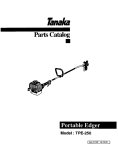
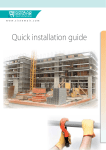
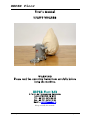
REPEX Floor
User’s manual
LIGHT EDGERS
WARNING
Please read the operating instructions carefully before
using the machine.
REPEX Floor SAS
8-10 rue de l’insurrection Parisienne
94600 CHOISY LE ROI
Tel : 33 (0)1.46.80.03.92
Fax : 33 (0)1.46.80.12.09
Email : [email protected]
.
Keep carefully this manual.
Operating Instructions REPEX EDGER uk.1.4.doc/2007-07-11
Page 1 sur 9
REPEX Floor
Index
1. Important safety precautions .................................................................................................. 3
2. Introduction to the « Light Edgers » ...................................................................................... 4
3. The machine and its components ........................................................................................... 5
4. Using the machine .................................................................................................................. 6
4.1 – Assembling the dust bag ............................................................................................... 6
4.2 – Changing the abrasives.................................................................................................. 7
4.3 – Positioning the long nose .............................................................................................. 7
4.4 – Adjusting the wheels ..................................................................................................... 8
5. Starting the machine ............................................................................................................... 8
6. Service and maintenance ........................................................................................................ 9
6.1 – Emptying the dust bag ................................................................................................... 9
6.2 – Replacing the brushes.................................................................................................... 9
6.3 – changing the cogged belt ............................................................................................... 9
7. Maintenance queries ............................................................................................................... 9
Operating Instructions REPEX EDGER uk.1.4.doc/2007-07-11
Page 2 sur 9
REPEX Floor
!
1. Important safety precautions
This machine is not a vacuum cleaner !
This machine must only be used on dry surfaces and should not be used in humid
conditions !
Do not touch any part of the machine with wet hands !
This machine is not a toy ! Children should be kept away from it during use !
Do not forget to attach the dust bag !
Do not use this machine without a sanding disc !
Do not use this machine if you find that any component is missing ! Each
component is vital !
Never try to repair this machine yourself ! If you have a problem, you must contact a
qualified technician !
Use this machine in accordance with the instruction manual !
Never use this machine without wearing suitable safety equipment : you must wear a
mask over your mouth and you are strongly advised to wear ear plugs.
This machine must be disconnected from power sockets during cleaning and
maintenance.
Voltage 230 Volts.
Operating Instructions REPEX EDGER uk.1.4.doc/2007-07-11
Page 3 sur 9
REPEX Floor
2. Introduction to the “Light Edgers”
First of all check that all the parts of the machine have been supplied.. P l e a s e , c o n t a c t y o u r
supplier if any parts of this machine are missing.
You should have :
!
!
!
!
!
1
1
1
1
1
instruction manual,
dust bag
Light Edger,
handle bag (with nut and bolt for attaching) ,
spanner (n° 13).
The “Light Edger”
When used correctly (follow necessary precautions) this machine is easy to use. It can be used
on various surfaces. For example, on stairs and under radiators.
The motor turns at 12.000 rpm, with its sanding disc driven by a belt.
This machine has an universal motor. As with other machines it should be used for no longer than 2030 minutes at each time, and you should let it rest for a few minutes between two operations. It is
strongly recommended to not use the machine for extended periods, and to use it in accordance with
the above precautions.
Charcteristics of this machine :
! Can be easily dismantled,
! Can be easily transported in the trunk of the car,
! Light-weight (7,2 kg),
! Comes with a disc with a diameter of 150 mm,
! Sound level A : 80 dB(A),
! Specifics of the chassis : Universal motor - 1,2 kW (1,6 CV), 230 V,
! Voltage 230 V – fuse 10A.
Operating Instructions REPEX EDGER uk.1.4.doc/2007-07-11
Page 4 sur 9
REPEX Floor
3. The machine and its components
Dust bag
Short nose
On/off switch
Sanding disc
Long nose (35 cm)
(Optional)
Sanding disc for this machine.
Center fix sanding with hole.
Sanding disc with « velcro »
Operating Instructions REPEX EDGER uk.1.4.doc/2007-07-11
Page 5 sur 9
REPEX Floor
4. Using the machine
4.1 – Assembling the dust bag
To fit the dust bag correctly, you must screw it onto the rod that sticks out of the back of the
machine. The bag should not be trailing along the ground.
Secure the bag to the rod with
the cord provided.
Safety warning :
(fig.1)
! Never use this machine without a dust bag. Sand dust can damage your
health if inhaled.
! This machine is only suitable for use on wooden surfaces.
! This machine must be checked regularly for faults or damage. If you have a
problem with your machine, please contact your supplier.
Operating Instructions REPEX EDGER uk.1.4.doc/2007-07-11
Page 6 sur 9
REPEX Floor
4.2 – Changing the abrasives
To change the sanding disc ( 1 5 0 m m ) , use the spanner (key N°13) provided to unscrew the
central disc (see fig 2). To change the Norgrip (Velcro) disc, simply pull it off – it is not
necessary to use the spanner.
(fig.2)
NOTE :
! Don’t forget to fit at least 2 sanding discs.
! Handle this machine with care. Do not drop it and make sure the disc is protected
during transportation.
4.3 – Positioning the long nose
The long nose is fitted to the main body of the machine by two 13mm screws. The short nose
reaches area up to 11cm. The long nose is used to reach covered or hidden areas like under
radiators.
Fig 3 shows where the screws to change the nose are. To fit the long nose correctly you must
place the belt around the pulley. The disc will then turn in the same way as the other disc.
Unscrew, losen the
tension of the belt
and remove the short
nose
Losen the tension of
the belt
Tighten the belt
Long nose (35cm)
(fig.3)
Operating Instructions REPEX EDGER uk.1.4.doc/2007-07-11
Page 7 sur 9
REPEX Floor
4.4 – Adjusting the wheels
The two wheels are easily removable for cleaning simply by unscrewing the gold (PAL) screw
above each wheel.
The PAL screw is also used to adjust the wheels.
Unscrew both parts
(fig.4)
! SAFETY WARNING :
o never make adjustments to the machine when the sanding disc is
flat on the ground in order to avoid damage to the machine.
o Sand dust can seriously damage your health if inhaled.
5. Starting the machine
Starting the machine is very simple. Pull the black safety lever up about 90° so it’s level with
the grey handle. The machine will never work unless you have the safety lever in line with the
handle.
Bring the safety lever
up so it is in line with
the handle
Safety lever
picture.
fig 5 -As you see the machine is on stop mode in this
! SAFETY WARNING :
Operating Instructions REPEX EDGER uk.1.4.doc/2007-07-11
Page 8 sur 9
REPEX Floor
This machine must be checked regularly for faults or damage. If you have a
problem with your machine, contact your supplier.
6. Service and maintenance
6.1 – Emptying the dust bag
The dust bag must be emptied when it is at a maximum of 1/3 full.
Open the dust bag gently without applying any pressure in order to avoid a dust cloud.
6.2 – Replacing the brushes
The brushes must be changed after between 600-800 hours of use. Unscrew the 3 screws
around the switch enclosure.
" Loosen 2 screws on the motor cover,
" Unscrew the nuts that fix the motor to the base,
" Lift the cover off and the two brushes are accessible,
" When you have refitted the brushes, gently blow away any excess dust on the
motor.
6.3 – Changing the belt
To replace the belt, you must first take off the long or short nose (depending which one is
attached) by unscrewing the 3 screws on top of the arm. The sanding disc will never be
detached.
While the machine is dismantled, you have easy access to the wheels should they need
oiling.
7. Maintenance queries
For any questions on how to use this machine, or if you don’t understand any of the
instructions, please contact us at REPEX.
phone : 33 (0)1.46.80.03.92
Adresse email : [email protected]
Operating Instructions REPEX EDGER uk.1.4.doc/2007-07-11
Page 9 sur 9