1
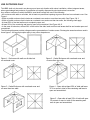
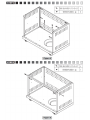
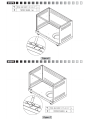
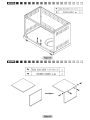
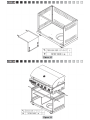
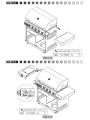
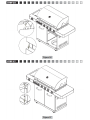
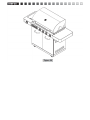
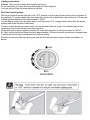
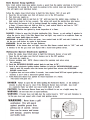
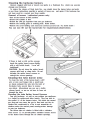
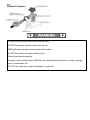
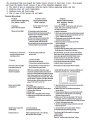
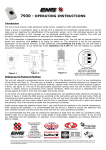
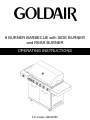
6 BURNER BARBECUE with SIDE BURNER and REAR BURNER OPERATING INSTRUCTIONS For model: GBQA550 Thank you for choosing a Goldair BBQ. This Goldair BBQ has been designed and manufactured to a high standard of engineering and with proper use and care, as described in this leaflet, will give you years of useful service. Please read these instructions carefully. READ ME FIRST Take extra care when unpacking and assembling your Goldair BBQ. Some edges may be sharp from the manufacturing process and may result in cuts if not assembled with care. Before attempting to assemble your Goldair BBQ, ensure all parts are correct and contained within the box as per the components list. Goldair suggests laying out all components on a large flat surface and removing any plastic or protective material before assembling your BBQ. If your BBQ has lockable castors ensure these are locked before attempting to assemble otherwise the BBQ may move during assembling resulting in injury. Do not dispose of packaging until completely satisfied with assembly of your BBQ CLEANING AND CARE OF YOUR BARBEQUE Ongoing Maintenance Your BBQ requires regular maintenance (interior and exterior) to ensure it remains in proper working order and to maintain its appearance. Exterior: Stainless Steel BBQ’s Overtime grease, fat and other cooking oils may build up on your BBQ. To clean, wash with warm/hot soapy water. Wash off soapy water with warm/hot clean water, leave to air dry. Apply a stainless steel BBQ protector to stainless steel surfaces. This will apply a protective coating on the exterior of the BBQ and assist in repelling the elements. Stainless steel will rust if you do not look after it properly From time to time spotting may occur on the exterior of your BBQ. This is normal and is due to moisture and/or other elements becoming trapped under the cover of your BBQ and building up (it is highly recommended that all BBQs are stored under an eve with a cover to protect against the harsh New Zealand elements – any BBQ not stored and covered correctly will not be covered under warranty). To ensure that spotting and discoloration does not become worse and more visible resulting in permanent damage to your BBQ, it should be cleaned and removed straight away. This is best done with a stainless steel cleaner/cutback solution, or if the spotting is larger and harder to remove, use a stainless steel/metal polish and then a cleaner/solution. Always use a soft cloth to clean your BBQ. Never use abrasive heavy duty sponges or scouring pads on the exterior of your BBQ, these products will begin to remove the stainless steel finish resulting in an uneven surface and faster rusting in the future. Powder Coated BBQ’s Overtime grease, fat and other cooking oils may build up on your BBQ. To clean, wash with warm/hot soapy water. Wash off soapy water with warm/hot clean water, leave to air dry. Once dry, use a BBQ exterior cleaner, this will apply a protective coating on the exterior of the BBQ and assist in repelling the elements. Always you use a soft cloth to clean your BBQ. Never use abrasive heavy duty sponges or scouring pads on the exterior of your BBQ, these products will begin to remove the powder coated finish resulting in an uneven surface and may result in rusting in the future. Interior: Plates and Grills –The best way to clean your BBQ plates/grills is to light-up the BBQ and leave it on with the hood down to warm-up for 10-15 minutes. After this time, remove excess fat, oils, cooking residue with paper towels or a cotton rag from plates/grills. This can also be completed after each time you use your BBQ. Depending on how often you use your BBQ you should also wash your plates/grills bi-monthly. After you have completed the steps above and have allowed time for the BBQ to cool, remove the plates/grills and wash with warm/hot soapy water. Wash off soapy water with warm/hot clean water, leave to air dry and place back into BBQ. Warming Rack, Flame Tamers and Drip Tray – Remove and wash with warm/hot soapy water. Wash off soapy water with warm/hot clean water, leave to air dry and place back into BBQ. For stubborn stains on your warming rack, soak in hot soapy water. Burners – Check the port holes of all burners regularly for signs of blockage. Over time fat, marinades, juices, etc. can build-up and cover port holes. This reduces gas and flame flow and may result in fires within the BBQ during cooking. Also check for spider and insect webs and/or nests. In some cases where BBQs have not been used in some time (normally during winter) these webs can be made within burners and gas lines restricting gas flow and ignition. NOTE: Never use chlorine based cleaners or bleaches on your BBQ, these products will deteriorate the surface and contribute to rusting BBQ Covers – All BBQs must be stored with a BBQ cover when not in use (regardless of whether the BBQ is stainless steel or powder coated) as per the warranty. After use, allow your BBQ to cool completely before fitting the cover (the BBQ cover may melt or burn if placed onto a hot BBQ). Also condensation can occur when the BBQ cools down under the cover which can foster rust growth. Please note, a cover can foster a “micro-environment” where moisture, salts and fat deposits can develop. when stored for long periods of time (typically this will occur during the Winter months when your BBQ is not used). During these longer periods of non-use a BBQ can develop stains and/or rust marks. It is important to check regularly (monthly) for any signs of these stains/rust and clean if needed. If surface stains and rust are left, over time they develop and can become very hard to remove. Spider and insect webs – Sometimes spiders and other insects climb into the tubes, gas lines and other areas of the BBQ. The insects can spin webs, build nests and lay eggs. The webs or nests can be very small, but they are very strong and can block the flow of gas. To avoid this occurring, clean burners prior to use, after storing, at the beginning of your BBQ season or after a period of one month without use. Guards are on the air intakes in an effort to reduce this problem, but it will not eliminate it. An obstruction can result in a “flashback” (a fire in the burner tubes). The burner may still light, but the obstruction does not allow full gas flow to the burners. Note: Complications arising from spider and insect webs built up inside gas lines are expressly excluded from warranty. USE OUTDOORS ONLY This BBQ shall only be used in an above ground open-air situation with natural ventilation, without stagnant areas, where gas leakage and products of combustion are rapidly dispersed by wind and natural convection. Any outdoor enclosure in which the BBQ is used shall comply with one of the following: • An enclosure with walls on all sides, but at least one permanent opening at ground level and no overhead cover. See Figure 1. • Within a partial enclosure that includes an overhead cover and no more than two walls. See Figure 2 & 3. • Within a partial enclosure that includes an overhead cover and more than two walls, the following shall apply: - At least 25% of the total wall area is completely open; and -At least 30% of the remaining wall area is open and unrestricted. See Figure 4 & 5. • In the case of balconies, at least 20% of the total of the side, back and front wall areas shall be and remain open and unrestricted. The following diagrams provide a diagrammatic representation of outdoor areas. Rectangular areas have been used in these figures - the same principles apply to any other shaped area Figure 1 - Enclosure with walls on all sides but no overhead cover Figure 3 - Partial Enclosure with overhead cover and no more than two walls Figure 2 - Partial Enclosure with overhead cover and no more than two walls Figure 4 - Open side at least 25% of total wall area. 30 % or more in total of the remaining wall area is open and unrestricted. Figure 5 - Open side at least 25% of total wall area. 30 percent or more in total of the remaining wall area is open and unrestricted 5. Mounting steps Make sure your grill is assembled properly. Detailed assembly instructions are packed with each grill giving specific assembly procedures for each model. Follow these instructions carefully to ensure the correct and safe assembly of the grill. Caution: Although we take every effort to ensure that the assembly process is as easy as possible, it is inherent with fabricated steel parts that corners and edged can cause cuts if improperly handled during assembly procedures. Be careful while handling any parts during assembly. It is strongly recommended that you protect hands with a pair of work gloves. 5. Mounting steps Make sure your grill is assembled properly. Detailed assembly instructions are packed with each grill giving specific assembly procedures for each model. Follow these instructions carefully to ensure the correct and safe assembly of the grill. Caution: Although we take every effort to ensure that the assembly process is as easy as possible, it is inherent with fabricated steel parts that corners and edged can cause cuts if improperly handled during assembly procedures. Be careful while handling any parts during assembly. It is strongly recommended that you protect hands with a pair of work gloves. Preparation You will need LPG gas bottle and proper regulators under the gas pressure to operate this gas grill. The regulators should be comply with EN12864 with current version and national regulation. Energy saving tips: a) Reduce the opening time of the lid. b) Turn the grill off as soon as cooking is completed. c) Preheat the gas grill for 10 to 15 minutes only. (Except for the first use) d) Do not preheat longer then recommended. e) Do not use a higher setting than required. Connect the hose and regulator to the gas container at the left side of the gas grill. Keeping in mind that the gas container must be kept away from heat and in a safe position. The hose dimension is 8mm-10mm diameter. Installation After purchasing your gas bottle you will then be ready to set it up with your gas grill. a) When changing the gas bottle which shall be carried out away from any source of ignition. Position the gas bottle can both underneath or at the side of your gas grill, keeping in mind that the bottle must be kept away from heat and in a safe position. b) When ready to use your gas grill insert the regulator into the gas bottle valve and tighten firmly. The Length of hose recommended which shall not exceed 1.5m. Warning: Before attempting to light your gas grill you must refer to your lighting instructions and warning safety points. Check the hose before each use, searching for cracking, cuts or any abrasions. If the hose is found to be faulty in any way do not attempt to use your gas grill. When changing your gas bottle ensures that there are no sources of ignition close by i.e. fires, cigarettes, naked flames etc. Make sure that the appliance is switched off. Ensure that the gas hose is not twisted which will affect the gas flow when using your gas grill. Also the hose must not have undue tension and must not touch any part of the gas grill which may be hot. Lighting instructions Caution: The lid must be open when lighting the burner! Do not stand with your face directly over the gas grill when lighting it. Your gas grill will have following method of ignition: Pilot Gas Control Ignition: With all gas controls on the Gas grill in the “OFF” position, turn the gas cylinder valve to the on position at the regulator. To create a spark you must push the control knob in and hold in this position for 3-5 seconds to allow gas flow and then turn anticlockwise to ”HIGH”. You will hear a “snap” from the igniter and you will also see a 3”-5” orange flame coming from the burner lighting tube at the left side of the burner. Continue to hold the burner control knob in for two seconds after the “snap”, this will allow gas to flow completely down the burner tube and insure ignition. When the burner is alight, adjacent burners will cross light when their controls are turned to “HIGH” At “High” setting the burner flame should be approximately 12-20mm long with a minimum of orange flame. Turn the gas control fully anticlockwise for minimum setting. Should you have any difficulty lighting your gas grill following the above steps, contact your dealer for advice. DO Use spanner to tighten all gas fittings Check all gas hose and line connections for damage, cuts or cracks each time you use the BBQ. Always leak test with soapy water Check main burners and rest of BBQ regularly for insect nets such as spiders, ants, etc. Nets are dangerous and need to be fully cleaned. These nets can block burner and gas lines restricting gas flow. Use the BBQ in ventilation areas Cool the BBQ before replacing the lid or cover Accessible parts maybe very hot. Always keep children away from the BBQ Have the gas cylinder filled by an authorized LPG supplier Always wear protective gloves when handling hot components Close the gas cylinder valve after each use. Clean the drip tray regularly. Keep the appliance away from combustible materials, gasoline, flames, liquids or vapors. “Burning off” the BBQ after every use (for approx 15 minutes) will keep excessive food residue to a minimum. DO NOT Lean over BBQ when lighting Leave cooking food unattended Store combustible material, gasoline or flammable liquids and/or vapors within vicinity of the BBQ Use BBQ with any cover on Use plastic or glass utensils on the BBQ Use the BBQ in strong winds Dismantle control valves Test for gas leaks with a naked flame Store spare gas cylinders in the cabinet Lay the gas cylinder down (always keep upright) Use BBQ indoors Modify the construction of the BBQ or the size of any burner, injector orifice or any other components. This will void your warranty. Move the BBQ during using Obstruct any ventilation of the BBQ Allow the flexible gas supply hose or any electrical cord to come in contact with any heated surface of the BBQ Use charcoal or any other solid fuel in this BBQ Disconnect any gas fittings while the BBQ is in use Use a rusty or dented gas cylinder with a damaged gas valve Fill the gas cylinder beyond 80% cap Lean heavily on the side shelves of your BBQ or attempt to transport your BBQ by lifting it from the side shelves. •Should the burners extinguish for any reason, turn off all control knobs and the cylinder gas valve. Wait 5 minutes before attempting to relight the appliance. •If a grease or fat fire occurs, turn off at control knobs and turn off the gas cylinder valve immediately until the fire is out. •A leak test must be carried out prior to using the BBQ for the first time and each time the gas cylinder is refilled, or each time the gas hose and gas regulator have been disconnected from the gas cylinder or appliance. RETAIN THIS MANUAL FOR FUTURE REFERENCE GENERAL OPERATION INSTRUCTIONS: Close the valve on the gas cylinder or the regulator after use. The use of this appliance in enclosed areas can be dangerous and is PROHIBITED. •Ignition: Battery operated multi spark ignition unit to both burners •Open the hood before attempting to light the grill •Open the side burner lid before attempting to light the side burner •Saucepans between 15cm and 22cm must only be used on the side burner. •Saucepans must have flat bottoms. Note: The vestige on the lid is the oil for protecting stainless steel ,you can use dry wiper to clean it. IMPORTANT Read the following instructions carefully and be sure your barbecue is properly installed, assembled and cared for. Failure to follow these instructions may result in serious bodily injury and/or property damage. If you have any questions concerning assembly or operation, consult your dealer or LPG Gas Company. When used always place the appliance and cylinder on flat level ground. Your barbecue can only be used with gas cylinders maximum 9kg CONNECTING THE GAS CYLINDER TO THE APPLIANCE The cylinder must be placed at the rear of the left hand side of the barbeque not under the side burner. The cylinder must not be placed in the cabinet of the appliance. The hose should be secured to the regulator and the appliance with hose clips. This BBQ is not intended for use on recreational vehicles or a marine environment. CLEARANCE TO COMBUSTIBLES Always maintain 915mm minimum clearance to combustible materials at the rear and sides of the BBQ. Do not use this BBQ under overhead combustible surfaces. * FOR LPG ONLY * IF A REPLACEMENT IS NECESSARY, PLEASE CONTACT EITHER OUR CUSTOMER SERVICE LINE OR THE RETAILER YOU PURCHASED IT FROM. * THE USE OF UNAUTHORISED PARTS WILL VOID YOUR WARRANTY AND CAN CREATE AN UNSAFE ENVIRONMENT AND CONDITIONS OF USE * FOR OUTDOOR USE ONLY * READ THIS MANUAL CAREFULLY BEFORE ASSEMBLY AND USE * ACCESSIBLE PARTS MAY BE VERY HOT. PLEASE KEEP YOUNG CHILDREN AND PETS AWAY. * PLEASE REMOVE ALL CARDBOARD, POLYSTYRENE AND OTHER MATERIALS BEFORE ASSEMBLY AND USE. GAS CYLINDER INFORMATION • This BBQ is designed to be used with a gas cylinder not exceeding 9KG • The gas cylinder supply valve must be turned off when the BBQ is not in use. • Gas cylinders must be stored outdoors, out of reach of children and must not be stored in a building, garage or any other enclosed area. • The gas cylinder used must incorporate a safety collar to protect the valve assembly. • Never store a spare cylinder under the BBQ shelves or inside the trolley housing. Any LPG cylinder not attached to the BBQ for use should be stored outdoors and well away from the BBQ. IMPORTANT: • When disconnecting and removing the gas cylinder for the purpose of refilling, always follow these procedures. • Ensure that all gas control valves on the BBQ and the gas cylinder are turned off before disconnecting the regulator from the cylinder. • Do not smoke or use a naked flame near the BBQ or gas cylinder while disconnecting the gas line between the BBQ and gas cylinder. • Remove the gas cylinder from the enclosure before disconnecting the regulator from the BBQ. • Tighten all connections before placing the gas cylinder back in its enclosure. • The gas leak testing procedure should be conducted every time the gas cylinder is refilled and reconnected to the appliance before using the appliance. REGULATOR CONNECTION 1. Check that all control knobs are in the ‘Off’ position. 2. Make sure the cylinder valve is off. 3. Remove the protective cap from the cylinder, if present. 4. Leak test the connection with a soapy water solution. (See Gas Leak Testing Procedure) GAS LEAK TEST PROCEDURE Never use a naked flame to check for gas leaks. Always use the following procedure to check for gas leaks. 1. In a small container, mix up a solution of water and detergent/soap. Mix the solution well. 2. Make sure that the gas supply valve on the gas cylinder is turned on. 3. Make sure that the gas control valves on the BBQ are all turned off. 4. Using a brush or spray bottle apply the solution to the gas line and each join in the gas line. 5. Bubbling of the solution will indicate that there is a leak present. 6. Re-tighten or re-seal any joints that are leaking. 7. If a leak persists then contact Goldair or a Gas Service Agent. For safe use of your grill and to avoid serious injury: DO NOT let children operate or play near the grill. KEEP grill area clear and free from materials that burn. DO NOT block holes in bottom or back of grill. Check burner flames regularly. Use grill in well-ventilated space. NEVER use in enclosed spaces such as a carport, garage, porch, covered patio, etc. DO NOT use charcoal or ceramic briquettes in a gas grill. SERVICING & SPARE PARTS Your gas BBQ should be serviced annually by a certified gas service agent BBQ COVER Please note that the Goldair BBQ Cover “if supplied” is not covered under your warranty. NATURAL HAZARD SPIDERS Spider and insect webs – Sometimes spiders and other insects climb into the tubes, gas lines and other areas of the BBQ. The insects can spin webs, build nests and lay eggs. The webs or nests can be very small, but they are very strong and can block the flow of gas. To avoid this occurring, clean burners prior to use, after storing, at the beginning of your BBQ season or after a period of one month without use. Guards are on the air intakes in an effort to reduce this problem, but it will not eliminate it. An obstruction can result in a “flashback” (a fire in the burner tubes). The burner may still light, but the obstruction does not allow full gas flow to the burners. Please note issues with spider and insect web build ups inside gas lines are expressly excluded from warranty. SUPPORT AND TECHNICAL ADVICE North Shore City, Auckland, New Zealand Monday – Friday 8am-5pm Phone: 0800 232 633 Website: www.goldair.co.nz IMPORTANT: PLEASE RETAIN THIS WARRANTY CARD NAME: ADDRESS: PURCHASED FROM: DATE OF PURCHASE: NAME OF PRODUCT: MODEL No: ONE YEAR WARRANTY Your Goldair product has been inspected, tested and is guaranteed subject to the following for a period to one year from the date of purchase against defects in workmanship and materials. During this period, such defects will be rectified by repair or replacement of the product purchased. Your warranty becomes invalid if in our opinion the product has been misused, incorrectly assembled, tampered with, connected to a gas supply not corresponding with the name plate specification, stored outdoors without the use of a BBQ cover and exposed to the elements or not regularly maintained as per the “Cleaning and Care and Maintenance” notes at the beginning of this user manual. The warranty does not include any labour or other associated expense that may be involved in removal or installation of the product. Normal wear & tear and any issues involving spider/insect web build ups inside gas lines are expressly excluded. If your Goldair product fails to operate satisfactorily, please contact Goldair via phone in the first instance. To obtain a repair or replacement product under this warranty, you will need to produce satisfactory evidence of date of purchase. The completed warranty and purchase receipt must be presented with the product. The warranty should be filled out at the time of purchase. It is in your interest to make sure this is done. Please note, BBQ covers (if included) are not covered under the warranty. If the product is to be replaced (cannot be repaired) then that replacement will be of the same or similar product or accessory excluding packaging, instruction card etc. Where a replacement product is supplied, this shall be guaranteed for the balance of the original warranty period. Any model that is no longer available will be replaced by a model of a value and with such features as we consider appropriate in the circumstances. Goldair Ltd is not responsible for freight forwarding charges, losses or damage in transit. If service is required after the warranty period has expired, the product should be inspected by a qualified gas service technician. Service outside of the warranty period will be at your cost. Consumers Guarantee Act (1993). In accordance with the above act, consumers are advised that: The manufacturer does not undertake that repair facilities and parts are necessarily available for this product. If any of the provisions of the foregoing are contrary to any relevant legislation, then that provision shall be deemed to be excluded from the warranty and the rest of the provisions will continue to apply.