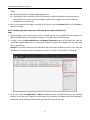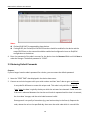
1
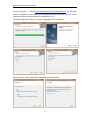
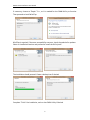
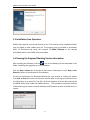
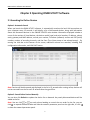
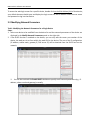
UTILITY Software For use with all Series Recorders and IP Cameras User Manual OMNI UTILITY Software User Manual Thank you for purchasing our products. If there is any question or request, please do not hesitate to contact your dealer. KT&C Certified Dealers can contact KT&C directly. This manual is applicable to the OMNI UTILITY software and its use with OMNI Series recorders and IP cameras. While KT&C makes every effort to insure the completeness and accuracy of the information contained in this Guide, we are not responsible for typographical errors or misprints. At the same time, KT&C reserves the right to make changes to improve the performance of our products at any time without notice, and so the specifications and content of this document are subject to change without notice. Every effort will be made to include corrections and updates in new versions of this manual and/or online. 1 OMNI UTILITY Software User Manual Contents CHAPTER 1 INTRODUCTION ..................................................................................................................... 3 1.1 OVERVIEW ................................................................................................................................................3 1.2 SYSTEM REQUIREMENTS ..............................................................................................................................3 1.3 CONVENTIONS ...........................................................................................................................................3 1.4 INSTALLATION AS A WINDOWS PROGRAM ........................................................................................................3 1.5 INSTALLATION FREE OPERATION .....................................................................................................................6 1.6 RUNNING THE PROGRAM/CHECKING VERSION INFORMATION .............................................................................6 CHAPTER 2 OPERATING OMNI UTILITY SOFTWARE .................................................................................. 7 2.1 SEARCHING FOR ONLINE DEVICES ..................................................................................................................7 2.2 MODIFYING NETWORK PARAMETERS ..............................................................................................................8 2.3 RESTORING DEFAULT PASSWORDS ................................................................................................................10 2 OMNI UTILITY Software User Manual Chapter 1 Introduction 1.1 Overview OMNI Utility software is a user-friendly tool for the discovery and configuration of OMNI recorders and IP cameras connected to the local area network [LAN] segments accessible from the PC on which the program is running. The program may be installed to run as one of the programs in the Windows menu/shortcut system. It can also run ‘installation free’ from any media (e.g. USB drive or CD/DVD) containing the executable files and libraries. When launched, the OMNI Utility automatically searches for and displays information about all accessible OMNI devices. You can also modify the basic network configuration of those devices using this software. 1.2 System Requirements Operating System: Microsoft Windows 8 / Windows 8.1 / Windows 7 / Windows 2008 32 / 64-bit, Windows XP / Windows 2003 32-bit CPU: Intel Pentium IV @ 3.0 GHz or above RAM: 1G or above Video Card: RADEON X700 Series Display: 1024*768 resolution or above 1.3 Conventions In order to simplify the manual, we refer to the “OMNI UTILITY software” as “the software” in the following sections. 1.4 Installation as a Windows Program Click on the “Setup” icon. During setup, it is necessary to install/update the Microsoft C++ Redistibutable files as well as the WinPCap program in order for the OMNI 3 OMNI UTILITY Software User Manual Utility to function. Check http://www.winpcap.org/install/default.htm for the latest version of WinPCap if you experience compatibility issues with your O/S. As of this printing, the latest version availabel for download is 4.1.3. Follow the steps (click “Next”) to choose a language for the installation, Select both the vcredist_x86 patch and WinPCap and click “Next”. 4 OMNI UTILITY Software User Manual If necessary, choose to “Repair” C++, as it is needed for the OMNI Utility to function. Then proceed to install WinPCap. WinPCap is required; if there are compatibility concerns, check the website for updates. Select an installation location and proceed to install the Utility itself. The installation should proceed. Create a desktop icon if desired. Complete “Finish” the installation, and run the OMNI Utility if desired. 5 OMNI UTILITY Software User Manual 1.5 Installation Free Operation OMNI Utility requires no external libraries to run. The contents of the installation folder may be copied to other folders and run. The program may be installed to removable disks. Or, download and unzip the contents of OMNI Utility.zip to the desired drive/folder and run the OMNI Utility executable. 1.6 Running the Program/Checking Version Information After installing the software, click the icon on the desktop (or the executable in the folder containing the program) to run the software. Click the Help > About tab at the top to view version information or click Help > User Manual to access a User Manual for the software. To save the information for discovered devices for your records or further use, please click Save as Excel and enter the file name and file path in the pop-up window to save the information as an excel file. The file is an Excel snapshot of all the data captured by the OMNI Utility, both visible and hidden columns. This provides a convenient method of documenting the names, network addresses and firmware versions for all devices in a system. 6 OMNI UTILITY Software User Manual Chapter 2 Operating OMNI UTILITY Software 2.1 Searching for Online Devices Option 1: Automatic Search When you launch the OMNI UTILITY software, it automatically searches the local LAN connections on your computer every 15 seconds. It will display a list of discovered devices, along with information about the discovered devices in the ONLINE DEVICES main window. Information displayed includes a count of the number of listed devices; the device model (type) and serial number; IP address, subnet mask, gateway and MAC address; control port number; Firmware (software) version and DSP (build) number; number of encoding channels; and the Start Time (time stamp at last reboot/startup). By moving the slide bar at the bottom of the screen, additional columns are revealed, including IPv6 configuration information, and IPv4 DHCP status. Note: Devices will be discovered and displayed in the list in 15 seconds after coming online; devices will not be removed from the list until 45 seconds after they go offline. Option 2: Search Online Devices Manually You can also click Refresh to update the device list on demand. Any newly discovered devices will be added to the list. Note: You can click or on each column heading to control the sort order for the list; you can click to expand the device table and hide the network parameter panel on the right side, or click to show the network parameter panel. 7 OMNI UTILITY Software User Manual To access the web login screen for a specific device, double-click on the IPv4 Address field of that device; your default browser should open and display the login screen for that IP address. Enter the user name and password to log into that device. 2.2 Modifying Network Parameters Task 1: Modifying the Network Parameters for a Single Device Steps: 1. Select one device to be modified from the device list and the network parameters of the device are displayed in the Modify Network Parameters panel on the right side. 2. If the DHCP function is enabled on the device, you can only edit the server port number of the device; the web port is set from within the web GUI for the device. The rest of the IP configuration (IP address, subnet mask, gateway IP, DNS server IP) will be obtained from the DHCP host on the network. 3. You can also uncheck the Enable DHCP checkbox to specify static network parameters (e.g., IP address, subnet mask and gateway) manually. 8 OMNI UTILITY Software User Manual Notes: IPv4 and IPv6 DHCP is supported by these devices. If using DHCP, the IPv4 and/or IPv6 DHCP functions should be enabled in the device and the router/DHCP host on the network should be enabled and configured to issue an IPv4/IPv6 configuration to the devices. 4. Enter the password of the admin account for the device into the Password field and click Save to make the changes. Task 2: Modifying Network Parameters of Multiple Devices (Batch Modification) Steps: 1. Click and drag or use control+click to select multiple devices to be modified from the device list. When multiple devices are selected the options in the right-side panel will change. 2. In what is now the Batch Modification of Network Parameters panel on the right side, edit the modifiable network parameters, e.g. starting IP address and server port. Web port is set in the web GUI for each device. Example: If you select 3 devices for modification and set the start IP address as 10.16.1.21, then the IP addresses of the devices will be assigned as 10.16.1.21, 10.16.1.22 and 10.16.1.23 in order. 3. Or you can check the Enable DHCP in Batch checkbox to enable the DHCP function for the selected devices. In this way, the IP Address, Subnet Mask, IPv4 Gateway, IPv6 Address and IPv6 Gateway of the devices can be obtained automatically from the DHCP host on the LAN. 9 OMNI UTILITY Software User Manual Notes: IPv4 and IPv6 DHCP is supported by these devices. If using DHCP, the IPv4 and/or IPv6 DHCP functions should be enabled in the device and the router/DHCP host on the network should be enabled and configured to issue an IPv4/IPv6 configuration to the devices. 4. Enter the password of the admin account for the device into the Password field and click Save to make the changes. The default password is “12345”. 2.3 Restoring Default Passwords Purpose: If you no longer have the admin password for a device, you can restore the default password. 1. Note the “START TIME” date displayed in the device data screen. 2. Contact our technical support with your serial number and that “start” date to get a serial code. It may take 24~48 hours to create this unique code. This code is only valid for the specific “start” date; the date is typically the day on which the unit was last rebooted. Please note that if the unit is rebooted between the time the serial code is requested and the time it is entered, the ‘start date’ changes, and the serial code becomes invalid. One approach is to specify a future date (e.g. two business days in the future). Request the code; reboot the unit on the specified day, then enter the serial code which is now valid for 10 OMNI UTILITY Software User Manual that reboot date. 3. Once you have the serial code, in the OMNI Utility, highlight the specific device to be reset, and enter the code in the Security Code field of the Password Recovery area and click OK to restore the default password. Note: The default password is 12345; for security reasons it is highly recommended that you immediately log into that device and change the default password. 11