1
Identification
TagPrint Pro 3.0
Label Creation Software
User’s Manual
TagPrintPRO 3.0
User’s Manual
Contents
Software License Agreement......................................................................................................................... 3
What’s New in TagPrint Pro 3.0...................................................................................................................... 5
TagPrint Pro 3.0 FAQs..................................................................................................................................... 6
Overview and Layout of TagPrint Pro 3.0..................................................................................................... 7
Controlling Views in TagPrint Pro 3.0............................................................................................................ 8
Right Mouse-click Commands for Selected Objects................................................................................... 11
Chapter A
Installing the software
1. System Requirements.................................................................................................................. 13
2. Single-user Install......................................................................................................................... 14
3. Network User Install.................................................................................................................... 17
Chapter B - File System
1. File Menu...................................................................................................................................... 24
2. Options......................................................................................................................................... 32
Chapter C - Ribbon features
1. Home Ribbon............................................................................................................................... 38
2. Table Ribbon ............................................................................................................................... 71
3. Print Ribbon................................................................................................................................. 83
4. Label Ribbon................................................................................................................................ 85
5. Utility Ribbon............................................................................................................................... 88
6. Message Bar................................................................................................................................. 93
7. Label Template In-line Parameters............................................................................................. 95
Chapter D - Creating Labels
1. Constant Text............................................................................................................................... 97
2. Variable Text.............................................................................................................................. 108
Chapter E - Advanced Label design
1. Date Codes................................................................................................................................. 117
2. UID Barcode............................................................................................................................... 119
3. Staggered Data and Backgrounds............................................................................................ 125
4. Multiple Designs........................................................................................................................ 130
Chapter F - Advanced Functions
1. Opening Excel Files.................................................................................................................... 134
2. Importing Data and Text........................................................................................................... 135
3. Continuous Materials ............................................................................................................... 142.
4. Print Groups and Print Later..................................................................................................... 145
5. Custom Label Template............................................................................................................. 150
6. Duplex for Double-sided Printers............................................................................................. 156
7. M-Boss........................................................................................................................................ 159
8. Advanced Functions - Macros................................................................................................... 161
Chapter G - Troubleshooting
2
www.Hellermann.Tyton.com | 800.537.1512
User’s Manual
TagPrintPRO 3.0
Software License Agreement
HellermannTyton TagPrint Pro 3.0 Software Package
End-User License Agreement (“EULA”)
TagPrint Pro 3.0 for Windows software (the “Software”)
is protected by copyright and other intellectual property
laws and treaties. HellermannTyton owns all rights, title,
and interest in the Software including copyright and
other intellectual property rights.
Grant of License
HellermannTyton grants to you a limited non-exclusive
license to use the Software in accordance with the
terms and conditions of this EULA. You have no right
to receive any updates, changes, or improvements that
HellermannTyton may make to the Software.
Storage/Network Use
You may install the Software on a storage device, such
as a network server, and use it to install or run the
Software on a workstation or other individual computers
located within the confines of a registered single, physical
building/location.
Technical Support
HellermannTyton may, in its sole discretion, provide
telephone or e-mail technical support to a maximum of
one (1) designated user for each registered/licensed copy
of the Software.
Transfer
Except as expressly authorized herein, you may not copy,
rent, lease, distribute, modify, or otherwise share the
Software. Any unauthorized copying, distribution, or
modification of the Software or sublicense or transfer of
any copy or adaptation of the Software to any other party
in any way not expressly authorized under this EULA will
result in, among other things, the immediate termination
of the license granted herein.
External
The license to the Software may be transferred one time
to another end user. Any such transfer must include
all component parts, media, printed materials, and this
end user License Agreement . Before such a transfer,
all copies of the Software must then be deleted from
any and all work stations and/or network servers at the
original registered single physical building/location.
Limitation on Reverse Engineering, Decompilation,
Disassembly, etc.
Any attempt to view the source code of the Software,
or any of its components, is strictly prohibited and you
agree not to undertake any such attempt. You are
not authorized to and agree not to reverse engineer
or attempt to derive the underlying information,
composition, structure or ideas of the Software or any
of its components. You may not use your knowledge of
the Software and its components to undertake yourself,
or to assist others in, efforts to imitate the features,
functionality or design of the Software or any of its
components.
Entire Agreement
This EULA is the entire agreement between you and
HellermannTyton relating to the Software.
Term
This EULA may be terminated immediately by
HellermannTyton if you breach any of the terms or
conditions. Upon termination or expiration, all rights
granted to you hereunder shall automatically terminate
and you agree to return to HellermannTyton or destroy all
copies of the Software.
Internal
You may not move or copy the Software to a workstation
or computer outside of the confines of the registered
single, physical building/location.
www.Hellermann.Tyton.com | 800.537.1512
3
TagPrintPRO 3.0
User’s Manual
Software License Agreement
HellermannTyton TagPrint Pro 3.0 Software Package
End-User License Agreement (“EULA”)
Indemnification
You agree to indemnify and hold harmless
HellermannTyton, its affiliates and their respective officers,
directors, employees and agents from and against any
and all claims, actions, liabilities, damages, costs and
expenses (including attorneys’ and accountants’ fees)
relating to, arising out of, or resulting from (i) any breach
or nonperformance by you of any of your covenants or
agreements set forth herein, (ii) any act, omission, conduct,
or misconduct by you or any parties to which you distribute
copies of the Software, and/or (iii) any third party claims
relating to your use of the Software.
Limitation of Liabilities
YOU ASSUME RESPONSIBILITY FOR, AMONG OTHER
THINGS: (i) THE SELECTION AND USE OF THE SOFTWARE;
(ii) THE ACQUISITION OF OTHER SOFTWARE (INCLUDING
ANY PROGRAMMING OR OPERATING SYSTEM SOFTWARE)
AND/OR EQUIPMENT COMPATIBLE WITH THE SOFTWARE;
AND (iii) THE INSTALLATION AND USE OF THE SOFTWARE
BY YOU AND ANY PERMITTED TRANSFEREES. YOU
AGREE THAT HELLERMANNTYTON SHALL NOT BE LIABLE
TO YOU OR TO ANY TRANSFEREES FOR: (A) ANY LOSS
OF USE OF COMPUTERS OR LOSS OR CORRUPTION OF
DATA OR THE COSTS OF SYSTEM OR DATA RECOVERY;
(B) ANY PERSONAL INJURY RESULTING FROM ERRORS
IN THE SOFTWARE OR CONTENT INCLUDING BUT NOT
LIMITED TO ERRORS IN INSTRUCTIONS OR SOLUTIONS;
(C) ANY THIRD PARTY CLAIMS; (D) ANY INDIRECT,
SPECIAL, PUNITIVE, EXEMPLARY, INCIDENTAL OR
CONSEQUENTIAL DAMAGES OR LOST PROFITS, WHETHER
BASED ON CONTRACT, NEGLIGENCE, STRICT LIABILITY
OR OTHERWISE, EVEN IF HELLERMANNTYTON HAS BEEN
ADVISED OF SUCH DAMAGES. Some states and countries
may not allow the limitation or exclusion of liability
for incidental or consequential damages, so the above
limitation or exclusion may not apply to you.
4
Disclaimer of Warranties
THE SOFTWARE IS PROVIDED “AS IS” WITHOUT
WARRANTY OF ANY KIND. TO THE MAXIMUM EXTENT
PERMITTED BY LAW, ANY AND ALL WARRANTIES
OF ANY KIND WHATSOEVER, INCLUDING IMPLIED
OR STATUTORY WARRANTIES, INCLUDING BUT NOT
LIMITED TO THOSE OF MERCHANTABILITY, FITNESS FOR
A PARTICULAR PURPOSE, NONINFRINGEMENT, TITLE,
ACCURACY OR COMPLETENESS OF RESPONSES, RESULTS,
REASONABLE CARE OR WORKMANLIKE EFFORT, LACK
OF NEGLIGENCE, AND/OR A LACK OF VIRUSES, ARE
EXPRESSLY EXCLUDED. HELLERMANNTYTON MAKES
NO WARRANTY, GUARANTY OR ANY REPRESENTATION
REGARDING THE USE, OR THE RESULTS OF THE USE, OF
THE SOFTWARE. HELLERMANNTYTON SHALL NOT BE
RESPONSIBLE OR LIABLE TO YOU OR ANY TRANSFEREES
WITH RESPECT TO ANY SUBJECT MATTER OF THIS
AGREEMENT INCLUDING YOUR USE OR ACCESS TO THE
SOFTWARE UNDER ANY CONTRACT, NEGLIGENCE, STRICT
LIABILITY OR OTHER THEORY FOR (A) LOSS OF DATA
OR COST OF PROCUREMENT OF SUBSTITUTE SERVICES
OR TECHNOLOGY; (B) FOR ANY INDIRECT, INCIDENTAL
OR CONSEQUENTIAL DAMAGES INCLUDING, BUT NOT
LIMITED TO, LOSS OF PROFITS OR INTERRUPTION OF
BUSINESS; OR (C) ANY MATTER BEYOND ITS CONTROL,
EVEN IF HELLERMANNTYTON HAS BEEN ADVISED OF
THE POSSIBILITY OF SUCH DAMAGES. Some states and
countries may not allow the exclusion of implied warranties
or limitations, so the above limitation and exclusion may
not apply to you.
Governing Law/Jurisdiction/Survival
This EULA shall be governed by the laws of the State
of Wisconsin and you hereby consent to the exclusive
jurisdiction and venue in the state and federal courts
governing Milwaukee County, Wisconsin, for the resolution
of any dispute between you and HellermannTyton
regarding this EULA or your use of or access to the
Software. The provisions of this EULA concerning
indemnities, liabilities, warranties, and proprietary rights
shall remain in effect after the expiration or termination.
www.Hellermann.Tyton.com | 800.537.1512
User’s Manual
TagPrintPRO 3.0
What’s new in TagPrint Pro 3.0?
If you are upgrading from TagPrint Pro 2.0, here is a guide to “What’s New” in TagPrint Pro 3.0.
Operates On Existing And New Windows Operating Systems
Opens And Recognizes TagPrint Pro 2.0 Template And Database Files
Task Based Vs. Button Based
The Screen View Can Be Customized By The End User
Barcodes Now Automatically Fit Inside The Label Box
Can Have Multiple Templates And Multiple Data Tables Open At The Same Time
Optionally Will Allow The User To Preview A Page Or Set of Labels
Allows Both A “Quick Preview” And “Normal Preview” Of A Label Or Set Of Labels
Automatic Spell Check
Networking Capabilities
Expanded Import Capabilities
Stores Heat And Speed Settings In The Template When Saved
Allows Label Editing In Landscape Or Portrait Mode
Automatically Searches For Program Updates Online
Shows Print Direction On The Screen
A Column In The Data Table Can Be Change To A “Templates” Column
Text Will Now Wrap Instead Of Just Disappearing Off The Cell Once The Limit Of The Visible
Characters Is Reached
Can Copy Rows To Columns Or Columns To Rows
Formulas Can Now Be Used In The Cells Of The Data Table
Allows Complete Date Customization
Free Hand Rotation Of Text/Image And Barcode Boxes
Allows The User To Adjust The Opacity Of The Text
Has A “Path” Option For Adding Lines To A Label
Allows The User To Create “Pin” Saved Templates And Tables
Allows The User To Change The Opacity Of The Graphic Image
Will Support Vectored Wmf (Metafiles)
Does Not Print Blank Cells
www.Hellermann.Tyton.com | 800.537.1512
5
TagPrintPRO 3.0
User’s Manual
What’s new in TagPrint Pro 3.0 - FAQ
Q: Can I open and save my current TagPrint Pro 2.0 Templates in TagPrint Pro 3.0?
A: Yes, TagPrint Pro 3.0 is fully backward compatible with version 2.0 files.
Q: Can I transfer my current labels database from TagPrint Pro 2.0 to TagPrint Pro 3.0?
A: Yes, TagPrint Pro has a built-in utility to transfer a label database and any custom label formats that may
have been created for specific applications.
Q: Can I run both TagPrint Pro 2.0 and TagPrint Pro 3.0 at the same time?
A: Yes – Neither program interferes with the other.
Q: I already own TagPrint Pro 2.0. How can I upgrade to TagPrint Pro 3.0?
A: If you are a registered user, just provide the serial number and purchase a single-user version of
TagPrint Pro 3.0 at a reduced cost. Use part number 556-00042.
Q: I own TagPrint Pro 2.0 and want to upgrade to a Network version of TagPrint Pro 3.0.
A: These are two different programs. The original program was sold as a single-user license. The new
program includes Network versions. A Network version cannot be upgraded from a single-user version. The
Network version has to be purchased as a new program and cannot be upgraded from TagPrint Pro 2.0. If the user wants to upgrade to the single-user license version of TagPrint Pro 3.0, that can be done at a
reduced price if the original serial number is presented and verified. Q: Will TagPrint Pro 3.0 still run on my XP System?
A: Yes, but it will be slower. The new program is designed to run on the enhanced operating systems of
Windows 7 and 8, but will work on XP. Again, the program will run slightly slower, but will still be very
operational and easy to use.
Q: Will my old printers (TT330SM or TT1210) work with TagPrint Pro 3.0?
A: Yes, but it may have to run them on a Windows XP system. The original printer drivers for these older
models were never built for Windows 7, so they will not run consistently or accurately. The other option is
to upgrade to a newer model like the TT230SM or TTM430. Older printers such as TT310SM, TT320SM or
TT210SM are not compatible. Q: Where do I go to register TagPrint Pro 3.0?
A: Go to http://hellermanntyton.us/warrantyregistration
Select the model number for the product, enter the date of purchase, type in the serial number, and click
“Add”. Repeat this process for up to 20 products you wish to register. When finished, fill out the remainder
of the registration form and click “Submit”.
6
www.Hellermann.Tyton.com | 800.537.1512
User’s Manual
TagPrintPRO 3.0
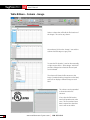
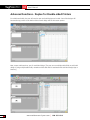
Overview and Layout of TagPrint Pro 3.0
Properties
Pane
Ribbon
Label Design
Data Table
Message Bar
TagPrint Pro 3.0 is a complete departure from version 2.0. The biggest change is the Ribbons. These allow
for easy access and location of functions within the program. Also, a new Properties Pane will allow users to
quickly change attributes of the information being displayed on the label.
Users can now have multiple labels and tables open at the same time. Print features have been enhanced to
allow printing from different templates at once, and new networking functions allow multiple users to create
and print labels.
www.Hellermann.Tyton.com | 800.537.1512
7
TagPrintPRO 3.0
User’s Manual
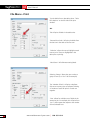
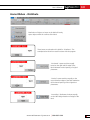
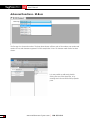
Controlling Views in TagPrint Pro 3.0
A user can have multiple label designs and tables open at the same time. Normally, only one can be open at
a time, but TagPrint Pro 3.0 allows the user to set up a customized screen view.
By clicking on a design or table tab, holding down the mouse button, and moving to the center of the area,
a new option guide will appear. This allows the user to select where to place the selected item on the screen.
A blue background will show how the placed object will appear. Releasing the mouse button will create the
new view.
8
www.Hellermann.Tyton.com | 800.537.1512
User’s Manual
TagPrintPRO 3.0
Controlling Views in TagPrint Pro 3.0
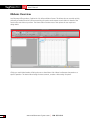
By selecting the tab (design or table) and moving to the center, the user can select and place an object on
the right side, or split the view.
Or the user can right mouse-click on the tab, and select to create a new vertical group.
This is the result. Either option will work for grouping designs and tables for placement on the screen.
www.Hellermann.Tyton.com | 800.537.1512
9
TagPrintPRO 3.0
User’s Manual
Controlling Views in TagPrint Pro 3.0
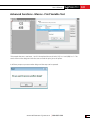
To flip between tabs, click on the tab, or click the drop down selector to select the tab.
A user can unpin the properties pane and minimize it. Once the mouse hovers over the tab on the side, the
properties pane will emerge. The user can then click on the pin to restore the pane.
10
www.Hellermann.Tyton.com | 800.537.1512
User’s Manual
TagPrintPRO 3.0
Right mouse-click commands for selected objects
Once on object is selected on the
label, there are some right mouseclick commands that can be used.
Cut the object
Copy the object (to clipboard)
Paste the object (from clipboard)
Delete the object
Layering functions
Bring to the front (blue box)
Send to the back (blue box)
If the upper left box is selected, for
example, a user can also:
Duplicate below
(creates copy object below)
Duplicate right
(creates copy object to the right)
www.Hellermann.Tyton.com | 800.537.1512
11
Chapter A
INSTALLING
User’s Manual
TagPrintPRO 3.0
Installing - System Requirements
TagPrint Pro Standalone / TagPrint Pro Client
Microsoft Windows XP SP3, Vista SP1 or later, Windows 7 and Windows 8
32 and 64 bit
.NET Framework 4
512 MB RAM (XP SP3)
1.0 GB RAM (Vista/Windows 7)
500 MB available hard disk space
TagPrint Pro Server
PC running Microsoft Windows 7 or 8, Windows Server 2008
.NET Framework 4
Microsoft SQL Server Express Edition 2008
1.0 GB RAM
500 MB available hard disk space
NOTE:
Microsoft Framework 4.0 is required before software installation. This is a free install
from Microsoft, and is normally included on any Windows Updates.
The user can run the Windows Updater, or visit Microsoft’s Download Center to install this program.
www.Hellermann.Tyton.com | 800.537.1512
13
TagPrintPRO 3.0
User’s Manual
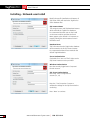
Installing - Single-user Install
Install .NET 4 FRAMEWORK first.
To install a single-user version, insert the CDROM into the computer.
The first screen that will appear is the license
agreement. Click on the check box to accept
and then click on “Install” to continue to
default directory and settings.
To change the install settings, click on
“Advanced”.
The first screen in the Advanced section
will allow the user to customize the install
directory. The user can choose to install the
program anywhere on the computer.
Click “Next”.
The next step is to select what options are to
be installed. If no options are included, the
default will be a full install.
Click on “Install” to proceed.
14
www.Hellermann.Tyton.com | 800.537.1512
User’s Manual
TagPrintPRO 3.0
Installing - Single-user Install
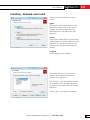
A status bar will show that the software is
installing. This can take a couple of minutes.
Click “Next”.
The software has been installed.
Click “Finish”.
www.Hellermann.Tyton.com | 800.537.1512
15
TagPrintPRO 3.0
User’s Manual
Installing - Single-user Install
Launch the program via the Start menu and/
or the HellermannTyton folder TagPrint Pro 3.0
also can be launched from a Desktop icon or
shortcut.
At the start of the program, the user will
see some information about registering the
program.
The software must be registered to qualify for
free technical support.
If the software is not registered, a message
will appear on the main screen that states
that the program will lose functionality if left
unregistered.
Enter the serial number, and click on “Test”.
Click “Test” to verify the serial key. Once the
green arrow appears, click “OK” to complete.
TagPrint Pro 3.0 software is ready to use.
16
www.Hellermann.Tyton.com | 800.537.1512
User’s Manual
TagPrintPRO 3.0
Installing - Network-user Install
Install .NET 4 FRAMEWORK first.
It is recommended that the user run the server
installation package on the computer which
will act as the TagPrint Pro Database server
in order to properly copy all database files,
optional application files, and sample data files.
The TagPrint Pro server installation will set up
a fully functional SQL Server database on the
server computer.
Pre-Installation Checklist
Prior to beginning the server installation
process, insure the following items are
accounted for:
1. Insure .NET Framework 4 (Full Framework)
is installed.
2. Insure SQL Server 2008 or higher is
installed. TagPrint Pro Server supports SQL
Server 2008 Express and higher.
3. Determine the folder location where the
SQL Server database files will be copied
default is the common documents folder
[C:\Users\Public\Documents].
4. Determine if you will be installing the client
application on the server along with the
database files.
To begin installation, launch the TagPrint.
Server.MSI file located on the installation media
or download location.
If the pre-requisites are not met, the following
installation error message will appear.
If all pre-requisites are satisfied, then the install
will proceed.
www.Hellermann.Tyton.com | 800.537.1512
17
TagPrintPRO 3.0
User’s Manual
Installing - Network-user Install
Identify the specific installation and instance of
SQL Server which will receive the TagPrint Pro
Server database files.
SQL Instance Name
The computer name and SQL database instance
which will hold the TagPrint Pro database.
It is recommend that the user run the install
on the server machine and that the Server
Name appear as the default. It is important to
properly identify the server Instance name in
this field as well.
Database Name
This is the name that the TagPrint Pro database
will be created as in this SQL Server instance.
It is recommended that the user maintain the
default TagPrintDatabase.
Server Authentication
Credentials for a user to ATTACH rights to the
SQL Server Instance must be provided.
Windows Authentication
Uses the currently logged user’s Computer/
Domain account.
SQL Server Authentication
Uses a SQL Server configured user
account (i.e., sa).
Press the “Test Connection” button to
validate the settings for the SQL Server before
continuing.
Press “Next” to continue.
18
www.Hellermann.Tyton.com | 800.537.1512
User’s Manual
TagPrintPRO 3.0
Installing - Network-user Install
Choose the type of installation you wish to
perform.
Typical
This only will install the database files to the
SQL Server and attach them as the named
database. This does not install any of the
sample data files or the TagPrint Pro client
application.
Custom
Choose which additional files to copy and also
decide whether to install the TagPrint Pro client
application. This option also allows the user
to select where the individual packages are
installed.
Complete
Installs everything in the package.
The typical install option only sets up the
database files and attaches the named
database to the SQL Server.
Click “Browse” to set the installation location
for the database files. Separate locations can
be chosen for the database files and the client
application.
Choose “Next” to complete the installation.
www.Hellermann.Tyton.com | 800.537.1512
19
TagPrintPRO 3.0
User’s Manual
Installing - Network-user Install
Select the default directory for the files.
This can be left as the default folder location.
Software will install.
Software is finished.
20
www.Hellermann.Tyton.com | 800.537.1512
User’s Manual
TagPrintPRO 3.0
Installing - Set up Network Users
Run the program from the server.
When the program is launched, it will ask for a
Serial Key for registration of the program.
If it is a network program, then once the
program key is entered, the user will need to
reboot the program. Once rebooted, the user
will now see a new icon in the Utility ribbon
named as: “Enter Network Settings”.
Click on this to enter the settings.
Change the connection type to Network User
Mode.
www.Hellermann.Tyton.com | 800.537.1512
21
TagPrintPRO 3.0
User’s Manual
Installing - Set up Network Users
Select the SQL server settings, which is either a
Single-user or Network User.
Enter the information for the SQL database.
Test the connection.
Each client machine will need to match the
settings of the SQL database location.
TagPrint Pro 3.0 can run concurrent sessions.
When each new user logs in for the first time,
they will have to enter a Network Serial Key to
activate the program.
TagPrint Pro 3.0 is sold in various network
packages. If a 5 Network package is sold then
up to five users can log into the server to have
common access to saved label designs and
templates.
If the maximum users attach level is reached,
an error message will appear. Only when a user
exists the program can a new user enter.
22
www.Hellermann.Tyton.com | 800.537.1512
Chapter B
FILE SYSTEM
TagPrintPRO 3.0
User’s Manual
File Menu - Introduction and Options
Under the File menu, there are options to
start a new label, open an existing label,
open a database table, save, save as, quick
preview, full preview, print, manage print jobs,
and close. Files can be pinned to the recent
documents board.
This also is where one can exit out of the
program.
Above the File menu is a drop down which is
used to minimize the ribbon for even greater
work space.
In the upper right corner of the software are
options to minimize the program, release the
program from full window view, and to close
out the program.
24
www.Hellermann.Tyton.com | 800.537.1512
User’s Manual
TagPrintPRO 3.0
File Menu - New
Selecting “File” and “New” will launch a
dialogue box to the right that has two options.
The first is to create a new label, and the
second is to create a new data table.
Selecting “File”- “New” will start the label
design wizard. This will be described in more
detail in the “Creating a New Label” section.
A user can have several labels and tables open
in the program at once. This allows flexibility to
have many jobs open and to print from those
jobs without having to close each label and
reopen.
Select “File” and “New” to create new label
designs.
Open multiple labels as needed.
NOTE:
At least one Label and Data Table must be
open in order to print serial numbers or
variable data labels.
Select “File” and “New” and the “M-Boss
Designer” to launch the M-Boss Designer
(further explained in the Advanced Functions
area of this manual).
www.Hellermann.Tyton.com | 800.537.1512
25
TagPrintPRO 3.0
User’s Manual
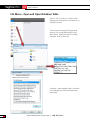
File Menu - Open and Open Database Table
Click on “File” and “Open” to launch a new
dialogue box that will point to a location for an
existing file to open.
The user also can change the file type when
opening. This includes label designs (.dsn3),
tables (.tab3), TagPrint Pro version 2.0 labels
and tables, Excel, and text files.
Clicking on “Open Database Table” will launch
a new dialogue box that will start the import
data wizard.
26
www.Hellermann.Tyton.com | 800.537.1512
User’s Manual
TagPrintPRO 3.0
File Menu - Print
To print labels, the user can use the “Print
Ribbon “or click “File” and then “Print”. To
send a print command to a printer, select the
“Print “ option.
This will bring the options for sending print
jobs.
Select the name of the printer.
If needed, select the properties button and
change/view the properties of the printer.
A status of the printer is displayed along with the
type and connection.
“Direct” is used when printing from a label
design or selecting number of labels or pages
to print. This will control the quantity of labels
sent to the printer.
A page is considered one row of labels. If a
label has five labels per row, then a single row
will print five labels.
Select “Labels” under “Direct” to print a
specific quantity of individual labels.
The option to “Print Later “ can be selected to
manage print job functions.
www.Hellermann.Tyton.com | 800.537.1512
27
TagPrintPRO 3.0
User’s Manual
File Menu - Print
To print labels from a data table, select “Table
Print Options” on the left side of the print
window.
ALL
This will print all labels in the table series.
“Reverse Print Order “will print the labels from
the last row in the table to the first row.
“Selection” allows the user to highlight certain
rows to print. These are highlighted in the
table prior to printing.
“Label Saver” will eliminate wasting labels.
Selecting “Range” allows the user to select a
group of rows (1 to 10 of 100 for example).
The “Number of Each” will print a duplicate
of that row as many time as indicated. Printing
a 5 number of each will print 5 of each row
together.
“Sets “allows for multiple runs of labels in the
same print job. For example, this will print from
1 to 10, then repeat that sequence the number
of times selected here.
28
www.Hellermann.Tyton.com | 800.537.1512
User’s Manual
TagPrintPRO 3.0
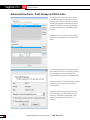
File Menu - Manage Print Jobs
The user can manage print jobs from the file
menu. This feature is outlined in the Advanced
Functions area of this manual, beginning on
page 116.
When selected, a “Manage Print Jobs” window
will appear.
Setting up and using this feature
is explained in detail in the
Advanced Functions area of this
manual, beginning on page 116.
www.Hellermann.Tyton.com | 800.537.1512
29
TagPrintPRO 3.0
User’s Manual
File Menu - Save and Save As
“Save” and “Save As” will save the label
design or data tables. When saving, it is
important to know that each section (label
design or data table) must be saved separately.
Selecting the header tab on each and going to
file “Save As” will allow the user to name the
file. This also will appear during the first save.
The “Save” function will just save work to that
name without the use of the dialogue box.
Change the file type when saving a label
design or data table.
30
www.Hellermann.Tyton.com | 800.537.1512
User’s Manual
TagPrintPRO 3.0
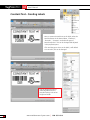
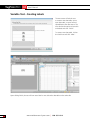
File Menu - Quick Preview and Full Preview
These functions allow a user to view the labels
before printing. Print directly from this dialogue
box and zoom the label for viewing. Change
the view to show multiple labels in the set.
“Quick Preview” will show one label at a time.
“Full Preview” (as shown here) will display
up to 10 labels in the set or a number to
preview set in the “File Options” area. See the
“Options” section (page 33) on setting default
label preview.
www.Hellermann.Tyton.com | 800.537.1512
31
TagPrintPRO 3.0
User’s Manual
File Menu - Options
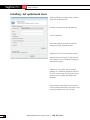
Select “Options” to set preferences in
TagPrint Pro 3.0. These include setting the
paths for locations of files, clip art, print jobs
and scripts as well as setting the language,
number of labels to preview, and the about
screen which has information about the
installed version of the software.
In the “Paths” tab the default directories can be
changed. If saved labels, or clip art are in a location
other than the folder that the software installs, a new
default path can be defined and saved.
“Language” allows the user to change the installed
language as well as the units of measurement. The
program must be restarted before these changes can
take effect.
32
www.Hellermann.Tyton.com | 800.537.1512
User’s Manual
TagPrintPRO 3.0
File Menu - Options
“General Options” has some features to set
defaults on how the program behaves.
Read Only Documents
Checking this box will change the designs to
“read only”, which prevents them from being
edited. This ensures a user can’t change a
design that is already saved. This applies to all
designs, not just those that are already locked.
Generate A Print Log
This feature, when turned on, will produce a
log of all the files printed by the software.
Ignore Printing Errors
If the user does not need a notification about
objects on the design that are located off the
edge of the labels, then check the box next to
“Ignore Printing Errors”.
The last section “Maximum Labels To Print
Preview” is a selector for determining the
number of labels to view in the print preview
(Full).
Since the “Full Preview “can take some time
and memory of the computer to generate, the
user can set the number of labels to preview
on demand.
The default is 10 labels.
www.Hellermann.Tyton.com | 800.537.1512
33
TagPrintPRO 3.0
User’s Manual
File Menu - Exit TagPrint Pro
To exit the program, the user can go into
“File” and “Exit TagPrint”.
Or
On the upper right of the software’s main
window there is the X button as shown to the
left here which will close the program.
In either case, the program will ask the user to
save designs or tables that are not yet saved.
34
www.Hellermann.Tyton.com | 800.537.1512
Chapter C
Ribbon Features
TagPrintPRO 3.0
User’s Manual
Ribbons Overview
Just like many Office products, TagPrint Pro 3.0 utilizes a Ribbon format. This allows the user to switch quickly
and easily to needed functions. No more searching for options under menus as each ribbon is related to the
function the user wishes to perform. The Home ribbon contains most of the options the user requires to
design labels.
Clicking on each ribbon header will bring the user to that ribbon. Each ribbon has features that pertain to a
specific operation. The Home ribbon being the most common; contains a wide variety of options.
36
www.Hellermann.Tyton.com | 800.537.1512
User’s Manual
TagPrintPRO 3.0
Ribbons - Types Overview
Home Ribbon This ribbon contains functions related to label design.
Table Ribbon This ribbon is used while working with data tables.
Print Ribbon This ribbon contains advanced printing features, including Label design preview options.
Label Ribbon This ribbon contains the Label design wizard and label settings such as locking the label
design or attaching a data table to a saved design.
Utility Ribbon The utility ribbon contains specialized features and tools including the ability to check for
program updates.
www.Hellermann.Tyton.com | 800.537.1512
37
TagPrintPRO 3.0
User’s Manual
Home Ribbon - Clipboard Overview
The Clipboard functions in the same manner as other Microsoft Office products.
These include copy, paste and cut features.
Objects selected in the label design can be cut, copied or pasted on the label. This
feature does not work in the data table.
To quickly perform the above functions, use standard Windows shortcuts:
1. Copy - CNTL - C
2. Paste - CNTL - V
3. Cut - CNTL - X
38
www.Hellermann.Tyton.com | 800.537.1512
User’s Manual
TagPrintPRO 3.0
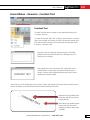
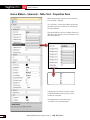
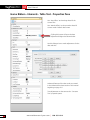
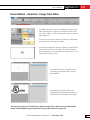
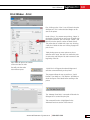
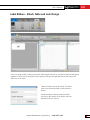
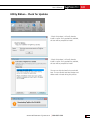
Home Ribbon - Elements - Constant Text
Constant Text
To create Text that doesn’t change on each label printed, select the
“Constant” text box.
To create this text box, select the “Constant” menu selection, move the
cursor over the label, and a black cross hair will mark the starting point.
Click and hold down the left mouse-click button and drag the mouse
to create a “Constant” field.
Drag the mouse to create the constant text box on the label.
Release the left mouse-click button and a blinking cursor will
allow text to be entered.
After typing text in the constant text box, clicking the mouse
outside the box or hitting the enter key will snap the text to
the box. The text will be centered within the box which can be
adjusted and sized as needed.
Any box that is on the label design can be moved, resized, and rotated by using the buttons located around
the box. Rotations can be performed with the button located above the box.
Rotate the box by grabbing onto
this button with the mouse and
rotating the box.
Resize the box by grabbing these
buttons with the mouse and
dragging to make it either larger
or smaller.
www.Hellermann.Tyton.com | 800.537.1512
39
TagPrintPRO 3.0
User’s Manual
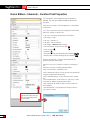
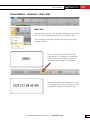
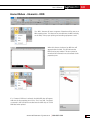
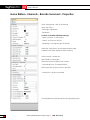
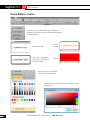
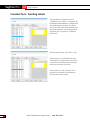
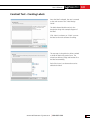
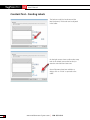
Home Ribbon - Elements - Constant Text Properties
The “Properties” pane will appear once a text box is
selected. The user can change variables to the text via
this pane.
If the box has a “Border”, then this adjusts the “Corner Radius”
of the border.
“Fill” color of the text box also can be selected on Home ribbon.
Adjust the “Opacity” of the fill color.
“Font Color” can also be selected on the Home ribbon.
“Font Family” or Type.
“Font Size” - Default is 12.
“Font Style” - Normal and Italic.
“Font Weight” - Bold, Normal, and Light.
“Horizontal Stretch” as shown to the right:
A
“Strike Through”: A
“Underline”: A
“Text Tracking” is the space in-between each character: A
A
“Vertical Stretch” increases the height of the characters: A
Selecting “Do Not Print” on the text box selected will not
appear on the label when printed.
Select the “Line Color” of the line or border surrounding the
box.
Select the “Line Style”, including solid and dashed.
Select “Line Thickness”, the default is zero.
Check “Allow Auto Scaling” for auto sizing of text, allowing the
computer to adjust fonts automatically.
Check “Allow Word Wrap” to allow words to wrap in the text
box.
“Horizontal Alignment” of text in the box - right, left, or center.
“Line Spacing” defines spaces between the lines.
“Text” represents the actual text that is in the box. Edit from
here if needed.
“Vertical Alignment” is the placement of the text in the box top, bottom, or center.
Selecting this button here [...]
will open a full dialogue box
for text editing
40
www.Hellermann.Tyton.com | 800.537.1512
User’s Manual
TagPrintPRO 3.0
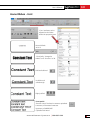
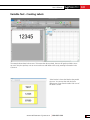
Home Ribbon - Elements - Table Text
Table Text
To create a text box with variable data, a table box attribute
will need to be created on the label. A data table also will
need to be created and opened to store data for printing
multiple labels.
In a data table, each row is a different label (i.e. rows 1-10
equal labels 1-10 and so on). Each column in the data table
will represent some data that can be displayed on the label
via these table text boxes.
To create the box, use the same click and drag procedures,
as previously reviewed, for a constant text field.
When the box is first created, the table field will contain an
Alpha character within brackets. This relates to the column in
the data table to which the data table attribute is attached.
There are no limits to the number of table fields that
can populate a label design.
After entering some data in the table, the data in the
table can be viewed on the label design by clicking on
the Field Code button on the message bar.
Rows are individual labels
www.Hellermann.Tyton.com | 800.537.1512
41
TagPrintPRO 3.0
User’s Manual
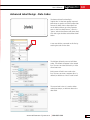
Home Ribbon - Elements - Table Text - Properties Pane
NOTE: Multiple table columns can be combined
into one field, if required.
The “Delimiter” is how the multiple columns are
separated in the box. Check this is override and
force the delimiter.
Each table field box can have multiple columns of
data. Up to five columns can be combined in one
table field attribute.
Typically only one column of data is used in
a table field attribute but up to five can be
combined, if required.
Text adjustments are the same as the
“Constant Text” properties panes.
42
www.Hellermann.Tyton.com | 800.537.1512
User’s Manual
TagPrintPRO 3.0
Home Ribbon - Elements - Date Text
Date Text
This feature creates a box on the label that will display the date and/or
time. This field is customizable by the user in the properties pane.
Click and drag to create a box, the date field will appear and can be
resized and moved.
This is how the box will appear with the field
codes turned on. To display the actual data that
will print, cycle the field codes by going to the
message bar and selecting off the {A} button.
With the Field Code button selected off, the data
is now displayed. Font, color, and position can all
be adjusted as needed in the properties pane.
www.Hellermann.Tyton.com | 800.537.1512
43
TagPrintPRO 3.0
User’s Manual
Home Ribbon - Elements - Table Text - Properties Pane
Use “Day Offset” to show days ahead of the
current time.
Use “Month Offset” to show months ahead of
current month. Default date format.
Clicking this button will open the date
adjustment dialogue box shown below.
Use this dialogue box to make adjustments for the
date and time.
Advanced features of the date code are covered
in the Advanced Functions section of this manual
beginning on page 116.
Text adjustments are the same as the “Constant
Text” properties panes.
44
www.Hellermann.Tyton.com | 800.537.1512
User’s Manual
TagPrintPRO 3.0
Home Ribbon - Elements - RFID
The “RFID” element will store a segment of data that will be sent to an
RFID capable printer. This data can be encoded onto the RFID underlay
on the label, if the proper printing and encoding equipment is used.
When this element is selected, an RFID box will
appear below the label. This will indicate that
RFID functions are enabled. This box cannot be
moved and all information must be edited via the
properties pane.
If a “Constant” RFID box is selected, the black RFID box will appear.
Add text via the properties pane in the “Text” box field. Text typed
or entered in this field will be encoded onto the RFID chip of a valid
RFID label when printed.
www.Hellermann.Tyton.com | 800.537.1512
45
TagPrintPRO 3.0
User’s Manual
Home Ribbon - Elements - RFID
If a table RFID box is selected, then the properties pane will allow the user to
select up to 5 columns of data to be combined and sent to the RFID encoder
on the printer. A data table must be opened for this feature to be active.
Both date and incremental attributes
can be added as well. The data codes
can be adjusted via the properties pane.
46
www.Hellermann.Tyton.com | 800.537.1512
User’s Manual
TagPrintPRO 3.0
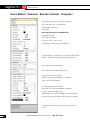
Home Ribbon - Elements - Barcode Constant
Creating barcodes is easy in TagPrint Pro 3.0. The “Barcode”
functions have been greatly improved from version 2.0.
The first type of barcode is a “Constant”. This barcode data will
be the same for all labels printed. To create one, go to the Home
ribbon, “Elements”, “Barcode”, “Constant” and select from the
barcodes list. This can be changed later once the barcode is on the
label design.
The user clicks and drags a box on the label, a
barcode will appear. This is the default barcode
with default text, which will automatically fit or
scale in size depending on how large the box is
when released.
Use the properties pane to adjust the barcode
text.
The barcode box can be resized and adjusted on
the label as with any other object.
As the barcode is resized, the text will adjust to
what is set in the text font size selector.
www.Hellermann.Tyton.com | 800.537.1512
47
TagPrintPRO 3.0
User’s Manual
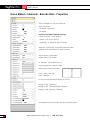
Home Ribbon - Elements - Barcode Constant - Properties
Select the “Background” color of the barcode.
Select the “Bar Color” in the barcode.
“Bar Height” adjustment.
“Bar Width”.
Enter barcode data here CHANGE TEXT
Use default settings
Bar ”Space Correction”
Fill or turn off to ”Stretch” to fit.
”Symbology” changes the type of barcode.
This will adjust the “Quiet Zone” (or free space) around the
barcode. This helps some readers capture the barcode.
Add a frame around the barcode.
Turn off the barcode from being printed.
Display or hide the “Checksum”.
Display or hide “Human Readable” characters.
Show “Start Stop Characters”.
Font adjustments for the barcode.
Placement of the”Human Readable” characters.
Color of “Human Readable” text.
Offset distance of “Human Readable” text from barcode.
Actual text size of the barcode until maximum is reached.
Text adjustments are the same as the other properties
panes.
48
www.Hellermann.Tyton.com | 800.537.1512
User’s Manual
TagPrintPRO 3.0
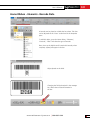
Home Ribbon - Elements - Barcode Data Table
A user also can set up a barcode on a label to use variable data.
The barcode will use a column of data in a data table to draw
information from when printed. This can be adjusted using the
properties pane.
First, create a box on the label using the function in the Home
ribbon, “Elements”, “Barcodes”, “Table”, and choose the type
of code. Move to the label and create a box.
A table also will need to be opened.
In this example, the barcode will use the “A”
column of data.
Barcodes can contain up to five columns of data
in one barcode. This is helpful in designing UID
barcodes as outlined in the Advanced Label
Design section of this manual.
To display data instead of the column
indicator, select off the field codes button in
the message bar.
www.Hellermann.Tyton.com | 800.537.1512
49
TagPrintPRO 3.0
User’s Manual
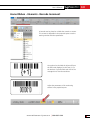
Home Ribbon - Elements - Barcode Date - Properties
Select “Background” color of the barcode.
Select “Bar Color”.
“Bar Height” adjustment.
“Bar Width”.
Conform To Standard (default settings)
“Space Correction” to bar spacing.
“Stretch” to fill or turn off to fit.
“Symbology” to change the type of barcode.
Adjust the “Quiet Zones” around the barcode to better
separate it from other objects for better scanning.
Add or remove a “Bearer Bar”.
Define width of “Bearer Bar”.
A “Delimiter” can be added, this is a
way to separate out columns of data.
Add columns of data to the code.
Force “Upper Case” text
Force “Delimiter”.
Do not print the barcode (still displays on screen).
Display or hide “Checksum”.
Display or hide “Human Readable Characters”.
Display or hide “Start Stop Characters.
Text adjustments are the same as the other properties panes.
50
www.Hellermann.Tyton.com | 800.537.1512
User’s Manual
TagPrintPRO 3.0
Home Ribbon - Elements - Barcode Date
A barcode can be placed on a label that has a date. This date
can be adjusted via the “Date” code wizard in the Properties
pane.
To add this object, go to the Home ribbon, “Elements”,
“Barcode”, “Date” and select the type of barcode.
Place a box on the label that will contain this barcode, when
complete, a {date} will appear in the box.
Object placed on the label.
Changing the field code switch in the message
bar, alloes views of date information in
the box.
www.Hellermann.Tyton.com | 800.537.1512
51
TagPrintPRO 3.0
User’s Manual
Home Ribbon - Elements - Barcode Data Table - Properties
Select “Background” color of the barcode.
Select “Bar Color.”
“Bar Height” adjustment.
“Bar Width”.
“Conform To Standard” (default settings).
“Space Correction” to bar spacing.
“Stretch” to fill or turn off to fit.
“Symbology” to change the type of barcode.
Adjust the “Quiet Zones” around the barcode to better
separate it from other objects for better scanning.
Add or remove a “Bearer Bar”.
Define width of “Bearer Bar”.
Adjust offsets for days, months and year.
Click on button to bring up date adjustment wizard.
Text adjustments are the same as the other properties panes.
52
www.Hellermann.Tyton.com | 800.537.1512
User’s Manual
TagPrintPRO 3.0
Home Ribbon - Elements - Barcode Increment
A barcode can be placed on a label that contains a counter.
This counter is adjustable in the properties pane to set the
starting number and other parameters.
Once placed on the label the object will have
the field code displayed. In this case, {+1} in
the brackets. Cycle the field code view in the
message bar to view the actual text.
Adjust the parameters of the numbering
scheme in the properties pane.
www.Hellermann.Tyton.com | 800.537.1512
53
TagPrintPRO 3.0
User’s Manual
Home Ribbon - Elements - Barcode Increment - Properties
Select “Background” color of the barcode.
Select “Bar Color.”
“Bar Height” adjustment.
“Bar Width”.
Conform To Standard (default settings)
“Space Correction” to bar spacing.
“Stretch” to fill or turn off to fit.
“Symbology” to change the type of barcode.
Adjust the “Quiet Zones” around the barcode to better
separate it from other objects for better scanning.
Add or remove a “Bearer Bar”.
Define width of “Bearer Bar”.
Define the number of digits for the counter.
“Use Leading Zeros” for example 00010.
Define start value for the counter on the label.
“Do Not Print” this box on the label.
Text adjustments are the same as the other properties panes.
54
www.Hellermann.Tyton.com | 800.537.1512
User’s Manual
TagPrintPRO 3.0
Home Ribbon - Elements - Constant Image
The user can add images to the label design. “Constant Image”
which will print the same image on every label. Select the Home
ribbon, “Elements”,”Image”, and “Image From File”. The
software can support many formats with GIF and JPG being
best for thermal printing.
On the label, click and drag open a box to the size required.
Resize and move this box after the image is selected and
displayed.
Upon the box being placed, a new dialogue box will
appear with a file location of an image. Point this to
the directory location of the image and select. The
software will have an assortment of default clip art
available for use in many applications.
The image will now appear on the label.
User can adjust the size, rotation, and placement by grabbing
the corners or the rotation button on the top.
www.Hellermann.Tyton.com | 800.537.1512
55
TagPrintPRO 3.0
User’s Manual
Home Ribbon - Elements - Constant Image - Properties
The properties pane can make some adjustments to the images.
Change the “Fill” or
background color of the
image. Some images are
not transparent.
Adjust the “Opacity” of
the fill.
Adjust “Image Opacity”.
Select and define a Line
around an image or
remove a Line around
the image.
Invert the image.
Allow the image to fill
the box that contains the
image. This might distort
the image.
To avoid distortion of the
image, use “Stretch” “Uniform”, however, this
can cut off the image until
the image box is enlarged.
56
www.Hellermann.Tyton.com | 800.537.1512
User’s Manual
TagPrintPRO 3.0
Home Ribbon - Elements - Image from Table
This feature allows the user to have different images on each
label. The image box or object on the label has to be a fixed
size. Select “Image”, “Table” and drag the mouse to create a
table image box.
The user then must have a table open under the Table ribbon,
and change one column type to images.
The first image table box, placed on a design, on the label will
reference the A column in the table. This can be adjusted in
the properties pane. Once changed to an image column, that
column will turn grey in color.
The image file location is entered into the
column by a right mouse-click in the cell.
Select IMAGE.
By switching off the field codes in the
message bar, the image will now appear in
reference to the file location of the image.
This feature must be used in combination with the image from a table tool in the Table Ribbon.
Please see Table Ribbon image instructions from the Table Features on page 125.
www.Hellermann.Tyton.com | 800.537.1512
57
TagPrintPRO 3.0
User’s Manual
Home Ribbon - Elements - Image from Table - Properties
Defines the column in the table where the image box will be
connected. The Default is A.
Background “Fill” can
be added. If the image
is transparent then the
fill color will appear with
image.
“Do Not Print” this image can be turned on or off.
“Effect” inverts the image.
“Image Opacity” changes the image opacity.
“Stretch” controls the image fill - uniform and uniform to fill.
Image inverted with fill
selected.
Example of an image using
adjustments for opacity.
Example of an image using
Invert, Fill and a dotted line
added around the label.
58
www.Hellermann.Tyton.com | 800.537.1512
User’s Manual
TagPrintPRO 3.0
Home Ribbon - Elements - Drawing
To draw a line, select the “Line” option under the “Drawing” element.
Click and drag a line to the length required and release. The line can be
moved and resized by a mouse-click on either end.
A “Path” line can be drawn and then adjusted by grabbing one of the
buttons on the line and moving to the desired shape.
“Rectangle” and “Circle” also can be rotated by grabbing the top
button on the attribute and moving.
A “Triangle” can be rotated as any other shape. Use flood fill with
yellow for caution shapes.
www.Hellermann.Tyton.com | 800.537.1512
59
TagPrintPRO 3.0
User’s Manual
Home Ribbon - Elements - Drawing - Properties
Adjust the “Fill” and “Opacity” of the shape.
The shape attribute can be selected so that it will print or
not print.
The “Line Color”, “Line Style” and “Line Thickness” can
be controlled.
60
www.Hellermann.Tyton.com | 800.537.1512
User’s Manual
TagPrintPRO 3.0
Home Ribbon - Elements - Drawing - Word Art - 3D
“Word Art” allows a user to place graphic words
on the label.
Clicking on “3-D Text “will allow the user to place
a box on the label with word art. The text can be
edited via the properties pane on the right.
The box can be resized and rotated like any other
type of object.
www.Hellermann.Tyton.com | 800.537.1512
61
TagPrintPRO 3.0
User’s Manual
Home Ribbon - Elements - Drawing - Word Art - 3-D - Properties
Fonts can be adjusted like other types of text.
However, with 3-D text, there is an option for
a side color.
The “Offsets” will move or position the text
within the box.
“Text” is where the text can be added or
edited.
The “Viewport” will adjust the text angles.
Change the depth of the text, or how far the
sides go back.
The “Field of View” moves the text forward or
back.
“Rotate” will spin the Word Art on it’s axis.
Use the other”Text Box” functions to rotate
the text or size it.
NOTE: Word Art text will not auto size.
This example of Word Art is shown with red
sides and a black front.
Text has been rotated.
62
www.Hellermann.Tyton.com | 800.537.1512
User’s Manual
TagPrintPRO 3.0
Home Ribbon - Elements - Drawing - Word Art - Text on Path
“Text on a Path” allows the user to place text around a circle.
Clicking on “Drawing”, then “Word Art”,
followed by “Text on a Path”, and then adding
to the label will create a box on the label with
some default text. Use the properties pane to
change the text.
NOTE:
If the text has too many characters for the circle,
the text will not be shown as a circle. (This does
not auto size.) Either reduce the number of
characters or increase the size of the circle.
By mouse-clicking and holding the mouse
button on the upper dot, rotate the text around
the path.
www.Hellermann.Tyton.com | 800.537.1512
63
TagPrintPRO 3.0
User’s Manual
Home Ribbon - Elements - Word Art - Text on Path Properties
“Font” adjustments and “Do Not Print” functions are the
same as all other properties panes.
The “Line Color”, “Line Style” and “Line Thickness” can
be controlled. The line is a square box around the text
represented by the outline.
A “Path Color “is the circle line or path that the text is
following.
Select to “Show Path” or hide.
The “Text Box” is where the text is added or changed.
This example is displayed with “Show Path”.
64
www.Hellermann.Tyton.com | 800.537.1512
User’s Manual
TagPrintPRO 3.0
Home Ribbon - Font
“Font” attributes can be
adjusted on the ribbon
and/or the properties pane.
Normal default:
Arial 12
“Font Family” changed to
IMPACT and “Font Size” to 36.
Bold and Italicized.
Underline and
strikethrough.
Right justified.
Font special:
Sentence case is first letter in sentence capitalized.
Lowercase, all characters lowercase.
Uppercase, all UPPERCASE.
Capitalize Each Word.
www.Hellermann.Tyton.com | 800.537.1512
65
TagPrintPRO 3.0
User’s Manual
Home Ribbon - Colors
Color of lines, fonts and the background fill can be
changed on the ribbon as well as the properties panes of
the selected boxes.
Text color
change
Default black text
“Line Color”, the default
is none. This is a black line
around the object.
Fill color
Each section has an expanded
color selector including none.
Selecting more colors will open a new window to select
any new color.
66
www.Hellermann.Tyton.com | 800.537.1512
User’s Manual
TagPrintPRO 3.0
Home Ribbon - Editing
“Editing” are some quick functions that can help in selecting
objects and undoing or redoing actions on the label design.
“Select All” will select ALL objects on the label.
“Undo” and “Redo” will back or forward edits
made to the label.
In this example, the image has been moved back
to where it was originally.
www.Hellermann.Tyton.com | 800.537.1512
67
TagPrintPRO 3.0
User’s Manual
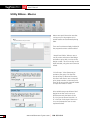
Home Ribbon - Align
The “Align” function works with selected objects or boxes on the label. To use this
function, select one or more of the objects on the label. The alignment occurs based
on the object and not the edges of the label.
Three objects on a label, with the selection box
around all objects.
Left justified align is based on the left most object edge.
Right justified align is based on the right most object edge.
Top justified align is based on the topmost object edge.
Bottom justified align is based on the bottommost object edge.
Center justified align is based on the all objects, and brings all
objects to direct center of label.
Centers objects on a horizontal plane while maintaining the
same vertical spacing.
Centers objects on a vertical plane while maintaining the same
horizontal spacing.
68
www.Hellermann.Tyton.com | 800.537.1512
User’s Manual
TagPrintPRO 3.0
Home Ribbon - Distribute
Distribution of objects or boxes on the label will evenly
space objects within the confines of the label.
Three boxes are selected on this label for “Distribute”. The
examples below show how each functions with the program.
“Horizontal” spaces each box equally
based on the right and left edge of the
label. Maintains vertical spacing of original
placement.
“Vertical” spaces each box equally on the
top and bottom edges of the label. Maintains
the horizontal spacing of the original box
placements.
“Auto-Align” distributes the boxes equally
on the label design based on all edges of the
label.
www.Hellermann.Tyton.com | 800.537.1512
69
TagPrintPRO 3.0
User’s Manual
Home Ribbon - Object
The “Object” function works with selected
objects or boxes on the label. To use this
function, select more than two of the
objects on the label. The alignment occurs
based on the object and not the edges of
the label.
Rotation. Selecting the object and clicking
on “Rotate Object” will spin the object 90
degrees at a time.
Flip or mirror text. This will either flip the
text on the vertical or horizontal axis.
Layering of objects. If the label design has
several boxes on it, they can be positioned on
the label in layers. Select a box and move the
box forward or backward (send to front or
back). This allows placement of boxes on top
or behind other objects.
Grouping. Select several boxes at once and
then group them together. As a group they
can be adjusted and changed as one single
box. Remove this by selecting “Un-group”.
70
www.Hellermann.Tyton.com | 800.537.1512
User’s Manual
TagPrintPRO 3.0
Table Ribbon - Insert and Delete Cells
Selecting a row or column cell
“Insert” will insert a new column. Select
a row (click on column header) in the
table and click “Insert”.
The new column will insert to the left,
pushing the original column right.
“Delete” will delete the row or column
selected.
www.Hellermann.Tyton.com | 800.537.1512
71
TagPrintPRO 3.0
User’s Manual
Table Ribbon - Attach Label
The user can attach a label to a table. The user must have a saved label and table opened and click on the
Attach Label or Attach Table button. Re-save the design and close the design. When opening the file back
up, the table and label should appear together.
72
www.Hellermann.Tyton.com | 800.537.1512
User’s Manual
TagPrintPRO 3.0
Table Ribbon - Column - Text
When a table is created, the columns
are defaulted to text. However, there are
times when there is a need to change
a column back to text from a copies,
design, or image column.
Select the column to change, by selecting
the column header, and click on Text in
the table ribbon under columns. This will
revert the column back to a white color
and then back to text. Any previous file
locations, copy numbers, or designs will
no longer function and will be treated as
normal text.
Note:
Information also can be typed into the
cell or the header bar at the top of the
spreadsheet.
www.Hellermann.Tyton.com | 800.537.1512
73
TagPrintPRO 3.0
User’s Manual
Table Ribbon - Column - Image
Select a column that will hold the file locations of
the images. This can be any column.
Once selected, click on the “Image” icon and the
column should change to a grey color.
To enter the file location, it can be done manually
or right mouse-click to “Select Image” which will
provide a dialogue box where the file and path
can be selected.
The column will show the file structure to the
image. Combined with an image box on the label,
each cell can display a different image on each
label.
The columns can be expanded
to show the entire file
structure.
If not, then the file location
name will spread across other
rows. This is normal and once
data is entered into the other
rows it will not be visible.
74
www.Hellermann.Tyton.com | 800.537.1512
User’s Manual
TagPrintPRO 3.0
Table Ribbon - Column - Design
This feature allows a user to have multiple label
designs (using the same label template), allowing
each label to be different in design.
Some users need to have objects in different
positions on the label for different requirements.
(i.e. Shipping, Production).
A full description of this feature is in the Advanced
Label Design section of this manual beginning on
page 117.
The user can create a set of labels, then using one data
table, select one of the columns to be a “Design” column.
Clicking on “Design” in the Table ribbon, once the column
is selected, will change the column to a design column.
www.Hellermann.Tyton.com | 800.537.1512
75
TagPrintPRO 3.0
User’s Manual
Table Ribbon - Column - Copies
A user can set up columns in the data
table to be “Copies” columns. This sets
the number of times each row (Label)
will print.
Select the column header (A) and
under table ribbon and columns, select
“Copies”. The column should become
this blue color.
Use this column to enter the quantity
of each label to print. Each row is a
different label. The actual data to print is
entered in one of the other default text
columns.
This example, row 1 or label 1 will print
two times, row 2 or label 2 will print
three times, etc.
Turn this off by selecting the column
header and selecting to delete the
column, or change it to a “Text” column
via the table ribbon icon.
76
www.Hellermann.Tyton.com | 800.537.1512
User’s Manual
TagPrintPRO 3.0
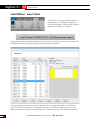
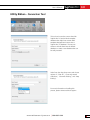
Table Ribbon - Sequence
On the table ribbon is the sequence feature. This allows the use of numbers and alpha characters in a
sequence. Prefixes and Suffix are constant for each cell produced. The start number and stop number are the
variables and can be any number.
This example shows TEST as the prefix, -A is the suffix and the
sequencer is set to produce 20 cells of data (1-20).
Click on “Fill” to start the process. Overwrite data if not satisfied
with the results.
Leaving the data in the sequencer, click to add columns and “Fill”
in cells. In this example, the “Reverse Order” is checked and filled to
create a two column table that could be used for to/from addressing.
www.Hellermann.Tyton.com | 800.537.1512
77
TagPrintPRO 3.0
User’s Manual
Table Ribbon - Sequence
Checking “Leading Zeros” will add zeros in front of the number up
to the total number of digits defined by the stop character. In this
example, the stop number is 100, so all numbers in the sequence will
have three digits.
“AlphaNumeric” allows a sequence with characters. In this example,
A1 to B1 will fill in with A2,A3,A4 . . . . etc. All other options can be
utilized as well.
78
www.Hellermann.Tyton.com | 800.537.1512
User’s Manual
TagPrintPRO 3.0
Table Ribbon - Sequence
To expand the types of sequences that can
be built, click on the drop arrow button and
the advanced sequencer will show up.
SKIP:
This is a user setting that will skip over a row
(or label) and place data in the next cell. This
is for skipping rows but maintaining the data
set.
INCREMENT:
This adds a user set number to the data.
Just like skipping, this doesn’t skip rows, this
skips data.
Example using an increment of 2:
TEST1-A
TEST3-A
TEST5-A
www.Hellermann.Tyton.com | 800.537.1512
79
TagPrintPRO 3.0
User’s Manual
Table Ribbon - Sequence
REPEAT:
This will repeat each piece
of data the number of
times entered. For this
example,TEST1-A is populated
twice.
Example:
TEST1-A
TEST1-A
TEST2-A
TEST2-A
Repeating 2
SETS:
The user can set this to have the
data complete one cycle and
then repeat all the data as many
times as needed.
80
www.Hellermann.Tyton.com | 800.537.1512
User’s Manual
TagPrintPRO 3.0
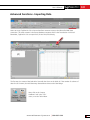
Table Ribbon - Data Import
Users can set up TagPrint Pro 3.0 to import data from
numerous sources via a Microsoft ODBC data connection.
The most common is the Access database connector which is
the first selection in this tool. Remember, TagPrint Pro 3.0 can
open Excel (.xls and .xlsx) files directly.
The next step is the “Connection” set up. This is where the user
will input the data location and passwords if needed to access
data. Test the connection to see if the connection is working.
Once set, hitting “OK” will input the data into a table in
the program.
Users can also set if the file will be “Read”, “Read Write”,
and sharing options.
Users also have a function to set the individual values.
For an Expanded tutorial on Data Import, please see the
Advanced Functions area of this manual beginning on
page 116.
www.Hellermann.Tyton.com | 800.537.1512
81
TagPrintPRO 3.0
User’s Manual
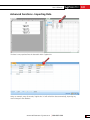
Table Ribbon - Import Text and Lock Table
The next source to import data is an “Text
Import” file tool. Some files are text, or .CSV files
that are not easily imported via copy or in Excel.
This tool allows the user to easily import text data.
In the Utility ribbon, under data, click on “Import
Text File”.
Once selected, the user will point to a location of
the file and a dialogue box appears. It will have a
couple of options for importing the file. The first
being to have the file sorted by a delimiter. Click
“Next”.
The preview will show a table and how the data
is imported. The user has options to change the
delimiter at this point. Clicking “Finish” will import
the data into the sheet.
Another option is to import via fixed length. Once
selected, the user can click on the window and
add bars that will be the separators. One also
can move these bars to fit the length of the data.
Once done, click “Finish” and import the data.
Tables and labels can both be locked. This allows users to ensure that
the label or table cannot be altered.
To unlock the table or label, simply open the label and click on this
feature on the ribbon. Enter the password and click “Unlock”.
82
www.Hellermann.Tyton.com | 800.537.1512
User’s Manual
TagPrintPRO 3.0
Print Ribbon - Print
First, clicking on the “Print” icon will launch the print
dialogue box. This is where the label design can be
sent to the printer.
Under “Direct”, for constant text printing, “Pages” is
the default. This will print an entire row of labels with
the same information. One can choose “Labels”, and
this will print the specific number of labels chosen.
This means that on a label with 4 per row, choosing
2 will print 2 labels in that row. Printing 4 pages will
print 4 rows.
Table printing opens up more options to print a
selection and a range. One also can reverse the print
or start at the end and print list and increment to the
beginning of the list.
No of Each will print a set number
of that one label in order.
Sets will print the entire
set and then repeat
“Quick Print” will bypass the above dialogue and
send the command directly to the printer.
The program allows the user to perform a “Quick
Preview” (one label) to a “Full Preview” (all labels) to
check the layout of the labels before sending to the
printer.
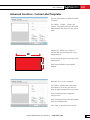
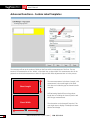
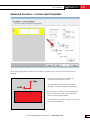
The “Manage Saved Jobs” command will launch the
dialogue box to control the print jobs.
This command function is highlighted in the
Advanced Functions section of this manual.
www.Hellermann.Tyton.com | 800.537.1512
83
TagPrintPRO 3.0
User’s Manual
Print Ribbon - Select Printer
Clicking on “Print Setup” will allow the user
access to the Selected Printer preferences page.
This is where the user can make changes to the
driver, only while the program is open.
These changes might not stay resident with
the driver if the program is closed. To make
permanent changes to the driver settings, close
the program and go into the control panel and
printers area. Make the changes to the print driver
properties and re-open the program.
84
www.Hellermann.Tyton.com | 800.537.1512
User’s Manual
TagPrintPRO 3.0
Label Ribbon - Design Wizard
Selecting the Design Wizard feature will launch a
new dialog box that is the start of the label design
wizard. The user can re-select a label here, and
hit “Finish” to change a label template, or click
“Next” and be directed though the process of
building a label.
For expanded description of building labels, please see the label design portion of this manual for a step-bystep review of how to create constant and variable text label designs beginning on page 96.
www.Hellermann.Tyton.com | 800.537.1512
85
TagPrintPRO 3.0
User’s Manual
Label Ribbon - Select Label
“Select Label” will change the label template on
the label design. The message bar displays the
current label template. To change, select the label
design tab of the label to be changed.
The top fields will show the template collection, family and units. The family is the type of printer being used
(TT230SM for example), Continuous labels, or Laser and Inkjet label templates.
The main display area will have a list of all the labels found in that family. The description, feed direction
arrow, and a quick layout overview are displayed to the right. Once a label has been selected, click “OK”.
Adding a new label to the family is possible. There also are options to edit, test, and delete label templates.
86
www.Hellermann.Tyton.com | 800.537.1512
User’s Manual
TagPrintPRO 3.0
Label Ribbon - Attach Table and Lock Design
A user can attach a label or table to each other. When opening the file up, the table and label should appear
together. Each file must be saved, then when opened, clicking on the attached table or label button will
attach one to the other.
Tables and labels can both be locked. This allows
users to ensure that the label or table cannot be
altered.
Unlock the table or label by opening the label
and click on this feature on the ribbon. Enter the
password and click “Unlock”.
www.Hellermann.Tyton.com | 800.537.1512
87
TagPrintPRO 3.0
User’s Manual
Utility Ribbon - Template Designer
The template designer will allow a user to
enter a custom label template. This can
be labels not found in the family sets, and
also can be a custom label for a specific
printer.
This area also allows the user to set up a
new printer type.
If editing a label, select the label as normal
and select “Edit”.
If this is a new label, select “New”.
The editor is now displayed. Please see the
Advanced Functions area of this manual
for full instructions of this feature.
88
www.Hellermann.Tyton.com | 800.537.1512
User’s Manual
TagPrintPRO 3.0
Utility Ribbon - Conversion Tool
This tool can be used to convert the older
TagPrint Pro 2.0 version labels template
database that might have custom label
templates designed and convert into a
TagPrint Pro 3.0 database. The user can
choose to include them into the default
database or create a new database that can
be easily accessed.
Select from the drop down menu and choose
options of “Clear All”, “Clear only named
collections”, “Overwrite Existing”, and “Keep
Existing”.
For more information on handling this
process, please contact technical support.
www.Hellermann.Tyton.com | 800.537.1512
89
TagPrintPRO 3.0
User’s Manual
Utility Ribbon - Macros
Macros are special instruction sets that
can be set up in the program to run
special features and automated printing
tasks.
There are four Macros already included in
the program but more could be added.
“Attach Data Tables” allows a user to
run this macro and select a label design
and table to print with no access to the
design or table. This is for security on the
label and table, only prints and cannot be
edited.
“Print Groups” is the fastest way to
activate a print group. See the Print
Groups section in Advanced Functions,
this macro will allow a user to enter the
print groups number or name and print.
Even can be set up with a barcode reader
to input the number or name.
Print variable text groups allows a label
design be set that a user can input
different text and print labels on the
fly. You just use the text box with a >1
or >2 and etc. hash tag and the macro
is run and prompts the user to enter
replacement data.
90
www.Hellermann.Tyton.com | 800.537.1512
User’s Manual
TagPrintPRO 3.0
Utility Ribbon - Check for Updates
“Check for Updates”, will verify that the
install is current. If any updates are available,
the user will be prompted to install.
“Check for Updates”, will verify that the
install is current. If any updates are available,
the user will be prompted to install.
The user can skip the install or be reminded
later. The user should have label designs and
tables saved or closed during this process.
www.Hellermann.Tyton.com | 800.537.1512
91
TagPrintPRO 3.0
User’s Manual
Utility Ribbon - Register
TagPrint Pro 3.0 software will need to be
registered here.
If the software is not registered, a
message will appear on the main
screen that states that the user will
lose functionality of the software if
left unregistered.
Enter the serial number, and click
on “Test”.
This will test and verify the serial number.
If verified, the arrow will turn green, then
click “OK” to activate the program.
92
www.Hellermann.Tyton.com | 800.537.1512
User’s Manual
TagPrintPRO 3.0
Message Bar - Features and Functions
Message bar is displayed on the bottom of the screen.
In the middle of the bar, is the label template part number that is the current label selected. If there are
multiple labels opened at once, this will display the highlighted or selected label template. The user must
ensure that the template displayed here matches the printer type being used.
www.Hellermann.Tyton.com | 800.537.1512
93
TagPrintPRO 3.0
User’s Manual
Message Bar - Features and Functions
Position of cursor
Field contours will
show or hide the
edges of the box.
Cycle the field
codes, to display
table column data.
94
Zoom Bar
Object or Box
selected width
and height
Guidelines can be enabled by clicking on
the ruler and dragging onto the label.
Snap to grid and show grid on
label. The grid will help align
objects and snap to grid will allow
objects to align automatically.
www.Hellermann.Tyton.com | 800.537.1512
User’s Manual
TagPrintPRO 3.0
Label Template In-line Parameters
A user can change label template parameters by clicking
into the grey area outside the label. At this point, a
properties pane of options will appear. These are options
that do not change the base template and are saved with
the design (.dsn3) only. When the user reopens a label
design, these in-line parameters will override some of the
template features set in the template designer.
Feed Direction - Normal and reverse
Heat Setting - Change the heat setting sent to the printer
during printing. Some labels require a lower or higher heat
or density setting for the printer and ribbon combination
(thermal transfer only)
Print Speed - Same as heat setting but this will change
the speed of the printer.
The above two settings would then be set to the printer
chosen in the printer drop down.
The template can be changed from landscape or portrait
for ease of the design and editing.
www.Hellermann.Tyton.com | 800.537.1512
95
Chapter D
Designing Labels
User’s Manual
TagPrintPRO 3.0
Constant Text - Creating Labels
There are two basic types of labels that can be designed with TagPrint Pro 3.0. The first is a constant text label, which
includes the options for text, barcodes or images that do not change for each label printed. The second type are variable
text labels, which require a data table. In this case, each label has information that can change from one label to the
next. Of course, the user can have a mixture of constant text and variable text on a label.
Start by selecting “File” and “New”.
Choose the create a new label design.
The “Label Design Guide” will now
appear.
The first step is to select the label.
The software will remember the
last label selected and this will be
displayed as the description of the
label. If this is confirmed as the
correct label, then click “Finish”.
If the user needs to select a different
label, then click “Select Label”.
www.Hellermann.Tyton.com | 800.537.1512
97
TagPrintPRO 3.0
User’s Manual
Constant Text - Creating Labels
The label selector is separated out into
“Collections” and “Family”. A collection can
be different labels databases. The default will
be all HellermannTyton labels. This allows
the user to build custom label databases and
keep them organized. The family represents
the printer type, for example, TT230SM or
Continuous.
Once the label is found, then click on “OK”.
The user also can Test the label from here.
This will send a test printout to the printer. It
is a box that surrounds the label to monitor
position and accuracy of the print.
The user also can “Edit” the label. This is
described in more detail in the Advanced
Functions area of this manual.
98
www.Hellermann.Tyton.com | 800.537.1512
User’s Manual
TagPrintPRO 3.0
Constant Text - Creating Labels
Once the label is selected, the user is returned
to the main screen of the “Label Design
Guide”.
The label selected should now be in the
description along with a sample diagram of
the label.
Click “Next” to advance or “Finish” to move
the label to the main software for editing.
The next step in the guide is to allow a wizard
to build the label using special icons. The
wizard can add text, image and borders all to
the label automatically.
Each of the icons is an element that can be
added to the label.
www.Hellermann.Tyton.com | 800.537.1512
99
TagPrintPRO 3.0
User’s Manual
Constant Text - Creating Labels
The first icon under text will add a constant
box of text to the label design. This is text that
will remain the same on each label printed.
The user can add more than one box, or can
remove boxes with the back button, or erase
the entire label with the erase button.
Another element that can be added is table
text. This feature will be outlined in the next
section, Variable text labels.
The user can have a mix of variable text and
constant text boxes on a single the label.
100
www.Hellermann.Tyton.com | 800.537.1512
User’s Manual
TagPrintPRO 3.0
Constant Text - Creating Labels
The next two icons allow the addition of an
automatic date and time stamp as well as an
increment field to the label design.
Each of these are customizable in the
editor via the properties pane for each label
attribute. The user can adjust the parameters
of the box.
The user can add images, which includes
either a constant image or a variable image.
The boxes also can be laid out vertically, or
the image can be placed on the side of the
text data information when using the layout
icons.
www.Hellermann.Tyton.com | 800.537.1512
101
TagPrintPRO 3.0
User’s Manual
Constant Text - Creating Labels
The last box to add is a border around the
label (as shown). This border can be adjusted
in the editor.
On the right are two icons to either take a step
back in the wizard (remove the last box) or
erase the entire label and start over.
Once all elements have been added to a
design, click on “Finish” to proceed to the
editor.
102
www.Hellermann.Tyton.com | 800.537.1512
User’s Manual
TagPrintPRO 3.0
Constant Text Label - Creating
The basic label design is now
created. The default name of the
file will appear in the tab above the
design.
The user can zoom the label for
better readability when editing.
The next step is to create a
constant text box. Select the Home
ribbon, look under “Elements”,
click on “Text” and “Constant”.
Hold down the left mouse button
and drag open a box to the size
required to fit the actual text.
Once the mouse button is released,
the text box will now prompt for
entry of text. The user can type in
text now or later by double clicking
the box to get the text entry
cursor.
www.Hellermann.Tyton.com | 800.537.1512
103
TagPrintPRO 3.0
User’s Manual
Constant Text - Creating Labels
The user can now select the box
and make adjustments such as
moving, resizing and changing the
properties of the text within.
These parameters can be changed
via the properties pane on the right
side or the Home ribbon.
On this label, we will adjust the
font size to 36. Once that is done,
a red slash will appear in the upper
right of the box. This means the
text is auto sized and is not actually
36 pitch. The software does this
to prevent truncating of text in the
box. Adjust the text size manually
until the red slash disappears, or
allow it to continue and it will
automatically auto size.
Auto size
Font size can be changed
104
www.Hellermann.Tyton.com | 800.537.1512
User’s Manual
TagPrintPRO 3.0
Constant Text - Creating Labels
Adding images to a label is easy.
This feature is on the Home ribbon,
“Elements”, “Image” and “File”.
This will place a constant image on
the label that will print on every
label.
Mouse-click and drag the box on
the label where you would like to
see the image. A new dialogue
box will appear with a file location
of your image. Many types are
supported, but JPG and GIF are
best for thermal printers. TagPrint
Pro 3.0 also supports BMP, EMF
and PNG.
The image can be resized and
moved around the label.
www.Hellermann.Tyton.com | 800.537.1512
105
TagPrintPRO 3.0
User’s Manual
Constant Text - Creating Labels
Next, to create a barcode box on the label, select the
barcode feature in the Home ribbon, “Elements”,
“Barcode”, “Constant” and select the type of
barcode required. This can be changed and adjusted
in the properties pane.
Click and drag open a box on the label, it will default
to a set value, this can be changed.
Use the properties pane to
make adjustments to the
barcode feature, such as bar
height and width.
106
www.Hellermann.Tyton.com | 800.537.1512
User’s Manual
TagPrintPRO 3.0
Constant Text - Creating Labels
The label is now ready to be
printed. Select “File” and “Print”,
or click on the “Print” ribbon.
A new dialogue box will appear
with the printer and options for
printing.
www.Hellermann.Tyton.com | 800.537.1512
107
TagPrintPRO 3.0
User’s Manual
Variable Text - Creating Labels
Start by selecting “File” and “New”.
Choose the create a new label design.
As with constant labels, select
the label size required, or see if
the default label shown in the
description is correct.
After selecting the label, the next
step is to click “Next” into the
label design wizard.
108
www.Hellermann.Tyton.com | 800.537.1512
User’s Manual
TagPrintPRO 3.0
Variable Text - Creating Labels
To place boxes on the label that
will use data from a data table,
select the variable text box from
table icon in the wizard.
Each box will have a letter to
represent the column of data that
will be used to connect the table
data to this attribute.
The user can have multiple variable
text boxes on the label that can all
be read data from a data table. If
selecting multiples, each new box
will have an incrementing alpha
character that corresponds to a
different column in the data table.
Click “Next” when the amount of
variable text boxes on the label is
correct.
www.Hellermann.Tyton.com | 800.537.1512
109
TagPrintPRO 3.0
User’s Manual
Variable Text - Creating Labels
The next screen will ask the user
to create a new data table, use an
open data table, or open an Excel
spreadsheet as the data source. The
user also has the option to leave this
unchecked and click “Finish”.
To create a new data table, click on
the check box and click “Next”.
Upon clicking Finish, the user will now see a label on one side and a data table on the other side.
110
www.Hellermann.Tyton.com | 800.537.1512
User’s Manual
TagPrintPRO 3.0
Variable Text - Creating Labels
Variable text labels allow a user to set up complex labels that vary from one label to the next. The user also
can set up labels that have objects or boxes of both types, constant and variable. Even dates, images, and
barcodes can be variable.
The user can create as many table text boxes as needed on
the label. Each time the user creates a new box on the label, it
will default to the next column in the data table. These are all
editable and selectable in the properties pane.
This example uses one table text box, or the A column. The
default view of this label is with the {A} in the box to reflect the
column. This can be changed to view the actual data by using
the field code switch in the message bar.
www.Hellermann.Tyton.com | 800.537.1512
111
TagPrintPRO 3.0
User’s Manual
Variable Text - Creating Labels
While using a data table to enter data, it is key to remember
that each row is considered a label and each column is data that
reflects a line of text on each label. Enter data in the A column of
the data table.
Upon clicking “Finish”, the user will now see a label on one side and
a data table on the other side.
112
www.Hellermann.Tyton.com | 800.537.1512
User’s Manual
TagPrintPRO 3.0
Variable Text - Creating Labels
The example shows data in three rows. This means that when printed, the user will get three labels. As we
can see in the print preview, one can now continue to add labels to this set by entering information in the
Column A.
“Print Preview” shows the labels as they would
print out. You can see that each box has a
different set of text from the table. Each row of
the table is a label.
www.Hellermann.Tyton.com | 800.537.1512
113
TagPrintPRO 3.0
User’s Manual
Variable Text - Creating Labels
One method to build data tables fast is with the sequencer. This is found under the Table ribbon. This allows
the user to enter information and build a sequenced set of data.
Enter the information needed in the sequencer. This
example, using TEST as the prefix, (will be constant for all
labels) and will include a start and stop variable. Clicking
on “Fill” will produce data on 10 cells (start at 1 and end
at 10).
Reverse order will put TEST10 in the first cell of the label
design when printing.
“Leading Zeros” will add the number of zeros ahead of
the lowest number up to the digits of the highest number.
For example: 001,002 to 100. 01,02 to 10.
Enter the information that you want and hit “Fill”.
114
www.Hellermann.Tyton.com | 800.537.1512
User’s Manual
TagPrintPRO 3.0
Variable Text - Creating Labels
Click on the next column (if the label has more than one column text box) and run the sequencer for each
column. The data won’t change in the sequencer so the user can easily build to and from data tables quickly.
In column B, “Reverse Order” and “Leading
Zeros” have been selected. Printing on Label
#1 from the data table will appear as follows:
www.Hellermann.Tyton.com | 800.537.1512
115
Chapter E
advanced design
of labels
User’s Manual
TagPrintPRO 3.0
Advanced Label Design - Date Codes
The date and time functionality in
TagPrint Pro 3.0 has been greatly improved.
Now there are options to build complex date
formats for labels. Place a date object box
on the label and then go to the properties
pane. In the”User Date Format”, there is a
“More” selector box (button with three dots).
Click this to get the date code builder shown
below.
...
A user can edit the command on this line by
entering the code for the date.
The dialogue allows the user to build date
codes. The default will appear in the sample
line. The user can either add to this, or clear
all and start new.
Each button will add a new code to the
line. The user can enter a separator (the / is
default) or add this to a line of code as well.
The second tab is time. It is used to either
make time stamps, or add time data to the
date fields.
www.Hellermann.Tyton.com | 800.537.1512
117
TagPrintPRO 3.0
User’s Manual
Advanced Label Design - Date Codes
Under the details tab, a user can input
customize date format codes and test.
The sample data and time stamp is defined as:
Day/Date/Day of Year/Month/Year/Time/Time short/ and full time zone.
After de-selecting the field codes on the date box, here are the results.
118
www.Hellermann.Tyton.com | 800.537.1512
User’s Manual
TagPrintPRO 3.0
Advanced Label Design - UID Barcode - Constant
The goal of UID is to create a UNIQUE IDENTIFIER that represents a component. It can be used to trace that
part back to the manufacturing company using a combination of data that is unique to that organization.
This data is combined to make a single unique part number that is encoded into a 2-D Data matrix barcode
found in TagPrint Pro. The unique part number is typically designed by combining the following information.
1. EID = (Company Identifier) is a unique number identifying an organization.
2. IAC = (Issuing Agency Code) is the agency that assigns the EID identifier.
3. UCN = (Unique Component Identification Number). In some cases, this is a part number or a unique serial
number that can be added to identify a specific part.
TagPrint Pro 3.0 takes either a three or four column table for a manual text entry and adds the required
headers and separators to the barcode. When the data matrix barcode is scanned by a UID reader, the
barcode is expanded to the example above. The user will not have to enter these group and record separators
into the software.
www.Hellermann.Tyton.com | 800.537.1512
119
TagPrintPRO 3.0
User’s Manual
Advanced Label Design - UID Barcode - Constant
The steps outlined here are used to create a
“Constant” UID barcode on a label. This information
will be the same on all labels produced.
On Home ribbon, look under “Elements”, “Barcode”,
“Constant”, and select “Data Matrix”.
Go to the label and click and drag to create a barcode
box on the label design. Scale to required size.
Select the barcode box on the label. Now the
properties pane should allow for adjustments to this
object on the label. Select “Data Matrix” by checking
the DataMatrixIsUid box.
120
www.Hellermann.Tyton.com | 800.537.1512
User’s Manual
TagPrintPRO 3.0
Advanced Label Design - UID Barcode - Constant
Once the barcode is selected as UID, several
new fields will appear in the properties pane.
Among these are data fields where the data
to be encoded is added.
Enter data fields here:
EID - 1234
IAC - 5678
UCN - 9012
Serial - 3456
Barcode is now encoded and is ready for
printing.
www.Hellermann.Tyton.com | 800.537.1512
121
TagPrintPRO 3.0
User’s Manual
Advanced Label Design - UID Barcode - Variable Data
A UID barcode can be set up
to have variable data. Where
each label has a different set
of numbers encoded. Start
with a label, and a data table.
Place a data matrix barcode using the tool found in the Home ribbon,
look under “Elements”, “Barcode”, “Table” and “Data Matrix”.
Proceed to create a box on the label.
In the data table, the UID is going to need
data input into four columns. These can be
any column. For this example A,B,C,and D will
be used.
122
www.Hellermann.Tyton.com | 800.537.1512
User’s Manual
TagPrintPRO 3.0
Advanced Label Design - UID Barcode - Variable Data
Select on the label and the barcode object. The
properties pane will now be ready to adjust this
barcode.
The user can adjust the barcode just as in other
standard barcode types.
Set the Delimiter to UID.
www.Hellermann.Tyton.com | 800.537.1512
123
TagPrintPRO 3.0
User’s Manual
Advanced Label Design - UID Barcode - Variable Data
Labels can be made that use a table text box tied
to the same columns as the barcode for complex
labels. See above.
Set each of the four table columns in data
source to the four columns. In this case, A,B,C,
and D.
NOTE: Most UID codes will only require three
fields, but up to four can be combined.
The barcode on the label should now reflect the
information in the four columns. Each row is a
separate label.
124
www.Hellermann.Tyton.com | 800.537.1512
User’s Manual
TagPrintPRO 3.0
Advanced Label Design - Staggered Data and Backgrounds
Labels can be designed to have
multiple layers of text and images
that rotate with the label. This
tutorial will go over the construction
of a staggered text label (white and
black text) and rotating colors in the
background.
Open a label and table for this
design.
First, add an image from table box
object onto the label. It should cover
the entire label surface.
Next, click on the table header
for which you will add the image
locations. For this example, select
column A and change column type to
“Image”. The column should change
to a grey color.
Right mouse-click on each row in column A and select an
image. The file selector should appear and point to the
location of the images. This example uses images already
found in the clip art file.
www.Hellermann.Tyton.com | 800.537.1512
125
TagPrintPRO 3.0
User’s Manual
Advanced Label Design - Staggered Data and Backgrounds
The file locations of all six labels are now visible in
the cells of the table. Each row is a different image
name location. Use the full “Print Preview” to see
all the labels along with the differing images.
Use the field code button on the message bar to
show the image on the label.
Native image
As in this example, the image does not fill the box we have
on the label. To flood fill this label design with the image,
select the box and use the properties pane and select “Fill”.
Fill
126
www.Hellermann.Tyton.com | 800.537.1512
User’s Manual
TagPrintPRO 3.0
Advanced Label Design - Staggered Data and Backgrounds
Turn off field codes.
With the “field codes” turned back off, add a text
box. Select the Home ribbon, “Elements”, “Text”
and “Table”. Place a box on the label for the size
of text box required.
Printed text will have to be pulled from a different
column than the image column. In this case, since
the images are in column A, place text in column B.
The new text box will be placed on top of the A
box for images. This is normal. The user will be able
to see the {A} below the {B}.
Place text in column B. As table data is populated,
the file locations of the images will disappear
below the text. This is normal.
One also can use the sequencer as shown here
above the table. For this example, we have added
text for the six rows, providing text on all six of the
labels.
Some of the image colors are darker, change the
text color to white in properties.
www.Hellermann.Tyton.com | 800.537.1512
127
TagPrintPRO 3.0
User’s Manual
Advanced Label Design - Staggered Data and Backgrounds
A full “Print Preview” now shows the labels. The
flood fill color in the background (images from
column A) and the new text in white as shown.
There also are some lighter colors where a black
font would be more acceptable. This can be done
by adding a second text box to the label design.
We will now change some of those to black text.
Here add a new data table text box with the Home
ribbon, “Elements”, “Text” and “Table”. Add a
new box to the label in the same size as {B} and
change the column to {C} if it didn’t default to C.
This new box we will remain as black text.
The boxes are off the label for display purposes in
showing each box and it’s column.
Place the boxes back on the label and C will
overlap B and overlap A.
128
www.Hellermann.Tyton.com | 800.537.1512
User’s Manual
TagPrintPRO 3.0
Advanced Label Design - Staggered Data and Backgrounds
On the rows where the image is a lighter color, we will move the text from column B to column C. There will
be no text in column B for lighter-colored images.
This will stagger the text from white to black text. In short, any data that will be printed in black goes in
Column C and any data printed as white text is entered in column B.
Now on the “Print Preview”, the
text will be two colors based on
the background color. The user
can expand on this and add more
columns and change the position of
text, color, or add more text boxes.
www.Hellermann.Tyton.com | 800.537.1512
129
TagPrintPRO 3.0
User’s Manual
Advanced Label Design - Multiple Designs
TagPrint Pro 3.0 will allow users to set up print
jobs that utilize several different designs of labels
at once.
This feature is important to users that find a need
to have the same information on the same label
type (template) but in different places on the label.
Many times, the product label needs to reflect
information in one place or object type (barcodes,
graphics), and in another place on the box label
and the shipping label. This is one example of the
many applications for this feature.
This feature works with the same base label
template only. For different label types or printers,
use the “Print Groups” feature found in the
Advanced Functions section of this manual.
The first step is to create the labels that are going
to be used. Once again, they will all be on the
same label template. Save each as a different file
name.
Next, create a data table. One table will send
information to all three labels in this set.
In these three examples, the objects on the label
are in different locations on the label, some labels
have more information then others.
130
www.Hellermann.Tyton.com | 800.537.1512
User’s Manual
TagPrintPRO 3.0
Advanced Label Design - Multiple Designs
The three labels are on the left side and the data table is
to the right. All three labels can use data in columns A and
B. Some of the labels are using constant text, or even date
fields.
The next step is to select a column to be set up as the
selector for the designs (Label 1, 2 or 3). Select column C
here and in the Table ribbon, click on “Design”. This will
change the color of the column to orange.
Right mouse-click on the row in column C and a “Select Template” will allow you to point to the location of
each of the three designs. Each row will need to have a label design assigned to it.
The file location of the design will appear in the column. Each row is a separate label.
www.Hellermann.Tyton.com | 800.537.1512
131
TagPrintPRO 3.0
User’s Manual
Advanced Label Design - Multiple Designs
The user can now check the labels by going to a full “Print Preview”.
Each label is using information from the data table, some are using constant information, but each is
displaying the information in different locations on the label.
Then as the user sends this print job to the printer, the program will use the three label designs to push the
information to the printer.
132
www.Hellermann.Tyton.com | 800.537.1512
Chapter F
Advanced
Functions
TagPrintPRO 3.0
User’s Manual
Advanced Functions - Opening Excel Files
TagPrint Pro 3.0 has the option to open
Microsoft Excel spreadsheets directly into the
program. Both XLS and XLSX sheets can be
opened. This will become the data table that a
label can pull information from when printing.
First, go to “FILE” and “OPEN”.
When opening the file, change the file type to
EXCEL (.xls or .xlsx). The file(s) should appear.
For this example, the file name is TEST.xlxs.
On opening, the file will now be a data table
in TagPrint Pro 3.0. If there is more than one
sheet, these can be accessed on the bottom
of the table. The user can edit this sheet and
either resave it as a TagPrint Pro 3.0 table, or
save back to an Excel format.
134
www.Hellermann.Tyton.com | 800.537.1512
User’s Manual
TagPrintPRO 3.0
Advanced Functions - Importing Data
Users can set up TagPrint Pro 3.0 to import data from numerous sources via a Microsoft ODBC data
connection. The most common is the Access database connector which is the first selection in this tool.
Remember, TagPrint Pro 3.0 can open Excel (.xls and .xlsx) files directly.
The first step is to create a label and table. Start with the A box on the label. Or if the number of columns of
data for use is known, then add that many data table text boxes to the label design.
Next, click on the “Import
Database” tool in the “File”
menu, or on the Table ribbon.
www.Hellermann.Tyton.com | 800.537.1512
135
TagPrintPRO 3.0
User’s Manual
Advanced Functions - Importing Data
The dialog box that appears will have a listing
of the Microsoft data connectors.
Most database connections will use the OLE DB
PROVIDER FOR ODBC DRIVERS.
In this example, we will use an Access database
to connect.
Click “Next” to proceed.
Click on the data source, which in this case
will be a MS Access database. One also can
use this for dBase files and Excel (remember
that TagPrint Pro can open Excel files directly.
However, for a live update of the data from
Excel, the user will need to use this feature)
136
www.Hellermann.Tyton.com | 800.537.1512
User’s Manual
TagPrintPRO 3.0
Advanced Functions - Importing Data
Enter the file location of the database.
The entire string to the location needs to be
entered along with the file extension.
Test the connection to ensure that the data has
been entered correctly.
Once test is complete, click “OK”.
www.Hellermann.Tyton.com | 800.537.1512
137
TagPrintPRO 3.0
User’s Manual
Advanced Functions - Importing Data
Clicking “OK” on the data link will open this
dialog box that is the selector for a table within
the database.
In this example, Table 1 has been selected.
The columns name will appear that is in the
table.
Select all of the columns. The user can select
one or multiple columns as needed for printing.
The user also can select “Auto Refresh” so
that it will automatically refresh the data at a
specific interval.
The number of minutes the data will refresh is
selected here. Select one minute.
Click “OK” to start the import.
138
www.Hellermann.Tyton.com | 800.537.1512
User’s Manual
TagPrintPRO 3.0
Advanced Functions - Importing Data
The data is now populated into the data table within TagPrint Pro.
Using our example, every 60 seconds, TagPrint Pro 3.0 will refresh the data automatically, importing any
recent changes to the database.
www.Hellermann.Tyton.com | 800.537.1512
139
TagPrintPRO 3.0
User’s Manual
Advanced Functions - Importing Data
After a minute, the data refreshes within
TagPrint Pro and is updated.
The updated data now shows on the label design and is ready for printing.
140
www.Hellermann.Tyton.com | 800.537.1512
User’s Manual
TagPrintPRO 3.0
Advanced Functions - Importing Text
The next source to import data is the text import file tool. Some files are text, or
.CSV files that are not easily imported via copy, or in Excel. This tool allows the
user some assistance in getting data imported. In the Utility ribbon, click “Data”
and “Import Text File”.
Once selected, the user will point to a location
of the file and then this dialogue box appears. It
will have a couple of options for the file. The first
being to have the file sorted by a delimiter. Click
“Next”.
The Preview will show a table and how the data
is imported. The user has options to change the
delimiter at this point. “Finish” will import the
data into the sheet.
Another option is to import via fixed length. Once
selected, the user can click on the window and
add bars that will be the separators. One can
also move these bars to fit the length of the data
fields. Once done, the user can click “Finish” and
import the data.
www.Hellermann.Tyton.com | 800.537.1512
141
TagPrintPRO 3.0
User’s Manual
Advanced Functions - Continuous Labels
There is a family of labels in TagPrint Pro 3.0
that utilizes continuous materials. This allows
the user to customize the size of the label to fit
the design.
The continuous label family of label templates
are set to a default size, but are easy for a user
to adjust.
Click “EDIT” to adjust.
Continuous labels are not dependant on printer type. Pick from the continuous family and either the
HellermannTyton part number of the roll, or any of the general sizes. (A user can add a size or create a
custom size manually.)
By clicking “EDIT”, the user can now adjust the
length of the label.
The first page is about the actual label. The only
item needing adjusting here is the Height. This
is set to 4 inches, but one can adjust to the size
or length required. The width will be constant
for the material width. In this case we are going
to print on 2 inch wide material that is 4 inches
long.
Click “NEXT” when done.
142
www.Hellermann.Tyton.com | 800.537.1512
User’s Manual
TagPrintPRO 3.0
Advanced Functions - Continuous Labels
On the second page is the sheet size. The
width is set to a default size. Do not change.
The sheet length, however, needs to match
the label length from the first page. In this
example, it is four inches.
Click “NEXT” when done.
Continuous labels are best viewed in
landscape, with a right-feed direction.
Click “NEXT” when done.
www.Hellermann.Tyton.com | 800.537.1512
143
TagPrintPRO 3.0
User’s Manual
Advanced Functions - Continuous Labels
The last page allows adjustments of label
margins. The user can test print the template
and if the printout does not appear centered
on the designs, it can be adjusted using the top
and left margin settings.
In this example, the top margin is probably not
needed here.
Click “Finish” and save the label.
Click “Finish”. Then select the label from the
template list and click “OK”.
Now, build the label as with any other label
template.
Follow the printers driver settings guide for
setting continuous materials. If a cutter is in
operation, the cutter may need to be enabled
in the printer driver.
144
www.Hellermann.Tyton.com | 800.537.1512
User’s Manual
TagPrintPRO 3.0
Advanced Functions - Print Groups and Print Later
TagPrint Pro 3.0 has the ability to group print
jobs and then print a group as one label
print job. This also allows the user to set up
a group to print to two different printers at
once (or more) and on different labels.
The first step is to create a label. Go to the
print option. In the print dialogue box, there is
a “Print Later” check box.
Select this box and click “OK”.
The next dialogue box to appear is where
the user can name the print job. A number
will default, as the file name, but it can be
changed to any number or letters.
Under description, the user can write a short
description of the label and printer.
Click “OK”.
In this example, the label is named as TEST1.
Repeat this process for each label design that
needs to be grouped and printed at one time.
www.Hellermann.Tyton.com | 800.537.1512
145
TagPrintPRO 3.0
User’s Manual
Advanced Functions - Print Groups and Print Later
As label designs are printed with the “Print Later”
box checked, they will be stored under “File” and
“Manage Print Jobs”.
When opened, the “Manage Print Jobs” dialogue
box will appear and will contain the print later
jobs. In this case, there are two, TEST1 and TEST2.
From here the user can send these print jobs
together or separately to the printer. In this case,
we will group them together under one file name.
146
www.Hellermann.Tyton.com | 800.537.1512
User’s Manual
TagPrintPRO 3.0
Advanced Functions - Print Groups and Print Later
To show the groups function, click on the drop
down arrow (Grouped Print Jobs) and expand the
window.
Click on “Add Group”. A new dialogue box will
appear asking for a Group Name. This single name
will represent all print jobs in that one group.
The example here is TESTGROUP and a description
can be added as well.
Select on the group name. The user can now add
jobs to this group from the jobs listing in the top
of the window.
www.Hellermann.Tyton.com | 800.537.1512
147
TagPrintPRO 3.0
User’s Manual
Advanced Functions - Print Groups and Print Later
To add jobs to the group, select the group
(TESTGROUP) and then select the print jobs
from the top. Click on “Add Job” and those
selected jobs and will be added to the group
named TESTGROUP. The print jobs will move
to the button under the TESTGROUP master
print job.
Once done, one can click on the print jobs in
the group and add features to that job listed
below.
In the print job properties, the user can enter
the number of times to execute the job when
the print group function is activated. This
represents label rows and not individual labels.
One also can ask for a prompt to enter number
of times to run the print job at the time of
actual printing.
Jobs also can be paused prior to printing so
that the operator can verify that the correct
label stock is loaded into the printer. Once
verified, the operator can click “OK” to
continue.
148
www.Hellermann.Tyton.com | 800.537.1512
User’s Manual
TagPrintPRO 3.0
Advanced Functions - Print Groups and Print Later
To execute the print groups, select the
grouped print job and click on the print
group icon.
www.Hellermann.Tyton.com | 800.537.1512
149
TagPrintPRO 3.0
User’s Manual
Advanced Functions - Custom Label Templates
Users might have a custom label that isn’t found in the select label families. This could be a nonHellermannTyton label or a custom label. TagPrint Pro 3.0 allows the addition of other “sizes” of labels which
can be saved under existing printer families or under newly created printer families.
The best path for creating a new label
template is to find the template designer
under the utility ribbon.
In the select label window, Select “New”.
This will launch a new window that starts with
a blank label template.
The name of the label is entered on the top
line. This can be anything the user wishes to
track as this template.
The next line is the family, this can be a new
family to store the template, or pick from the
included families.
Add a short description of the label.
150
www.Hellermann.Tyton.com | 800.537.1512
User’s Manual
TagPrintPRO 3.0
Advanced Functions - Custom Label Templates
The next area is where the label information
in entered.
The “Width”, “Height,” “Shape” and
“Radius” information pertains to the actual
individual label. Not the liner or the rows of
labels.
Measure the “Width” and “Height” of
the label and enter the dimensions in the
appropriate box.
W
H
Do not include the gap or liner width in this
measurement.
Enter that information in the template
designer.
Next select if it is circle or rectangle.
The “Radius” measurement can be taken
and entered, if not known, the user can
leave the label template with square corners.
If using a thermal printer, change the
selector to YES.
Units of measurement for the label template
also can be changed here.
Click “Next” to proceed to the next step.
www.Hellermann.Tyton.com | 800.537.1512
151
TagPrintPRO 3.0
User’s Manual
Advanced Functions - Custom Label Templates
The next page will set up the number of labels on the liner and the measurements of the liner. The top
section is the measurement of the “Width” of the label liner or sheet width. This measurement also can be
greater than the actual measurement to allow for right and left offset adjustments later on in the process.
Sheet Length
L
The next measurement is the sheet “Length”, this
measurement is the actual length of the label.
This does not include the gap for thermal transfer
materials.
Self-laminating labels will have a large sheet
length due to including the clear tail portion and
then the gap measurements.
Sheet Width
The orientation can be changed if required. The
user might want to display in landscape to better
edit the label design.
W
152
www.Hellermann.Tyton.com | 800.537.1512
User’s Manual
TagPrintPRO 3.0
Advanced Functions - Custom Label Templates
The example below shows two horizontal columns
with a gap, and two vertical columns with a gap.
At the bottom of this window are options to set
up a template that has multiple labels per row.
These can be either horizontal or vertical.
H
Gap
V
Gap
This example uses two labels per row. This is
selected by entering two horizontal columns as
well as the gap space (if any) between the labels.
Vertical rows can be added when sheets of laser
or ink jet labels are defined. For thermal transfer
labels this is typically set as one.
The preview window will display how the labels
appear.
Click “Next” to continue to the next step.
www.Hellermann.Tyton.com | 800.537.1512
153
TagPrintPRO 3.0
User’s Manual
Advanced Functions - Custom Label Templates
The next step is to select the type of layout for the label. The most popular and common are Gap and
Continuous. Black mark can be used if the label liner has a black line on the back.
If selecting Gap or black mark, the user needs
to enter the measurement of the gap, this is the
space between the rows.
Gap
Gap mark offset should not be used unless
directed by HellermannTyton technical support.
154
www.Hellermann.Tyton.com | 800.537.1512
User’s Manual
TagPrintPRO 3.0
Advanced Functions - Custom Label Templates
When making adjustments, several test prints might be needed to get a full picture of the movement of
the labels.
Top
Left
The last page of the setup is to adjust the
placement of the labels on the liner.
The top margin and left margin are manually
adjustable. The others will adjust automatically.
A test button is provided to test the layout of the
label. A small wire box will surround the label
based on the entered parameters.
Once the label is positioned correctly, “Finish” and
save the template design.
www.Hellermann.Tyton.com | 800.537.1512
155
TagPrintPRO 3.0
User’s Manual
Advanced Functions - Duplex for Double-sided Printers
For variable text labels, the user will need to open two label designs and a table. One of the designs will
become the top portion of the label and the second design will be the bottom portion.
Next, create a table text box, one for each label design. [The user can use multiple table fields on each label
design. If using multiple table fields, remember which table field is associated with each label design (top or
bottom).]
156
www.Hellermann.Tyton.com | 800.537.1512
User’s Manual
TagPrintPRO 3.0
Advanced Functions - Duplex for Double-sided Printers
Click on each label design (click into the grey area
outside the white label). In the properties pane,
there is an option for Type. Choose one of the
labels for the TOP and the other for the BOTTOM.
Then save each label design. For the top label, the
user will now choose the design for the bottom.
Click on the three dots to bring up a file browser
and search for the saved bottom design.
Save the two designs again including the top
design.
Once they are linked, anytime the user opens the
top design, the bottom design will open as well.
www.Hellermann.Tyton.com | 800.537.1512
157
TagPrintPRO 3.0
User’s Manual
Advanced Functions - Duplex for Double-sided Printers
Next, select the “Print” tab and “Print Job as Normal”. The printer will print on both sides of the media.
Do not check the box for
“Duplex (if supported)”.
Send the command to the printer.
158
www.Hellermann.Tyton.com | 800.537.1512
User’s Manual
TagPrintPRO 3.0
Advanced Functions - M-Boss
The M-Boss is a metal stamping printer.
TagPrint Pro 3.0 has the ability to set up
these markers and send the print command
to the printer.
The printer is only capable of printing text
and only so many characters. Thus, it needs
its own set of parameters and editing area.
To start a new print job for the M-Boss,
select the “M-Boss Designer in the “File”
menu and “New”.
The M-Boss editor will have a place to choose the part number of the marker and will automatically give the
user the number of lines supported on the marker.
www.Hellermann.Tyton.com | 800.537.1512
159
TagPrintPRO 3.0
User’s Manual
Advanced Functions - M-Boss
The first step is to choose the marker. The drop down selector will have each of the markers part number and
number of lines and characters supported. For this example the 3 line x 23 character metal marker has been
chosen.
It is now possible to add text by double
clicking into one of the three lines, or by
entering text in the text field of the properties
pane.
160
www.Hellermann.Tyton.com | 800.537.1512
User’s Manual
TagPrintPRO 3.0
Advanced Functions - Macros - Attach Data Tables
Macros are extra time-saving functions that
can help in some background operations and
printing features.
The macros that are included are:
Attach Data Tables
Hello World
Print Groups
Print Variable Text Groups
“Attach Data Tables” macro allows a user to
open a label design and table together and
send to the printer with no editing functions.
Running the macro pulls up two dialogue
boxes that will prompt to open the design
(.dsn) and table (.tab3).
Once the job is printed, the macro will
prompt to process a new job. It’s a fast way
to print jobs without editing.
www.Hellermann.Tyton.com | 800.537.1512
161
TagPrintPRO 3.0
User’s Manual
Advanced Functions - Macros - Print Groups
Print Groups works in concert with the “Print
Groups” functions shown earlier in this
section. Once you have a combined Print
Group name or number, using this macro
can speed up the printing of that group.
First, set up a Print Group. Have the name or
number ready.
Run the Macro.
The prompt will appear that allows you to
enter that name or number and hit “OK”.
Once done, it will return to this prompt.
You can use a wand scanner to input the
name or number as well.
162
www.Hellermann.Tyton.com | 800.537.1512
User’s Manual
TagPrintPRO 3.0
Advanced Functions - Macros - Print Variable Text
“Print Variable Text Groups” macro allows
a user to set up a label that will prompt for
variable text.
First step is to create a label, with constant
text.
The constant text field should have the
following characters ONLY:
># with # being a number starting with 1
and incrementing with each text box.
The user can have several of these boxes on
the labels, just keeping aware that you need
to have the > and then the number of the
box.
This example with have two constant text
boxes, with the >1 and >2.
www.Hellermann.Tyton.com | 800.537.1512
163
TagPrintPRO 3.0
User’s Manual
Advanced Functions - Macros - Print Variable Text
Save the design.
Run the macro
It will prompt for the file.
Once it is selected, the next prompt will ask the
user to replace the text in the > boxes.
Enter the text you would like to be entered into
the > text box.
164
www.Hellermann.Tyton.com | 800.537.1512
User’s Manual
TagPrintPRO 3.0
Advanced Functions - Macros - Print Variable Text
This example has two > text boxes, 1 and 2. We replaced the text in both (123) in >1 and (456) in > 2. The
text is shown on the design and now the user can send the print job to the printer.
It will then prompt to process another design and the steps can be repeated.
www.Hellermann.Tyton.com | 800.537.1512
165