1
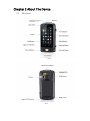
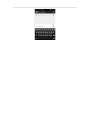
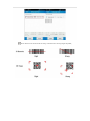
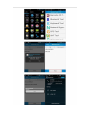
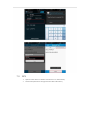
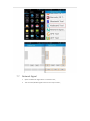
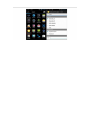
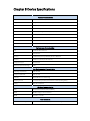
Handheld Mobile Computer
SIRIO 4000 User Manual
CATALOGUE
Chapter 1 Getting Started ......................................................................................................... 4
Chapter 2 About The Device ..................................................................................................... 6
Chapter 3 Call Function ............................................................................................................ 8
Chapter 4 Barcode Reader ...................................................................................................... 10
Chapter 5 RFID Reader ........................................................................................................... 12
Chapter 6 Fingerprint Reader .................................................................................................. 16
Chapter 7 The Other Functions................................................................................................ 17
Chapter 8 Device Specifications ............................................................................................... 25
Chapter 1 Getting Started
1.1 Brief Instruction
MMS SIRIO 4000 is a series of Android powered smart terminals, with data capture, data processing,
wireless communication. It is with high-reliability & high-expansibility. Auto & Accurate data collection
is achieved in various business fields via a complete solution of premium options, the flexible solution
among options and operators is suited-up. You will find out with SIRIO 4000, much easier deployment,
reduced complexity, decreased maintenance, are the benefits for enterprises.
SIRIO 4000 meets industrial level IP64 (IEC sealing), is sufficient to routine applications, eg, railway
inspection, road parking toll, vehicle inspection, logistics express, power inspection, warehousing
management, chain retail, etc. Whether the mobile operators are working indoor or outdoor, with
MMS SIRIO 4000, your business is always &highly efficient on-line.
Meeting industrial standards, designed to support a various of mobile solutions. With the build-in high
performance Cortex-A9 1GHZ dual core processor technology, the operators need only one device to
enjoy a convenient and easy job, SIRIO 4000 will be the ideal choice for key-fact business in mobile
solutions, for simplified task flow, enhanced work efficiency, for shortened time to customer response,
more satisfied customer care service.
MMS SIRIO 4000 comes with world wide band WCDMA technology. . Multi channels data and voice
communication guarantees the real-time communication and data efficiency, SIRIO 4000 brings you
the best ROI.
1.2 Precaution Before Using Battery
Do not leave batteries unused for extended periods of time, either in the product or in storage. When
the battery has been unused for 6 months, check the charge status and charge or dispose of the
battery as appropriate.
The typical estimated life of a Lithium-Ion battery is about two to three years or 300 to 500 charge
cycles, whichever occurs first. One charge cycle is a period of use from fully charged, to fully
discharged, and fully recharged again. Use a two to three year life expectancy for batteries that do not
run through complete charge cycles.
Rechargeable Lithium-Ion batteries have a limited life and will gradually lose their capacity to hold a
charge. This loss of capacity (aging) is irreversible. As the battery loses capacity, the length of time it
will power the product (run time) decreases.
Lithium-Ion batteries continue to slowly discharge (self-discharge) when not in use or while in storage.
Routinely check the battery’s charge status. The user manual typically includes information on how to
check battery status, as well as battery charging instructions.
Observe and note the run time that a new fully-charged battery provides for powering your product.
Use the new battery run time as a basis to compare run times for older batteries. The run time of your
battery will vary depending on the product’s configuration and the applications that you run.
Routinely check the battery’s charge status.
Carefully monitor batteries that are approaching the end of their estimated life.
Consider replacing the battery with a new one if you note either of the following conditions:
The battery run time drops below about 80% of the original run time.
The battery charge time increases significantly.
If a battery is stored or otherwise unused for an extended period, be sure to follow the storage
instructions in this document. If you do not follow the instructions, and the battery has no charge
remaining when you check it, consider it to be damaged. Do not attempt to recharge it or to use it.
Replace it with a new battery.
Always follow the charging instructions provided with your product. Refer to your product’s user
manual and/or online help for detailed information about charging its battery.
Charge or discharge the battery to approximately 50% of capacity before storage.
Charge the battery to approximately 50% of capacity at least once every six months.
Remove the battery and store it separately from the product.
Store the battery at temperatures between 5 °C and 20 °C (41 °F and 68 °F).
Chapter 2 About The Device
2.1 Structure
<Front>
<Back>
Buttons:
Button
Function
1.
Power Button
Press and hold to turn the device on or off
2.
App List View Button
View a list of apps running
3.
Home Button
Press to return to the home screen
4.
Cancel Button
Tap to return to the previous screen
2.2 SD Card Installation
Detailed installation steps are as follows:
1. Open the SIM slot as the direction of ‘Open/Lock’ labeled;
2. Open the SD slot as the direction of ‘Open/Lock’ labeled;
3. Install the SD card properly;
4. Lock the SD slot and SIM slot properly;
2.3 SIM Card Installation
1. Open the SIM slot as the direction of ‘Open/Lock’ labeled;
2. Install the SIM card correctly;
3. Lock the SIM slot properly;
2
3
2.4 Battery Installation
1. Push the battery down into the bottom of the battery;
2. Push the battery to the direction of the array;
3. Turn the battery lock;
2.5 Battery Charging
2.5.1 Direct Charging
Use the adapter to charge the battery via the USB connector of the snap-on;.
2.5.2 Cradle Charging
Connect the adapter with the power cable to charge the device.
2.6 Device Turning on/off
Press the ‘Power’ button on the side shortly due to turn on/off.
Chapter 3 Call Function
3.1 Phone
1. Click this icon
:
2. Click the number button to input the numbers;
3. Click the
4. Click the
button to confirm and dial;
to end the calling;
Contacts
Logs
Voice Calling
Emulated Numeric Keypad
3.2
Contacts
1. Click ‘Contacts’ to open the contacts list;
2. Click ‘
’ to add the new contact;
3.
’ to import/export or delete the contact list;
Click ‘
Group
Favorites
Contact List
3.3 Messaging
1.
Click ‘
2. Click ‘
3. Click ‘
4. Click ‘
’ to open the message list;
’ to input the content;
’ to send the message;
’ to add photos, videos;
Chapter 4 Barcode Reader
1. Open the Barcode Demo within Handset Tools;
2. Press the ‘Scan’ button to start scanning, then the auto interval parameters
can also be set;
Note: Please scan the barcode correctly, otherwise the scanning might be failed;
Chapter 5 RFID Reader
5.1 Low Frequency
1. Open the RFID_LF Demo within Handset Tools and then press the ‘Scan’
button to start scanning;
2. Tag types including ID Card/Animal Tag/Hitag/HDX Tag/EM4450 can be also
selected, and Hitag-S and EM4305 reading/writing are already supported by
the device;
Note: please ensure that the LF module is embedded in the device, also please select the tag type
correctly, otherwise the operation might not work. Meanwhile, please pay attention to the HDX and
FDX-B since they are using different hardware due to the different working principles.
5.2 High Frequency
5.2.1
14443A
1. Open the RFID_14443A demo within Handset Tool, and press the ‘Scan’
button to start scanning;
2. Mifare and Ultra Light reading/writing are also supported;
5.2.2
15693
1. Open the RFID_15693 demo within Handset Tool, and press the ‘Scan’ button
to start scanning;
2. 15693 writing are also supported;
5.3 Ultra High Frequency
1. Open the UHF demo within Handset Tool, and press the ‘Scan’ button to start
scanning;
2. Multiple tags reading and single tag reading/writing are also supported;
Chapter 6 Fingerprint Reader
1. Open the Fingerprint Demo in Handset Tool and then press the ‘Scan’ button
to start scanning;
2. Put the finger to the fingerprint module and set the ID/name of the
template under ‘ACQUISITION’;
3. Put the finger to the fingerprint module properly and identify by
ID/Name/Score under ‘IDENTIFICATION’;
4. The local templates can also be checked under ‘Data’;
Chapter 7 The Other Functions
7.1 PING Tool
1. Open the Ping Tool in Handset Tool;
2. Set the Ping parameters and select the internal/external addresses;
7.2 Bluetooth
1. Open the Bluetooth demo in Handset Tool and turn on the Bluetooth;
2. Input the content or select the file, then scan the nearby Bluetooth printer
and pair them;
3. Select the printer and click ‘Print’ to print the content;
7.3 GPS
1. Open the GPS demo in Handset Tool and turn on GPS module;
2.
Set the GPS parameters and get the GPS data information;
7.4 Volume Settings
1. Open the Volume Setting demo in Handset Tool;
2. Set the volumes based on the requirements;
7.5 Light And Sensor
1. Open the Light And Sensor demo in Handset Tool;
2. Test the lights and sensor based on the requirements;
7.6 Keyboard Tool
1. Open the Keyboard Tool demo in Handset Tool;
2. Set and test the key values of the device;
7.7 Network Signal
1. Open the Network Signal demo in Handset Tool;
2. Test the WIFI/Mobile signal based on the requirements;
7.8 Keyboard Emulator
Keyboard Emulator can be used directly for multiple using environments and the
output formats can including prefix/suffix/enter/tap can also be defined.
Chapter 8 Device Specifications
Physical Characteristics
Dimensions
153mm*75mm*29mm/6.02*2.95*1.14in.
Weight
286g/10.09oz. (includes main battery)
Screen
4in.WVGA (480*800) TFT-LCD, capacitive dual touch
Keyboard
3 function keys, 3 side buttons
Battery
Main bat. (rechargeable li-ion polymer, 3.7V, 3200 mAh)
Expansion Slot
MicroSD/TF, maximum capacity of 32G
SIM Slot
1 PSAM, 1 SIM, 1 MicroSD
Audio
0.5W
Camera
OV 5M pixels, auto focus (optional)
Performance Characteristics
CPU
Cortex-A9 1GHz dual core
OS
Android 4.0.4
Memory
512MB RAM(optional)/1GB RAM, Build-in 4GB Flash
Interface
USB Micro-B, serial port RS-232(TTL)
Storage Card Type
MicroSD card
Maximum Expansion Storage
32GB
User Environmental Characteristics
Operating Temperature
-10℃ to 50℃
Storage Temperature
-40℃ to 70℃
Humidity
5%RH-95%RH(non-condensing)
Dropping Survive
1.2m/3.9ft. drop, 6 sides (concrete floor under operating temp.)
Sealing
IP64, IEC compliance
Wireless Communication
WAN
WCDMA/HSDPA/HSPA+ (850/2100MHz),
WLAN
IEEE802.11b/g/n, internal antenna
WPAN
Bluetooth v2.1+EDR
Data Collection
Barcode Scan Engine
1D barcode(Symbol SE955, laser, hardware decoding):
2D CMOS laser scanner: Symbol SE4500
LF 125KHz/134.2KHz, HDX/FDX-B(optional)
RFID
HF 13.56MHz, ISO14443A/ISO15693(optional)
UHF 860-960MHz, EPC C1 GEN2/ISO18000-6C
Developing Environment
SDK
MMS SDK
Programming Language
Java
Developing Tool
Eclipse