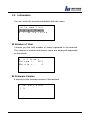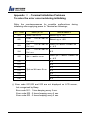
1
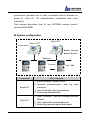
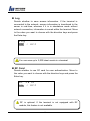
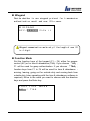
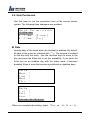
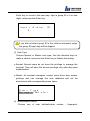
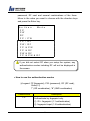
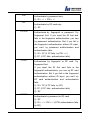
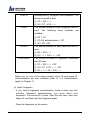
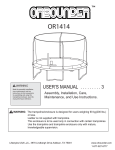
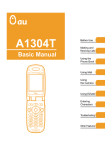
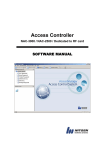
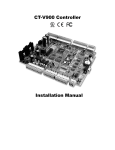
ⓒ Copyright 2003, NITGEN Co., Ltd.
All rights reserved
Features and specifications are subject to change without notice. No part
of this guide may be copied or reproduced for any purpose without the
prior written authorization from NITGEN.
NITGEN holds the copyright on the brands NITGEN and NITGEN logo.
To Contact Us
Tel. 82-2-3415-1800
Fax. 82-2-3415-1601
E-mail : [email protected]
URL : http://www.nitgen.com
-2-
Table of Contents
Chapter 1 Before You Start
1.1 About the product ------------------------------------------------ 5
1.2 Features and specifications ----------------------------------- 8
1.3 Product details ---------------------------------------------------- 11
1.4 LCD screen -------------------------------------------------------- 14
1.5 How to input fingerprint ----------------------------------------- 16
1.6 Authentication types --------------------------------------------- 17
Chapter 2 Environment Setup
2.1 Menu configuration ------------------------------------------------ 21
2.2 Fingerprint Option -------------------------------------------------- 24
2.3 UI (User Interface) Option ---------------------------------------- 30
2.4 Door Option ---------------------------------------------------------- 32
2.5 System Option ------------------------------------------------------ 34
2.6 Gate Permission ---------------------------------------------------- 39
2.7 Network --------------------------------------------------------------- 42
2.8 Factory Initialization ----------------------------------------------- 46
Chapter 3 How to Use the Terminal
3.1 User Manager ------------------------------------------------------- 50
3.2 Information ----------------------------------------------------------- 64
Appendix
Appendix
Appendix
Appendix
Appendix
Ⅰ
Ⅱ
Ⅲ
Ⅳ
Ⅴ
Network Connection Problems ------------------------ 66
Terminal Initialization Problems ----------------------- 69
Sound Modification Guide ------------------------------ 70
Direct Sunlight problems -------------------------------- 71
FAQ (Frequently Asked Question) -------------------- 73
- 3-
Chapter 1
Before You Start
1.1 About the product
-5
1.2 Features and specifications - 8
1.3 Product details
- 11
1.4 LCD screen
- 14
1.5 How to input fingerprint
- 16
1.6 Authentication types
- 17
-4-
1.1 About the product
n Overview
Biometric systems are recently used in various authentication
systems. They are increasingly used not only in environments that
require high level of security but also in many other places
because they are convenient and economical. Among various
biometric systems, the fingerprint recognition system takes up
most of the market because it is easy to use as well as economical
and capable of developing various types of applications. NITGEN,
a global leader in the fingerprint recognition industry, provides
various fingerprint authentication solutions such as PC security,
knowledge management, vaulting service, access control,
electronic approval, and fi nancial payment. NITGEN actively
responds to customer needs through continuous research,
development and quality management.
The NITGEN access control system is an advanced product in
which core technologies of NITGEN recognized worldwide such as
fingerprint recognition algorithm, optical sensors, embedded
design technology, and software application technology are
organically combined and optimized. In addition, unlike other
existing access control systems that use passwords or ID cards
only, it is free from such risks as loss of password and abuse or
duplication of card, providing excellent convenience and security. It
is designed to maximize operational efficiency, enabling integrated
monitoring and systematic management of terminals which have
been operated independently on a remote location via the network.
The NITGEN access control system can use various combinations
of RF card, password and fingerprint authentication. Designed to
meet both universal uses and specific uses, it can be used in
various customer environments including enterprises and
- 5-
government agencies due to such convenient built-in features as
group ID, short ID, 1:N authentication, interphone and voice
instruction.
This manual describes how to use NITGEN’s access control
terminal (NAC-3000).
n System configuration
Access Server
Client PC
Server PC
Remote Manager
Remote Monitor
Network
Terminal
Component
NAC-3000
Main Features
Server PC
1. Server software: Access Sever
2. Terminal communication and log
collection
3. User information and log database
4. Performing authentication
Client PC
1. Client software: Remote Manager/Remote
Monitor
2. User registration and management
3. Monitoring terminal status and events
-6-
data
Terminal
(NAC-3000)
1. Performing user authentication
2. Door control
You can use all features with the NITGEN access control terminal
(NAC-3000) only. If you use it with the management programs
(Access Server, Remote Manager and Remote Monitor ) in network
environment, you can manage a number of terminals more easily
and efficiently. You can use the server and client software in one
PC.
- 7-
1.2 Features and specifications
n Product features
The NITGEN access control system (NAC-3000) has the following
features:
① Control and manage access of a large number of people.
② Combine several authentication types (fingerprint, password,
and RF card).
③ Control multiple access control terminals via the network.
④ Manage remote systems easily (running server and client PCs
independently).
⑤ Provide various additional features including user access
lookup and interphone.
⑥ Real-time monitoring of access status.
⑦ Access control by period and time.
⑧ SDK (Software Developer’s Kit) is provided for development of
various applications such as time & attendance (not supplied).
⑨ High speed 1:N authentication is available.
⑩ Enhanced user convenience (short ID/group ID authentication
and Auto-on).
n System specifications (when connected with the
server)
Section
Access terminal
Remote
management
Content
Connection allowed up to 255 terminals
Simultaneous server access up to 8
-8-
Number of users
to register
Network
Authentication
type
5,000 users (2 fingerprints per 1 user)
10,000 users (1 fingerprint per 1 user)
10 Mbps, TCP/IP
Fingerprint,
(optional)
password
and
RF
card
n Terminal specifications
Section
Display
Content
Size
128 * 64 Dots LCD
Language
Sensor
English, Korean
Model
OPP01
Type
Optical
Resolution
500 DPI
Additional
Auto on / Latent Image Check
1:1 mode: T < 1sec.
1:N mode
-Avg. 2.5sec(1,000FP, Server)
-Avg. 2sec (500FP, Terminal)
-Avg. 1sec (300FP, Terminal)
Speed
Authentication
※PentiumⅣ 1GHz, 512MB RAM
Algorithm
FRR: 0.1 % or less, FAR:
0.001 % or less
Number of
users to
register
Terminal
2,000 users (2 FP per 1 user)
4,000 users (1 FP 1 user)
Communication
TCP/IP
10 base-T Ethernet
RS-232C
- 9-
Max 115200 bps (optional)
Wiegand
Size
Case
135 (W)*45 (L)*202.5 (H) mm
Bracket
Supported
doors
Power
102.4(W)*26.6(L)*157.5(H) mm
Deadbolt / Strike / EM Lock / Auto door
Adaptor
Interphone
Additional
features
26 bit, 34 bit mode(output only)
※ID Length : 4digit
Input: AC 100 V ~ 240 V, 50/60
Hz
Output: DC 12 V, 3 A
MIC and Speaker included
Voice instruction (English / Korean)
Downloading Logo / Firmware
Variable ID length (4 ~ 15 digit)
RF Module (HID)
Option
UPS (12V / 2.9Ah)
Storage
Temperature
Operation
-25℃ ~ 65℃
-20℃ ~ 60℃(With no icing or
condensation)
Storage
15% ~ 90% RH
Operation
25% ~ 85% RH
Humidity
- 10 -
1.3 Product details
①
④
②
⑧
③
⑤
⑥
⑦
4. LED lamps: They indicate the terminal operation status.
The below table shows what they mean from the left:
Lamp
Operation Status
Color
Power
Power status. The LED is on while the
power is supplied.
Red
Network
Network connection status. The LED is
on while connected to the network.
Green
Door
Open/close status of the door. The LED
is on while the door is open.
Green
② LCD screen: It displays menus and options for all operations.
③ Keypad: It is used to enter user ID or set up environment. For
each key description, please see the following table:
- 11 -
Keys
0~9
Description
Number keys.
*, #
Direction keys. Move the cursor up and down
when selecting menu items.
*(Backward), # (Forward)
Enter
Press this key to complete such operation as ID
input or environment setup.
Cancel
Delete the entered numbers one by one, or move
to the upper-level of the menu.
Call
A guest can use it to talk to someone inside with
the interphone.
Menu
F1 ~ F4
Set or modify the settings.
Define time & attendance features: arriving,
leaving, going out for outside duty and coming
back from outside duty. You can freely set the
function keys in accordance with the
requirements of the related software.
④ Speaker: For voice instruction, interphone communication, and
alarms.
⑤ Fingerprint input sensor: Put the fingerprint here.
⑥ Auto-On switch: No keyboard operation is required. Fingerprint
is automatically read in when placing the
finger on the fingerprint input sensor.
⑦ Microphone: It is connected to the internal interphone.
⑧ Reset Switch : In case the terminal is halted during operation
- 12 -
cause of unknown reason, you can push this switch to reset terminal.
- 13 -
1.4 L C D screen
n Initial screen
The initial screen of the terminal is as below. The icons in the
upper part of the LCD screen indicate the status of the terminal.
The logo in the middle of the screen can be defined by the
manager, and current date and time are displayed at bottom.
11 -JAN
09:25 :34
n Initial screen
The below table describes the icons in the LCD screen.
Icon
Description
The door is connected to the door lock
device.
The
door
is
open
after
the
user
authentication is validated.
The display language is English.
The display language is Korean.
Terminal mode
SO (Stand Alone): All operations take place
in the terminal alone.
NS (Network Server): Authentication is done
in the server.
NL (Network Local): Authentication is done
in the terminal and the log is saved in the
- 14 -
in the terminal and the log is saved in the
server.
The terminal is connected to the server.
The terminal is not connected to the server.
- 15 -
1.5 How to input fingerprint
When you enroll and authenticate user fingerprint, do the
followings to avoid authentication error:
5. Press your finger evenly to maximize the input area. If
we say the weakest push as 0%, and the strongest
push as 100%, apply 50~70% of force.
② Make sure that the core of the fingerprint is at the center of the
fingerprint input window. In general, the core of the fingerprint is
on the same line as the lunula of the fingernail. So locate the
lunula of the fingernail at the center of the fingerprint input
window.
- 16 -
1.6 Authentication types
With the NITGEN access control system, you can use fingerprints,
passwords, and RF cards (optional) for authentication. Depending
on customer environment, you can use one of the following
authentication types as you need.
n Fingerprint authentication
Use fingerprints to validate access authentication with the following
types:
• 1:1 authentication
In this mode, enter a pre-registered ID first and then a fingerprint.
The enrolled fingerprint corresponding to the ID will be compared
to the entered fingerprint on a 1:1 basis. The 1:1 authentication
type takes a short time regardless of the number of users. There
is no need to make any special settings in the system. After
entering the ID, enter the fingerprint to perform authentication.
• 1:N authentication
Only enrolled fingerprints are used for authentication. Though the
authentication procedure is simple, this method will take a little
longer than the 1:1 authentication if there are many users. There
is no need to make any special settings in the system. But
because there were many users, so it takes too much time to
authenticate, use ‘1:N Timeout’. The user who wasn’t
authenticated in timeout will have fail message. Refer to the ‘1:N
Timeout’ for more information.
• Short ID (SID) authentication
The user ID can be 4 – 15 digits long depending on the initial
setting. This method simplifies ID input procedure. Instead of
entering the entire registered ID, you can enter only the first part
- 17 -
of the ID for authentication. For example, if the user ID is 1234
567, enter 12 only and then the fingerprint. Then the system will
perform 1:N authentication for all Ids that start with 12xxxxx.
There is no need to make any special settings in the system.
• Group authentication
For group authentication, you can specify a group ID of 1 – 4 digits
long for each user group. You will enter a group ID and a
fingerprint for authentication. For example, you can use the unit
number for public housing like an apartment as a group ID. You
can specify a group ID when you register a user. Unlike other
methods, you must enter the group ID, and then press F1
before entering the fingerprint to perform group authentication.
• T/A authentication (Time & attendance)
Using the function keys (F1~F4), you can use the T/A mode. If you
press any function key before authentication, a T/A authentication
log will be saved. The T/A authentication log has the ID and the
function key code. For example, if your ID is 1234 and you press
the F1 key before authentication, the authentication log would be
1234+F1.
n
Password authentication
A password of 4 – 8 digits long is used to validate access
authentication. You can use this method in such a special case as
when the fingerprints are damaged.
n
RF card authentication (optional)
The RF card of a user is used to identify the user. You can register
the RF card number to the system in advance to provide against
loss or theft of the RF card.
n
Auto T&A (time & attendance) Mode
- 18 -
In this mode, 1:N identification will give you log data of the T&A
without pressing the function Keys (F1~F4). In Auto T&A Mode,
the initial screen will be change as below. In this mode, even
though you try just 1:N identification, you’ll successfully get the log
data that you want. You don’t have to press any function key.
F1
INPUT ID
:
11-JUL
09:25:34
1) How to get in the Auto T&A Mode
At first, you should setect the T&A mode in the menu of the
Function Mode and go to the initial screen. And then press the
function key you want for more than 4 second.
2) How to get out of the Auto T&A Mode
Press the cancel key for more than 1 second.
* TIP : You don’t have to input group ID during user registing,
if a terminal is used in T&A Mode.
- 19 -
Chapter 2
Environment Setup
2.1
2.2
2.3
2.4
2.5
2.6
2.7
2.8
Menu Configuration
Fingerprint Option
UI Option
Door Option
System Option
Gate Permission
Network
Factory Initialization
- 20 -
- 21
- 24
- 30
- 32
- 34
- 39
- 42
- 46
2.1 Menu Configuration
n Features
The terminal menu is configured as follows. You can use this menu
to set the initial environment, register users, and set the fingerprint
recognition device and the network. You can use the menu button
on the terminal keypad.
For more information on how to register, modify and delete users,
and check the version, please refer to Chapter 3.
Menu
User
Manager
FP Option
UI Option
Door Option
System Option
Command
1.
Register User
2.
3.
4.
Modify User
Delete User
Delete All
1.
2.
Sensor Option
Secu. Level
3.
4.
5.
6.
Capture Mode
Sensor Timeout
Auto-On Check
1:N Timeout
1.
Language
2.
3.
Voice
Beep
1.
2.
Open Duration
Warn. Duration
1.
2.
Encryption
Log
3.
RF Card
4.
5.
WIEGAND
Function Mode
6.
Terminal Mode
- 21 -
7.
8.
Time Setting
Timezone Mode
Gate Permit
1.
2.
3.
Date
Time [From]
Time [To]
Network
1.
2.
3.
4.
Terminal ID
TCP/IP
N/W Timeout
Port Number
Information
1.
2.
# of User
F/W Version
1.
DB Format
2.
3.
4.
FP Number
ID Length
Reset Term
Factory Ini.
n Master authentication
When you install the terminal for the first time, you can set the
environment without master authentication. But after the master
has been registered, you should pass master authentication to
change the terminal settings with menu.
In standalone mode without the network connection, the
first registered user will be the master. For more information
on how to register users, refer to "Register users" in
Chapter 3. When you register the first user, the default user
type becomes Master.
In network environment, you can choose either Normal or
Master for the first registered user. In other words, the
registration procedure of the first user is the same with
other normal procedure.
- 22 -
If you press the menu button to show the menu, the following
screen will appear for master authentication. Enter the Master ID
and proceed with the pre-defined authentication type (fingerprint,
password and RF) to display the menu.
Input
:1234
Master
Jan-31-03
ID
04:27
n Result screen
If you succeed, the following message will appear, followed by the
menu screen.
Success!
If you fail, the following message will appear and you will go back
to the initial screen. This failure message means that the changes
you made have not been applied.
Fail!
- 23 -
2.2 Fingerprint Option
Use this menu to set the operation environment of the fingerprint
input sensor. It has the following 5 submenus. Move to the
submenu you want to choose with the direction keys and press the
Enter key.
FP Option
1.Sensor Option
2.Secu. Level
3.C ap t u r e M o d e
4.Sensor Timeout
5.Auto-On
Check
6.1:N Timeout
n Sensor Option
Set the sensor options to get a clear fingerprint image. The sensor
option values are the internal settings of the CMOS image sensor.
You can set gain, brightness and contrast. The defaults of Gain,
Brightness and Contrast are 2, 40 and 20 respectively.
These values can largely affect the fingerprint recognition
performance because they are very sensitive. So it is highly
recommended that default values be used without any
modification if possible.
• Gain (1 / 2 / 4 / 8)
Sensor Option
1.Gain
(1/2/4/8):2
- 24 -
Enter a gain value and press the Enter key. Then the brightness
setup screen will appear.
• Brightness (0~100)
Sensor Option
1.Brightness
(0 - 100):40
Enter a brightness value and press the Enter key. Then contrast
setup screen will appear.
• Contrast (0~100)
Sensor Option
1.Contrast
(0 - 100):20
If the recognition performance is decreased because it is
very dry (i.e. in winter), adjust Brightness between 20 and
30 (recommendation: 20).
If the recognition performance is decreased because it is
very wet (i.e. in summer), adjust Brightness between 50
and 80 (recommendation: 60).
- 25 -
n Security Level
Specify security level if you use fingerprint authentication. You can
choose a level between 1 and 9. The greater the number is, the
higher the security level is. You can specify security levels for 1:1
mode and 1:N mode separately to use the system more efficiently.
In general, set the 1:N mode security level higher than the 1:1
mode one.
If a high level of security is required, you will need to specify
a high security level. But a high security level can increase
the false rejection rate (fail to authenticate the right person)
depending on the status of the fingerprint. In contrast, a low
security level may increase the false acceptance rate (allow
authentication for the wrong person).
• 1:1 mode
In this mode, you should input ID first and then your fingerprint.
The enrolled fingerprint corresponding to the ID will be compared
to the entered fingerprint on a 1:1 basis. So you can set lower
security level in this mode than in 1:N mode without degrading
security.
Secu. Level
1.1:1 Mode
(1 - 9): 5
• 1:N mode
In this mode, you need to input fingerprint only without ID. It is
recommended to set a higher security level in this mode than in
1:1 mode. The default is 8.
- 26 -
Secu. Level
2.1:N Mode
(1 - 9): 8
In the 1:N mode, if you set the security level too low, the
false acceptance rate may increase, resulted in degrading
security. On the other hand, if you set it too high, the false
rejection rate may increase, resulted in inconvenience.
n Capture Mode
『 Latent』 prevents recognition error possibly caused by latent
fingerprint image in the fingerprint input window because of sweat
or sebum. 『 Intelli』increases recognition performance against dry
finger or wet finger. The initial setting is 『 Latent』 . Move to the
value you want to choose with the direction keys and press the
Enter key.
CaptureMode
Normal / Latent
/ Intelli
- 27 -
This feature can increase security but it may slow down
authentication time. So if high level of security is required,
you can use this feature. But you'd better not use this
feature in an environment where convenience and
quickness are more important (i.e. when used for
attendance management).
n Sensor Timeout (1 ~ 30 seconds)
Set the timeout of fingerprint input. The LED blinks and the
terminal waits for fingerprint input during the specified seconds.
After that time, the LED will be turned off. The default is 『 5 』. Use
the number keys to enter the value and press the Enter key.
Sensor Timeout
(1 - 30): 5
n Auto-On Check
Auto-On check is an automatic finger detection function. If
someone place finger on the sensor, it detects finger and simuates
pressing Enter Key.
The initial setting is 『 ON』. Move to the value you want to choose
with the direction keys and press the Enter key.
Auto-On Check
ON / OFF
- 28 -
n 1:N Timeout Setting
In case of 1:N identification, FAIL message will occur if
identification is not completed within time that specified in Option
menu. This is for avoiding making users wait too long.
Decide whether to use 1:N Timeout. The initial setting is 『 ON』 .
Move to the value you want to choose with the direction keys and
press the Enter key.
1:N TIMEOUT
1. Use Timeout
ON / OFF
Next, you can set timeout value. If you choose『 OFF』 , this menu
won’t appear. The initial setting is 2 sec.
1:N TIMEOUT
2. Set Timeout
( 2 ? 9 ) : 2
- 29 -
2.3 UI (User Interface) Option
Use this menu to set the user environment such as display
language, voice instruction and alarm. The following three
submenus are provided. Move to the submenu you want to choose
with the direction keys and press the Enter key.
UI Option
1.Language
2.Voice
3.Warn. Beep
n Language
Select either ENG (English) or KOR (Korean) to set the language
for LCD screen display. Move to the value you want to choose with
the direction keys and press the Enter key.
Laguage
KOR / ENG
n Voice
Provide voice instruction on how to use the terminal for fingerprint
authentication. Move to the value you want to choose with the
direction keys and press the Enter key.
- 30 -
Voice
ON / OFF
n Button Beep
Decide whether to use button beep. Move to the value you want to
choose with the direction keys and press the Enter key.
Beep
ON /
OFF
- 31 -
2.4 Door Option
Use this menu to set the door open and close behaviors operated
by the terminal. Move to the submenu you want to choose with the
direction keys and press the Enter key.
Door Option
1.Open Duration
2.Warn. Duration
n Open Duration
Specify how long the door will be open after user authentication is
validated. You can specify a value between 1 and 20. Use the
number keys to enter the value and press the Enter key.
Open
(1 -
Duration
20) : 5
n Warning Duration
It gives an alarm if the door is still open after the specified time
elapses. If the alarm sounds, check why the door is not closed and
take necessary steps to make sure that the door closes normally.
Specify a value between 1 and 20, but it should be greater than
the door open time. Use the number keys to enter the value and
press the Enter key.
- 32 -
Warn. Duration
(1 - 20) : 10
These features may not work in some types of doors.
- 33 -
2.5 System Option
Use this menu to set the terminal system. The following 7
submenus are provided. Move to the submenu you want to choose
with the direction keys and press the Enter key.
System Option
1.Encryption
2.Log
3.RF Card
4.WIEGAND
5.Function Mode
6.Terminal Mode
7.Time Seting
8.Time z o n e M o d e
n Encryption
Decide whether to encrypt incoming and outgoing content of
terminal in network communication. Move to the value you want to
choose with the direction keys and press the Enter key.
Encryption
No Use/DES
If you use encryption, security and system stability will be
enhanced. On the other hand, it will take longer to perform
encryption and decryption.
- 34 -
n Log
Decide whether to save access information. If the terminal is
connected to the network, access information is transferred to the
server in real-time, whereas if it is in standalone mode without
network connection, information is saved within the terminal. Move
to the value you want to choose with the direction keys and press
the Enter key.
Log
ON /
OFF
You can save up to 3,000 latest events in a terminal.
n RF Card
Decide whether to use RF card for user authentication. Move to
the value you want to choose with the direction keys and press the
Enter key.
RF
ON
Card
/ OFF
RF is optional. If the terminal is not equipped with RF
module, this feature is not available.
- 35 -
n Wiegand
Decide whether to use wiegand protocol for tr ansmission
authentication result and user ID to sever.
WIEGAND
OFF/26bit/34bit
Wiegand communication works only if the length of user ID
is 4 digit.
n Function Mode
Set the function keys of the keypad (F1 ~ F4) either for access
control (AC) or for time & attendance (T&A). If you choose 『 AC』,
F1 will be used for group authentication. If you choose 『 T&A』 ,
function keys from F1 to F4 will be used for time & attendance arriving, leaving, going out for outside duty and coming back from
outside duty (inter-operating with the time & attendance software is
required). Move to the value you want to choose with the direction
keys and press the Enter key.
Function
AC / T&A
Mode
- 36 -
n Terminal mode
The terminal can be used in one of the following three modes.
Move to the value you want to choose with the direction keys and
press the Enter key.
• SO (Standalone Only):
One terminal is used independently. All settings such as user
registration, deletion, and access control are performed in the
terminal alone. Event log information is saved within the terminal.
• NL (terminal authentication):
User authentication is done by the terminal while various log
events are sent to the server in real-time instead of being saved
within the terminal.
• NS (server authentication):
User authentication is done by the server.
Please refer to the authentication modes described above and
choose the proper one.
Terminal Mode
SO / NL / NS
n Time Setting
Set the current date and time to be displayed in the LCD screen.
Use the number keys to enter the date and time. When you enter
the year and press the Enter key, the cursor moves to “month,”
and so on (year →month →day →hour →minute →second). Use
the 24 hour format for hour setting.
- 37 -
Time
2003
02 :
Setting
/ 04 / 17
37 : 13
n Timezone Mode
Set the current timezone mode. There are 2 kinds of Timezone Mode.
You must select one of them in this menu. The initial value is the
Complex mode.
1) Simple mode
Please refer to ‘Gate Permission’ .
2) Complex mode
In this mode, you can control the permission of a terminal and each
user separately. For setting in detail, you have to use the Access
Manager software. Refer to the software manual for more information.
You cannot control the complex timezone in detail on the Terminal
Menu.
T i m e z o n e
M o d e
Simple / Complex
- 38 -
2.6 Gate Permission
Use this menu to set the permission time of the access control
system. The following three submenus are provided.
Gate Permission
1.Date
2.Time [From]
3.Time [To]
n Date
Specify days of the week when the terminal is enabled. By default,
all days of the week are checked with 『 *』. The terminal is enabled
on the day with the mark . Use the direction keys to move to the
day and press the Enter key to set the availability. If you press the
Enter key on an enabled day with the check mark, it becomes
disabled. Keep in mind that access is prohibited on disabled days.
Date
Mon *
Tue *
Wed *
Thr *
Date
Fri *
Sat *
Sun *
Save &
Exit
When you complete the setting, select 『Save
- 39 -
&
Exit』.
n Time [From]
Set the start time of the day when the terminal begins to work. For
example, if you want to use the terminal from 9 am to 9 pm, set the
start and end times respectively as follows. Use the number keys
to enter the value and press the Enter key.
Time
(0 -
[From]
24) : 9
n Time [To]
Set the end time of the day when the terminal stops to work. Use
the number keys to enter the value and press the Enter key.
Time
(0 -
[To]
24) :
21
- 40 -
If you restrict access time, user access is allowed only
within the specified time frame. But the authentication can
be enabled by the terminal master who has the authority to
change the time restriction setting with menu.
If you want to specify the time expending two days such as
from 1 pm today to 2 am the next day, set the start time as
13 and the end time as 2.
You cannot change Gate Permission, when timezone mode
is not “Simple”.
- 41 -
2.7 Network
Use this menu to set the network environment to connect the
terminal to the network. The following four submenus are provided.
Move to the submenu you want to choose with the direction keys
and press the Enter key.
Network
1.Terminal ID
2.TCP/IP
3.N/W Timeout
4.Port Number
n Terminal ID
Set a unique ID for the terminal. Considering that several terminals
can be connected to the server via the network, make sure that the
ID matches the one specified in the management program.
Terminal ID
(1-255) : 1
n TCP/IP
Set TCP/IP of the terminal.
① DHCP
You can decide whether to use DHCP that automatically assigns
IP addresses to network clients. If you choose to use DHCP by
selecting 『 ON』 , you can skip step ② and ③.
- 42 -
TCP/IP
1.DHCP
ON / OFF
② Terminal IP
An IP address consists of 4 numbers and each of the number
has 3 digits. Entering all 3 digits for a number will move the
cursor to the next field so that you can start to enter the next
number. But you should press the Enter key to move to the next
field if a number has less than 3 digits.
2.Terminal IP
__0.
0.
0.
0.
③ Subnet Mask
The first two numbers of Subnet Mask are fixed as 255.255.
Enter the rest numbers with the same way as you enter the
terminal IP address.
3.Subnet Mask
255.255.__0.
0.
- 43 -
④ Gateway
Enter the Gateway address with the same way as you enter the
terminal IP address.
4.Gateway
__0.
0.
0.
0.
Whenever Gateway address changed, Terminal would be
reset. This helps reconnecting of network.
⑤ Server IP
Enter the server IP address with the same way as you enter the
terminal IP address.
4.Sever IP
__0.
0.
0.
- 44 -
0.
n Network Timeout
When the terminal communicates with the server via the network,
it will be assumed that the network connection is disabled if there
is no response within the specified time. You can specify a value
between 2 and 20. If the network environment is not stable, start
with 5 seconds and then increase the value gradually.
N/W Timeout
(2 - 20) : 10
If the server communication cycle is too short, it may cause
too much communication burden on the networking. If it is
too long, the real-time monitoring system may not work well.
So set the value properly for your environment.
n Port Number
Set the port number for when the terminal communicates with the
server via the network. You can specify a value between 1 and
65535.
Port Number
: 7332
- 45 -
2.8 Factory Initialization
Use this menu to initialize the current settings to factory defaults.
To use『 FP Number』 or 『 ID Length』, you must
delete all users because they are not available if there is left any
one registered user.
Factory Ini.
1.DB Format
2.FP Number
3.ID Length
4.R e s e t T e r m
n DB Format
Format the flash memory where user information is stored and the
memory where log information is stored. If you select DB Format,
the following message appears.
DB Format
YES / NO
Choose “YES” to start formatting. The following message will
appear, showing you that formatting is in progress.
Formating…
- 46 -
When formatting is complete, you will return to the initial screen.
Factory Ini.
1.DB Format
2.FP Number
3.ID Length
4.R e s e t T e r m
n Fingerprint Number
Choose the number of fingerprints you can enroll for each user ID.
Move to the value you want to choose with the direction keys and
press the Enter key.
Fixed Option
FP Number
1 / 2
If you choose 1, you can register up to 4,000 users, and if
you choose 2, you can register up to 2,000 users.
n ID Length
Specify the user ID length between 4 and 15.
Fixed Option
ID Length
(4 - 15) : 4
- 47 -
You can't change the ID length if there is left any one
registered user.
n Reset Terminal
Resetting the Terminal without disassembling. When following
message appear, choose “YES” to reset
Are You Sure?
Y E S / N O
- 48 -
Chapter 3
How to Use
the Terminal
3.1 User Manager
3.2 Information
- 49 -
- 50
- 64
3.1 User Manager
Use this menu to manage the database where user information is
stored. You can access this menu only through master
authentication. (Refer to "Master authentication" in Chapter 2.)
Four submenus are provided: Register User, Modify User, Delete
User and Delete All. Move to the submenu you want to choose
with the direction keys and press the Enter key.
User Manager
1.Register User
2.Modify User
3.Delete User
4.Delete All
If the terminal mode is NL or NS, only 『Register
User』 will be displayed on the screen. The other
features are available only in the server.
n Register User
Register users who will use the access control system. User
information will be stored in the database. After you pass master
authentication, use the following procedure to register users.
- 50 -
In SO terminal mode, user registration is performed in the
terminal. In NL or NS terminal mode, it is done in the terminal
or the server. In the NL or NS mode, however, you can
register users as long as the network works well. If the
terminal is disconnected, you can't register users.
If you want to change the SO terminal mode to NL or NS,
you must delete the entire users in the terminal database
and re-register.
① Input ID
If you choose Register User, the below screen will appear so
that you can input a user ID. Enter an ID and press the Enter key.
If an identical ID already exists, an error message will appear
and you will go back to the previous menu.
Input
:
ID
To modify the ID during the input process, use the Cancel
button. Pressing the Cancel button will delete numbers one
by one if there are any numbers entered. If there's nothing,
you will return to the upper-level menu.
② Input Group ID
When you finish Input ID process, the next Group ID screen will
appear so that you can specify the group where the user
belongs to. If you do not want to use the group ID, press the
- 51 -
Enter key to move to the next step. Input a group ID in 4 or less
digits, and press the Enter key.
Inpur
:
0
Group
ID
If you did not select group ID in the initial environment setup,
the group ID input step will be skipped.
③ User Type
Choose Normal or Master user type. Use the direction keys to
make a choice, and press the Enter key to finalize the setting.
• Normal: Normal users do not have the privilege to manage the
terminal. They will have the access privilege only after they pass
authentication.
• Master: As terminal managers, master users have door access
privilege and can manage the user database and set the
environment with corresponding menu items.
User Type
Normal / Master
④ Authentication Mode
Choose one of user authentication modes - fingerprint,
- 52 -
password, RF card and several combinations of the three.
Move to the value you want to choose with the direction keys
and press the Enter key.
Authen.
FP
PW
RF
FP / PW
FP
PW
FP
FP
PW
FP
Mode
/ RF
/ RF
& PW
& RF
& RF
& PW & RF
If you did not select RF when you setup the system, any
authentication modes including RF will not be displayed in
the screen.
• How to use the authentication modes
※Legend: FP (fingerprint), PW (password), RF (RF card),
Enter(8 )
“/” (OR combination), “&” (AND combination)
Classification
FP
Description
Authenticate by fingerprint only.
① ID + fingerprint (1:1 authentication)
② fingerprint input (1:N authentication)
- 53 -
PW
Authenticate by password only.
① ID + 8 + PW + 8
RF
Authenticate by RF card only.
① RF
FP/PW
Authenticate by fingerprint or password. Try
fingerprint first. If you input the ID first and
fails in the fingerprint authentication, you can
try password authentication. But if you fail in
the fingerprint authentication without ID input,
you can't try password authentication and
authentication fails.
① ID + FP (if FP fails, try PW +8 )
② FP (if FP fails, authentication fails)
FP/RF
Authenticate by fingerprint or RF card. Try
fingerprint first.
If you input the ID first and fails in the
fingerprint authentication, you can try RF card
authentication. But if you fail in the fingerprint
authentication without ID input, you can't try
RF card authentication and authentication
fails.
① ID + FP (if FP fails, try RF)
② FP (if FP fails, authentication fails)
③ RF
PW/RF
Authenticate by password or RF card.
① RF
② ID + 8 + PW + 8 (if PW authentication fails,
try RF)
- 54 -
FP&PW
Authenticate by fingerprint and password. You
should succeed in both.
① FP + PW + 8
② ID + FP + PW + 8
FP&RF
You should succeed in both fingerprint and RF
card.
The
following
three
methods
are
available.
① RF + FP
② FP(1:N authentication) + RF
③ ID + FP + RF
PW&RF
You should succeed in both password and RF
card.
① RF + PW + 8
② ID + 8 + PW + 8 + RF
FP&PW&RF
You should succeed in fingerprint, password
and RF card.
① FP + PW + 8 + RF
② ID + FP + PW + 8 + RF
③ RF + 8 + FP + PW + 8
When you try one of the above modes, short ID and group ID
authentications are also available (refer to "1.6 Authentication
types" in Chapter 1).
⑤ Input Fingerprint
If you select fingerprint authentication mode or other one that
includes fingerprint authentication, you must input your
fingerprint. You should do it twice. After the first input, take your
finger off, and then input the fingerprint again.
Place the fingerprint on the sensor.
- 55 -
Place
FP
1
If the following screen appears after the first fingerprint input,
take your finger off from the sensor.
Remove
FP
Place the same fingerprint again.
Place
FP
2
If the fingerprint input is successful, a success message will
appear. If it fails, a failure message will appear and you will
return to the initial registration screen.
⑥ Input password
If you select password authentication mode or other one that
includes password authentication, you must enter the password.
- 56 -
Password can be 4 - 8 characters long.
Input
:
Passwd
1
For security, password is displayed as 『 *』 .
Input
:* * * *
Passwd
1
Enter the password again for confirmation.
Input
****
Passwd
2
If the password input is successful, a success message will
appear. If it fails, a failure message will appear and you will
return to the initial registration screen.
⑦ Input RF card.
If you chose to use RF card when you setup the system, use the
RF card to register the user. Place the RF card near the
fingerprint input sensor. If you did not choose the RF option
- 57 -
when you setup the terminal environment, press the Enter key to
go to the next step.
Contact RF
On Sensor
Card
If the RF input is successful, a success message will appear. If it
fails, a failure message will appear and you will return to the
initial registration screen.
n Modify User
Use this feature to change the information on a registered user.
You can change fingerprint, password, group ID, RF card,
authentication mode and user type. fI you select『Modify
User』, the following screen will appear so that you can enter
the user ID whose information you want to modify.
Input
1234
ID
Enter the ID and press the Enter key, and you'll see the following
items in the displayed screen. Move to the submenu you want to
choose with the direction keys and press the Enter key.
- 58 -
Modify User
1.FP
2.Authen. Mode
3.User Type
4.Group ID
5.Password
6.Change RF
• Fingerprint
Change the fingerprint of each registered user. As you did in the
first fingerprint enrollment, input the fingerprint twice. After the
first input, take your finger off, and then input the fingerprint
again.
Place the fingerprint on the sensor.
Place
FP
1
If the following screen appears after the first fingerprint input,
take your finger off from the sensor.
Remove
FP
Place the same fingerprint again.
- 59 -
Place
FP
2
• Password
Change the password of each registered user.
Enter a new password.
Input
****
Passwd
1
Enter the password again for confirmation.
Input
****
passwd
2
• Group ID
Change the group ID where the user belongs to.
Enter a new group ID. If you don't want to use a group ID, press
the Enter key to skip this step.
- 60 -
Input Group
:
0
ID
• Change RF Card
Change the RF card of each registered user.
Contact RF
On Sensor
Card
• Authentication Mode
Change the authentication mode of each registered user.
Select a new authentication mode you want to use.
Authen.
FP
PW
RF
FP / PW
FP
PW
FP
FP
PW
FP
Mode
/ RF
/ RF
& PW
& RF
& RF
& PW & RF
- 61 -
• User Type
Change a user type of each registered user.
Choose either Normal or Master.
User Type
Normal / Master
n Delete User
Enter the user ID you want to delete.
Input
:2222
ID
The below confirmation screen will appear. Choose either YES or
NO, and press the Enter key.
Are You
YES / NO
Sure?
n Delete All
Delete all registered users in the terminal.
- 62 -
Choose either YES or NO, and press the Enter key.
Are You
YES / NO
Sure?
All registered users in the terminal will be deleted. Please
use this feature very carefully.
- 63 -
3.2 Information
You can check the terminal information with this menu.
Information
1.# of User
2.F/W Version
n Number of User
It shows you the total number of users registered in the terminal.
The number of normal and master users are displayed separately
on the screen.
# of User
Normal: 124
Master:
4
n Firmware Version
It shows you the firmware version of the terminal.
F/W
1.0
Version
- 64 -
Appendix
Appendix Ⅰ
- 66
(Network Connection Problems)
Appendix Ⅱ
- 69
(Terminal Initializing Problems)
Appendix Ⅲ
- 70
(Sound Modification Guide)
Appendix Ⅳ
- 71
(Direct Sunlight problems)
Appendix Ⅴ
- 73
(Frequently Asked Question)
- 65 -
Appendix Ⅰ - Network Connection Problems
To solve the connection problem between Server and
Terminal
If terminal is not connected on server via network, please check
the followings:
■
Not registered terminal on server
Please register the terminal on server
001
Contact
Not
■
Master
Registered
Invalid terminal ID
After check the terminal ID, please set another valid one (1~255)
002
Contact
Invalid
■
Master
TID
Different user ID length of server and terminal
Please set the same USER ID Length for server and terminal
003
Contact
ID
Master
Length
Err
- 66 -
■ Different number of fingerprint to register of server and
terminal
Please set the same number of fingerprint to register for sever and
terminal.
004
Contact Master
Finger Cnt Err
■
Terminal ID confliction
Please change Terminal ID with unregistered one
005
Contact
TID
■
Master
Conflicted
Invalid MAC address
Please contact Customer Service Center (☎ 82-2-3415-1800)
006
Contact
MAC
Master
Addr
Err
- 67 -
■ Invalid Firmware Version
Please upgrade Firmware. If the versions of Access manager SW
and Firmware don’t match, the terminal won’t work well.
In this case, please feel free to contact us. Our office phone
number is 82-2-3415-1600
007
Contact
I n v a l i d
Master
F W V e r
- 68 -
Appendix Ⅱ - Terminal Initializtion Problems
To solve the error occurred during initializing
Refer the countermeasures for possible malfunctions during
initializing after supplying power to Terminal as followings ;
Err. Code
001
002
003
004
005
Description
Countermeasure
Undefined Error
FPGA
Rebooting or A/S
Initialization
Failure
LCD
Initialization
Failure
RTC
Rebooting or A/S
Check LCD module connection
or A/S
Initialization
Failure
Optic module error
A/S
Check optic module connection
or A/S
010
A/S
011
A/S
012
A/S
013
System Software Error
A/S
014
A/S
015
Rebooting
016
A/S
※ Error code 001,002 and 003 are not displayed on LCD screen,
but recognized by Beep
Error code 001 : 1 time beeping every 5 sec.
Error code 002 : 2 times beeping every 5 sec.
Error code 003 : 3 times beeping every 5 sec.
- 69 -
Appendix Ⅲ
How to control the volume of voicing guide
How to connect with external speaker system
A. Turnnig the volume up
We have fit the volume of voicing guide the best condition. But in
case the environment is noisy, you might not hear it.
To turn it up, you have just only to connect jumper (J6) inside
terminal.
※ This may cause tone quality to degrade a little, because the
speaker being used in terminal is small.
B. Connection external speaker
To meet your need of louder voicing guide, we prepare the
connector for external speaker. Connecting with an external
speaker having amplifier, you’ll be able to get louder voice guide.
※
Connect an external speaker with connector (J4) inside a
terminal. This is the definition of connector
1th Pin : GND
2nd Pin : OUTPUT
- 70 -
Appendix Ⅳ
Direct Sunlight problems
How to improve decreased recognition rate due to direct
sunlight
1) Why direct sunlight should be blocked during
fingerprint authentication
Like a camera, the fingerprint recognition device captures an
image. If there is a large amount of light, the image gets darker
and becomes hard to recognize.
Unlike a camera, the device not have a shutter or an iris. So you
should block direct sunlight yourself.
2) Where to install
As all our products are optical products that can be affected by
direct sunlight, avoid the following places when you install.
① Next to the window likely to get direct sunlight
② Outdoors where there is no awning
3) How to improve recognition rate in case direct sunlight
cannot be avoided
① Stand with the sun behind your back.
(As shown in the figure, use your body to block direct sunlight.)
- 71 -
② Cover the sensor with your free hand as if you wrap your hand
around it.
③ Use a tool like a parasol to block sunlight during authentication.
- 72 -
Appendix Ⅴ FAQ (Frequently Asked Question)
Fingerprint authentication does not work.
What can I do?
1. On a cold day or right after you wash your hands, your
fingerprints easily get dry. And if your hands are contaminated
with dirt or dust, your fingerprints will also get dry. In these
cases, apply a moisturizer to return them to their normal
condition before trying fingerprint authentication.
2. When you have difficulties with fingerprint authentication, it is
desirable to try the verification authentication method (enter
your ID and get it compared to your original fingerprint on a 1:1
basis) rather than the identification authentication method (try
authentication without entering your ID). NAC-3000 also
supports SID that allows you to try authentication after pressing
only first 2 digits of your ID, which provides better fingerprint
recognition rate than the identification authentication method.
3. In case your fingerprint gets transformed by a wound, and thus
becomes different from the saved one, you can use a password
or an RF card as a supplementary authentication tool.
4. If you use the server authentication mode (NS mode) among
network authentication modes and the server is also used as a
personal or a business PC, the load on the PC will increase
due to the additional works other than authentication, thereby
decreasing the authentication rate. If you do not use a
dedicated NAC-3000 server, please use the terminal
authentication mode (NL mode).
- 73 -
The Auto-on function does not work or malfunctions.
1. The device does not work even if you place your fingerprint on
the fingerprint input window.
First of all, check if the Auto-on function is set to OFF. If so,
change it to ON. If it does not work after you change the
setting, please contact NITGEN Customer Support Center.
NITGEN Customer Support Center
(82-2-3415-1600, [email protected])
2. The device continues to work even if you do not place your
fingerprint on it.
When the LED of the fingerprint recognition device blinks
repeatedly, when you reset the terminal power, the LED may
blink for a certain amount of time, and the Auto-on function may
not work. In this case, please contact NITGEN Customer
Support Center.
3. The device malfunctions when you use the RF card.
In NAC-3000R, if you place the RF card on the terminal for
authentication, the Auto-on sensor can be activated. It may
happen mainly with our old-version products. In this case,
please contact NITGEN Customer Support Center.
The RF card authentication doesn't work.
First of all, check if the RF card function is set to OFF. If so,
change it to ON. If it does not work after you change the
setting, please contact NITGEN Customer Support Center.
How can I upgrade the firmware?
- 74 -
Use Access Manager to download the firmware (binary file)
provided by NITGEN from the server to the terminal.
(using TCP/IP)
The terminal makes a buzz.
Depending on the type of the interphone connected to
NAC-3000, there may be serious howling. If you use Kocom's
interphone (DP-202H) that has proven compatibility with
NAC-3000, howling can be eliminated.
Is there any countermeasure against static electricity?
NAC-3000 obtained CE certification with regard to ESD
(Electro Static Discharge), and passed the internal QA
certification test. So we guarantee that this device satisfies
Level 3 (Contact: 6kV, Air: 8kV) of the IEC 61000-4-2 standard.
However, if it is installed in wintertime or in a place with low
humidity and carpeted floor, 35kV of static electricity can be
discharged to people. So please exercise caution when using
the device in such an environment.
What can I do if the device is destroyed by an intruder?
Depending on installation methods, NAC-300 can be
categorized into the general type and the buried type. As the
buried type is kept inside the wall, it is safe from accidental
damage. The general type is protected with a metal bracket
and cannot be damaged easily. However, in case someone
tries to destroy or disassemble it by force, the tamper switch
works with alarm sound.
- 75 -
FCC NOTICE
THIS DEVICE COMPLIES WITH PART 15 OF THE FCC RULES.
OPERATION IS SUBJECT TO THE FOLLOWING TWO CONDITION:
(1) THIS DEVICE MAY NOT CAUSE HARMFUL INTERFERENCE, AND
(2) THIS DEVICE MUST ACCEPT ANY INTERFERENCE RECEIVED,
INCLUDING INTERFERENCE THAT MAY CAUSE UNDERSIRED
OPERATION.
This equipment has been tested and found to comply with the limits for a
Class B digital device, pursuant to part 15 of the FCC Rules. These limits are
designed to provide reasonable protection against harmful interference in a
residential installation.
This equipment generates, uses and can radiate radio frequency energy and,
if not
installed and used in accordance with the instructions, may cause harmful
interference to radio communication. However, there is no guarantee that
interference will not
occur in a particular installation. If this equipment does cause harmful
interference to
radio or television reception, which can be determined by turning the
equipment off and on, the user is encouraged to try to correct the
interference by one or more of the following measures :
- Reorient or relocate the receiving antenna.
- Increase the separation between the equipment and receiver.
- Connect the equipment into an outlet on a circuit difference from that to
which
the receiver is connected.
- Consult the dealer of an experienced radio/TV technician for help.
- 76 -
NOTE : The manufacturer is not responsible for any radio or TV interference
caused by
unauthorized modifications to this equipment. Such modifications could void
the user’s
authority to operate the equipment.
CAUTION : Changes or modifications not expressly approved by the party
responsible
for compliance could void the user’s authority to operate the equipment.
- 77 -