1
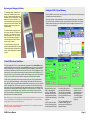
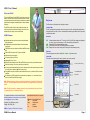
GEM-2 User’s Manual
What is the GEM-2?
This is the 2008 model of the GEM-2. While it has several new
features, the basic sensor function remains the same: it measures apparent electrical conductivities at multiple user-selected
frequencies and magnetic susceptibility at the lowest selected
frequency.
iPaq Layout
The iPaq screen is divided into the following four areas:
The GEM-2 consists of the ski that contains all sensing elements, an electronics enclosure that plugs onto the ski, a detachable iPaq for display, and a shoulder strap.
Command Bar:
The left– and right-hand command buttons correspond to the left– and right-hand push buttons
along the bottom of the iPaq. All four command buttons become green when active. Only active
commands are visible.
GEM-2 Features
Status bar:
Attached electronics enclosure permits easy field battery
pack replacement
Simplified electronics extends battery life and eliminates
cooling fans
PDA/IPaq as the user interface with full WinceGEM functionality
External GPS connector with 12V power available
BAT
GPS
STA
LINE
Shows the battery health: the 1st warning is at 15%; the BAT bar background changes to
red, along with a continuous beep, at 10%; the transmitter will stop at 5%
Represents PPS and quality/satellite number
A/D overload, turns RED when analog inputs are overloaded
Displays the line number, starting from 0, during the dead reckoning survey
Data Area:
This area displays survey data in StripChart, Contour, or Spectrum mode.
Dead reckoning survey option
Control Bar:
This area contains commands for setup, operation, and survey controls.
Frequency range up to 90 kHz
Lightweight: 8 lbs or 3.6 kg
Bluetooth communication to the PDA and RS232 serial ports to any other external devices
Power On (side of iPaq)
Real time “painting” of the survey area for quick data look
No need to download data after each survey: data are stored in the internal memory as well as
on the SD card in separate .gbf files for each survey.
The .gbf files may be converted to .csv format after the survey on either the PDA or another
computer.
On demand, the PDA displays the environmental noise spectrum (i.e., transmitter off) and
stores it on the SD card for later analysis.
Command Buttons
Status Bar
Note: This manual assumes that you are familiar with the basics of operating the iPaq and Windows CE. The Getting Started Guide that comes with the iPaq supplies most of the necessary
details..
Data Area
Note: The iPaq included in the package contains the original manufacturer’s warranty. Should
you need repair service, contact them directly.
For updated information on this and other Geophex
products, please visit www.geophex.com, send email
to [email protected], or write to
Geophex, Ltd., 605 Mercury Street
Raleigh, NC 27603, USA
Control Bar
Some abbreviations used in this manual:
SD card:
Tx:
Cfg:
I:
Q:
Secure Digital Card
Transmitter
Configurations
Inphase
Quadrature
Mark/LnRes
Log
GEM is a Registered Trade Mark of Geophex
GEM-2 User’s Manual
Page 1
Replacing and Charging the Battery
To replace the battery, unscrew the two
battery door thumbscrews and remove
the door. Grasp the battery tab and pull
the battery out of the compartment. If the
battery tab is missing, stand the ski on
end with the battery opening facing down,
place one hand to catch the battery, then
tap the ski gently on the ground to dislodge the battery.
Getting the GEM-2 Up and Running
Power the GEM ski and the iPaq. Tap the Geophex icon on the screen and wait for the program
to establish communication with the ski.
Select type of display: Stripchart displays the data for a selected frequency or other parameters such as Q-sum for the last 20 seconds, using the PDA time unless GPS is used. Contour
displays realtime 2D painting of the selected data. Spectrum displays instantaneous I/Q response over all frequencies.
To install the battery, simply plug it into
the console, label-side up. If it doesn’t go
all the way in, it’s upside-down. Simply
remove the battery, turn it over, and try
again. When the battery is plugged in,
install the battery door and two thumbscrews to hold it in place.
To charge the battery, plug it into the
external charger supplied with the system.
Follow the instructions provided with the
charger. Normal charging time is about 40
minutes.
WinceGEM Software Installation
The iPaq supplied (HP iPAQ 111 Classic Handheld) is preloaded with the WinceGEM operating
software with backup files in the SD card in the InstallGEM2 directory. For a new (re-)installation,
take the following steps: in the directory InstallGEM2, tap the WinceGEM.cef, select Device as
the location to install and tap Install on the bottom left of the screen. Once the installation is completed, tap OK on the top right corner and repeat the same procedures for the EMExport.cef. To
set up the Geophex logo as a shortcut, tap Start, select Settings; in the Personal tab select the
Today icon, in the Items tab uncheck all items, leaving just the WinceGemPlus selected.
Set Bluetooth as the default to communicate with the ski (ski power ON). Tap the Bluetooth
icon to go to the Bluetooth Manager; under the Setting General tab turn Bluetooth on and
select Default. Tap the Accessibility tab and check Allow other devices to connect; select All
devices and check Other devices can discover me; also check Use PocketPC device name
for Bluetooth. On Services tab select Serial Port, check Enable services, click the Advanced
command button and verify that the Inbound COM port is 5 and Outbound is 6. Tap OK on the
top right corner and click Manager button; select Active Connection tab; select New; scroll
down and select Explore a Bluetooth Device; select Next and wait for the iPaq to find the ski
Bluetooth and set it as the default COM port.
Note: During a survey, we strongly recommend that the iPaq be left attached to the top of the ski
console; its removal may cause a slight offset in the background data. For remote applications,
the iPaq can be removed up to 10m from the ski.
Note: The user may opt to disable the Bluetooth and instead use a PC connected by hardwire to
an RS232 on the ski to another computer.
GEM-2 User’s Manual
Regional Settings: select
50Hz or 60Hz powerline
frequency. The GEM data
will contain a column showing the powerline amplitude
in milliGauss at the selected
frequency.
If GPS is used, also select
the zone of the survey area
and the desired GPS output.
As a default, iPaq communicates with GEM via Bluetooth.
The outbound port of the Bluetooth must be set as the GEM
Port in the Setup/Ports menu,
baud 115,200.
The Ports menu allows the user
to switch to RS232 if the user
wants to control the GEM from a
separate computer.
Router Port from the
Setup/Ports menu
allows the selection of
the GPS baud rate.
The GPS must be set
to send the GPGGA
string only.
Page 2
Check/Change Frequencies
The GEM transmits four frequencies as factory default. Modify
the number of frequencies by selecting Cfg from the Control
Bar and then Frequencies from the menu. Reduce the number of frequencies to three for higher moments. A maximum
of five, log-spaced frequencies is recommended. Adjust
Base periods to average to control the number of 30 (25)Hz
base periods stacked before output occurs.
Select one of the frequencies; then select one of the
options and modify the frequency as desired.
Start Tx and wait until the
Log button becomes available.
Clicking Log will start the
survey; at this point the operating system will open a dedicated file to store the data in
the internal iPaq memory and
a backup in the SDC. By the
end of the line, press Log
again.
Move to the next line and
press Log again; the line
number in the status bar
will increment by one.
Survey
Select Survey area from the Cfg menu.
Insert survey area parameters; select
the corner to start the survey and direction. If GPS is not selected, the survey
will be regarded as dead reckoning.
GEM-2 User’s Manual
From the Contour command bar select Sensitivity/Scheme in order to pick I (inphase) or Q
(quadrature) of a frequency or Qsum to be displayed/painted on the survey area.
When the survey is completed, stop Tx. The contour
color scale may be adjusted
by selecting Sensitivity
from the Contour menu.
From the Contour control
bar select Smooth Image.
This is an example of a
basic contour map of a
survey area.
Page 3
Export the Survey Data
Other Advanced Features
From Run control bar select Close
Survey and then select Export
Survey. Tap on the file to be located and exported to the SDC
directory SDgemdata. If a GPS
survey was conducted, an
xg...gem.csv will be created; for
dead reckoning, an xr...gem.csv.
Select survey parameters for dead reckoning,
enter the line length and spacing, then the X,Y of
the starting point and Export. A .csv file with the
same name will be created on the SDC. If SDC is
unavailable, the file will be saved in the iPaq
memory. If the survey was done with a GPS, then
click the GPS box. If Degrees is selected, the
data will be exported in lat-long degrees; otherwise in UTM.
Note: the .gbf file can be transferred to a PC and
exported with the PC Export Utility Provided. This
may be faster for large surveys.
Advanced Features
Show GPS will pop up a
window showing the external GPS received string.
See below for details.
Battery status will display
the GEM’s battery information
From Cfg menu select
Filtering; the processor
performs smoothing of the I
and Q data in time. A moving median filter is applied
followed by a moving average filter.
Log menu allows selection of
data logging mode. If you
enter a non-zero value for
the Time period, samples
are logged for the specified
number of seconds each
time the Logging button is
clicked. This mode can be
useful for recording data at
discrete locations.
Male DB9 Connector:
The male DB9 connector provides RS232 input from an external device such as a GPS receiver. The following communication parameters are used:
Baud rate
Data Bits
Parity
Stop Bits
Handshaking
Selectable on the Router Port 9600 or 4800
8
None
1
None
Connecting an external GPS:
When an external GPS is connected to the ski, the following conditions apply:
Environmental Passive Noise Spectrum is available
under the Run menu. This shows the background
EM noise level (the Tx is off) and can be useful for
avoiding noisy frequencies. If very noisy, you may
postpone the survey until off-hours or weekend.
GEM-2 User’s Manual
The Environmental Active Noise
Spectrum under the Run menu
(the Tx is on) allows the user to
visualize the transmitted frequencies above the background noise.
1. The GEM utilizes the PPS signal provided by the GPS at pin 8 of DB9 connector. Serial
communication is supported with GPS transmitted data at pin 2 and GPS received data at
pin 3. Pin 5 is GND. Pin 9 is +12V (500mA maximum), supplied by the GEM. Please
confirm compatibility with your particular GPS before using the +12V supplied.
2. GPS unit must be set to send the $GPGGA (time of next PPS pulse) once per second.
3. GEM will automatically synchronize its internal clock to the GPS time. The $GPGGA
strings are stored along with the EM data.
4. The Status Bar GPS indicator displays the presence of the GPS signal by displaying (+)
when PPS is present, along with the GPS quality/number of satellites.
Page 4
Female DB9 Connector:
The female DB9 connector provides RS232 communication to a computer. A standard RS232
DB9 cable (male-female) and RS232-to-USB2 adapter is supplied for connecting to a PC. The
WinGEM software supplied with the system uses this connection to remotely control the GEM-2.
The following communication parameters are used:
Baud rate
Data Bits
Stop Bits
115,200
8
1
Parity
Handshaking
None
None
Communication between Ski and Computer
To transfer the communication of the ski from the iPaq’s Bluetooth to computer RS232, click
Setup, then Ports and select Switch GEMPort to RS232. The password is 1234.
To transfer the GEM2 ski communication back to the iPaq’s Bluetooth, connect your computer with
a standard RS232 cable to the GEM 2 ski and use the GEMtoBT.exe program supplied on the CD
to re-establish the communication with the iPaq’s Bluetooth.
To force temporary RS232 communications, remove the console from the ski (four corner screws),
turn the console on, then momentarily push the RESET button on the bottom of the console. Use
WinGEM or GEMtoBT.exe to set desired communications. Then turn the console off and mount it
back on the ski. When power is turned back on, communications will occur as chosen.
How do I Learn More about the GEM Sensors?
The Geophex website, www.geophex.com, provides ample information about the GEM sensors,
design and operating principles, survey tips, manuals, and downloadable software. The site also
carries many journal articles related to the GEM sensors, which can be viewed or printed.
How Do I Convert the GEM-2 Data to Apparent Conductivity and Susceptibility?
Using the EMInvertor Utility, the GEM-2 ppm data can be converted to apparent conductivity and
magnetic susceptibility at each frequency used for the survey.
For a discussion of the theory and practical assumptions involved in these calculations, see the
article by Huang and Won (2001), entitled “Conductivity and Susceptibility Mapping Using Broadband Electromagnetic Sensors,” published in the Journal of Environmental and Engineering Geophysics. The article is available at the Geophex website.
How Do I Invert GEM-2 Multi-Frequency Data to a Layered Earth?
A program for inverting the GEM-2 data to a Layered Earth Model can be downloaded from the
“About Geophex” page of our web site. This 1-D inversion program is provided for informational
purposes only. It should be considered as Beta version software. We request users to work with
our Geophex scientists to improve it.
Software Included on the CD
There are several commercial software on the market that deal with the GEM-type multifrequency data for 1-D, 2-D, and 3-D inversion.
The CD included in the shipping contains the following:
What is the Depth of Exploration for GEM-2?
Install iPaqPlus
Utils-PC
Manuals
Readme.rtf
This is a very complex question because the answer depends on many factors, particularly on
ground conductivity, target volume, and ambient electromagnetic noise. Based on many analyses
and field data, we estimate the GEM-2 should be able to see about 20m in resistive areas
(>1000ohm-m) and about 10m in conductive areas (<100ohm-m). This figure assumes an ambient noise level of 5ppm. The noise level is generally high in urban areas and low in rural areas.
For typical applications, we do not recommend the GEM-2 for depths greater than 10m. For more
discussion on this subject, consult the “Skin-depth Nomogram” in “GEM-2 Principle of Operation”
on our web site.
Installs iPaq software through Microsoft ActiveSync or SD memory chip
PC software for controlling the GEM and processing data.
GEM-2 Manual and WinGEMv4 Manual (.pdf format)
Listing of CD contents
Technical Help
For technical help, please contact:
Geophex, Ltd.
605 Mercury St.
Raleigh, NC 27603, USA
Tel: (919) 839-8515
Fax: (919) 839-8528
Web: www.geophex.com
Or send emails to: [email protected]
GEM-2 User’s Manual
Depth of exploration for a given earth medium is determined by the operating frequency. Therefore, measuring the earth response at multiple frequencies is equivalent to measuring the earth
response from multiple depths. Hence, such data can be used to image a 3-D distribution of subsurface objects. Results from several environmental sites indicate that the multi-frequency data
from GEM-2 is far superior in characterizing buried, metallic and non-metallic targets to data from
conventional single-frequency sensors. For handheld sensors, the transmitter-receiver coil separation is inherently small and has little to do with the depth of exploration.
For comprehensive discussions and examples, please read an article by Huang: “Depth of investigation for small broadband electromagnetic sensors,” published in 2005 in Geophysics, v. 70, n.
6, pp. G135-G142, also available at the Geophex website. One conclusion is that small co-located
sensors like the GEM-2 and GEM-3, the depth of exploration is proportional to the square root of
the skin depth expressed in meters.
Page 5