1
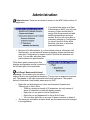
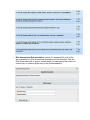
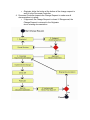
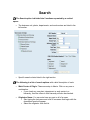
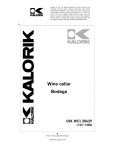
Management of Change Version 2.0 User Manual Table of Contents Introduction................................................................. 1 Home.......................................................................... 5 Administration............................................................. 7 Change Request ...................................................... 13 Search ...................................................................... 23 Summary .................................................................. 26 Introduction Description: The purpose of the Management of Change (MOC) application is to make it possible to enter, approve and search for change requests online. For all users other than the application administrators, only change requests the user created or the user is requested to approve will display. User Access: Any person, employee or contractor in Rio Tinto Active Directory can access the application and be an approver. But you can only initiate Change Requests if your business unit has been setup. There are three levels of access to the MOC application: 1. User: Most persons who use MOC enter at this level. If the Business Unit under which you are an employee has been setup, you will have access to everything except Admin in the application. If your Business Unit has not been setup, you will see the menus, but everything except Help will be grayed out and inactive. 2. Plant Administrator: If you have been setup as a Plant Administrator in MOC, you will have access to Admin and be able to assign names to default Role Assignments and add additional department and work centers. But you will not be able to make any changes to Configuration for Impact Levels & Roles at the business unit level or add assign plant level administrators. You will be able to click on the business unit level and see the configuration for impact levels and role assignments, but you will not be able to change them. 3. Business Unit Administrator: If you have been setup as a Business Unit Administrator, you will have full access to all of the above plus Configuration for Impact Levels & Roles at the business unit level. You can also add, delete, or modify other plant and business unit administrators. Navigation: The application is subdivided into six sections as shown below: Home, Admin, Change Request, Search, Summary and Help. Each section can be accessed by clicking on the menu item at the top of the screen as shown below. • The Admin section only appears when administrators for the application login. • The Supporting Links option appears only if such links have been setup for the business unit. Typically these links are to training material and are made when the business unit is originally setup. Links can be added or modified later by submitting a ticket to the Service Desk. Help: This manual can be accessed from the application by clicking Help option from the main menu at any time. If you are having a problem with the application or the information provided in the manual is not sufficient for you needs, submit a ticket to the Service Desk with a detailed description of the problem or the help you need and ask to have it directed to the Application Sustainability Team (AST). Someone from the team will give you a call as soon as possible. New Setups: If you want to setup a new business unit, contact the Service Desk and submit a ticket with your request to the Applications Sustainable Team (AST) at IS&T. Someone from the team will then call you on the phone and ask how the application is to be configured. They will then run a script to customize it. Once implemented, personnel from your business unit can use the application to create Change Requests. The cost of developing the application will NOT be passed on to new business units; however, there is an annual cost associated with using the product that is based on level of support and priority. MOC Owner: The application is owned and managed by AST at IS&T. There is no specific individual designated as the owner. Home Click Home and a screen opens that displays two charts: Change requests you have created and Change requests pending your approval as shown below. Change Requests you have created: • ID: The ID number is generated automatically when a change request is first submitted. Click the number and it will open the Change Request for viewing or editing. • Revision: If a Change Request is submitted and not approved, then the person who created it can revise and resubmit it. o A revision number will appear that is generated by the application itself. o The MOC ID number remains unchanged. • Status: This shows where the change request is in the 5 stages of the approval process: o Originated o Assigned o Approved, Missing Documentation, Disapproved or Cancelled o Implemented o Completed • Status Description: Indicates what needs to be done next. Change requests pending your approval: • • ID: If a change request has been submitted and you have been designated as an approver, then that request will appear in the list pending your approval. o Click the ID to open and view it. You will not have the option to change it, but there will be an Approvers tab at the top. Click it to approve or disapprove it the Change Request. The Status and Description are the same as described above. Administration Admin Access: There are two levels of access to the MOC Admin section of the application: 1. If you have been setup as a Plant Administrator in MOC, you will have access to Admin and be able to assign Role Assignments and add additional department and work centers. But you will not be able to make any changes to Configuration for Impact Levels & Roles at the Business Unit level or add other plant administrators. 2. Business Unit Administrator: If you have been setup as a Business Unit Administrator, you will have full access everything a plant administrator does plus Configuration for Impact Levels & Roles at the business unit level. You can also add other plant and business unit administrators. Click Admin and a screen opens that displays configuration options in panels on the left and right of the vertical bar. Left Panel: Business Unit Level Hierarchy. This is where you can add or select a level in the organizational hierarchy. The top item is always the business unit. The graphic to the right shows what each level represents. The graphic below it shows how it has actually been setup for IS&T. • • Right click on the business unit (such as Information Systems and Technology) to Add a Plant. o There is a maximum length of 50 characters, but only names of about 30 characters or less will display properly. o Right click on any plant to Add a Department o Right click on any department to Add a Work Center. o You can also right click on any one of these to rename or delete it. The hierarchy and names of these levels are fixed and cannot be changed in the application. Right Panel: Business Unit Level Role Assignments, Impact Levels, and Administrators. Here you have the option to set impact levels, roles, and assign administrators. • Business Unit Level Roles: There are 4 levels of roles in the application to match the 4 organizational levels in the left panel: Business Unit, Plant, Department, and Work Center. Under each role you can setup titles for decision makers at that level. • To add a new title to a role, click the “New” button at the top. Enter the title in the field provided and select the role level from the drop-down on the right. • To delete a title, select it and then click the “Delete” button. • Roles setup under the business unit appear below under Role Assignments where specific persons can be assigned to those titles. • Roles assignment for the Plant, Department and Work Center are setup in the right panel when you click on the specific level in the left panel. • The four dots to the left of the titles under Roles indicate the item can also be dragged and copied to any item under Impact Levels. • When a role is dragged to an Impact Level, then the person assigned to that role will be emailed and asked to approve or disapprove a change request after it has been submitted. • Business Unit Level Impact Levels: When a request for change is made, it has impacts. The Impact Levels are defined in the Business Unit 14.3 Management of Change (MOC) - Rev. 4 Standard (See Page 10). • To add a new impact level, click the “New” button at the top and enter the name in the field provided. Then click anywhere outside the box to have it setup and saved. • There can be any number of impact levels. • When a new impact level is created, it displays at the top of the list below. But if you refresh the page, impact levels will appear in alphabetical order. • • • • • Document Control is automatically added as a sublevel under every Impact Level, but it will only appear below when you refresh the page. To delete an impact level, select it and then click the “Delete” button. To modify the name of an impact level, you need to delete it and then recreate it. Required Approvers can be setup under any Impact Level by dragging over a Role under the Business Unit, Plant, Department or Work Center. • When a role is dragged to a sublevel under Impact Level, then the person associated with that role is designated a required approver for this change request. That person will be emailed a link to the application and asked to approve or disapprove a change request that has been submitted. • The change request cannot receive final approval until all approvers have logged in and approved it. • If there is no response back from a required approver within a reasonable time, then any business unit or plant administrator can approve or disapprove it. • The order in which approvers appear can be changed by selecting and dragging them to a new position. The order can be important because it can determine the order in which change requests are approved (See Enforce Approval Order below). Business Unit Level Role Assignments: This option lets you select a specific person for each job or description setup under the top business unit roles. To select a name, click in the field to the right of the role and start typing the last name of the person. A list of persons taken from Active Directory with the characters you have typed will appear below. If you see the one you want, click on it and it will appear in the field. o Roles assignment for the Plant, Department and Work Center are setup in the right panel when you click on the specific level in the left panel. o • Business Unit Level Other Settings: This option lets you setup or delete the names of person of persons who are authorized as Administrators in the MOC application. Business Unit Administrators: People setup here will have access to the Admin section of the application. • Click New to setup a new person. • Every business unit administrator has the right to add or delete other administrators at the business unit level and below. • Every administrator can access a change request and swap out names of persons in the approval order list. This is generally only done when a person is not available to approve an MOC or if the person is no longer in that role. o Enforce Approval Order: Check this box if you want emails to be sent to persons assigned to roles according to the order in which they appear under the selected Impact Level. • If "Enforce Approve Order" is not checked, then emails will be sent to all persons assigned to roles under the assigned Impact Level at the same time. o Approval notification internal hours: This option sets the time delay between emails notifying persons who need to approve or disapprove a change request. • The default is 1 hour. There is no maximum. • Once the person sent the email has responded, emails are no longer sent to that individual. o Right Panel: PLANT Role Assignment and Administrators. The graphic below shows what may appear in the right panel when you click on the plant (second level) in the left panel. • • Role Assignments: • Here you can assign names to each of the Plant roles listed. • The roles that display here are setup at the Business Unit level as described above. • Unlike the other hierarchy levels, every Plant will have Document Control as one of the Role Assignments. • To select a name, click in the field to the right of the role and start typing the last name of the person. A list of persons taken from Active Directory with the characters you have typed will appear below. If you see the one you want, click on it and it will appear in the field. Plant Administrators: • People setup here will have access to the Admin section of the application, but they can only make changes at their Plant level and below. • Every administrator can access a change request and swap out names of persons in the approval order list at the plant level and below. • Plant Administrators do not have the right to add or delete other plant administrators. • Click New to setup a new person. Right Panel: DEPARTMENT and WORK CENTER Role Assignments. The graphic below shows what appears in the right panel when you click on the Department (third level) in the left panel. • Role Assignments: o Here you can assign names to each of the Department or Work Center roles listed. • The roles that display here are setup at the Business Unit level as described above. • Unlike the business unit and plant levels, Department and Work Center do not have Document Control as one of the Role Assignments. o To select a name, click in the field to the right of the role and start typing the last name of the person. A list of persons taken from Active Directory with the characters you have typed will appear below. If you see the one you want, click on it and it will appear in the field. Change Request The change request option is separated into 5 parts by tabs at the top. To make a change request, enter all necessary data and click Send for Approval at the bottom of the screen. • • This button is grayed out until the 5 required fields (shown in red) have been filled-in. The change Request options and the number of tabs at the top may vary from one Business Unit to another and are configured initially when the Business Unit is setup. Change Request Details: Work Center Origination: Click Select… to open a window where you can select the work center at your business unit. • • A drop-down window will appear with your business unit hierarchy of plant, department and work center. The work centers will be in bold. You must select a work center to create a request. Work Centers are setup in Admin and if you are not seeing the work center you require, contact your plant administrator. Impact Level: The options in this drop-down menu are setup and defined by the MOC Business Administrator. Since they may be different for every business unit, you need to contact the administrator of your business unit for the definition of each level. Change Type: There are two types of changes: Permanent and Temporary. • • Temporary: Select this option if the request is for only a temporary change and you intend to revert back in the near future. Permanent: Select this option if the request is for a permanent change and you have no plan to revert back. Reference Type & Number: • • There are four reference types to select from: • Drawing (Engineering or other drawings) • CEA (Capital Expenditure Authority) • PO (Purchase Order) • REQ (Requisition) To the right of the type, there is a field in which you can enter the associated number when appropriate. Expected Completion Date: This must be a current or future date. If you enter a past date, it will produce an error message. Confidential Change Request: This option limits visibility to only the Originator and the required approvers. • • Business unit and plant administrators will not be able to see it. It will not appear in any searches except those done by the Originator or the required approvers PSM / OSHA: Check this box if the MOC applies to a part of a plant that is regulated by OSHA PSM regulations. • • OSHA is the acronym for “Occupation Safety and Health Administration” PSM is the acronym for “Process Safety Management of Highly Hazardous Chemicals” Risk Assessment Required: This option is checked and grayed out because, by default, it is required that the Originator conduct a risk assessment. • Risk Assessment Questionnaire: Click the link to open the questionnaire and view the 6 questions shown below. Click close at the top right to save your answers. If you select “No” to ALL of the questions, the Risk Assessment Required box is automatically unchecked. • Risk Assessment Documentation: Unless you answered No to all of the above questions, a Risk Assessment document must be included. Click the Risk Assessment link to open a screen where you can specify the location of a hard copy or upload a digital copy of the risk assessment. EMS Documentation Required: This option is grayed out because it is checked automatically when you select either the EMS questionnaire or upload an EMS document. • EMS is the acronym for Environmental Management Systems. The purpose of this questionnaire with six questions is to determine if there are any environmental concerns with the change request. EMS Questionnaire is shown below. If any question is answered No, then comments should be added. EMS Documentation: Click this option to specify the location of a hard copy or upload a digital assessment. If you upload anything, the EMS Documentation Required box is automatically checked. Additional Fields: Each of the following 5 fields must be filled in or marked as Not Applicable: "N/A" Description: This is a required field or marked as 'NA'. • Supporting Documents: This is optional and with it you can add a hard copy or a digital file. • After entering something in each of the above fields, click anywhere outside to save the changes. Why can't I submit this change request for approval? Listed below are the required items which must be completed before any change request my be submitted for approval: • • • • • • • A work center must be selected. All required supporting comments must be filled out or marked as 'NA'. All approval roles (Approvers tab) must be assigned. The risk assessment questionnaire must be completed. A risk assessment must be uploaded if one is required. An EMS document is required but not supplied. Required Documentation isn't accounted for (Required Documentation Tab) Once you have completed all the above requirements the button to send for approval will be enabled. If the change request was sent without error, a message will appear in confirmation. REQUIRED DOCUMENTATION: • • • This section must be completed before it is implement and sent to document control for closing. There is a check box at the end of the list that must be checked if there are no documents required. The documentation options shown below are customized with content when the business unit is originally setup. Enter the number of documents in the fields provided. • After entering the number, click outside the field in any blank space on the screen and a link will display (5 doc(s) needed) which you can click and open a screen for uploading or specifying the location of the documents. APPROVERS: • Persons assigned to do the approvals come to this screen to Approve or Disapprove the request. • Any approver can add additional approvers. To add a new approver, click the Insert Approver button on the right side. Approvers can be located before, between or after existing approvers by clicking the appropriate buttons. o A field will appear at the top that says: "This approver has been inserted" Click in the Please Select... field and enter the last name of the approver. A drop-down list will appear from which you can select the approver. o To delete an inserted approver, click the red X to the right of the name. Approvers setup by the Originator cannot be deleted by approvers. But additional approvers setup by approvers can be deleted by any approver. o • The Approve and Disapprove options are grayed unless you are the designated person who has been assigned to do the approval. • Once all approvers have approved the request and the Originator has completed and referenced the required documentation, then the change request is sent to Document Control for final approval which is shown above as the last and final approver. POST AUDIT: • • A Post Audit is required before the change request can be closed. This is where the Originator comes after it has been approved and implemented to evaluate the approval process. If any of the 5 questions are marked No, then a short comment should be added by clicking General Comments at the bottom of the form. CHECK OFF • • A Check Off is also required before the change request can be closed. This is where the Originator comes after the Change Request has been approved and implemented to make sure everything necessary has been done. It doesn't matter if the Post Audit or the Check Off is done last. Both must be done to close the Change Request. If any of the 7 items are left blank, then a short comment must be added explaining why it is not applicable. Steps in the Request for Change process: 1. Originated: Originator creates a Change Request. • The originator is responsible for the MOC from creation to closing. 2. Assigned - Awaiting approval: Emails are sent out to persons who must approve or disapprove it. • If disapproved by any approver, the originator is notified via email and has the option to revise or cancel it. • If approved by all approvers, the originator is notified via email. 3. Approved - Need to implement: • Originator completes and acquires all documentation. • Originator or others implement the change. • Originator completes the Post Audit. • Originator completed the Check Off. • Originator clicks the button at the bottom of the change request to send it to the Document Controller. 4. Document Controller inspects the Change Request to make sure all documentation is in place. • If Approved, the Change Request is closed. If Disapproved, the Change Request is returned to the Originator due to missing documentation. Search The Search option is divided into 2 sections separated by a vertical space. • The business unit, plants, departments, and work centers are listed in the left section. • Specific search criteria listed in the right section. The following is a list of search options with a brief description of each: • Work Center of Origin: These are setup in Admin. Click on any one or combination. • If you check any one plant, department or work center in a hierarchy, then the others in that hierarchy will also be checked. • Originator Name: You can enter here any part or all of a name. • Start typing the last name and a list of surnames that begin with the characters typed will appear. • Select the originator from the list. • Impact Level: These are setup in Admin and appear here in a drop-down menu. • Change Type: There are only two change types: temporary and permanent. These are selected when making a change request. • Reference Type & Number: There are 4 reference types and numbers and appear here in a drop down menu. These are selected when making a change request. • Origination Dates: When change requests are made, they are dated. In the “From” and “To” origination dates, you can select all change requests between and including those dates. • PSM / OSHA: This option lists all change requests where this was checked when making the request. • Status: There are 5 status options that are assigned automatically in the application as the approval process moves forward. Here you can select to list all change requests at various levels of approval. Click Search to begin the search of the database. A table will appear that displays the requests found, if any. • • • Requests marked Confidential by the Originator will not appear unless you are the Originator or an assigned approver. Click the ID number on the left to open and view the request. You will not be able to edit it unless you are the owner or an assigned approver. Note, you may need to use the scroll bars to view the entire list. Summary Summary is where any users can come and view a report that shows for each plant and specified dates the number of Change Requests that have been originated, assigned, approved, implemented, disapproved, cancelled, closed, initiated, active and closed as shown below.