1
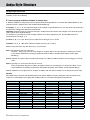
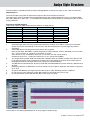
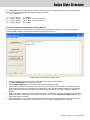
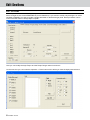
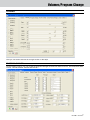
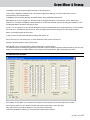
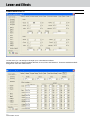
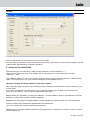
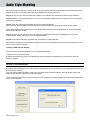
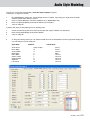
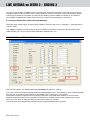
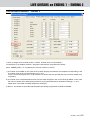
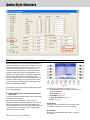
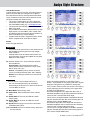
STYLE COMPILER MANUAL
Audya Style Structure
Audya Style Structure
The Audya Style structure is compounding by 4 x Main Arranger (A, B, C, D) , 4 Fill ins,
4 Breaks, 3 Intro and 3 Ending.
▀▀ How to program a Midi file suitable for Audya Style
A Midi file suitable for Audya Style must be programmed as single Midi file ( 0 format) with related Marker for the
following section: (please refer to the file KetronStyleSetUp.mid).
4 Arranger: A , B , C, D. The standard length of an arranger is typically 8 bars but also 2,4,16,24 and 32 bars are
accepted accordingly with different musical needs.
Important: if Audio Drums are used into the Style, on Midi part must have the same length of the Audio Drum file
(See chapter Audio Style Modeling).
For example, if the Audio Drum has a length of 8 bars and a Time signature of 4/4, also the Midi must be 8
measures and Time Sign. 4 / 4.
4 Fill Ins: A, B, C, D. 1 Bar. Each Fill on is related to its Arranger A, B, C and D.
4 Breaks: A, B, C, D. 1 Bar. Each i Break is related to its Arr.A, B, C and D.
Intro 1: Very short Intro only with drum and / or percussion.
End 1: Short Ending with a Corona stop.
The End 1 composing must be done straight on C Major without chord changing or melody lines. Most
of Live Guitar database are already programmed with an END 1 template (See chapter “Audio Style
Modeling”)
Intro 2: Typically a couple of bars programmed straight on C Major and Minor without chord changing or melody
lines.
End 2: Typically 2 or 3 bars plus and stop as Corona.
To be programmed straight on C Major and Minor without chord changing or melody lines. Most of Live
Guitar database are already programmed with END 2 templates (See chapter “Audio Style Modeling”)
Intro 3 – End 3: To be programmed on C Major and Minor with free harmonizations according to the music style.
Markers
Each Midi section must be well identified with some specific Markers properly assigned. Here the names to be
written for to each Marker, according with the Major, Minor or Seventh arrangement programmed:
MAJOR
ARRA_MAJ
ARRB_MAJ
ARRC_MAJ
ARRD_MAJ
FILA_MAJ
FILB_MAJ
FILC_MAJ
FILD_MAJ
BRKA_MAJ
BRKB_MAJ
BRKC_MAJ
BRKD_MAJ
INT1_MAJ
INT2_MAJ
INT3_MAJ
END1_MAJ
END2_MAJ
END3_MAJ
ARRA_MIN
ARRB_MIN
ARRC_MIN
ARRD_MIN
FILA_MIN
FILB_MIN
FILC_MIN
FILD_MIN
BRKA_MIN
BRKB_MIN
BRKC_MIN
BRKD_MIN
INT1_MIN
INT2_MIN
INT3_MIN
END1_MIN
END2_MIN
END3_MIN
ARRA_SEV
ARRB_SEV
ARRC_SEV
ARRD_SEV
FILA_SEV
FILB_SEV
FILC_SEV
FILD_SEV
BRKA_SEV
BRKB_SEV
BRKC_SEV
BRKD_SEV
INT1_SEV
INT2_SEV
INT3_SEV
END1_SEV
END2_SEV
END3_SEV
MINOR
SEVENTH
2 KETRON • AUDYA STYLE COMPILER
Audya Style Structure
The first measure of the Midi file file must have a single Marker on the first tick (step 1) and must be named as:
Audya Style 1.0.
The user will start to program his style events only from the second measure of the file.
The sequence’s order for the Midi parts programmed and for their respective Markers is free, for instance ARRA_
MAJ, INT3_MIN, FILLC_MAJ, etc.....), but all Sections and Markers must be written on following the other to avoid
empty measures.
Style Parts and Midi Channel
These are the parts and Midi Channels to be used for on Style section:
DRUM1
Ch 10
Drum Set 1
DRUM 2
Ch 9
Groove (Drum Set 2)
BASS
Ch 5
Bass
CHORD1
Ch. 6
El Piano / Ac.Piano
CHORD2
Ch. 7
Ac Gtr / El Gtr
CHORD3
Ch. 8
Strings / Pad
CHORD4
Ch. 11
Orchestral
CHORD5
Ch. 12
Orchestral
111
222
333
444
555
666
777
888
ll the Arranger parts must be programmed basically on C Major and C MInor or Seventh if requested.
A
Audya will convert automatically to all inversions and will recognized the chord changes by internal
algorithms.
On the Midi file the following events and controls are accepted:
Note On/Off, Bend, Modulation, Sustain, Expression, PanPot, Reverb, Chorus, Wha Wha (on:CC 84 value
127 – Off CC 84 value 0, continuous Controllers on CC 85
Value from 0 to 127), Portamento on/Off (on: CC 65 value 127, Off: CC 85 value 0),
Portamento Time CC 5 - continuous value from 0 to 127, Tempo Track (BPM).
The Audya Style Compiler 2009 tool will provide a detailed check for all data contents of the file on order
to get the best music result. Furthermore the Style can be fully edited for sounds, levels, effects also on
the keyboard itself into the Style View menu (except for note informations) .
The Midi file must be saved with 0 (zero) Format with all relative Markers on each sections (Resolution at
48 TPQ)
Please pay attention on Midi tracks do not record twice note or data on style part: this will be recognized
as on error.
All events and Markers of a single track shouldn’t drop on other following sections or Markers.
Do not record Control Changes or Pitch Bend events on the same tick (note on /Off).
Do not leave twice events with different data on the same note (tick).
Here a view for the”KetronStyleSetUp.mid” for the program Cubase SX (R).
KETRON • AUDYA STYLE COMPILER
3
Audya Style Structure
▀▀ How to program the Live Guitar on the Midi file (Intro 3 - End 3 sections)
User can create on Intro 3 (MAJ / MIN) and on Ending 3 (MAJ /MIN) free harmony sequences using the LIVE
GUITARS. Here the procedure to write Live Guitar informations on the Style:
(See also the Chapter “Audio Style Modeling” and ”Live Guitar on Intro-Ending”).
Kchords: on the first tick of the Channel 12 must be programmed a metaevent by typing the word ”KCHORDS”
(Caps case).
Program Changes: After the txt metaevent “KCHORDS” must be written the Live Guitar Program Change. on
Program Change is related to a single Live Guitar Chord tonality as on the following table:
Major Chords (from 1 to 12)
C Major : P. Ch. 1
C# Major: P. Ch. 2
D Major : P. Ch. 3
D#Major : P. Ch. 4
E Major : P. Ch. 5
F Major : P. Ch. 6
F# Major : P. Ch. 7
G Major : P. Ch. 8
G# Major: P. Ch. 9
A Major : P. Ch. 10
A# Major: P. Ch. 11
B Major : P. Ch. 12
Minor Chords (from 13 to 24)
C Minor : P. Ch. 13
C# Minor: P. Ch. 14
D Minor : P. Ch. 15
D# Minor: P. Ch. 16
E Minor : P. Ch. 17
F Minor : P. Ch. 18
F# Minor : P. Ch. 19
G Minor : P. Ch. 20
G# Minor: P. Ch. 21
A Minor : P. Ch. 22
A# Minor: P. Ch. 23
B Minor : P. Ch. 24
7th Chords (from 25 to 36) (if exists )
111 Start. The Start Program change for Live Chord is the Progr. Change Number 125.
222 This must be inserted after the Chord tonality Program Change.
Here on example:
111
222
333
First Tick
Second Tick
Third Tick
1.1.0
1.1.1
1.1.2
KCHORDS
1 125 (C Major)
(Start)
333 Stop. The Stop Program Change is Number 126 and will be used to stop the top the Live Guitar performance
on Intro 3 and End 3.
4 KETRON • AUDYA STYLE COMPILER
Audya Style Structure
444 Long Chord. It is possible also to insert Live Guitar Long Chord Program Changes with 127 (Long Chord
Slow”) or Program Change Number 128 (for Long Chord Fast).
555 Here on example:
7.1.0 Progr. Change 15 : D Minor
7.1.1 Progr. Change 127: D Minor - Fast Long Chord or
7.1.1 Progr. Change 128: D Minor - Slow Long Chord
7.1.2 Progr. Change 125: START
▀▀ How to compile on Audya Style from the Midi file
Once programmed your own Midi file for the Style, will be necessary to compile it by using the Audya Style
Compiler 2009. Install the Audya Style Compiler .exe program and run it:
Audya Style Compiler 2009 tool (Main View)
111
222
333
444
Create a Folder having the same name of the Style and copy there your Midi file.
On Utility and Setting menu select your device.
Press Compile Midi files and select the folder where your Midi is located.
The file will be compiled automatically. You will find a couple of files into the folder, on with extension .pat
which is the final Pattern to be loaded into Audya and the other with the extension .bin which includes the
Style parameters only (see Edit Style: Working with Audya, Sequencer and Style Compiler for additional
details).
555 Now, if you want to edit and modify your Style as you like for Sections, Volumes, Program Changes, Pan Pot,
Modes, Drum Mixer & Remap, Lowers, Effect and Audio you can press Audya Style Modify and load you
Pattern file already compiled.
666 Remember that you can copy the new Pattern directly into Audya –User Style folder , and you can edit the
above Parameters on the Audya itself and then you can save the modified Style into User Style.
KETRON • AUDYA STYLE COMPILER
5
Edit Sections
EDIT SECTIONS
On the top left corner of the following view you can select which section is to be modified.
Select a single section as the ARRANGER A (check related box) if you would to modify only Arranger A or select
GLOBAL CHANGE if you want to modify a single parameter for all the Arranger parts. Same procedure can be
used on all other menu of Audya Style Compiler.
Here you can modify the Style Tempo and the Tempo Range value min and max.
On the next view you can locate the Operation > PLAY button which will let you hear the Style parts selected:
6 KETRON • AUDYA
Volumes/Program Change
VOLUMES
Here you can set the Volumes for a single section or the Style.
PROGRAM CHANGE
On the following menus you can modify the Program Changes and Pan Pot value for Drum1, Groove/Drum2, Bass,
Chord1, Chord2, Chord3, Chord4 and Chord5.
KETRON • AUDYA
7
Pan Pot/Mode
PAN POT
MODE
On this menu you can modify different Modes for Chords, Bass and Drums, on single or global mode.
Chord Trigger: If enabled to On, the Chord programmed will be retriggered on time you’ll play a different chords.
8 KETRON • AUDYA
Drum Mixer & Remap
If enabled to OFF the Chord programmed will not be retriggered.
Chord Close / Parallel: If enabled to On, the Chord programmed will play on Close mode with a correct
transposition to the nearest notes.
If enabled to Off the Chord will play on Parallel mode, doing a parallel transposition.
Bass Mode: when set to Trigger On, the Bass note is retriggered anytime a new chord is struck. When set to
Alternate on, the Bass will adapt the alternate bass on a smoother musical way thus avoiding the repetition of the
fundamental Bass note when changing chords.
Fond. C1 or C0: when set to C0, permits the Bass to play the fundamental note if programmed on C0 into the Midi
file. If set to C1, the Bass will ignore the C0, even if programmed, and will transpose it to the highest octave.
Mute: If On all style parts will be muted
Crash: If set to On the AutoCrash will be played after the Fill on.
Drum Set: here you can select your on drum set where crash sound comes from.
Dynamic: Set the Dynamic value for the Crash.
RIFF MODE: This is a special feature used on Variation D of the Arranger.
On detail the Riff is an Arrange programmed inside with a typical chord progression. With this feature you can play
freely your melody line (or improvisation) over a typical chord progression without pressing any chord.
DRUM MIXER & REMAP
Drum Mixer: on this Menu it is possible to set volume, reverb and pan pot for each percussive section.
Drum Remap: here you can replace a certain percussive instrument of your own style.
Key: selects the note number related for new percussion instrument.
Instrument destination: select your new percussive instrument to add on.
KETRON • AUDYA
9
Lower and Effects
LOWER AND EFFECTS
On this menu you can assign to the style up to 4 simultaneous effects.
Select these chains of effects template: Reverb, Chorus, Echo and Distortion. These are available as DSP
Assignment chain with related send.
10 KETRON • AUDYA
Audio
AUDIO
This view will appear only if on Audio Drum is used on the Style .
You can modify just the Volume value of the Audio Drum for any single section or all the sections together. See the
chapter “Audio Style Modeling” for further information.
▀▀ SAVING STYLE PROCEDURE
After the editing you can save all your data on Style (otherwise your work will be lost …).
Select “Section Page” and press STYLE SAVE. You can also press icon on the bottom left on the box
”Operation...” tool)
Use ”SEND TO AUDYA” in order to send style to Audya by USB connection. Style will be sent to USER STYLES
folder . You should choose your style sub folder family as you want (Ballad, Pop etc.).
Edit Style: Working with Audya, Sequencer and Style Compiler
After copied the Style to Audya may be necessary a phase of editing on the keyboard in order to achieve a good
musical result.
If you want to modify later some Midi parts of your Style while keeping this mix obtained into the keyboard
(Sounds, Levels, Effects...) then you should follow these instructions:
Step 1: Before the compilation your style was a Midi file - 0 format (called for instance “StyleTest.mid”) and was
placed on a certain folder (called for instance ”MyStyle”) .
Step 2: Run the Audya Style Compiler 2009 and compile the Midi file (“preserve setup” box must be enabled).
Now the Compiler has created 2 files: StyleTest.PAT and StyleTest.bin.
The .bin is a service file containing all the style parameters.
Step 3: Import on Audya the pattern StyleTest.Pat and apply all your modifications as volume, efx and so directly
on the Audya layout.
KETRON • AUDYA
11
Audio Style Modeling
Save the changes by pressing SAVE button. By the way Audya saves the Style with the new parametrs into User
Style folder, but of course these parameters are different than the original ones.
Step 4: Send to PC the new ”StyleTest.PAT” pattern just modified and overwrite the previous original Pattern.
Step 5: Delete from the folder ”MyStyle” on your PC the file StyleTest.BIN, which corresponds to the old original
parameters of the Style.
Step 6: Open the Audya Style Compiler and press Audya Style Modify.
Select the new StyleTest.PAT previously imported from Audya after modifications and press STYLE SAVE.
Audya Style Compiler has created now a new StyleTest.BIN having the same parameters of the Style”StyleTest.
PAT recently edited on Audya.
Step 7: Now using your sequencer you can apply any modification required to the Midi parts of your style
”StyleTest.Mid”. At the end you can Save it as StyleTest.MID.
Step 8: Recompile the Midi file ”StyleTest.mid” by pressing Compile Midi files.
Audya Style Compiler has now updated the Midi file with the notes changes and with the new parameters exactly
as previously mixed into Audya.
Creating a Midi file from Pattern
Here how extract a standard Midi file from on Audya Style pattern.
1) Press Source from Audya Style
2) Select the Pattern and open it. The Midi file will be automatically generated into the same folder when the
Pattern is located.
AUDIO STYLE MODELING
The Audio Style Modeling is a innovative feature of Audya that permits to create your own style with few steps on a
quick and easy manner.
The core of this powerfully feature is the new huge Bank Library supplied with the 3.0A OS Update. Part of the
Style may be affected / replaced by a Bank template.
There Audio Style Modeling can be controlled from the Audya Style Compiler 2009 or from the internal Style View
menu of the keyboard.
12 KETRON • AUDYA
Audio Style Modeling
Here how to control the Style Modeling from the Style Compiler program:
Create your on style from scratch:
111
222
333
444
y “Utility&Setting” select the ”Create empty structure” feature. Type firstly your style name and than
B
create a master folder where to save it.
Press ”Compile Midi files” and select a Midi file (e.g.: MyNewStyle.mid).
Press ”Audya Style Modify”and load the Pattern just compiled.
Jump on step #5.
Create a new style (or edit) starting from an existing style:
111
222
333
Create a folder having the same name of the style and copy the Pattern into the folder.
Press Audya Style Modify and load this Pattern.
Jump on step #5
55
n Program Change menu you can select several Grooves and templates from the huge Bank Library and
o
you can assign it to each style part.
Style Bank
Audio Drum
Drum Bank
Groove Bank
Bass Bank
Piano Bank
Guitar 1 Bank Guitar 2 Bank
Arp&Lick
Live Guitar
Channel Chord name
Audio Output
10
11
5
6
7
8
11
12
Drum 1
Drum 1
Groove
Bass
Chord 1
Chord 2
Chord 3
Chord 4
Chord 5
KETRON • AUDYA
13
LIVE GUITARS on INTRO 3 – ENDING 3
You can use the GLOBAL CHANGE control to quickly insert a template on all parts of the Style. on this case the
Style Bank related to Groove, Bass, Piano, Guitars, Arp&Lick will be not assigned to Intros and Endings. Special
controls are provided for Live Guitars on parts and Intro-Ending (see the chapter Live Guitar on Intro 3-End 3).
The GLOBAL CHANGE doesn’t affect the Audio Drums as this is set automatically on all sections.
▀▀ Saving the Style Edited with Audio Style Modeling
Select the initial “Section Page” and press STYLE SAVE or press the Disk icon on ”Operation...” area (left bottom
of screen view).
Use ”SEND TO AUDYA” to send the style to Audya via USB. The style will be copied into Audya Folder called
USER STYLES (you can choose sub folder destination as Ballad, Pop, etc.).
LIVE GUITARS on INTRO 3 – ENDING 3
(See also the chapter “KCHORDS TRACK PROGRAMMING on INTRO 3 – END 3)
If you have used some Program Change related to LIVE GUITARS on Intro 3 and Ending 3, after compiled the Midi
file you’ll see on the above picture the word “KCHORDS” (Intro 3 check box on is required).
Audya Style Compiler recognizes Chord changing progression on the Midi file and await for the Live Guitar
template assignment (None), as it is possible to perform the Live Guitar sequence with different type of Guitar.
Select your Live Guitar and play it directly from the pop-up menu (as showed).
If the Live guitar is not assigned the style will play the programmed Midi track (if present).
14 KETRON • AUDYA
LIVE GUITARS on ENDING 1 – ENDING 2
LIVE GUITARS on ENDING 1 – ENDING 2
In order to assign the Live Guitar to End1 or End 2, activate check on”Preset End1”.
If Preset End is not enabled, the End 1 will play the internal track programmed (if exists).
When PRESET_END 1 / 2 is enabled your have two options to choose:
1) Live Guitar set to NONE: on this case the Live Guitar will play automatically the template corresponding to the
Live Guitar used on the current Arranger A, B, C or D.
If on the current Arranger there’s not provided a Live Guitar, then the style will play the conventional Midi track
(is present).
2) Live Guitar set to a template different than the Live Guitar assigned to the current Arranger ABCD: on this case
the new Live Guitar set for Ending will perform its pre-programmed specific template for Ending 1 or 2, no
matter which Live Guitar is already assigned to Arrangers.
3) Most of Live Guitar are provided with templates specifically programmed for END1 and END2.
KETRON • AUDYA
15
Audya Style Structure
SETTING AUDIO STYLE MODELING on AUDYA
With the Release 3.0A the Audio Style Modeling of
Audya is raised up to its final and complete structure.
The 4 new BANK for sections Drum, Piano, Guitar1
and Guitar 2, together with the enhancement
of previous existing Libraries for Bank Bass and
Arp&Lick makes the Audio Style Modeling a very
powerful and easy system to compose new Styles.
It’s enough to start from an existing Style and,
without programming a note, to scroll the Modeling
Libraries while listening in real time the final result
and to replace the various parts of the Style using
the huge templates available.
Let’s take a look to some practical examples for the
Audio style Modeling.
▀▀ S
elect a Style to be edited and access the
Style View
The parts underlined in Red are the ones interested
to the Bank functioning.
By pressing twice the tabs F1, F2, F3, etc. it is
possible to select the BANK Libraries. The scroll for
various templates is achieved by the l’Alpha dial.
The new Bank Libraries, once selected and assigned
to the Style parts, are replacing the original MIDI
parts written for such Style.
16 KETRON • AUDYA STYLE COMPILER
FFFFFFFF
F1: the Drum controlling on tab F1 is very
sophisticated with the possibility to address 4
different ambients:
Audio Drum (Figure 1)
Drum Bank (Figure 2)
User Audio Drums (Figure 3)
Drum1 (Figure 4)
Audio Drum
Internal Audio Drum library, with more than 324
complete Audio files. (Could be increased).
Drum Bank
Midi Drum database with 255 Styles. (Could be
increased).
Audya Style Structure
User Audio Drums
Custom Wave Loops of the user. This new powerful
feature provided with the 3.0A permits to replace
the internal Audio Drums of Audya with Drum Wave
loops created from the user and located into a new
HD folder named User Audio Drums.
•• The Loops must be Wave 44.1 kHz, 16-bit and
must have a name with symbol @ followed from
the exact BPM number, e.g.: [email protected].
•• The loops are automatically synchronized with the
MIDI of the Style.
•• It is possible to associate a different Wave for each
Style section, such as ABCD, Fill In, Break, Intro
and Ending (See the enclosed documentation for
User Audio Drums for further details).
•• Together with the 3.0A is supplied a Demo folder
with 4 complete User Audio Drums styles.
FFFFFFFF
Drum1
Drum Set type selection.
IMPORTANT
•• On internal Audio Drum and on User Audio Drums
the template scroll may be done only at Style
Stop condition.
•• Internal Audio Drum and User Audio Drums are
auto-excluding, same as Drum Bank and original
MIDI Drum of the Style.
FFFFFFFF
F2: with F2, similar to F1, are accessed 3 different
Drum ambients:
Groove Bank: Up to 240 Drum Percussion
Library with Acoustic and Electric Loops (Latin,
Dance, Pop, Folk, etc.).
Groove: compatibility set up section for Drum
Loops of old Style Libraries (SD1, SD 5, Midjay).
Drum2: Drum Set type selection for the second
Drum Set.
FFFFFFFF
IMPORTANT
•• Groove section, Groove Bank and Drum 2
are auto-excluding but they can be added
individually to Audio Drums or User Audio Drums
or Drum Bank or Drum1.
F3: Bass Bank. Bass Library (333).
F6: Piano Bank. Piano and Electric Piano Library
(236).
F7: Guitar Bank 1. Acoustic and Electric Guitar
Library (253).
F8: Guitar Bank 2. Acoustic and Electric Guitar
Library (253).
F9: Arp & Lick. Arpeggios and various Orchestral
embellishments (254).
F10: Live Guitar. Audio Live Guitar Library, with up to
150 Live Guitars.
All the Orchestral Libraries such as Bass, Piano,
Guitar 1-2 and Arp&Lick are playing with their original
Program Change but it is possible to change the
voice on each section (when box is blue coloured) by
simply selecting the sound family on the right hand
and the single GM Voices.
All variations applied to the Style with the insert of
the Bank templates may be memorized and saved as
usual into the correspondent User Style.
The access to a single template of the Bank Libraries
may be reached also with the numerical key pad 0 -9
(Please see the STYLE BANK Lists).
All variations apported to the Style with the insert of
the Bank templates may be memorized and saved as
usual into the correspondent User Style.
The access to a single template of the Bank Libraries
may be reached also with the numerical key pad 0 -9
(Pls. see the STYLE BANK Lists).
KETRON • AUDYA STYLE COMPILER
17
KETRON s.r.l.
Via Giuseppe Taliercio n. 7
60131 Ancona (Italy)
Tel. +39 071 285771
Tel. +39 071 2857748
www.ketron.it
email: [email protected]