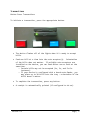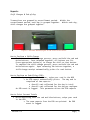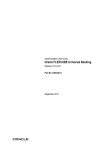
1
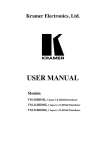
CA$H DEPOT [USER MANUAL] How to configure, maintain, and use the device. Transactions Mag Stripe Transaction The magnetic stripe card reader is commonly referred to as an MSR and is illustrated below. It is a four (4) way reader which allows you to swipe your card in any direction. Figure 1: Mag Stripe Reader w/ Green Light Illuminated When the MSR is online, the green light is on. If the light is either red or is not lit at all, please call your service provider. o To start a transaction, swipe your card. The device flashes all of the lights when it’s ready to accept bills. If only the red light flashes, please refer to this table: If red light flashes once, re-swipe the card again - depending on your swipe speed, adjust either a bit slower or faster. If red light flashes twice, the card is not active. Feed one bill at a time into the note acceptor(s), any orientation. If multiple note acceptors are installed on the device, you can feed either one or both at the same time. o o Certain bills may not be accepted (1s, 2s, and 5s for instance). If your device is configured with a bunch-note-feeder, you may place up to 30 bills into the tray – orientation of the bills doesn’t matter. To end the transaction, swipe your card again. A receipt is automatically printed (if configured to do so). Transactions Button-Press Transactions To initiate a transaction, press the appropriate button. The device flashes all of the lights when it’s ready to accept bills. Feed one bill at a time into the note acceptor(s). Orientation of the bills does not matter. If multiple note acceptors are installed on the device, you can feed either one or both at the same time. o Certain bills may not be accepted (1s, 2s, and 5s for instance). o If your device is configured with a bunch-note-feeder, you may place up to 30 bills into the tray – orientation of the bills doesn’t matter. To complete the transaction, press any button. A receipt is automatically printed (if configured to do so). Version 1.3 Page | 1 Reports Shift Changes & End-of-Day Transactions are grouped by reconcilement period. Within the reconcilement period, each day is grouped together. Within each day, shift-changes are grouped together. Figure 2: Available Buttons/Lights on the front of the device. How to Perform a Shift-Change To initiate the shift-change process, press and hold the red and white buttons. Once released together, all buttons are lit. Press appropriate button(s) to change the shift on that button. To complete the shift-change process, press and hold the red and white buttons again. Upon releasing the buttons together, a shift-change receipt automatically prints for each button. How to Perform an End-Of-Day (EOD) While depressing the blue button, swipe your card in the MSR An EOD report automatically prints. The day end is comprised of two reports: Overall cash collected for the day in total Overall cash collected for the day per employee An EOD event is logged. This parameter drives the EOD reports How to Print Current Totals While depressing both the red and blue buttons, swipe your card in the MSR The same reports from the EOD are printed. No EOD event is logged. Version 1.3 Page | 2 Reconciliation Settling the Device To start the reconciliation process, press and hold the green button while swiping a settlement card. Once you have swiped your card, let go of the button. If the button is illuminated, as pictured below, the device is in reconcilement mode. You may open the door to clear the note acceptor(s). Be careful not to open the door before entering the reconciliation mode. If a card was not authenticated, an internal alarm will sound. You may turn off the audible alert by following the steps above. Figure 3: Reconcilement mode is indicated by the green button being lit. Once the note acceptor(s) have been cleared, close the door and swipe your card again (no need to press any buttons). The reconcilement receipt is automatically printed and the green light will go out. The receipt offers the following information: Reconciliation Date / Time Last Reconciliation Date / Time Transaction Number Range Note Acceptor Totals (per note acceptor) Version 1.3 Page | 3