1
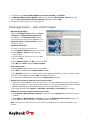
KeyImage
Quick
Start
Guide
A reference document of useful
information and step-by-step
instructions.
Table of contents
2
KeyImage Features
2
Installation
2
Installing KeyImage Inquiry and
KeyImage ARP
3
Installing the KeyImage Security CD
3
Launching the KeyImage Inquiry and
KeyImage ARP Applications
4
Installing the CSC Security Certificate
5
KeyImage Inquiry –
view check images
6
KeyImage ARP –
view your statement or reconciliation
7
Toggle between KeyImage Inquiry
and KeyImage ARP
7
Questions?
KeyImage features
• Fast access to banking and reconcilement statements for all ARP accounts
• Images of paid checks for the period indicated on the face of each CD
• Indexing software that allows you to search for check images on previous CDs
• The ability to use reports and statements to search for check images and streamline your research
Installation
KeyImage Inquiry and KeyImage ARP software can be installed from any KeyImage CD dated after 9/1/2009,
or downloaded from our website at key.com/cashmanagement. The following instructions will guide you through
either installation process.
Pre-Installation
Complete the following steps prior to installing the KeyImage software:
1.Log on to the PC on which you’ll be installing KeyImage Software as a user with Administrator
privileges.
2. Close all other applications (except your web browser if installing KeyImage from key.com).
3. It is not necessary to manually backup existing CD data. The install process backs up existing data to
C:\Program Files\CVBackup.
4. If using more than one workstation with KeyImage with a shared data store, be sure to set up
Shared Local mode on ALL workstations prior to launching the application (see network installation
information below).
Installing KeyImage Inquiry and KeyImage ARP
Installing KeyImage Inquiry and KeyImage ARP from CD
1. Insert the KeyImage CD in the CD or DVD drive.
2. Double-click the My Computer icon on the desktop.
3. Double-click the CD/DVD drive.
4. Double-click the Installs folder icon.
5. Double-click the KeyImage13.exe icon.
• Running KeyImage13.exe will walk you through the process of backing up your data, uninstalling previous
versions of KeyImage, and installing the latest version of KeyImage software and documentation.
• Follow all prompts during the installation process.
• You may be asked to enter or confirm information. Accept default settings by selecting the Next button or
the OK button until the installation is complete. If you change any of the default settings, be certain to note
your changes and save them for future reference.
2
Installing KeyImage Inquiry and KeyImage ARP from the key.com website
1. KeyImage software is available online at www.key.com/cashmanagement.
2. Click on the KeyImage Software Version 13.0 link and select Run from the dialog box.
• Running KeyImage13.exe will walk you through the process of backing up your data, uninstalling previous
versions of KeyImage, and installing the latest version of KeyImage software and documentation.
• Follow all prompts during the installation process.
• You may be asked to enter or confirm information. Accept default settings by selecting the Next button or
the OK button until the installation is complete. If you change any of the default settings, be certain to note your
changes and save them for future reference.
Network installation of KeyImage Inquiry and KeyImage ARP software is now supported!
Refer to the Inquiry User Manual, section 2.2.2, for details. Contact support with any questions.
Installing the KeyImage Security CD
The installation should start automatically when the Security CD is inserted. If it doesn’t, follow these steps:
1. Double-click the My Computer icon on the desktop.
2. Double-click the CD/DVD drive.
3. Double-click the setup.exe icon.
• Running Security CD setup.exe will walk you through the process of installing the latest version of
KeyImage Security CD software and documentation to the computer.
• Follow all prompts during the installation process.
• You may be asked to enter or confirm information. Accept default settings by selecting the Next button or
the OK button until the installation is complete. If you change any of the default settings, be certain to note
your changes and save them for future reference.
Launching the KeyImage Inquiry and KeyImage ARP
Applications
After successfully installing KeyImage Inquiry and KeyImage ARP, you can launch the applications by
selecting Start > Program Files > KeyImage Workstation from the Start menu at the bottom of your
Windows desktop. The KeyImage Workstation folder includes shortcuts to the KeyImage Inquiry and
KeyImage ARP applications and their User Manuals. If you chose not to add desktop icons during the
installation, you can still create them as follows:
1. Double-click the My Computer icon on the desktop.
2. Navigate to where the KeyImage software is installed (usually C:\Program Files\CV).
3.Right-click on the arp32.exe file. Select the Send To menu item, then left-click the Desktop (create
shortcut) menu item.
4.Right-click on the inquiry.exe file. Select the Send To menu item, then left-click the Desktop (create
shortcut) menu item.
3
Installing the CSC Security Certificate
Installing the CSC Security Certificate – Microsoft Office XP and Office 2003
If your system administrator hasn’t installed the CSC Security Certificate, you will see a Security Warning
message when launching KeyImage ARP / Microsoft Word. Follow these steps to install the Certificate:
a.In the Security Warning window, if Always trust macros from this source is not grayed out, check the
box and click on Enable Macros. The Security Warning window will close automatically.
b.Close Microsoft Word and launch KeyImage ARP again. No additional warning messages should be
displayed.
c.If Always trust macros from this source is grayed out, click on Details.
d.The Digital Signature Details window will open.
e.Click View Certificate. The Certificate window will open.
f.Click Install Certificate. The Certificate Import Wizard window will open.
g. To continue, click Next. The Root Certificate Store window will open.
h.Click Next. The Certificate Import Wizard window will open, displaying the successful completion
message.
i.Click Finish. When the Security Warning window opens again, close it.
j.A warning message will be displayed. Click OK and then close Microsoft Word and launch KeyImage ARP.
The Security Warning Window will appear again with Always trust macros from this source enabled.
k.Check Always trust macros from this source and click Enable Macros.
l. This should prevent any additional warning messages from being displayed.
Installing the CSC Security Certificate – Microsoft Office 2007 and Office 2010
If your system administrator hasn’t installed the CSC Security Certificate, you will see a Security Warning
message when launching KeyImage ARP / Microsoft Word. Follow these steps to install the Certificate:
a. On the bar that says Security Warning Macros have been disabled, click Options.
b.The Microsoft Office Security Options windows opens displaying Security Alert - Macros message.
Click Show Signature Details.
c. In the Digital Signature Details window click View Certificate.
d. In the Certificate window click Install Certificate.
e. In the Certificate Import Wizard window click Next.
f.In the Certificate Store window, click the Place all certificates in the following store radio button and
click Browse.
g. In the Select Certificate Store window, click on Trusted Root Certification Authorities, and click OK.
h.Click Next on the Certificate Store window.
i.Click Finish on the Completing the Certificate Import window.
j.Click Yes on the Security Warning window.
k.Click OK on the successful import message window.
l.Click OK in the Certificate window.
m.Click OK in the Digital Signature Details window.
4
n. You should still see Security Warning Macros have been disabled. Click Options.
o.The Microsoft Office Security Options windows opens displaying Security Alert - Macros message.
Click the Trust all documents from this publisher radio button and click OK.
p. Exit Microsoft Word and then launch KeyImage ARP.
KeyImage Inquiry – view check images
1.Open KeyImage Inquiry
Select the KeyImage Inquiry item from the Start
> Programs > KeyImage Workstation menu
or double–click the KeyImage Inquiry shortcut
icon on the desktop to launch the application. The
KeyImage Inquiry and Check Image_1 windows
will open as shown.
2. Import the CD volume
This needs to be done once for each CD.
a.Insert KeyImage ARP CD into your DVD/CD drive.
b.Select Volume > Import from the KeyImage
Inquiry window.
c.When the directory listing of the CD in your drive
opens, click OK.
d.Select Volume & Index, click OK, and then click Yes.
e.Click OK when Status indicates Import complete.
3. View check images
a.Select Search (magnifying glass icon) from the toolbar.
b.Click Clear at the bottom of the Search Criteria window.
c.Click Retrieve to list the first 40 check images or enter additional information to search for specific images.
d.To view an item, highlight it and click View, or double-click the item.
e.An Image of the selected check will display in the Check Image_1 window.
4. Sorting search results by field (one search result at a time)
a.Right-click the field heading on which you want to sort. A (1) will be added to the heading name and the
field will be sorted for the current 40 items on the screen. You can sort by multiple fields by right-clicking on
additional field headings. Subsequent heading names will be appended with (2), (3), etc.
b.To change sort order, Select Options > Sort Order > Ascending or Descending from the menu.
5. Sorting your search results by field (all search results)
a.Select Options > Global Sorting > Enabled. A checkmark next to Enabled indicates that this feature is
turned on.
b.Select Options > Global Sorting > # of Items to display the Global Sort Items Count dialog box. This
option allows you to set the maximum number of records to be sorted.
Note: The maximum number of items you can select to sort depends on the amount of available system
memory.
5
6. To view multiple images
Select Options > # of Images from the menu, then select 1, 2, or 3 images.
7. To export your search results
a.Select Image > Search to open the Search dialog box. Enter the search criteria and click Export All.
b.A dialog box will open. Click OK to confirm that you want to export the items.
c.The Export to Folder dialog box will open. Click on the arrow to display a menu of drives, and then click
on the drive to which you want to store your data.
d.The Export All dialog box will open, displaying the default Export Batch Name. You may use the default
batch name or enter your own.
e.The Export All dialog box will show the status of the export in the Status field. The Cancel button will
change to Done once the export is complete. Click Done to clear the dialog box.
8. To print the image index
Select File > Print Index from the menu.
9. To exit the program
Select File > Close from the menu.
KeyImage ARP – view your statement or reconciliation
1. Open KeyImage ARP
Select the KeyImage ARP item from the Start > Programs > KeyImage Workstation menu or doubleclick on the KeyImage ARP shortcut icon on the desktop to launch Microsoft Word. The KeyImage Inquiry
and Check Image_1 windows will also be displayed. The following toolbar will appear in Word for Office XP
and Office 2003.
For Office 2007 and Office 2010, the following Add-Ins tab will appear in the Word tab area.
2.Ensure CD information has been imported
If the volume information from each of your CDs has not been imported, refer to Step 2 under the KeyImage
Inquiry section above.
3. View additional statements and reconciliations
a.Select Report Folder from the toolbar
b.Enter the last four digits of the desired statement account number (Ex: ‘4567.stm’, ‘4567.rpt’, etc.).
6
4. Select statement information
a.Highlight the desired statement information (paid date, amount, serial number, etc) and click the desired
toolbar button.
b.If the KeyImage Inquiry window does not display after selecting a toolbar option, click the flashing
KeyImage icon at the bottom of the desktop screen to view the desired check images.
Toggle between KeyImage Inquiry and KeyImage ARP
The following three options can be used to switch between KeyImage Inquiry and KeyImage ARP:
1. Press the ALT & TAB keys at the same time to toggle between applications
2. Select the desired window icon at the bottom of the desktop screen
3. Select the minimize option from the top right corner of the desired window
Questions?
If you need additional assistance, please contact our Corporate Business Banking Center at either of the
numbers below. We’re available Monday through Friday, 8:00 a.m. – 9:00 p.m. ET.
216-813-3200
800-821-2829
Key.com is a federally registered service mark of KeyCorp. ©2012 KeyCorp. KeyBank is Member FDIC. ADL4449
7