1
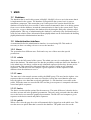
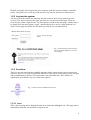
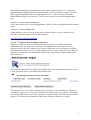
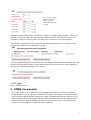
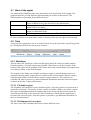
Marine Bacterioplankton Database (MBD)
Global Positioning of Marine Bacterioplankton
(GPMB)
MBD / GPMB
User’s Manual
Introduction
MBD/GPMB is the result of a project done for the University of Kalmar, Department of
Biology and Environmental Science. The department wished for a system that could store
and manage DNA-sequences. The system should also be able to administrate from the
Internet. A graphical interface for displaying the data in the system should be implemented.
The most fundamental part of the system is a relational database. This database is easily
administrated using a web-interface created with JSP-code. The graphical presentation is
realized with a Java-applet.
This user’s manual will describe the functionality of MBD/GPMB and how the system is
managed. There will be short examples of how certain tasks are done and things to consider
when administrate the system. The user’s manual is divided into two parts, MBD and GPMB.
In the MBD-part the whole administration interface will be described. More limited and easy
accessible guidance is provided on the homepage of the database.
This product includes software developed by the Apache Software Foundation
(http://www.apache.org/). The software used is the web servers Apache and Tomcat.
The database that is being used by the system is MySQL.
The following web browsers have been tested and work with the system.
•
•
•
•
•
•
Safari v 1.0, Mac OS X
Internet Explorer 5.2, Mac OS X
Internet Explorer 6.0, MS Windows XP
Internet Explorer 5.5, MS Windows 2000
Mozilla 1.4, MS Windows XP
Opera 7, MS Windows XP
Because of the use of code that follows well implemented standards it is most likely for the
system to work when using different web browsers than the ones that are mentioned above.
2
1 MBD
1.1 Database
The database that is used in this system is MySQL. MySQL is free to use in the means that it
is implemented in the system. The database is integrated in the system, but it is run as a
standalone component. This means that even if other parts of the system should fail, the
database will most likely be accessible. Under normal circumstances there is no direct contact
from a user with the database, instead the communication is done by the system itself. There
is, however, a way to administrate the database directly through a third party software called
phpMyAdmin. This way of administrating the database is extremely risky and should only be
used as a last solution. More information about phpMyAdmin can be found under the heading
phpMyAdmin under Administration interface.
1.2 Administration interface
As mentioned before the administration interface is created using JSP. This makes it
necessary to have a working web server to use the interface.
1.2.1 Users
The system has four different users. Each and every one of these users has special
permissions.
1.2.1.1 admin
This user has the full control of the system. The admin user can view and update all of the
data in the database. The admin user also has the possibility to add new data in the database. It
is the admin user who has to confirm newly submitted sequences before they become active
in the system. This part will be elaborated under the section Confirm newly submitted
sequences. The BLAST-tool will compare a given sequence to all the sequences in the
database when the admin user uses it.
1.2.1.2 mme
The mme user is the normal account used by the MME-group. This user has the right to view
sequences that are owned by the mme user. Besides viewing the owned data the mme user
have the right to view data that are already published. I. e. the data that is accessible to the
public. When the mme user uses the BLAST-tool the given sequence is compared with mmeowned and public sequences.
1.2.1.3 basics
The basics user has similar options like the mme user. The main difference is that the basics
user have an own tab in the graphical presentation. This tab is only activated when the admin
user or the basics user starts the graphical presentation. The BLAST-tool compares a given
sequence to the basics owned and public sequences.
1.2.1.4 public
When a user visits the page he or she will automatically be logged on as the public user. This
user has access to public data that is stored in the database. The public user can use the
3
BLAST-tool and it will compare the given sequence with the sequences that are owned by
public. The public user can at any point choose to log into the system as a different user.
1.2.2 Log into the system
All users except the public user must log into the system to have access to their specific
services. The active session in the open web browser is connected to the login. There are
several ways to find a login screen. The first option is found on the start page. Another way is
to simple press the menu option “login”, and the third way to access a login function is to
click a secure page and follow the link that is presented, see screenshot below.
Fig. 3.1, This is the login
screen.
Fig. 3.2, This message is shown when
a user with limited rights try to access
a secure page.
1.2.3 Functions
There are several menu options available and most of the options below can be accessed by
all users. There is of course a significant difference of the search results that a public user gets
and an administrator, but this is not noticeable to the individual user. Here follows an
explanation of each and every one of the menu options.
Fig. 3.3,These are the available menu options.
1.2.3.1 start
This is the start page that is displayed when first visiting the mbd/gpmb site. This page shows
information about the site and shows a login screen.
4
1.2.3.2 GPMB
The GPMB option leads the way to a start page for the Java-applet. In close proximity to the
start button there is a label telling which user the applet will start with. To see additional
information about starting the applet, please read Starting the applet later in this manual.
1.2.3.3 browse
There are several search options and these can be found under the browse option in the menu.
•
•
•
•
•
•
•
•
Accession Number
ID Number GI
Locus
Definition
Taxonomy
Contig Number
Region
Modification
It is possible to use free text search with every search option. When the search results is
greater than one a dropdown box is shown that contains all search results. There is also an
option to cycle through the search results.
1.2.3.4 blast
The BLAST tool is rather simple to use. Its user interface consists of a text area where the
sequence that should be compared is entered. A button under this text area activates the
BLAST-function, who takes about 2-5 seconds to execute. When the BLAST tool is finished
executing, the result is shown. The result contains active links to sequences that is included in
the result. This link brings up the browse option with the current sequence active. Please note
that the BLAST tool uses different base of sequences to compare the entered sequence with.
For further reading, please read under Users earlier in this manual.
1.2.3.5 submit sequence
This option displays a number of text fields that can be entered to submit new sequences to
the system. The new sequence is placed in a queue and must be confirmed by the
administrator to be stored in the active part of the database. This is further explained under
Confirm new sequences later in this manual.
1.2.3.6 admin
The options under admin are only available to the administrator. If any other user tries to
access this option an error message is displayed.
5
Fig. 3.4, This pictures
shows the options
available under the
admin menu.
1.2.3.6.1 View and update
This option is very similar to the browse function. The main difference is that this option
gives the possibility to edit the values. The View and Update page is divided into two parts.
The upper part represents the current selected contig. The lower part displays the sequences
that the current contig consists of. The reference of the current sequence is also shown here.
All the text fields are editable. It is also possible to delete a whole contig or a sequence. To do
this the user needs to mark the checkbox that says, “Delete confirmation”. This is done to
make sure no data are deleted by mistake.
Fig. 3.5, To be able to delete data the user must
mark the checkbox “Delete confirmation”.
1.2.3.6.2 Add/remove references to/from a sequence
This option is used to add or remove a reference to a sequence.
1.2.3.6.3 Insert sequence
This option is the same as submit sequence. This makes it possible to add new sequences into
the database. Please note that the values submitted here will not have to be confirmed like the
ones the other users submit.
1.2.3.6.4 Insert contig
This option is used to insert new contigs in the database.
1.2.3.6.5 Bulk upload
Bulk upload makes it possible to upload a comma separated file, containing data, to the
system. This file must follow a specific standard to be accepted by the system. The easiest
way to create a file that follows the standard is to use the Excel-template provided with the
system. There is a link to the Excel-template under this menu option. The template contains
different fields where the data need to be entered in a correct format. The easiest way to work
with this template is to open it in Excel and enter the data wanted. After all the values are
entered the file should be saved as a comma separated file (.csv).
1.2.3.6.6 phpMyAdmin
This option opens a new window where phpMyAdmin starts. This tool makes it possible to
administrate the database in a rather insecure way. phpMyAdmin should only be used in
emergency and when the ordinary web interface is defect. The reason that this tool is so
dangerous is that it makes it possible to edit every single table of data in the database. Many
tables are connected to each other and if the tables are edited manually, in an incorrect way,
6
this could mean that the connection between the tables could be broken. To be able to use
phpMyAdmin the MySQL database and the Apache web server must be running. The users
that is used with phpMyAdmin is strictly database users i. e. the users that exist in the
MBD/GPMB system is not used here. There are two ways of accessing the phpMyAdmin
tool.
1.2.3.6.6.1 Access via the web interface
This is the normal way of access phpMyAdmin. There is a link to phpMyAdmin in the admin
option.
1.2.3.6.6.2 Access via direct link
phpMyAdmin is only to be used in emergency and to be able to access it when the web
interface is defective there is a direct link available.
http://halia.hik.se:8080/mysqladmin/
1.2.3.6.7 Confirm newly submitted sequences
When new sequences have been submitted to the system by a user different from the
administrator the new sequences are queued. The administrator must confirm the new
sequences before they are available to the system. When there are new sequences available,
the administrator will see a screen, when logging into the system, telling him or her that new
sequences are available. The administrator is given the opportunity to inspect and confirm
these sequences.
If the administrator chooses to inspect and confirm the newly submitted sequences he or she
will be presented with a screen that looks similar to this:
The options here are to confirm or delete the new sequence. If the administrator chooses to
confirm the sequence he or she must first add some information to the sequence. This is done
by choosing Edit sequence (see above) and type in which contig the current sequence will be
added to. The following screenshot will show how sequence connects to a contig:
7
Fig. 3.6, This function
makes it possible to
connect a newly
submitted sequence to
a contig.
Additional functionality makes it possible to set the user of the current sequence. This means
that only the current owner and of course the administrator have the right to see their own
sequences. If the user it set to public all of the users are able to see the new sequence.
If no contig is selected to the new sequence and the administrator tries to confirm it to the
database, the following error message is shown:
A newly submitted sequence can be deleted by marking the checkbox that is found next to the
sequence that should be deleted. If the administrator chooses to delete the newly submitted
sequence the following message will be shown:
1.2.3.7 login
Shows the login screen.
2 GPMB (Java-applet)
To be able to use the Java-applet the client computer must have a web browser and Java
Virtual Machine version 1.4 or later installed. The applets performance will depend on the
client computer and the Internet connection. Faster computer and Internet connections will
make the applet faster to work with. Because of the amount of data that the applet needs to
download from the systems database the applet may take some time to load and this time
will most certainly differ from different client computers.
8
2.1 Start of the applet
The menu option GPMB presents some instructions and a start button for the applet. The
graphical interface presents different data depending on which user that starts it. The
following data are presented for the different users:
admin
mme
basics
public
Have the right to see all of the samples and sequences in the database.
A special BASICS tab is also showed for the administrator.
Have the right to see MME-owned and published samples. The
BASICS tab is not shown.
Have the right to see BASICS-owned and published samples. Have the
right to see the BASICS tab.
Have the right to see published samples. The BASICS tab is not shown.
In close proximity to the start button a label is showing which user the applet will start with.
2.2 Tabs
At the top of the applet there are several tabs located. Every tab represents a specific page and
by clicking the tab label the current page is shown.
2.2.1 Worldmap
This tab shows the world map. At the start the applet shows the current available samples
from the database. All of the samples are clickable. When they are clicked a listbox at the
bottom of the applet will be populated. The listbox shows the clicked sample and samples that
is in close proximity of the clicked sample.
The samples in the listbox are clickable and when a sample is clicked another listbox are
populated showing which contigs that are available in the clicked sample. When a contig is
clicked another listbox is filled with the current contigs sequences. The sequences are
clickable and when a sequence is clicked additional information about the selected sequence
is shown on the tabs Contig and Reference.
2.2.1.1 Clickable regions
The worldmap is divided into several clickable regions. All of the regions are located near or
around the coastal line. The borders to these regions are hidden. When a user clicks a region
this region is highlighted and all the samples that are not located in the selected region are
removed from the map. At the same time the first listbox are filled with the sample that is
located in the selected region. From this point it is possible to get additional information in
the way described above.
2.2.1.2 Worldmap tab, lower part
The lower part of the worldmap tab consists of three different parts.
9
2.2.1.2.1 Reset button
When a user has selected a region and clicked on some different samples it might sometimes
be useful to reset the worldmap to its original state. This is done by clicking the button
marked Reset that is located on the worldmaps lower left.
2.2.1.2.2 Depth indicator
All of the samples that are visible on the worldmap is colour coded i. e. a specific colour
represent a specific depth. To be able to interpret the colours a legend is provided. This is
located in the lower middle part of the worldmap tab.
2.2.1.2.3 Listboxes
This part consists if three listboxes that shows the current selected samples, contigs and
sequences. All values in the listboxes are clickable. By selecting the exact values wanted
more specific information can be extracted from the database. Additional information about
the selected values can viewed on the tabs Contig and Reference.
2.2.2 BASICS
This tab is only available when the applet is started by an administrator or the BASCIS-user.
The reason that the BASICS-tab is protected is that BASICS research findings are considered
sensitive information and should not be available to the public. The BASICS tab has the same
functionality as the worldmap tab but instead of showing the whole world, a map over Europe
is shown. On this map the BASICS owned and public samples are showed.
2.2.2.1 BASICS tab, lower part
The lower part of the BASICS tab is identical to the lower part of the worldmap tab. Please
see the heading 3.2.1.2 for additional information.
2.2.3 Contig
This tab shows information about a special contig. The active contig is determined by the
choices made in the Worldmap-, BASICS- or contig-tab. If no contig is selected all the fields
are empty.
2.2.4 Reference
This tab shows the reference of the selected sequence. The information available are, among
others, the author, date of publication and which region a certain sequence belongs to.
2.2.5 Help
This tab will show fundamental help how to use the applet.
2.2.6 About
This tab shows additional information about the applet and its developers.
10
3 Error Messages/Error handling
This system depends on several components and their cooperation. If a component fail or the
communication between the components fail the system will generate an error message. The
main code in the system is protected by secure interfaces and it is therefore unlikely that a
user can damage the system. If an error occurs it is most likely that a service on the server is
not running. The two most important components that must be running for the system to function
properly are Tomcat and MySQL. If the system is not working properly the following things should be
checked:
1. Check that the Tomcat web server is running.
2. Check that MySQL is running.
3. Check that Apache web server is running.
If all services mentioned above are running there is a more severe problem in the system and
the user should contact someone who is in charge of the system.
3.1 MBD
If the database is not running this will be indicated by error messages that are showed when
one of the menu options is clicked. If the user enters incorrect values into the web interface an
error message will indicate what is wrong with the current value.
3.2 GPMB
The applet handles error by showing error messages in the consol to the plugin that runs the
applet in the browser. If the applet starts up normally and no values are showed on the map,
there is a problem with the connection to the database or the database may not be running.
11