1
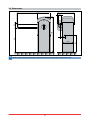
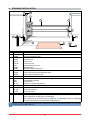
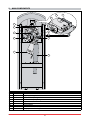
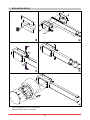
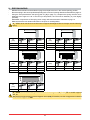
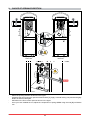
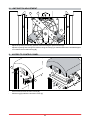
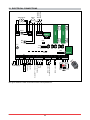
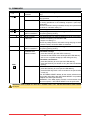
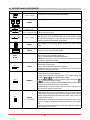
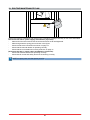
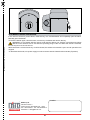
QIK80EH IP2085EN- rev. 2011-01-19 EN Installation and maintenance manual for electromechanical barrier. (Translation of the original instructions) DITEC S.p.A. Via Mons. Banfi, 3 - 21042 Caronno Pertusella (VA) - ITALY Tel. +39 02 963911 - Fax +39 02 9650314 www.ditec.it - [email protected] INDEX Subject Page 1. General safety precautions 2. EC declaration of conformity 3. Technical data 3 4 5 5 6 7 8 9 10 11 12 13 13 14 15 16 17 18 19 20 21 22 22 23 3.1 Operating instructions 3.2 Dimensions 4. 5. 6. 7. 8. 9. 10. 11. 12. 13. 14. 15. 16. 17. 18. 19. 20. Standard installation Main components Mechanical installation Rod installation Rod balancing Choice of opening direction Adjustment of limit switches Access to control panel Electrical connections Commands Outputs and accessories Settings Radio receiver operation Start up Troubleshooting Routine maintenance plan Operating instructions 20.1 General safety precautions 20.2 Manual release instructions CAPTION This symbol indicates instructions or notes regarding safety issues which require particular attention. i This symbol indicates informations which are useful for correct product function. This symbol indicates instructions or notes intended for technical and expert personnel. STOP This symbol indicates operations not to be effected for not compromise the correct operation of the automation. This symbol indicates options and parameters which are only available with the indicated item. This symbol indicates options and parameters which are not available with the indicated item. All right reserved $OOGDWDDQGVSHFL¿FDWLRQVKDYHEHHQGUDZQXSDQGFKHFNHGZLWKWKHJUHDWHVWFDUH7KHPDQXIDFWXUHUFDQQRW KRZHYHUWDNHDQ\UHVSRQVLELOLW\IRUHYHQWXDOHUURUVRPPLVLRQVRULQFRPSOHWHGDWDGXHWRWHFKQLFDORULOOXVWUDWLYH purposes. ,3(1 2 1. GENERAL SAFETY PRECAUTIONS This installation manual is intended for professionally competent personnel only. ,QVWDOODWLRQHOHFWULFDOFRQQHFWLRQVDQGDGMXVWPHQWVPXVWEHSHUIRUPHGLQDFFRUGDQFHZLWK*RRG:RUNLQJ Methods and in compliance with applicable regulations. %HIRUHLQVWDOOLQJWKHSURGXFWFDUHIXOO\UHDGWKHLQVWUXFWLRQV%DGLQVWDOODWLRQFRXOGEHKD]DUGRXV7KHSDFNDJLQJ materials (plastic, polystyrene, etc.) should not be discarded in the environment or left within reach of children, as these are a potential source of hazard. %HIRUHLQVWDOOLQJWKHSURGXFWPDNHVXUHLWLVLQSHUIHFWFRQGLWLRQ 'RQRWLQVWDOOWKHSURGXFWLQDQH[SORVLYHHQYLURQPHQWDQGDWPRVSKHUHJDVRULQÀDPPDEOHIXPHVDUHDVHULRXV KD]DUGULVN %HIRUHLQVWDOOLQJWKHPRWRUVPDNHDOOVWUXFWXUDOFKDQJHVUHODWLQJWRVDIHW\FOHDUDQFHVDQGSURWHFWLRQRUVHJUHJDWLRQRIDOODUHDVZKHUHWKHUHLVULVNRIEHLQJFUXVKHGFXWRUGUDJJHGDQGGDQJHUDUHDVLQJHQHUDO 0DNHVXUHWKHH[LVWLQJVWUXFWXUHLVXSWRVWDQGDUGLQWHUPVRIVWUHQJWKDQGVWDELOLW\7KHPRWRUPDQXIDFWXUHU LVQRWUHVSRQVLEOHIRUIDLOXUHWRXVH*RRG:RUNLQJ0HWKRGVLQEXLOGLQJWKHIUDPHVWREHPRWRUL]HGRUIRUDQ\ deformation occurring during use. 7KHVDIHW\GHYLFHVSKRWRFHOOVVDIHW\HGJHVHPHUJHQF\VWRSVHWFPXVWEHLQVWDOOHGWDNLQJLQWRDFFRXQW DSSOLFDEOHODZVDQGGLUHFWLYHV*RRG:RUNLQJ0HWKRGVLQVWDOODWLRQSUHPLVHVV\VWHPRSHUDWLQJORJLFDQGWKH forces developed by the motorized barrier. 7KHVDIHW\GHYLFHVPXVWSURWHFWDQ\DUHDVZKHUHWKHULVNH[LVWVRIEHLQJFUXVKHGFXWRUJUDJJHGRUZKHUH WKHUHDUHDQ\RWKHUULVNVJHQHUDWHGE\WKHPRWRUL]HGEDUULHU Apply hazard area notices required by applicable regulations. (DFKLQVWDOODWLRQPXVWFOHDUO\VKRZWKHLGHQWL¿FDWLRQGHWDLOVRIWKHPRWRUL]HGEDUULHU %HIRUHPDNLQJSRZHUFRQQHFWLRQVPDNHVXUHWKHSODWHGHWDLOVFRUUHVSRQGWRWKRVHRIWKHSRZHUPDLQV Fit an omnipolar disconnection switch with a contact opening gap of at least 3 mm. 0DNHVXUHDQDGHTXDWHUHVLGXDOFXUUHQWFLUFXLWEUHDNHUDQGRYHUFXUUHQWFXWRXWDUH¿WWHGXSVWUHDPRIWKHHOHFtrical system. When necessary, connect the motorized barrier to a reliable earth system made in accordance with applicable safety regulations. During installation, maintenance and repair, interrupt the power supply before opening the lid to access the electrical parts. To handle electronic parts, wear earthed antistatic conductive bracelets. The motor manufacturer declines DOOUHVSRQVLELOLW\LQWKHHYHQWRIFRPSRQHQWSDUWVEHLQJ¿WWHGWKDWDUHQRWFRPSDWLEOHZLWKWKHVDIHDQG correct operation. For repairs or replacements of products only original spare parts must be used. The installer shall provide all information relating to automatic, manual and emergency operation of the motorized barrier, and provide the user with operating instructions. 3 ,3(1 2. EC DECLARATION OF CONFORMITY Manufacturer: DITEC S.p.A. $GGUHVV9LD0RQV%DQ¿&DURQQR3OOD9$,7$/< Declares that the motorised barrier product, such as QIK80EH conforms to the essential requisites of the following EC directives: - Electromagnetic Compatibility Directive 2004/108/EC - Machine Directive 2006/42/EC - Building Products Directive 89/106/EC conforms to the following characteristics of the standard EN 13241-1 (Attachment ZA): - Production controls in the factory (in conformity) - Release of dangerous substances (in conformity) - Resistance to wind load (Class 5) - Safe opening (in conformity) - Mechanical resistance and stability (in conformity) - Manoeuvring forces (in conformity) 2UJDQL]DWLRQQRWL¿HG7UHYLVR7HFQRORJLD&(57 Registration number: 1600 Address: Via Pezza Alta, 34 31046 Rustignè di Oderzo (TV) Caronno Pertusella, 19-01-2010 ,3(1 Si S Silvano ilv lvan v no A An Angaroni nga g ro roni ni ((M (Managing Ma an nag agin ng Director) Diiire D rre ector ect cctto orr) 4 3. TECHNICAL DATA QIK80EH Power supply Absorption Torque Opening time Closing time Rod length (max) Service class Temperature Degree of protection 230 V~ / 50-60 Hz 1.2 A 200 Nm 6÷12 s/90° 6÷12 s/90° 7950 mm 4 - INTENSE S2 = 50 min S3 = 50% -20° C / +55° C IP24D Control panel Fuse F1 Motor power supply Accessories power supply Degree of protection EL34 F2A 24 V= / 16 A 24 V= / 0.5 A IP55 Intermittence 3.1 Operating instructions Service class: 4 PLQLPXP·\HDUVRIZRUNLQJOLIHZLWK·F\FOHVSHUGD\ Applications: INTENSEIRUFRQGRPLQLDOLQGXVWULDODQGFRPPHUFLDOHQWUDQFHVSDUNLQJVSDFHVZLWKLQWHQVH vehicle or pedestrian access) Performance characteristics are to be understood as referring to the recommended weight (approx. 2/3 of maximum permissible weight). When used with the maximum permissible weight a reduction in the above mentioned performance can be expected. 6HUYLFHFODVVUXQQLQJWLPHVDQGWKHQXPEHURIFRQVHFXWLYHF\FOHVDUHWREHWDNHQDVPHUHO\LQGLFDWLYH Having been statistically determined under average operating conditions, and are therefore not necessarily DSSOLFDEOHWRVSHFL¿FFRQGLWLRQVRIXVH Each automatic entrance has variable elements such as: friction, balancing and environmental factors, all of which may substantially alter the performance characteristics of the automatic entrance or curtail LWVZRUNLQJOLIHRUSDUWVWKHUHRILQFOXGLQJWKHDXWRPDWLFGHYLFHVWKHPVHOYHV7KHLQVWDOOHUVKRXOGDGRSW suitable safety conditions for each particular installation. 5 ,3(1 3.2 Dimensions PL = min 4500 - max 7600 405 525 1180 140 100 815 80 80 560 355 i 127(XQOHVVRWKHUZLVHVSHFL¿HGDOOPHDVXUHPHQWVDUHH[SUHVVHGLQPLOOLPHWUHVPP ,3(1 6 4. STANDARD INSTALLATION 4 1 3 2x1.5 mm² 2 5 7 7 7 4x0.5 mm² 4x0.5 mm² 3x1.5 mm² A 8 2x1.5 mm² 6 Ref. Code 1 QIK80EH QIK80Z 2 QIKC40 QIKC55 QIKCG QIKLUX QIKC QIKAM QIKGR 3 QIKAF QIKAFE QIKAFZ 4 LAMPH 5 XEL5 LAN4 LAN7 XELCA 6 GOL4 7 XEL2 XELCQ XELCB 8 LAB9 A i Description Barrier enclosure Enclosure fastening base Rod 3975 mm Rod 5550 mm Joint for rod /LJKWNLWIRUURG UHÀHFWRUVER[IRUURG Mobile support Aluminium barrier 2000 mm Fixed support )L[HGVXSSRUWZLWKHOHFWURPDJQHWLFEORFN Fixed support fastening base Flashing light Key selector switch &RPELQDWLRQNH\ERDUG Card decoder Column for control accessories Radio Photocells Photocell container Photocell column 0DJQHWLFORRSGHWHFWLRQGHYLFHIRUWUDI¿FPRQLWRULQJ Connect the power supply to an approved omnipolar switch with an opening distance of the contacts of at least 3mm (not supplied). The connection to the mains must be made via an independent channel, separated from the connections to command and safety devices. 127(WKHJLYHQRSHUDWLQJDQGSHUIRUPDQFHIHDWXUHVFDQRQO\EHJXDUDQWHHGZLWKWKHXVHRI',7(& DFFHVVRULHVDQGVDIHW\GHYLFHV 7 ,3(1 5. MAIN COMPONENTS 7 9 3 4 4 5 3 2 2 1 6 Ref. Code 1 2 3 4 5 6 7 8 BATKH 9 MD2 ,3(1 Description 24 V= motor with encoder Opening/closing limit switches Limit switch adjusting Mechanical stop adjusting Key release Blue spring Ø63 mm Control panel &RQWLQXRXVPRGHEDWWHU\NLW Display module for diagnostics and advanced controls 8 8 6. MECHANICAL INSTALLATION 405 205 164 205 355 Ø12,5 600 348 - 600 550 800 700 ,IWKHVXUIDFHGRHVQRWSHUPLWVWURQJ¿UPIDVWHQLQJRIWKHHQFORVXUHSUHSDUHDFRQFUHWHEDVHZLWKWKH anchor ties and base plate QIK80Z embedded which must be level and clean. Insert elements made of iron or other material through the anchor ties so that the ties are attached to the concrete reinforcement. Pass the cable ducts through the central hole of the plate. :$51,1*PDNHVXUHWKDWWKHIDVWHQLQJLVVWURQJDQG¿UP Secure the enclosure. 127(WRRSHQWKHHQFORVXUHUHOHDVHWKHDXWRPDWLRQDVGHVFULEHGRQSDJHDQGXQVFUHZWKHVFUHZV RQWKHIURQW 9 ,3(1 7. ROD INSTALLATION L 1 2 3 4 Ø3 Ø3 5 Cut the length of the rod to L=PL+350 mm. ,QVWDOOWKHURGDVVKRZQLQWKH¿JXUH ,3(1 10 8. ROD BALANCING - Release the automation as described on page 23 and place the bar in the vertical opening position. Place the spring in the correct position depending on the choice of opening direction as described on page 12. Using the nuts placed above the spring (see ref. [B] on page 12), compress the spring until the rod is EDODQFHGDWDQDQJOHRIWRWKHÀRRULQWKLVSRVLWLRQWKHURGPXVWEHVWDWLRQDU\RUSRLQWVOLJKWO\ upwards). W$51,1*FRPSUHVVLRQRIWKHVSULQJPXVWFRPSO\ZLWKPHDVXUHPHQW$LQGLFDWHGRQSDJH 0DNHVXUHWKDWWKHURGUHPDLQVVWLOOZKHQLQWKHRSHQRUFORVHGSRVLWLRQ W W$5 1,1*QHYHUXVHWKHIRUFHRIWKHPRWRUWRVXSSRUWWKHZHLJKWRIWKHURG$OZD\VXVHWKHEDODQFLQJ W$51,1*QHYHUXVHWKHIRUFHRIWKHPRWRUWRVXSSRUWWKHZHLJKWRIWKHURG$OZD\VXVHWKHEDODQFLQJ VSULQJ PL PL PL (mm) 4500 - 5399 5400 - 6899 6900 - 7600 PL (mm) QIKM5 / / / QIKM5 / / / QIKM5 4500 - 5199 5200 - 6699 6700 - 7200 QIKM5 / / / QIKM5 / 560 PL 560 PL 2m 2m min 500 2m PL (mm) 4600 - 4799 4800 - 6199 6200 - 6800 / / QIKM5 2m min 500 PL (mm) QIKM5 / / / QIKM5 / / / QIKM5 4800 - 5899 5900 - 6500 / / QIKM5 / / QIKM5 560 PL 2m 2m 2m min 500 PL (mm) 6700 / / QIKM5 :$5 : :$51,1* 1,1* IRU 3/ PP \RX PXVW XVH WKH ¿[HG VXSSRUW 4,.$)4,.$)( 4,.$ . )4,.$ . )( RU PRELOH VXSSRUW VXSSRUW 4,.$ . 0 4,.$0 :LWKWKH¿[HGVXSSRUWZLWKWKHHOHFWURPDJQHWLFEORFN4,.$ . )(LQVWDOOHGXVHWKHFRQ¿JXUDWLRQVLQGLFDWHG :LWKWKH¿[HGVXSSRUWZLWKWKHHOHFWURPDJQHWLFEORFN4,.$)(LQVWDOOHGXVHWKHFRQ¿JXUDWLRQVLQGLFDWHG IRUWKHPRELOHVXSSRUW4,.$ IRUWKHPRELOHVXSSRUW4,.$0 . 0 11 ,3(1 CHOICE OF OPENING DIRECTION A A 9. C B Right opening DIP2=OFF Left opening DIP2=ON 85 Nm 6HOHFWWKHRSHQLQJGLUHFWLRQDVVKRZQLQWKH¿JXUH $VVHPEOHWKHVSULQJXVLQJWKHVSHFLDOVFUHZ0[>&@DSSO\DWKUHDGORFNLQJFRPSRXQGDQGWLJKWO\ IDVWHQDVVKRZQLQWKH¿JXUH 6HW',3RQWKH(/FRQWUROSDQHODVVKRZQLQWKH¿JXUH 2QFH\RXKDYHLQVWDOOHGWKHURGDGMXVWWKHFRPSUHVVLRQRIVSULQJ4,.0XVLQJWKHQXWV>%@XQWLO$ mm. ,3(1 12 10. LIMIT SWITCH ADJUSTMENT C A B A C - Adjust the opening and closing position of the bar using the special screws [A]. Adjust the opening and closing limit switches using the cams [C] so that the switches are activated approx. 3 mm before the mechanical stop [B]. 11. ACCESS TO CONTROL PANEL D F 3 1 D 2 E - Unscrew and remove the front screws [D]. Pull the ring [E] and lift the enclosure cover [F]. 13 ,3(1 Transformer Motor Limit switch Limit switch Safety switch 12. ELECTRICAL CONNECTIONS 24V= 12 11 0 BIXMR2 ENC AUX2 TRF AUX1 24 V~ COM M+ M- PRG F1 ON OFF 1 2 3 4 5 ,3(1 + Automatic closing Opening Closing Stop 14 GOLR ANT 0 1 G1G3 0 1 8 7KH¿JXUHVKRZVWKHPDLQFRQQHFWLRQVRIWKHFRQWUROSDQHO(/ RC RDX IN POWER ALARM Safety re-opening SA Output 24 V= / max 0.5 A Lighting kit Flashing light Power supply 11 14 0 +G2- 0 1 2 3 4 9 BATKH L N C NO 12 VC TC R1 Safety re-opening Automation status light SIG VA 0 1 21 22 MD2 GOL4 13. COMMANDS 1 1 Command Function 2 N.O. AUTOMATIC CLOSING 3 N.O. OPENING STEP-BY-STEP 1 1 4 8 N.O. CLOSING N.C. REVERSE SAFETY CONTACT N.C. STOP N.O. HOLD-TO-RUN FUNCTION 1 1 9 9 1 G1 N.C. REVERSE SAFETY CONTACT N.O. TRANSMITTERS STORAGE AND CANCELLATION PRG SETTINGS RESET Description The permanent closing of the contact enables automatic closing. With DIP1=ON, the closing of the contact activates the opening operation. With DIP1=OFF, the closing of the contact activates opening or closing operations in the following sequence: open-stopclose-open. 127(LIDXWRPDWLFFORVLQJLVHQDEOHGWKHVWRSLVQRWSHUPDQHQW EXWODVWVIRUDGXUDWLRQVHWE\7& The closing of the contact activates the closing operation. The opening of the safety contact triggers a reversal of motion (re-opening) during closing. The opening of the safety contact stops the current operation. The opening of the 1-9 contact enables the hold-to-run function. - hold-to-run opening 1-3 with DIP1=ON; - hold-to-run closing 1-4. 127(DQ\VDIHW\GHYLFHVDXWRPDWLFFORVLQJDQGSOXJLQFDUGV LQVHUWHGLQ$8;$8;DQG5';DUHGLVDEOHG The opening of the safety contact triggers a reversal of motion (re-opening) during closing. :$51,1*WKH%,;05VWRUDJHPRGXOHPXVWEHLQVHUWHG Transmitter storage: SUHVVWKH35*NH\WKH6,*/('FRPHVRQ WUDQVPLWWKHWUDQVPLWWHUWREHVWRUHGWKH6,*/('ÀDVKHV - wait 10 s to complete storage (the SIG LED goes out). Transmitter cancellation: SUHVVWKH35*NH\IRUVHFWKH6,*/('ÀDVKHV SUHVVWKH35*NH\IRUDQRWKHUVHFWKH6,*/('ÀDVKHV TXLFNO\ :$51,1*WKH%,;05VWRUDJHPRGXOHPXVWnotEHLQVHUWHG SUHVVWKH35*NH\IRUVHFWKH,1/('ÀDVKHV SUHVVWKH35*NH\ZLWKLQVHFIRUDQRWKHUVHFWKH,1/(' comes on). The SETTINGS RESET deletes all the remote software settings made using MD2. After SETTINGS RESET it is possible to adjust the control panel directly. :$51,1* LI WKH 0' GLVSOD\ PRGXOH LV GLVFRQQHFWHG IURP WKHFRQWUROSDQHOD6(77,1*65(6(7PXVWEHSHUIRUPHG :$51,1*PDNHDMXPSHUIRUDOOWKH1&FRQWDFWVLIQRWLQXVH7KHWHUPLQDOVZLWKWKHVDPHQXPEHU :$51,1*PDNHDMXPSHUIRUDOOWKH1&FRQWDFWVLIQRWLQXVH7KHWHUPLQDOVZLWKWKHVDPHQXPEHU DUHHTXDO 15 ,3(1 14. OUTPUTS AND ACCESSORIES Output Value - Accessories 0 1 24 V= / 0.5 A Description Accessories power supply. Power supply output for external accessories, including automation status lamp. - + Flashing light. Activated during opening and closing operations. C NO 14 0 0 LAMPH QIKAFE Electric lock. Activated when the barrier is closed. 24 V= / 1 A QIKLUX Light kit.2QZLWKEDUULHUFORVHGÀDVKLQJZLWKEDUULHURSHUDWLQJ -G2 24 V= / 300 mA max and off with barrier open. Automation status lamp (proportional). The light goes off when the automation is closed; the light comes 24 V= / 3 W G3 RQZKHQWKHDXWRPDWLRQLVRSHQWKHOLJKWÀDVKHVZLWKDYDULDEOH frequency while the automation is operating. If the GOLR radio receiver is used, connect the antenna wire (173 mm) supplied or connect the BIXAL antenna via RG58 coaxial BIXAL cable. 14 +G2 1 ANT 0 1 2122 MD2 DMCS AUX1 AUX2 RDX COM BAT ,3(1 GOLR BIXMR2 BATKH 2 x 12 V / 2 Ah Used to connect the MD2 display module for advanced functions control or connect the DMCS software. The control panel has two housings for plug-in cards such as a radio receiver type, magnetic loops, etc. Plug-in card operating is selected using DIP1. :$51,1*WKHSOXJLQFDUGVPXVWEHLQVHUWHGDQGUHPRYHGZLWK WKHSRZHUVXSSO\GLVFRQQHFWHG The control panel has a housing for a plug-in card such as a GOLR radio receiver type. Plug-in card operating is selected using DIP1. :$51,1*WKHSOXJLQFDUGVPXVWEHLQVHUWHGDQGUHPRYHGZLWK WKHSRZHUVXSSO\GLVFRQQHFWHG If the GOLR radio receiver is used, the storage module can be used to store the remote controls. ,W DOORZV WKH RSHUDWLQJ FRQ¿JXUDWLRQV WR EH VDYHG XVLQJ WKH function of the MD2 display module. 7KHVDYHGFRQ¿JXUDWLRQVFDQEHUHFDOOHGXVLQJWKHIXQFWLRQ of the MD2 display module. If the control panel is replaced, the BIXMR2 storage module being used can be inserted in the new control panel. :$51,1* WKH VWRUDJH PRGXOH PXVW EH LQVHUWHG DQG UHPRYHG ZLWKWKHSRZHUVXSSO\GLVFRQQHFWHG Battery operating. 7KH EDWWHULHV DUH NHSW FKDUJHG ZKHQ WKH power supply is on. If the power supply is off, the control panel is powered by the batteries until power is re-established or until the battery voltage drops below the safety threshold. If this occurs, the control panel turns off. :$51,1*WKHEDWWHULHVPXVWDOZD\VEHFRQQHFWHGWRWKHFRQWURO SDQHOIRUFKDUJLQJ3HULRGLFDOO\FKHFNWKHHI¿FLHQF\RIWKHEDWWH ULHV 127(WKHRSHUDWLQJWHPSHUDWXUHRIWKHUHFKDUJHDEOHEDWWHULHVLV DSSUR[LPDWHO\&& 16 15. ADJUSTMENTS Description OFF Command 1-3 operation. Step-by-step 127( LW DOVR VHWV RSHUDWLQJ PRGH RI WKH SOXJLQ FDUGV FRQQHFWHG RQ $8; $8; DQG5'; Opening direction selection. Opens towards right. The opening direction is intended by viewing the automation from the side being examined. Opening with safety devices open. Enabled. Opening contacts 1-8 with the automation idle allows immediate opening using command 1-3 or remote control. FUTURE USE / Electronic antifreeze system. Enabled. Maintains motor function even at low ambient temperatures. DIP1 DIP2 DIP3 DIP4 DIP5 Trimmer VA-VC s 0s s 10 TC Opening. Opens towards left. Disabled. Opening contact 1-8 with the automation idle prevents all operations. / Disabled. Description Opening speed adjustment. Adjusts the opening speed. Closing speed adjustment. Adjusts the closing speed. max 60 min ON Setting automatic closing time. From 0 to 120 s. 120 s R1 min max min max RC LED Thrust on obstacles adjustment. The control panel is equipped with a safety device that stops motion if an obstacle is encountered during the opening operation and reverses motion during the closing operation. R1=MIN gives maximum obstacle sensitivity (minimum thrust). With R1=MAX, maximum thrust is obtained. Deceleration distance during closing. Adjusts the deceleration distance when closing to allow optimum approach. SIG On Transmitter enabling/storage phase. 12 0-12 limit switch contact is open. 11 0-11 limit switch contact is open. SA At least one of the safety contacts is open. Flashing Reception of a radio transmission. Cancellation of transmitters in progress. BIXMR2 memory damaged. / / / IN Receipt of command or change in status of SETTINGS RESET in progress. a dip-switch. POWER ALARM Power supply on. Encoder fault. 17 ,3(1 16. RADIO RECEIVER OPERATION The control panel has a housing for a plug-in card such as a GOLR radio receiver type with a frequency of 433.92 MHz. The antenna consists of a 173 mm long rigid wire. ,WLVSRVVLEOHWRLQFUHDVHWKHUDQJHRIWKHUDGLRE\FRQQHFWLQJWKHH[WHUQDODQWHQQDRIWKHÀDVKLQJOLJKWVRUE\ installing the tuned antenna (BIXAL). 127(WRFRQQHFWWKHH[WHUQDODQWHQQDWRWKHFRQWUROSDQHOXVHDFRD[LDOFDEOHW\SH5*PD[P Up to 200 remote controls can be stored in the storage module. Refer to the transmitters user manual to store, clone and delete transmitters. )URPRQHWRIRXU&+NH\VRIDVLQJOHWUDQVPLWWHUFDQEHVWRUHGLQWKHFRQWUROSDQHO ,IRQO\RQHDQ\&+NH\RIWKHWUDQVPLWWHULVVWRUHGFRPPDQGVWHSE\VWHSRSHQLQJLVFDUULHGRXW ,IIURPWZRWRIRXU&+NH\VRIDVLQJOHWUDQVPLWWHUDUHVWRUHGWKHIXQFWLRQVPDWFKHGZLWKWKH&+NH\VDUHDV follows: - CH1 = command 1-5 step-by-step/opening; - CH2 = opening command; - CH3 = command to switch on/off the courtesy light; - CH4 = stop command, equivalent to impulsive command 1-9. If the control panel is replaced, the storage module being used can be inserted in the new control panel. :$51,1*WKHVWRUDJHPRGXOHPXVWEHLQVHUWHGDQGUHPRYHGZLWKWKHSRZHUVXSSO\GLVFRQQHFWHG ,3(1 18 17. START-UP :$51,1* :$51,1* 7KHRSHUDWLRQVLQSRLQWDUHSHUIRUPHGZLWKRXWVDIHW\GHYLFHV 7KHWULPPHUFDQRQO\EHDGMXVWHGZLWKWKHDXWRPDWLRQLGOH 7KHWULPPHUFDQRQO\EHDGMXVWHGZLWKWKHDXWRPDWLRQLGOH 7KHDXWRPDWLRQDXWRPDWLFDOO\VORZVZKHQDSSURDFKLQJWKHVWRSV 0DNHDMXPSHUIRUWKH1&VDIHW\FRQWDFWV 2- Manually place the rod in the open and closed position. Adjust the mechanical stops and limit switches as indicated on page 13. 3- Use DIP2 to set the required direction as indicated on page 12. 4- Connect the power supply cable to the terminals L-N- as indicated on pages 7-14. 6ZLWFK RQ DQG FKHFN WKDW WKH DXWRPDWLRQ LV RSHUDWLQJ FRUUHFWO\ ZLWK VXEVHTXHQW RSHQLQJ DQG FORVLQJ commands. &KHFNWKDWWKHOLPLWVZLWFKHVDUHDFWLYDWHG &RQQHFWWKHVDIHW\GHYLFHVUHPRYLQJWKHUHODWLYHMXPSHUVDQGFKHFNWKH\ZRUNFRUUHFWO\ 7- If required, activate automatic closing using command 1-2 and adjust the time using the TC trimmer. 8 Set the desired opening and closing speed using the VA and VC trimmers. Adjust the deceleration distance when closing using the RC trimmer. 9- Set the obstacle thrust with the R1 trimmer. :$51,1*FKHFNWKDWWKHZRUNLQJIRUFHVH[HUWHGE\WKHGRRUZLQJVDUHFRPSOLDQWZLWK(1(1 UHJXODWLRQV &RQQHFWDQ\RWKHUDFFHVVRULHVDQGFKHFNWKH\RSHUDWHFRUUHFWO\ i 127(LQWKHHYHQWRIVHUYLFLQJRULIWKHFRQWUROSDQHOLVWREHUHSODFHGUHSHDWWKHVWDUWXSSURFHGXUH 19 ,3(1 18. TROUBLESHOOTING Problem Possible causes The automation does not No power. open or close. (POWER ALARM led off). Short circuited accessories. (POWER ALARM led off). Blown line fuse. (POWER ALARM led off). Safety contacts are open. (SA led on). Release SAFETY SWITCH microswitch open. (11 and 12 leds on). 7KHUHPRWHFRQWUROGRHVQRWZRUN Remedy &KHFNWKDWWKHFRQWUROSDQHOLVSRZHUHG correctly. Disconnect all accessories from terminals 0-1 (voltage must be 24 V=) and reconnect one at a time. Replace F1 fuse. &KHFNWKDWWKHVDIHW\FRQWDFWVDUHFORsed correctly (N.C.). &KHFNWKDWWKHKDWFKLVFORVHGFRUUHFWO\ DQGWKHPLFURVZLWFKPDNHVFRQWDFW &KHFNWKDWWKHUDGLRUHFHLYHUDQGVWRUDge module are present. &KHFNWKDWWKHWUDQVPLWWHUVKDYHEHHQ stored correctly on the radio. The automation opens but Safety contacts are open. &KHFNWKDWWKHVDIHW\FRQWDFWVDUHFORdoes not close. (SA led on). sed correctly (N.C.). Photocells are activated. &KHFN WKDW WKH SKRWRFHOOV DUH FOHDQ (SA led on). and operating correctly. 7KHDXWRPDWLFFORVLQJGRHVQRWZRUN &KHFNWKDWFRQWDFWLVFORVHG External safety devices not Incorrect connections between the Connect N.C. safety devices together in activating. photocells and the control panel. series and remove any bridges on the control panel terminal board. The automation opens/clo- Encoder disconnected, false encoder &KHFN WKDW WKH HQFRGHU LV FRQQHFWHG correctly, clean the contacts by conVHVEULHÀ\DQGWKHQVWRSV contacts, encoder fault. necting and disconnecting the encoder 32:(5$/$50OHGÀDVKLQJ plug on the contacts, replace encoder. Motor leads crossed. &KHFNWKHPRWRUOHDGV 32:(5$/$50OHGÀDVKLQJ There is friction or the spring is not ten- 0DQXDOO\ FKHFN WKDW WKH DXWRPDWLRQ sioned correctly. PRYHVIUHHO\FKHFNWKH5DGMXVWPHQW DQGFKHFNVSULQJWHQVLRQLQJ The remote control has li- The radio transmission is impeded by Install the antenna outside. Substitute mited range and does not metal structures and reinforced con- the transmitter batteries. ZRUN ZLWK WKH DXWRPDWLRQ crete walls. moving. i NOTELIWKH0'GLVSOD\PRGXOHLVSUHVHQWFRQVXOWWKHVisualization of alarms and faults FKDSWHULQ WKHUHODWLYHLQVWDOODWLRQPDQXDO ,3(1 20 19. ROUTINE MAINTENANCE PLAN 3HUIRUPWKHIROORZLQJRSHUDWLRQVDQGFKHFNVHYHU\PRQWKVDFFRUGLQJWRLQWHQVLW\RIXVHRIWKHDXWRPDWLRQ Disconnect the 230 V~ power supply and batteries (if present): &OHDQDQGRLOWKHOHYHUVDQGFKHFNWKHQXWVDQGVFUHZVDUHDOOZHOOWLJKWHQHG &OHDQDQGJUHDVHWKHVSULQJSRVWDVVKRZQLQWKH¿JXUH &KHFNWKHHOHFWULFDOFRQQHFWLRQVDVVKRZQRQSDJH &KHFNWKDWWKHPDQXDOUHOHDVHLVRSHUDWLQJFRUUHFWO\ &KHFNWKDWWKHURGLVEDODQFHGFRUUHFWO\DVVKRZQRQSDJH Reconnect the 230 V~ power supply and batteries (if present): &KHFNWKDWREVWDFOHGHWHFWLRQLVRSHUDWLQJFRUUHFWO\ &KHFNWKDWDOOFRQWURODQGVDIHW\IXQFWLRQVDUHZRUNLQJFRUUHFWO\ i NOTEIRUVSDUHSDUWVVHHWKHVSDUHVSULFHOLVW 21 ,3(1 20. OPERATING INSTRUCTIONS ON OFF The following precautions are an integral and essential part of the product and must be supplied to the user. Read them carefully since they contain important information on safe installation, use and maintenance. 7KHVHLQVWUXFWLRQVPXVWEHNHSWDQGIRUZDUGHGWRDOOSRVVLEOHIXWXUHXVHUVRIWKHV\VWHP 7KLVSURGXFWPXVWRQO\EHXVHGIRUWKHVSHFL¿FSXUSRVHIRUZKLFKLWZDVGHVLJQHG Any other use is to be considered improper and therefore dangerous. The manufacturer cannot be held responsible for any damage caused by improper, incorrect or unreasonable use. Avoid operating in the proximity of the hinges or moving mechanical parts. Do not enter within the operating range of the motorized barrier while it is moving. 'RQRWEORFNWKHPRYHPHQWRIWKHPRWRUL]HGEDUULHUVLQFHWKLVPD\EHGDQJHURXV Do not allow children to play or stay within the operating range of the motorized barrier. Keep remote controls and/or any other control devices out of the reach of children in order to avoid possible involuntary activation of the motorized barrier. In the event of fault or malfunctioning of the product, turn off the power supply switch, do not attempt to repair or intervene directly and contact only professionally competent personnel. Failure to comply with the above may cause a dangerous situation. $OOFOHDQLQJPDLQWHQDQFHRUUHSDLUZRUNPXVWEHFDUULHGRXWE\SURIHVVLRQDOO\FRPSHWHQWSHUVRQQHO 7RHQVXUHWKDWWKHV\VWHPZRUNVHI¿FLHQWO\DQGFRUUHFWO\WKHPDQXIDFWXUHU¶VLQGLFDWLRQVPXVWEHFRPSOLHGZLWK and routine maintenance of the motorized barrier must be performed by professionally competent personnel. ,QSDUWLFXODUUHJXODUFKHFNVDUHUHFRPPHQGHGLQRUGHUWRYHULI\WKDWWKHVDIHW\GHYLFHVDUHRSHUDWLQJFRUUHFWO\ $OOLQVWDOODWLRQPDLQWHQDQFHDQGUHSDLUZRUNPXVWEHGRFXPHQWHGDQGPDGHDYDLODEOHWRWKHXVHU For the correct disposal of electric and electronic equipment, waste batteries and accumulators, the user PXVWWDNHVXFKSURGXFWVWRWKHGHVLJQDWHGPXQLFLSDOFROOHFWLRQIDFLOLWLHV ,3(1 22 DETACH AND DELIVER TO THE CUSTOMER 20.1 General safety precautions DETACH AND DELIVER TO THE CUSTOMER 20.2 Manual release instructions ,QWKHHYHQWRIDIDXOWRUSRZHUIDLOXUHLQVHUWWKHNH\WXUQLWDQWLFORFNZLVHDQGFRPSOHWHO\RSHQWKHKDWFK Manually open the barrier. 7REORFNWKHEDUULHUDJDLQFORVHWKHKDWFKWXUQWKHNH\FORFNZLVHDQGUHPRYHWKHNH\ :$51,1*GRQRWUHOHDVHZLWKWKHVSULQJVXQGHUWHQVLRQZLWKRXWURG3HUIRUPURGORFNLQJDQGUHOHDVH ZLWKWKHPRWRUVZLWFKHGRII'RQRWHQWHUWKHRSHUDWLQJUDQJHRIWKHURG:KHQWKHEDUULHULVUHOHDVHG WKHURGPD\PRYHRILWVRZQDFFRUG :KHQWKHKDWFKLVFORVHGEXWWKHNH\LVVWLOOKRUL]RQWDOWKHUHOHDVHPLFURVZLWFKLVRSHQDQGDOORSHUDWLRQVDUH VWRSSHG 7RGHDFWLYDWHWKHEDUULHUWKHSRZHUVXSSO\PXVWEHUHPRYHGDQGWKHEDWWHULHVGLVFRQQHFWHGLISUHVHQW Installer: TM DITEC S.p.A. Via Mons. Banfi, 3 21042 Caronno Pertusella (VA) - ITALY Tel. +39 02 963911 - Fax +39 02 9650314 www.ditec.it - [email protected] 23 ,3(1 TM DITEC S.p.A. 9LD0RQV%DQ¿&DURQQR3OOD9$,WDO\7HO)D[ www.ditec.it [email protected] DITEC BELGIUM LOKEREN Tel. +32 9 3560051 Fax +32 9 3560052 www.ditecbelgium.be DITEC DEUTSCHLAND OBERURSEL Tel. +49 6171 914150 Fax +49 6171 9141555 www.ditec-germany.de DITEC ESPAÑA ARENYS DE MAR Tel. +34 937958399 Fax +34 937959026 www.ditecespana.com DITEC FRANCE MASSY Tel. +33 1 64532860 Fax +33 1 64532861 www.ditecfrance.com DITEC GOLD PORTA ERMESINDE-PORTUGAL Tel. +351 22 9773520 Fax +351 22 9773528/38 www.goldporta.com DITEC SVIZZERA BALERNA Tel. +41 848 558855 Fax +41 91 6466127 www.ditecswiss.ch DITEC ENTREMATIC NORDIC LANDSKRONA-SWEDEN Tel. +46 418 514 50 Fax +46 418 511 63 www.ditecentrematicnordic.com DITEC TURCHIA ISTANBUL Tel. +90 21 28757850 Fax +90 21 28757798 www.ditec.com.tr DITEC AMERICA ORLANDO-FLORIDA-USA Tel. +1 407 8880699 Fax +1 407 8882237 www.ditecamerica.com DITEC CHINA SHANGHAI Tel. +86 21 62363861/2 Fax +86 21 62363863 www.ditec.cn