1
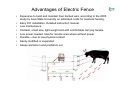
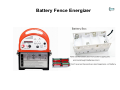
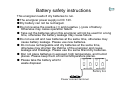
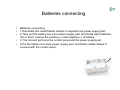
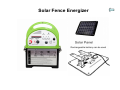
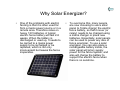
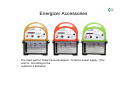
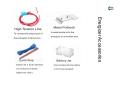
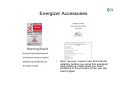
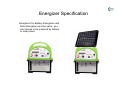
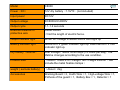
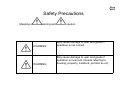
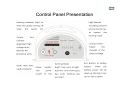
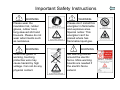
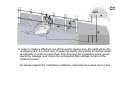
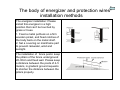
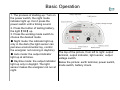
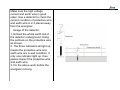
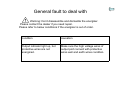
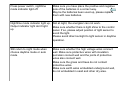
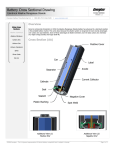
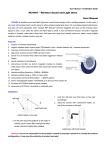
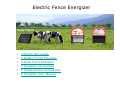
Electric Fence Energizer
•
•
•
•
•
•
1.Electric fence facts
2. Battery Fence Energizer
3. Solar Fence Energizer
4. Energizer Accessories
5. Related Fence Accessories
6. Energizer User Manual
Electric fence facts
•
•
•
Electric fence is a psychological barrier that keeps animals in and wild
animals and predators out. A pulse of electric current is sent along the fence
wire, about one pulse per second, from an energizer which is grounded.
When the animal touches the fence, it completes the circuit between the
fence and the ground and receives a short, sharp but safe shock. The shock
is sufficiently memorable that the animal never forgets.
Because it is a psychological barrier, it does not require great physical
strength. However, it must be well designed and constructed to absorb
some pressure from animals, snow and wind. The energizer must have
enough power for the length of the fence and for the animals being
controlled.
For complete information on building an electric fence system, request the
free Aria Power Fence Systems manual at www.aria-get.com www.ariachina.com
Advantages of Electric Fence
•
•
•
•
•
•
•
•
Expensive to build and maintain than barbed wire, according to the 2005
study by Iowa State University on estimated costs for livestock fencing.
Easy DIY installation. Detailed instruction manual.
Low maintenance
Portable, small size, light weight and with comfortable carrying handle.
Low power needed. Idea for remote area where without power
Durable – due to low physical contact
Easily modified or expanded
Keeps animals in and predators out
Battery Fence Energizer
•
A battery energizer makes your
electric fencing system very
mobile, convenient. When you
need set fence system in a remote
area where no main power to
charge the fence. It is idea for
small fence or temporary fencing.
These energizers are light weight
and easy to relocate, require no
maintenance and generally the
batteries last 1-6 months before
replacements are needed. These
batteries are not rechargeable.(12
Rechargeable battery also
compatible )
The battery energizers can be
matched with solar panels to
create a solar assist system. This
system prolongs the battery life by
trickle feeding the battery.
Battery safety instructions
This energizer needs 8 dry batteries to run.
●The energizer power supply is DC 12V.
●Dry battery can not be recharged.
●Do not reverse the positive (+) and negative (-) pole of battery.
Otherwise may cause operation failure.
● Take out the batteries when this energizer will not be used for a long
time, otherwise the battery leakage may cause failure.
●Do not use old and new batteries at the same time, otherwise may
cause battery leakage. Please use new batteries.
● Do not use rechargeable and dry batteries at the same time,
otherwise may shorten the lifetime of the energizer and cause
leakage and breakage. Please use the same brand dry batteries.
● Don not place batteries in exposed, high temperature, and humid
places. Please keep them at normal temperature places.
● Please take the battery which been used up as a non-combustible
waste disposal.
Batteries connecting
•
•
•
•
•
Batteries connecting
1 Dismantle this metal fixable clamps to separate the power supply part.
2 Take out the battery box from power supply part, and install eight batteries
into it. Don’t reverse the positive (+) and negative (-) of battery.
3 The connect port joins the control panel and the power supply part.
4 Put the battery box back power supply part, and fasten metal clamps to
connect with the control panel.
Batteries connecting
Solar Fence Energizer
Why Solar Energizer?
•
One of the problems with electric
fencing is that it is often used far
from a mains power source or in a
remote area. Therefore relies on
heavy 12V batteries. A typical
electric fence battery will last 2-6
weeks. When the battery is
discharged or used up, it needs to
be carried to a mains power
supply to be recharged or be
replaced, which is not only
inconvenient but leaves the fence
inoperative.
•
To overcome this, many people
are now choosing to use a solar
panel to 'trickle charge' the electric
fence battery, so that it never (or
rarely) needs to be charged using
a mains charger or place new
batteries. Essentially, solar panels
can be used to power any size of
fence energizer. To use a solar
energizer, you can also place a
rechargeable battery inside, the
solar panel will priory supply
power for the fence system, and
also will charge the battery to
support the electric fence when
there is no sunshine.
Solar Panel Installation Method
Frame mount installation method.
1. Turn over solar panel and set frame mount according to the direction of arrow.
※For direction is limited. Please pay attention.
2. Please fix it with screw and don’t remove it according to the picture.
Demonstration of installation method of solar panel.
Please set solar panel on which is wide and face to the sun. (Don ’t set it in open air,
and prevent it from rainwater.)
1. Please fasten frame mount on solid pillar or panel with screws.
2. Please fasten solar panel on frame mount.
Safety instructions of the installation of solar panel.
1.It has to face to the south and has sunlight more than six hours everyday.
2.It will cause low voltage of storage battery without enough sunlight. Please pay
attention to it.
(Please keep in mind these instructions. )
Safety instructions of using solar panel
● In general, it does not need maintenance. Please use your eyes directly
while examining it.
● Please don’t exert a great strength on the panel.
● Please don’t use pirate solar panel.
Storage battery
● Please use the recommended storage battery for solar energy.(Storage
battery:valve regulated lead-acid battery, Nominal voltage:12V, Nominal
capacity:7.2Ah]
● Please don’t make it short-circuit or disassemble it, otherwise it will cause
damage.
Storage method and instructions of storage battery when it is non-use
● Remove the wires that connect the storage battery
● Please store battery in cool place after finishing charging.
Instructions for using after long keeping
● Please charge battery before use.
● Connect the battery to the battery wire and the solar lead wire.
Connection Method
The use of solar panel and connection method of wires.(KMS-01)
1. Please remove the battery lid of power source.
2. Unfasten the wires, which connect positive and negative electrode, on the
bottom of controlling zone. Then connect solar panel wires with electrode
through the hole in the bottom of power source, red to the positive, black to the
negative.
■Recommended battery
·Storage battery:valve regulated lead-acid battery, Nominal voltage:12V,
Nominal capacity:7.2Ah
Solar Panel Specification
Model
KMS-01
Max Output
8W
Max Current
0.519A
Max Voltage
15.4V
Size
(about)240(width)×320(height)mm
Weight
(about)2Kg
Wire Length
(about)1650mm the distance between solar panel and
energizer
Accessory
Fixable frame×1
(※ Accessories don’t include screws)
Solar Panel Guarantee
During warranty period ,please operate correctly according to the instructions.
If proper operation caused failure, please bring your energizer and guarantee
to where you bought it. And they will repair it for you.
Product
Animal Earth Solar Panel
Model
KMS-01
Client
Address
Name
Tel No.
Agency
Address
Name
Tel No.
Date
Guarantee
1 Year
Energizer Accessories
•
•
The main part of Solar Fence Energizer, To fence power supply. (The
color is according to the
customer’s demand)
Energizer Accessories
Energizer Accessories
•
User Manual: Please read this manual
carefully before you using this energizer
and conserve it well when you have
problems in the process of use you can
read it again
Related Fence Accessories
•
•
•
•
In addition to host standard accessories, want to have a complete protection
system also need other
accessories. But these accessories are not include in the Aria Energizer ’s
standard accessories. If you
need these accessories from us, Please let us know in advance. So that we
can give you to do relevant
arrangement
Related Fence Accessories list
Energizer Specification
Energizers for Battery Energizers and
Solar Energizers are the same, you
can choose to be powered by battery
or solar panel.
Model
C8000
Power(DC)
12V dry battery(1.5V*8)(not included)
Input power
DC12V
Output voltage
DC8000-DC4000V
Output cycle
1.1-1.2 seconds
Effective distance of
protective wire
About 3000m
*Not the length of electric fence.
Output indicator light
When DC voltage is above 2000V then light up
Battery indicator light
Above DC7V green indicator light up. Less than DC7V red
indicator light up.
Dry battery(lifetime)
Low Voltage:about 30-40 days (12 hours per day). The
lifetime changes according to the use condition.
Product Size
(About)Width 210×Length 160×Height 290mm(Not
include the metal fixable clamps)
weight ( exclude battery)
(About)2kg
Accessories
Warning Board×3, Earth Wire×1, High-voltage Wire×1,
Pothook of the guard×1, Battery Box×1, Detector×1
Safety Precautions
Meaning of
warning and
caution
WARNING
May cause damage to user and goods if
operation is not correct.
WARNING
May cause damage to user and goods if
operation is incorrect. (Goods referring to
housing, property, livestock, pet and so on).
Control Panel Presentation
Important Safety Instructions
WARNING
Please wear the
insulation hat, rubber
gloves, rubber boot,
long-sleeved shirt and
trousers. Please do not
wear adornments such
as necklaces.
WARNING
When this guard is
working, touching
protective wire may
cause hazard by high
voltage. Can not do any
physical contact.
WARNING
Please don’t install this
energizer in flammable
and explosive area.
Special notice: This
energizer can’t be
placed where has
flammable liquid gas.
WARNING
Set warning boards
around the electric
fence. More warning
boards are needed if
the electric fence
extend.
WARNING
It may affect the
normal operation of
medical devices, such
as cardiac pacemaker.
Please do not let heart
disease patients close
to the electric fence
and operate this
energizer.
WARNING
Please keep away
from the electric fence
when there might
have thunder and
lightning.
WARNING
If set electric fence in
locations such as
footway , please set a
additional fence
around the electric
fence , and set up
warning boards in 20m
on the electric fence.
WARNING
Don’t disassemble and
change this energizer,
otherwise can get a
electric shock
The use and installation safety
instructions
● Do not let this energizer be drenched by water.
● Please don't place this energizer directly under sunshine.
● This energizer is used to prevent wildlife, any other use is not being allowed.
● Please bury the three basic wires of this energizer underground.
( Don't mistakenly cut down the protective wire when you are
mowing.)
● Cut weeds around protective wires at intervals, in order to prevent them from
touching protective wires.
● This energizer may turn into night mode, which is the original state, when
touched by grass or other objects.
● Touch protective wires with power may cause an electric shock.
● Please place warning boards around the electric fence and in front of
protective wires.
● Place the energizer well before spraying pesticide, otherwise can cause
failure.
● Check the batteries at intervals. Please replace the batteries When the NG
light glimmers.
● Take out the batteries when this energizer is not used, otherwise can cause
leakage.
● Don't disassemble and change this energizer, otherwise can cause accident
and failure.
● Not to undertake responsibility for any injury and accidents, which is caused
by using this energizer.
In order to make a effective use of this guard, please bury the earth wires into
underground in a correct way. Please cut weeds around the protective wires
at intervals, in order to keep them from touching the protective wires, avoid
electricity leakage, and insure the unimpeded high-voltage current of the
protective wires.
So please inspect the mainframe, batteries, and protective wires once a day.
The body of energizer and protection wires
installation methods
The energizer installation: Please
install this energizer in a high
position that can’t be touched by
grass or trees.
1. Fixed a metal pothook on a firm
wooden picket, and fixed notches of
the body back on the metal shelf.
2. Set a covering on mainframe part
to prevent rainwater, wind and
sunlight.
The installation of fence posts: keep
the pillars of the fence underground
20-30cm and fixed well. Please keep
a distance between the posts of 4-5
meters, in gradient ground requests
to shorten the distance between the
pillars properly.
Insulator (fixed protective wire)
and protective wire installation:
1. Fixed insulator on this electric
fence
2. Twine protective wire around
insulator as shown.
Earth device installation:
1. Embed 3 earthing electrode
underground totally (depth over
10cm).
2. Respectively embedded
earthing pole
Warning: Earth wire is a most important factor to make the
electric fence run well, inappropriate embedding of the earth wire
can affect the function of the fence.
Protection wires installation method
Fix protective wires with
insulation porcelain. Fix 2
protective wires with
insulation porcelains at a
distance from 50-80m as
shown.
2. Connect high voltage wires
with protective wires as
shown. Twine high voltage
wires connection with
protective wires tight wrap
with plastic tape to prevent
leakage as the right shown.
Do not let high voltage wires
touch ground and water.
Protective wires
maintenance and
management.
1. Inspect protective
wires termly, prevent
them from being
touched by obstacles
such as grass and
trees.
2. Set warning boards
around protective
wires.
Cut weeds and other bar around
the protective wires at intervals, in
order to prevent them from
touching
Protective wires;
When in rainy day, misty
weather,frost day and moist
weather, the wires may have
electricity leakage and may not
work perfectly. In order to prevent
obstacles from touching the
electric fence and protective wires,
please check them termly;
In order to avoid getting an
electric shock, please set warning
boards around electric fence and
replace them when they are
damaged.
According to the terrain to installs
protective wires.
1.If set electric fence in locations such as
footway , please set a additional fence
around the electric fence , and set up
warning boards in 20m on the electric
fence.
2. Please set handles in the gates.
3. To prevent wild animals invading,
please set protective wires properly in
undulant ground.
4. The harmful beasts can burrow a hole
and come out from the hole in laddery
terrain. Therefore please install protective
wires as shown.
Basic Operation
1. The process of starting-up: Turn on
the power switch, the night mode
indicator light up. Don’t press the
power switch until a ticking sound.
2. Press the button of testing battery,
the light【OK】up.
3. Press the working mode switch to
choose the desired mode.
● Night mode: the indicator light up
only in the dark (the light sensor can
perceive environmental ray, control
the energizer not running in daytime).
● Auto mode: the output indicator
light up at all times.
● Daytime mode: the output indicator
light up only in daylight. The light
sensor makes the energizer not run at
night.
The top of the picture, from left to right: output
terminal, output indicator, light sensor, output
voltage switch.
Below the picture: earth terminal, power switch,
mode switch, battery check.
Make sure the high voltage
current and earth wire in good
order: Use a detector to check the
current condition of protective wire
and earth wire in 2-3 places away
from the energizer.
Usage of the detector:
1. Embed the whole earth rod of
the detector underground. Hang
the pothook on the protective wire
as shown.
2. The three indicators all light up
means the protective wire and
earth wire are in well condition. If
only one indicator light up, then
please inspect the protective wire
and earth wire.
3. Do the above work before the
energizer running.
General fault to deal with
Warning: Don’t disassemble and dismantle the energizer.
Please contact the dealer if you need repair.
Please refer to below conditions if the energizer is out of order.
condition
causation
Output indicator light up, but
protective wires are not
energized.
Make sure the high voltage wires of
output port connect with protective
wires well and earth wires condition.
Press power switch, nighttime
mode indicator light off.
Make sure you have place the positive and negative
pole of the batteries in a correct way.
May be the batteries been used up, please replace
them with new batteries.
Nighttime mode indicator light up, Not at night, the energizer can not work.
Output indicator light don’t light
Make sure whether there is light shine to the control
up
panel. If so, please adjust position of light sensor to
avoid the light.
Please avoid direct sunlight to light sensor in daytime
operation.
Still return to night mode when
choose daytime mode or auto
mode
Make sure whether the high voltage wires connect
well. Make sure protective wires with insulation
porcelain connect well and the joints of protective
wires also connect well.
Make sure the grass and trees do not contact
protective wires.
Make sure earth wires embedded underground well,
do not embedded in sand and other dry area.
Press the testing battery button, and no
response.
Make sure you have place the positive
and negative pole of the batteries in a
correct way. May be the batteries been
used up, please replace them with new
batteries.
The energizer is soaked by water or get
hit by lightning.
Inspect the energizer, and contact the
seller.
Energizer Guarantee
Name
Model
C8000
Customer
information
Address
Y
D
M
limited warranty
period 3 years
Name
Telephone No.
Franchiser
information
Address
Shop Name
Telephone No.
Earthing pole, high voltage connection, warning boards are out of guarantee
The consumer shall have no coverage or benefits under this limited warranty if
any of the following conditions are applicable.
1. The failure and damage caused by inappropriate operation and
dismantlement.
2. The damage caused by collision and transport after purchase.
3. The operation failure caused by fire, flood, thunder and other natural disaster
and abnormal voltage.
4. Have no warranty card.
5. No purchase date, name of customer and franchiser, or altering information
on the warranty card.
6. Damage caused out of your country.
7. The guarantee only works in customer’s country.
8. This warranty card is the proof for us to provide free reparation under limited
time and conditions.
The customer information on this card is only used for repairing and replacing
the energizer, no other purpose.
If the following cases occurs, please pay all repairment expense yourself, even
in warranty period.
1. The failure caused by inappropriate operation or disassembly.
2. The damage caused by dropping down or transport after sale.
3. The failure and damage caused by fire, earthquake, flood, thunder and
lightning or other natural disaster, and abnormal voltage.
4. The failure and damage caused by using it for other purpose.
5. Excluded repairment.
6. No purchase date, name of customer and agency, or altering information on
the warranty card.
7. Damage caused not in your own country.