1
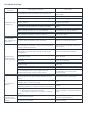
e4ride electric skateboard - user manual
Introduction
The e4ride skateboard is controlled by a wireless handheld remote that allows instant throttle response
with smooth acceleration and deceleration. A number of safety features are incorporated into the design
for ease of operation and reliability. The most important is the integrated EABS electric-braking that
actually charges the battery when slowing down or stopping.
When the handheld remote controller is switched on, a beep is heard to indicate that all is well. If you
hear this beep repeatedly during operation, this indicates that the 9V battery inside the handheld remote
is low on power and has typically been used for more than one hundred hours. This is an important safety
feature, as in a few minutes the hand held remote will no longer be able to control the skateboard motor.
This inability includes the electric-braking function and the skateboard will then only coast, like a regular
one without power. Therefore, using two rechargeable NiMH 9V batteries, and swapping them to the
charger routinely, is highly recommended. And the more often you charge them, the greater their overall
longevity. This way you save money and throw less away.
Another safety feature prevents the skateboard from being used unless a person is on the deck. A
proximity sensor “feels” your immediate proximity, allowing control, or removing power should the rider
step away from the deck. The e4ride is also designed to operate on a unique channel, blocking any
external radio interference and only allowing the user to take control.
Last but not least, for sensible progression, there’s a nifty operating-power selector that lets you choose
one of three skill levels. This feature is accessed using one of three positions of a switch inside the
handheld remote. Using the e4ride beginner-setting for low speed learning, the maximum travel range is
also achievable. Go for the intermediate-setting when you have more experience with the e4ride functions.
And for maximum power and speed, use the expert-setting.
User Instructions
1. Charge the battery before use. The charger plugs into an ordinary wall outlet, and into the controller
which is mounted under the deck in a small aluminum box. The batteries are fully charged when the light
on the charger turns from red to green.
2. Start by using the beginner-mode even if you are an expert rider. Slide the lid off the bottom of the
pistol-style handheld remote and carefully pull out the 9 volt battery. Always shut the remote off, at the
top of the pistol to change modes. Then make sure the small sliding switch inside is pushed right to the
end, towards the front of the pistol.
3. Do not forget your padding and helmet.
4. Now turn-on the skateboard power by pushing the red button on the controller, opposite side to the
charging port, until you see a green light. And stand anywhere on the deck.
5. Flip the switch on the top of the handheld remote and listen for a short beep. The system is then ready
to go! If you don’t hear a beep, or you hear a repeated beep, replace the 9V battery with a fully charged
rechargeable NiMH battery.
6. Lean forward before using the remote throttle. Gently and gradually pull the pistol trigger until the
skateboard starts. You will hear a slight buzzing, low frequency noise coming from the skateboard. This is
normal and can warn people that a powered skateboard is in operation near them.
7. Make special note that the electric brake is activated as you release the spring-loaded trigger. So
again, do this gently for a gradual acceleration and deceleration. This way you will maintain good control,
as well as preserving your electric-drive components like the belt, drive-wheel, and batteries, reducing
wear and the likelihood of any premature failure.
8. Steer the e4ride as you would a regular skateboard.
9. For your safety, a e4ride motor will stop and brake automatically if you drop the handheld remote, or
step off the deck while riding.
10. To prevent battery discharge, both components shut down automatically, after several minutes of
inactivity. After a few minutes of not being used, a short beep is heard from the handheld remote as it
goes off. Then after a total of about ten minutes a two-tone beep indicates that the skateboard has shut
off.
Maintenance
Electric skateboards are extremely reliable, as there are very few moving parts. So other than charging
your battery at every possible opportunity without delay to increase longevity, the drive belt tension is of
paramount importance. Too tight is as bad as too loose. Belts, wheels, bearings, and batteries are subject
to wear and tear. Replace them before they cannot be used normally.
Drive belt inspection: A sawing noise on startup or stopping may be caused by a slipping drive belt. If you
suspect that the drive belt is not properly adjusted, remove the lid of the plastic belt-protection box by
unscrewing the two Phillips screws by the left back wheel. Inspect the belt by rotating the wheel. A worn
or stretched belt should be replaced to preserve the drive wheel sprocket. Now Press the belt with your
thumb at mid-span to assess the slack. Normally the belt should sink about 5mm.
Drive belt adjustment: If it feels loose or you have heard or felt any belt slippage, tighten the belt by
loosening the two Allan bolts, washer-bolt nuts, and the kingpin nut. Push the motor unit forward and
retighten the nuts and bolts. If the belt is too tight there will be unnecessary stress not only on the belt,
but also the bearings. This will rapidly increase the likelihood of belt breakage, and also reduce the life of
the motor and wheel bearings. Loosen a tight belt by moving the motor unit back. To achieve proper
tension you may have to take out the belt, adjust, and put it back in. See the belt replacement procedure.
Drive belt replacement: Follow the inspection procedure. Then pull off the wheel after carefully prying the
chrome hubcap off and undoing the axel nut. Place the new belt around the motor sprocket and the axel.
Slide the wheel back on, rotating for the last bit to bring the edge of the belt around the drive wheel
sprocket and then all the way on slipping laterally, bit by bit. Replace the nut, and the hubcap. A little
Tack-It on the hubcap mounts will help keep them in place.
Bearing replacement: The wheel bearings are press-fit and can be replaced using hand tools after
removing the wheels. Follow the drive-belt-replacement procedure to remove the drive wheel.
User tips
1. Go for smooth operation. Avoiding excessive acceleration will not only look good and reduce the risk of
personal injury, conservative riding will also prolong battery life with a gradual battery discharge, rather
than a degrading rapid discharge.
2. Lean back before braking and maintain drive wheel traction. Excessive unbalanced braking will allow
the wheel to skid and quickly wear out. The controller has very efficient and powerful EABS electronic
brake. Braking smoothly will protect your driving wheel and driving belt from extreme wearing.
3. Use a rechargeable 9 Volt battery for the handheld remote, and recharge regularly. If during operation,
beeping is heard, your battery is in immediate need of charging. This is a warning for your protection,
because neither the motor, nor the braking will be functional in a few moments.
4. Set the handheld remote for beginners. The e4ride XT controller allows you to preset its maximum
speed in three ranges: 0-8 km/h, 0-15 km/h and 0-30 km/h. To change the speed range shut off the
controller and open the lid on the battery box on the underside of the controller. Slide out the battery and
locate the small three position switch as shown on the picture. Slide the switch all the way upfront for the
lowest speed, slide it backwards one step for the medium speed and one more time backwards for the
fastest speed range. Then turn on the remote controller again.
5. Use direct hand contact with the chrome ring on the handheld remote. An unusual grasp or gloves can
interfere with your ability and the system may not work properly.
General Safety Tips
1. The e4ride Skateboard is intended for use by persons aged 14 or above.
2. Operators must comply with all local laws and regulations. Check with your local police or transport
department to determine local requirements. Pay special attention to local helmet and safety-gear laws.
3. Always wear your ANSI or Snell-approved helmet. Elbow and kneepads are a good idea for protection
from injuries including laceration in the event of a fall.
4. Do not operate the e4ride Skateboard at night. A e4ride Skateboard is not equipped to be operated in
the dark or low light conditions. You will not be easily visible to pedestrians or drivers without sufficient
daylight.
5. The electric motor, batteries, and controls can be damaged if exposed to water. Do not allow the e4ride
Skateboard to be used in the rain, nor to be driven though puddles of water.
6. The product is designed to be used by one person at a time. Product abuse will not be repaired without
charge, even during the warranty period. So do not carry additional people or any cargo. And do not put
additional loads on the e4ride Skateboard by pulling or towing anything.
7. Your insurance policy may not provide coverage for accidents involving this product. Contact your
insurance agent for more information.
8. Do not do stunts or jumps like you would do with an ordinary skateboard. You might seriously damage
the e4ride Skateboard and injure yourself or others in the process. Be considerate, ride safely and with
style.
Mechanical Safety Tips
1. Check all nuts, bolts and mounted components to ensure the e4ride Skateboard is properly assembled.
2. Stop using the product immediately if any part becomes loose. Correct the looseness prior to resuming
the ride.
3. Maintain proper tightness on the wheel nuts. Too tight a pressure on the axle increases friction,
reduces speed and thus operation time, as well as wearing the wheel material quicker.
Electrical Safety Tips
1. Completely charge the battery before riding the e4ride Skateboard for the first time.
2. Turn off the e4ride Skateboard and the remote controller when not in use.
3. Use caution when recharging the batteries. Do not recharge in an area that will allow the e4ride
Skateboard or the charging unit to become wet. Recharge only in an area that is well ventilated.
4. Keep children away from the e4ride Skateboard while it is being recharged.
5. Stop use of the product or the charging unit if any wire becomes worn, broken, or damaged in any
way.
6. Do not modify the electrical controls or wiring. Use only motors, batteries, and charging units supplied
or approved for the e4ride Skateboard.
7. Do not use the e4ride Skateboard battery to power or recharge any other equipment.
8. Do not block the air vents on the charging unit. If blocked, the charging unit may overheat and create
a fire hazard.
TROUBLESHOUTING
Common
Troubles
Description & Reason
How To Fix
1) Skateboard hand controller is not powered on
Turn on the skateboard. You should
hear a beep.
2) The rider is not standing on the board
Step on the skateboard
3) Trigger of the controller is not in the right position Pull gently the trigger backwards
Skateboard will
not start up
4) The indicator is not light that means insufficient
battery capacity
Recharge the battery
5) The dictator flickers in red and green means
overheat/overload protection of motor/controller
Re-start when motor/controller is
cooled
6) If no ‘beep’ when turn on controller means
battery wrong insertion or run out of battery
Reset battery or change battery
7) Rider’s hand does not touch directly the metal
film of handle controller or glove is too tick
Palm touch the metal film directly or
take off the glove
Skateboard stops 1) Overheat/overload protection of motor
automatically
after running for 2) Low voltage protection of the controller
some time
Discontinuous
outage during
running process
It is unable to
charge
Cool the motor
Change or recharge the battery
1) Rider’s hand does not touch directly the metal
film of handle of controller or glove is too tick which
results in bad transmitting.
Palm touch the metal film directly or
take off glove
2) The metal film of the handle controller is
damaged or came off which results in bad signal
transmitting
Repair the damaged metal film
3) Rider’s location on the skateboard is not
completely correct
Adjust location
4) The metal film of the bottom of the skateboard is
damaged
Repair the metal film
5) Controller and receiver are soaked in water or
became moist
Drain, dry
6) Insufficient battery, indicator became red
Recharge the batteries
7) The potentiometer on the trigger has been
contaminated which results in bad contact
Open the gun and clean it using a
special spray you can buy from
electronic shop
1) Inserted incorrectly or battery pack connects
become open circuit (the charger indicator shows
green)
Reset connect the circuit again
2) No power or power plug is set wrong, the charger
indicator does not show any light
Reset
3) It is normal that the indicator of charger
alternately glimmers, it means coming to full charge
Normal
4) Red light flashes in succession, because:
a. charger does not work smoothly
b. too charge the battery low voltage of battery
group
Change charger or change the battery
group
Strong vibration
1) Belt became flexible
and high noise
during running or
2) Bearing is damaged
braking
Adjust the belt and fasten all screws
and nuts, adjust back nut
Change bearing