1
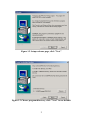
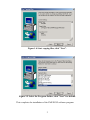
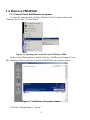
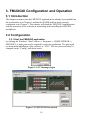
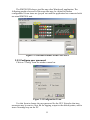
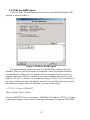
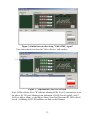
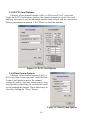
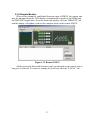
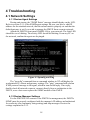
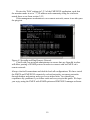
USER MANUAL
FMUXGUI
Graphical User Interface
CTC Union Technologies Co., Ltd.
Far Eastern Vienna Technology Center (Neihu Technology Park)
8F, No. 60 Zhouzi St.
Neihu, Taipei 114
Taiwan
Tel: +886-2-26591021
Fax: +886-2-27991355
Email:
[email protected]
URL:
http://www.ctcu.com
FMUXGUI User Manual
Graphical User Interface
This manual applies to FMUXGUI version 1.5 & 1.5n.
Copyright © 2004, CTC Union Technologies, Inc.
All rights reserved.
All specifications are subject to change without prior notice.
Table of Contents
1. Software Install and Remove ................................................................................. 1
1.1 Introduction..................................................................................................... 1
1.2 System Requirements ..................................................................................... 1
1.11 Operation System.................................................................................... 1
1.12 Hardware ................................................................................................. 1
1.2 Installation ....................................................................................................... 1
1.4 Remove FMUXGUI ....................................................................................... 4
1.3.1 Control Panel Add/Remove programs.................................................. 4
2. SNMP Card Configuration..................................................................................... 6
2.1 Introduction..................................................................................................... 6
2.2 HyperTerminal™ settings .............................................................................. 6
2.3 Connecting to the FMUX01........................................................................... 6
2.4 FMUX01 menu system................................................................................... 7
2.5 SNMP Card settings ....................................................................................... 7
2.5.1 SNMP Agent Configuration.................................................................. 8
2.5.2 Manager Configuration.......................................................................... 9
2.5.3 Save and Restart..................................................................................... 9
3. FMUXGUI Configuration and Operation ...........................................................10
3.1 Introduction...................................................................................................10
3.2 Configuration ................................................................................................10
3.2.1 Start the FMUXGUI application.........................................................10
3.2.2 Configure user password .....................................................................11
3.2.3 Edit the SNMP Agent ..........................................................................12
3.3 Operation.......................................................................................................14
3.3.1 Optical Card Options ...........................................................................14
3.3.2 FMUX Options.....................................................................................15
3.3.3 LAN Status...........................................................................................15
3.3.4 E1/T1 Card Options.............................................................................16
3.3.5 Data Comm Options ............................................................................16
3.3.6 Remote Monitor...................................................................................17
4 Troubleshooting .....................................................................................................18
4.1 Network Settings...........................................................................................18
4.1.1 Review Agent Settings ........................................................................18
4.1.2 Review Manager Settings....................................................................18
1. Software Install and Remove
1.1 Introduction
This brief manual will explain the installation, configuration and operation of
the FMUX01 GUI (Graphical User Interface), a Windows® based program that
uses SNMP protocol to monitor and configure the FMUX01 fiber multiplexer. This
first section will deal with the installation and removal of the FMUXGUI software.
1.2 System Requirements
1.11 Operation System
The GUI program, hereafter called FMUXGUI, is designed for installation in
any Microsoft™ Windows® based computer. The program runs a standard
Windows installer and is compatible on any 32bit OS (Windows 95/98/ME) or NT
based OS (Win NT 4.0, Windows 2000, & Windows XP). Also highly
recommended is the HyperTerminal program which is not installed by default in
Windows 95/98.
1.12 Hardware
The minimum recommended hardware requirements for running FMUXGUI
are a Pentium™ class computer with 64MB memory, 5MB free disk space (the
final installed software is less than 2MB), CDROM drive (for installing the
software), VGA graphics display with 800x600 minimum resolution (1024x768
preferred), and a configured 10Base-T or 100Base-TX Network Interface Card
(NIC).
1.2 Installation
Place the FMUXGUI installation CDROM in to the computer's CDROM
drive. Use "My Computer" or "Explorer" to browse to the CDROM's contents.
Double click on the "Setup" icon to start the program installation.
Figure 1.1 Setup started InstallShield Wizard
1
Figure 1.2 Setup welcome page, click "Next"
Figure 1.3 Choose program directory, click "Next" to use default.
2
Figure 1.4 Start copying files, click "Next".
Figure 1.5 Select the Program Folder, click "Next" for default.
This completes the installation of the FMUXGUI software program.
3
1.4 Remove FMUXGUI
1.3.1 Control Panel Add/Remove programs
To open the control panel, click the Windows "Start" button and from the
"Settings" icon, select "Control Panel".
Figure 1.6 Opening the Control Panel in Windows 2000
In the Control Panel window, double click the "Add/Remove Program" icon.
The following window will open. Find the FMUXGUI icon as shown below.
Figure 1.7 Add/Remove Programs window
Click the "Change/Remove" button.
4
Figure 1.8 Confirm file deletion, click "Yes" to continue uninstall.
Figure 1.9 Uninstall completed successfully, then click "OK".
The FMUXGUI computer program has now been completely uninstalled from
your computer.
5
2. SNMP Card Configuration
2.1 Introduction
The FMUX01 SNMP card is an optional component, installed inside the
FMUX01 chassis, and provides Telnet and SNMP access. The setting of the SNMP
card is performed through the terminal console port of the FMUX01.
2.2 HyperTerminal™ settings
The settings for console port communication with the FMUX01 are 19.2K
baud, 8 bits, no parity, 1 stop bit and no flow control. In the HyperTerminal
program terminal window click the "properties" icon and set the communication
parameters as in the following graphics. Click the "Configure… " button in the
properties window and set the port settings. When set properly, click "OK".
Figure 2.1 HyperTerminal port settings for FMUX01
2.3 Connecting to the FMUX01
The console port on the FMUX01 is an RS-232D interface (DCE) that utilizes
an RJ-45 connector. Use the configuration cable that is supplied with the FMUX01
or prepare a three wire DB9(F) to RJ-45 cable with the following pinout:
RJ-45
signal
DB9(F)
4
GND
5
5
TD
2
6
RD
3
6
Figure 2.2 FMUX01 welcome screen in console mode.
Connect the PC running HyperTerminal to the FMUX01 that has an installed
SNMP card option. The above screen indicates successful communication with the
FMUX01.
2.4 FMUX01 menu system
Details of the menu system operation and meaning of menu items is described
in detail in the FMUX01 User's Manual. The following information is only for
configuration of the SNMP option for use with a network management system.
From the main welcome screen, press "Enter" and select the local FMUX01
for login. Enter the password that you have previously set if required. The default
factory settings require no password to access the console port.
2.5 SNMP Card settings
To access the SNMP card settings, follow the menu system as below:
********************************************
**** FMUX-01 CONSOLE MODE Ver 1.14
*****
********************************************
0. Logout
1. Display System Status
2. Define System Parameter
3. Alarm Buffer Display
4. Performance Display
5. ACO (Alarm Cut-Off)
Select "2" Define System Parameter
7
<<< Define System >>>
1. System Config
2. Optical Port Config
3. Port 1 Config
4. Port 2 Config
5. Port 3 Config
6. Port 4 Config
7. Alarm Threshold
8. Date & Time
9. SNMP Card Config
[
[
[
[
E1 75 ]
RS-530 ]
E1 120 ]
LAN ] [ 100M/F ]
"[ N/A ]"
Select "9" SNMP Card Config (if [ N/A ] is shown, the SNMP was not found)
<<< SNMP Card Config >>>
1. SNMP Agent Config
2. Manager Config
3. TFTP and Flash
4. Save and Restart
Select "1" for SNMP Agent Config
2.5.1 SNMP Agent Configuration
The "agent" is the FMUX01 SNMP. The IP address, subnet mask, default
gateway, and TFTP server's IP address/path are all set within the SNMP Agent
Configuration. The following menu will display:
<<< SNMP Agent Config >>>
1. IP Address
[172. 24. 1. 11]
2. Subnet Mask
[255.255. 0. 0]
3. Gateway IP
[172. 24.190.254]
4. TFTP Server IP
[172. 24. 1.126]
5. TFTP Server Path
[/snmp.bin]
Item number 1, IP address is the IP address that the SNMP card will answer to
when "pinged", Telnet'd, TFTP'd or when accessed by SNMP.
Item number 2, is the subnet mask for the network that the card is attached to.
Item number 3, is the default gateway for the network that the card is attached to
and is required if the FMUX01 is to be managed from a different subnet.
Item number 4, is the IP address of a server running the TFTP protocol (trivial
FTP) used for updating the SNMP firmware image in the SNMP card.
Item number 5, is the path and filename of the image file that the SNMP card will
download when the TFTP upgrade function is called.
After setting, exit the Agent configuration menu with <ESC> and the save the
settings by selecting item "4" from the SNMP Card Config menu or continue to
Manager Config.
HINT: when entering IP addresses, enter without "dots" and include any leading zeros. For
example, the above IP address 172.24.1.11 would be entered as 172024001011 while 10.0.0.1 would be
entered as 010000000001.
8
2.5.2 Manager Configuration
From the SNMP Card Config menu, select item "2", Manager Config.
Manager configuration is required to tell the agent (the SNMP card) who has
authority to access the SNMP via "Get" commands (read) or "Set" commands
(write) and where to send "trap" messages (unsolicited messages that are usually
generated by alarms in the FMUX01).
<<< Manager Config >>>
1. Access IP #1
[172. 24. 1.126] [Community #1] [Trap]
2. Access IP #2
[192.168. 0. 15] [Community #2] [Trap]
3. Access IP #3
[192.168. 0.125] [Community #2]
4. Access IP #4
[192.168. 0. 53] [Community #2
]
5. Community String #1 (R/W) [secret]
6. Community String #2 (Read) [public]
The manager configuration has the ability to setup access for up to four (4)
different management workstations. The community strings act like passwords in
dealing with the device via SNMP protocol. By changing the community strings
(numbered 1 & 2) for read / write ('secret' in this case) and read only ('public')
access, and assigning a community string to an access IP, an administrator can
control access to the FMUX01.
Note that in the above example, the management workstation with IP address
172.24.1.126 and using the community string 'secret', has full read and write access
and receives traps. The management station at 192.168.0.15 has read only
privileges when using the community string 'public' and can also receive trap
messages. The other two stations at Access IP 3&4 have read only access and do
not receive any trap messages. After all settings have been made, <ESC> to the
SNMP Card Config menu and do "Save and Restart".
2.5.3 Save and Restart
<<< SNMP Card Config >>>
1. SNMP Agent Config
2. Manager Config
3. TFTP and Flash
4. Save and Restart
When selecting item "4", the card will immediately do a save of the
configuration and then reboot the SNMP card.
Save to SNMP Card
Wait …………………
Restart SNMP Card
CAUTION: It is imperative that power not be interrupted while the SNMP card is
saving the configuration to flash memory. Failure of power may result in
scrambled flash contents and an SNMP card in an un-usable state.
9
3. FMUXGUI Configuration and Operation
3.1 Introduction
This chapter assumes that the FMUXGUI application has already been installed on
the workstation as in Chapter 1 and that the SNMP card has been correctly
configured as in Chapter 2. This chapter will detail the FMUXGUI configuration
and the operation of the software in monitoring and controlling the FMUX01
multiplexer.
3.2 Configuration
3.2.1 Start the FMUXGUI application
by clicking the Windows "Start" button => Programs => SNMP GUIMGR =>
FMUXGUI. A login password is required to enter the application. The password
set from initial installation of the software is "1021". The user password may be
changed via the "Config" pull down menu.
Figure 3.1 GUI manager login
Figure 3.2 FMUXGUI first started
10
The FMUXGUI behaves just like any other Windows® application. The
following graphic shows all of the areas that may be clicked for further
configuration. Some items are 'greyed' out until the application has connected with
an actual FMUX01 unit.
Figure 3.3 Selectable features of the FMUXGUI
3.2.2 Configure user password
Click on "Config" from the window menu bar.
Figure 3.4 Configuration Form
Use this form to change the user password for the GUI. Note also that trap
messages may be sent to a text file for logging, output to the default printer, and/or
issue a warning beep on the PC.
11
3.2.3 Edit the SNMP Agent
Click on "Edit" from the window menu bar to enter the Edit Window. The
graphic is show as follows:
Figure 3.5 Edit the SNMP Agent
The entries already entered are there by default if the software was just
installed. They are just for reference as examples of how the format should be
entered into the window. If we continue with our example from the previous
chapters, then the FMUX01 unit which we wish to manage (the agent) is at IP
address 172.24.1.11 and the r/w community string is 'secret". So we will click in
the lower window (or select the already entered text) and backspace over it until
the window is empty. Then we will enter our own format string:
1 172.24.1.11 secret CSD-RMT
Then click the "Save" button.
Now the FMUXGUI is set to manage a FMUX01 at IP address 172.24.1.11 with a
community string of 'secret' and our manager will display its name as CSD-RMT.
12
Figure 3.6 Initial screen after doing "Edit SNMP Agent"
Now select the device from the "Select Device" sub window.
Figure 3.7 Operational FMUXGUI screen
Note: LEDs with the letter "B" indicate blinking LEDs. For E1 connections, as in
the above E1 120 port, blinking is an indication of LOS (loss of signal). An E1
LOS is a Major Alarm, so the Major Alarm, Near End Error and E1 LED will all
be red. A blinking LAN LED indicates no link on the Ethernet.
13
3.3 Operation
The interface for the FMUXGUI program is a point and click Windows®
application that requires little use of the keyboard. From this main display, we can
switch to the "Remote" unit, get to the "Optical" section, the "FMUX" section and
to any of the active "channels".
3.3.1 Optical Card Options
Click the button marked "Optical". From this window we can display the
optical card's status, view the current or history performance records or setup the
card's working status, auto laser shutoff (ALS) or loop back. Use the "Get" button
to read the card's status. Use the "Set" button to write new status to the card. (The
operation is preformed via SNMP protocol.)
Figure 3.8 Optical Card Options
Click the "Close" button to close the Optical Card Options window.
14
3.3.2 FMUX Options
Click the button marked "FMUX". Under the FMUX Options window, the
system can be configured for performance monitoring options, clearing of
performance monitor data, external clock (if option is installed) setting, Alarm
relay setting, Alarm Cut Off, data/time setting, save/load settings and FMUX status
such as firmware version, power status, etc.
Figure 3.9 FMUX Options
3.3.3 LAN Status
If a 10/100 Ethernet Bridge card is installed in any port, the status of the
Ethernet link and performance may be viewed by clicking the channel button,
located just below the LED indicator. Click "Close" to close this window.
Figure 3.10 LAN Card Options
15
3.3.4 E1/T1 Card Options
Click any of the channel buttons (A,B,C, or D) for any E1 or T1 port card.
Under the E1/T1 Card Options window, the channel settings for service, line code
and loop back may be set, the individual channel status viewed, and the current and
history performance monitored. Click "Close" to close this window.
Figure 3.11 E1/T1 Card Options
3.3.5 Data Comm Options
Click any of the channel buttons (A,B,C, or
D) for any Data Comm port card. Under the Data
Comm Card Options window, the channel
settings for service, data rate, timing source, loop
back and flow control may be viewed (Get) or set
for each individual channel. This window may be
closed by clicking the "Close" button.
Figure 3.12 Data Comm Options
16
3.3.6 Remote Monitor
When a fiber channel is established between a pair of FMUX, the remote unit
may be managed from the LCD display, terminal mode console or via SNMP and
the FMUXGUI application. From the main unit display, click the "REMOTE" tab
and the display will update to show the complete status of the remote FMUX.
Figure 3.13 Remote FMUX
All the previously discussed functions can be performed on the remote unit as
long as it is selected. To return to manage the local unit, click the "LOCAL" tab.
17
4 Troubleshooting
4.1 Network Settings
4.1.1 Review Agent Settings
During unit startup, the "SNMP Exists" message should display on the LCD.
Refer to section 2.5.1 of the SNMP agent settings. Be sure you have a valid IP
address for the attached network, that the subnet mask is properly set and that the
default gateway is set if you wish to manage the FMUX from a remote network.
Attach the FMUX's front panel SNMP/LAN to your network. The Link LED
should be on or blinking. The activity LED should be blinking. From any PC on
the network, confirm the agent can be pinged.
Figure 4.1 Ipconfig and Ping
The "ipconfig" command from a command window in NT will display the
workstation's IP, subnet and gateway settings. The "ping" command will send an
ICMP protocol message to the agent, which in turn should reply. If no reply,
double check all network connects, connect directly from a workstation to the
FMUX, or as a last resort replace the SNMP module of the FMUX.
4.1.2 Review Manager Settings
For the FMUXGUI to connect to the FMUX for management, the FMUX's
SNMP must be properly configured with the manager's IP address and authorized
for read/write (via community string setting) and trap messages. Review the
settings explained in 2.5.2.
18
Review the "Edit" settings in 3.2.3 of the FMUXGUI application, such that
the monitor mode is set to "1", IP address and community string for read/write
match those as set from section 2.5.2.
If the management workstation is on a remote network, ensure it can also pass
the ping test.
Figure 4.2 Ipconfig and Ping Remote Network
Check with your network administrator to ensure that any firewalls in place
will allow passing of SNMP protocol in order to connect with an FMUX on a
remote network.
Always check all connections and double check all configurations. We have tested
the FMUX and FMUXGUI extensively on local networks, on remote networks
through bridges and routers and even over wireless links. You should not
experience any problems if you follow each and every step in this guide. We hope
you enjoy using the FMUX with SNMP option and FMUXGUI manager software.
19
20
21
Transmission Units
CTC Union Technologies Co., Ltd.
Far Eastern Vienna Technologies Center
(Neihu Technology Park)
8F, No. 60, Zhouzi St., Neihu, Taipei, Taiwan
Phone:(886) 2.2659.1021 Fax:(886) 2.2.799.1355
E-mail: [email protected]
http://www.ctcu.com
22