1
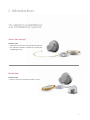
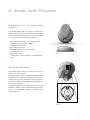
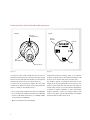
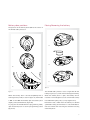
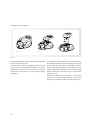
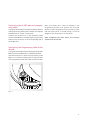
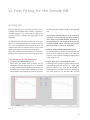
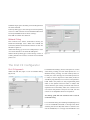
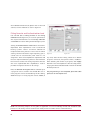
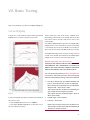
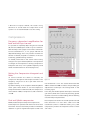
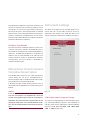
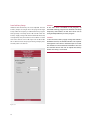
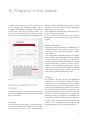
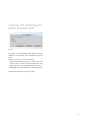
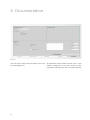
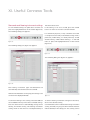
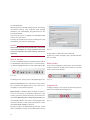
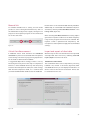
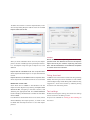
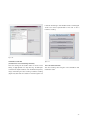
Business Unit Vibrant
Fitting Guide
Symfit 6.1
1
Table of contents
I. Introduction
5
II. Setting up hardware and software
6
Hardware
6
Fitting software discussed in this guide
6
Accessories
6
III. Amadé audio processor
IV. Fitting Session
V. First Fitting for the Soundbridge Amadé
7
12
13
vibrogram
13
audiogram
15
VI. First Fitting for the Amadé BB
17
AUDIOGRAM
17
FIRST FIT configurator
19
VII. The Basic Tuning
21
THe Curve Display
21
Settings in the Basic Tuning
22
VIII. Fine Tuning
24
Frequency Shaping
24
Compression
25
Speech/Sound 26
Microphone: Directional and Omnidirectional
27
Instrument settings
27
IX. Programs in the Amadé
29
Presets available in the Amadé
29
Selecting and changing a program
30
Changing presets, activating or deactivating a program
30
Copying and switching programs between slots
31
X. Documentation
32
XI. Useful Connexx tools
33
XII. Further information
38
I. Introduction
The Vibrant Soundbridge
and Bonebridge Systems
Vibrant Soundbridge®
Introducing
• The Vibrogram: Direct Drive threshold measurement
• DSL, NAL-NL1 NAL-NL2 available for the Vibrant
Soundbridge fitting
Bonebridge ™
Introducing
• Fitting of the bone conduction implant system
5
II. Setting up Hardware and Software
The following components are necessary for fitting the Amadé audio processors of the Vibrant Soundbridge
and the Bonebridge systems.
Hardware
Minimum System Requirements
Recommended System requirements
• Processor (CPU): Pentium III, 800 MHz
• Processor (CPU): Pentium 4.2 GHz
• Hard disk space: 300 MB free storage
• Hard disk space: 2 GB free storage
• RAM: 256 MB
• RAM: 1 GB
• Graphics Display: 1024 x 768 resolution, 64k colors
• Graphics Display: 1280 x 1024 resolution,
• Programming Interface: HI-PRO or NOAHlink
16.7m colors
• Programming cable with CS44 interface
• Programming Interface: HI-PRO or NOAHlink
• CD-ROM drive
• Programming cable with CS44 interface
• Windows XP
• DVD drive
• USB interface: 1.1
• Windows XP Pro, Windows Vista, Windows7
• USB interface: 2.0
Fitting software discussed in this guide
• Siemens Connexx Software v6.4.3 - 6.4.5
• VIBRANT MED-EL SYMFIT Hearing Instrument Database:
Accessories
• Audio Processor Adapter (to check the function of
the Amadé)
• Audio Processor Fitting Kit - Amadé
It contains all the necessary accessories for the
Amadé fitting and maintenance
6
- For the Vibrant Soundbridge: Symfit 5.1 or
Symfit 6.1
- For the Bonebridge: Symfit 6.1
III. Amadé Audio Processor
Characteristics of the Amadé audio
processor
The Amadé audio processor (figure 1) contains the
digital signal processing for both the Vibrant Soundbridge
and the Bonebridge implant system. The state-of-theart signal processing provides these features:
• Digital signal processing in 16 frequency bands
− Frequency range 250 Hz - 8000 Hz
• 8 compression channels
• Directional microphone
• Advanced speech in noise management
• 3 storable programs
• Zinc-Air 675 battery
figure 1
− battery life 5-7 days depending on amplification
level
How to wear the Amadé
The Amadé audio processor should be worn by the
patient as shown in figure 2.
The battery compartment should be placed pointing
downwards, as it is the heaviest part of the processor.
In this position, the two microphones form a horizontal
line and the effect of the directional microphones (if
activated) is optimized.
Be aware that there is a left and a right version of the
Amadé. To achieve correct directionality the correct
version of the Amadé should be used for the
corresponding ear.
figure 2
7
Front and back of the Amadé audio processor
BACK
FRONT
Program
Change Button
Serial
Number
Version
Two
Microphones
Side
Battery Door
figure 3a
figure 3b
On the front side of the Amadé, the user can choose
Underneath all these markings there is an indicator
between three programs by pressing the program change
showing on which side of the head the Amadé should
button. The two microphones allowing for a directional
be worn, (L for the left side, R for the right side).
microphone option can also be seen in figure 3a.
The holding magnet is located in the center of the
On the base of the processor (figure 3b), the serial
Amadé. It can be recognized with one to five dots. The
number of the device is printed. On the right hand side
number of dots represents the strength of the magnet.
there is a mark for the Amadé version:
Amade audio processors are automatically shipped with
a number 3 magnet. Numbers 1 and 2 are weaker
• Hi for a high power Amadé for the Vibrant Soundbridge
magnets. Numbers 4 and 5 are stronger magnets and
• Lo for a low power Amadé for the Vibrant Soundbridge
used in cases when the skin flap between the implant
• If there is no mark, the device is a standard Amadé
and the Amade is thicker than usual.
for the Vibrant Soundbridge
• BB for an Amadé for the Bonebridge
8
A
Battery door positions
Placing/Removing the battery
The position of the battery door defines the status of
the Amadé audio processor.
B
5a
4a
C
5b
4b
5c
4c
figure 5
figure 4
D
The Amadé audio processor uses a single Zinc-Air 675
battery. Figure 5 (a-c) shows how to exchange the battery.
When the battery door is closed completely with a
When the battery door is open, the battery can be
working battery inside, as seen in figure 4a, the Amadé
inserted or removed (figure 5a). Use a Zinc-Air 675 battery
is ON. To turn OFF the Amadé, open the battery door
inserted with the plus pole (+) on top (figure 5b+c).
slightly (5mm) anticlockwise (figure 4b).
Remove the tab / sticker from the battery. To achieve
To program the Amadé with the programming cable,
optimized battery performance it is recommended to
open the battery door to see the programming socket
wait one minute after removing the tab before closing
(figure 4c).
the battery door.
9
Changing the magnet
6a
6b
6c
figure 6
The adequate strength of the magnet should be checked
To change the magnet (figure 6, a-c), turn the battery
during every fitting session.
door 180° anticlockwise from the closed position. Once
If the magnet is too weak, the audio processor may not
opened 180°, the battery door can be lifted off and the
stay on the user’s head and if the magnet is too strong,
magnet can be replaced. Place the metallic part of the
reddening of the skin or pain can occur. If the magnet
magnet facing down towards the bottom of the Amadé
appears to be too weak or too strong, please change
battery compartment; the plastic foam should be facing
accordingly.
towards the top.
Replace the battery door by moving it to the same
position as it was when it was lifted off. Then turn the
battery door clockwise (180°) to the desired position.
10
Connecting the HI-PRO box and programming cable
Next, the battery door must be placed to the
To program the Amadé, the HI-PRO box (GN Otometrics)
while the cable is plugged into the programming socket
and a programming cable (CS44 interface) are required.
and the battery door is closed enough so the AP
NOAHlink can be used as an alternative.
Adapter shows the processor is turned ON.
programming position. This position can be found
Connect the HI-PRO box to the computer where
Connexx and Symfit are installed, plug the programming
After completing the steps above, the Connexx
cable into the connector of the corresponding side of
software can be started.
the HI-PRO box.
Connecting the Programming Cable to the
Amadé
To program the Amadé, connect the programming cable.
Make sure the Amadé battery is sufficiently charged.
Open the battery door to access the programming socket
(figure 7). To connect the audio processor, align the marks
on the programming cable and socket, and connect then.
figure 7
11
IV. Fitting Session
Start fitting session - enter client data
After starting the Connexx software, the Client List
Create a new client - required and optional
data
and Data screen will appear (figure 8). For new clients,
To create a new client record, click on the “New” button
complete the fields on the screen. For existing clients,
located in the bottom left corner of the “Client List and
existing data can be loaded.
Data” screen. On the right side you will see the fields
to enter the client data.
First Name, Last Name and Date of Birth are required
to create a new client record. All other fields are optional.
When the data for the new client is complete, click the
“Save” button. The newly added client information
should now be transferred and appear in the client list.
The client list
figure 8
To search for a client in the client list, enter the first or
last name into the corresponding field and click “Search
Now”. To display the complete list of clients, click on
“Show all”.
To load data for a specific client, double-click on the
corresponding dataset. Or click on the client dataset
and click on “Load Client”.
12
V. First Fitting for the Soundbridge
Amadé
The Vibrogram
The Vibrogram is a pure tone audiogram received by
SYMFIT database you have installed, go to
direct stimulation of the inner ear through the Vibrant
”Help”, followed by “Info about Database”.
Soundbridge. It can be performed with all types of the
Here it can be confirmed that SYMFIT 6.1 is
VSB Amadé audio processor.
installed to program an Amadé BB, SYMFIT 5.1 or
Pure tones are presented through the Amadé and are
6.1 is required to program the VSB Amadés.
adjustable in frequency (from 500Hz to 6000Hz) and
loudness (between 15dB and 105dB).
2. The programming cable is not properly connected
Measuring the “audiogram” through the implant does
to the processor
not only provide information about the hearing loss of
Please refer to chapter III on page 11 of this guide
the patient in the Vibrogram, but also about the
to learn how to connect the programming cable
frequency response of the Vibrant Soundbridge and the
correctly.
coupling of the FMT to the inner ear.
3. The hardware is not installed correctly.
The Vibrogram thresholds are recommended
Please refer to the user manual of the HI-PRO
to be used as a starting point for the fitting
box (or NOAHlink) for assistance.
of the Vibrant Soundbridge system
Make sure that the HI-PRO box is set up on a
serial port COM1 to COM4.
Detecting a connected Amadé Audio
Processor
The first step is the detection of the hearing instrument
via the detect connected instruments button in the
toolbar (figure 9).
figure 9
It is not necessary to select the processor first, the
detection automatically recognizes which audio
processor is connected.
figure 10
note: troubleshooting
Figure 10 shows that Connexx has detected an Amadé
IF THE AMADÉ IS NOT RECOGNIZED CORRECTLY, THE
(in this example Amadé Hi) on the side where the audio
FOLLOWING MAY HAVE OCCURRED:
processor is connected to the HI-PRO box.
1. The wrong SYMFIT version is installed
Now it can be differentiated between a first fit session
To check which version of the VIBRANT MED-EL
and a follow up fitting.
13
Follow-Up fitting (go to Fine Tuning) should be chosen
Begin taking measurements at 1kHz, 30dB above the
for the Vibrogram measurement.
bone conduction threshold. Click on the corresponding
Press OK to confirm the selection.
symbol to activate the tone and start the measurement.
The tone will remain active until either another test tone
Starting the Vibrogram measurement
The necessary calibration settings are stored in the
is activated or the measurement is complete. The active
tone will be displayed on the top and bottom of the
Vibrogram screen (figure 12).
processor via selecting “Fitting”, followed by ”Test
Settings…”. The following window (figure 11) will
figure 11
appear. Click on Vibrogram Settings. The Amadé is
programmed and the Vibrogram table (figure 12) is
activated.
figure 12
Caution: Do NOT close the Test settings window.
NOTE: Test tones can be adjusted from 500Hz to
Select the Vibrogram tab from the 6 tabs in Fine Tuning.
6000Hz in frequency and from 15dB to 105dB in volume.
The Vibrogram table will appear (figure 12). The
Vibrogram process is similar to an audiogram.
Remark:
In order to prevent external sounds from being picked
If the patient is having difficulty finding satisfying
up by the microphones, mute the Amadé. Refer to figure
fitting levels, consider collecting the uncomfortable
42 on page 34 on how to mute the Amadé.
loudness levels (UCL) during the Vibrogram process
so there is a full range of responses.
THE PRE-PROGRAMMED AMADÉ IS NOW GIVEN TO THE
PATIENT AND PLACED OVER THE IMPLANT.
14
Vibrogram Measurement completion
When the measurement is finished, click on Vibrogram
Settings and Close the Test Settings window. The
following window will appear (figure 13), select Yes. It
is not intended to leave the test settings in the Amadé.
As the Vibrogram thresholds have been received as a
basis for the first fitting it can now be continued with
entering the thresholds (and UCL values) in the
Audiogram tab.
figure 13
The Audiogram Tab
Select the Audiogram; this is the first tab in the Connexx
Amadé. For the first fitting the thresholds of the patient
software and it will appear after creating a new client.
have to be entered at least on the side which is to be
The data entered in this screen will be used by the
fitted (figure 14).
Connexx software to calculate the target gains for the
figure 14
When fitting the Amadé audio processor of the Vibrant
patient as well as the efficiency of energy transfer from
Soundbridge the thresholds and the dynamic range of
the FMT to the inner ear.
the patient (UCL) are defined by the Vibrogram. It is
Air Conduction symbols are used to enter the Vibrogram
therefore suggested to use the Vibrogram as a basis for
thresholds, if UCL values have been measured, UCL
the fitting as it includes the hearing thresholds of the
symbols are used to enter them here.
15
The First Fit Configurator
After entering the Vibrogram as a basis for the first fit,
Fitting formula and acclimatization level
the first fit configurator can be started.
A modified version of the DSL I/O, NAL-NL2 or NAL-
This is done via selecting ”Fitting” and then ”First
NL1, as the Fitting Formula in the Fitting Method
Fit…” from the menu or using the highlighted icon in
window, is recommended (figure 17). All three fitting
figure 15.
formulas are optimized to the output characteristics of
the Vibrant Soundbridge system. Setting the Acclimatization Level reflects the client’s experience with amplification from conventional hearing systems. Level 1
should be selected for inexperienced hearing aid users.
Level 1 has the lowest starting volume and cautious
high frequency gain so sounds are not uncomfortably
figure 15
loud. Level 2 is for “beginners” with some amplification experience and level 3 for experienced hearing aid
First fit approach
users. Acclimatization level 4 can be used as the set-
First select whether the first fit should be done for
ting for patients who are the most experienced with
the left, the right or for both connected hearing
amplification. Level 4 provides the highest volume for
instruments, in the case of a bilateral fitting. In the
all settings.
following example (figure 16) an Amadé is connected
Next, the Number of Programs will be selected. Up
on the right side. Therefore the other two options
to 3 programs can be stored in the Amadé. One or
cannot be selected here. Click on Next to continue.
more programs can be created during the first fitting.
Additional (up to 3 total) programs can be added, at
any time, after the first fitting. There are 3 default programs: “Universal”, “Noisy Environment”, “TV/Music”.
After selecting the number of programs, click “Apply
First Fit”. This will complete the first fit configuration,
target gains will be calculated and stored in the Amadé
audio processor.
The programming is now complete; place the audio
processor on the implant site.
figure 16
figure 17
VI. First Fitting for the Amadé BB
Audiogram
Select the Audiogram; this is the first tab in the Connexx
the bone conduction (BC) thresholds of the implanted
software and will appear after creating a new client.
side.
The data entered in this screen will be used by the
Connexx software to calculate the target gains for the
The Connexx software mainly uses air conduction
Amadé BB.
thresholds for the target gain calculation however,
when fitting the Amadé BB with conductive or
For the first fitting, the hearing thresholds of the user
mixed hearing loss, the respective BC thresholds
need to be entered. Depending on the type of hearing
should be entered with air conduction (AC) symbols
loss, the bone conduction (BC) threshold of either the
and will be used as a basis for the first fit.
implanted side or the contralateral side (for single-sided
deafness) should be entered as described below.
2.Bilateral conductive and Mixed Hearing Loss
Values are entered by double-clicking on the corres-
For bilateral fittings, follow the steps listed above.
ponding level-frequency point in the audiogram field.
Enter the bone conduction values of the left and
right ear in the respective audiogram field with AC
Considerations for the Audiogram
1.Conductive and Mixed Hearing Loss
symbols (figure 18).
3.Single-sided sensorineural deafness (SSD)
When fitting the Amadé audio processor for the
Bonebridge can be used for patients with profound
Bonebridge, consider that the inner ear is stimulated
unilateral sensorineural deafness or single-sided
by bone conduction directly. Meaning, the hearing loss
deafness (SSD). In this case, the Bonebridge is
that needs to be compensated is defined by the inner
implanted on the deaf side. Sounds are picked up by
ear component of the hearing loss; measure and enter
the audio processor on the deaf side and the
figure 18
17
vibrations travel across the skull, via bone conduction,
Please refer to section II on page 6 to check
stimulating the normal hearing inner ear on the
which version of the SYMFIT database is required
contralateral side.
for the Amadé to be programmed correctly.
To include the attenuation of bone conduction from
the deaf side to the normal hearing side, measure
2. The programming cable is not properly connected
the unmasked bone conduction measured on the
to the processor.
(implanted) deaf side. Use these values as a basis for
Please refer to chapter III on page 11 of this
the first fit; enter in the audiogram tab on the
guide to learn how to connect the programming
implanted side with AC symbols.
cable correctly.
Remark:
3. The hardware is not connected correctly.
Typically, bone conduction thresholds are only
Please refer to the user manual of the HI-PRO
measured from 500 Hz to 4 kHz. Values at 250 Hz, 6
box (or NOAHLink) for assistance.
kHz and 8 kHz should be entered by extrapolating from
Make sure that the HI-PRO box is set up on a
the given bone conduction thresholds. Where no
serial port COM1 to COM4.
values are entered, no gain will be calculated.
Detection of the Amadé and First Fit
Next, to detect the Amadé BB audio processor, click the
detect connected instruments button on the toolbar
(figure 19).
It is not necessary to select the processor first;
detection will automatically recognize the connected
audio processor.
figure 19
remark: troubleshooting
figure 20
If the Amadé BB is not recognized correctly,
Unilateral fitting
the following may have occurred:
Figure 20 shows that Connexx has detected an Amadé
1. The wrong SYMFIT version is installed
BB on the side where the audio processor is connected
18
To check which version of the VIBRANT MED-EL
to the HI-PRO box.
Symfit database you have installed, go to:
Now it can be differentiated between a first fit session
“Help”, followed by “Info about Database”. Here
and a follow-up fitting.
it can be confirmed that Symfit 6.1 is installed
New Fitting (go to First Fit Configurator) should be
to program an Amadé BB.
chosen in this context. The software will start to
calculate target gains according to the audiogram that
has been entered.
Follow-up fitting (go to Fine Tuning) for follow-up fitting
sessions. It will read out the connected Amadé and it
can be proceeded based on these settings.
Press OK to confirm the selection.
Bilateral Fitting
The software also allows simultaneous fitting for
bilateral Bonebridge users. When two Amadé are
connected, detect connected instruments shows the
window in figure 21.
Select New fitting (go to First Fit Configurator) in case
of a first fit based on the entered audiograms.
Select Follow-up fitting (go to Fine Tuning) in case of
figure 21
a fitting based on the values stored in the connected
processors.
The First Fit Configurator
First Fit Approach
For bilateral first fittings, there is the option to use the
Select the side: left, right or both for bilateral fitting
same fitting strategy for both audio processors or a
(figure 22).
different fitting strategy for each audio processor.
Usually, the same strategy for both audio processors
is used, as seen in figure 22. Each audio processor
should be programmed, one at a time on the patient’s
head. After both processors are programmed, place
them on the patient and turn them on. Adjust the
volume with the gain setting until both sides have an
equal level of sound. Finally, make sure sounds are not
too loud for the patient. If they are too loud, turn the
volume to an acceptable level for the patient.
This fitting guide will now continue with a case of
unilateral fitting.
For a unilateral fitting, the following example (figure 23)
is for an Amadé BB connected on the right side. After
selecting the correct side, click “Next” to continue. For
figure 22
the the Amadé BB, it is strongly recommended to use
19
the modified formula DSL I/O (please refer to the next
section). Use the tickboxes as seen in figure 24.
Fitting formula and Acclimatization level
Use the DSL I/O as Fitting formula in the Fitting
method window (figure 24), it has been optimized to
the output characteristics for Bonebridge. NAL-NL1
should NOT be used for fitting the Bonebridge system.
Setting the Acclimatization Level reflects the client’s
experience with amplification from conventional
hearing systems. Level 1 should be selected for
inexperienced hearing aid users. Level 1 has the lowest
starting volume and cautious high frequency gain so
figure 23
figure 24
sounds are not uncomfortably loud. Level 2 is for
“beginners” with some amplification experience and
any time, after the first fitting. There are 3 default
level 3 for experienced hearing aid users. Acclimatization
programs: “Universal”, “Noisy Environment”, “TV/Music”.
level 4 can be used as the setting for patients who are
After selecting the number of programs, click “Apply
the most experienced with amplification. Level 4
First Fit”. This will complete the first fit configuration,
provides the highest volume for all settings.
target gains will be calculated and stored in the Amadé
BB audio processor.
Next, the Number of Programs will be selected. Up to
3 programs can be stored in the Amadé BB. One or
The programming is now complete; place the audio
more programs can be created during the first fitting.
processor on the implant site.
Additional (up to 3 total) programs can be added, at
NOTE: The remaining chapters in this guide are applicable to both Soundbridge Amadé and Amadé BB audio
processors. All settings can be used for both audio processor families unless stated otherwise.
20
VII. Basic Tuning
Next, in the third tab, you will see the Basic Tuning tab.
Curve Display
In figure 25 ( a. VSB, b. BB) the input/output (gain) Curve
Three black lines and three cherry red/teal lines
Display of the Connexx software can be seen.
(depending on which side is to be fitted, teal for the left
side, cherry red for the right side) can be seen in the
curve display.
The cherry red/teal lines represent the target gain/
output that Connexx calculated in the first fit according
to the audiogram for inputs of 40 dB (soft sounds), 65
dB (conversational level), and 90 dB (loud input sounds).
The black lines represent the current settings that are
stored in the Amadé and therefore the actual gain/
output of the system for the same input levels.
Remark: Adjusting the curve display
25a
To display the correct values for the Vibrant
Soundbridge and Bonebridge systems the
default settings from the Connexx software
have to be changed for the curve display.
This can be done by selecting Settings → Preferences
in the menu. There the first tab is the Curve Display
tab where the following settings have to be selected.
1. Gain (G) or Output (O): This defines whether the
gain or the output of the system is displayed.
Both settings are equivalent via the calculation
Output Level = Input Level + Gain.
25b
The output level for the Vibrant Soundbridge is
given in dB SPL (sound pressure level).
figure 25
The output level for the Bonebridge is given in
dB FL (force level).
In the Curve Display the relation between the following
2. Coupler Type = Ear Simulator
axes can be seen:
3. Stimulus = Pure Tone
- x-axis: Frequencies from 125 Hz to 8000 Hz
- y-axis: Gain / Output (depending on what was set on
Note: These changes only have to be done once.
the Curve Display settings).
The changes will be saved and become default
settings for future sessions.
21
Settings in the Basic Tuning
Basic adaption of the programming is done in the Basic
Master Gain
Tuning window (figure 26). Simple questions about
If the user experiences the overall volume of the
hearing impression with the Amadé can be directly
system as too loud or too soft, it can be set with the
responded to in this window.
Master gain in the Basic Tuning and also in the Fine
Tuning window.
With this control, the volume of the system can be
increased or decreased by incremental steps of 3 dB.
Remark:
The number displayed at the Master gain field
represents the maximum amplification of the 65 dB
input curve in the curve display for the respective
view mode. For detailed information about the
amplification pattern of the system please refer to
the curve display.
Volume of specific sounds
To further improve the basic fitting, it is also possible
to respond to more specific questions in this tab. For
example, the volume of the user’s own voice,
convenience of loud sounds (e.g. clapping hands) or
soft sounds.
Remark:
Be aware that changing the settings in the Basic
Tuning window influences the amplification and
compression profile of the system. It is therefore
recommended to refer also to the Fine Tuning tab.
Changing the sound quality
The Vibrant Soundbridge and Bonebridge systems
provide excellent high frequency amplification that may
figure 26
or may not be used by the user. For users who have not
heard high pitch sounds for a long period of time, these
Remark:
may sound metallic or sharp. Because of this, users may
Every setting in the software that is adjusted will be
not be comfortable with these sounds. The sound
per default immediately sent to the processor and
quality in the Basic Tuning window can be adjusted by
will therefore be perceived by the user.
clicking on too sharp. This reduces the gain in the high
22
frequencies and increases the gain in the low
frequencies, making the sound more muffled.
New First Fit
Begin by pressing the button on the bottom of the basic
tuning window to start a new first fit.
Remark:
High frequency sounds are essential for speech
understanding. Considering this, the user should
get used to these kinds of sounds over time. It is
suggested to slowly increase the high frequency
sounds from fitting session to fitting session.
23
VIII. Fine Tuning
The Fine Tuning settings allow frequency specific gain
as the current gain applied.
and compression as well as advanced speech in noise
By marking several frequency bands with the mouse,
adjustments to be made.
the gain in user-defined frequency areas can be changed
easily and quickly.
Frequency Shaping
Remark:
The number between 0 and 60 is interpreted in the
way that 60 is equivalent to the maximum amplification
on the specific frequency band and every 1 dB lower
means -1 dB below the maximum amplification. The
information value of this number is limited.
The exact values of the amplification applied depending
on frequency and input level can be taken from the
curve display.
Remark:
Figure 27 shows that an increase of the overall gain
with the handle is not possible, as the control is
shown as non-active. This is interpreted in a way that
channels 11-13 are already set at maximum
amplification. To increase that overall volume of the
system the gain in the channels 11-13 has to be
reduced first, then the Master gain can be increased
again. Of course, this changes the frequency shaping
slightly.
The Maximum Power Output (MPO)
By setting this control, the maximum output of the
system can be limited. The MPO is a very fast compression
of signals represented in the last 2 dB of output of the
Amadé. This can be useful if the user complains that very
loud sounds are uncomfortable. The MPO can be set in
figure 27
increments of 3 dB from 0 dB (no reduced output limit)
The first tab in Fine Tuning allows the gain for each of
Setting the MPO represents a reduction of the dynamic
the 16 individual frequency bands to be adjusted
range of the system and it is therefore suggested to do
separately in incremental steps of 1 dB using a drag and
this with caution.
drop method (see figure 27).
Setting the MPO control to the utmost right position
If the mouse is moved over one of the controls, the
sets the system into the Peak Clipping (PC) mode, the
central frequency of the frequency band appears as well
MPO is deactivated. This means that the system uses
to -21 dB (output limit reduced by -21 dB).
24
2 dB more of output, however, this causes strong
distortions if sounds reach the output limit of the
system. It is not recommended to use this setting.
Compression
Frequency dependent amplification for
loud and soft input sounds
It is possible to separately adjust the gain for loud (90
dB) and soft (40 dB) input sounds in up to 8 channels.
With the help of the eyeglass control these 8 channels
can be combined into 1, 2 or 4 groups and then be
adjusted accordingly. This is very useful as it allows the
clinician to directly respond to comments of the user
concerning specific listening situations.
As already mentioned in the section Basic Tuning
changes in the input related amplification are equivalent
to changes in the compression settings (compression
kneepoint and ratio) in the specific frequency band
which should therefore be observed (figure 28).
Setting the Compression Kneepoint and
Ratio
Of course Connexx also allows to manually set
Compression Kneepoints and Compression Ratios. The
figure 28
frequency range can be also split here with the
eyeglass control.
fast attack time is 5 ms. The second level meter with
By double-clicking on the respective field a dropdown
900 ms attack and 1400 ms release time provides gain
menu opens which allows to set the compression
adjustments based upon the average level of the
kneepoint between 35 dB and 75 dB, the compression
incoming signal.
ratio between 1.00 (no compression) and a maximum
In this way, the Amadé operates with a quasi-automatic
of 4.00.
gain control, while at the same time preserving speech
dynamics essential to understanding, without allowing
Dual and Syllabic compression
uncomfortably loud peak levels.
Dual compression follows the overall speech level and
Dual (double temporal component compression)
limits distortion. For users who suffer from mild
Dual compression operates with both a fast and a slow
recruitment (mild to moderate hearing loss), dual
level meter. The fast level meter provides an immediate
compression protects the temporal contrast of their
reduction in gain for higher-level impact sounds. The
own voice.
25
Syllabic (or fast compression)
Syllabic compression adjusts the gain for instantaneous
fluctuations that occur within speech. It operates with
a fast level meter using an attack time of 10 ms and a
release time of 100 ms.
It should be used in frequency bands where a user has
a strongly reduced dynamic range (moderate to severe
hearing loss) which is more common in the high
frequencies. In this case it is preferable to select syllabic
compression for the compression areas five to eight.
The attack and release time of syllabic compression are
fixed.
Speech/Sound
With the tools in this tab, the Speech and Noise
Management, Sound Smoothing, Wind-Noise reduction,
and Feedback Cancellation can be set. These settings
can support the user’s hearing experience in different
environmental situations (figure 29).
Speech and Noise Management
This feature is an adaptive algorithm following the
currently detected noise that maximizes both the
hearing comfort and the speech intelligibility for each
figure 29
acoustical situation. This means that speech signals
are emphasized while interfering noises such as traffic
without affecting speech or soft impulsive sounds and
noise or air conditioning are suppressed. If the
therefore maintains the naturalness of sound. A choice
checkbox is enabled you can select between med
can be made between med (medium Sound Smoothing)
(noise attenuation of 8 – 15 dB) and max (noise
and max (maximum Sound Smoothing). The two
attenuation of 12 – 24 dB) noise attenuation.
settings differ with respect to the amount of
attenuation of loud impulsive sounds.
Sound Smoothing
This feature guarantees high listening comfort. The
Wind-Noise reduction
algorithm detects loud sounds with a sudden onset
This feature is useful in special listening situations
(like clattering dishes, rustling paper, or slamming
where wind generates unwanted noises in the Amadé.
doors) which are annoying for hearing impaired people.
The reason for this fact is that the openings for the
Sound Smoothing eliminates only these sounds
microphone ports can generate interference.
26
The Wind-Noise Reduction algorithm evaluates the
Instrument settings
amount of wind noise at the housing openings of the
microphones. In case of strong and therefore annoying
Two alert tone types can be enabled (figure 31) to
wind noise the gain in the low frequencies is reduced
inform the user of the audio processor about an
proportionally to the wind speed and the microphone
adjustment that needs to be made. The alert tones
system is switched to omnidirectional. You can select
can be activated to indicate the following situations:
between med (medium Wind-Noise reduction) and max
(maximum Wind-Noise reduction).
Feedback Cancellation
This feature enables a feedback reduction system. This
system continuously analyzes the feedback path of
the Amadé and subtracts the unwanted feedback, if
necessary. If Feedback Cancellation is enabled, the
selection can be made between slow and fast base
setting: Slow base setting is optimized for maximum
sound quality, fast base setting is optimized for
maximum effective gain.
Microphone: Directional and
Omnidirectional Option
The Amadé audio processor has a dual microphone
system which can be set to Omnidirectional or
Directional (figure 30). In omnidirectional mode sounds
from all directions are processed equally.
In directional mode, sounds coming from the front of
the Amadé user are amplified over sounds coming from
behind.
Remark:
figure 30
In the directional mode sounds being picked up by
the rear microphone are amplified less than the
sounds being picked up by the front microphone.
Information about program change
Therefore, the overall volume is slightly lower in the
The number of beeps depends on the selected program,
directional mode than in the omnidirectional mode.
e.g. one beep indicates program 1. The frequency of
This can be compensated by increasing the master
the alert tones can be adjusted for optimal audibility
gain.
and set to 250, 500, 750, 1000, 1500, 2000, 3000,
4000, or 6000 Hz (figure 31).
27
Low battery beep
Remark:
Indicates that the battery has to be replaced. The low
If the alert tone is enabled in one program, all
battery beeps are longer than the program change
activated listening programs are affected. The beep
beeps and their frequency is 250 Hz below the program
frequency and loudness of the alert tones can be
change beeps. The beep occurs 20 seconds after the
changed independently for each program.
battery supply voltage falls below a defined threshold,
subsequently every five minutes. The loudness of both
Remark:
alert tones can be set in 5 dB steps from 15 dB to 105
In case that the battery supply voltage falls below a
dB. To demonstrate the program change beeps press
defined threshold, the Amadé switches into a power
the Play alert tone button.
management state with a reduced output of 18 dB.
The Amadé can still be detected via HIPRO in this case
but Connexx will ask the user to replace the battery
before the fitting is continued.
figure 31
28
IX. Programs in the Amadé
For different listening situations, up to three programs
Speech and Noise Management as well as Sound
can be activated. All Amadé parameters can be
Smoothing are set to medium, and the Wind-Noise
modified and individually adjusted in every listening
Reduction is set to maximum.
program. The programs can be seen sorted 1 to 3
(Please find more information about these features on
from top to bottom either on the right or the left
pages 26 and 27 of this guide).
margin of the Connexx programming screen (figure 32).
In slot 1 the program Universal is always active.
Nevertheless you can change any setting within the
program.
Noisy Environment
The program “Noisy Environment” is predefined in slot
2 and designed for noisy situations such as traffic,
conversation in a large group, restaurants, or similar
noisy situations.
To provide speech intelligibility and comfort within
these situations the Amadé parameters are modified
as follows: the microphone system is set to directional.
Additionally Speech and Noise Management is set to
maximum attenuation, Sound Smoothing is set to
medium, and the Wind-Noise Reduction is set to
maximum. Furthermore the channel gains are reduced
in the lower frequency range as well as the gain for
loud sounds for the whole frequency range.
TV/Music
figure 32
The “TV/Music” program, which is the predefined
program for slot 3, is primarily intended for listening
Presets available in the
Amadé
to music but also for TV applications. It aims to provide
a natural, wide band sound for the Amadé user. To
achieve this goal, Wind-Noise reduction is turned off
and for this particular acoustical environment, the
The following presets are available: Universal, Noisy
Sound Smoothing feature is also turned off. The overall
Environment, TV/Music, Telephone acoustically, Outdoor/
gain is also increased, especially in the low and high
Sports, and Privacy.
frequency ranges, to provide more bandwidth and
sound quality. The time constants of the compression
Universal
The “Universal” program, which is stored under slot 1,
are set to high values (dual) and the microphone
system is set to omnidirectional mode. Speech and
Noise Management is set to medium attenuation.
is automatically active after switching on the Amadé.
The microphone system is set to omnidirectional.
29
Telephone Acoustically
changes will be done in program 1.
The program “Telephone acoustically” is intended for
To switch to program number 2 or 3 a simple click on
telephone applications. It is aimed to provide speech
the respective preview window is sufficient.
intelligibility for the narrow band telephone signal.
Hence the amplification in the middle frequency range
is increased and decreased in the very low and very
high frequencies. The Microphone System is set to
omni-directional, Wind-Noise Reduction is turned off
and medium is set for Speech and Noise Management
Changing presets, activating
or deactivating a program
as well as for Sound Smoothing.
Outdoor/Sports
The program “Outdoor/Sports” is predominately
intended for outdoor activities, such as cycling, and
eliminates disturbing wind noise.
To achieve this goal a maximum Wind-Noise Reduction
is used and the microphone system is set to
omnidirectional characteristics. Additionally the
amplification in the lower frequency range is reduced,
with the Speech and Noise Management and Sound
Smoothing being deactivated.
figure 33
Privacy
If three programs have been selected for the first
The program “Privacy” is intended for all applications
fitting, by default, the “Noisy Environment” program
where the Amadé user does not wish to be disturbed
is stored in slot number 2 and the “TV/Music” program
by environmental sounds. Hence the amplification is
in slot number 3.
decreased by 9 dB for the whole frequency range. The
In the dropdown menu displayed in figure 33 one of
microphone system is set to omnidirectional and the
the other presets can be chosen for the corresponding
Speech and Noise Management and Wind-Noise
program slot.
Reduction are deactivated. The Sound Smoothing
In the same way programs can also be switched off if
algorithm is set to its maximum impact in this program.
they are not needed by selecting Off in the dropdown
menu.
Selecting and changing a
program
Remark:
Please note that you cannot switch off program
number 2 as long as program number 3 is active.
A modified program will appear with the extension
In figure 32 the first program is magnified meaning that
“(modified)” in the dropdown menu. Predefined
the Amadé is currently in this program. The user is
programs are not changed.
hearing with program 1 at this time and all the setting
30
Copying and switching programs between slots
figure 34
By clicking on the activated preview window and drag
and drop it over another one the window in figure 34
opens.
There are 2 options to choose between:
• Copy the activated program into another slot. This
can be useful to create another program with only
slight changes (e.g. increased/decreased volume)
• Exchange the activated with the targeted program
Confirm the selection by pressing on OK.
31
X. Documentation
figure 35
In the last tab a report about the fitting session can
All parameters like the date and the name of the
be created (figure 35).
clinician, audiogram of the user, hearing system
parameters and target gain can be stored or printed.
32
XI. Useful Connexx Tools
Store and recall hearing instrument settings
the client’s data form.
To store Amadé settings for quick access for later use
If the setting is not to be stored, press the Cancel
press the highlighted button in the toolbar (figure 36).
button to return to the main Connexx window.
The following dialog box appears:
For evaluation purposes, it may sometimes be useful
to compare the currently used Amadé settings with a
previously made fitting. To recall previously stored
Amadé settings select Recall Settings... in the Edit
figure 36
menu or press the highlighted button in the toolbar
(figure 38).
The following dialog box (figure 37) appears:
figure 38
The following dialog box (figure 39) appears:
figure 37
The hearing instrument type and date/time are
automatically entered and cannot be altered.
Activate the checkboxes for the program settings to be
stored for the displayed Amadé.
figure 39
A Comment relating to this setting in the text field can
To select a hearing instrument setting from the menu,
also be added at the top of the menu of Amadé settings.
click on the desired setting.
Press the Store button to acknowledge storage of the
Click the Delete button to delete the hearing instrument
hearing instrument setting. The hearing instrument
setting selected (only programs with marked checkbox
setting shown on the screen is stored permanently in
will be deleted) in the dialog box. The setting cannot
33
be recovered later.
With the Program selected settings button, the hearing
instrument settings (only programs with marked
checkbox) are immediately programmed into the
connected Amadé.
Press the Ok button to update the selected Amadé
setting onto the screen.
Pressing the Cancel button closes the dialog box, and
the working area remains unchanged.
Remark:
Please note that everything stored here is not stored
in the user database. It is only stored on your local
figure 41
Connexx installation and these settings cannot be
exported.
be pressed if no data have been selected.
By pressing Cancel: The dialog box is closed and data
Save a session
To save a completed hearing instrument fitting and all
are not saved.
associated data, select Save Session... in the File menu,
Mute button
or click the highlighted button in the toolbar (figure 40).
Click on the loudspeaker symbol (figure 42) in the lower
toolbar to mute the Amadé. Press the button a second
time to unmute the Amadé.
figure 40
The dialog box for saving a session will appear (figure 41):
Session Comment: Enter a comment for this fitting.
figure 42
This comment will appear later in the session list.
Program link
Completion of this field is optional.
To apply a change in one program to all active programs
click on the marked button (figure 43).
Measurements / Fitting: Select the data you wish to
store for this fitting by checking Audiogram, right
hearing instrument and/or left hearing instrument. The
input fields Manufacturer and Hearing Instrument are
automatically filled in and cannot be changed. Enter
the serial numbers of the hearing instruments in the
input field Serial number, if desired.
By pressing Ok, the selected fitting data are stored
and are available for later use. The Ok button cannot
34
figure 43
Binaural link
Note that this is the recommended manual procedure.
For bilateral Amadé users a setting for both audio
Additionally, an automated Anti-Feedback analyzer is
processors can be changed simultaneously. Click on
available by selecting Critical Gain Measurement in the
the marked button (figure 44) to apply a change in one
Fitting menu (figure 45).
program to the respective program on the contralateral
ear at the same time.
When selecting Start Measurement the hearing implant
generates an impulse sound across the whole frequency
range for the programs that have been selected. This
impulse sound is ciphered and analyzed by the
microphones. Select Optimise to apply the recommended
figure 44
settings.
Critical Gain Measurement
Import and export of client data
If feedback occurs after activation the Feedback
With the help of this tool client data can be imported
Cancellation system can be activated within the Speech/
and exported. Start the tool by selecting Client DB
Sound settings. Furthermore programming adjustments
Import/Export from the File menu.
can be made to eliminate the feedback.
A suggested adjustment strategy follows: start by
Exporting client data
increasing the knee point a few steps in compression
The saved client data can be exported by choosing
band no. 8. If the feedback level stays the same, bring
between one, several or all entries (figure 46). With
it back to the initial position and try the same strategy
the Show all button you can display the whole list of
with the next compression band, no. 7. Continue until
clients saved on the current workstation. Entries can
you have identified which band creates the feedback.
be selected from this list.
figure 45
35
To define the location to save the exported data, insert
the corresponding file path and file name in the field
Export client data to file.
figure 47
figure 46
Remark:
Please be aware that importing client data is only
After you have selected at least one entry the export
possible with the identical version of the Import/
process can be started by pressing the Export button.
Export tool that you used for exporting the client
In a subsequent step, the type of export has to be
data. The client database is not backwards compatible
defined:
to earlier versions of Connexx.
Export data for standalone use: SHS compatible data
will be exported. NOAH import is not possible with this
format.
Fitting Assistant
Export data for use in NOAH: NOAH compatible data
In addition to the information found in this Programming
will be exported. Your NOAH user ID has to be entered.
Guide, the Fitting Assistant available in the Symfit
software (figure 48) provides fitting and troubleshooting
Importing client data
suggestions. Start the assistant by selecting Fitting
Client data can be added to the database via the
Assistant from the Fitting menu.
import function (figure 47) by clicking on Import client
data from file, navigating to the file’s location, and
selecting the appropriate file. The Client database
Test settings
location displays the database to which the new data
Besides the Vibrogram settings, two other test settings
will be added.
can be useful for the fitting session.
If an NHA file is selected the whole list of clients, which
They can be selected via Fitting → Test Settings in
will be added by the import process, is shown in the
the menu.
list field. Click the Import button to start the import
process.
36
however the fitting in the Amadé remains unchanged.
Tones can now be presented to the user to do a
loudness scaling.
figure 48
Loudness Scaling
figure 49
(available for the Soundbridge Amadé)
This test setting can be used in order to assess if the
Full on gain setting
fitting is appropriate in a way that e.g. 65 dB input
This test setting sets the gain in the Amadé to the
sounds have equal loudness over the whole frequency
maximum value.
range. Activating the test setting Loudness Scaling
(figure 49) activates the table in the Vibrogram tab
37
XII. Further Information
If you need assistance regarding the Connexx Software,
please refer to the Connexx Help via Help → Connexx
Help or simply by pressing F1 on your keyboard.
If you need any further information regarding the
fitting of the Amadé, please refer to the Instructions
for Use (IFU).
For further information on our products, please visit
the MED-EL website:
www.medel.com
or contact us via email:
[email protected]
38
VIBRANT MED-EL
Hearing Technology GmbH
Fürstenweg 77
6020 Innsbruck, Austria
Tel: +43-512-28 88 89
[email protected]
28274 3.0
medel.com/pro