1
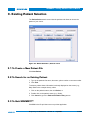
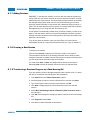
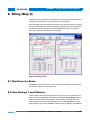
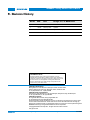
SOUNDFIT™
Fitting Software User’s Manual
Information Note
Proprietary and Confidential
32136 - 3
July 2006
1 of 21
SOUNDFIT™ Fitting Software User’s Manual
Contents
1. Basic Software Operation Overview .........................................................................4
2. Installation .................................................................................................................5
2.1 Minimum System Requirements .....................................................................5
3. Existing Patient Selection..........................................................................................6
3.1 To Create a New Patient File ..........................................................................6
3.2 To Search for an Existing Patient ...................................................................6
3.3 To Quit SOUNDFIT™ .....................................................................................6
4. Patient Data Entry (Step 1) .......................................................................................7
4.1 Entering Patient Information and Audiogram ..................................................7
4.1.1 Adding Sessions ....................................................................................8
4.1.2 Creating a New Session ........................................................................8
4.1.3 Transferring a Previous Program to a New Hearing Aid........................8
4.1.4 Viewing Previous Sessions....................................................................9
4.1.5 Deleting Sessions ..................................................................................9
4.1.6 Proceed to the Device Selection Step ...................................................9
5. Device Selection (Step 2)........................................................................................10
5.1 Select Instrument ..........................................................................................10
5.2 Read/Detect Instrument ................................................................................11
5.3 View Instrument Information .........................................................................11
5.4 Proceed to the Fitting Screen Step ...............................................................11
6. Fitting (Step 3).........................................................................................................12
6.1 Read From the Device ..................................................................................12
6.2 View Settings 1 and 2 Buttons ......................................................................12
6.3 Autofit ............................................................................................................13
6.4 Manual Adjustments .....................................................................................13
6.5 Reset the Device ...........................................................................................13
6.6 ANSI Mode ....................................................................................................13
6.7 Program the Device ......................................................................................14
6.8 Notes .............................................................................................................14
7. Buttons ....................................................................................................................15
8. Appendix: SOUNDFIT Quick Reference Guide ......................................................16
8.1 I/O Tab ..........................................................................................................16
8.1.1 Lower Threshold ..................................................................................16
8.1.2 Compression Ratio ..............................................................................16
8.1.3 Gain .....................................................................................................17
8.1.4 AGCo ...................................................................................................17
8.2 Response Tab ...............................................................................................17
8.2.1 Low Cut................................................................................................17
8.2.2 High Cut...............................................................................................18
8.2.3 Crossover Frequencies........................................................................18
Proprietary and Confidential
32136 - 3
July 2006
2 of 21
SOUNDFIT™ Fitting Software User’s Manual
8.3 Graphic EQ Tab ............................................................................................18
8.3.1 Graphic Equalizer ................................................................................18
8.4 Adaptive Tab .................................................................................................19
8.4.1 Feedback Canceller .............................................................................19
8.4.2 Noise Reduction ..................................................................................20
9. Revision History ......................................................................................................21
Proprietary and Confidential
32136 - 3
July 2006
3 of 21
SOUNDFIT™ Fitting Software User’s Manual
1. Basic Software Operation Overview
SOUNDFIT™ is an easy-to-use hearing aid fitting software application.
SOUNDFIT™’s interface consists of three steps, each serving a major task:
Patient Information Entry
•
Create a record for a new patient.
•
Select an existing patient.
•
Record personal information about the patient such as name, address, etc.
•
Record the Audiogram(s) for the patient.
Hearing Aid Selection
•
Simulate various hearing aid fittings for the hearing loss shown on the
audiogram, or,
•
Read and identify a hearing aid connected to the programming box.
Fitting
•
Manually or automatically (using Autofit) configure the connected device to
provide suitable gain for the hearing loss described in the audiogram.
Proprietary and Confidential
32136 - 3
July 2006
4 of 21
SOUNDFIT™ Fitting Software User’s Manual
2. Installation
To install SOUNDFIT™:
1. Run the installer. If installing from CD, insert the CD into your computer to
launch the installer. If you download SOUNDFIT™, double click the file that
you downloaded, to launch the installer.
2. Specify a destination directory when prompted. You may accept the default or
change to your desired location.
The installation places an icon in the programs area of the Start menu as well as
on your desktop.
2.1 Minimum System Requirements
To run SOUNDFIT™, you must have the following computer and interface
capability:
•
A Pentium class computer.
•
Video resolution of 800x600 or greater.
•
Minimum 256 Colour Video Adapter.
•
Windows 95 or more recent.
•
A programming device (such as the Gennum USB Programmer).
The software interfaces to Gennum’s VENTURE™, FOUNDATION™ or DUET™
based hearing aids.
Proprietary and Confidential
32136 - 3
July 2006
5 of 21
SOUNDFIT™ Fitting Software User’s Manual
3. Existing Patient Selection
The Patient Select search screen lists the patients and allows to choose the
patient of your choice.
Figure 3-1: Patient Selection / Search screen
3.1 To Create a New Patient File
Click New Patient.
3.2 To Search for an Existing Patient
1. Type in the patient's first name, last name, phone number or account number
2. Click Find.
To select a patient whose information is already displayed on the screen (e.g.,
Mary Smith in the example above), either:
1. Click on the patient's name, then click Select, or
2. Double click on the patient's name (e.g., Smith).
3. Click Cancel to go to the Patient Information Entry screen.
3.3 To Quit SOUNDFIT™
Click Exit in the file pull down menu to quit the application.
Proprietary and Confidential
32136 - 3
July 2006
6 of 21
SOUNDFIT™ Fitting Software User’s Manual
4. Patient Data Entry (Step 1)
Figure 4-1: Patient data entry screen
4.1 Entering Patient Information and Audiogram
You may add or change SOUNDFIT patient information by typing the information
into the fields provided.
Enter audiometric thresholds by clicking your mouse at the intensity and frequency
on the graph area. Thresholds for the right ear appear in red, while thresholds for
the left ear appear in blue.
Note:
•
If no thresholds are entered for 125Hz or 8000Hz, SOUNDFIT will assume a
value of 0dB.
•
Unmasked bone conduction (BC) can be entered for reference, but are not
used by the Autofit routine.
You can copy the audiogram from the right ear to the left by clicking Copy in the
audiogram area.
Proprietary and Confidential
32136 - 3
July 2006
7 of 21
SOUNDFIT™ Fitting Software User’s Manual
4.1.1 Adding Sessions
SOUNDFIT™ uses the term ‘session’ to refer to each visit made by a patient (or
client). Each time you Save a record of the visit it is stored as a session. A single
patient may have many sessions. This functionality provides a means of recording
the changes and progress made over time, as well as allowing you to access
previously saved information. Every session has a date/time stamp as well as a
name. You can name the session as you prefer. For example Initial Visit, Fitting #2,
Reprogramming, Fine Tuning and One-Year Follow-up, etc.
A new session is automatically created when you select a patient or create a new
patient. This new session will not be saved to the database until Save is clicked.
Clicking Save also closes the current working session and any further edits will be
applied to a new session.
If you do not name the session, when you select Save your current work is
automatically stored as a copy of the selected session (eg. ‘Copy of: Session 1’).
4.1.2 Creating a New Session
To create a new session:
Click the copy Session (located in the Tool bar) to create a new session.
This new session still has all of the existing information but the ability to make
changes as required is available. Be sure to give each new session a name so that
you can easily find the information that you need later.
You must either Save or Undo any changes before starting a new session.
Selecting Undo removes all changes from the last time you selected Save.
4.1.3 Transferring a Previous Program to a New Hearing Aid
If you are replacing a lost or damaged hearing aid with a similar circuit. To detect
the device, connect the new hearing aid to the programmer.
1. Click Session from the Patient Information window.
2. Select the date you want to retrieve information from and then click Next.
3. Type a new session name for today’s work and then click OK.
4. Click Next to display target curve and instruments used in the selected
session.
5. Select Work with Settings Stored in Database (differ from those read) in
the check box.
6. Click OK which displays the settings you want to transfer into the new hearing
aid.
7. Click Program and then Save.
8. Click Save to retain information in this session.
Proprietary and Confidential
32136 - 3
July 2006
8 of 21
SOUNDFIT™ Fitting Software User’s Manual
4.1.4 Viewing Previous Sessions
A previous session can be viewed but not edited. To view a previous session, click
the Session Date box and select the session that you would like to view. If you wish
to use this session as a starting point for a new session, click Session or Next from
the tool bar. Then, a prompt asks you for a new session name.
4.1.5 Deleting Sessions
To delete the currently selected session from the database:
Click Delete Session. If all sessions have been deleted, clicking Delete Session
one more time gives you the option to delete the patient from the database.
4.1.6 Proceed to the Device Selection Step
Click Next.
Proprietary and Confidential
32136 - 3
July 2006
9 of 21
SOUNDFIT™ Fitting Software User’s Manual
5. Device Selection (Step 2)
This step identifies the hearing aids connected to the programmer and / or allows
you to select a model for simulation.
Upon entering this step from the Patient Information window, the software attempts
to discover which instruments are currently connected to the programmer.
If the software detects that the device(s) which are currently connected do not
match those recorded in the currently selected session, a dialog box will be
displayed providing an option to correct the difference (Retry), or use the currently
connected devices, or maintain the selections in the database. If the selected
devices do not match the connected devices, the software will operate in
Simulation mode and no communication with the hearing aids will be permitted.
5.1 Select Instrument
Select the product from the drop-down list.
Figure 5-1: Device Selection screen
Note: Devices can be manually selected using the drop down boxes labelled Select
Instrument. Manual selection of the hearing aids forces the software to work in
Simulation Mode for that ear.
Proprietary and Confidential
32136 - 3
July 2006
10 of 21
SOUNDFIT™ Fitting Software User’s Manual
5.2 Read/Detect Instrument
If you connect your hearing aids during the patient information window you should
already be in programming mode.
Otherwise, select Read to automatically search the interface box(es) to identify
products connected.
Note: You can specify which programmer to use to communicate with the hearing
aid(s) by clicking the Tools menu item followed by Options. This allows you to
specify the default programmer to use or to return to Auto Select mode, which
searches through all of the installed programmers to find a connected hearing aid.
The default behaviour of SOUNDFIT is Auto Select.
5.3 View Instrument Information
On the Device Selection screen, below the selected instrument, you see a sample
photo of the selected instrument.
Beside the sample photo of the device, there is a display of the recommended
fitting range of the selected device. If the audiogram curve rests within the shaded
area, the device is suitable for the patient's hearing loss.
Below the graph and photo of the device, the selected instrument’s Model name,
Output, Gain and a short product description are displayed.
5.4 Proceed to the Fitting Screen Step
Once the device(s) have been selected, click Next to begin the fitting process.
Proprietary and Confidential
32136 - 3
July 2006
11 of 21
SOUNDFIT™ Fitting Software User’s Manual
6. Fitting (Step 3)
The fitting screen provides the necessary tools to fit the hearing aid to the patient's
hearing loss. The fitting can be done manually or automatically.
Upon entering this step, the software reads the current settings from the connected
device(s). If the data that is read from the hearing aids does not match the data that
was stored during the selected session (if applicable), a dialog box appears to
allow you to choose which data to initially display.
Figure 6-1: Fitting screen
6.1 Read From the Device
Click Read to set the on-screen controls to the actual settings currently stored in
all memories, within all connected devices..
6.2 View Settings 1 and 2 Buttons
These buttons provide temporary storage area where two sets of parameters for
each ear can be manipulated. Selecting the appropriate View Settings button for
each ear will make these settings active. These settings are initially set to the
values read from the device upon entering this step. Click Program to burn the
active settings to the device and Save to store the active settings to the database.
Proprietary and Confidential
32136 - 3
July 2006
12 of 21
SOUNDFIT™ Fitting Software User’s Manual
6.3 Autofit
Click Autofit to automatically adjust the device controls for the currently displayed
memory of both ears (if applicable) to best match the target curve for the patient's
hearing loss. If the hearing aid has more than one memory, you must select each
memory and AutoFit it individually.
If you want to AutoFit one ear while you have two hearing aids connected, then
click View Settings 2 for the ear with no changes. AutoFit maintains the second
setting (temporary memory storage). Click View Settings 1 to return the Hearing
Aid to the user settings then click Program and Save.
6.4 Manual Adjustments
The controls may be manually adjusted to allow fine-tuning beyond the abilities of
the Autofit routine or you can do the full fitting by hand.
Adjusting the Graphic EQ parameters with DUET™ or VENTURE™ based
products may either be performed on the Graphic EQ tab or by dragging the green
dots shown on the graph.
Please see the Appendix for manual adjustments.
6.5 Reset the Device
If you want to return a hearing aid to its default settings (Factory built-in Hearing
Aid settings), click the menu item Tools, followed by Restore LEFT Default
Settings or Restore RIGHT Default Settings (depending on the side that you
would like to reset). This feature will set the SOUNDFIT™ parameters back to the
product default values for the currently selected memory for the selected ear.
6.6 ANSI Mode
Click Tools from this screen to provide an option to place the device into it's ANSI
test state if the ANSI definition files appropriate for the connected device(s) has
been provided by the hearing aid manufacturer.
•
Click Cancel to return to the main fitting window without making any changes
to the hearing aid
•
Click ANSI from the dialog box to place the hearing aid into it's ANSI test state
•
Click OK to reset the hearing aid to the state that it was in immediately before
starting the ANSI test and return to the main fitting window.
Proprietary and Confidential
32136 - 3
July 2006
13 of 21
SOUNDFIT™ Fitting Software User’s Manual
6.7 Program the Device
Click Program to Save the current memory in the hearing aid using the settings
specified by the on-screen controls. This stores any settings you have changed into
long-term memory.
By default, clicking Program applies the changes to the currently selected
memory. If you wish to program all memories at once, click the Tools-menu item,
then click Options. This presents a check box to allow you to program all
memories at once.
6.8 Notes
•
The Fig6 algorithm generates the target curves. Fig6 is a computer-based
approach to fitting a non-linear hearing aids that have wide dynamic range
compression (WDRC). For more information please see The Hearing Review,
November/December 1995, Vol.2, No.10, Pages 28 and 30.
•
For the response curve colour schemes see Table 6-1 below.
•
To access the user manual click Help, then select SOUNDFIT Help from
anywhere in SOUNDFIT.
•
To access information for Gennum Software Support select Help and then
About SOUNDFIT.
Table 6-1: Response Curve Colour Scheme
Red
40 dB
Blue
65 dB
Green
90 dB
Proprietary and Confidential
32136 - 3
July 2006
14 of 21
SOUNDFIT™ Fitting Software User’s Manual
7. Buttons
Previous – Return to the previous step
Next – Proceed to the next step
Save – Save any changes to the current session
Undo – Revert to the last saved condition
Copy Session – Create a new session with this patient
Copy – Copy Information from the Right side to the Left side
Mute – Turns off all output from the hearing aid
Autofit – Automatically adjusts the aid to suit the hearing loss
Read – Read all settings currently stored in the hearing aid(s)
Program – Program the current settings into the hearing aid(s).
Notes – Enter general notes for the current patient.
Print – Print a summary sheet for the selected patient
Proprietary and Confidential
32136 - 3
July 2006
15 of 21
SOUNDFIT™ Fitting Software User’s Manual
8. Appendix: SOUNDFIT Quick Reference Guide
8.1 I/O Tab
8.1.1 Lower Threshold
Use this to adjust the gain for soft sounds in CH1-CH4. The lower the number, the
more gain for soft sounds. A higher number will be more linear and give the least
amount of gain for soft sounds.
Adjustments
•
Reduce the gain for soft sounds (higher number) when the patient hears
people better from further away than from up close. Increase the gain for soft
sounds (lower number) if the patient is having trouble hearing soft voices or
from a distance.
•
Reduce the gain for high frequency soft sounds (higher number) if the aid is
feeding back.
•
Reduce the gain for soft sounds (higher number) if a previous linear user is
having difficulty adjusting to the amount of compression from a WDRC circuit.
•
Reduce the gain for soft sounds (higher number) if the hearing aid cuts out
when the patient speaks. It could be that the kneepoint is low enough that the
patient’s own voice is triggering compression.
8.1.2 Compression Ratio
Determines how much the signal will be compressed once the incoming signal is
loud enough to cause compression to occur (after the lower threshold value). This
helps to restore non-linearity and dynamic range (normally 95dB range). Offers
relatively distortion-free listening under saturated conditions and reduces the need
for user adjustment of the volume control.
Adjustments
High compression ratios are typical for patients with a narrow dynamic range, while
low compression ratios are typical for large dynamic ranges. The required
compression ratio = normal dynamic range (eg. 95)/impaired dynamic range (eg.
55) = 1:1.7.
Proprietary and Confidential
32136 - 3
July 2006
16 of 21
SOUNDFIT™ Fitting Software User’s Manual
8.1.3 Gain
Vertical slider that allows a change to the overall gain setting. The top position
corresponds to the maximum gain setting of the aid and the bottom position
corresponds to the minimum gain setting.
Adjustments
When the hearing aid has a volume control, gain should be set so that there is
reserve gain left on the volume control. Typically, gain would be programmed so
that the patient could use the hearing aid with the volume control set to either ½ (¾
- max) so there is reserve gain left in the instrument.
8.1.4 AGCo
This vertical slider allows changes in the level of output for very loud sounds. It is
designed to prevent the hearing aid from saturating and provides protection from
the loud sounds. This should be usually set at a few dB below the patient’s upper
limit of comfort.
Adjustments
Reduce the AGCo to decrease the gain for loud sounds.
8.2 Response Tab
8.2.1 Low Cut
This is an adjustable corner frequency below which the low cut is active.
Adjustments
•
Raise the corner frequency to provide more cut to the low frequencies.
•
Reduce low frequencies when the patient’s own voice is too loud, hollow or
muffled, traffic noise or air conditioners and fans are too loud, clarity is poor, or
there is too much base.
•
Increase low frequencies when soft voices are difficult to hear, or when voices
sound tinny or sharp, and if the patient if having trouble getting adequate gain
before feedback.
Proprietary and Confidential
32136 - 3
July 2006
17 of 21
SOUNDFIT™ Fitting Software User’s Manual
8.2.2 High Cut
This is an adjustable corner frequency above which the high cut is active.
Adjustments
•
Lower the corner frequency to provide more cut to the high frequencies.
•
Reduce high frequencies when sounds are too tinny/sharp, or when there is
feedback.
8.2.3 Crossover Frequencies
There are displayed as vertical red (right) or blue (left) lines on the graph. On a two
channel instrument they should be set between 1000Hz and 2000Hz to separate
consonants from lower format vowels. With a 4-channel instrument, the crossover
should be distributed over the speech signal components.
Adjustments
Move the horizontal slider on the Response Tab another position for each of the
crossover controls. This can be used to help shape the frequency response.
8.3 Graphic EQ Tab
8.3.1 Graphic Equalizer
VENTURE and DUET products have a multi-band graphic equalizer. These bands
are spaced logarithmically and each one can provide gain adjustments in 1dB
increments using the vertical sliders.
Adjustments
Use these to refine the shaping of the frequency/gain response curves.
Proprietary and Confidential
32136 - 3
July 2006
18 of 21
SOUNDFIT™ Fitting Software User’s Manual
8.4 Adaptive Tab
8.4.1 Feedback Canceller
Based on a phase cancellation method, the Adaptive Feedback Canceller (AFC)
reduces acoustic feedback by forming an estimate of the hearing aid feedback
signal and then subtracting this estimate from the hearing aid input. The forward
path of the hearing aid is not affected and unlike adaptive notch filter approaches,
this does not reduce the hearing aid's gain. The AFC is based on a time-domain
model of the feedback path and reduces the risk of experiencing feedback while
wearing the hearing aid. Increased detail in the feedback path model results in
more accurate feedback estimation, less residual feedback in the hearing aid
signal and increased stable gain. The internal feedback path model contains over
40 adjustable parameters. This provides finer tuning for stable feedback paths and
rapid adjustment for dynamic feedback situations. The parameters of the internal
feedback path model are updated at a rate of several thousand times per second.
Additionally, it features rapid adjustment for dynamic feedback situations and
resistance to tonal inputs. When sustained feedback is detected, the canceller will
attack the feedback signal. If a tonal input signal is detected, the feedback
canceller is disabled to prevent cancellation or distortion of the incoming tone. This
detection process occurs continuously, automatically and rapidly whenever the
feedback canceller is enabled.
Adjustments
Check box to indicate that feedback canceller is to be activated. Once it is activated
the operation is completely automatic. Changes in the feedback path are
adaptively tracked and compensated. No user adjustments or in-situ calibration is
required. Ensure that the fit of the hearing aid is adequate and that there is no
excess cerumen in the ear canal which may be the source of a fit problem.
Proprietary and Confidential
32136 - 3
July 2006
19 of 21
SOUNDFIT™ Fitting Software User’s Manual
8.4.2 Noise Reduction
The adaptive noise reduction algorithm is built upon a high resolution 128-band
filter bank enabling precise removal of noise. It monitors the signal and noise
activities in these bands, and imposes a carefully calculated attenuation gain
independently in each of the 128 bands. Below the kneepoint, compression is 1:2
or 1:3. This reduces microphone and circuit noise and is of benefit to patients with
normal hearing in the low frequencies. Noise reduction is determined by a
combination of three factors:
•
The SNR in each band determines the maximum amount of attenuation that
will be applied to the band; the poorer the SNR, the greater the amount of
attenuation.
•
Simultaneously, in each band, the masking threshold variations resulting from
the energy in other adjacent bands is taken into account.
•
Finally, the noise reduction gain is adjusted to take advantage of the natural
masking of 'noisy' bands by speech bands over time.
Based on this approach, only enough attenuation is applied to bring the energy in
each 'noisy' band to just below the masking threshold. This prevents excessive
amounts of attenuation from being applied and thereby reduces unwanted
artifacts.
Adjustments
Move the horizontal slider to reduce the perceived noise by up to 12dB.
Proprietary and Confidential
32136 - 3
July 2006
20 of 21
SOUNDFIT™ Fitting Software User’s Manual
9. Revision History
Version
ECR
Date
Changes and / or Modifications
0
134053
June 2004
New document.
1
135909
February 2005
Updates.
2
140371
June 2006
Updates reflecting 2.3.0 software release.
3
141348
July 2006
Adjust software release number.
DOCUMENT IDENTIFICATION
INFORMATION NOTE
Information relating to this product and the application or design
described herein is believed to be reliable, however such information is
provided as a guide only and Gennum assumes no liability for any errors
in this document, or for the application or design described herein.
Gennum reserves the right to make changes to the product or this
document at any time without notice.
GENNUM CORPORATION
Mailing Address: P.O. Box 489, Stn. A, Burlington, Ontario, Canada L7R 3Y3
Shipping Address: 970 Fraser Drive, Burlington, Ontario, Canada L7L 5P5
Tel. +1 (905) 632-2996 Fax. +1 (905) 632-5946
GENNUM JAPAN CORPORATION
Shinjuku Green Tower Building 27F, 6-14-1, Nishi Shinjuku, Shinjuku-ku, Tokyo, 160-0023 Japan
Tel. +81 (03) 3349-5501, Fax. +81 (03) 3349-5505
GENNUM UK LIMITED
25 Long Garden Walk, Farnham, Surrey, England GU9 7HX
Tel. +44 (0)1252 747 000 Fax +44 (0)1252 726 523
Gennum Corporation assumes no liability for any errors or omissions in this document, or for the use of the
circuits or devices described herein. The sale of the circuit or device described herein does not imply any
patent license, and Gennum makes no representation that the circuit or device is free from patent infringement.
GENNUM and the G logo are registered trademarks of Gennum Corporation.
© Copyright 2004 Gennum Corporation. All rights reserved. Printed in Canada.
www.gennum.com
Proprietary and Confidential
32136 - 3
21
July 2006
21 of 21