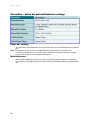
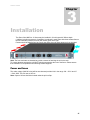
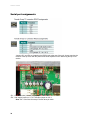
1
SIERRA VIDEO Sierra View MADI-XX User’s Manual SIERRA VIDEO SIERRA VIEW MADI-XX User’s Manual Sierra Video P.O. Box 2462 Grass Valley, CA 95945 Tel: (530) 478-1000 Fax: (530) 478-1105 Email: [email protected] Version 2.0 Publication Date: February 2012 The information contained in this manual is subject to change by Sierra Video SIERRA VIDEO Table of Contents Introduction 1 MADI-xx Expansion Slots 2 Powerful alarms 3 Remote control, monitoring and configuration scheduling 4 Main features 5 The on-screen display 6 Bargraph scales 7 Alarm indicators 8 Network requirements 8 Level and alarm streams 8 Audio streaming 9 Operation 11 Operating modes 11 Normal mode 11 Menu mode 11 Control button summary 12 Menu Commands 13 Menu Navigation 13 Scales – analog and digital scale types, reference value and colors 13 Bargraph scales 14 Analog and digital scale references 14 Level Bars – bar and label settings 15 Meter Rows 16 Ranges and colors 16 Bar labels 16 Peak hold indicators 16 Bar width, position and spacing 16 Analog and digital groups 17 Phase Bars – phase bar and multi-indicator settings 18 Phase bar settings 18 Multi-indicators 18 Alarms configuration 19 Alarms 20 Anti-phase alarm 20 Resetting alarms 20 Using ALARM-xx frames 20 Network Settings 20 System – user config, IP settings, matrix setup, audio mon, screen resolution 21 User configuration Network Settings Matrix setup Using the on-screen matrix mimic Audio monitor assign Audio network stream Screen resolution Align monitor size/position About – Firmware and installed cards Firmware Input card type Installation 22 22 23 23 24 24 24 24 25 25 25 27 Power and fuses Health and safety considerations Disposal Input card configurations Connector I/O Removing the top cover Serial port assignments Audio I/O connector pin assignments Supplied accessories Options Upgrading firmware Using SOFT-xx CONFIG-xx DISPLAY-xx Installation Guide System requirements Initial Setup Troubleshooting 27 28 28 29 29 29 30 31 33 33 34 35 36 36 38 38 39 41 Sample problems and their solutions 41 Specifications 45 Warranty 47 Contents - 1 SIERRA VIDEO 1 Chapter Introduction The Sierra View MADI-xx is a 128 x 128 channel MADI router with integral multi-channel audio metering and signal fault alarms for up to 128 channels. It is designed for live sound theatres, concert halls, radio and TV and is supplied as a 1U rack mounting frame. 1 SIERRA VIDEO MADI-xx Expansion Slots It has two slots for optional external audio expansion using 32 channel analog or AES/EBU I/O cards. When fully expanded, the total usable matrix size is 192 x 128 (two I/P cards), 128 x 192 (2 O/P cards) or 160x160 (1 I/P card and 1 O/P card). Any of the MADI inputs or analog or AES/EBU inputs or outputs (on a fully equipped frame) can be converted to any of the three supported formats. In addition, the MADI stream can be tapped into to break out up to 16 pairs of analog or AES/EBU audio for external processing. The processed audio can then be fed back into the MADI stream. All audio level and alarm data can be viewed on a local display and streamed via a TCP/IP network for remote visual monitoring. Monitored parameters include audio level, audio-loss, carrier-loss (when using AES/EBU inputs) over-level and sustained anti-phase between assigned channel pairs. Six industry standard audio meter types are supported and each meter can have its own range colors, break points and reference level and a choice of peak hold and phase correlation functions. 2 MADI-XX An on-screen menu provides access to all parameters. Up to four pairs of audio channels can be selected for audible monitoring. These can be streamed over the TCP/IP network and are available in both analog and AES/EBU format via an optional monitor output card. Powerful alarms Alarm settings and thresholds can be set independently for each channel or pair of channels. This allows different alarm configurations for different programming such as pop, classical music, news, sport, movies and drama. Not only does this significantly reduce the occurrence of false alarms, but the entire gamut of MADI-xx settings, including alarm settings, meter types and colors, can be scheduled to change over a 24 hour period using optional SOFT-xx PC software. 3 SIERRA VIDEO Remote control, monitoring and configuration scheduling Although the MADI-xx is designed to be used as a stand-alone monitor it may also be used with control and monitoring software to monitor and configure multiple units over a network. The optional Windows PC software (SOFT-xx) provides multiple frame integration, automated control, event logging, configuration scheduling, real time diagnostics and unlimited user setups. It also acts as a desktop meter bridge by rendering analog and digital audio meters and alarms to screen for multiple frames. Channels can be named for ease of use and associated with alarms and analog or digital meters as required. Other optional networked monitor accessories are available to further enhance the monitoring of multiple audio streams in multi-channel control rooms. For example, the ALARMS-xx remote alarm reads up to 32 channels of alarm data from a single MADI-xx or AM-xx frame. The unit has front panel LED indicators which show each type of alarm condition for each channel. ALARM-xx units may be easily cascaded to monitor more channels. REMOTE-xx is a 1U hard wired remote control panel which replicates the front panel keys to allow MADI-xx or AM-xx to be mounted away from the main operational position. Both REMOTE-xx and ALARMS-xx can be connected via LAN or RS422. Audio level and alarm data may also be distributed over a LAN to other devices that can render audio meter bargraphs and alarm status information to screen and the protocol used is available by request. Available accessories include audio input breakout cables for converting from XLRs (or BNCs in the case of unbalanced AES/EBU) to 25 way and 37 way D connectors. 4 MADI-XX Main features 92x192 router allows any input to be switched to any output 2 x Coaxial & 2 x Optical 64 channel MADI interfaces for 128 MADI channels Optional external 32 channel audio I/O interface cards Optional SOFT-XX control, source/bar labeling, monitoring and configuration scheduling software for use with multiple units over LAN DVI-I graphical output for audio metering and system menu Optional audible monitor output card for 4 analog and digital pairs from any source Audio streaming for up to 4 channel pairs via TCP/IP DIN PPM, BBC PPM, NORDIC PPM, VU, VU EXTENDED, AES/EBU scale types each with their own ballistics, range colors, break points and level reference On-screen bargraphs may be grouped according to signal type or manually assigned to sources irrespective of signal format Sources can be named with up to 16 alpha-numeric characters Per channel alarms for audio carrier loss, over and under level & anti-phase Phase bar assignable to any channel pair On-screen menu for unit configuration 1U rack-mountable Keyboard socket for custom labels Works with optional dedicated hardware monitoring units Available accessories include audio I/P breakout cables to XLR / BNC 5 SIERRA VIDEO The on-screen display The MADI-xx meter/alarm display provides a visual status display of up to 128 channels in two rows of 64 channels each. Each row can be assigned to display MADI input 1 or 2, or the input External bus. If the second row is set to Off, the first row is rescaled to fill the screen. The MADI-xx Meter/Alarm Display – default colors and break points Break points and colors used for the upper and lower ranges of each bar type can be customized to satisfy any in-house monitoring style for each of the six scale types. 6 MADI-XX Bargraph scales The following audio scales are supported: Note: Each bar type can have different range colors, break points and level reference. Where optional external audio cards are installed and preferences for different scale types has been detected, external channels are placed automatically into two groups according to signal type. This is dealt with in detail in the Analog and digital groups section in the Operation chapter. 7 SIERRA VIDEO Alarm indicators Flashing mini-alarms can be assigned to the bargraphs for under-level, over-level, anti-phase and no-carrier (AES only). The colors used are as follows: ・ Audio Loss: Yellow – position (left or right) indicates channel ・ Audio Over: Red – position (left or right) indicates channel ・ Anti-Phase: Cyan – middle alarm ・ Carrier Loss: White – middle alarm If carrier loss occurs only that alarm will flash, unless audio loss had already been active for the same channel. Note: There are also mini-phase bars which can be turned on for each bar. The colors for in-phase and out-of-phase are customizable. Network requirements There are many ways networks can be configured and a hard and fast rule is hard to make as both latency and bandwidth will affect operation. Bandwidth requirements can be calculated from are the sum of the alarm and level data together with any streamed audio monitoring feeds. A MADI-xx frame being monitored by SOFT-xx will require up to 455kbps at startup assuming one monitoring application and no streamed audio. Further monitoring applications will require up to 370kbps each. Streamed audio bandwidth is dependent on monitoring audio quality and the number of stereo pairs being monitored. Full bandwidth quality requires 1.6Mbps for each stereo pair so the maximum bandwidth needed for four stereo pairs would be 6.4 Mbps. This figure must be added to the bandwidth needed for all of the Monitoring applications expected to be active at one time. The next section discusses bandwidth requirements in more detail: Level and alarm streams Level and alarm streams use unicasting for every monitoring session invoked. When the SOFT-xx starts it will establish one stream for a connected MADI-xx frame at 455kbps, which is the sum of the two streams. The alarm only stream is used for logging in the configuration application (CONFIG-xx) and the other stream is used for a single monitoring application (DISPLAY-xx). Each monitoring station requires a stream at 370kbps for level and alarm data. 8 MADI-XX Audio streaming Audio streaming bandwidth is directly proportional to the number of audio pairs streamed and the quality levels used: Network bit-rate does not change when multiple stations are listening to the same stream since multicasting is used for each stereo pair. 9 SIERRA VIDEO 2 Chapter Operation The front panel user interface consists of 6 buttons. The functions assigned to control buttons depend on the mode selected. Operating modes Normal or ‘locked’ mode is the normal operating mode. Configuration or ‘menu’ mode provides access to configuration menus. Normal mode In normal use, the configuration menu will be locked to prevent inadvertent operation and configuration menus are not available. The main ‘normal’ mode controls are as follows: Select Parameter buttons move channel-select cursor to select phase bar source Lock button resets the peak hold indicators when pressed briefly Lock button enters ‘menu’ mode when held down for about three seconds Menu mode To enter menu mode from normal mode (with the red Lock LED off) hold the Lock button down for about 3 seconds. The configuration or ‘menu’ mode will be entered, on-screen menus will appear and the red Lock LED will illuminate. If the Lock button is held down again, any changed settings will be saved and the MADI-XX will return to normal meter mode. The menu mode will return to the last menu item visited provided the unit has not been reset or switched off since a configuration menu was last accessed. The main ‘menu’ mode controls are as follows: Function scrolls menu cursor up and down to select function Select Parameter keys (<>) selects settings to apply to chosen parameter; also selects main menu when menu name is highlighted Insert On + Select Parameter (INS + <>) selects main menu page Insert On + Lock confirms action in some menus Lock button leaves ‘menu’ mode and saves settings when held down for about three seconds 11 SIERRA VIDEO Control button summary The 6 menu buttons are assigned functions as follows: Note: Factory reset may be applied by holding down the Function/Fade buttons whilst performing a power cycle – see the Trouble Shooting for further details. 12 MADI-XX Menu Commands The menu or configuration mode is entered by holding the Lock button down for three seconds. This will allow configuration menus to be accessed. Menu Navigation ←→ Select submenu when menu name highlighted or change Parameter value within menu ↑↓ Select item in menus and sub-menus LOCK Press Lock (briefly) to return to main menu from sub-menu Press Lock for more than 3 seconds to leave menu system INS + ← → Move to another main menu Scales – analog and digital scale types, reference value and colors 13 SIERRA VIDEO Bargraph scales Standard scales and their corresponding ballistics may be selected. These may be positioned to the left, right or both sides of the relevant bargraphs or turned off. Analog and digital scale references The AES/EBU scale is designed for use with digital audio. Analog scales can be used for AES/EBU channels, (and AES/EBU scales may be used for analog channels) but the default normal and upper range settings are re-scaled. 14 MADI-XX Level Bars – bar and label settings 15 SIERRA VIDEO Meter Rows Two 64 channel bargraph rows are supported which can be assigned to either MADI input or output or either the I/P or O/P expansion bus. If the second row is turned off, the first row is scaled to fill the screen. Ranges and colors Each bargraph may be split into three different colored sections, over-range, upper-range and lower-range. The break points can be chosen for groups of 2/4/8/16 or 32 bars or for all bars or for an individual bar (by selecting a specific bar in the break point sub-menu). Upper and lower analog bar range points may be set between -30 and 12 dB in 1 dB steps. The digital upper range points may be set between -30 and 0 dB in 1 dB steps. The digital lower range point may be set between -50 and -10dB in 1dB steps. Note: If only one or two colors for each bargraph are preferred, then the upper and lower range points may be set to an equal level or changed to the same color. Bar labels In default mode channels are labeled numerically. Labels of up to 16 characters long may be created either by using a keyboard attached to the PS2 socket on the front of the unit or by using the SOFT-xx Configuration and Monitoring software. If a keyboard is connected into the front of the unit, keyboard mode will be available when Labels is selected. The attached keyboard can then be used to enter text directly at the cursor position which will initially be below the first left hand bar on the screen. Customized labels up to 16 characters long can be entered. Use the up/down keys to change character position, the delete and backspace keys to change text and the keyboard left and right keys to move to another bar. Note: The US keyboard layout is used. Labels may be in one of the following formats: Text, Rotated Text, Numeric, Rotated Numeric and Off. The label color may be any named color available. These choices affect all labels. Peak hold indicators Peak hold indicators are provided for all channels. The delay time before decay may be set according to requirements and includes an ‘infinite’ setting which indicates the maximum level attained over any period of time until it is reset. This is carried out by briefly pressing the ‘Lock’ button when in the normal operating mode. Peak Hold color may be any named color available. Bar width, position and spacing Bar width can be adjusted for all bars or for selected bars. If it is adjusted for all bars the effect will be to scale all the bars horizontally on the display. Bargraphs spacing may be adjusted between all Left and Right bars and for spacing between all L/R pairs and between selected bar pairs. Width and spacing is adjusted in pixels. All bars may also be adjusted together for horizontal and vertical position. There is no horizontal/vertical setting for individual bars. 16 MADI-XX Analog and digital groups When digital and/or analog input cards are installed, the external input bus may be assigned to the upper and/or lower bargraph rows for monitoring. Bar groups are automatically created based on the following rules: With 2 analog input cards and a row selected as EXTERNAL IN, the meter scale for analog signals is used for all 64 channels in that row. With 1 analog input card (no second card) and a row selected as EXTERNAL IN, the meter scale for analog signals is used but only 32 bars will be shown for that row. With 1 analog input card and 1 digital input card, and a row selected as EXTERNAL IN, the row will be split into 2 groups. If the first external input card is analog then the first group will show the scale selected for analog and meter the analog channels. The second group will show the scale selected for digital and meter the digital channels. The opposite applies if the first external card is digital. With 2 digital input cards and a row selected as EXTERNAL IN, the scale chosen as the digital scale is always used. Where ‘analog’ and ‘digital’ groups have been automatically created, the gap between the groups can be controlled using Group Spacing from 0 to 100 pixels. Tip: The scale assigned to a group can be any of the supported scales and need not necessarily match the signal type. Note: The scale for MADI out is always that chosen for digital signals, regardless of whether MADI sources are selected from an analog input card or not. 17 SIERRA VIDEO Phase Bars – phase bar and multi-indicator settings Phase bar settings The phase bar can be positioned at the top or bottom of the screen and assigned to any channel pair. Note: The assigned channel pair will be highlighted during selection from the on-screen mimic. It can also be assigned to the on-screen cursor controlled by the Select Parameter Left/Right keys, so that moving the cursor assigns the phase bar. Multi-indicators Multi-indicators appear above each pair of bars but below any alarm indicators. In Phase and Out of Phase color assignments are the same for both multi-indicators and the assignable phase bar. 18 MADI-XX Alarms configuration 19 SIERRA VIDEO Alarms Alarms may be enabled per channel for audio-loss and over-level. Alarms may be enabled per channel pair for anti-phase and carrier-loss (AES/EBU inputs only). Thresholds and timeouts are adjustable for each alarm type for both digital and analog bar types. An alarm condition is provided in the form of flashing colored rectangles situated at the top of the respective bargraphs. Refer to the On-screen alarms and phase indicators section for further details. Anti-phase alarm The anti-phase alarm threshold can be set for any negative value or any value less than -0.5. The later setting may be preferred to reduce unwanted anti-phase alarms, since most audio signals may cause negative indications. Resetting alarms Alarm indication normally persists even though the underlying condition that triggered the alarm is no longer present. To ensure that outdated alarms are removed, the Alarm Auto Reset function forces all active alarms off after an adjustable period of time. Any alarm conditions that are still present will then re-trigger the appropriate alarm. Using ALARM-xx frames Up to four LAN connected ALARM-xx frames may be assigned using the search facility in the ALARMS-xx sub-menu. Network Settings These settings only need to be manually entered if DHCP is set to NO. This would be required for a network that uses fixed IP addresses and does not rely on a DHCP server to allocate them automatically. If DHCP is used, the settings are grayed out but should nevertheless be valid provided the DHCP server has updated the frame. Identify is the MAC address or physical address of the IP port; it is unique to the frame and cannot be changed. Tip: The IP address must be unique on the network. Please see your system administrator if these details are required. 20 MADI-XX System – user config, IP settings, matrix setup, audio mon, screen resolution 21 SIERRA VIDEO User configuration The MADI-xx has four user memories, USER 1, USER 2, USER 3 and USER 4. Settings can be copied from one user to the other and further changes can be made before saving. Any changes made are saved automatically when exiting the menu by briefly pressing the ‘Lock’ button, whichever User is selected. Note: A separate set of channel labels may be saved for both User 1 and User 2 memories. Applying ‘Reset User n’ returns the settings of user ‘n’ memory to the factory default. Factory defaults may also be applied with a Master Reset as explained in the Trouble Shooting chapter. Reset and Copy functions require the Lock and Insert On buttons to be pressed together as confirmation. Network Settings These settings only need to be manually entered if DHCP is set to NO. This would be required for a network that uses fixed IP addresses and does not rely on a DHCP server to allocate them automatically. If DHCP is used, the settings are grayed out but should nevertheless be valid provided the DHCP server has updated the frame. The MAC address is the physical address of the IP port; it is unique to the frame and cannot be changed. Tip: The IP address must be unique on the network. Please see your system administrator if these details are required. 22 MADI-XX Matrix setup Input sources may be taken from either the optical or BNC connectors for each 64 channel MADI inputs independently. Each of the three 64 output groups (MADI 1, MADI 2 and the Ext bus) of the 192x192 matrix may assigned to any of the 64 input groups; MADI I/P 1, MADI I/P 2 and the External I/P bus. Note: The same I/P may be assigned to more than one output. Tip: To assign inputs on a one-to-one basis, use one of the Reset 1:1 options. This will set channel 1 out to channel 1 in, channel 2 out to channel 2 in and so on for each matrix. Using the on-screen matrix mimic Matrix inputs may also be assigned using the two-dimensional matrix mimic. Select Reset: Show Matrix and press the Lock and Insert On buttons to display the mimic. To change a cross-point move the orange highlight cursor (at top left in the picture) to the desired location and press the Insert On button to activate. When done, press the Lock button to leave the matrix mimic screen. 23 SIERRA VIDEO Audio monitor assign There are four audio monitor output pairs available in both analog and digital form. Each of these pairs can be assigned to any available pair of audio inputs. Both analog and digital audio monitor outputs are provided, irrespective of the format of the input signal selected for monitoring. Since both output formats are derived from the same internal source, any gain applied to the signal sent to the output board will affect both sets of monitor outputs equally. The monitor output levels are subject to both the Analog/Digital Scale Reference and the Analog 0dB Reference settings in the Scales menu. The output board is hard wired so that a -24dBfs signal corresponds to 0dBu. Therefore, alternative reference settings are liable to result in audio level discrepancies at the audio monitor outputs. The Preferred Monitor Out Type setting in the System menu applies an automatic correction to either the analog or digital monitor output, so that irrespective of gain adjustments in the Scales menu, the corresponding monitor output format is maintained at the correct level. Note: Selected channels are common to analog and digital outputs and cannot be set independently. This also applies to streamed audio monitoring. Audio network stream Up to four audio network streams can be put on the network, at the bit rates shown. The URLs to use for playing back the streams are: rtsp://<ip_address>/stream1, rtsp://<ip_address>/stream2, rtsp://<ip_address>/stream3, and rtsp://<ip_address>/stream4, where ip_address is the IP address of the MADI-xx. See the Specification Chapter and FAQ for help with configuring media players and networks. Screen resolution There are currently two output resolutions supported, 1024x768 @ 60 Hz and 1280x768 @ 71.9 Hz. If a new resolution is selected it will flash red to indicate that both Lock and Insert On must be pressed together to change the output resolution. The default of 1024x768 @ 60 Hz (48.4kHz) is supported by most CRT monitors and 15/17 inch LCD monitors. The wide-screen resolution of 1280x768 @51.1 Hz may not be suitable for monitors that cannot lock to its vertical refresh rate of 51.1Hz (horizontal refresh rate of 40.6kHz). Note: An LCD monitor should always be run at its native resolution to avoid image degradation as a result of artifacts caused by the LCD's internal scaler. Align monitor size/position The white active area rectangle allows the auto-adjust feature of analog LCD panels to function properly. It may also be used as a guide for manual alignment of the attached monitor. Note: The MADI-xx front panel Left/Right keys have no function in this mode. 24 MADI-XX About – Firmware and installed cards Firmware The firmware level installed is shown for both network and controller. Input card type The type of I/O cards fitted is displayed. 25 SIERRA VIDEO 3 Chapter Installation The Sierra View MADI-xx 1U frame may be installed in 19 inch bays with 355mm depth (~400mm including connectors). Ventilation is produced in each frame with three exhaust fans on the left hand side (viewed from front) with intake grilles at the right. Frames should be installed into bays such that airflow through these apertures is not impeded. Note: The front rack ears are intended to provide a means of retaining the unit in the rack. To ensure adequate support the unit MUST also be supported at the rear of the frame. Please ensure that ventilation is not impaired when selecting suitable supports. Power and fuses The mains voltage (240/100 volts) will be auto detected provided it is in the range 100 – 250 V and 47 – 63Hz, 50W. The unit uses a 1A fuse Note: A spare 1A fuse should be located under the pull-out flap. 27 SIERRA VIDEO Health and safety considerations The Installation and Maintenance of the Sierra View MADI-xx unit and any associated equipment, must be carried out by PERSONS SUITABLY QUALIFIED to work with equipment which may be connected to the mains supply. The unit MUST BE DISCONNECTED & ISOLATED FROM THE MAINS INPUT and from other product outputs before undertaking maintenance. ELECTRIC SHOCK HAZARDS exist if conductive instruments, neck chains or fingers etc are placed within the unit or in close proximity of the input/output terminals/connectors. Incorrect installation can cause internal components to rupture and particles to be ejected from the product. TOXIC FUME HAZARDS exist if the unit is subjected to direct flames or excessive temperature of above 100 Degrees Centigrade ambient. The mounting and installation of the unit must be arranged by the user to comply with all safety regulations by the indigenous authority. Disposal Do not incinerate as explosive and toxic fume hazards exist. Disposal must be by dismantling the product to component level and disposing of each component by an approved method. 28 MADI-XX Input card configurations The MADI-xx may be fitted with up to two hot-swappable external audio I/O cards. The input cards are always installed in the two lower right hand slots (as viewed from the front). The controller card is always fitted in the top left slot and the Audio Monitor card is always fitted in the bottom left slot. Note: I/O cards are hot-swappable and may be freely inserted and removed whilst the unit is powered. Changes are normally recognized immediately; however inserting analog cards may force a system reset. This is not harmful and the inserted cards will always be recognized following a reboot. Connector I/O MADI I/O uses SC & coaxial BNCs, external audio uses female 37 way ‘D’ connectors and monitoring audio outputs use 25 way 'D’ connectors. The video sync input uses a BNC connector and all serial data connectors use 9 way ‘D’ connectors. The LAN connector is a standard RJ45 connector and video out uses a standard DVI-I Microcross connector. The USB connector is for fast data access. A PS2 connector on the front is for a keyboard. Removing the top cover Warning: To avoid dangerous electric shock, do not perform any service or make adjustments unless qualified to do so. The mains supply must be disconnected before removing any covers. To gain access to the internal pcb and associated electronics proceed as follows: ・ Disconnect the mains supply from the unit ・ Remove the screws retaining the top cover and keep them in a safe place Proceed as follows to replace the cover: ・ Replace the cover and screw firmly in position using the saved screws ・ Re-connect the mains supply to the unit 29 SIERRA VIDEO Serial port assignments Jumpers JP1 and JP2 are located on the RS232 pcb at the rear of the unit. Access requires the removal of the top cover with the power removed as explained in the 'Removing the top cover' section. JP1 – DTS/RTS select (normally no jumper) JP2 – Half duplex jumper on 1 & 2; Full duplex jumper on 2 & 3 Note: Pin 1 is the first left most pin of each three pin block. 30 MADI-XX Audio I/O connector pin assignments Analoge audio In/Out Connector type: 37 way ‘D’ female AES/EBU inputs may be jumper selected per channel to be either balanced or unbalanced. The settings are set via jumpers on each digital audio input card. 31 SIERRA VIDEO Analog audio Out connector type: 25 way “D” male 32 MADI-XX Supplied accessories Options 33 SIERRA VIDEO Upgrading firmware From time to time, MADI-xx firmware updates may be made available. These might be either for the network card, the controller card, or both. The method for uploading to the frame is the same and is easily performed using a PC connected to the MADI-xx LAN port directly, or over a network. 1) Establish communication with an MADI-xx frame to be upgraded over a network by using Windows Explorer to search for the IP address of the frame: ftp//xxx.xxx.xxx.xxx. 2) The two current firmware files should be visible; MADIXX.BIN for the MADI-xx controller firmware and madixxnet_APP.s19 for the network firmware. 3) Copy the replacement file or files to the clipboard and paste them where the original files appear. 4) The file transfer will begin. The new network firmware will take effect only after the MADI-xx has been rebooted. Note: The IP addresses of the frame and the PC must be in the same range. If necessary, the IP address of the frame can be changed within the on-screen menu (see page 18). 34 MADI-XX Using SOFT-xx SOFT-xx has been developed specifically for use with the Sierra View AM-xx and MADI-xx multichannel audio meter systems on a TCP/IP network. The main purposes of the software are: ・ The integration of up to four AM-xx and / or MADI-xx frames on a LAN ・ Remote control, audio metering and audible monitoring via LAN ・ To create, store and schedule the upload of different user configurations ・ To create a log of system events ・ Remote monitoring and reset of system alarms Operators do not need to know which frames process which MADI/audio channels as the combined system will appear as a one virtual multi-channel monitoring system. Note: The total number of channels that can be handled by SOFT-xx at any one time is 256. SOFT-xx comprises two separate applications, CONFIG-xx and DISPLAY-xx. CONFIG-xx and DISPLAY-xx are independent and may each be run on the same PC or different PCs on the same LAN, with the proviso that only one instance of CONFIG-xx can control frames at a time. 35 SIERRA VIDEO CONFIG-xx This application is the system management administrative tool. Password protection can be implemented to prevent unauthorized access. Only one instance of CONFIG-xx can be run on the same LAN at any one time. CONFIG-xx is USB dongle protected and must be run on the PC to which the dongle is connected. Configuration Files The administration tool allows many settings to be globally set for all frames or for individual frames. This is mainly accomplished by using configuration files which are maintained for each frame and can be uploaded manually or scheduled for upload at set times. A configuration file defines the essential alarm and level metering parameters that a MADIxx/ AM-xx frame will use. It covers such things as meter scales types, alarm thresholds and sensitivities and which of the available alarms can be used on a per channel basis. All of these parameters can be changed by uploading a different configuration file. Changes can also be scheduled to take place at selected times. Uploading and scheduling are restricted to users with access to the CONFIG-xx configuration application. MADI-xx/AM-xx Settings Fixed settings such as channel names, and audio formats supported by particular channels and network streaming formats are not held within a configuration file, but can nevertheless be changed by configuration level users using CONFIG-xx. DISPLAY-xx This application is used in operational areas where audio and alarm monitoring is required. It may be password protected to restrict user access. Multiple instances of DISPLAY-xx can be run simultaneously on the same LAN. DISPLAY-xx has two levels of functionality. For full operation, a dongle must be connected to the PC on which it is to be run. Full Operation (with dongle) ・ Remote alarm monitoring and reset ・ User configurable audio metering ・ Switching of MADI-xx/AM-xx frame audio monitor and audio streaming outputs Limited Operation (without dongle) ・ Remote alarm monitoring and reset DISPLAY-xx can be used independently of CONFIG-xx and can either read existing preconfigured MADI-xx/AM-xx data streams on the LAN or request it’s own stream if none are available. If no streams are available, all data will be streamed. Monitoring level data and alarms Although only CONFIG-xx has control of the configuration files, DISPLAY-xx allows a 'House Style' to be maintained for users working in similar areas by using named files to save and recall ‘style sheet’ settings. These include the colors and break points used for bargraph ranges, the number of bargraphs visible at one time in the Full Screen display, whether bargraphs or meters are used to build virtual meter bridges and whether alarms are combined with the Full Screen bargraph display or only shown in a dedicated Alarms Window. Note: Administration level users can limit the data monitored by DISPLAY-xx at selected workstations and from selected frames using CONFIG-xx, for example to only send alarm data, but not level data. 36 MADI-XX Virtual Meter Bridge Displays Parameters monitored by DISPLAY-xx can include audio level, audio-loss, carrier-loss (when using AES/EBU inputs) over-level and sustained anti-phase between assigned channel pairs. Six industry standard audio meter types are supported and each meter can have its own range colors, break points and reference level. Channel names, audio formats, alarm sensitivity and meter scale types are normally assigned using CONFIG-xx and cannot be changed from within DISPLAY-xx. A basic range of settings can be performed from the MADI-xx/AM-xx frame menu, but only CONFIG-xx allows Data and Audio stream format configuration. 37 SIERRA VIDEO Installation Guide A basic system consists of multiple MADI-xx/AM-xx frames and a single PC connected to a common LAN. The LAN may be dedicated or form part of a larger system. In the latter case, care must be taken to ensure that sufficient data capacity is available and that no conflicts are likely to be encountered with other equipment and services. The software is supplied on CD-ROM. Follow the installation wizard, which will provide the options to install either CONFIG-xx or DISPLAY-xx or both applications on the PC. A multiPC installation will typically require CONFIG-xx, and optionally, DISPLAY-xx, to be installed on one machine for use by the system administrator. Workstation PCs used for monitoring will then only required DISPLAY-xx to be installed. Reminder: Only one instance of CONFIG-xx can address the same frames on the same LAN at a time. A warning is given if an attempt is made to run a second copy of CONFIG-xx. System requirements MADI-xx/AM-xx Network: ・ 370 Kbps per monitoring station ・ 85 Kbps for logging ・ Up to 6.4 Mbps for audio streaming (at full stereo bandwidth) ・ Subnet routers must pass multi-cast packets SOFT-xx: ・ IBM compatible PC running Windows XP (Service Pack 2) ・ 700 kHz Processor Speed or greater ・ 512 Mb RAM ・ Graphics card supporting DirectX V9.0c (minimum resolution: 1024 x 768) ・ CD-ROM drive ・ Network card ・ USB port In most cases a low to medium specification computer will suffice, for example a laptop with a 700MHz processor. At install, only 20 Mbytes of disk space is needed, though more may be required if numerous logs and configuration files are maintained. A fresh install of Windows XP SP2/DirectX 9.0C is recommended. A DirectX 9.0C compatible graphics card is recommended to show the Full Screen bargraph display correctly. 38 MADI-XX Initial Setup Both CONFIG-xx and DISPLAY-xx use IP addresses to communicate with frames. If desired, IP settings can be entered directly via each MADI-xx/AM-xx on-screen menu. Alternatively, CONFIG-xx can be used to search for MADI-xx/AM-xx frames on the network by entering the Network Setup page within its Utilities menu. The current MADI-xx/AM-xx network settings can then be changed within Network Setup. MADI-xx/AM-xx frames may be addressed by CONFIG-xx by selecting the IP address of each frame in turn and adding them to the frame list. When several frames are integrated via CONFIG-xx, they will appear within both software applications as one system rather than as separate frames. For example, audio channels will appear in numerical sequence starting with channel 1 of frame 1. In a system with four fully populated AM-xx frames, channel 64 of frame 4 will appear as channel 256. Before using CONFIG-xx to edit MADI-xx/AM-xx frame settings, it is strongly recommended that all current configuration settings are saved. This can be done by allowing CONFG-xx to obtain the frame’s current settings and saving them as explained in the online help file. Use the online help facility for each application for further information. 39 SIERRA VIDEO 4 Chapter Troubleshooting The power switch should illuminate red whenever mains power is supplied. Always ensure that power is connected before using the problem solving guide. A spare fuse is supplied in space provided in the IEC mains connector before the unit leaves the factory. Always replace the fuse with one of the correct value as shown in the Installation section. Sample problems and their solutions There is no video output Check that there is power to the unit and that it is turned on Check that the video output resolution is not beyond the capability of the display (see answer to question below) An output should be seen within a few seconds of switching on The image appears fuzzy or lacking clarity If an analog or digital LCD/Plasma screen is used check that the resolution used is the same as the native resolution of the panel. This will avoid forcing the panel to rescale the image. Most panels produce artifacts when their internal scalers are active. MADI-xx output resolution is set using the Screen Resolution function under the System menu. The image is not centered in the screen Use the monitor controls to align the image. If an analog LCD screen is used use the auto-adjust facility. A screen extents rectangle can be displayed to assist manual or automatic centering via the Align Monitor Size/Pos function under the system menu. Unit fails to respond correctly to commands Power cycle the unit and/or perform a Master Reset In the unlikely event that the unit fails to respond correctly, a Master Reset may be applied to restore all settings to the factory default. Turn off the power for a few seconds, then turn it back on while pressing both Fade/Function buttons until the bargraphs appear. This may take up to ten seconds. Follow any required configuration steps after any reset. The Monitor Select Cursor cannot be seen Check that it has not been scrolled off-screen All alarms and bargraph elements turn on in menu mode This is done to allow configuration changes to be viewed immediately 41 SIERRA VIDEO Can I use analog bargraphs for digital inputs (or digital scales for analog inputs)? Yes. The range colors, break points and level references are set for the scale type and NOT the source assigned. For example assuming the following settings: - Analog scale type: AES/EBU - Analog/Digital scale reference: -18dBfs - Analog 0dB reference: 0dBu - Digital upper range point: -18dBfs - Digital lower range point: -40dBfs Feeding in analog 0dBu will produce a level of -18dBfs, with the color changes occurring at -40dBfs and -18dBfs. Changing the Analog 0dB reference to +4dBu will produce a level of -22dBfs, with the color changes unaltered. Changing the Analog/Digital reference to -20dBfs (with the anlg ref still at +4dBu) will produce a level of -24dBfs, with color changes unaltered. The same applies to displaying digital channels on an analog scale; the color changes will adhere to the analog upper and lower settings. Can bargraphs be assigned to any source and placed in any position on the screen? Yes, providing Channels are assigned to Bars manually. Refer to the Matrix Setup section of the SYSTEM menu in the Operation chapter. What are the digital and analog bar groups for? These groups reflect the two different types of external signal type; digital or analog. Rules exist to automatically create these groups according to the type of installed external input card to allow channels in the external input and output buses to be monitored effectively. The scales used depend on user preferences made in the Scales menu and need not match signal type. The rules used are explained in detail in the Analog and digital groups section of the LEVEL BARS menu in the Operation chapter. How can I force channels and bars to 1:1 correspondence so that bars are ordered from left to right to reflect the default channel numbering? This is done automatically if the 1:1 option is selected for MADI OUT 1, 2 and EXTERNAL OUT MATRIX in the Matrix Setup section of the SYSTEM menu in the Operation chapter. Can digital audio be balanced or unbalanced? Yes. AES/EBU inputs may be jumper selected per channel to be either balanced or unbalanced inputs. The settings are set via jumpers on each digital audio input card as explained in the installation section. What are the RS232 options? DTS/RTS select and half/full duplex via jumpers on the rear serial port pcb as explained in the installation section. Access to this board requires removal of the top cover with power removed. 42 MADI-XX How is audio monitoring streamed? Audio is streamed using open standard RTSP/RTCP/RTP streaming media protocols and can be played back by any compliant media player. This includes Quicktime, VLC, and MPlayer. Others, such as Microsoft Media Player and RealPlayer use their own standards and cannot be used. Any player that provides cache control, such as VLC, is good because delay can be minimised. (To minimise the delay in VLC, go to Settings > Preferences > Input / Codecs > Demuxers > RTP/RTSP. Tick the Advanced Options, and change the Caching value to 100. Anything less than this and the player may have problems playing data continuously). What are the monitor stream URLs? The URLs to use for listening to the audio monitor streams are: rtsp://<ip_address>/stream1, rtsp://<ip_address>/stream2, rtsp://<ip_address>/stream3, and rtsp://<ip_address>/stream4, where ip_address is the IP address of the frame. What is the recommended network capacity? Network capacity should be sufficient to carry the intended load. This will be the sum of level and alarm data together with any streamed audio monitoring data. The alarm and level data bandwidth required for every monitoring application is up to 370kbps. The configuration application needs alarm data at 85kbps for logging and every stereo pair streamed at full bandwidth adds 1.6Mbps. So, if there are four active monitoring stations and four full-bandwidth audio monitoring streams the required minimum bandwidth on the network will be nearly 8Mbps. Lower bit rates can be achieved with lower quality audio steams and/or less alarm or data information. See the Network Requirements section in the Introduction chapter. Note: Any routers on the subnet that the frame is connected to must allow multicasting packets to pass. 43 SIERRA VIDEO 5 Chapter Specifications Standard I/P format 2 x MADI 64 channel, coaxial & optical Optional I/P format Analog, 32 channels, +24 dB capability per card AES/EBU, balanced / unbalanced, 16 pairs per card Inputs 32/44.1/48/96 kHz. All 96kHz AES/EBU input channels are resampled at 48KHz for resynchronization with the internal clock. Standard O/P format 2 x MADI 64 channel, coaxial & optical Optional O/P format Analog, 32 channels, +20 dB capability per card AES/EBU, balanced / unbalanced, 16 pairs per card Outputs 48 kHz 24 bit Optional monitor O/P Any 4 pairs selected from any input, analog +20 dB capability and AES/EBU balanced / unbalanced, 48 kHz 24 bit. All 96kHz AES/EBU sources will be resampled to 48kHz and sent out at 48kHz). Standard MADI connectors Optical type SC & coaxial BNC Optical interface FDDI Duplex 62.5/125 & 50/125 Multimode compatible. Wavelength 1300nm. Maximum distance 2Km. Optional audio I/P connectors 4 x 37 pole, female sub-D for analog & AES-EBU Optional audio monitoring O/P connectors 1 x 25 pole, male sub-D for analog & 1 x 25 pole, male sub-D for AESEBU Reference I/P AES/EBU reference Video output DVI-I (inc. XGA) supporting 4:3 & 16:9 aspect ratios. Graphical interface firmware. Output connector: Microcross DVI-I (Digital DVI and RGBHV via adaptor) Resolutions supported XGA: 1024x768 @ 60 Hz/48kHz and 1280x768@ 51 Hz/41kHz. Data I/O RS232 or RS422: 115Kbps max. Data out, alarms out/reset, parameter read/set. USB-2: 6.144MHz max. Data out, alarms out/reset, parameter read/set. Includes up to 4 pairs compressed audio monitor data. LAN port: Data out, alarms out/reset, parameter read/set. Note: For all data O/P audio meter scale/ballistic data are in dB. 45 SIERRA VIDEO Scales and Ballistics NORDIC: Overall dynamic range: 54dB (+12 to -42dB) Attack time: 10mSec Decay time: 1.7Sec per 20dB decay DIN PPM: Overall dynamic range: 55dB (+5 to -50dB) Attack time: 10mSec Decay time: 1.5Sec per 20dB decay BBC PPM: Overall dynamic range: 24dB +3dB down "Mark 1" (+12 to-12dB) Attack time: 10mSec Decay time: 2.8Sec per 24dB decay (from "Mark 7" to "Mark 1") VU: Overall dynamic range: 23dB (+3 to -20dB) Attack time: 300mSec Decay time: 300mSec per 20dB decay VU EXT: Overall dynamic range: 60dB (+10 to -50dB) Attack time: 300mSec Decay time: 300mSec per 20dB decay AES/EBU: Overall dynamic range: 60dB (0 to -60dB) Attack time: < 5ms Decay time: 1.5Sec per 20dB decay Phase Correlation Display Attack time: 0.4Sec for zero to ±1 deviation Decay time: 0.4Sec for ±1 to zero deviation Input dynamic range: 45dB Minimum input level: -45dBu Network 370kbps per monitoring station plus 85kbps for logging plus Up to 6.4Mbps audio streaming (at full stereo bandwidth) Subnet routers must pass multicast packets Mechanical 1U 19” Rack Mount box. Outline Dimensions: 484mm(W) x 355mm(D) x 44.5mm(H) Weight: 6.75kg (full frame) Power Switch-mode PSU: 50W (nominal), 100V - 250V / 47 - 63 Hz auto selected Environmental Temperature 0°C to 30°C Humidity 70% max. Front controls Power on/off and PS2 keyboard connector plus removable panel with 6 configuration buttons. Rear panel 4 x 37 way 'D' type connector for optional audio I/O and 2 x 25 way 'D' type connectors for audio monitor out. BNC for AES/EBU frame synchronisation reference. 2 x 9 way ‘D’ type connectors for serial data. RJ45 connector for LAN. DVI-I Microcross connector for video out. USB connector is for fast data access. 46 SIERRA VIDEO 6 Chapter Warranty A. General Buyer assumes all responsibility for ascertaining the suitability of Sierra Video (hereinafter "SVS") products for Buyer's intended use. No product sold by SVS is designed or manufactured for use in any manner or under any conditions other than those described in SVS's instruction manuals and other printed material for each particular product. If any product is used or applied in a manner or under conditions not specifically authorized by such written materials or if any product is used by unqualified or improperly trained personnel, Buyer agrees that SVS shall have no liability of any kind arising from such use, and Buyer agrees to indemnify and hold SVS harmless from any claims of third parties arising from such use, and Buyer shall provide SVS with counsel of SVS's choice to defend against such claims. B. Limited Warranty 1. This warranty applies only to the original purchaser and is non-transferable. This warranty begins on the date of purchase and will be in effect for five (5) years for new equipment or and for three (3) years for "Factory Refurbished" equipment. Power Supplies and fans are warranted for three (3) years from the date of purchase for new equipment and two (2) years for “Factory Refurbished” units, from the date of purchase. Buyer must obtain a Return Material Authorization ("RMA") number from SVS prior to returning a product for repair. If, in SVS' sole discretion, the product is found to be defective during the term of this warranty, SVS will at its option: (a) provide free replacement parts, and/or (b) repair the unit at an SVS facility. During the warranty period, SVS will make every reasonable effort to support critical emergencies by supplying no-cost loan equipment while the defective unit is being repaired. SVS will provide replacement parts and/or factory service at no charge. Buyer bears the cost of shipping products returned to SVS under this warranty. SVS will bear the cost of shipping repaired products or replacement parts to the Buyer. This limited warranty shall not apply to any of SVS's goods which have been altered or which have been subjected to misuse, mishandling, improper storage or negligence. The aforementioned provisions do not extend the original warranty period of any goods which have been replaced by SVS. This limited warranty shall not apply to any goods not of SVS's manufacture, Buyer to be entitled only to the warranty set forth in the original manufacturer's limited warranty. 47 WARRANTY THIS LIMITED WARRANTY IS EXPRESSED IN LIEU OF ALL OTHER WARRANTIES, EXPRESS, IMPLIED OR STATUTORY, INCLUDING WITHOUT LIMITATION THE IMPLIED WARRANTIES OF MERCHANTABILITY AND OF FITNESS FOR A PARTICULAR PURPOSE, AND ALL OTHER OBLIGATIONS OR LIABILITIES ON SVS'S PART. SVS neither assumes nor authorizes any other person to assume for SVS any other liabilities in connection with the sale of products of its own manufacture. 2. SVS's liability hereunder on any claim of any kind, except as set forth herein for any loss, injury to person or property or damage, shall in no case exceed the price allocable to the goods which give rise to such claim. 3. In no event shall SVS be liable for any damages or injuries to person or property if any goods do not meet the above limited warranty, including, without limitation, incidental expenses or consequential or special damages, except as set forth in such limited warranty. The foregoing states the exclusive remedy of Buyer and the exclusive liability of SVS for any breach of the foregoing limited warranty. C. Cancellation Except as provided in paragraph B immediately above, all sales are final, and Buyer may cancel this order or return products only upon written consent of SVS. D. General In the event of a breach of any of the terms hereof, the non-breaching party shall be entitled to recover all of its costs, fees, and expenses, including, without limitation, reasonable attorney's fees, from the breach party incurred as a result of such breach, regardless of whether or not a suit is actually filed to enforce the terms hereof. The provision hereof shall be governed by the laws of the State of California (excluding its choice of law provisions). The headings are for convenience only and do not limit or amplify the terms and provisions hereof. In case any one or more of the provisions set forth herein shall be held to be invalid, illegal, or unenforceable in any respect, the validity, legality, and enforceability of the remaining provisions contained herein shall not in any way be affected or impaired thereby. No waiver, alteration, or modification of any of the provisions hereof shall be binding unless in writing and signed by an authorized Officer of SVS. NOTE: All products returned to SVS for service must have prior approval. Return authorization requests may be obtained from your SVS dealer. 48