1
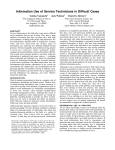
Cedar
User manual
Last modified:
10/08/2005
Author:
Johann Larusson
[email protected]
1
Table of Contents
Introduction................................................................................................................3
The Cedar environment.............................................................................................4
Cedar client overview................................................................................................5
1. User manager....................................................................................................6
2. Chat...................................................................................................................8
3. Browser.............................................................................................................8
4. Editor................................................................................................................9
Editing Wiki pages.........................................................................................10
5. Overview.........................................................................................................10
Controlling the Overview...............................................................................12
Configurations for the Cedar environment..............................................................13
Running Cedar.........................................................................................................15
Prerequisites........................................................................................................15
Microsoft Windows users..............................................................................15
Linux/Mac users ............................................................................................15
Running the environment....................................................................................16
Microsoft Windows users..............................................................................16
Linux/Mac users.............................................................................................18
HOW TO list...........................................................................................................19
How to edit an already existing wiki page..........................................................19
How to update the content of a wiki page I was editing.....................................19
How to create a new wiki page...........................................................................19
How to start a private chat..................................................................................20
How to open up a shared browser.......................................................................20
How to open op a shared editor..........................................................................20
How to get details about wiki pages in Overview..............................................20
How to rearrange the pages in my overview.......................................................20
How to create links between two pages in the Overview...................................21
2
Introduction
This document is a user manual for Cedar which is an experimental
platform for asynchronous and synchronous collaborations for building
websites. Cedar is also an application wrapper around a Wiki website that
provides additional collaborative tools (e.g. Wikipedia). Cedar is developed
using the THYME and Sage toolkits that enable us to automatically produce
complete replayable transcripts of online user behavior. The purpose of
Cedar is to provide a groupware solution that supports research on
coordination and sensemaking activities.
This document will describe the Cedar “environment” and how Cedar
works, the user interface, and how to use Cedar. The document will also
cover the configuration settings that need to be adjusted before Cedar can be
used.
Cedar is currently compatible with the following wiki types:
1. MediaWiki (Tested with Wikipedia www.wikipedia.org).
2. MoinMoin: (Recommended http://moinmoin.wikiwikiweb.de/)
Cedar is actively being developed at the GROUP (Group for Research
on Usability and Pragmatic) lab at the Department of Computer Science at
Brandeis University in Waltham, MA. For more information about Cedar
please contact Johann Larusson (johann[at]cs.brandeis.edu).
3
The Cedar environment
Cedar is what we call the front-end, the client that users use when they
want to collaborate on building websites (HTML or Wiki websites). The Cedar
client will be covered extensively later in this document. However, the term
“The Cedar Environment” is equally important to consider since Cedar is in
fact more than just the client. The name might be confusing. Cedar works
within “an environment” that makes it possible to use it as a collaborative
groupware solution. It is important to familiarize with how the Cedar
environment works in order to know how to use Cedar efficiently. The “Cedar
Environment” includes the following three software applications: The Cedar
room, WikiProxy, and The Cedar client.
Figure 1 - This figure illustrates how the Cedar environment is structured.
When you are participating in a group each group member has an
instance of the Cedar client (front end) running. Each of those clients needs
to connect to a Cedar room and the room can run on one of the client
machines or a separate machine. The purpose of the Cedar room is to pass
messages between all the clients so that they can communicate with one
another and be truly a “collaborative groupware solution”. You cannot run a
Cedar client without a Cedar room. Each group working together should only
have one room running. Think about the above picture as showing the setup
for one group which has N many participants collaborating.
As mentioned previously Cedar acts as a wrapper around a wiki server
4
allowing the participants to create and modify wiki pages. To achieve this the
group has to run another application alongside the room called the WikiProxy.
The WikiProxy is the communication layer between the wiki server that the
group uses and the Cedar room and therefore all the Cedar clients. The room
manages all communication between the clients and the clients and the
WikiProxy. The WikiProxy messages are just a small number of the
messages that are being passed around in the room. The dashed line
isolates the room and clients from the proxy so illustrate that the majority of
communication occurs below the line, messages get passed from the room
and to the proxy only when needed.
There is no user intervention required between the participants and the
Cedar room and the WikiProxy. You only need to make sure to start both
applications before you start the clients. The startup sequence should be 1.
Cedar room, 2. WikiProxy, 3. Cedar clients.
Cedar client overview
This chapter will give an overview of the Cedar client user interface.
The following subchapters will cover each part mentioned in this overview in
more detail.
The Cedar client user interface contains 5 components that users can
interact with. These components are the following:
1. User manager
2. Chat (IM style)
3. Browser (web browser)
4. Editor (to edit wiki/HTML pages)
5. Overview
Figure 2 - The Cedar client interface
5
The figure above displays a red number and name which relate to the
list above. Each one of these components interacts with one another and to
other components in other clients connected to the same room. That
interaction is transparent to you the user. The following sub chapters will
cover each one of the components in more detail explaining the purpose of
the component, and how you can interact with it.
1. User manager
The purpose of the user manager is first of all to list the users that are
connected at the current moment to the same room so that all the participants
in the group can see who are online and who are not. Also the user manager
provides each user with a set of functions to interact further with his/her group
members. These functions include:
1. Private chat: Starting a private chat with one or more users. The
default chat provided for all users is public, meaning that everyone
can send and receive messages in the default chat.
2. Currently working on: See the editor of another group member.
3. Share a browser: See the browser of another group member.
To get access to these function you simply need to right-click the
remote user you wish to interact with. All the function except the private chats
are one-to-one. The private chats can include N many group members. If you
would like to start a private chat with 2 other group members you can highlight
them both by pressing-and-holding the Control key and selecting the desired
users with the mouse by clicking on their user names. To interact with only
one group member you simply click his username so that he/she is selected
and then you right click the username. Once you right click the desired
username(s) you will see a pop up menu where you can select the three
functions mentioned above.
Figure 3 - The user manager with the pop up menu showing.
6
In figure 3 you can see the pop up menu showing after the username
“rick” was right-clicked. When you select each of these functions they will
open up a new tab containing the component at their correct locations. For
example, if you select to start a private chat a new tab will appear in the chat
area with the private chat contained in that chat tab. The tab will be
positioned right next to the public chat tab. The same goes for the editor and
the browser. The following pictures show how the Cedar interface changes
when these functions have been selected and how you can access the new
items.
Figure 4 - This figure demonstrates where a private chat window is placed.
Figure 5 - This figure demonstrates where a shared browser is placed.
7
Figure 6 - This figure shows where a shared editor is placed.
2. Chat
The purpose of the chat area is to provide group members with an
easy way to communicate with one another. By default all group members
have a public chat window. This window is opened on startup and it cannot be
closed. All group members can see the chat and can type to the public chat.
The chat also has a “members” area to the right. This is so that we can
list the members in each chat room. Cedar does allow private chats. This
“members” list comes in handy when you have e.g. multiple private chats
open and you want to know who is in what private chat. To open up a private
chat you interact with the user manager (see the previous chapter). The figure
below shows the chat in action.
Figure 7 - The figure shows the chat in action.
If you want to send a text message in either the public chat or a private
chat you simply type the text into the input box at the bottom and press send.
The text will go to the chat room that you have selected (visible) at the time
you send the message. For example if you have a private chat tab selected
and you press the send button the message you typed in will go to that
private chat.
3. Browser
The browser provides users with access to the world wide web. It
8
makes it possible for the users to see the web page (html/wiki) that they are
working on from a browsers perspective and allows the users to access the
world wide web to search for information. Each user has a browser that
he/she can use. This browser cannot be closed. The browser is divided into
two sections. The upper section is the browser toolbar where the user can
control the browser and the lower section is the rendering view where the
page is displayed. The toolbar provides the same basic functionality as other
mainstream browsers:
1. Go back: To the previously visited pages.
2. Go forward: To the page you visited after the currently loaded page.
3. Stop: Stop the loading of a page, helpful if it is taking too long and
the server might me down or too slow.
4. Go home: Go to the browsers default homepage.
5. Go (press enter in the address box): Visit the url that the user typed
into the address box.
A user can also open a shared browser. What that means is that you
see the browser of another group member, the page he is currently looking at,
but you cannot control his/her browser. The view is read only but the browser
looks the same and opens up in a new tab right next to your default browser.
To read how you can open up a shared browser and monitor other group
members and their browser activities read the sub chapter on “User
manager”. The following picture shows the browser. At the top is the toolbar
that provides the controls for the browser and below it the page that the user
is visiting is rendered.
Figure 8 - This figure shows the basic layout of the browser.
4. Editor
The editor provided in Cedar is a basic text editor. This is the
component that the group members use to edit web pages. The editor is very
simple. It divides into the editing pane (users type in the wiki text into this
pane) and then at the bottom of the editing pane there is a small toolbar with
two buttons.
9
Figure 9 - This figure shows the editor in action.
It is possible to open up a shared editor (similar to the shared browser).
In the shared editor you can watch the edits that a group member is making
but you cannot interact with his editor, it is read only. The shared editor will
open up in a new tab (with the remote users username) as the title right next
to your default editor. For more information on how to open up a shared editor
read the “User manager” chapter.
Editing Wiki pages
When you need to edit wiki pages you start by going to your browser
and navigate to the page will be editing. Once you have loaded the page into
your browser you press the “GET” button on the editor toolbar. That will fetch
the content of the wikipage you selected and load it into the editor as shown
in the figure above. You then make your changes and when you are finished
you press the “POST” button. That will post the data changes to the wiki web
server.
Once you hit “POST” the browser will refresh itself to show you the new
version of the page. Depending on the changes you made the Overview
component might also update itself. That is covered in the next chapter about
the Overview.
5. Overview
The purpose of the Overview is to provide an “overview” of the project
that the group is working on, to visualize the scope of the project by showing
the number of pages that have been created for the project and the
connections between the pages. That information is extracted from the
content as the Overview parses the document content in search for
information. You can also see detailed information about each page by letting
the mouse cursor hover over the page in the Overview.
The Overview updates its data structure if any of the following
situations occur:
1. The user performed a “GET” (editor) and fetched a wikipage from
10
the server.
2. The user performed a “POST” (editor) to the wiki server and
updated the content of a wikipage that he/she had previously
loaded and....
a) The modified content contains links to wikipages that the user
has not loaded yet.
b) The user removed links to pages that the he/she had previously
loaded. In this case the link is removed but the page still
remains in the Overview as a stand-alone page.
c) The user added a link to a page he/she has loaded and is
currently a stand-alone page. A link is redrawn to the page and it
becomes a part of the “network” again.
3. A remote group member loaded a page that the user has not
loaded yet.
The pages in the overview can be linked together or they can be standalone pages. If a page is a stand-alone page it is because it is not supposed
to connect (link) to any of the other pages or if all links to that page have been
removed. The page is never removed, just the link. Should the group decide
to re-add a link to the stand-alone page the link is redrawn.
Figure 10 - The overview in action. The yellow box shows how details for each page are
displayed.
The overview uses an algorithm to place its cells (one cell represents a
wikipage) at non-overlapping positions in the windows. If new pages are being
11
placed in the overview (and the overview already contains pages) then the
algorithm is only applied to the new pages. If the overview is being updated
because of remote actions, e.g. another group member loaded a page that
other users have not loaded still, the pages are drawn on the overview and
the links but the algorithm is not applied. That is because the change occurs
because of “foreign” actions so it would be to interruptive if the overview
would change drastically. The user can always arrange the documents as
he/she sees fit by clicking on the page and holding the mouse button down
while dragging the page around.
Controlling the Overview
It is possible to interact with the Overview in the following ways:
1. Change the position of a page: Click on the page and hold the
mouse button down while you drag the page to the location you
want.
2. Show page details: Hover over the page with your mouse to
display detailed information about the page.
3. Load wikipage in editor and browser: Double click on a page in
the Overview and the page will load in the editor and in the
browser.
4. Create a new wikipage: Right click on the Overview and select
Create new document. That will open up a dialog window where
you type in the page name and once you hit OK the page will be
loaded in the editor and you can edit the page. Once you POST
the changes to the server the browser will reload with the new
page and the Overview will add the new page to its data structure.
5. Rearrange the pages: (Apply algorithm to all pages). Right click
the overview and select Arrange documents. That will apply the
algorithm to all the pages that have been loaded and it will strive to
place all documents within the window where none overlap.
Figure 11 - This figure shows the popup menu that appears if you
right click the Overview.
12
Figure 12 - This figure shows the dialog that appears if
you select to create a new page through the Overview.
Configurations for the Cedar environment
Before Cedar is started it needs to be configured correctly. This needs
to be done prior to starting the applications since they cannot deal with
runtime configuration changes.
The configuration settings are stored in a XML file called
configuration.xml which is stored in the sandbox directoruy. The file is
generated automatically on first startup if it does not exist. Each entry in the
file is either of type wpe (WikiProxyEntry) or linkpattern but they differ in
attributes. Figure 13 shows an example of the configuration file.
If the configuration.xml file is created automatically on startup because
it did not exist then default settings are used. These default settings apply to
MoinMoin wiki.
13
Required settings for the WikiProxy
Type
Id
Value
Purpose
wpe
hostname
A complete URL to the This is the url that the
wiki server that the WikiProxy uses so that
group will use.
it knows where to GET
and POST pages.
wpe
wikitype
A value indicating the
wikitype that is on the
other end of the url
specified
in
the
hostname. Please see
the “Allowed wiki types
table”
for
the
appropriate value.
This
is
required
because
there
are
different
strategies
required to GET and
POST data to different
wiki types.
wpe
linkpatterns
usepatterns:
This
determines if links
should be extracted or
not.
Defines
the
basic
settings for the link
detection. Links are
necessary
for
the
Overview to work.
casesensitive: Should
link detection consider
letter cases.
linkpattern A
number
representing
the
order
position of this
pattern. No link
patterns
should
have
the
same
number.
type: Whether a link
that is an internal link
or not. Internal links
are links that link to
pages on the same
wiki server.
patter: The regular
expression
that
describes the particular
link.
Links are parsed from
the
content
using
RegularExpressions.
Changes made to the
patterns
result
in
different
results
displayed
in
the
Overview.
Table 1 - Required settings for Cedar.
Allowed Wiki types
Wiki type
Identifier to use in
configuration.xml
MediaWiki (Wikipedia)
wikipedia
MoinMoin wiki
moinmoin
Table 2 - This table summarizes the approved wiki types and the corresponding identifier that should
be used in the configuration.xml file..
14
Figure 13 - An example of the configuration.xml file.
Running Cedar
Prerequisites
Before you can run Cedar you have to make sure you meet all the
prerequisites.
Microsoft Windows users
1. Download and install the JAVA runtime environment JRE (version
1.4 or later) into a directory of your choice. We call this directory
pathtojava from now on.
2. Set the JAVA_HOME environmental variable to point to
pathtojava.
3. Download Cedar from the Cedar website. Install it into a directory
of your choice, e.g. c:\cedar, from now on we refer to this as
pathtocedar. Once you have extracted the archive into pathtocedar
you should have 3 batch files (run-cedar-room.bat, runwikiproxy.bat, run-cedar-client.bat) and one directory (sandbox)
inside pathtocedar
Linux/Mac users
Mac users can probably skip the first three steps.
1. Download and install the JAVA runtime environment JRE (version
1.4 or later) into a directory of your choice. We call this directory
pathtojava from now on.
2. Set the JAVA_HOME environmental variable to point to
pathtojava.
3. Install the TENEX C Shell (tcsh). Use apt-get or whatever suits you
best. It can also be downloaded from tcsh.org.
4. Download Cedar from the Cedar website. Install it into a directory
of your choice, e.g. /home/johann/cedar, from now on we refer to
this as pathtocedar. Extract the archive to a directory of your
choice. For example /home/johann/cedar, we will refer to this a
pathtocedar. Once you have extracted the archive into pathtocedar
you should have 3 shell script files (run-cedar-room.sh, run15
wikiproxy.sh, run-cedar-client.sh) and one directory (sandbox)
inside pathtocedar.
5. Mac users only: Download the extra scripts-for-mac.tar.gz package
from the Cedar website and overwrite the three script files from the
original package with the three from the scripts-for-mac.tar.gz.
Assuming the settings have been correctly changed in the
configuration.xml file you have installed and configured all the prerequisites
you can now run Cedar.
Running the environment
Microsoft Windows users
1. Running the Cedar room
●
Open the run-cedar-room.bat file in your favorite editor, e.g.
Notepad. Find the following section:
rem The path to the directory that contains Cedar (the bat files and sandbox directory)
SET cedardir=c:\cedar
●
If your pathtocedar differs from the cedardir value then change it
so it matches your setup. Save the run-cedar-room.bat file, open
up a new command prompt and cd into the pathtocedar directory
and run the following command:
run-cedar-room.bat
●
The second to last line says something like this
MSG [1128698553788]: Default URL is thyme://[email protected]/ (in
tri.shell.TriSystemShell)
●
We are interested in ip address part of the "thyme://[email protected]/". We will call this thymeurl. YOU WILL HAVE
TO REMEMBER THIS VALUE.
2. Running the WikiProxy
●
Open the run-wikiproxy.bat in your favorite editor. Find the
following section:
rem The path to the directory that contains Cedar (the bat files and sandbox directory)
SET cedardir=c:\cedar
rem Name or ip address of the computer running the Cedar room
SET hostname=129.64.46.62
16
●
●
Replace the cedardir value with your pathtocedar value like you did
in the Cedar room. Replace the value "129.64.46.62" with the
thymeurl. You can also use the hostname of the computer if you
know it.
Save the run-wikiproxy.bat file, open up a new command prompt
and cd into the pathtocedar directory and run the following
command:
run-wikiproxy.bat
3. Running the Cedar client
●
Open the run-cedar-client.bat in your favorite editor. Find the
following section:
rem The path to the directory that contains Cedar (the bat files and sandbox directory)
SET cedardir=c:\cedar
rem Name or ip address of the computer running the Cedar room
SET hostname=129.64.46.62
rem Username for the participating user
SET username=client1
●
●
Replace the values in cedardir and hostname like you did for the
WikiProxy in the previous step. Then change the username value
"client1" to the username you want to use while using the system.
This is what your group members will recognize you with so use
something simple and good, e.g. "rick".
Save the file and close the editor. Open up a new command
prompt and cd into the pathtocedar directory and run the following
command:
run-cedar-client.bat
When you participate in the work session with your group and you are
not running the Cedar room and the WikiProxy then you have to obtain the
thymeurl from your group member that will run the room and proxy.
17
Linux/Mac users
1. Running the Cedar room
●
Open up a terminal, cd into the pathtocedar directory and run the
following command:
sh run-cedar-room.sh
●
Look at the output from the run-cedar-room.sh. The second to last
line says something like this:
MSG [1128655426458]:
tri.shell.TriSystemShell)
●
Default
URL
is
thyme://[email protected]/
(in
We are interested in ip address part of the "thyme://[email protected]/". We will call this thymeurl. YOU WILL HAVE TO
REMEMBER THIS VALUE.
2. Running the WikiProxy
●
Open the run-wikiproxy.sh in your favorite editor e.g. VIM. Find the
following section:
#Name or ip address of the computer running the Cedar room
hostname=johann
●
●
Replace the value "johann" with the thymeurl. You can also use the
hostname of the computer if you know it.
Save the run-wikiproxy.sh file, open up a new terminal and cd into
the pathtocedar directory and run the following command:
sh run-wikiproxy.sh
3. Running the Cedar client
●
Open the run-cedar-client.sh in your favorite editor. Find the
following section:
#Name or ip address of the computer running the Cedar room
hostname=johann
#Username for the participating user
username=client1
●
●
Replace the value "johann" with the thymeurl like you did
previously. Then change the username value "client1" to the
username you want to use while using the system. This is what
your group members will recognize you with so use something
simple and good, e.g. "rick".
Save the file and close the editor. Open up a new terminal and cd
18
into the pathtocedar directory and run the following command:
sh run-cedar-client.sh
When you participate in the work session with your group and you are
not running the Cedar room and the WikiProxy then you have to obtain the
thymeurl from your groupmember that will run the room and proxy.
HOW TO list
How to edit an already existing wiki page
Method 1:
● Navigate to the page in your browser by typing in the url. Once the
page has loaded hit the “GET” button in the editor toolbar. The
page will load in the editor and Overview.
Method 2:
● Double click on the page you want to edit in the Overview. That will
fetch the page and load it into the editor and browser.
How to update the content of a wiki page I was editing
●
Once you have changed the content click the “POST” button on the
editor toolbar. That will send a message to the wiki server to
update the page and load the newly modified page in the browser.
How to create a new wiki page
Method 1:
● Navigate to the page in your browser by typing in the url. Because
the page does not exist yet you will add a preferred name at the
end of the wiki server url. That will be the page name.
● Hit the “GET” button on the editor toolbar. That will load the page
into the editor.
● Once you are done hit the “POST” button and the page has been
created.
Method 2:
● Right click somewhere on the Overview and select “Create new
document”. Type in the desired page name into the dialog box that
appears. The new page will be loaded into the editor.
● Click “POST” on the editor toolbar when you are done making
changes and the page has been created and will be loaded into
the browser and the Overview will update itself.
Method 3:
● Edit the page (“How to edit an already existing wiki page”) that links
to the new page you will create.
19
●
●
●
●
●
Add a link in the current page to the page you will create. Use the
desired page name in the link.
POST the changes (“How to update the content of a wiki page I
was editing”).
The Overview will update itself creating a link to the new page.
Double click the new page you want to create and it will load in the
new page in the editor.
POST the changes and the new page has been created.
How to start a private chat
●
●
Two participants: This means you and someone else. Right click
the participant in the user manager that you which to have a
private conversation with. A new chat tab with the private chat will
appear right next to the public chat tab.
More than two participants: Select the participants that will be in
the private chat by holding down the Control key and clicking on
the usernames. Then right click one of the users and select
“Private chat”. A new chat tab with the private chat will appear right
next to the public chat tab.
How to open up a shared browser
●
Select the user that has the browser you want to see by clicking on
his username in the User Manager. Right click the username and
select “Share a browser”. A new browser tab with the shared
browser will appear right next to your browser tab.
How to open op a shared editor
●
Select the user that has the editor you want to see by clicking on
his username in the User Manager. Right click the username and
select “Currently working on”. A new editor tab with the shared
editor will appear right next to your editor tab.
How to get details about wiki pages in Overview
●
Locate the page in the Overview. Place your mouse cursor (for a
few seconds) over the page and the details will be displayed in a
hovering yellow window right next to the page.
How to rearrange the pages in my overview
●
●
Manually: Click on a page and hold the mouse button down while
dragging the page to the desired location.
Automatically: Right click anywhere on the Overview to display
the pop up menu. Select the “Arrange documents” and the layout
20
algorithm will try to rearrange the pages without overlap.
How to create links between two pages in the Overview
●
●
●
Open the page that is supposed to link to another page by
following the “How to edit an already existing wiki page” step in this
guide.
Add a link to the other page in the editor.
Follow the “How to update the content of a wiki page I was editing”
step.
21