1
InspectIt ReportPro for Texas User’s Guide
1
User’s Guide
for Texas
Version 01.01.08
© COPYRIGHT 1994-2008 AHIT, LTD.
ALL RIGHTS RESERVED
InspectIt ReportPro for Texas User’s Guide
2
Table of Contents
To go directly to a link below, hold the CTRL key and click on a section name.
OVERVIEW................................................................................................................................................................. 4
INSTALLATION PROCEDURES ........................................................................................................................................ 5
FIELD CHECK LIST AND AUTOTEXTDOCUMENT.............................................................................................................. 5
NAVIGATING MICROSOFT WORD .................................................................................................................................. 6
NAVIGATE THE WORD SCREEN ........................................................................................................................................... 6
USING THE KEYBOARD AND HIGHLIGHTING SHORTCUTS WITHIN WORD .......................................................................... 7
THE “UNDO” FEATURE IN WORD ........................................................................................................................................ 8
DELETING SECTIONS OR PAGES FROM THE REPORT DOCUMENT ........................................................................................ 8
SAVING A WORD DOCUMENT .............................................................................................................................................. 8
PRINTING A WORD DOCUMENT ........................................................................................................................................... 8
GETTING STARTED WITH REPORTPRO™ FOR TEXAS PROGRAM ........................................................................................ 9
INSERTING THE INSPECTION / CLIENT INFORMATION ......................................................................................................... 9
REPORT SECTIONS SCREEN ................................................................................................................................................. 9
REPORTPRO CHECK BOXES ............................................................................................................................................... 10
THE “INFO” BUTTONS ...................................................................................................................................................... 10
COMMENT SCREEN TOOLBARS.......................................................................................................................................... 10
REPORTPROCOMMENTSCREENS............................................................................................................................................... 11
GENERAL COMMENTS FEATURE ....................................................................................................................................... 11
THEREPORTPROTOOLBAR ...................................................................................................................................................... 12
EDITING THE REPORT ................................................................................................................................................ 13
THE“UNDO”FEATUREINWORD................................................................................................................................................ 13
THE “SEARCH FOR ADDITIONAL INFORMATION” FUNCTION ............................................................................................ 13
ADDING GRAPHICS TO THE REPORT .................................................................................................................................. 13
DELETING SECTIONS OR PAGES FROM THE REPORT ......................................................................................................... 14
SAVING YOUR REPORT TO DISK ........................................................................................................................................ 14
EMAILING THE REPORT ..................................................................................................................................................... 15
CUSTOMIZING THE REPORTPRO™ FOR TEXAS PROGRAM............................................................................................... 15
EDITING THE REPORTPRO DOCUMENT TEMPLATE ........................................................................................................... 15
EDITING THE INSPECTION DOCUMENTS TEMPLATE .......................................................................................................... 15
CUSTOMIZING THE COMMENT SCREEN SUMMARY SECTIONS .......................................................................................... 15
BOOKMARKS...................................................................................................................................................................... 16
MODIFYING THE COMMENT SCREENS ............................................................................................................................... 17
EXAMPLE: ADDING AN ITEM TO AN COMMENT SCREEN .............................................................................................................. 17
EDITING THE REPORTPRO AUTOTEXT ENTRIES................................................................................................................ 19
EXAMPLE: RE-DEFINING AUTOTEXT ................................................................................................................................ 19
MODIFYING THE COMMENT SCREEN LOCATIONS LISTS ................................................................................................... 20
CUSTOMIZING THE “INFO” BUTTONS ............................................................................................................................... 20
DEFINING THE DEFAULT FOLDERS .................................................................................................................................... 21
TREC STANDARDS OF PRACTICE ...................................................................................................................................... 21
BACKING UP THE REPORTPRO PROGRAM ......................................................................................................................... 21
TRANSFERRING FILES BETWEEN COMPUTERS................................................................................................................... 21
TECHNICAL SUPPORT ........................................................................................................................................................ 22
APPENDIX 1: INSPECTION DOCUMENTS PROGRAM ............................................................................................. 23
INTRODUCTION .................................................................................................................................................................. 23
RUNNING THE INSPECTION DOCUMENTS PROGRAM........................................................................................................ 23
RUNNINGTHEPROGRAM.......................................................................................................................................................... 23
InspectIt ReportPro for Texas User’s Guide
3
COMPANYINFORMATION ......................................................................................................................................................... 23
INSPECTIONINFORMATIONSCREEN ............................................................................................................................................ 23
EDITING THE DOCUMENTS ................................................................................................................................................ 24
USING THE KEYBOARD TO NAVIGATE THE PROGRAM ...................................................................................................... 25
SAVING YOUR DOCUMENTS TO DISK ................................................................................................................................ 25
CUSTOMIZING THEINSPECTION DOCUMENTS PROGRAM ................................................................................................. 25
EDITINGYOURDOCUMENTS-THEINSPECTIONDOCUMENTSTEMPLATE ............................................................................................ 25
ADDING ADDITIONAL PAGES (DOCUMENTS) TO THE TEMPLATE ..................................................................................... 25
THE INSPECTION DOCUMENT PROGRAM FIELD TOOLBARS .............................................................................................. 26
BACKING UP THE INSPECTION DOCUMENTS PROGRAM .................................................................................................... 26
TECHNICAL SUPPORT ........................................................................................................................................................ 26
APPENDIX2:THETEXASWDIREPORT................................................................................................................................ 27
INTRODUCTION ...................................................................................................................................................................... 27
USINGTHEPROGRAM .............................................................................................................................................................. 27
RUNNINGTHEPROGRAM.......................................................................................................................................................... 27
CREATINGAPLOTPLAN DRAWING............................................................................................................................................. 27
APPENDIX 3: END-USER LICENSE AGREEMENT .................................................................................................... 28
InspectIt ReportPro for Texas User’s Guide
4
for Texas
Overview
Thank you for ordering ReportPro for Texas. The InspectIt family of software is the most comprehensive automated reporting
software available on the market today. The programs allow you to generate a report that conforms to the TREC standards with the
ease of filling out forms.
The ReportPro program generates the report inside Microsoft Word for Windows. This enables the inspector to compile, edit and
print the report using the world’s most powerful, full featured word processor.
ReportPro allows you to provide reports that suit your marketplace. If you provide a summary of significant items, the software
accommodates this. If you would like to include digital photos or line drawings, this can be done. The software is extremely flexible.
Useful field checklists can be used at the inspection to collect the necessary information with which to generate a report. The
checklists are identical in content to the program and can also be edited by you as you make changes to the software. This allows you
or your office staff to compile the report with ease after the inspection. A master copy of the checklists has been included with the
program. You can use these masters to make copies of the field checklists for use during your inspections.
If you prefer to generate your inspection report on site, the software is quick and simple enough that you can compile and print your
report at the end of an inspection. The availability of reliable, yet inexpensive portable computing equipment makes this a more and
more viable approach.
NOTICE: Before using the software please review the End-User License Agreement - which can be found in Appendix 2 of this Guide.
InspectIt ReportPro for Texas User’s Guide
5
Installation Procedures
Steps by step installation are available from the InspectIt website at http://www.ahit.com/support. Should you have any problems or
require assistance with the installation of the program, please do not hesitate to contact our Technical Support office by calling 1-800441-9411 (Option 3), Monday through Friday, 9 AM to 5 PM Central time.
The installation consists of copying the files within the Setup.exe file to the \Templates folder for Word. The installation program will
then switch the location of your \Templates folder to:
C:\InspectIt\ReportPro for Texas
Word will complete the installation the next time that it is run. Should you have existing templates that you have created within Word and still
wish to use them, you will need to copy these template files to the new location of the \Templates folder.
Field Check List and AutoText Document
Two additional document files are now on your hard disk in the same folder that you installed the program. The documents are named
AUTOTEXT.DOC and CHEKLIST.DOC. The AutoText.doc file is a Word document containing all of the text that the ReportPro
program can produce and lists the AutoText entry names. The ChekList.doc file contains a set of checklists that can be used in the
field during the inspection, should you wish to use them. You can edit this file as you modify the program to include your own
options.
Note: These files can be opened by clicking on the Inspection menu within the program and choosing the option View AutoText
Document / Field Checklist.
InspectIt ReportPro for Texas User’s Guide
6
Navigating Microsoft Word
Using the ReportPro for Texas software means that you will need to be able to navigate through Microsoft Word. To help you
understand Word, we have put together a few of the basic terms and features that we feel you will need to use our program. Additional
information can be found in Word from the Help option.
Navigate the Word Screen
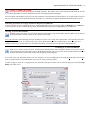
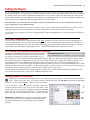
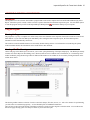
Word 97 through 2003: The screen shown below will identify the basic components of Word that you will use to navigate through
the program. The ReportPro for Texas toolbar will appear on the left side of the screen and each of the section toolbars will float over
the top of the document by default.
Standard
Toolbar
Title Bar
Menu Bar
ReportPro
for Texas
Toolbar
Formatting
Toolbar
Scroll Bar
ReportPro
for Texas
Section
Toolbar
Status Bar
Word 2007: In this version of Word, the ReportPro for Texas toolbar and each of the section toolbars will appear on the Add-Ins tab
at the top of the screen. The floating toolbars are not an option in this version of Word.
Title Bar
ReportPro
for Texas
Toolbar
ReportPro
for Texas
Section
Toolbar
Ribbon
Scroll Bar
Status Bar
InspectIt ReportPro for Texas User’s Guide
7
Using the Keyboard and Highlighting Shortcuts within Word
While Microsoft Windows is thought of as a “point-and-click” interface, the keyboard can also be used to effectively navigate many
Windows applications. Microsoft Word is no different and has proven this by the many different ways to navigate within their
program. In addition to using the mouse in a point-click fashion, Word also allows you to use the keyboard with what they call
keyboard shortcuts. These are key strokes in which you press two or more keys simultaneously to accomplish many functions. In the
keyboard combinations shown below, keys pressed at the same time are separated by a plus (+) sign.
You may find that, with practice, a combination of keyboard and mouse functions can substantially speed up your work, and working
in ReportPlus software will be no exception.
Common tasks done in Word
Bold letters
Italic letters
Underlining
Copy
Cut
Paste
Undo
Select all
Selecting Text by mouse
Any amount of text
A word
A line of text
A sentence
A paragraph
A graphic
A text box or frame
Selecting Text by keyboard
One character to the right
One character to the left
To the end of a word
The beginning of a word
To the end of a line
To the beginning of a line
One line down
One line up
To the end of a paragraph
The beginning of a paragraph
One screen down
One screen up
To the beginning of a document
To the end of a document
To the end of a window
To include the entire document
Ctrl+B
Ctrl+I
Ctrl+U
Ctrl+C
Ctrl+X
Ctrl+V
Ctrl+Z
Ctrl+A
Drag over the text.
Double-click the word.
Move the pointer to the left of the line until it changes to a right-pointing arrow, and
then click.
Hold down CTRL, and then click anywhere in the sentence.
Move the pointer to the left of the paragraph until it changes to a right-pointing arrow,
and then double-click. Or triple-click anywhere in the paragraph.
Click the graphic.
Move the pointer over the border of the frame or text box until the pointer becomes a
four-headed arrow, and then click to see the sizing handles (sizing handle: One of the
small circles or squares that appears at the corners and sides of a selected object. You
drag these handles to change the size of the object.).
SHIFT+RIGHT ARROW
SHIFT+LEFT ARROW
CTRL+SHIFT+RIGHT ARROW
CTRL+SHIFT+LEFT ARROW
SHIFT+END
SHIFT+HOME
SHIFT+DOWN ARROW
SHIFT+UP ARROW
CTRL+SHIFT+DOWN ARROW
CTRL+SHIFT+UP ARROW
SHIFT+PAGE DOWN
SHIFT+PAGE UP
CTRL+SHIFT+HOME
CTRL+SHIFT+END
ALT+CTRL+SHIFT+PAGE DOWN
CTRL+A
NOTE: Many more keyboard shortcuts can be found in the Help menu within Word
InspectIt ReportPro for Texas User’s Guide
8
The “Undo” Feature in Word
One of the features of Microsoft Word is the Undo command. This feature can be accessed from the Edit menu (or the Title
Bar in Word 2007) or from the Undo button (shown at the beginning of this paragraph).
You can actually undo multiple actions; up to the last 100 that have been performed on the document. If you inserted the wrong text
into your report, click on the Undo button until the unwanted text is cleared. The keyboard command for the undo feature is Ctrl+Z.
Deleting Sections or Pages from the Report Document
To delete a specific section or page from the report, simply highlight the entire page and press either the Backspace key or Delete key
on your keyboard. Be sure to include the page break at the bottom of the page as you are highlighting, if it includes one.
Saving a Word Document
In Word, to Save a document, go to File on the menu bar (or the Office Logo in Word 2007) and select Save. You can also use
the keyboard shortcut Ctrl+S or select the Save button on the toolbar.
Save your work often! Take advantage of Word’s AutoRecover feature. Go to Tools on the menu toolbar, select Options in the Tools
list then click on the Save tab (or click the Office Logo, choose Word Options, then Save in Word 2007). Next, select the ‘Save
AutoRecover Info every’ feature and set it to the amount of minutes you wish for the save function to automatically run.
Printing a Word Document
When you are ready to print your report, click the Report Printing button on the ReportPlus Toolbar. You can click the File
option on the menu bar (or the Office Logo in Word 2007) and select Print. You can also use the keyboard shortcut Ctrl+P or
select the print button on the toolbar (shown at the beginning of this paragraph).
If you wish to fax your documents directly from your computer, you can accomplish this by choosing the Print option from the File
menu. The print window will contain options to use your fax, local, or network printers.
To print one page or a specific set of pages from your document, in the print window (Ctrl+P), select the pages you want in the Page
Range area of this screen.
InspectIt ReportPro for Texas User’s Guide
9
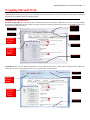
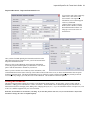
Getting Started with ReportPro™ for Texas Program
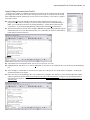
Clicking on the “InspectIt” button will display the screen at right. You will be given the
option to “Run ReportPro for Texas” or “Inspection Documents” - clicking on these
buttons will start the either of the programs. You can also use the Inspection menu to start
any of these options (Note: Look to Appendix 1: Inspection Documents Program).
If you choose “Open Existing Report”, you will be able to browse your computer to find
reports that have already been created. Clicking on the “Report Download” button will
cause a screen to appear where you can enter your username and password and download
additional reports. If you are Pay-Per-Use, you can download in blocks of 10, 25, or 50 at
a time. If you have purchased the software outright, you will just need to enter your
username and password once every 50 inspection reports to verify that you are the
registered user for the software.
Another way to start the Program is to go to the File menu and select New. You will be
given a choice of document templates on your computer (you may need to select General).
Choose “InspectIt ReportPro for Texas.dot” (if you are not viewing the .dot extension,
choose InspectIt ReportPro for Texas) and click on the OK button and the ReportPro
program will start.
Inserting the Inspection / Client Information
To insert the inspection address and client information into the inspection report, click on the
Inspection / Client Information button on the Report Sections screen (shown above). The
screen to the left will now appear. When you have finished entering the data on this screen,
click on the OK button. The information will be inserted onto the first page of the report.
Also, the inspection address will appear in the header and the client name will appear in the
footer of each page of the report document. If you choose “OfficePro Data”, the program will
import the last inspection record that you have exported from the OfficePro software (sold
separately).
When the inspection information has been inserted into the report, the Save As window will appear where you can name and save the
document. Note: Remember that each time you create a new inspection report, it counts as one of your uses of the software – be sure
to save the document.
Report Sections Screen
When you start ReportPro, the first window you will see after the opening screen is the Report Sections screen. You can also call up
the Report Sections Screen by clicking the top button
on the left-hand toolbar, from the
Reports menu, or from the keyboard by pressing Alt+Z. From this screen, you can select the
section of the report that you would like to complete. The screen also has options to insert
the inspection and client information into the report, and the General Comments screen (see
Comment Screens later in this Guide. This screen can be customized to re-define or create
your own report sections (see Customizing the Program later in this Guide).
InspectIt ReportPro for Texas User’s Guide 10
ReportPro Check Boxes
Check boxes are used to complete the Inspected / Not Inspected / Not Present / Not Function or in Need of Repair portions of the
report document. To “check” one of the boxes, simply double-click on it right on the document itself. Double-clicking on it again will
“un-check” the box.
Check boxes can be added, deleted, or modified within the program. You’ll soon find how easy it is to tailor the report to suit your
local conditions by simply editing the check boxes within the ReportPro template file (See “Editing the ReportPro Template” later in
this Guide). You can copy and paste in as many check boxes if you choose to add check box items in your Comments area, for
example.
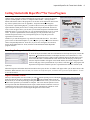
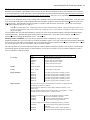
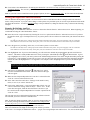
The “INFO” Buttons
As you insert text from the Option Screens, you will notice buttons - that appear on the document. Rather than the triple
question mark groups where you type in additional information (explained later in this Guide), the INFO buttons allow you to choose
from a list of options that you can define yourself. You can use each INFO button an unlimited amount of times and can use up to 125
unique lists (See “Customizing INFO Boxes” later in this Guide).
By double clicking on one of these buttons, a screen similar to the one
at left will now appear. You can select and option from the list or type
in the text box at the top of the list.
The Insert – Close button will insert your selected item and then close
the screen. The Insert - Repeat button will insert your selected item
and keep the screen displayed so that you may select another item. The
Insert - Break button will act as if you hit the Enter key and have your
next selection start a new paragraph. If you have chosen the Run Next
INFO Button option from the Search toolbar (see the Search for
Additional Information section), the Insert - Edit button will insert your
selection, close the screen and stop the program from searching for the
next INFO button.
If you wish to edit the list to add your own pre-defined options, click
on the Edit List button (Note: If a Convert File screen appears, choose
the option Text Only). A text document will now appear containing the
list of options currently available. You can add an unlimited amount of
your own options, edit any existing items, or delete any items you do not apply to your geographic area. Each item should be
contained on a single line and not be longer than 250 characters (which includes any punctuation). Once you have made your
changes, simply close the list document and save the changes.
Note: If a screen appears saying that all formatting will not be saved, click Yes to continue with the save. The INFO button lists must
be saved as a Text Only file (.txt) and cannot contain any formatting.
Comment Screen Toolbars
When you select a choice from the Report Sections screen, the Comment Screen
toolbar for that section will now appear over the report document. Each
Comment Screen for the section has it’s own button on this toolbar (see the
Structural Comments toolbar at right for an example). Clicking on one of these
buttons will activate the appropriate Comment Screen (see the next section of
this Guide) that you can use to insert items into your report document.
ReportPro™ for Texas Tip:
You can have as many section toolbars open at one time as you want. For example, if you are working on the
Exterior section of the program, you may want the Structure, Electrical, and Plumbing toolbars showing so you can
quickly move back and forth between these sections. You can also re-position any toolbar by holding your left
mouse button down in the title of the toolbar and then dragging the toolbar to a new location.
InspectIt ReportPro for Texas User’s Guide 11
ReportPro Comment Screens
One of the most exciting features of the ReportPro program is the Comment Screens. The Comment Screens will allow you to define
your own entries (which are saved as AutoText) to the software. Each sub-section of the report (Foundations, Heating Equipment,
Dishwasher, etc.) has it’s own Comment Screen. The Comment Screen feature also includes a utility that enables you to define new
AutoText and add the AutoText name to the Comment Screen of your choice simultaneously (see “Modifying Comment Screens”
later in this Guide).
The Comment Screen feature can be used to add any observations, recommendations, additional text, etc., that you may need in the
program that are not present by default; observations which are specific to your geographic location, for instance. There is no
limitation to the length or formatting of the text that you define to the screen - you can even define a combination of a photo, a
drawing, and a paragraph of text as a single entry!
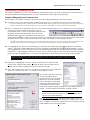
To insert text into the report with the Comment Screens, follow these steps:
n Bring up the toolbar for a particular section (example: Structure) and click
one of the buttons (example: Foundations). The screen below right will
now appear.
o Choose an option from the upper portion of the screen. Items that appear in
all caps are sub-headings that can be used. If you are unsure as to which
option you would like to select, you can use the Preview button. Clicking
on an option and then clicking on the Preview button will display up to the
first 255 characters of the option you have selected.
p If you wish, you can choose an option from the Locations / Additional
Comments list. Many of the options allow you to add items from this list
into the text as it is printed on the report. You can also type in the upper
portion of the list up to 250 characters in case none of the list items are
applicable. This list can be modified for each Comment Screen to include
your own options (see Modifying the Location Lists later in this Guide).
q Click on an Insert button. You will notice that on the Comment Screens, you have a choice: “Insert in Section”, will place your
text in the section of the report you are working on. The “Summary” buttons will insert your choice in both the Report Overview
page (Summary) of the report as well as in the current section (example: Foundations). The “Insert At Cursor” button will insert
your choice at the current cursor location within the document (this option is especially helpful when you are editing the report and
realize that you need to insert additional text). After you have finished inserting your text, click on the Cancel button to close the
screen.
Note: Please note that if you select location, the location will remain on the screen and be inserted into any additional options unless
you clear the Location text box. You can accomplish this by clicking on a blank line in the list of location options.
Note: A button titled “Hint” is also on the Comment Screens. This button will give you information about how to use the Comment
Screens while you are creating a report.
General Comments Feature
Similar to a Comment Screen, this screen can be used to insert additional information within the
report. Bring up the Report Sections screen and then click on the General Comments button. The
screen at right will now appear and you can make your selections by clicking on an item on the list
and then clicking on an Insert button. Insert - At Cursor will insert your selection at the current
cursor position. If you choose the Insert – At End button, a page break will be inserted at the end of
the document and then the option you selected will appear on the following page.
Each of the options on this screen has a corresponding AutoText. When you choose “Maintenance
Advice”, two pages of text are added to the report document. Choosing any of the Photo Frame
options will insert a frame on your document of a fixed size that you can then insert a photo or
drawing into. The advantage of this is that the photo or drawing will be the size of the frame, not the
width of the document.
InspectIt ReportPro for Texas User’s Guide 12
The ReportPro Toolbar
The special toolbar that appears along the left-hand side of the screen has many helpful features. The toolbar can also be turned off if
you are using the program on a smaller screen and wish to see more of the report document.
The “Report Sections” button gives you access to the Report Sections Screen, where you can choose which section of the report
you would like to create or edit. This button will also display a toolbar that will allow you to start any section of the report (e.g.
starting the Exterior section) without going to the Report Sections Screen.
“Search for Additional Information” searches the report document (similar to the Find and Replace function in Word), from the
current cursor position to the end of the document, for a group of 3 question marks (???). When you define text to the program,
you can have the question marks present so that you can add information to the text entry after you have inserted it into the report
(example: serial numbers, amperage, etc.).
Using the “Copy to Report Summary” button will copy highlighted text observations to the summary section of the Report
Summary. After the text is copied to the Summary page, you will be returned to where you were working in the report
document.
The “Photo Frame” buttons will add an empty frame at your current cursor position in the report document. You can then insert
a photo or digital image into the frame and it will be automatically sized to the size of the frame. The “Photo Summary”
button will add a new page to the end of the report with 6 photo frames on the page.
The “Report Printing” button will search the document for any triple question mark groups (???) or INFO buttons left in the
document before bringing up the Print window.
The “Customization Tools” ToolbarClick on the “Customization Tools” button to display a toolbar with customization options to
define new text to the program, re-arrange lists of options, re-define existing options, add INFO buttons, edit the template file,
etc.
The “TREC Standards of Practice” opens a document which contains TREC Standards of Practice. You can use this as a
reference when creating a report or print copies to include with your report documents.
As the name implies, the “Hide Report Sections Toolbar” will hide from view the Report Sections Toolbar.
As the name implies, the “Hide Section Toolbars” will hide from view any section toolbars that are currently open, including the
Report Sections toolbar.
Click on the “Open Manual” button in order to open the User’s Guide.
InspectIt ReportPro for Texas User’s Guide 13
Editing the Report
As you work through the Comment Screens of the ReportPro software, text (referred to as AutoText in this Guide) will be inserted
into the report document. At some point, you will want to edit the document. You can either edit each report section as you complete
it or edit all sections when you have completed all Comment Screens. The text of the report can be edited using any of the powerful
features of Microsoft Word (such as changing the fonts, adding color, changing the layout, etc.). If you are unfamiliar with Microsoft
Word, refer to the User’s Manual and Help files supplied with your version of Word.
Remember that the report can be tailored to your liking. If you don’t like portions of the text, or if you want the format or layout of the
report to change, this can be accomplished quickly.
While editing a report, read the text to see that it’s what you want. If you have made a mistake and inserted the wrong text, you can
bring the Comment Screens back and pick the correct option. With practice, you’ll be able to navigate very quickly.
You can edit the text or add to it as you see fit. The INFO buttons, Toolbars, and Menu Bar give you powerful features to help speed
up your work.
The “Undo” Feature in Word
One of the many powerful features of Microsoft Word is the Undo command. This feature can be accessed from the Edit menu or
from the standard toolbar. You can actually undo multiple actions; up to the last 100 that have been performed on the document. If
on the Word toolbar until the unwanted text is cleared (or
you inserted the wrong text into your report, click on the Undo button
keep clicking on the Undo button to undo multiple actions). The keyboard command for the undo feature is Ctrl-Z.
The “Search for Additional Information” Function
This function of ReportPlus searches the report (similar to the Find
and Replace function in Word), from the current cursor position to
the end of the document, for a group of 3 question marks (???) or
INFO buttons (see next section for information regarding INFO buttons). When you define text to the program, the question marks
can represent information to be added to the text after you have inserted it into the report (example: serial numbers, amperage, etc.).
By clicking on the Search for Additional Information button, the program searches your report document and highlights the 3
questions marks (???) – when you start typing, the question marks are replaced by your new text. For INFO buttons, the cursor will be
blinking immediately to the left of the button. A toolbar will also appears so you can continue to search your report document or go to
the beginning of the document to begin your search from the first page to the end of the report.
Clicking on Run Next INFO Button will cause the program to search for the next INFO button and automatically double-click on it.
You can then select from the list of options in the Additional Information screen.
Adding Graphics to the Report
Digital images such as photos from a digital camera, your company logo, line drawings, etc., can be inserted into the inspection
report. Position your cursor where you want the graphic to appear and choose the Add Photo option from the ReportPlus
toolbar or you can also use the Picture… button on any section toolbar.
A screen will appear – such as the one shown to the right - allowing you
search the hard drive and even give you a preview of the image. Once
find the image, click on the name to highlight it and choose the Insert
button. You will now see the image in your report. You can also insert
photo frame into your document and then insert your photo within the
IMPORTANT NOTE: Before you choose to insert an image or photo
into your report, the cursor must be blinking on a blank line with no
text otherwise Word will close and no changes will be saved to the
document.
to
you
a
frame.
frame
other
InspectIt ReportPro for Texas User’s Guide 14
Once the image is inserted within the frame you are then able to add an arrow,
oval, text box or call out by right clicking on the image. As seen to the right, a
box will then pop up and you will scroll down to “ReportPlus Options Menu”
which will then open another box giving you options to add graphics to your
image.
You have the ability to change the default color and size of the graphics by
selecting “Image Format Settings” in this pop up box. This will open a new option
screen that contains the setting for the four graphics provided (arrow, oval, text
box and callout). Changing the settings in this window will make the settings
permanent until another change is made. You can find a view of the “Image
Format Settings” screen below. The functionality and look of this window
remains the same in Word 97-2003 and Word 2007.
Once the image appears on the document, you can click on the Drawing button
and bring up the Drawing toolbar to highlight
specific areas of the photo. The toolbar can also be shown by clicking with your right mouse button on any toolbar and selecting
Drawing from the list. You are able to add arrows, squares, circles, etc. directly on the photo itself and change the color and size of the
shapes once they have been drawn in using the buttons on the toolbar.
Note: In Word 2007, you will need to click on the Insert tab of the
Ribbon and select the Shapes option in the Illustrations group. Once a
shape,
such as an arrow, has been drawn on the document, the Ribbon will change to give your formatting options such as color, thickness of
line, etc.
Deleting Sections or Pages from the Report
To delete a specific section or page from the report, simply highlight the entire section or page and press the Delete key on your
keyboard. Be sure to include the Page Break at the bottom of the page as you are highlighting, if it includes one.
Saving your Report to Disk
If you did not save the report document when is was created, you can use the Save Inspection Report option from the Reports menu.
The program will display the Save As window and allow you to save the current document with the name of your choice in the
Inspection Reports folder on your hard drive (as defined in the Default Folders screen).
Save your work often! Don’t compile an entire report without saving it along the way – by clicking on the Save button on your
toolbar, for instance. You would also be wise to take advantage of Word’s AutoRecover feature (found by clicking on the Tools
menu, selecting Options, and clicking on the Save tab).
InspectIt ReportPro for Texas User’s Guide 15
Emailing the Report
If you wish to email your inspection documents directly to your customer, Realtor, or other interested party, you can attach the
inspection document to an email message through your email software. Please look to the documentation or help file within your
email software if you are unsure about attaching files.
We would suggest password protecting your document if you are going to send it via email. This can be done by clicking on the File
menu and choosing Save As. From the Save As screen, click on the Options button (in Word 2000 or 2002, click on the Tools button
and choose General Options). On the screen you will see a text box where you can enter a password to protect the document from
being modified.
Customizing the ReportPro™ for Texas Program
Editing the ReportPro Document Template
A “template” file is similar to pre-printed letterhead. The template contains the text and formatting that appears by default when you
begin a new inspection report. Template files can be edited in the same way as any Word document.
To open the ReportPro document template file, choose the Reports menu and select Modify Report Template. The template file
(InspectIt ReportPro for Texas.dot) will now open and you will be able to edit it exactly as you would a document file.
IMPORTANT NOTE: When editing document templates or AutoText entries, you should be viewing the Bookmarks that are
present within the text (see Bookmarks later in this Guide). Bookmarks appear as large capital I’s or the end section of an Ibeam. Be very careful not to delete the Bookmarks while editing – deleting them will cause errors within the program.
An important rule to remember is that when you are editing the template, you should not run any of the program functions used to fill
out a report. Anything added to the template becomes a permanent change. Once you have completed your editing of the template
file, be sure to save your changes. The documents generated from the ReportPro program will now include your changes.
Editing the Inspection Documents Template
Included without charge with the ReportPro software is our document generator OfficePro Express. You can create cover letters,
invoices, inspection order forms, promotional letters, and so on. To edit these documents, (inserting your own logo, company name,
etc.) open the OfficePro Express.dot file and edit the template as you would a document.
Note: See “Appendix 1: OfficePro Express” at the back of this User’s Guide for additional information on customizing the OfficePro
Express program.
Customizing the Comment Screen Summary Sections
On each Comment Screen there are 6 Insert buttons below the Insert in Section button on the left side of the screen. These buttons can
be used to create sub-categories within your Summary section of the report. Each button corresponds to a unique bookmark –
Summary for the first button, Summary2 through Summary6 for the following buttons. These bookmarks can also be moved so that
they are on separate pages if you wish.
The names of the categories can also be changed. To edit a category name, click on the AutoText Tools toolbar button on the left side
of the screen and then click on the Customize Summary Categories button. The screen at right will now appear and you can now edit
the titles.
Note: You will need to also edit the InspectIt ReportPro for Texas.dot template to change the text of the sub-headings on the
Summary page.
InspectIt ReportPro for Texas User’s Guide 16
Bookmarks
ReportPro uses bookmarks as placeholders so that it knows where in the report document to insert your Comment Screen selections as well as the Inspection / Client information. If the bookmarks are not present within the inspection report, ReportPro will not know
where to place text within the document and will generate an error message – therefore it is very important that the bookmarks are not
deleted.
You can view the bookmarks while you are working on the document to help you from inadvertently deleting them. To do this, either
click on the Bookmarks button on the left-hand toolbar in the ReportPro program or choose the Show/Hide Bookmarks option from
the Reports menu. The bookmarks will appear similar to a capital I or and end section of an I-beam – please look to the example
below (the bookmark is between “lot” and “is”):
I
The lot is lower than adjacent lots. Grading improvements should be undertaken where possible. The general topography of the area is
such that it will be difficult to control storm water entirely. During heavy rains or snow melts, the accumulation of storm water on the lot
may be unavoidable.
You can find the name of a particular bookmark by clicking your cursor on the bookmark and then selecting the Bookmark option
from the Insert menu. The name that appears directly below “Bookmark name:” is the name of the bookmark. There is also a
keyboard shortcut to bring up the Bookmark screen – Ctrl+Shift+F5.
Should you delete a bookmark, you can re-insert it into the document or template file. First, make sure you are viewing the
bookmarks and then place your cursor where you want the bookmark to appear. Next, click on the Insert menu and choose Bookmark.
You can now type in the name of the bookmark, click on the add button, and the bookmark will now appear in the document. You can
also use this same process to move a bookmark from one location to another.
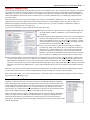
The following chart is a list of bookmarks that are present within the document template by default. This list shows you which page
the bookmark appears on and the purpose of each bookmark. Use this list as a reference in case you delete a bookmark or wish to
move a bookmark to a different location.
Name
cover
client
inspaddress
inspector
inspdate
Purpose
Informs ReportPro of the location of the Cover Page
Location of the Client’s name
Location of the Inspection address
Location of the Inspector’s name
Location of the Inspection date
Header:
PropID / PropID2
Location of the Inspection address
Footer:
client1 / client2
Location of the Client’s name
Report Summary:
Summary
Summary2
Summary3
Summary4
Summary5
Summary6
Used when copying items to Summary section 1
Used when copying items to Summary section 2
Used when copying items to Summary section 3
Used when copying items to Summary section 4
Used when copying items to Summary section 5
Used when copying items to Summary section 6
Report Sections:
Note: Each sub-section has a bookmark that corresponds to a Comment Screen.
The naming convention is as follows:
The first characters indicate the section number in Roman numerals – from
section I to VI
The next character indicates which sub-section letter it corresponds to – A to K
The final characters will be all zeros – 8 characters total.
Cover Page:
Therefore, for Structural (Section I), the bookmarks would be as follows
IA000000
Location for Foundations comments
IB000000
Location for Grading and Drainage comments
IC000000
Location for Roof Covering comments
In another example, the bookmarks for Plumbing (Section IV), would be:
IVA00000
Location for Water Supply System and Fixtures
comments
IVB00000
Location for Drains, Wastes, Vents comments
IVC00000
Location for Water Heating Equipment comments
InspectIt ReportPro for Texas User’s Guide 17
Modifying the Comment Screens
This feature is remarkably easy to use. You can add your own observation items to any of the Comment Screens for each section of
the report (Foundations, Heating, Dishwasher, etc.). The example below contains step-by-step instructions.
Example: Adding an Item to an Comment Screen
In this example, we will add an item to the Comment Screen in the Grading and Drainage section of the program.
n Type the text for your new option anywhere within the inspection report. Our sample text for this exercise is shown below:
The lot is lower than adjacent lots. Grading improvements should be undertaken where possible. The general topography of the area is such that it will be
difficult to control storm water entirely. During heavy rains or snow melts, the accumulation of storm water on the lot may be unavoidable.
o Next, we will add a “LOC” bookmark to the text so we can insert a location into the text, if we choose to do so. Click on the View
menu, choose Toolbars, and choose the option “InspectIt
Customization Tools” or select “Customization Tools” from the
ReportPro Toolbar on the left hand side. Next, click on the
Bookmarks button on the Customization Tools toolbar and
choose “Show Bookmarks”. Now, place your cursor where you would like the location to appear and click on the “Add Location
Bookmark (LOC)” button from the Customization Tools Toolbar. Our sample text will now appear as below:
I
The lot is lower than adjacent lots. Grading improvements should be undertaken where possible. The general topography of the area is such that it will be
difficult to control storm water entirely. During heavy rains or snow melts, the accumulation of storm water on the lot may be unavoidable.
p Now highlight the text. To preserve the formatting, you will need to also include the paragraph mark (¶) at the end of the last
on the Word toolbar. A good
sentence. This mark is usually hidden and can be seen by clicking the “Show/Hide ¶” button
way to highlight text is to have your mouse pointer in the left-hand margin and move the mouse straight down while pressing the
left mouse key. This highlights an entire line at a time as you move down the page and will automatically include the paragraph
mark at the end of the highlighted text. You can also accomplish this by triple-clicking with your mouse on the paragraph.
The lotIis lower than adjacent lots. Grading improvements should be undertaken where possible. The general topography of the area is
such that it will be difficult to control storm water entirely. During heavy rains or snow melts, the accumulation of storm water on the lot
may be unavoidable.¶-
q Once the text is highlighted, choose the “Add To Comment Screens” option from the
Reports menu or button on the toolbar. The program will now ask you which screen to
modify (choose Grading / Drainage from the screen shown to the right).
r In the “Enter a name for the new item:” field on the screen shown below, type in the name
of the new Comment Screen entry – we will call our observation “Low Lot”.
Once you have named your entry and
clicked on the OK button, the
program will ask if you want to edit
the text file (.txt) for the Comment
Screen. The option you just added
will appear at the end of the list and
you can edit the text file to group
similar items together (example: grouping all of your Grading comments
together – see the next page for information on editing .txt files).
IMPORTANT NOTE: To make the change permanent you will
need to save the InspectIt ReportPro for Texas.dot template when
you close your current document.
Note: You can also delete items using steps in this example. First, you
would not highlight any text and then bring up the Comment Screen of your
choice. Using the list box shown at above left, click on the option you wish
to delete and then click on the Delete button.
InspectIt ReportPro for Texas User’s Guide 18
Example: Editing an Comment Screen Text File
In the previous example, we added an item to the Exterior Observations Comment Screen and will
now change the position on the screen where our option can be found. You can also use the cut and
paste commands to transfer options from text file of one screen to another, if you wish to re-organize
your report sections.
n Click on the Reports menu and choose the option “Edit Comment Screen Text Files”. The
program will now ask you to modify a text file in which section (choose Grading & Drainage).
Note: you can edit the Location list for Grading & Drainage – and all other Comment Screen
Location lists – by choosing Grading/Drainage and then click on the Edit Locations button.
o Word will now open the text file (in this example: IB000000.txt) and the paragraph marks (¶) will
automatically turn on. To turn them back off after you’ve edited this file, click on “Show/Hide ¶”
button shown on the screens below.
p Scroll down to the end of the document. We can now see our item “Low Lot”.
q Highlight this line and choose “Cut” from the Edit menu. If your cursor is on a blank line after you cut the text, hit the Backspace
key.
r In this example, we decide that we want this item to appear above the option “Low Lot Relative To Neighbor”. Scroll up the
document until these items appear.
s Place your cursor at the beginning of the “Low Lot Relative To Neighbor” line and select “Paste” from the Edit menu. Note:
when you paste in the option, Word will often add an extra space at the end of the line. The spaces are represented by dots as
shown on the screen below. If an extra space has been inserted, be sure to delete it or the program will not recognize it as an
AutoText entry.
InspectIt ReportPro for Texas User’s Guide 19
t Close and save the “IB000000.txt” file making sure that the file is saved as a text only (.txt) file by Word (you can lose the
formatting changes). The next time you run the Exterior Observations screen, the “Low Lot” option will now appear at the top of
the list.
Note: If you want to leave a blank line between groups of options, be sure to hit the spacebar once – the line cannot be totally blank.
Editing the ReportPro AutoText Entries
The text defined to the ReportPro program is saved as AutoText entries within Microsoft Word. Changes made to the AutoText
entries will be permanent. If you just want to change a word or phrase in a particular report, do so in the report document itself and do
not change the AutoText. To make a permanent change to the pre-defined text, change the AutoText entry as shown in the following
example.
Example: Re-Defining AutoText
In this example, we will edit and re-define the “Low Lot” observation from the Exterior / Observations screen. Before beginning, we
recommend activating the “Show Bookmarks” feature.
n Insert the text into a report document by choosing the “Low Lot” option from the Exterior / Observations screen or if you know
the AutoText name, type it in and press the F3 key on your keyboard. The text will now be inserted into your document as shown
below:
I
The lot is lower than adjacent lots. Grading improvements should be undertaken where possible. The general topography of the area is such that it
will be difficult to control storm water entirely. During heavy rains or snow melts, the accumulation of storm water on the lot may be unavoidable.
o Next, edit the text to your liking. In this case, we will remove phrase “or snow melts”.
I
The lot is lower than adjacent lots. Grading improvements should be undertaken where possible. The general topography of the area is such that it
will be difficult to control storm water entirely. During heavy rains, the accumulation of storm water on the lot may be unavoidable.
p Now highlight the text. To preserve the formatting, you will need to also include the paragraph mark (¶) at the end of the last
sentence. This mark is usually hidden and can be seen by clicking the “Show/Hide ¶” button
on the Word toolbar. A good
way to highlight text is to have your mouse pointer in the left-hand margin and move the mouse straight down while pressing the
left mouse key. This highlights an entire line at a time as you move down the page and will automatically include the paragraph
mark at the end of the highlighted text. See Appendix 1 for examples on how to highlight items to preserve the default report
format.
The lotIis lower than adjacent lots. Grading improvements should be undertaken where possible. The general topography of the area is
such that it will be difficult to control storm water entirely. During heavy rains, the accumulation of storm water on the lot may be
unavoidable.¶-
q Once the text is highlighted, choose the
“Edit Auto Text” option
from the Customization Tools toolbar. The screen shown to the right
will now appear.
r Make sure that “InspectIt ReportPro for Texas.dot” is selected from the
“Look in:” list box on the AutoText screen.
s In the “Enter AutoText entries here:” field type in the AutoText entry
name (“Low Lot”) or select it from the list.
t Click on the “Add” button. A screen will appear that will ask, “Do you
want to re-define the existing AutoText entry?” - choose “Yes”. If this
screen does not appear, either the AutoText name is incorrect or you
have not chosen the "InspectIt ReportPro for Texas.dot” option from the
“Look in:” field.
The entry has now been re-defined and will appear in the edited version the
next time that you insert it from the Comment Screen.
Note: To make the change permanent, when you close the document that you
are currently working on, Word will ask if you want to save changes to the
InspectIt ReportPro for Texas.dot template file. Choose “Yes” from the
screen if you wish to keep the changes you made to the AutoText.
There is no limitation to the length or formatting of the text that you define
to the screen. For example, the Maintenance Advice – 2 pages of text using multiple fonts and font sizes. You can also define digital
InspectIt ReportPro for Texas User’s Guide 20
photographs or line drawings as AutoText entries. In fact, you can even define a combination of a photo, a drawing, and a
paragraph of text as a single entry! Your Microsoft Word manual will help you with creating and editing AutoText entries.
Modifying the Comment Screen Locations Lists
You can add your own options (or modify existing ones) on the Comment Screen Location lists. Click on the Reports menu and
choose the option “Edit Comment Screen Text Files”. The program will now ask you to modify a text file for a particular Comment
Screen (example: Grading / Drainage). Choose the screen whose list you wish to edit and then click on the Edit Locations button.
The text file is then opened and you can add, edit, re-arrange, or delete as you see fit. See the example “Editing an Comment Screen
Text File” earlier in this Guide for step-by-step instructions.
Customizing the “INFO” Buttons
You can use each INFO button with the same list of options an unlimited amount of times and up to 125 different INFO buttons can
be created – each with it’s own unique list of options. The INFO buttons can be present on the ReportPro template file or defined
within AutoText entries.
To place an INFO button on the document or template, simply highlight an existing INFO button, copy and paste
it into a new location. If you wish to use the same list, there is nothing further you need to do. To use a different
list of items or to create a new list, click on the INFO button with the right mouse button and choose the option
Toggle Field Codes. Instead of only the button graphic being displayed, the example shown below will appear
on the document:
{ MACROBUTTON InformationPopUp1
}
To change the list of options that will be displayed, change the number following the text “InformationPopUp”. Since the program
can accommodate up to 125 different lists, the text can read from “InformationPopUp1” to “InformationPopUp125”. Once the
number has been changed you can switch back to displaying only the button by clicking with your right mouse button over the text
and choosing the option Toggle Field Codes.
The INFO buttons can be used with text that is already present in the
document or be used to create paragraphs. The first example would be on
the Foundation sub-section where the text “The foundation is “ is present
on the document and the INFO button would give you options to complete
the sentence (“performing as intended”, “in need of major repair”, etc.).
Another example would be to create INFO buttons with lists such as
shown on the screen shown at left.
Using the list on this screen, you could choose the first option – which
would be the beginning of the sentence – and then choose one of the
options below to complete the sentence. You could then go on the next
group of options and create another sentence. This would build a
paragraph of two sentences on your document. If, however, you wanted to
have both sentences as separate lines, you would click on the Line Break
button before moving onto the second group of options. To try the options on this screen for yourself, this list has been defined as
“InformationPopUp125”.
InspectIt ReportPro for Texas User’s Guide 21
Defining the Default Folders
You can define the default folders on your hard drive for Inspection Reports,
Inspection Documents, and the location of your digital images (such as digital
photos, line drawings, etc.) by clicking on the Reports menu and choosing the
Default Folders. Type the paths to the folders of your choice, click on the OK
button, and the location will be saved to the program. When you next use the
Inspection Report option from the Reports menu, the program will change to
folder that you have entered on the Default Folders screen your inspection
reports before it displays the Save As window.
Note: The folders that you define must exist on your hard drive – typing in a
path on this screen will not create the folder. You must create the folders
Windows Explorer, for example) prior to using this option.
option
Save
the
folder
(using
TREC Standards of Practice
The TREC Standards of Practice for home inspection have been provided with this program as a separate Word document. If you
wish to include the Standards with your inspection report, you can print off as many copies as you wish. Also, since it is a Word
document, you can customize the document to include your company information, logo, etc. To open this document, click on the
TREC button
on the ReportPro toolbar.
Backing Up the ReportPro Program
You’ve heard it time and time again. Back up your important files and software. Well, we’re going to tell you again. Make a back up
copy of the InspectIt ReportPro for Texas.dot file whenever you make a changes to the AutoText, Report Sections Screen, Toolbars, or the
ReportPro template. To do this, simply back up the file InspectIt ReportPro for Texas.dot from the Templates folder of Microsoft
Word to your back up media (tape backup, Zip disk, floppy disks, etc.) and keep it in a place where you’ll be able to retrieve it. If you
do not do this and experience a hard disk problem, all of your AutoText and/or template changes will be lost.
Programs such as Microsoft Backup (which came as part of Microsoft Windows) can be used to back up ReportPro. We would
recommend backing up the entire Templates folder when using this type of backup software. See your Windows documentation or
help files for more information.
Note: The text files associated with the Comment Screens should be backed up as well. These files are located in the Templates folder
and all files are named with four tilde symbols (example: IVA00000.txt) for easy recognition. Simply copy these files to the same
backup disk that you use for the ReportPro template file.
Note: Both the InspectIt ReportPro for Texas.dot template and the Comment Screen text files are located in your Templates folder for
Microsoft Word. If you do not know the location of your templates folder, please look to the section of this Guide entitled
“Determining the Word Template Folder” for instructions on how to locate your Templates folder.
Transferring Files between Computers
As you customize your options within the ReportPro program, you may wish to transfer all of your changes from your desktop to your
laptop computer. This can be done by transferring the template file InspectIt ReportPro for Texas.dot and the Comment Screen text
files (example: IVA00000.txt) from the Templates folder of your desktop to the Templates folder of your laptop. After these files
have been transferred, when you next run the ReportPro program, the options and layout will be identical on both computers.
Note: Both the InspectIt ReportPro for Texas.dot template and the Comment Screen text files are located in your Templates folder for
Microsoft Word. If you do not know the location of your templates folder, please look to the section of this Guide entitled
“Determining the Word Template Folder” for instructions on how to locate your Templates folder.
InspectIt ReportPro for Texas User’s Guide 22
Technical Support
At AHIT, we are committed to supporting our products and helping you with your reporting solutions. In trying to provide you with
the best possible customer service, we offer a variety of ways to receive information or assistance from our company. Our Technical
Support hours are 9 AM to 5 PM Central Time, Monday through Friday.
•
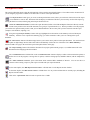
For technical information and/or assistance, please call our Technical Support line at (800) 441-9411
•
Expanded information can also be obtained from our Website at http://www.ahit.com/support.html
•
Our online Bulletin Board system can be accessed from our Website at http://www.ahit.com
•
Technical Support staff can also be reached via Email at [email protected]
InspectIt/ReportPlus/OfficePro/OfficePro Express are trademarks of AHIT, Ltd.
The Illustrated Home is a trademark of Carson, Dunlop & Associates, Ltd.
Microsoft/Windows/Word are trademarks of the Microsoft Corporation
© COPYRIGHT 1994-2008 AHIT, LTD.
ALL RIGHTS RESERVED
InspectIt ReportPro for Texas User’s Guide 23
APPENDIX 1: INSPECTION DOCUMENTS PROGRAM
Introduction
The Inspection Documents program is designed as a companion program to the InspectIt ReportPlus software and is used to create
additional documents needed for the inspection. These documents include and Order Form, Inspection Agreement, Invoice, Report
Cover Letter, Letter to the Buyer’s Agent, and a Letter to the Seller’s Agent. All of these documents can be modified to include your
own verbiage, logos, etc. – you can also add an unlimited amount of additional documents.
Running the Inspection Documents Program
Running the Program
To run the program, click the “InspectIt” button on the toolbar at the top of your screen. Select the
option “Inspection Documents” to start the program. You will be given the option to “Create
Documents” or “OfficePro Data”.
If you select “Create Documents”, the program will start and you will be shown the Inspection
Information screen. From here, you can fill in the screens with the information that will be used to
create your documents.
If you choose “OfficePro Data”, the program will search for information that you have exported from
the OfficePro software, start a new document, and show the Inspection Information screen with the
exported information displayed (OfficePro is sold separately).
Company Information
One of the first things you will want to customize in the program is the Company Information. This information will be used on all of
the documents that are in the Inspection Documents program by default and can also be inserted into any document that you may add
to the program.
To add your information, click on the click the “InspectIt” button on the toolbar at the top of your screen (or click on the Inspection
menu on the Word menu bar) and choose the “Company Information” option. A screen will appear where you will be able to use the
fields on the screen to enter your company information. When finished, click on the OK button. This information will now be used in
all future reports and inspection documents.
Inspection Information Screen
The Inspection Information screen is where you will be doing the vast majority of the work within the Inspection Documents program.
This screen displays fields for information about the specific property as well as buttons to access screens used to fill out information
on the Client (or Clients), Buyer’s Realtor, Seller’s Realtor, and Other Referral (such as an attorney, lender, etc.). The information
will also be retained while you are using the program so if you made a mistake in the spelling of the Client Name, for instance, you
can run the program again without having to input all of the information a second time. Just make the correction and click the OK
button - the documents will be updated.
InspectIt ReportPro for Texas User’s Guide 24
Inspection Documents - Inspection Information Screen
If you wish to start with a completely
blank screen, click on the Clear
Screen button. The inspection
information screen will then appear
with every field blank.
Clicking on the Client(s), Buyer’s
Realtor, Seller’s Realtor, or Other
Referral Information buttons will
bring up a screen such as the one
shown below:
Once you have finished inputting the information and click on the
OK button in the Buyer’s Realtor screen, you will be returned to the
Inspection Information Screen.
When you click on the OK button on the Inspection Information
screen, the program will then update your documents. You can now
print or edit the documents to include any custom text.
Note: If you have made an error within any of the information, click
on the Information Screens button at the top of the toolbar on the left side of the screen, or choose the Information Screens option
from the Documents menu. The Inspection Information screen will then re-appear with the information that you had just entered.
You can make any changes you wish, then click on the OK button. The documents will then be updated.
Editing the Documents
The Inspection Documents template file contains several documents strung together. At some point, you may want to edit the
documents - adding specific information to a letter, for instance. The documents can be edited using all the powerful features of
Microsoft Word (such as changing fonts, adding color, changing the layout, etc.). If you are unfamiliar with the word processor, refer
to the User’s Manual supplied with your version of Word.
Remember, the documents can be tailored to your liking. If you don’t like portions of the text, or if you want the format or layout of the
documents to change, this can be accomplished quickly.
InspectIt ReportPro for Texas User’s Guide 25
Using the Keyboard to Navigate the Program
Although Microsoft Windows is thought of as being a point-and-click interface, the keyboard can be used to effectively navigate many
Windows applications. The Inspection Documents program is no exception. If fact, you may find that, with practice, a combination
of keyboard and mouse functions can substantially speed up your work.
For example, all push buttons in the Inspection Documents program can be activated with a key or keyboard combination. An example
would be using the keyboard combination Alt + C to bring up the Client(s) Information screen (“c” being the underlined letter on the
button). Also, you can use the Tab key to work your way through a screen. Each time you press Tab, the next option on the screen is
highlighted. If you wish to cancel out of any Windows screen, press the Esc key at the upper left-hand corner of your keyboard which is also the same as pressing the Cancel button.
Saving your Documents to Disk
One of the many beauties of the Inspection Documents program is the ability to save your documents to disk in such a
way that you can easily retrieve them at a later date. We recommend that you use file names that correspond to the
street address of the property you are inspecting. Alternatively you can use a date-coded format for your file names, or
the report number. You can also create folders on your hard drive to store your documents in. It’s up to you!
Customizing the Inspection Documents Program
Editing Your Documents - The Inspection Documents Template
A “template” file is similar to pre-printed letterhead as it contains the text and formatting that appears by default when you start the
Inspection Documents program. The template can be edited like any Word document.
To open the Inspection Documents template file, choose the Documents menu and select “Modify Inspection Documents Template”.
The template file (Inspection Documents.dot) will now open and you will be able to edit it exactly as you would a document file.
Note: Anything added to the template file will become a permanent change. Once you have completed your editing of the template
file, be sure to save your changes. The documents generated from this point forward using the Inspection Documents program will
now include your changes. An important rule to remember is that when you are editing the template, you should not run any of the
program functions used to run the Inspection Documents program.
Adding Additional Pages (Documents) to the Template
The most impressive feature of Inspection Documents program is its ability to create an unlimited number of documents, all from
filling out the Inspection Information Screens only once. Create as many documents as you want!
Creating new pages or documents to be filled out is a very simple process. Once the template file for the program is open, you can
add additional pages simply by inserting page breaks. To insert a page break, click your mouse where you want the page break
(usually at the end of the template document), from the Insert menu choose Break, and then select Page Break. Note: The keyboard
shortcut for inserting a page break is Ctrl + Enter.
You can now begin typing on your new page, formatting it as you wish. You can also insert Fields from the Field toolbars within the
program to merge the inspection information into your documents. See below for more information. If you wish to delete any pages
from the Inspection Documents template, simply delete the text and the page break. Be sure to save the template file once you have
edited the documents to your liking.
InspectIt ReportPro for Texas User’s Guide 26
The Inspection Document Program Field Toolbars
Inserting merge fields within you documents could not be easier! “Merge fields” are any of the fields that you see on the Inspection
Information screens when you run the Inspection Documents program. To insert a field into your document, choose View Document
Field Toolbars from the Documents menu, or click on the Document Field Toolbar button on the left side of the screen. The Field
Categories toolbar shown above will now appear. You can then select a category such as Client (shown above). Next, click your
mouse cursor where you want to insert the client’s first name, for example, in your document. Now click on the First Name button on
the toolbar and you will see it inserted at the cursor position. When you run the Inspection Documents program, the client’s first name
will be inserted at this point in your document.
You can use the same fields (such as the client’s first name) as many times as you like within your documents - it makes no difference
to the program. Once you’ve inserted a field, you can change the font, size, etc. to whatever you wish. Give it a try and find out how
easy it is to create new documents!
Backing Up the Inspection Documents Program
You’ve heard it time and time again. Back up your important files and software. Well, we’re going to tell you again. Make a back up
copy of the Inspection Documents.dot file whenever you make a change to the Inspection Documents template. To do this, simply copy the
file Inspection Documents.dot to a floppy disk, or other backup media, and keep it in a place where you’ll be able to retrieve it. If you
do not do this and experience a hard disk problem, all of your template changes will be lost. While we can send you another copy of
the program, we will not be able to recover your changes.
Technical Support
At AHIT, we are committed to supporting our products and helping you with your reporting solutions. In trying to provide you with
the best possible customer service, we offer a variety of ways to receive information or assistance from our company. Our Technical
Support hours are 9 AM to 5 PM Central Time, Monday through Friday.
•
For technical information and/or assistance, please call our Technical Support line at (800) 441-9411
•
Expanded information can also be obtained from our Website at http://www.ahit.com/support.html
•
Our online Bulletin Board system can be accessed from our Website at http://www.ahit.com
•
Technical Support staff can also be reached via Email at [email protected]
InspectIt/OfficePro are trademarks of AHIT, Ltd.
Microsoft/Windows/Word are trademarks of the Microsoft Corporation
© COPYRIGHT 1994-2008 AHIT, LTD.
ALL RIGHTS RESERVED
InspectIt ReportPro for Texas User’s Guide 27
APPENDIX 2: THE TEXAS WDI REPORT
Introduction
The ReportPro for Texas software also includes a program that can be used to complete the Texas Official Wood Destroying Insect
Report. When the report is created, it will be saved as a separate document from the home inspection report. You will find an option
found on the desktop of your computer.
to start this program when you click on the InspectIt Report Writing button
Using the Program
Running the Program
The program is very easy to complete as it utilizes many of the same functions as the inspection form such as check box controls and
INFO buttons. If you create the WDI report immediately after creating the home inspection report, the client and inspection
information will be automatically carried over.
The check box controls and INFO buttons are activated by double-clicking on them. For information on customizing the options
found in an INFO button, this information can be found earlier in this document.
Creating a Plot Plan Drawing
On the final page of the WDI report is an area for you to create a plot plan drawing of the inspected property. The WDI report already
contains some basic shapes for the building, street, direction, and text boxes to indicate areas of infestation, etc. The drawing can be
further modified by using the Drawing toolbar for Microsoft Word shown - the toolbar can be accessed by clicking the button on the
toolbar shown below.
Drawing Toolbar Button
The drawing toolbar contains a selection of tools to create basic shapes, fill colors, arrows, etc. After a few minutes of experimenting,
you will be able to create drawings quickly – see the Word help files for additional information.
The text boxes to the right of the drawing (containing code letters) can be moved to anyplace on the document. You can delete ones
that do not apply and copy paste in as many text boxes as you need for the report.
InspectIt ReportPro for Texas User’s Guide 28
APPENDIX 3: END-USER LICENSE AGREEMENT
This Software, including any documentation and media that accompanies this license, (the "Software") is the property of the American Home Inspectors
Training Institute, Ltd. (AHIT) and is protected by copyright law. While AHIT continues to own the Software, you will have certain rights to use the
Software after you accept this license. Your rights and obligations to use the Software are as follows:
You may:
1)
use one copy of the Software on a single computer at a single site at a single time;*
2)
use the Software on a network, provided that you have a licensed copy of the Software for each computer that can access the
Software over that network. You can acquire LAN or network packs for this purpose;*
3)
after written notice to AHIT, transfer the Software on a permanent basis to another person or entity within your company,
provided that you retain no copies of the Software and the transferee agrees to the terms of this agreement;
4)
modify the text or data that accompanies the Software, in the manner that is described in the User's Guide also accompanying
the Software; and
5)
print the text or data in conjunction with running the Software and supply this print out to other parties in a manner for which
the Software is intended.
*PAY-PER-USE SOFTWARE
If you have purchased this software on a Pay-Per-Use plan, you may install this software on as many computers as you wish
provided that you purchase Report Packs (uses of the software) for each computer that the software is installed. Packs are not
transferable.
*MEMBERSHIP SOFTWARE
If you have purchased this software on a Membership plan, you may install this software on as many computers as you wish
provided that only the licensed user (whose name appears on documents created by the software) operates the software on
each computer that the software is installed. Use of the software by anyone other than the licensed user will require the
purchase of an additional membership. Violations of this license agreement can lead to suspension and/or cancellation of your
membership.
You may not:
1)
print out or copy databases, documents, text, or any other data that accompany the Software, or a substantial portion thereof,
and supply it to any person or corporation;
2)
copy any of the documentation that accompanies the Software;
3)
re-sale, rent, lease, or sub-license any portion of the Software;
4)
reverse engineer, de-compile, disassemble, modify, translate, make any attempt to discover the source code of the Software, or
create derivative works from the Software; or
5)
use the previous version of the Software in addition to an upgraded version received as a replacement of the prior version.
Upon upgrading the Software, all copies of the prior version must be destroyed except for copies retained for archival purposes.
Limited Warranty
AHIT warrants that the media on which the Software is distributed will be free from defects for a period of thirty (30) days from the shipping date of the
Software to you. Your sole remedy in the event of a breach of this warranty will be that AHIT will, at its option, replace any defective media returned to
AHIT within the warranty period or refund the money paid for the Software. AHIT does not warrant that the Software will meet your requirements or that
operation of the Software will be uninterrupted or that the Software will be error-free.
THE ABOVE WARRANTY IS EXCLUSIVE AND IN LIEU OF ALL OTHER WARRANTIES, WHETHER EXPRESS OR IMPLIED, INCLUDING THE
IMPLIED WARRANTIES OF MERCHANTABILITY, FITNESS FOR A PARTICULAR PURPOSE AND NONINFRINGEMENT. THIS WARRANTY
GIVES YOU SPECIFIC LEGAL RIGHTS. YOU MAY HAVE OTHER RIGHTS, WHICH VARY FROM STATE TO STATE.
Disclaimer of Damages
REGARDLESS OF WHETHER ANY REMEDY SET FORTH HEREIN FAILS OF ITS ESSENTIAL PURPOSE, IN NO EVENT WILL AHIT BE LIABLE
TO YOU FOR ANY SPECIAL, CONSEQUENTIAL, INDIRECT OR SIMILAR DAMAGES, INCLUDING ANY LOST PROFITS OR LOST DATA
ARISING OUT OF THE USE OR INABILITY TO USE THE SOFTWARE EVEN IF AHIT HAS BEEN ADVISED OF THE POSSIBILITY OF SUCH
DAMAGES. SOME STATES DO NOT ALLOW THE LIMITATION OR EXCLUSION OF LIABILITY OR INCIDENTAL OR CONSEQUENTIAL
DAMAGES SO THE ABOVE LIMITATION OR EXCLUSION MAY NOT APPLY TO YOU.
IN NO CASE SHALL AHIT’S LIABILITY EXCEED THE PURCHASE PRICE OF THE SOFTWARE. The disclaimers and limitations set forth above will
apply regardless of whether you accept the Software.
General
This Agreement will be governed by the laws of the State of Wisconsin. This Agreement may only be modified by a license addendum which accompanies
this license or by a written document which has been signed by both you and AHIT. If you have any questions regarding this Agreement, please write AHIT
at the address below:
AHIT, Ltd.
N19 W24075 Riverwood Drive, Suite 200, Waukesha, Wisconsin 53188