1
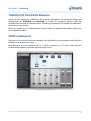
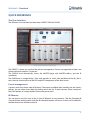
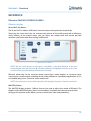
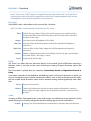
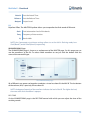
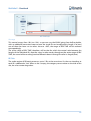
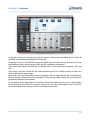
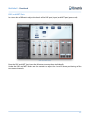
USER MANUAL
version 1.0
MoReVoX • Overloud
THANKS FOR CHOOSING REmatrix _______________________________________3
WHAT IS REmatrix? ____________________________________________________3
USING REmatrix _______________________________________________________4
How to create a preset with REmatrix
4
QUICK REFERENCE _____________________________________________________6
The User Interface
Preset management
IR libraries
Import an IR
Customize IR
Master Effects
Adjust the reverb times
Preferences
Tooltips
About REmatrix
6
6
6
7
7
7
7
7
7
7
LEARN BY OBJECTIVE __________________________________________________8
Installing the VST format on Windows®
Loading REmatrix as an insert plugin
Loading REmatrix as a send (aux) effect
Running REmatrix as a standalone application
Locate the version number of REmatrix
Adjust IR individual and global reverb times
Customizing the IRs
Adjust the MASTER effects
Set an IR in Solo
8
8
8
8
8
9
9
9
9
REFERENCE __________________________________________________________10
REmatrix GRAPHIC INTERFACE AREAS
10
REmatrix display
IR Slots
10
14
DRY and WET Slots
Preset columns
17
18
Preferences
19
Settings
Parameter Smoothness
19
19
Audio Settings...
Authorization
19
20
2
MoReVoX • Overloud
THANKS FOR CHOOSING REmatrix
Thanks for your preference on REmatrix, the result of a long process of conception, design and
development by MoReVoX and Overloud, to create an innovative product that will
revolutionize the world of software reverbs, introducing the concept of a flexible recombination
of the IRs in a convolution.
With your support we will proceed in the direction taken by maintaing the highest quality and
creating better products.
WHAT IS REmatrix?
REmatrix is a new kind of reverb that combines the high fidelity of a convolution reverb with the
flexibility of an algorithmic reverb.
With REmatrix you can combine up to 5 impulse responses, or IR (each with extensive
customizations options), to obtain the final reverb sound.
The user interface of REmatrix
3
MoReVoX • Overloud
USING REmatrix
REmatrix is a reverb processor with many editing possibilities but intended to be used to its full
sonic potential for both experiences programmers and for those who have a more intuitive
approach to the sound.
The fastest way to use REmatrix is to start using the provided presets customizing them for your
to fit your needs adjusting:
• REV TIME, to set the total length of the reverb
• MASTER EQ, to adjust the general colour
The large number of presets of REmatrix has been made in real mixing sessions and is, actually,
the ideal starting point for an immediate use of REmatrix in your projects.
The next step of the customization is to act on the balance of the 5 faders to adjust the base of
the timbral components of the presets.
At its least of potential, REmatrix can also be used as a standard Convolver, i.e. using a single
factory IR or by importing any type of IR in WAV or AIFF format from any library, but with the
immediate added value of the extra processing available on board (modulation, drive,
compression, ...).
One of the features that make REmatrix unique however, is that it can mix more IRs (factory or
user) and distribute them easily in the stereo field generating unprecedented natural and linear
reverberations that are also colourful and aggressive.
Create presets with REmatrix is simple and intuitive as well as offering the possibility to approach
the spatial dimension of the reverb from a new perspective.
How to create a preset with REmatrix
We recommend that you start by loading a single IR and calibrate its parameters via the
Extended Control panel until it meets your taste. At this point add the other IRs (setting the
respective parameters again using the Extended Control panel) trying to position the
subsequent IRs with the purpose of making the stereo panorama unique and special.
For example, starting from an HALL IR, it would be interesting to sum a more central ROOM
(Stereo parameter of the Extended Control panel), to improve the stability in the mono part, and
at same time to sum a PLATE with a slightly enlarged stereophony an a short delay to add a
pleasant and musical wide-decay.
In such a preset, by adding an EARLY IR we can add greater incisiveness, as well as adding a
SPECIAL IR can give an unprecedented three-dimensional character to the final reverb.
Once reached the desired IR mix you can add life to the staticity of the Convolver through the
modulation (MOD) and give more character to the overall sound through the DRIVE and COMP
effects.
The algorithmic reverb (REV), based on the well-known Overloud algorithms, is an indispensable
tool to ensure the queues, even when extreme, always remain natural and musical, at any
setting. The reverb, then, should be generally used as an integration of the Convolver.
4
MoReVoX • Overloud
The DELAY, as the REV, is applied to the sum of the IRs. It’s the ideal tool to create extra spatiality
greatly expanding the tonal possibilities and usability of REmatrix.
REmatrix puts no limits to your creativity, and its extremely intuitive usage actually reduces the
learning curve to zero.
5
MoReVoX • Overloud
QUICK REFERENCE
The User Interface
The REmatrix user interface has three areas: PRESET, DISPLAY, FADER.
Areas of the interface of REmatrix
The PRESET is where you can find the presets management. Presets are organized in banks and
where each bank contains 128 presets.
The DISPLAY area alternatively shows: the MASTER page with MASTER effects, and the IR
waveforms.
The FADER area is composed by 5 slots with controls of: Level, Solo and Mute of the IRs, plus 2
extra slots for Level and Pan of the DRY and WET components of the final sound.
Preset management
A preset stores the whole state of REmatrix. The presets available after installing are the Factory
presets. You can select a new bank by clicking one in the list. To load a preset, select it and press
the LOAD button, or simply double-click on the preset itself.
IR libraries
You can load a new IR in one of the 5 slots of REmatrix at any moment. Click the Extended IR
Controls button and the panel with the IR extended controls will show. In the list of installed IRs,
double-click on one of them to load it.
6
MoReVoX • Overloud
Import an IR
There is a special IR library called My IRs that contains the user IRs. You can import your own IR/s
by clicking the IMPORT button.
Customize IR
Clicking the IR Extended Panel you will see a panel with the IR additional controls. Acting on
those controls you can customize the sound of that IR.
Master Effects
REmatrix includes a MASTER section with 6 effects applied to the output of the 5 Convolvers.
Selecting the MASTER page you will see the effects in a diagram showing how they are
connected to each other. Just click on one of them to select it and see the parameters. Double
click to turn the effect on/off.
Adjust the reverb times
When the MASTER section is hidden and you see the IR waveforms, on the bottom side of the
display you will see the REV TIME fader with which you can adjust the overall reverb time.
Preferences
Click the PREFERENCES button to set the Preferences of REmatrix. When you’re done just click the
button again.
Tooltips
You can enable the showing of help tooltips. When enabled, you will see a brief help text when
you move over a control.
About REmatrix
Click ABOUT to see some information about REmatrix and those who did work to the concept
and to realize it.
7
MoReVoX • Overloud
LEARN BY OBJECTIVE
In this section of the manual you will find some common tasks described. Tasks are by objective,
so that you most likely will find the one fitting your need of the moment.
Installing the VST format on Windows®
The installation of the VST format on Windows deserves a special caution: specify the folder
where to install the VST plugin according to the DAW (the VST host application) current
Preferences.
Follow the steps below:
• Run the VST host application (i.e. Cubase, Sonar...)
• Detect if the host application format is 32 bit or 64 bit (look at the About page)
• Access the Preferences panel of the host application at the VST plugin page
• Write down the current VST folder/s
• Locate the installer of REmatrix of the same bit format of the host application
• Run the installer paying attention at the stage when it prompts to specify the VST folder
• Select one of the folders set within the host VST preferences
This sequence is particularly important. Installing the plugin in a VST folder which is not listed
through the ones set in the host VST preferences won’t let you find it when you will need to load
it.
Loading REmatrix as an insert plugin
Run the host application and load your project (song) or create a new one having at least an
audio track. On the audio track, in the host mixer, locate the Insert button/area. Click there to
add an insert plugin and, from the popup box that will appear, select MoReVoX Overloud >
REmatrix.
Loading REmatrix as a send (aux) effect
Run the host application and load your project (song). In the host mixer locate the send effects
area and click to add one. From the popup box that will appear, select MoReVoX Overloud >
REmatrix.
Running REmatrix as a standalone application
The installer adds REmatrix as a new application through the other ones of the computer, so just
look for REmatrix in the same place where you find any other app and run it from there.
NOTE: all banks and presets are shared between all plugin formats and the standalone
application letting you to share the presets between them all.
Locate the version number of REmatrix
Click the ABOUT button in the top-right side of the user interface. The main display of REmatrix
will show a scrolling text with some information about the product itself. The first information is
the complete name and version number.
8
MoReVoX • Overloud
Adjust IR individual and global reverb times
REmatrix is extremely flexible about reverb times. IRs can easily be lengthened or shortened by
the LENGTH parameter of the IR Extended Controls panel. But the most important reverb time
control is REV TIME. This fader acts on the global reverb time of REmatrix as if it would change all
the active IR reverb times contemporarily by still keeping the reciprocal IR time ratios.
Customizing the IRs
There are different ways to customize the IRs of REmatrix. First, you can adjust the level by
moving the level fader of the IR itself. Next, you can open the IR Extended Controls panel and
have access to a set of additional controls.
Adjust the MASTER effects
MASTER effects do affect the sound at the output of the Convolvers, where there is the global
reverb sound of REmatrix. Click the MASTER button to highlight it and you will see the effects in
a diagram explaining how they are interconnected. Click the effects on the diagram to select
them and see their parameters.
Set an IR in Solo
Click the S button to put an IR in Solo. When an IR is in Solo, the other IRs get temporarily muted
(excluded from processing) and you can hear the input sound processed by that IR only.
NOTE: when an IR is in Solo, active MASTER effect modules stay active but REV and DELAY
which get muted as well like the other IRs.
9
MoReVoX • Overloud
REFERENCE
REmatrix GRAPHIC INTERFACE AREAS
REmatrix display
IN and OUT Vu-Meters
The IN and OUT Vu-Meters of REmatrix show the input and output levels respectively.
Observing the input level you can estimate the volume of the audio processed by REmatrix,
while, looking at the output meter, you can adjust the output level and correct possible
variations due to the other level settings of REmatrix.
IN and OUT Vu-Meters
NOTE: the first small square, on the top of a Vu-Meter, is the Peak indicator. If the level
measured goes over the limit of 0 dB, the Peak indicator will highlight and stay so for a few
instants to show you that perhaps the volume is too high.
REmatrix processing can be mono-to-stereo (mono input, stereo output), or stereo-to-stereo
(stereo input, stereo output) according to the audio preferences (standalone application) or if it
was loaded (plug-in) on a mono or stereo audio track.
NOTE: when the input is mono, both input bars (left and right channels) show the same level.
MASTER display
The MASTER display includes 5 effects that can be used to adjust the sound of REmatrix. The
diagram of the MASTER display shows how the effects are placed and connect to each other.
Acting on the modules of the effects you can control their status and parameters.
10
MoReVoX • Overloud
MASTER effects diagram
MASTER Effects
MOD
Modulation Effect. Modulates the processed sound, after the IR sum and before the other
MASTER effects. The modulation has been conceived fundamentally to remove the staticity of
the classic Convolvers. At extreme settings it is able to provide marked chorus effects.
Spread
Adjusts the scale of the delay times of the reflections of the reverb. The
higher the more the sound is modified with respect to its neutral center.
Motion
The speed of the modulation. The higher the value the more you can
distinguish repetitions of sound patterns.
Intensity
Adjusts the amount of effect applied.
REV (M)
Reverb Effect. Adds an additional algorithmic reverb to the sound of the convolver.
REmatrix is a processor devoted to music and the algorithmic reverb guarantees the absolute
musicality of reverb tails at any setting of the convolver.
NOTE: this effect is automatically muted when an IR is soloed.
Time
Length of the reverb tail.
Colour
Timbre of the reverb.
Diffuse
Controls the geometry of the room impacting on the envelope of the
reverb.
Level
HPF
Reverb output level.
High Pass Filter, pre reverb.
NOTE: the HPF filter has been added to make the algorithmic reverb seamlessly integrate
with the convolution reverb. By varying the values of HPF then we can freely decide which
portions of the spectrum of the convolution reverb should also benefit from the algorithmic
11
MoReVoX • Overloud
reverb. Low values of HPF involve an algorithmic processing which tends to the full band.
Increasing the value of the HPF the algorithmic reverb will be applied proportionally to more
limited portions (into the high frequencies) of the spectrum.
DELAY (M)
Delay Effect. Adds a delay effect to the sound of the Convolver.
NOTE: this effect is automatically muted when an IR is soloed.
Time
Regen
Defines the time delay. Clicking the small note you can synchronize the
Delay to the BPM of the DAW according to all the values of the standard
duration of the notes.
Sets the amount of feedback of the Delay.
Low Cut
High pass filter of the Delay (lower limit of the reproduced frequency
spectrum).
High Cut
Low pass filter of the Delay (upper limit of the reproduced frequency
spectrum).
Stereo
Level
Applies a delay between the Left and Right channels to get a stereo delay.
At a value of 0.0 s, the Delay is mono.
Output level of the Delay.
DRIVE
The Drive is an effect that can add extra density to the overall sound of REmatrix returning a
behavior which is sensitive to the values of the input making REmatrix extremely dense and
musical.
The Drive effect is placed after the sequence: Convolution Reverb ➜ Algorithmic Reverb ➜
Delay.
It has been meticulously developed to add different colors of harmonic distortion in order not
only to simulate the most common compression effects such as that of the tape and the tubes,
but also to add actual distortion (when used in extreme setting marked graphically with a dark
line).
Drive
Colour
Amount of distortion.
Colour of the distortion. Minimum values produce distortions similar to
those typical of a tape. Highest values produce distortions similar to those
of tubes.
COMP
Compressor Effect. Optimized for the usage with reverbs, acts effectively on the dynamics of the
reverb allowing you to easily change the sound by adding aggressiveness and fullness.
Sustain
Changes the Threshold Ratio by simultaneously compensating the Volume.
12
MoReVoX • Overloud
Attack
Sets the Attack Time.
Release
Sets the Release Time.
Output
Output Level.
EQ
Equalizer Effect. The MASTER Equalizer allows you to equalize the final sound of REmatrix.
Gain
Gain/attenuation level of the bands.
Freq
Frequency of intervention.
Q
Band width.
NOTE: the Q parameter at minimum settings allows to set the bell in Shelving mode, LowShelf (Band 1) and Hi-Shelf (Band 2) respectively.
IR WAVEVORMS Page
The IR WAVEFORMS page is shown as a replacement of the MASTER page. On this page you can
see the waveforms of the IRs. To select which waveform to see just click the button with the
name of the wanted IR type.
The IR WAVEFORMS page
IRs of REmatrix are processed together to obtain a virtual resultant IR: the MIX IR. The last button
of the column, MIX, is precisely the resultant IR.
NOTE: the degree of opacity of the waveform indicates the level of the IR. The higher the level,
the more color of the waveform is opaque.
REV TIME
On the IR WAVEFORMS page is the REV TIME control with which you can adjust the time of the
resulting reverb.
13
MoReVoX • Overloud
REV TIME fader
The range
This control ranges from -50% to +50%, so you can vary the IR MIX going from half to double,
with an additional constraint: because even the single IRs can be adjusted in length, if at least
one of them has been set to values close to +50%, the range of REV TIME will be reduced
correspondingly.
The active range of REV TIME, therefore, will be that for which the mutual ratio between the
lengths of the individual IR is kept the same. In other words, throughout the active range of REV
TIME, the sound of the resulting reverb of REmatrix doesn’t change if not for its length (time).
IR Slots
The audio engine of REmatrix processes up to 5 IRs at the same time. On the user interface, to
each IR is dedicated a “slot”. When a slot is empty, the category name written as the title of the
slot, has a less contrasting colour.
14
MoReVoX • Overloud
IR Slots
IR Level Faders
The most important control of the slot is the Fader whose range goes from –∞ to +6 dB. This
fader adjusts the level of the corresponding IR getting a different mix between the IRs and then a
different sound for the resulting reverb where the contribution of the IR in question will be more
or less.
NOTE: if you hold the SHIFT key down while moving an IR fader, all of them will move
together. That’s useful for raising or lowering all IR levels by the same amount.
S • Solo – M • Mute
Next to the faders are the buttons S and M to put the IR in Solo and Mute respectively. When you
have one IR soloed, the other ones are automatically muted. In that condition, however, you will
still be able to add other IRs in Solo by clicking their S button.
Soloing an IR, the MASTER effects DELAY and REV will be temporarily disabled.
At the bottom side of each slot, if one IR is loaded, you will see the name of the IR library that IR
belongs to, and the name of the IR itself.
Each slot has a set of Extended Controls accessible by pressing the Extended Controls Panel
button.
IR Extended Controls Panel
This panel is a vertical column on the left side of the interface.
15
MoReVoX • Overloud
IR Extended Control Panel
At the top is the name of the IR type (slot) the panel is referred to, then follows the list of the IR
available in the database of REmatrix for that type.
Under the list there is the IMPORT button with which you can import an user IR and insert it into
the database in the current category. WAV and AIFF audio files are allowed.
Then come the Extended Controls for the selected slot. Two Fully Parametric Equalizers: EQ1 and
EQ2.
Then there is the PAN control for the stereo positioning and the STEREO control to adjust the
stereo width of the stereo image.
Afterwards, the LENGTH control to adjust the length of the IR. Note that the IRs of the REmatrix
libraries can be shortened but also elongated. This further possibility makes the use of REmatrix
particularly flexible and immediate.
At the bottom of the panel there is the DELAY control with which you can insert a delay before
the initial processing of the IR. Using this control, you can adjust the response times of the IRs
involved to obtain the resulting sound of simulated environment.
16
MoReVoX • Overloud
DRY and WET Slots
Last two slots of REmatrix adjust the levels of the DRY part (input) and WET part (processed).
DRY and WET Slots
Even the DRY and WET slots have the M button to mute them individually.
Under the DRY and WET faders are the controls to adjust the L and R stereo positioning of the
two stereo channels.
17
MoReVoX • Overloud
Preset columns
The left column of the interface contains information about REmatrix presets.
Preset column of REmatrix
The upper display shows the name of the current preset. In the right part of the display there is
the indicator of changes that turns on when you modify the state of REmatrix after loading or
after saving a preset, thus, when there are changes that need to be saved.
BANKS List
This list show the banks of presets currently present in the REmatrix database. Each bank
contains 128 positions to save up to 128 presets.
Below the list there are the ADD and REMOVE buttons to respectively add and remove a bank of
presets.
NOTE: factory banks, those containing the initial presets of REmatrix, can be freely modified
or removed. To restore a factory bank of presets, right click a bank (even a brand new bank
you just created), and choose “Restore from a factory bank...” and then select the name of the
factory bank to restore. Warning: any presets already present in the bank will be overwritten.
PRESETS List
Under the list of banks is the list of presets. As already stated, each bank contains 128 preset
positions. Each preset also shows a star which indicates if it’s a preferred preset.
To load a preset in REmatrix, you can select it and click LOAD or just double click it.
Also below the preset list is the SAVE button to save the current settings in the selected preset.
18
MoReVoX • Overloud
Then, the last button is the X to remove a preset emptying the position occupied in the PRESETS
list.
Preferences
The Preferences panel of REmatrix is where you set some options to customize its usage and
behavior and where you authorize/de-authorize it.
Settings
These options customize the usage of REmatrix around certain aspects of the user interaction.
Don’t change DRY, WET Levels and Mutes upon preset loading
Prevents REmatrix from touching DRY and WET levels when loading a new preset. This is useful
when you have set up the correct levels for the DRY and WET portions of the processed signal
and want to test different presets to find the one that best fits your needs.
Loading REmatrix as a SEND effect, for example, you might want to set the DRY level to -∞ (or
Mute it) and keep it so while testing various presets.
NOTE: when this option is selected, changes to DRY and WET levels and their Mutes won’t
mark the current preset as modified. So if you move these parameters, don’t expect that
REmatrix warns you to save the preset when you load a new one.
Parameter Smoothness
This setting selects how smoothly REmatrix will transition from one overall reverb sound to the
new one when you move a parameter requiring a deep recalculation of the matrix of Convolvers.
For example, when you change an IR length, the reverb needs to be set up from scratch with a
full recalculation. This normally is performed quite fast, but if you are dragging the IR length
fader thumb, multiple recalculations will take place. The way a new reverb replaces the previous
one is adjusted by this setting.
Smooth, Medium and Fast are the values allowed. Smooth is the slowest one but provides a
natural transition. Fast, on the opposite, will improve responsiveness with some compromise on
the sound during the transitions. In the middle there is the Medium option, which most of the
time does the job.
Audio Settings...
This setting is only present in the Standalone format of REmatrix because the application has to
take control of the audio interface (plugins formats leave this job to the DAW application).
• Output
Selects the output audio device where REmatrix will stream the processed audio stream.
• Input
Selects the input audio device where REmatrix will get the audio stream to process.
• Sample rate
Sets the sample rate in audio samples per second.
19
MoReVoX • Overloud
• Audio buffer size
Sets the size of the audio buffers processed by REmatrix. Higher values for this setting will
increase the latency but will lower the CPU load.
Authorization
This section of the PREFERENCES panel manages the license authorization of REmatrix.
Clicking the button Manage your Authorizations... you can access the authorization/s of
REmatrix. The Standalone format of REmatrix is particularly comfortable when you run it to
authorize. Click this button and you will see the Overloud account information window.
You need to be registered as an Overloud user in order to authorize Overloud products.
Since the instructions to authorize can change occasionally, you won’t find a description of the
authorization process here. Just run an Internet browser and access our website
www.overloud.com. Once there, select the FAQ section from the header and then click the
Installation/Authorization title on the left side.
20