1
HOW TO USE TIME ATTENDANCE OPERATING SYSTEM
User Manual -- Administrator
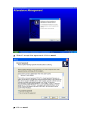
INSTALLATION
Installation of Z K Software administrator/user need original
software installation cd before use this software
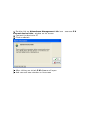
First insert CD of Z K in CD Rom
Right click on CD Open Zk Attendance Management 2008 v
3.7.1 build 121 folder . Double click on setup.exe user see this
window on his desktop click on Run.
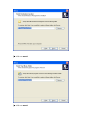
After click on Run software ask you select language then select
English Language & click on ok
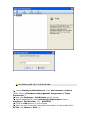
User see setup window on his screen
Click on next
Select I accept the agreement click on next
click on next
click on next
click on next
click on Install
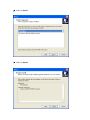
this software must have to install related driver
click on next
click on next
click on next
After completing Driver installation process user see another
window
This window ask you to YESrestart a computer now / No I will
restart the computer later
Select Yes restart a computer now
Click on finish
After click on Finish tab Z K software installation process completed
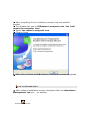
Z K SOFTWARE OPEN
After softasre installation process completed User see Attendance
Management .lnk icon on desktop
Attendance Management.lnk
Double click on Attendance Management .lnk icon .user see Z K
connect device hints window on his screen
Connect the device to PC
Click on ok tab
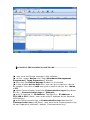
After clicking on ok tab Z KSoftware will open
And user see new window on his screen
CONNECT THE MACHINE TO SOFTWARE
user must set Device manage In this software
at first select device icon from Attendance Management
Programme [ Temp Supervisor ] Window
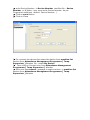
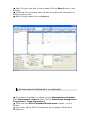
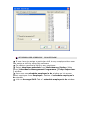
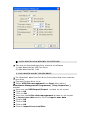
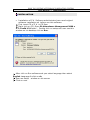
then user see Device Manage window on his screen
in this window device Edit area user can give a name to device
as suitable first click on Add then give a name to device Ex:- Name
= E9
select Communication type from Communication type Drop down
Box Ex :- Communication type = Ethernet
write IP Address in IP Address Text Box Ex:- IP Address =
192.168.1.224 ( Note:- user must write IP Address As per personal
LAN Setting )
write Communication key in Communication key text Box Ex:Communication key = 0( Note:- user must write Communication key
As per Fingerprint machine’s default Communication key)
write Device Number in Device Number text Box Ex:- Device
Number = 1( Note:- user must write Device Number As per
Fingerprint machine’s default Device Number )
Click on save Button
Click on Close
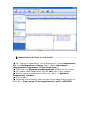
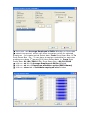
For connect the device first select the device from machine list
section from Attendance Management Programme [ Temp
Supervisor ] Window Ex:- select My Device
Then click on Connect icon from Attendance Management
Programme [ Temp Supervisor ] Window
then user see connect message in status column in machine list
section from Attendance Management Programme [ Temp
Supervisor ] Window
DEPARTMENT SETTING IN SOFTWARE
For setting of department & sub department select Department
list from Maintainance /Option (Main Menu) Attendance
Management Programme [ Temp Supervisor ]
Then user see Department Management Window on his screen
For create news department click on add icon of this window
Write A name of department which you have in Add New
Department window
Click on ok
Following this procedure user can set all sub department which he
have Ex: - input name of the department to add = ASHTECH
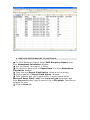
SET EMPLOYEE LIST IN SOFTWARE
select Employee Maintenance from Maintenance /Option
(Main Menu) Attendance Management Programme [ Temp
Supervisor ]
user see employee list Window on his screen
Select department from include sub Department area of
employee list Window Ex:- ASHTECH
Click on Add Button of this window
User can set employee’s personal information in this window Ex:AC No. =1 ,Name = AAA …..
After filling all text box of this window Click on Save Button of this
window
Following this procedure user can set all employee’s information in
software one by one.
After filling all data click on close tab
SET MANTAINANCE TIMETABLE IN SOFTWARE
For create a timetable in software select Maintenance timetable
from Maintenance /Option (Main Menu) Attendance Management
Programme [ Temp Supervisor ]
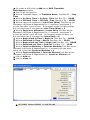
Then user see Shift Timetable Maintenance window on his
screen
user must define Shift Timetable as per company’s HR Rules &
Regulations
for create a shift click on Add tab of Shift Timetable
Maintenance window
then fill all the text box
Write a Timetable Name in Timetable Name Text Box Ex :- Day
Time
Write a On Duty Time in On Duty Time Text Box Ex :- 09:00
Write a Off Duty Time in Off Duty Time Text Box Ex :- 18:00
Write a Late error Alllownce in Late Time (Mins) Text Box as per
company’s HR Rules & Regulations Ex :if company employees 5
minute late after clock in time & Company accept his late coming
But not more than 5 minutes then Late Time (Mins) = 5
Write a Early error Alllownce in Leave Early Text Box as per
company’s HR Rules & Regulations Ex :if company employees 5
minute go before clock out time & Company accept his early go
But not more than 5 minutes then Leave Early = 5
Write a Begin clock in Time in Begin in Text Box Ex :- 00:00
Write a End clock in Time in End in Text Box Ex :- 23:59
Write a Begin clock out Time in Begin out Text Box Ex :- 00:00
Write a End clock out Time in End out Text Box Ex :- 23:59
Write a Count as Workday in Count as Workday Text Box as per
company’s HR Rules & Regulations Ex:- if company one day work
count as 1 day then Count as Workday = 1
Write a Count as Minutes in Count as Minutes Text Box as per
company’s HR Rules & Regulations Ex:- Count as Minutes = 1
click on Add tab
click on close tab
SET SHIFT MANAGEMENT IN SOFTWARE
in this software user can must assign a shift to all employee for
assign a shift select Maintenance Shift Schedule from
Maintenance /Option (Main Menu) Attendance Management
Programme [ Temp Supervisor ] window
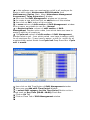
then user see Shift Management window on his screen
for create a new shift first click on add button of this window
then click on Edit button of this window
in name column of shift section of Shift Management window
write a name as suitable to user Ex:- Normal
in Beginning Date column of shift section of Shift
Management window write a date ,from which date user have to
assign a shift for all employee
in Cycle unit column of shift section of Shift Management
window select a unit ,from which period user have to assign a shift
for all employee Ex:- if user have to assign a shift for month for all
employee then select Month from Cycle unit Drop Down Box . Cycle
unit = month
then click on Add Time Button of Shift Management window
then user see Add shift Time Period Window
in select Shift category for this Time Period Section write a
check mark on Day Time (09:00 -18:00) Check Box
Click on Ok Tab
Click on Close Tab of Shift Management window
SET EMPLOYEE SCHEDULE IN SOFTWARE
If user have to assign a particular shift to any employee then user
can assign a shift by using this software
For assign a particular shift to any employee
Select employee schedule from Maintenance/Option (Main
Menu) Attendance Management Programme [ Temp Supervisor
] window
then user see schedule employee‘s Ac window on his screen
select employee from Employee Section of schedule employee‘s
Ac window
click on Arrange Shift Tab of schedule employee‘s Ac window
then user see Employee attention option(EMPL.Name) window
on his scren
click on
window
+
sign of Employee attention option(EMPL.Name)
then user see Arrange Employee’s Shifts Window on his screen
select time period which user have to assign a shift for selected
Employee . for create period Select date From Drop Down Box & To
Drop Down Box Ex :- if user have to assign a schedule for particular
employee on date 1st january2010 then Select date in From Drop
Down Box= 01/01/2010 & To Drop Down Box =01/01/2010
click on ok tab of Arrange Employee’s Shifts Window
click on ok tab of Employee attention option(EMPL.Name)
click on close tab of schedule employee‘s Ac window
SET ATTENDANCE RULE IN SOFTWARE
User must set Attendance rule in this software as per company’s
Rule & Regulation
For set Attendance Rule Select Attendance rule from
Maintenance/Option (Main Menu) Attendance Management
Programme [ Temp Supervisor ] window
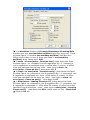
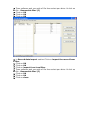
then user see Formula Attendance Checking Rule window on
his screen
in this window user can set Basic Settings in Basic Settings
Section of Formula Attendance Checking Rule window
user can set unit Name in unit Name Text Box as suitable as user
Ex:- unit Name= ASHTECH
user can set Abbreviation Name in Abbreviation Name Text Box
as suitable as user Ex:- Abbreviation Name= ASHTECH
in From {Start a Week}Drop down Box user can select any
weekday as per company’s Rule & Regulation Ex:- as per company’s
Rule & Regulation the weekday start from Monday then select From
{Start a Week}= Monday
in From {Start a month}Drop down Box user can select any
month day as per company’s Rule & Regulation Ex:- as per company’s
Rule & Regulation the month day start from 1 then select From
{Start a month }= 1
in the Longest time Zone under Drop down box user Feed
minutes figure in the Longest time Zone under drop down box
EX:- Office time is daily in hour 9 Hour then feed in the Longest time
Zone under drop down box= 540
in the Shortest time Zone exceed Drop down box user Feed
minutes figure in the Shortest time Zone exceed drop down box
EX:- Office Shortest time is daily in hour 4 Hour then feed in the
Longest time Zone under drop down box= 240
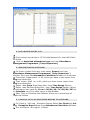
in calculation Section of Formula Attendance Checking Rule
window user see one workday as{Mins} text Box .user can Feed
minutes figure in window one workday as{Mins} text Box EX:Office time is daily in hour 9 Hour then feed in one workday
as{Mins} drop down box= 540
in clock –in over{mins . Count as late } drop down box feed
minutes figure by company’s rule & regulation Ex:- if company’s
rule & regulation is employee enter in office after 5 minute of office
time that calculate him as late mark. then type in clock –in
over{mins . Count as late } drop down box 5
In clock –in over{mins . Count as early} drop down box feed
minutes figure by company’s rule & regulation Ex:- if company’s rule
& regulation is employee out from office before 5 minute of office
time that calculate him as early go mark. then type in clock –in
over{mins . Count as early} drop down box5
in after{mins . Leaving Count as OT } drop down box feed
minutes figure by company’s rule & regulation Ex:- if company’s rule
& regulation is employee in office after 60 minute of office time that
calculate him as overtime mark. then type in after{mins . Leaving
Count as OT} drop down box 60 & check mark on this Check Box
Click on Ok tab
DATA DOWNLOAD & REPORTS IN SOFTWARE
Two way to download data form machine to software
1) data download by USB Pen Drive
2) data download by LAN
DATA DOWNLOAD BY USB PEN DRIVE
For download data from Pen drive first collect data from machine
to pen drive
Connect the pen drive to pc
Select USB Disk managementfrom Data (Main Menu)
Attendance Management Programme [ Temp Supervisor ]
window
then user see USB Import/Export window on his screen
Click on OK
Click on OK
then user see U Disc data management window on his screen
in import user data section Click on import user data
Click on OK
Click on OK
Click on OK
Click on import from local Disc
Then software ask you path of file then select pen drive & click on
ok Ex:- Removable Disc (F)
Click on OK
Click on OK
Click on OK
in Record data import section Click on import the record from
U Disc
Click on OK
Click on OK
Click on import from local Disc
Then software ask you path of file then select pen drive & click on
ok Ex:- Removable Disc (F)
Click on OK
Click on OK
Click on close
DATA DOWNLOAD BY LAN
First connect the device to PC By LAN Network For that LAN Cable
to device
click on download attendance logs icon from Attendance
Management Programme [ Temp Supervisor]
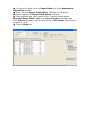
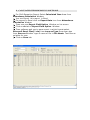
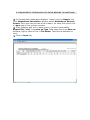
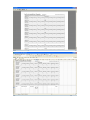
SHOW REPORT IN SOFTWAER
For show a report first user must select Report icon from
Attendance Management Programme [ Temp Supervisor ]
window Then user see Attendance Calculation window on his screen
First select Department or All, which you have to see report from
Dep drop down Box
Then select Staff no. or All, which you have to see report from
Dep drop down Box
Select date From Drop Down Box from Time Range Section
Select date To Drop Down Box , from Time Range Section ,Which
period report user have Ex:-From = 26/01/10, To =26/01/10Click
on Calculate icon From Main menu of this Window
After Click on Calculate tab Software Show you various type of
report as follows
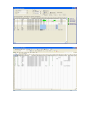
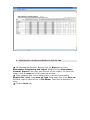
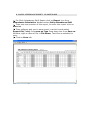
CLOCK IN /OUT LOG EXCEPTION REPORT IN SOFTWARE
For Clock in / Out Log Exception Report Select For Clock in / Out
Log Exception Report Area from Attendance Calculation Window
You can Export this report in Excel
For export to Excel click on Export Data icon from Attendance
Calculation Window
Then user see Export Field Option Window on his screen
Click on ok tab of Export Field Option Window
Then software ask you to save report in which format select
Microsoft Excel Files(*.xls) from save as Type Drop down box
from Save as Window. type a name of file in File Name Text Box as
suitable for user.
Click on Save tab
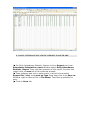
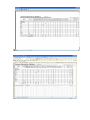
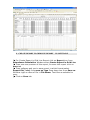
SHIFT EXCEPTION REPORT IN SOFTWARE
For Shift Exception Report Select Shift Exception Report Area
from Attendance Calculation Window
You can Export this report in Excel
For export to Excel click on Export Data icon from Attendance
Calculation Window
Then user see Export Field Option Window on his screen
Click on ok tab of Export Field Option Window
Then software ask you to save report in which format select
Microsoft Excel Files(*.xls) from save as Type Drop down box
from Save as Window. type a name of file in File Name Text Box as
suitable for user.
Click on Save tab
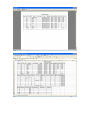
CALCULATED ITEMS REPORT IN SOFTWARE
For Shift Exception Report Select Calculated Item Area from
Attendance Calculation Window
You can Export this report in Excel
For export to Excel click on Export Data icon from Attendance
Calculation Window
Then user see Export Field Option Window on his screen
Click on ok tab of Export Field Option Window
Then software ask you to save report in which format select
Microsoft Excel Files(*.xls) from save as Type Drop down box
from Save as Window. type a name of file in File Name Text Box as
suitable for user.
Click on Save tab
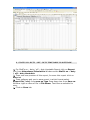
DAILY ATTENDANCE STATISTIC REPORT IN SOFTWARE
For Daily Attendance Statistic Report click on Report icon from
Attendance Calculation report Window select Daily Attendance
Statistic Report Then user see preview of this report, for save this
report click on save tab of this preview window
Then software ask you to save report in which format select
Report file(*.xls) from save as Type Drop down box from Save as
Window. type a name of file in File Name Text Box as suitable for
user.
Click on Save tab
ATTENDANCE GENERAL REPORT IN SOFTWARE
For Attendance General Report click on Report icon from
Attendance Calculating and report Window select Attendance
General Report Then user see preview of this report, for save this
report click on save tab of this preview window
Then software ask you to save report in which format select
Report file(*.xls) from save as Type Drop down box from Save as
Window. type a name of file in File Name Text Box as suitable for
user.
Click on Save tab
DEPARTMENT ATTENDANCE STATISTIC REPORT IN SOFTWARE
For Department Attendance Statistic Report click on Report icon
from Attendance Calculation Window select Attendance General
Report Then user see preview of this report, for save this report click
on save tab of this preview window
Then software ask you to save report in which format select
Report file(*.xls) from save as Type Drop down box from Save as
Window. type a name of file in File Name Text Box as suitable for
user.
Click on Save tab
STAFF’S ON - DUTY / OFF – DUTY TIMETABLE IN SOFTWARE
For Staff’s on – duty / off – duty timetable Report click on Report
icon from Attendance Calculation Window select Staff’s on – duty
/ off – duty timetable
Then user see preview of this report, for save this report click on
save tab
Then software ask you to save report in which format select
Report file(*.xls) from save as Type Drop down box from Save as
Window. type a name of file in File Name Text Box as suitable for
user.
Click on Save tab
DAILY ATTENDANCE SHIFT IN SOFTWARE
For Daily Attendance Shift Report click on Report icon from
Attendance Calculation Window select Daily Attendance Shift
Then user see preview of this report, for save this report click on
save tab
Then software ask you to save report in which format select
Report file(*.xls) from save as Type Drop down box from Save as
Window. type a name of file in File Name Text Box as suitable for
user.
Click on Save tab
CREATE REPORT IN GRID LINE REPORT IN SOFTWARE
For Create Report in Grid Line Report click on Report icon from
Attendance Calculation Window select Create Report in Grid Line
Then user see preview of this report, for save this report click on
save tab
Then software ask you to save report in which format select
Report file(*.xls) from save as Type Drop down box from Save as
Window. type a name of file in File Name Text Box as suitable for
user.
Click on Save tab