1
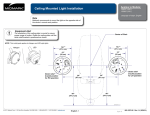
Back
Next
Applies to Models:
Track Light with Monitor Installation Instructions
153829 (-000 thru -008)
153830 (-000 thru -008)
153906 (-010 thru -018)
153907 (-010 thru -018)
Language of origin: English
Light
39-3/4” when monitor
is sideways
38-1/2”
24° Monitor
Dead Zone
warning
46° Light
Dead Zone
Equipment is not suitable for use in the presence
of a flammable anesthetic mixture.
Equipment Alert
This installation requires at least two
service technicians.
Monitor
91"
Transformer
61-3/4" Possible
Trolley Travel
61-3/4”
140.0”
Note
The Light has a 46° Dead Zone at the foot end of the track.
The Monitor also has a 24° Dead Zone as shown here.
50°
The Dead Zones move along the track length with each trolley.
336°
Equipment Alert
96"
to
128"
314°
The Light and Monitor Flex Arms can come into contact with one another.
Note
In addition to a template on the shipping box, a
full size paper template, kit 002-1260-00, is also
available.
© 2011 Midmark Corp. | 60 Vista Drive Versailles, OH 45380 USA | 1-800-643-6275 | 1-937-526-3662 | midmark.com
9"
5-3/4"
35"
1
Wall
38-1/8"
003-1925-00
Rev. J (6/21/13)
Back
Next
Recommended Mounting Locations
10"
6-1/2"
Equipment Alert
Access hole. Dimensions shown indicate
centers for through holes for cabling.
The A/V Cable and Facility Power line
require two 2-1/2'' minimum diameter
access holes thru the ceiling. Visually confirm
that you will have room to feed the cables thru the
backer board access hole before mounting the track
to the ceiling.
5-1/4"
6"
Foot End
4-1/2"
Video Input
Source Box
12"
A/V Source
access hole
Mounting holes
Note:
Snap in Connector
for Facility power
32"
Template is
on shipping
box
66-1/2"
Mounting holes
Equipment Alert
Light Trolley
9-5/16"
8-5/8"
Consult a professional to verify installation
complies to all local building codes.
Remove the Video Input Source
Box Cover and Power Source Cover
while the track is still in the box so you can see
the Facility Power and A/V Cable input access
holes as you mount the track on the ceiling.
79-1/2"
90"
Track is
91" Long x 10"
wide
(with end caps in
place)
11/16"
Pivot Point
of Chair
Rotation
Note
32"
In addition to a template on the shipping
box, a full size paper template, part number
003-2022-00, is also available.
Backer
Board
90" Long
x 10" Wide
28-1/2"
Monitor Trolley
Mounting holes
14"
Head End
Transformer
Channel in
Backer Board
for wire run
Longitudinal
Center of
Chair and
Track
© 2011 Midmark Corp. | 60 Vista Drive Versailles, OH 45380 USA | 1-800-643-6275 | 1-937-526-3662 | midmark.com
2107i
2
Equipment Alert
The orientation and position of the track mounted light and monitor in relation to the chair is critical!
Back
Next
Service Tip
Recommended Ceiling Support Structure
warning
Note
Use only the Lag Bolts (3 1/2” x 5/16”) supplied with the
track assembly. Do not substitute a lower grade. All 6
Lag Bolts and Washers must be used to secure track to
support structure and they each must be anchored in a supporting
stud. Pre-drill pilot holes in structure with a 7/32” diameter drill bit
to prevent cracking the support structure. Drill holes 2 3/8” deep.
Midmark does not supply the ceiling support structure; these illustrations show suggestions only. Consult a qualified professional to install
the appropriate support structure. The weights listed apply only to the
track system, not the ceiling support. To prevent the flex arms from
drifting, the track assembly must be level and not deflect more than
1/16” over a 12” span.
For Installation
Perpendicular
to Joist.
For Installation
Parallel to Joist.
Service Tip
Equipment Alert
Leave the plastic wrap on the
Trolleys while mounting the
track to prevent them from
rolling up and down the track.
The A/V Cable and Facility Power line
require two 2-1/2'' minimum diameter
access holes thru the ceiling. Visually confirm
that you will have room to feed the cables thru the
backer board access hole before mounting the track
to the ceiling.
© 2011 Midmark Corp. | 60 Vista Drive Versailles, OH 45380 USA | 1-800-643-6275 | 1-937-526-3662 | midmark.com
3
Equipment Alert
Track with Light and Monitor
Weight (Max.)..........157 Lbs. (71 kgs)
Back
Next
Recommended Ceiling Support Structure...continued
Note
Midmark does not supply the ceiling support structure;
these illustrations show suggestions only. Consult a
qualified professional to install the appropriate support structure. The weights listed apply only to the
track system, not the ceiling support. To prevent the
suspension arms from drifting, the track assembly
must be level and not deflect more than 1/16” over a
12” span.
For Existing
Construction with
Joists running
parallel
8-5/8" On
Center
Pilot Hole
Power and
A/V Cable
access holes
Existing
Ceiling
Equipment Alert
The A/V Cable and Facility Power line
require two 2-1/2'' minimum diameter
access holes thru the ceiling. Visually confirm
that you will have room to feed the cables thru the
backer board access hole before mounting the track
to the ceiling.
Equipment Alert
Track with Light and Monitor
Weight (Max.)..........157 Lbs. (71 kgs)
1/4" Fender
Washer
For installations
on suspended ceilings
Level
3-1/2" x 5/16"
Lag Screws
Support Structure
built to Local Codes
Support
Structure
built to
Local
Codes
warning
Use only the Lag Bolts (3-1/2” x 5/16”)
supplied with the track assembly. Do not
substitute a lower grade. All 6 Lag Bolts
and Washers must be used to secure track to support
structure and they each must be anchored in a supporting stud. To prevent cracking of support structure,
pre-drill pilot holes in structure using a 7/32” diameter
drill bit. Drill holes 2-3/8” deep.
90" L x 12" W x 2" D Dimensional Lumber (cut
hole in suspended ceiling
for pallet)
Facility Electrical
Power and Audio/
Video Source
Access Hole
© 2011 Midmark Corp. | 60 Vista Drive Versailles, OH 45380 USA | 1-800-643-6275 | 1-937-526-3662 | midmark.com
4
Ceiling
Backer
Board
Suspended
Ceiling
Track
Back
Next
Color Page
Connections at the Video Control End (Foot of the Chair)
Facility A/V
Source Cables
warning
Turn off the Facility power to this circuit at the Electrical Control Panel before wiring the power to this unit.
Equipment Alert
The A/V Cable and Facility Power line
require two 2-1/2'' minimum diameter
access holes thru the ceiling. Visually confirm
that you will have room to feed the cables thru the
backer board access hole before mounting the track
to the ceiling.
Facility Power
Snap in Connector
for Facility Power
Access Hole for Facility
A/V Source Cables
WARNING
Always disconnect light from the power source before removing any covers. Failure to do so may result in personal injury.
Step 1:
Track and Backer Board are shown
separated here for visual clarity
Remove the video input source box cover (four screws) and the power source cover (two nuts).
Step 3: Feed the facility A/V source cables
thru the access hole and connect to
the track A/V cables.
Power
Source
Cover
Brown
Video Input
Source
Cover
Black
White
Blue
Green
Caution
Connect ground wire to ensure system ground continuity. Failure to do so may result in electric shock.
Keps Nut
Step 2: Feed the facility power through the clamp hole and connect to terminal block as shown.
Note: To assure proper grounding, keep the star washer on the painted surface of the
mounting plate, place the ground wire on top of it and tighten down both with the Keps nut.
© 2011 Midmark Corp. | 60 Vista Drive Versailles, OH 45380 USA | 1-800-643-6275 | 1-937-526-3662 | midmark.com
Ground Wire
Star Washer
Grounding Stud
5
Ground Wires
(green and yellow)
Track A/V
Cables
Back
Next
Equipment Alert
Disconnect power from the Track Light Monitor with the use of a wall mounted light switch may cause issues with display settings on the Personal Computer. While power is
still being applied to the TLM, the PC has the ability to detect and communicate with the monitor. Communication between the PC and the monitor of the TLM can happen even if the monitor has been placed in Standby Mode using the power button on the monitor or the remote control. If a wall mounted light switch is used to cut power to the
TLM, the PC may revert back to the default display settings of a single monitor. To avoid this, please do not install a wall mounted light switch to cut power to the TLM. If a wall monitor
light switch must be installed for service reasons, please contain switch inside of a locked cover.
Note
Recommendation, to properly connect multiple Track Light Monitors together on one coax cable connection, please read the following:
• Do not use a splitter to connect multiple TLM’s together without an amplifier. Adding splitters decreases the signal power, plus long runs of coax cable further increases the power
losses.
• Proper connection of splitters and amplifiers should occur as follows: SPLITTER
AMPLIFIER
SPLITTER
AMPLIFIER.
Do not connect a TLM directly from a splitter output. Best performance is achieved when the TLM’s are directly connected to the output of an amplifier.
• Use a Bidirectional Cable-TV Amplifier to split and amplify the cable signal power up so that each output is as strong as or stronger than the original signal.
Amplifying the signal helps the signal propagate down a long cable and still maintain enough power at the monitor or TV to display a nice picture.
• It is recommended to use an Bidirectional CableTV Amplifier that comes with an adjustable gain control knob. Gain knob to be used to properly adjust signal for TLM.
Examples of Bidrectional Cable -TV Amplifier Set-up
Input
Gain
IN
Min
Input
Min
Cable
Input
Input
Gain
IN
Gain
IN
Min
Max
Output
OUT 1
OUT 3
OUT 2
OUT 4
For
More
Max
Output
OUT 1
OUT 3
OUT 2
OUT 4
Max
Output
OUT 1
OUT 3
OUT 2
OUT 4
OR
1 - 2 Split
Cable
Input
Input
Gain
IN
Min
Max
Output
OUT 1
OUT 3
OUT 2
OUT 4
DA3245
© 2011 Midmark Corp. | 60 Vista Drive Versailles, OH 45380 USA | 1-800-643-6275 | 1-937-526-3662 | midmark.com
6
Back
Next
Installing the Monitor and Light Down Tubes
Monitor and Light Down Tubes
Monitor
Trolley
Light
Trolley
Step 1: Screw the monitor down tube into the
monitor trolley casting as far as it will
go and secure by tightening the two
lock patch set screws in the trolley
casting.
Step 2: Screw the light down tube weldment
into the light trolley casting as far as it
will go and secure by tightening the two
lock patch set screws in the trolley
casting.
DA2153i
Light Down
Tube Weldment
Ceiling Height
inches (cm)
Monitor
Down Tube
Tape
Color
(see Note)
Coiler Bowl
Assembly
029-4871-0X
Dash No.
Four Set
Screws
with Lock
Patches
Monitor Suspension Tube
Light Suspension Tube
052-0678-0X-216
030-1845-0X-216
Dash No.
Tube Length
Dash No.
Tube Length
96*/98 in. (244/249 cm)
Red
-00
-00
5.69 in. (15 cm)
-00
11.71 in. (30 cm)
99/102 in. (251/259 cm)
Orange
-01
-01
8.69 in. (22 cm)
-01
15.71 in. (40 cm)
103/106 in. (262/269 cm)
Yellow
-02
-02
9.69 in. (25 cm)
-02
19.71 in. (50 cm)
107/110 in. (272/279 cm)
Green
-03
-03
10.69 in. (27 cm)
-03
23.71 in. (60 cm)
111/114 in. (282/290 cm)
Blue
-04
-04
14.69 in. (37 cm)
-04
27.71 in. (70 cm)
115/118 in. (292/300 cm)
Violet
-05
-05
18.69 in. (47 cm)
-05
31.71 in. (80 cm)
119/122 in. (302/310 cm)
Gray
-06
-06
22.69 in. (58 cm)
-06
35.71 in. (90 cm)
123/126 in. (312/320 cm)
Brown
-07
-07
26.69 in. (68 cm)
-07
39.71 in. (101 cm)
>126 in. (320 cm)
Black
-08
-08
30.69 in. (78 cm)
-08
43.71 in. (111 cm)
* There are no Down Tubes available for ceilings lower than 96 " in height
© 2011 Midmark Corp. | 60 Vista Drive Versailles, OH 45380 USA | 1-800-643-6275 | 1-937-526-3662 | midmark.com
7
Note:
The “Tape Color” Column corresponds to
the correct tape color on the VGA and Coax
Harnesses for a specific suspension tube.
That color will be exposed directly beneath
the coiler bowl assembly. If you should ever
move this unit to another location with a different ceiling height, you will need different
down tubes and the harness will have to be
retracted or extended in the coiler bowl until
the correct tape color is exposed.
Back
Next
Light Flex Arm Connections and Installation
Note
Have an assistant support the Flex Arm as
you make the connections necessary for
installation.
Step 3: Rotate flex arm as needed to align nearest two mating slots and insert the key. Lower collar over key.
Equipment Alert
To ensure quiet operation, apply a thin coat of lubricant to the inside of the Light Down Tube and to the outer surface
of the bearing shaft.
Step 1:
Step 4: Align set screw
directly over key
and tighten.
Collar
Connect the light cable connector
to the pivot arm. bend any excess
cable as shown and push it up into
the down tube.
Key
Set
Screw
Down Tube
Note
Al
ign
Key
Set Screw
Fle
Use only the 10-32 x 3/16 Set
Screw with lock patch supplied
with the Flex Arm.
Collar
xA
rm
wi
th
Tra
c
k
Pivot
Bearing
DA2252_a
Set
Screw
hole
Step 2: Slip the flex arm into down tube. Align the flex
arm with the track, light facing the head end. (Set screw hole will be 180° across from flex arm.)
© 2011 Midmark Corp. | 60 Vista Drive Versailles, OH 45380 USA | 1-800-643-6275 | 1-937-526-3662 | midmark.com
8
DA2258i
Back
Next
Tension Adjustments
Neck Cover
(Long Neck)
Arm Pivot
Adjustment Screws
To adjust tension at Light pivot joint...
A)
B)
C)
D)
Remove screw cover as shown.
Loosen set screw.
Loosen or tighten light pivot adjustment screw.
Tighten set screw.
To adjust tension at Arm / Yoke pivot joints...
A) Remove neck cover as shown (see Note).
B) Loosen or tighten appropriate screws to adjust tension.
Light Pivot
Adjustment Screw
Yoke Pivot
Adjustment Screws
Note: Some halogen models have a short neck on the lighthead. It is not
necessary to remove the neck cover on these models.
Set Screw
Short Neck
Arm Pivot
Adjustment Screw
Yoke Pivot
Adjustment Screw
To adjust Flex Arm tension...
A) Remove end cap and top cover as shown.
B) Loosen or tighten adjustment nut as desired.
Adjustment Nut
© 2011 Midmark Corp. | 60 Vista Drive Versailles, OH 45380 USA | 1-800-643-6275 | 1-937-526-3662 | midmark.com
9
Back
Next
box
Monitor Flex Arm Installation
Step 1:
Step 3: Slip the flex arm pivot bearing into the
down tube.
A) Align the flat on the pivot arm with the right weldment flat.
B) Rotate the flex arm assembly as needed to bring the nearest two slots into alignment.
C) Insert the key and lower the collar.
D) Align Set screw directly over key and tighten.
Down
Tube
Cover
(top)
Place the top half of the down tube cover
(from flex arm box) and the collar temporarily
onto the down tube above the key slot. Lightly tighten the set screw to hold in place.
Collar
Put Key in Slot
Note
Lower Collar
Have an assistant support the Flex Arm as
you make the connections necessary for
installation.
Insert
Set Screw
OUT
Note
Use only the 10-32 x 3/16 Set
Screw with lock patch supplied
with the Flex Arm.
OUT
Step 6: Pull cable down thru the pivot bearing and route it
into the flex arm channel.
Step 2: Pull the bottom half of the down tube
cover off the flex arm (held in place with magnets).
Cable
Path
Alig
n
to r Flat o
ight
n
wel Pivot
dme
B
nt fl earing
Down Tube
at
Cover (bottom)
Step 4: Remove the screw from the end and
slide the channel cover off.
l
ne
an
ch
Channel
Cover
Step 5: Remove two screws and the
bracket from flex arm channel.
Screw
Bracket
DA2257i
© 2011 Midmark Corp. | 60 Vista Drive Versailles, OH 45380 USA | 1-800-643-6275 | 1-937-526-3662 | midmark.com
10
Back
Next
Flex Arm Cable Connections
Monitor Mounting and Tension Adjustment
Step 1: Route the A/V cable into the flex arm channel as shown.
The cable connections are staggered for a better fit along the length of the channel.
To adjust tension on monitor mount...
Remove screw, handle and cover. While holding mount, turn adjustment nut to increase or
decrease the tension.
Note: Remove monitor from mount before adjusting tension.
OUT
+
Four M4.7 x
12mm long
mounting screws
included with the
monitor
Channel
Cover
and Screw
Down Tube
Cover (bottom)
e
bl
Ca
in
l
ne
an
ch
Bracket
Step 2: Install the bracket (two
screws) over the cable
to hold it in place.
Step 3: Slide the channel cover into the
bottom of the flex arm and secure
with the screw.
Note: The screw can be installed on either side of the
channel.
Step 4: Replace the bottom down
tube cover, lower and
screw the top cover onto it.
© 2011 Midmark Corp. | 60 Vista Drive Versailles, OH 45380 USA | 1-800-643-6275 | 1-937-526-3662 | midmark.com
11
OUT
To mount the monitor on the hoop arm assembly...
Insert the four screws included with the monitor thru the hoop
arm assembly mounting plate and into the back of the monitor
as shown.
Back
Next
Monitor A/V Connections
Step 2: Remove and reuse two screws from
the monitor back to attach bracket onto monitor back.
Step 1: Plug cables into the back of the Monitor:
Note:
For a clean appearance, attach all connectors
to the monitor even though some may not be
attached to a source.
Cover
Bracket
Step 3:
© 2011 Midmark Corp. | 60 Vista Drive Versailles, OH 45380 USA | 1-800-643-6275 | 1-937-526-3662 | midmark.com
12
Divide cables around the mounting plate,
looping at the bottom while making
connections to the monitor. Install cover (3 screws) securing the cables.
Back
Next
Side Rail Installation
Note
The side rails are notched at each end to prevent them
from hitting the mounting brackets on the track.
Step 2: Use a rubber mallet to lightly tap the
side rails into the space between
the track extrusion and the backer board.
Step 1: Remove the 2 screws and
the end cap from the front
end of the track.
End Cap
Step 3: Secure the end cap on the front end of the track with
2 screws.
DA2259
© 2011 Midmark Corp. | 60 Vista Drive Versailles, OH 45380 USA | 1-800-643-6275 | 1-937-526-3662 | midmark.com
13
Back
Next
Range of Motion
Equipment Alert
The light and monitor flex arms can come into contact with one another.
© 2011 Midmark Corp. | 60 Vista Drive Versailles, OH 45380 USA | 1-800-643-6275 | 1-937-526-3662 | midmark.com
14
Back
Next
Monitor and Light Flex Arm Tension Adjustments
Monitor Flex Arm Tension Adjustments
Light Flex Arm Tension Adjustments
End Cap
End Cap
Screw holds
cover on
Tension
Adjustment
Nut
End Cap
Push in
buttons
to remove
End Cap
Screw
Increase
Screw holds
End Cap on
Decrease
Decrease
Increase
DA2274
DA2274
Tension
Adjustment
Nut
Monitor Specification:
Refer to Manfaturer’s User Manual for monitor specifications.
Note
Refer to: www.exorvision.com for additional information on
service and warranty for the monitor and remote control.
The Model and Serial Number will be required.
© 2011 Midmark Corp. | 60 Vista Drive Versailles, OH 45380 USA | 1-800-643-6275 | 1-937-526-3662 | midmark.com
15
DA187500i