1
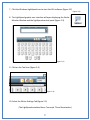
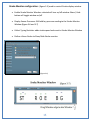
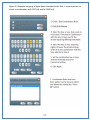
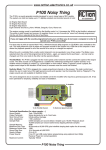
i LightSpeed models LSCv2, LSF, LightSpeed Classic and LSS. LightSpeed Graphic User Interface 1.50 Build 12.01 ii Copyright and Trademarks The LightSpeed writer is manufactured by Stenovations, Incorporated. Copyright © 2013 by Stenovations, Incorporated. All rights reserved. LightSpeed Writer user guide. Fourth Edition. No part of this publication may be reproduced, stored in a retrieval system or transmitted in any form or by any means electronic, mechanical photocopying, recording or otherwise, for any purpose other than the purchaser’s personal use, without the prior written permission of Stenovations, Incorporated. The information provided in this guide is furnished for informational use only and is subject to change without notice. The software described in this guide is furnished under a license agreement, and may be used or copied only in accordance with terms of that agreement. Microsoft, Windows XP, Windows 7 and Windows 8 are registered trademarks of Microsoft Corporation in the United States and or other countries. All other brands or product names are the trademarks or registered trademarks of their respective holders. Printed in the USA iii WARNINGS! CALIBRATED SENSITIVE EQUIPMENT: Do not place objects on top of the LightSpeed. Do not apply more pressure to the LightSpeed keys than can be expected during normal writing operations. KEYPAD REMOVAL WARNING: Avoid any upward pulling force of the LightSpeed keys themselves. Doing so can separate the keys and destroy the LightSpeed. SD cards used must not have a storage capacity over 1 Gigabyte SD card must be installed before the LightSpeed is powered on or backup to the SD card will not occur. Do not remove or insert SD card with LightSpeed powered on TECHNICAL SUPPORT: Technical Support can be contacted at 304-346-8363 or by email at [email protected] iv Table of Contents Section 1: LightSpeed Introduction Section 2: Initial Installation and Quick Start Section 3: LightSpeed configuration Toolbar Selections Real-Time Backup SD Card Backup Writer Settings Number Bar Settings Stroke Monitor configuration Sleep Mode configuration Bluetooth settings Section 4: LightSpeed Key Sensitivity Adjustments Basic Threshold Settings Single-Key Threshold Settings Advanced Settings Combination Rule Editing Anti-Stacking Options Section 5: Bluetooth Connectivity Section 6: StenoEditor Section 7: Raw Data Viewer Section 8: Translation from Secure Data card Section 9: General Information Section 10: LightSpeed Maintenance Plan v 6 7 7 12 12 13 13 14 15 16 17 18 19 20 21 22 24 25 28 30 31 35 38 Section 1: LightSpeed Introduction The LightSpeed is compatible with Microsoft Windows 8, 7, XP and Vista. Bluetooth Reset Power and Bluetooth Indicator USB Connection SD Card Slot Power Button (figure 1-1) Power Button: The Power button is used to turn the LightSpeed on and off. It is used to place the LightSpeed into Bluetooth Pairing Mode and to indicate the battery state of charge. Power and Bluetooth indicator: The power and Bluetooth light will indicate power applied, Bluetooth status and writing to SD card backup. SD Card Slot: The Secure data card slot is used to house a 1GB (Max size) SD Card for backup of Smartwriter and RTF files. (1 GB SD card included with LightSpeed) Bluetooth Reset: The Bluetooth reset button is found on the bottom half of the LightSpeed. It is a Pinhole access to the Bluetooth reset /on button. USB Connection: The USB is used to connect a 5 pin mini-B connector. The port is used for Steno transmission and battery charging. Battery Pack: The LightSpeed comes equipped with a rechargeable battery pack see section 8 for charging details 6 Section 2: Initial Installation and Quick Start For initial LightSpeed installation the following steps must be performed sequentially 1. Insert Secure Data card into Secure Data card port 2. Connect LightSpeed to the PC USB port using the supplied USB cord 3. Press and Hold the Power Button until the Blue Power Indicator Light illuminates, then release the power button 4. Allow time for the LightSpeed’s USB drivers to load. Once finished the PC will display a message stating the USB component is ready for use. This will only be required on initial installation. 5. Insert disc labeled LightSpeed Installation into the CD-ROM drive. It should start loading the LightSpeed Graphic User Interface (GUI) automatically. If the software does not start to load, go to the Windows Start Menu, then My Computer. Left-click the CD-ROM drive that contains the GUI disc. Once the folder is open double-click the file named Autorun.exe. 6. From the Installation Menu Click Install (figure 2-1) a. b. c. d. e. f. Agree to the license agreement / Click “I agree” Choose component / Click “Application Files” / Click Next Choose Install location / Click Next Choose Start Menu folder / Click Next Choose to Load Eltima drives Software will complete loading 7 7. Click the Windows LightSpeed icon to start the GUI software (figure 2-2) (Figure 2-2) 8. The LightSpeed graphic user interface will open displaying the Stroke Monitor Window and the LightSpeed control panel (figure 2-3) (figure 2-3) 9. Click on the Tool icon (figure 2-4) (figure 2-4) 10. Select the Writer Settings Tab (figure 2-5) (The LightSpeed emulates Baron Transcript TX and Smartwriter) 8 11. Under the Writer Mode drop-down select Baron Transcript TX 12. Click “OK” / an Updating Keyboard Flash memory notification should display (figure 2-5) 13. Return to Main GUI screen click the Start/Stop button, “Start” should display 14. Use the Com Port dropdown to select the desired port assignment (figure 2-6) 15. Click the Start/Stop button until “Stop” is displayed 16. Open CAT Program. Continue to next page (figure 2-6) 9 Brief descriptions of individual CAT programs translation digitalCat: 1. 2. 3. 4. Under Translator menu, select Steno Source Select Baron Realtime for Primary Steno device Choose appropriate COM Port from step 12 Click “OK” to save settings, begin translation Eclipse: 1. 2. 3. 4. 5. 6. 7. 8. 9. Under Production menu, select User Settings Choose the input tab Select Transcriptor X or Baron TX in the writer field Ensure Read from Cable checkbox is unchecked Click COM Setup Button Choose appropriate COM Port from step 12 Click “OK” to save settings on Window Click Test to test the Port Click “OK” to save settings, begin translation Case Catalyst: Users should consider using Smartwriter settings in step 10 if the software requires an initial stroke on the writer before starting a transcript. Ensure the “Wait for initialization packet box is checked in Writer Setting Tab. See Section 3, Step 4 1. 2. 3. 4. 5. Under tools menu, select Options, then Translate Options Click the Options button at the bottom left of dialog Under Realtime Tab, choose Baron TX Choose appropriate COM Port from Step 12 Click “OK” to save settings, begin translation 10 ProCat: Users should consider using Smartwriter settings in step 10 if the software requires an initial stroke on the writer before starting a transcript. Ensure the “Wait for initialization packet box is checked in Writer Setting Tab. See Section 3, Step 4 1. 2. 3. 4. 5. Under Translate Menu, select Preferences Choose Writer Tab Select Baron TX Choose appropriate COM Port from Step 12 Click “OK” to save settings, begin translation For proper LightSpeed startup and shutdown the following steps must be performed sequentially Normal LightSpeed Startup and Translation sequence 1. 2. 3. 4. 5. 6. 7. Ensure SD card is inserted into SD card port Connect LightSpeed to PC using supplied USB cable Power up LightSpeed Start LightSpeed Graphic User Interface (GUI software) Verify settings GUI settings and click Start Start Translation software and verify steno source settings Start Translation Ending translation and Powering down LightSpeed sequence 1. Stop CAT Program Translation 2. Click Start/Stop button (figure 2-6) until “Start” is displayed. A message will appear with a notification that the Writer has stopped 3. Close the LightSpeed GUI program 4. Press the Power button momentarily. The power light will extinguish 5. Disconnect the USB cable. 11 Section 3: LightSpeed Configuration Access the configuration setting by clicking the “wrench” icon on the main screen. Toolbar selections: Multiple LightSpeed configurations can be saved and applied at a later time Set Default: Resets all configurations to factory setting Load: Used to load a previously save configuration setting Save: Used to save current configuration for later use. Real-time Backup: (Figure 3-1) configuration is used to assign save locations for RTF, Smartwriter and Raw Steno files to the PC. Back up real-time checkbox: (Default checked to save files) Add / Remove: used to add and remove additional save locations Browse icon: used as shortcut to view saved files Browse RAW files icon: used as shortcut to view RAW steno files Translate from file checkbox: used to select retranslation from Raw files Selection of this box will convert a RAW data file into a RTF file. A prompt will display for selection of the RAW file to convert. Once selected a prompt for save to location will appear. 12 SD card Backup: (figure 3-2) configuration is used to select files saved to LightSpeed SD card. (See section 8 for detailed SD card information) Use Smartwriter: select to save Smartwriter files to SD card Use RTF backup: select to save RTF files to SD card Reveal SD Card: select to make SD card viewable to Windows “My Computer” Auto Save: Time backups files are updated See Section 8 for SD card backup use Writer settings: (figure 3-3) Writer Mode: used to select steno source format Enable Noise suppression: select to eliminate sensor noise Wait for initialization packet: checked in conjunction with Smartwriter Mode Detect stuck keys: Not Active. In place for future use Re-initialized writer when stuck key detected: Not Active. In place for future use 13 Number Bar Settings: (figure 3-4) Use Classic number bar (as a single key) Number key + Letter Key. Use enhanced number bar 1 (all numeric keys) Number bar keys will write their corresponding numbers. Use enhanced number bar 2 (#at center) Number bar keys will write their corresponding number. The center number key becomes a standard number bar which can be used in conjunction with letter “A” to get a 5 and “O” to get a 0, or “AO” to get 50 Ignore numeric keys pressed with letter keys (can be used in conjunction with enhanced selections) Instructs software to ignore numeric keys when pressed with letters keys Emulate zero keys as #D (can be used in conjunction with enhanced selections) Emulate zero keys as #O (can be used in conjunction with enhanced selections) (Figure 3-4) 14 Stroke Monitor configuration: (figure 3-5) used to control Stroke display window Enable Stroke Monitor Window: selected will turn on/off window. Show / Hide button will toggle window on/off Display Sensor Pressures: Will add key pressure reading to the Stroke Monitor Window (figure 3-6 and 3-7) Collect Typing Statistics: adds stroke speed and count to Stroke Monitor Window Define a Steno Stroke to Show/Hide Stroke monitor (Figure 3-6) 15 Sleep Mode Therory of operation Touching the keyboard in order to find starting position, or just resting one's fingers on the keys, could generate an unwanted steno stroke being sent to CAT software. The Sleep Mode's function is to discard any stroke in which at least one finger remains in contact with a key for longer than X amount of time. The default setting is two seconds. So if you place your fingers on the keyboard, and maintain contact with at least one of the keys for two seconds or longer, when you release all keys, no steno stroke will be generated. Another option is to define a null stroke, that is, a finger combination that does not send any stroke out to one's CAT software. Sleep Mode configuration: (figure 3-8) Seconds: set to assign amount of time pressed keys will end stroke if continous pressure is being applied to keys, click “OK” Define empty (null ) Stroke: 1. 2. 3. 4. 5. Left-click on the box with the three dots, Type in the left-side keys Hit the spacebar to move the cursor to the right-side keys. Typing a vowel also moves the cursor to the right of the entry window Click the Add button and then the Close button, Click “OK” (figure 3-8) 16 Bluetooth: (figure 3-10) Bluetooth Always Allowed: When selected Bluetooth pairing is available at all times Bluetooth only allowed when USB is disconnected: When selected Bluetooth operation will only be permitted without the USB cord connected Bluetooth disabled: When selected Bluetooth functions are disabled. (figure 3-10) See Section 5 for Bluetooth connectivity 17 Section 4: LightSpeed Key Sensitivity Adjustments Basic Threshold Theory of Operation LightSpeed sensors are capable of sensing the slightest pressure. It is necessary to set a pressure threshold (numerical value) that establishes the point at which pressure upon a key is sufficient to generate a steno letter within a stroke. Having the right combination of pressure threshold settings is critical to using the LightSpeed to its fullest potential. Setting a higher numerical value will increase amount of pressure required to generate the steno letter. Lowering the number decreases the amount of pressure required to generate a steno letter. Reporters with a light touch should start with thresholds at 250 to 300 for consonants and 100 to 120 for vowel key sensors. Reporters with a heavier touch should start with consonant key thresholds set to the 400 to 500 range. Vowels keys should be set at the 100 to 120 range. These are recommended threshold starting points and should be adjusted to the reporter’s personal preference at some point. Access the Key sensitivity setting by clicking the “Finger Press” icon on the main screen. figure 4-1 (Figure 4-1) 18 (Figure 4-2) Basic Threshold adjustments Tab: (figure 4-2) (The Default Basic Threshold settings are 300 for consonants and 200 for vowels) Pressure View Window. The first block indicates the key that is being adjusted. The key can be selected by depressing the LightSpeed key or by selecting with the mouse cursor. P1, P2 and P3 boxes. The figures inside the boxes signify the current amount of pressure being applied to the corresponding key’s sensors. The figures above the boxes are the recorded peak pressures applied with the corresponding key’s sensors during adjustments. The pressure readings will range from 0 to 1023. S1, S2 and S3 boxes. Used to set the desired amount of pressure on the corresponding key sensors to register a key strike. The higher the setting the more pressure is required to register the key strike. A lower setting will lessen the amount of required pressure. The desired numeric sensor settings are entered into the S1, S2 and S3 boxes and then saved by the Apply/Apply All button 19 Selected Keys. Keys selected for sensitivity adjustment will become darkened and provide an approximate sensor location. The amount of sensors on individual keys will vary. Apply/Apply All. When selecting “Apply” the settings will be saved to the individual key being adjusted. If “Apply All” is selected the settings will be saved and applied to all keys. Single-Key Threshold Theory of Operation Due to the experience of the creator of the LightSpeed, a Single-Key Threshold option was added. When using the LightSpeed on the job, he began getting the word "approximate" translating unexpectedly (the initial P- was defined as approximate). Unbeknownst to him, his left middle finger was ever so slightly touching the initial P-. Raising the Basic Threshold to account for unintentional initial P- at times would result in the initial P- not up in other combinations, such as STPH, TPH. The Single-Key Threshold feature was added to help eliminate unintentional key touches when a single key is struck. The user only needs to raise the Single-Key Thresholds on the keys that are being struck unintentionally and are the sole key being used during a steno stroke. Single-Key Threshold adjustments: (figure 4-2) (The Default Single-Key threshold settings are 500 for consonants and 300 for vowels) The Single-Key Threshold boxes, indications and sensor settings are identical to Basic Threshold adjustments. 20 Advanced Settings: Access advanced settings by selecting the “Advanced” Tab during Sensitivity Settings Not use Key processing Rules: Selected disables Advanced Key Processing Rules. Use Combination Rule: Selected enables Combination Rule Settings Use Preponderance Rule: Removed for future use (figure 4-3) 21 Combination Rule Theory of Operation The Combination Rule creates a second basic threshold that only applies to a key's sensors when that key is stroked in combination with other keys whose sensors reach their basic thresholds. One typical example, beneficial to many reporters, is assigning a higher basic threshold to the final -L key only when it is struck in combination with -PBT (nt) and/or -PBD (nd). See figure 4-5 for example of this ruling being setting. However, the final -L can at times also have a lower basic threshold, for example, when hit in combination with the -FP T. See figure 4-6 for example of the Rule being set. Combination Rule Editing: Note: the Combination Rule feature is only available when connected to a computer via USB cable. It will not function when writing to a computer by means of Bluetooth. 1. Select “Use Combination Rule” in the Advanced menu window (figure 4-5) 2. Click the 3. Select the Edit Button (figure 4-5) The Combination Rule editing window will open (figure 4-5) 4. Select the Key or keys that needs to reach Basic Threshold in combination with the keys being set in combination thresholds 5. Select the Key or keys that need higher of lower Threshold settings when struck in combination with the keys set in Step 4 6. Set the basic threshold desired pressures numerical setting 7. Click Apply. The rule will be save and applied to the LightSpeed configuration 8. Combination Rules that have been applied can be viewed, edited and deleted by clicking the “Show All” button. The Combination list window will open and display all Rules in use. (figure 4-5) 22 Figure 4-5 Example assigning a higher basic threshold to the final -L key only when it is struck in combination with -PBT (nt) and/or -PBD (nd). 23 Anti-Stacking Options: Access the Anti-Stacking options by clicking the “Rotating” icon on the main screen. (Figure 4-7) Solution 1: disabled / in place for future use Solution 2: Selection will provide the option to set selected keys and percentage of reduction in pressure to end stroke. Solution 3: Splits defined stroke XXX-YYY into two strokes YYY and XXX depending on flags specified Solution 4: Splits stroke when no numeric and vowel keys pressed. For example STKPWHR-FPL would be FPL and STKPWHR Solution 5: Selection accounts for Key sensor latency during rapid writing (7 Strokes per second or more) (figure 4-8) 24 Section 5: Bluetooth Connectivity LightSpeed writers are equipped with Bluetooth and can be connected wirelessly to personal computers (PC) with compatible Bluetooth adapters. The PC must support 'Human Input Devices' and 'Serial Port' Bluetooth profiles (HID and SPP), and should support Bluetooth 2.0+. Windows 7 supports HID and SPP natively, and will be used for the following instructions. Windows XP and Windows Vista will be similar. Consult the documentation that came with your computer for specific Bluetooth Pairing instructions. Bluetooth setup 1. Connect the LightSpeed to the PC using the USB cable and start the LightSpeed GUI (See Section 2 for details) 2. In the LightSpeed GUI, click on the Wrench icon, and then select Bluetooth. Select either "Bluetooth always allowed" or "Bluetooth only allowed when USB disconnected. (Figure 3-10). Click “OK”. 3. If “Bluetooth always allowed” is selected skip step 4 4. If “Bluetooth only allowed when USB disconnected" is selected in steps “b.” a. Close GUI program (program is not required for this function setting. b. Disconnect USB cable 5. Hold down the LightSpeed’s Power Button until the blue Transmitting Indicator light begins to flash (figure 1). This indicates that the LightSpeed's Bluetooth is enabled and is in pairing mode. 6. Add a new Bluetooth device following the instructions for your version of Windows and Bluetooth software. If you're using Windows 7, double click on the Bluetooth icon beside the clock, then click "Add Device" (figure 5-1 for Windows 7) 25 (figure 5-1) 7. Select LightSpeed device and continue. If prompted for a “Pairing Code”, use the serial number on the bottom of your LightSpeed (figure 5-2) (Figure 5-2) 8. Wait for the Windows to notification that it has completed installing Driver software for the LightSpeed (figure 5-3) (figure 5-3) 26 9. To view the COM Port, Right-Click on the LightSpeed device icon and select Properties. The COM Port will be listed under Device Functions. (figure 5-4) (figure 5-4) 10. Open CAT program and set Realtime settings to the correct COM Port and writer type. The LightSpeed should be set to “Baron Transcriptor X”. For example, in DigtalCat “Baron Realtime” would be selected. (figure 5-5) (figure 5-5) 11. Start Translation. The Blue Indicator Light goes to solid (stop flashing). The Indicator light will only remain solid while translation is in progress. Once translation stops the indicator light will begin flashing. To end Bluetooth connection push the power button momentarily (figure 1-1). LightSpeed will power down. 27 Section 6: Steno Editor The Steno Editor program displays stroke, key pressure and timestamp readings provided by the RTF file generated during backups. The Steno Editor readings can be used as a tool to analyze the LightSpeed user’s performance. 1. Access the Steno editor program by clicking the StenoEditor icon found in the Programs LightSpeed folder (figure 6-1) (Figure 6-1) 2. Open the File tab and select Open. 3. Select the RTF/CRE file to be analyzed. The files will be found in the save location established in Section 3, Step 2 4. Click Open. The Stroke data and the detailed Stroke monitor window appear 28 `The “Time” column displays the time the stroke was made The “Stroke” column displays keys used for translation The “Raw Stroke” column displays all keys sustaining pressure during the stroke but not necessarily used in translation (light shaded keys) 5. Using the mouse curser select the Stoke to be analyzed. The Stroke monitor window will display a detailed reading of key pressures. (figure 6-2) (figure 6-2) The blue and green numerical values indicate the pressure applied at the time the stoke was made The dark shaded letters indicate the keys that registered during the stroke. Keys reaching the threshold settings established in Section 4 The light shaded letters indicate the keys that did not register during the stroke. Keys failing to reach the threshold settings established in Section 4. Stroke Times Window (figure 6-3): Provides the individual Key time stamp during the stroke. Access the window opening the Options tab and selecting “Stroke Times”. (Figure 6-3) 29 Section 7: Raw Data Viewer The Raw Data files are a Log of raw data generated by the sensors of the LightSpeed. They do not include actual steno notes but rather the recorded pressures of individual keys. The Raw Data files can be used to retranslate the same jobs using multiple LightSpeed configurations. Access the Raw Data Viewer program by clicking the Raw Data Viewer icon found in the Programs LightSpeed folder (figure 7-1) (Figure 7-1) 1. Open the File tab and select Open. 2. Select the LightSpeed Raw Data file (*.LS0,*.LS1 extension) to be analyzed. The files will be found in the save location established in Section 3, Step 2 Click Open. The Raw data and the detailed Pressure window appear The mouse curser when placed on the blotches will provide pressure reading of individual key sensors throughout the pressure application Pressure Window 3. See figure below for description of Raw Data Viewer symbols 30 Section 8: Translation from Secure Data Card Secure Data Card (SD card) The LightSpeed stores backup RTF and Smartwriter files to the SD card depending on selections made during Step 3, Section 3 The SD cards used must not exceed 1 gigabyte of memory capacity The SD card must be installed prior to powering up LightSpeed Each time a new back up RTF or Smartwriter file is needed the LightSpeed will need to be powered off and powered on The SD card must not be removed until the LightSpeed has been powered down Do not format the SD card while installed in the LightSpeed The SD card should be installed face up. DO NOT FORCE the card into the slot. A click will be felt when the card has been installed correctly Remove the SD card by slightly pushing the card until a click is heard. The card can then be removed from the LightSpeed Translating from SD Card 1. Removed SD card from LightSpeed 2. Insert SD card into computer’s SD card slot. Once inserted the computer Open dialog box should appear. It should display the Removable Drive location and the folders and files on the card. See example below 3. Continue through the folders by date until the files to be translated are found (file.000 Smartwriter / XXXX.RTF RTF file) 4. Select the RTF or Smartwriter file 5. Translate the files In accordance with the CAT programs instructions 31 Follows is a brief description of individual CAT programs translation of RTF and Smartwriter files (CAT user manual should be referenced for actual instruction). digitalCat: Translating backup Smartwriter files 1. Under Translator Menu, choose Steno Source 2. Change the Primary Steno Device to Stentura Disk and click “OK” 3. Under Translator Menu, choose Start Translation. 4. Navigate to the SD card as described earlier 5. Select the Smartwriter file (file.000) and click open Eclipse: Translating backup Smartwriter files 1. Select user settings and choose the Input tab 2. Change the Writer type to Smartwriter 3. Make sure the Read from is set to the Drive or folder 4. Navigate to the SD card as described earlier 5. Click “OK” on the prompting screens 6. Click Read Notes 7. Select the Smartwriter file to be translated 8. Click Read then “OK” 9. Click Translate Case Catalyst: Translating backup Smartwriter files 1. Click Read Notes 2. Set the writer to a Stentura 3. Choose Browse as the method and 4. Then navigate to the SD card as described earlier 5. Click “OK” on all prompt screens 6. Click on the file to translate 7. Click Save to save the file 8. Once saved, double-click the folder created (during step 7) to open the Translation window 32 9. Confirm appropriate dictionaries are selected and method is from File 10. Click Translate digitalCat: Translating backup RTF files 1. Under File Menu, chose Open. A Open file window will display 2. Select Rich Text Format (RTF/CRE) in the Files of Type dropdown 3. Select the RTF file to Translate 4. Steno Notes will display in Steno Window 5. Under Translator menu select Retranslate All Eclipse: Translating backup RTF files 1. Under File Menu click Open Notes 2. Name the Notes file to create 3. Press Enter 4. Choose “Yes” to create Notes File 5. Under File menu select Import 6. Change “Files of Type” option to RTF 7. Browse to location of RTF, select and click Open 8. Translate Notes file using appropriate dictionary Case Catalyst: Translating backup RTF files 1. Click Read Notes 2. Set Writer to Stentura 3. Choose “Browse” as method 4. Click Browse button, navigate to the file to be translated 5. Click “OK” on all screen prompts 6. Click file to Translate 7. Click Save, double-click folder created to open translation window 8. Select appropriate dictionaries 9. Select Method is from File 10. Click Translate 33 TurboCat: Translating backup RTF files 1. From Main Menu, chose Utilities button 2. Select File Exchange using RTF/CRE 3. Using Arrow keys, choose the RTF file to import 4. Name the transcript, press Enter (If error message appears concerning number of strokes, press Space to continue) 5. Press any key to exit Utilities 6. Press F10 to open Job Menu 7. Use Arrow key to select imported job 8. Choose Note Utilities 9. Choose Extract Notes 10. Press Enter to create file with default name 11. Choose Translate (with job still highlighted) 12. Choose Yes to overwrite existing job, File translates 13. Press Space bar to continue Premier Power: Translating backup RTF files (Premier Power must have 4.01 update) 1. Select Tools menu 2. Select Power DOS 3. Choose IMP-RTF 4. Choose Select 5. Use Arrow Keys to locate file to convert. Press Space to select 6. Press Enter to begin translation 7. Choose Yes in confirmation window 8. The RTF file is now converted 9. Translate Imported file using dictionary 34 Section 9: General Information Battery details and Charging The LightSpeed comes equipped with a rechargeable internal battery pack The On/Off Power Button display colors signify the state of battery charging Green signifies the battery pack is at Full Charge Orange signifies that the battery pack is discharging (LightSpeed in use) Red signifies that the battery is reaching the end of its charge The Battery pack can be charged using the supplied USB cord connected to the LightSpeed and a computer The computer must be on and the USB connection powered Ensure that the computer’s “Power Saver” settings do not disable USB ports The LightSpeed may remain on or off for charging The LightSpeed charges at 4 hour intervals. If continued charging is necessary the LightSpeed must be disconnected and reconnected Replacement of the battery pack must be performed by Stenovations technicians LightSpeed Unplugged Warning Window Displayed in the event the LightSpeed has become unplugged or shutdown Check security of USB cable connections Assure LightSpeed has not powered off Window should close once device has restored communication 35 About Icon (?) Provides Steno Pad (LightSpeed) Serial number Firmware loaded to LightSpeed Graphic User Interface version and Build (LightSpeed Software) Appearance configuration: used to customize the GUI appearance (figure 3-9) Enable transparency and select percentage of transparency Minimize on start. Selection will start GUI minimized to taskbar. Stroke monitor window will display maximized Shows icon in task bar when minimized when selected 36 Skins configuration: Select and apply to customized the GUI Skins (Figure 3-10) (Figure 3-10) 37 Section 10: LightSpeed Maintenance Plan Stenovations LightSpeed Maintenance Plan Terms and Conditions Eligibility: LightSpeed must be in working condition at the time of purchasing the maintenance plan. Customers may elect whether or not to have loaner coverage for an additional fee at the time of maintenance plan purchase. Pricing and Fees: Maintenance plans purchased during the 30 day period after your initial warranty has expired are $300.00 per year. Additional loaner coverage may be purchased for $150.00 per year. Maintenance plans purchased beyond the 30 day period of the initial warranty are $500.00 for the first year with each year thereafter being $300.00. Additional loaner coverage may be purchased for $150.00 per year. All prices are stated in U. S. dollars and are subject to any local taxes, duties or fees. Published prices are subject to change without notice. No refunds of price adjustments will be made on prior purchases. Maintenance plans are nonrefundable, but may be transferable upon sale of covered LightSpeed. Stenovations must be notified prior to potential sale of LightSpeed and a transfer fee will be charged. Your canceled check, credit card payment or paid invoice statement indicates acceptance of the LightSpeed maintenance plan’s terms and conditions. Scope of Coverage: Any and all requests for service must be scheduled through Stenovations Technical Support Department, 304-346-8363. The maintenance plan will cover the battery and all internal parts, but will not cover damage any abuse or neglect to the LightSpeed. Returned Shipping for LightSpeed repair work is paid for by Stenovations, but Stenovations has the right to determine means and method. 38 If additional loaner coverage has been purchased all shipping will be paid for by Stenovations at our discretion; however, the loaner will be sent via 2-day express delivery, where available. Loaner machines are not available for rent. All loaner machines will remain the property of Stenovations, Inc. Loaner must be returned within 3 business days after receipt of repaired LightSpeed or will be billed at the full retail price. A maintenance plan must be in place before consideration will be given for a trade-in value on future writers Stenovations may offer with trade-in option. Stenovations, Inc. 606 Virginia Street East, Suite 200 Charleston, WV 25301 304-346-8363 www.stenovations.com 39