1
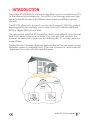
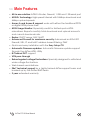
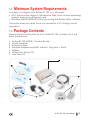
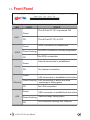
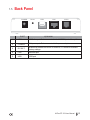
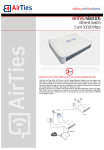
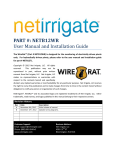
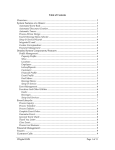
ADSL2+ Combo Router Firewall USER MANUAL This manual has been prepared by AirTies Wireless Networks Corporation. All rights reserved. Manual Overview This manual guides you through the steps necessary for setting up and configuring your AirTies device. Please read this manual carefully before beginning the installation process. The Warranty does not cover failure or damage as a result of not following the instructions in the manual. AirTies will not be held responsible in such circumstances. The User Manual is an important resource you can refer to for safe and proper use of your device. Please retain it for future reference. Safety and Maintenance In order to prevent damage to your device, be sure to keep it in its original box during transportation. The device must be used solely with its original power adapter. Please note that the adapter is 220V only. Do not use with 110V AC. Do not insert a PSTN (phone) plug into the LAN port. If you encounter any problems, do not open or disassemble the device. Call AirTies Technical Support. In order to prevent electric shock, do not operate the device in wet or damp areas. In the event of a gas leak, do not use the device. Do not turn the device on or off. Do not plug or unplug the power cord. Avoid using the device in dusty environments. If dust buildup should occur, use a dry cloth to remove the dust. To clean the exterior of the device use a dry cloth. Do not attempt to clean the interior. There are no user serviceable components inside. For information regarding the installation and configuration of the device consult the remainder of this manual. TABLE OF CONTENTS 1. INTRODUCTION.....................................................................................1 1.1. Main Features......................................................................................2 1.2. Minimum System Requirements........................................................3 1.3. Package Contents............................................................................3 1.4. Front Panel..........................................................................................4 1.5. Back Panel............................................................................................5 2. Installation....................................................................................................6 2.1. Basic Cabling Procedure...................................................................6 2.2. Installation Settings..........................................................................7 2.2.1. ADSL Settings Using the AirTies Easy Setup CD...........................7 2.2.2. ADSL Settings Using the AirTies RT-103 Web Interface............9 3. Other Settings..................................................................................11 3.1. NAT and Port Forwarding.............................................................11 3.2. FIREWALL Settings...........................................................................12 3.2.1. Access Control..............................................................................13 3.2.2. Applications..............................................................................14 3.2.3. MAC Address Filtering................................................................15 3.2.4. Web Filters....................................................................................15 3.2.5. URL Filters...............................................................................16 3.2.6. DMZ.....................................................................................................17 3.2.7. Anti-DoS.......................................................................................17 3.3. Tools......................................................................................................18 3.3.1. Firmware Update.........................................................................19 4. How to Use the AirTies ADSL Utility......................................................19 4.1. ADSL Usage Monitor......................................................................20 4.2. Auto Firmware Updates.......................................................................21 1. INTRODUCTION The AirTies RT-103 ADSL2+ combo router allows you to connect two PCs to the Internet simultaneously. The ADSL2+ technology provides high speed Internet access with 24Mbps download and 4Mbps upload speeds. The RT-103 offers both Annex A and Annex B support. With this patentpending AirTies technology, your router works with either traditional PSTN or digital ISDN phone lines. The advanced anti-DoS SPI Firewall protects your network from hacker and DoS (denial of service) attacks. You can also limit or block the Internet access of any local user by defining URL, IP, or MAC address based filters. The Automatic Firmware Upgrade feature informs the user when a new firmware version is available and, if the user chooses to, automatically upgrades the router with the new firmware. Internet RT-103 AirTies RT-103 User Manual 1 1.1 Main Features All-in-one solution: ADSL2+ Router, Firewall, 1 USB and 1 Ethernet port ADSL2+ Technology: High speed Internet with 24Mbps download and 4Mbps upload speeds Annex A and Annex B support: works with either the traditional PSTN or digital ISDN phone lines ADSL Usage Monitor: Especially useful for limited quota ADSL subscribers. Reports monthly total download and upload amounts and current download rate. Router: DHCP server, NAT, NAPT Advanced Firewall for maximum security: Advanced anti-DoS SPI Firewall; URL, IP and MAC address based filtering, DMZ Quick and easy installation with the Easy Setup CD Automatic Firmware updates: Automatic firmware update support through the AirTies ADSL Utility 8 Channel PVC support VPN pass-through Robust against voltage fluctuations: Specially designed to withstand wide voltage fluctuations Web based user interface 24x7 technical support by a highly trained AirTies support team and backed up by the AirTies R&D team 3 year extended warranty 2 AirTies RT-103 User Manual 1.2 Minimum System Requirements In order to configure your AirTies RT-103, you will need: a PC that runs any version of Windows or UNIX, Linux, or Mac operating systems and has an Ethernet card. Windows 98/ME/2000/XP/Vista for running the AirTies Utility software The router does not need to be connected to a PC during normal operation. 1.3 Package Contents Please check that the box for your AirTies RT-103 contains all of the items listed below: 1. 2. 3. 4. 5. 6. 7. AirTies RT-103 ADSL2+ Combo Router Power adapter Ethernet cable Standard telephone/ADSL cable (1 long and 1 short) Splitter AirTies Easy Setup CD User Manual Com ADS bo R L2+ o Fire uter wall USE RM ANU AL 6 AirTies RT-103 User Manual 3 1.4. Front Panel POWER LED LIGHT Green PWR ADSL Internet ADSL Ethernet USB STATE The AirTies RT-103 is powered ON. Off The AirTies RT-103 is OFF. Green ADSL connection is established. Green flashing An ADSL connection is being negotiated. Off Green No ADSL connection. Internet connection is established Internet Off Green No Internet connection LAN connection is established and active. Green flashing LAN connection is active and data exchange is taking place. Ethernet USB Off No LAN connection Green USB connection is established and active Green flashing Data exchange taking place Off 4 AirTies RT-103 User Manual No connection through the USB por 1.5. Back Panel POWER Reset PORT USB LAN ADSL AÇIKLAMA 1 ADSL 2 POWER 9 V power port. To be connected to the power adapter. 3 RESET Button that restarts the device or resets it, i.e. returns it to default factory settings. 4 LAN Ethernet port 5 USB USB port ADSL line port. To be connected to the MODEM port of the splitter. AirTies RT-103 User Manual 5 2. Installation 2.1. Basic Cabling Procedure The following figure shows how to connect your RT-103 using the cables provided. How to connect the cables is also explained in detail by the animated instructions that automatically start when you insert the Easy Setup CD into the CD drive of your PC. 1. Using the short telephone/ADSL cable provided, connect the "MODEM" port of the splitter with the "ADSL" port of your router. 2. Connect your ADSL telephone line to the "LINE" port of the splitter provided. 3. Connect your phone to the "PHONE" port of the splitter. 4. Connect your PC to the LAN port of the AirTies RT-103. 5. Plug the power adapter provided into the 220V wall outlet and the other end of the power cord to your router and turn it on. POWER Reset USB LAN ADSL MODEM PHONE LINE 6 AirTies RT-103 User Manual Phone Line 2.2. Installation Settings You can modify the installation settings of your router either by using the Easy Setup CD with animated instructions or by using the Web user interface. 2.2.1. ADSL Settings Using the AirTies Easy Setup CD The AirTies ADSL Utility Software provides you with the easiest way to complete the installation of your router. Once the cabling is completed, insert the Easy Setup CD provided into the CD drive of your PC. The AirTies ADSL Utility Software Installation program will start automatically. If it does not start automatically, please run the program "installation.exe" on the CD. 1. A sequence of animated instructions will guide you through the cabling of your router. Please verify that you have connected the cables as shown in this presentation. You can skip this animation at any time and proceed with setup by clicking the Setup link in the upper right hand corner of the window. 2. Once the presentation is finished, click the "SETUP" button. This will launch the AirTies ADSL Utility Setup Wizard. AirTies RT-103 User Manual 7 3. Click "Next>" in the "AirTies ADSL Utility Setup Wizard" window. 4. In the window that appears, enter the ADSL username and ADSL password that was assigned to you by your service provider. Fill out the Customer Information fields and click "Next>". 8 AirTies RT-103 User Manual 5.Congratulations! You have successfully completed your ADSL configuration. 2.2. Installation Settings Once the cabling of your AirTies router is completed and you have connected your PC to the router, you can adjust the initial settings with the advanced Web interface using any Web browser (e.g.Internet explorer, Mozilla Firefox, Netscape). You don't need to be connected to the Internet to do this. 1. Open your Web browser (e.g. Internet Explorer) 2. In the Address bar enter 192.168.2.1, the default IP address of your device. This will launch the Web interface of your AirTies router. 3. You will be prompted for a password to login. Initially, leave this field blank and continue by clicking "Submit". AirTies RT-103 User Manual 9 4. Go to "ADSL Settings" under the "ADSL" main menu on the left menu bar.Click "vc1" to proceed with the ADSL configuration. 5. In the window that appears, enter your ADSL Username and Password and click "Save". If you do not know or do not remember your ADSL username or password, contact your ADSL service provider to get these values. Please check with your ADSL service provider to make sure the values for PVC settings (VPI=8 and VCI=35) are compliant with your ADSL service provider's infrastructure. 10 AirTies RT-103 User Manual Congratulations! You have successfully completed the ADSL settings of your AirTies RT-103. The Internet LED on the front panel will light up solid green. If you have problems connecting to the Internet after this, please contact your ADSL service provider. 3. Other Settings 3.1.NAT and Port Forwarding Network Address Translation (NAT) is a way to map an entire network (or networks) to a single IP address. NAT allows multiple clients in your local network to access the Internet through a single global IP address assigned to you by your Internet service provider. NAT is commonly used together with Port Forwarding. "Port Forwarding" is used in order for a host outside your local network to access a machine on your local network. To enable Port Forwarding on a port, go to the "NAT" menu on the left menu bar of the Web interface of your router and click "Port Forwarding". AirTies RT-103 User Manual 11 In the window that appears; In the "Application" field, assign a name for the Port Forwarding rule you are creating. Enter the local IP address of the client that is to be accessible from the Internet in the "Target IP Address" field. Select the protocol that the application uses from the list of protocols in the "Protocol" box. If you are unsure of the protocol, select "TCP&UDP". Enter the real port number used by the application in the "Wan Ports" field. Enter the local port number for the application in the "Target LAN Ports" field. (can be the same as the Real Port) To forward a range of ports instead of a single port, use a dash (-) sign in between. For example to forward all ports between 23 and 80, enter "23-80". Check the "Enable" box. Click "Save". 3.2. FIREWALL Settings A firewall prevents unauthorized Internet users from accessing your local network and your computer. AirTies Firewall has SPI, Stateful Packet Inspection, feature. SPI monitors the protocol and packet addresses being received to determine if the information should be passed through the firewall to the connected computers. The Internet addresses that are a source of malicious attacks are permanently blocked from accessing your network. You can also limit or block the Internet access of any local user by defining advanced rules for Internet access. Firewall is activated by default. The following sections describe the submenus under the FIREWALL menu of the web interface. 12 AirTies RT-103 User Manual 3.2.1. Access Control You can allow or block Internet access for any computer on your local network through the Access Control feature. These access restrictions can be based on IP address as well as MAC address. Access Control is activated by default. Click "New" to define a new access rule. In the window that appears: Enter a name for the access rule you would like to define in the "Rule Name" field. Choose a name that is easy to remember. In the "Select Client" section enter the IP or MAC addresses of the clients whose access you would like to restrict with this rule. Click the "Add" button next to MAC Address or IP Range. Access control can be defined based on local IP or MAC address (uniquely identifies the network adapter of the device). If an access rule is defined by MAC address, the rule defined for the device will be valid even if the local IP address changes. It is possible to enter the MAC or IP addresses manually or choose them from the list of client devices in the local network. AirTies RT-103 User Manual 13 3.2.2. Applications In this window, you can enter port definitions of an application (game, P2P program, service, etc.) that is to be used in the Access Control menu. You can also edit or remove the definition of an application. To define a new application, click the "New" button. Enter a name for the application you are defining in the "Application Name" field. Enter the WAN port for the application in the "Real Ports" field. Enter the internal port number that the application will use in the local network in the "LAN Ports" field. Click "Save". 14 AirTies RT-103 User Manual 3.2.3. MAC Address Filtering MAC Address Filtering allows you to permit network access based on MAC addresses. When this feature is activated, you can specify the MAC addresses of the computers that will be allowed access to the Internet. Check the "Activate MAC Address Filtering" box. Enter a new MAC address or choose one from the list of clients and click "Add". Click "Save". 3.2.4. Web Filters Web Filters can block some possibly risky web based applications and web browser features that are open to abuse before they reach the computers in your network. For example, cookies can reveal personal information that you may enter at a website. You can deal with these kinds of vulnerabilities at the router level. In the "Web Filters" window, check the corresponding "Filter On" box for each web application or browser feature you would like to block (proxy, cookie, java applet, activeX, pop-up). AirTies RT-103 User Manual 15 3.2.5. URL Filters You can block access of any computer in your local network to the websites you specify. In this window, you can enter the URL or any keyword that is part of a URL of the websites you would like to block access to. To block access of a computer in your local network using URL filters, check "Http with URL Filters" box for the rule that you created for this computer in the "Access Control" page. 16 AirTies RT-103 User Manual 3.2.6. DMZ The DeMilitarized Zone (DMZ) feature opens up all the ports of a single local network host for unrestricted access from the Internet. Although it's a risky method, you can open and forward all the ports for a certain client at once with DMZ to resolve access problems resulting from firewall or NAT settings. WARNING: It is not recommended to keep all the ports open for any client for an extended period. To enable DMZ, check the "Activate DMZ" box; enter the local IP address of the client that you would like traffic to be forwarded to in the "Select LAN IP Address" field and click "Save". 3.2.7. Anti-DoS The Anti-DOS feature prevents "Denial of Service" attacks that aim to disable your router by flooding it with connection requests. In this window, you can set the maximum number of connections that will be allowed from the Internet for a specified time interval for each protocol. AirTies RT-103 User Manual 17 3.3. Tools In this page you can restart your router or reset it to factory defaults. The "Restart" button lets you turn your router off and then on remotely. The "Restore Factory Defaults" button allows you to set your router back to factory defaults remotely. This will clear all the current settings on your router. During either operation, the connection to the router will be lost. You can reconnect after the router comes back up. 18 AirTies RT-103 User Manual 3.3.1. Firmware Update In order to update the software in the router, go to "Firmware Update" under the "TOOLS" menu. Click "Browse" and locate the most recent router firmware file on your computer in the pop-up window. (You can download the most recent firmware file from the AirTies website www.airties.com). Then click "Update". After the firmware is successfully installed, the system will automatically be restarted. For this reason, your connection to the device will be lost and you will need to reconnect to make the installation settings. 4. How to Use the AirTies ADSL Utility The AirTies ADSL Utility is installed on your computer by the Easy Setup CD that is included with your AirTies router. After the installation from the CD is completed, click the AirTies ADSL Utility icon on your desktop to start the ADSL Utility. AirTies RT-103 User Manual 19 4.1. ADSL Usage Monitor By clicking on the "Counter" menu of the AirTies ADSL Utility, you can view the monthly broadband usage (download and upload) and display your current download rate. Even if there is more than one computer connected to your router, it is sufficient to install the AirTies ADSL Utility that contains the Usage Monitor on one of the computers only. The program will report monthly usage summary for a 12-month period for all the data traffic that goes through your router. The data is kept in the permanent memory of the device and therefore will not be lost if the modem is turned off. 20 AirTies RT-103 User Manual 4.2. Auto Firmware Updates The AirTies ADSL Utility informs you if a newer version of the firmware for your router becomes available, and, if you prefer, updates the firmware automatically whenever a newer version is available. Running the most recent firmware on your device is essential to get the best performance out of your router and to benefit from the use of new technologies. You can initiate firmware/software updates by going to the Information menu of the AirTies ADSL Utility and clicking on "Update Firmware" or "Update ADSL Utility Software" buttons. AirTies RT-103 User Manual 21 YM.AR.103.UM.EN.D00 REV.17072007