1
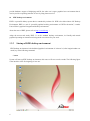
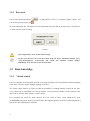
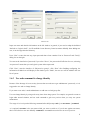
General User Guide
This chapter introduces some basic knowledge that will help you work with Asianux 2.0.
1.1 Booting the system
Restart computer after installation is completed. A GRUB boot loader selection menu will appear after
system self-test. If you have a Windows system installed on your computer, the following options will be
displayed:
z
Asianux 2.0 Server
Boot after successful installation of system or when system is properly configured.
z
Windows
Enter Windows or MS-DOS operating system.
Select the option you want to boot to using up or down arrow, then press <Enter>; If no actions are taken,
system will automatically boot to default boot system after idle for a while.
The name of GRUB boot menu option is same as boot label that configured during
installation, if there is a smp mainboard in system, it will also add single CPU kernel boot,
such as: Asianux Advanced Server-up
1.2 Starting and Finishing Operation
1.2.1 Login
Linux is a multiuser、multitask OS, it can allow multiple users to share the software and hardware
resource, the using purview and using mode of different users are different, so Asianux Linux system has a
course to identify and validate the users that visit the system. This course is called logining in.
To be simply, logining is to input user’s name and password to make know that it is a warranted user of
this system. This step is helpful to protecting system.
After completing GRUB booting, system will carry out a series of checking and setting, after starting
up the services, it will enter the logining interface of Asianux 2.0.
When logining in system, the following information must be provided:
1
z
User name
Input the user name after the prompt login: , and then press <Enter>.
User name canbe devided into two kinds: one is the account that used by administrator, it can also be
called superuser account, use root to express, you can carry out any operation by using it; the other is
common user account, you can just carry out purviewed operation by using it.
Because just one root account is established during installing, so you can just use root to enter the
system at the first time.
root is called superuser, it is unlimited in system. So it is suggested to users that: to avoid
losing of mistaken operation, do not use root account in daily work unless carrying out
system configuring and management. After using root to login in system for the first time,
you should add general user account that is needed in time.
z
Password
When the prompt Password: is seen on the screen, input the password of this user, and press <Enter> button.
The character that input after password can not be showed on the screen again, cursor
cannot move neither, this is kind of safety precautions. To avoid some seeing your password.
Only the warranted user can login into system, if some user name and password that you input are correct,
system will show the prompt shell on the screen, this means you have logined in successfully.
[root@localhost /root] #
[Redflag@localhost Redflag] $
(superuser mode)
(general user mode, the user ame here is Redflag)
If the user name or password is incorrect, system will throw out the information of incorrect logining.
You have to make sure match case when inputing user name、password and command name,
because capital letter and lowercase have different meanings in Linux system.
If you are a new user, should ask administrator to set up an account before logining in system for the first
time, it includes user name、password and user’s main content etc. Refer to setion 1.6.1: use command to
add new user for the steps of using command to establish new users.
1.2.2
Logout
If youwant to quit from system after finishing your work, input logout or exit after the prompt, then
press <Enter>, system will return the logining information screen after carrying out relative procees.
Press <Ctrl+D> after the prompt shell to quit from system.
2
1.2.3
Close and restart
Administrator can use poweroff or halt command to close the system, and use reboot aommand to restart
the system
Moreover, it is more agile to use shutdown command: input shutdown command that has no parameter, the
system will be closed after 2 minutes. shutdown command can also add some parameter options:
Such as:
now
+mins
(after appoint minutes)
hh:ss
(between a particular time)
poweroff/halt command liks shutdown –h now。
reboot command liks shutdown –r now。
Do not shut the power under the situation that you have not carry out the natural program
of closing completely. Otherwise,you will see the information that the system report there
has some mistake of disk when you start up system again.
1.3 About user interface
User interface means the communication mode between user and computer. Asianux 2.0 provides two
different kinds of user interface: command line interface base on text mode and graphical desktop
environment. To use which one depends on the operating habit of user and practice require.
1.3.1
Command line interface
Command line interface is a old but powerful user interface in Linux system, the system will start up
the relative shell automatically when user enters Asianux 2.0. shell is a kind of command-language
interpreter, its responsibility is communicate between user and system. Every command that input under
prompt is carried out by Linux kernel after interpret by shell. You can start up、hang up or even compile
program thought shell. There are many kinds of shell, the defaulted shell of Asianux 2.0 is bash. Bash is the
abbreviation of Bourne Again Shell, under bash, root account user “#” as prompt and general user use “$” as
prompt.
1.3.2
z
Graphical desktop environgment
What is X Window system
X Window is a standard GUI in Linux, it contains two parts: one is X Window server which is used to
3
provide hardware support of displaying and IO; the other one is upper graphical user environment that is
used to provide a operating interface for user by using bottom service.
z
KDE desktop environment
KDE is a powerful desktop system that is contained by Asianux 2.0. KDE is the abbreviation of K Desktop
Environment, KDE is a suit of “powerful graphical working environment on UNIX workstation”, it makes
Linux OS have graphical integrational desktop environment.
About the news of KDE, please refer to http://www.kde.org 。
Adopt the newest and steady KDE 3.1 as the standard desktop environment, its friendly and natural
graphical operating environment can bring much convenience for your work.
1.3.3
Startup of KDE desktop environment
KDE desktop environment is the defaulted graphical environment of Asianux 2.0, after longin inunder text
mode, key in the following command:
# startx
System will start up KDE desktop environment, this course will cost several seconds. The following figure
is the interface of the first logining of root user.
4
KDE desktop
You can also start up desktop system by keying in the following commands in command line:
# xinit
start up X server
# startkde
run KDE
1.4 Graphical logining and closing of work
1.4.1
Graphical logining
It will start up KDE desktop environment automatically if login from graphical logining interface.
If you set to login in system by using graphical mode, the following logining interface will appear after
finishing booting and examining.
Logining window
Input correct user name and password in the dialog box above, press “Start” button. System will start up
KDE desktop environment, this course may cost several seconds.
root is called superuser, it is unlimited in system. So it is suggested to users that: to avoid
losing of mistaken operation, do not use root account in daily work unless carrying out
system configuring and management.
To add and manage user’s account under graphical environment, you can use rfuser tool
5
1.4.2 Exit work
,or using shortcut <ALT+F1>, and select "logout" option,and
Click system main menu button
you can also press the logout icon
.
The following dialog box will appear now, the background color turn dark at the same time, it will ask user
to make sure the mode of exiting.
Exit KDE
If you logout before save, all data will be losing.
In the event that you can't exit the system using the above mentioned methods, press
<Ctrl+Alt+Backspace> concurrently, and system will shutdown desktop window
immediately. Note: Be sure to save all work done!
1.5 Basic knowledge
1.5.1
Virtual control
Linux is a multiple user and multiple task OS, it can support multiple users’ long-distance and local logining
at one time, it can also support multiple logining of one user.
The virtual control function of Linux provides the probability of running multiple consoles at one time,
every console can be considered to be entirely absolute. User can switch to another virtual console to start
other work at one time when running a virtual console.
Every terminal can switch by using shortcut, user can switch to other virtual platforms by press
<Ctrl+Alt+Fn>(in general, n=1-7), system will also show logining prompt, ask for user name and password
like the first time logining after switching.
6
1.5.2
Run level
Runlevel is the startup or stopping service that must be finished when initializing course enters some
runlevel, it describes what kind of service that system can provide and can not provide. Runlevel is defined
by figure, there are seven runlevel in Asianux 2.0:
Runlevels of system
Level
Definition
0
Stop running the system.(you can not set this level as defaulted level)
1
Single-user mode, usually used in special system management work, such as losing
password of root or checking file system etc.
2
Multi-user mode, but it can not support NFS
3
Absolute multi-user mode
4
System reservation, undefinded
5
Multi-user mode, compared to 3, defaultly logining by using graphical interface
6
System restarting (can not ba set as defaulted runlevel)
The most important configuring file about initial course in system is /etc/inittab, the structure of this file is
complex, and administrator can hold its content by looking over correlative documents.
Here is an example: if you want to login in by using graphical mode, you can edit /etc/inittab file, replace
the following line:
id:3:initdefault:
with the following line:
id:5:initdefault:
It set the runlevel of system as 5, that is X Window startup mode, it will start up the logining interface of
graphical mode automatically.
A interesting method to turn off the computer is that switch system to runlevel 0 (close) or runlevel (restart),
for example, the following command will close system:
# init 0
7
1.5.3
Brief introduction of shell
When users working under command line mode, it does not communicate with OS kernel directly, but the
command interpreter accept it and send to other program after analysis. System will start up relative shell
automatically when entering Asianux 2.0 environment. The defaulted shell in Asianux 2.0 is bash.
The basal format of bash command is:
Command name
[optin]
[parameter1]
[parameter2]…
The aontent inside square brackets is optional to commands.
[option]:there is special definition, generally start with“ -”,you can use “-”to connect multiple option,
for example, ls -l -a is same as ls –la.
[parameter]:Provide information of command during running, or the file name that used during the
running process of command.
You have to make sure match case when inputing user name、password and command name,
because capital letter and lowercase have different meanings in Linux system.
You have to use space to compart command、 option and parameters. Successive space will
be interpreted to single space by shell.
z
Key in command
Input relative command after shell prompt and press <enter> to affirm. Shell will read the command and
carry out. If system cannot find the input command, it will display:“ Command not Found”, now you have to
check if the match case is correct or not.
Use “;” to compart two commands, this way, you can input multiple commads in a line. The executing order
are same with input order.
z
Command complementarity
When the the directory of the command is very deep or the file name is very long, just press <Tab> button,
system can complement the command thought looking for relative option. If there are several character
stings matching, and it can not complement, you can double press <Tab>, system will list all the file name.
z
History
Shell can record all the commands that has ever been input, you can select the command that has been input
before by just press direction key: up and down.
Based on these, you can practice by using the following simply commands:
8
clear: refurbish screen;
date: display date and time on the screen;
echo: redisplay the content of command line on standard output
cal: display calendar that has appointed month or year, it can contain two parameters, use figures to express
month and year; if there has just one parameter, it expresses year, the range of year is 1-9999; cal aommand
that does not contain a parameter expresses calendar of current month. The grammar format of aommand is:
cal
1.5.4
[month]
[year]
Help system
Asianux 2.0 has powerful system and network function, large amount applicationsand many
complicated operating commands. In order to help users operating more favoringly, system provides many
kins of online help information.
z
Online manual
All users can use man command to start up online user manual, the format of this command is:
man command
The following are the classifying of usually used Linux help system manual; it is uder /usr/man directory:
1、 user command
2、 commands that transferred by system
3、 storeroom function
4、 interpretion of device and drive of device
5、 file format
6、 command about games program
7、 macro command package etc
8、 system maintenance and management commands
For example: the following command line will show the manual page of cal command:
# man
cal
Use aommand “man man”, it will show the using method of the command man.
9
z
It can also show the reference information of command by adding - -help parameter to the command
that is looked for.
z
Use help command to list many help information of internal command.
z
The command whatis can find brief help information throught command name, its format is: whatis
keyword.
1.6 Brief knowledge of user management
1.6.1 Use command line to add new user
The steps to establish a user in the interface of command line are as follows:
1、 Open shell prompt;
2、 If root user does not login in, key in command su -, then inout password of root;
3、 Use useradd username aommand to set up a new user;
4、 Use passwd username command to set logining passwoed for the new user.
5、 Input password twice to affirm
You have to make sure match case when inputing user name、password and command name.
1.6.2 Use graphical tool to add new users
Select “systemÆcontrol panel” in mian menu (or double click “my computer” to open resource manager,
and select “control panel”), double click “User/Group” in the lebel page of “system” to open managing tool
of user and group.
Click “Add new user” button in toolbar, it will appear guide of “Add new user”.
10
Add new user
Input user name and describe information on the left window; in general, it just need to adopt the defaulted
/bin/bash to “login in shell”; it will establish a home directory /home/username defaultly when adding new
user, it can also appoint other directory.
Press “Next” to enter the next step, input password that at least contains 6 bits in “Password” and “Vertify”
dialog box on the right.
You can set the time limit of password, if you select “Never”, the password will efficient for ever, sselecting
“no password” means that you can login in system without password.
Click “Next”, enter the interface of “Subjected to groups”, click “Next” after finishing configuring, the
information of added user will display in the window, press “finish”, the new user will be added to the user
list of system.
1.6.3 Use sudo command to change identity
Because of the shortage of su on security (because that su needs use to get administrator’ password), so it is
suggested to use sudo to change identity.
If you want to use sudo, it needs administrator to add user to wheel group first.
User can change identity by using sudo at any time when using system. For example, use general account to
login under normal situation, and use sudo command to gain root purview when you carry out system
maintenance.
The usage of su is to input the following command after shell prompt: sudo [ –u <username> ] command.
-u is optional, username is the user name which you want to switch to, if you do not appoint user name,
then it will switch to root user defaultly. command is command that user need to run as root purview.
11
After press <Enter>, it will notice you to input password, the password here is the user’s self password (but
not the password of administrator). The operations of user will be added into log. It will return to user’s
prompt after finidhing the running of program.
Concerning more usage of sudo command, please look over its manual by using man sudo command.
12


![j:j_"Xt$l"j:]:":,lg]:"r/Human Resources have been duty - e](http://vs1.manualzilla.com/store/data/005657435_1-26d97049bf04f0fd92265d73e45a9ab3-150x150.png)