1
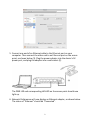
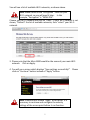
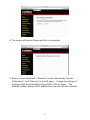
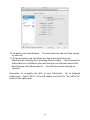
How to setup EW-7416APn/EW-7228APn as an AP
Client by using a Mac computer
EW-7416APn and EW-7228APn can work as Wireless Bridge which will catch your home network’s WiFi
signal and convert to Ethernet port(s). After the setup is completed, you can plug your Ethernet
devices like DVD Blu-Ray player, Xbox, Internet TV to EW-7416APn/EW-7228APn. Your Ethernet
devices will be able to access your WiFi network for Internet.
AP Client mode is also known as Wireless Bridge or Station Infrastructure mode.
This instruction is for Macintosh system.
0
Web Management Interface
1. Have your Macintosh computer operate as usual, and click on “System
Preferences”.
2. In System Preferences, click on “Network”.
3. Here you will see all of your network connections. Remove any Ethernet
cable that may be connected, so that the “Ethernet” status in the left
sidebar displays “Not Connected”, as shown below. Then, you need to
ensure that your Macintosh’s Wi-Fi is switched off. Select “Wi-Fi” from the
left sidebar.
4. If your Wi-Fi is switched on, click on the button labeled “Turn Wi-Fi Off”.
The “Network” screen should now look like the screen below, where under
the heading “Wi-Fi” in the left sidebar, the status is shown as “Off”.
1
5. Connect one end of an Ethernet cable to the Ethernet port on your
computer. Then connect the other end to an Ethernet port on the access
point, as shown below (1). Plug the power adapter into the device’s 5V
power port, and plug the adapter into a wall socket (2).
The PWR LED and corresponding LAN LED on the access point should now
light up.
6. Network Preferences will now display an Ethernet adapter, as shown below.
The status of “Ethernet” should be “Connected”.
2
7. Click on “Ethernet” in the left panel and then click the drop down arrow for
the menu labeled “Configure IPv4” in the right panel. From the drop down
menu, select “Manually”.
3
Note: The access point uses the default IP address
192.168.2.1, which may not be in the same IP address
subnet of your network. Accordingly, you need to
modify the IP address of your Macintosh to
192.168.2.10, as shown in the next step.
Note: Please refer to the user manual for guidance on
how to assign a new IP address to the access point. If
the default IP remains unchanged, you will need to
repeat this process and modify the IP of your
Macintosh every time you wish to configure the access
point.
8. In the panel on the right side, enter IP address 192.168.2.10 and subnet
mask 255.255.255.0. Click on “Apply”.
9. In the left sidebar, “Ethernet” should now display “Connected” as shown
below. In the right panel, you should see the IP address 192.168.2.10 and
subnet mask 255.255.255.0.
4
10. Open your internet browser and enter http://192.168.2.1 in the address
box. In the pop up window, enter the following username and password:
Username:
Password:
admin
1234
Click “Log In”.
11. This will open the access point’s web management interface, which allows
you to configure the functions and settings of the access point. Please refer
to the user manual for more information about configuration; the following
is an example of how to set the access point to “Station Infrastructure”
mode.
5
Setup Station Infrastructure Mode
1. On the “Status and Information” page, click “Basic Setting” in the left
menu.
2. Click the arrow to open the menu labeled “Mode”.
Select “Station-Infrastructure” mode.
Click on “Select Site Survey” button to get a new window.
6
You will see a list of available Wi-Fi networks, as shown above.
Note: Make a note of the “Encryption” listed for your
Wi-Fi network, as you will need it later. In this
example, “Encryption” is “WPA2-PSK’.
Choose your Wi-Fi network and click on “Done”. If your Wi-Fi network is not
shown, “Refresh” the list of available networks, then “select” your Wi-Fi
network.
3. Please note that the Main ESSID would be the name of your main WiFi
network. Click on Apply.
4. You will see a screen which displays “Save settings successfully!” Please
click on “Continue” button instead of “Apply” button.
Note: Please do not choose “Apply” at this point. It is
necessary to continue and configure the security
settings of the access point before it can function.
7
5. Select “Security” from the left sidebar in the Edimax web management
interface. This will take you to the screen shown below. Under the heading
“Security Settings”, open the menu labeled “Encryption”.
Select the appropriate type of encryption, based on the security settings in
your existing Wi-Fi network. In this example, we select “WPA pre-shared
key”. In the field marked “WPA Unicast Cipher Suite, select WPA2(AES”.
Note: You need to select the same encryption as your
existing Wi-Fi network, otherwise this AP Client device
cannot connect to your existing Wi-Fi.
6. In the field marked “Pre-Shared Key Format”, choose “Passphrase”. In the
field marked “Pre-Shared Key”, enter your existing wireless network
password. For other encryption types, please refer to the user manual for
detailed instructions.
Note: The access point must use the same wireless
encryption password as with the root wireless
network, i.e. your existing Wi-Fi network.
When this is done, click “Apply”.
7. You will then see the following screen. Please click “Apply” to restart the
system and bring the changes into effect.
8
8. The system will restart. Please wait for it to complete.
9. Return to your Macintosh’s “Network” screen, found under “System
Preferences”. Click “Ethernet” in the left panel. Change the settings of
Configure IPv4 from Manually to Using DHCP. Click on Apply. The
Ethernet adapter will get the IP address from the main wireless network.
9
10. Go back to your web browser. Try some web sites and see if you can get
on Internet.
11. If Internet works, you can disconnect the access point from your
Macintosh by removing the connecting Ethernet cable. You can move the
Edimax device to a different place and connect your Ethernet devices like
Blu-Ray player with Edimax device. Your Ethernet devices will get on
Internet.
Remember to re-enable the WiFi of your Macintosh. Go to Network
preferences. Select “Wi-Fi” in the left sidebar and click the “Turn Wi-Fi On”
button in the right panel.
10
11