1
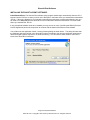
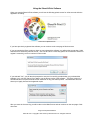
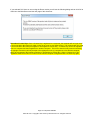
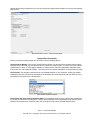
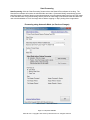
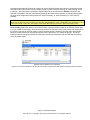
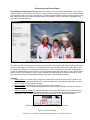
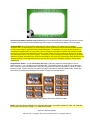
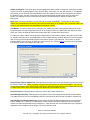
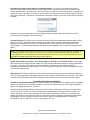
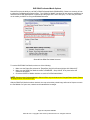
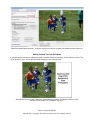
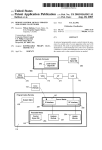
Shoot-N-Print Automatic Print Software Version 3 www.Shoot-N-Print.com Installation and User Manual September 2015 Revision 1.1 www.Shoot-N-Print.com This software and the described processes have been tested and are supported using digital cameras that create industry standard .JPG images. The Shoot-N-Print software will NOT process proprietary RAW image files. Shoot-N-Print will run on 32 and/or 64-bit versions of Windows XP (Home or Pro – SP3 recommended), Vista SP1, Windows 7 (SP1 recommended), Windows 8/8.1 and Windows 10. Copyright © 2011-2015 by Shoot-N-Print.com TABLE OF CONTENTS PURPOSE OF SHOOT-N-PRINT: .…………………………..………………… 3 BRIEF OVERVIEW OF SHOOT-N-PRINT: ……………………………………. 4 FEATURES, BENEFITS & OPTIONS OF SHOOT-N-PRINT: ……………… 6 INSTALLING THE SHOOT-N-PRINT SOFTWARE: ………………………… 8 USING THE SHOOT-N-PRINT SOFTWARE: ………………………………… Setup Before Processing ………………………………………………….. Start Processing …………………………………………………………….. Processing using Automatic Mode ……………………………..……….. Processing using Preview Mode ………………..………………………... Stop Processing …………………………………………………………….. Select Single Image to Print ……………………………………………….. Advanced Options …………………………………………………………… Select Landscape Border/Template Layer to Print .……………….. Select Portrait Border/Template Layer to Print …………………….. Ganged Photo Option - 1, 2, 4 or 8 Photo(s) Per Page ……………. Added Text Options …………………………………………………….. Text Builder ………………………………………………………….. Select Font (Style/Family)………………………………………….. Select Font Color…………………………………………………….. Select Background Color….. ……………………………………… Show Background Behind Added Text..………………………… Multiple Printers… ………………………………………………………. Save Final Printed Images in “As Printed” Folder…………………. Also Show Full Sized Preview Image on Secondary Monitor …… Preview Print Only ………………………………………………………. Disable Actual Printing to Printer...…………………………………… Wait Timeout ……………………………………………………………… Save/Recall Configuration Settings ………………………………….. Unregister License Key…………….. ………………………………….. 9 11 14 14 16 18 18 19 19 20 20 21 21 21 21 21 21 22 22 23 23 23 23 23 25 DNP DS40 Perforated Media Options..……………………………………. 26 Exit Shoot-N-Print Software ………………………………………………. 28 Page 2 of 28 printed 9/8/2015 Shoot-N- Print - Copyright © 2011-2015 by Shoot-N-Print.com All rights reserved. Purpose of SHOOT-N-PRINT Automatic Print Software The Shoot-N-Print automatic print software was designed with the onsite event photographer in mind that has situations where the photographer's position/camera is primarily stationary, the subjects are "staged" or "posed", the photographer controls major cropping, lighting, colors, white balance, etc. (via the camera) and a photo needs to be printed automatically from each picture taken. Shoot-N-Print is a great tool, especially for fast paced events where the time to manually find, open, crop, print and rename images is too time-consuming and labor intensive and where a better, faster workflow is needed. This tool is best utilized when using one of today’s fast dye-sub printers but can also be used with most inkjet or laser printers. Although it is best to use a professional or pro-sumer digital SLR camera for event photography, Shoot-N-Print can be used with most less expensive point and shoot digital cameras. Page 3 of 28 printed 9/8/2015 Shoot-N- Print - Copyright © 2011-2015 by Shoot-N-Print.com All rights reserved. Brief Overview of SHOOT-N-PRINT Automatic Print Software Main Screen – Automatic Mode The following is a brief overview of How Shoot-N-Print Works using the Default Advanced Settings (details on how to change Advanced Settings/Options are discussed later in this User Manual): 1. 2. 3. 4. Select folder to monitor Select printer to use Select paper size to use Select number of copies to print of each photo Page 4 of 28 printed 9/8/2015 Shoot-N- Print - Copyright © 2011-2015 by Shoot-N-Print.com All rights reserved. 5. Determine whether to crop, rotate, preview each image before printing (Preview Mode) or have ShootN-Print automatically print all images in Selected Folder to Monitor (Automatic Mode) 6. Determine whether to print each photo in full color, black & white or sepia tone 7. Start/Stop Processing 8. Select a single image to print (manual mode) 9. Use DNP’s DS40 Perforated Media (only shown when DNP DS40 printer is selected with 4x6 paper) 10. Statistics 11. Advanced Settings/Options (see below) 12. Exit Shoot-N-Print Once processing is started a photo will automatically be printed for each image found in the “Selected Folder to Monitor”. As new images show up in the folder, they will be printed automatically. Images printed will be moved to a sub-folder named Printed. If the Preview option is selected, each image found in the “Selected Folder to Monitor” will be shown in the extended area on the right side of the screen (see “Processing using Preview Mode” section) and the user will have the ability to crop, rotate and preview each image and choose whether to either “Print” the full image, the cropped area only or “Skip” any image found in the “Selected Folder to Monitor”. Once all images in the folder have been printed, Shoot-N-Print will continue to monitor the folder for new images arriving until the “Stop Processing” button or the “Abort Printing” button is clicked. This allows the photographer to continue to take pictures and have them automatically printed. Page 5 of 28 printed 9/8/2015 Shoot-N- Print - Copyright © 2011-2015 by Shoot-N-Print.com All rights reserved. FEATURES, BENEFITS & OPTIONS OF SHOOT-N-PRINT The Shoot-N-Print automatic print software provides the following features and benefits for onsite event photographers. Details of each feature/option are discussed later in this User Manual. Features/Benefits/Options Automatically prints all photos taken or choose to preview each image with the ability to Crop, Rotate & Print or Skip any image. Automatically apply custom Border/Template/Logo (using user’s custom made transparent .PNGs) to every photo taken/printed. Automatically add Custom Text overlay to each photo – use Shoot-N-Print’s built in Text Builder to include custom variables like image #, date/time taken, date/time printed in Custom Added Text. Set Custom Font, Custom Text Color and Custom Text Background Color. Custom Font size is automatically calculated by Shoot-N-Print to show the Added Text as large as possible based upon size/orientation of selected Paper Size. Rotate Crop Box to Portrait or Landscape orientation regardless of image orientation or printer paper orientation, giving photographer more cropping options and capabilities to give the customer what they want. Option to save complete printed image (with cropping, template/border/logo and custom added text) as a .JPG in "As Printed" folder – great for quickly doing exact re-prints and re-orders of any print during or after the event. No need to manually open, crop, resize, apply custom Template/Border/Logo, add Custom Text, print and rename/save/copy/move each image to be printed – This is ALL done AUTOMATICALLY with Shoot-NPrint. Option to "Disable Printing" and ONLY save completed photo (with cropping, template/border and custom text) as a .JPG in "As Printed" folder WITHOUT actually printing completed image to a printer - GREAT for publishing to social media! Single "Print" button to print either full image or cropped area. Prints cropped area if crop box left on screen otherwise prints full image. Multiple/Ganged Images Option (# photos per page) – Print 1, 2, 4 or 8 photos per page. Automatically resizes, centers, rotates and center crops each image to match the selected paper size. Advanced Custom Option to print to 2 printers, rotating between printers to speed up productivity. User sets the # of prints to print to each printer before switching to other printer (i.e. Print 10 prints to Printer A and Print 5 Prints to Printer B). Default Paper Size is automatically selected when changing printers for fast changing of Printer/Paper Sizes when in Preview mode or Printing Single Images Automatic saving of current configuration/settings upon exit PLUS Save/Recall up to 10 custom named configuration/settings. Next/Previous buttons allow photographer to go back and preview/print the last 5 images while in Preview mode without having to stop processing – great when shooting multiple shots of same person/group and choosing which shot to print. Starts up in Preview Mode (vs Automatic Mode) and resizes the application window, making full use of monitor/screen real estate based upon monitor/screen resolution. Moves images to Printed, Skipped and/or As Printed sub-folders to keep track of what was printed, what was skipped and JPG of final photo printed with cropping, Border/Template/Logo and Custom Text (As Printed) for exact printing of re-orders. Makes for quicker and easier file management. Statistics – shows number of images Processed, Printed & Skipped for each session plus grand totals for time Shoot-N-Print remains open. Processes images using any of the following methods of placing images in a folder: Camera tethered to computer using camera manufacturer's or 3rd party "capture" software Wirelessly transmitted images to a folder (using devices such as Eye-Fi or Wi-Pics) Simply copying images from camera's memory card to a folder on computer Existing images in a folder Allows printing of multiple copies of each photo for events where more than 1 copy of each print is needed. Normal maximum quantity of 5 copies to prevent accidental printing of too many images on very fast dye- Page 6 of 28 printed 9/8/2015 Shoot-N- Print - Copyright © 2011-2015 by Shoot-N-Print.com All rights reserved. subs. This maximum can be over-ridden but prompts user to make sure they are wanting to override the 5 maximum copies. Option to print photos: Full Color Greyscale/Black & White Sepia Toned Option to quickly and easily print any single image with Custom Template/Border/Logo and Custom Text, in any folder on computer or network. Ability to automatically add pre-designed Borders/Templates/Logos (landscape or portrait or both) to each image (in Automatic or Preview mode). Manually crop each image (in Preview Mode) – crop box is automatically sized to match the aspect ratio of the selected print size and can be rotated to either Landscape or Portrait orientation. Dual monitor support – utilize Windows ability to set up dual monitors, on a single computer, and show a full screen preview image on secondary monitor/display for customers or photographer or table tech to view images (in Preview Mode). You can also show complete image (with cropping, template/border and custom text) on screen and 2nd monitor (for customer to review) BEFORE printing image to printer allowing user to change cropping or choose to "Skip" image and go to next image in queue. Supports DNP's 4x6 Perforated Media (DS404x6PM) for the DS40 Dye Sub Printer (This special version of paper includes a vertical perforation optimized to create a unique 4x4 social media print size and a 2x4 tearaway strip that can be used for a marketing message. Use Shoot-N-Print to create unique offerings for your onsite event clients. Instagram type social photos with a marketing message or tear off stub. Unlimited possibilities and Shoot-N-Print makes it quick and simple - no photoshop or darkroom or other software required! Ability to un-register a License Key from one computer and register the License Key on another computer. Runs on 32-bit and/or 64-bit versions of Windows XP, Vista, Windows 7, Windows 8/8.1 and Windows 10. Page 7 of 28 printed 9/8/2015 Shoot-N- Print - Copyright © 2011-2015 by Shoot-N-Print.com All rights reserved. Shoot-N-Print Software INSTALLING THE SHOOT-N-PRINT SOFTWARE: Install Shoot-N-Print: The Shoot-N-Print software setup program should begin automatically when the CD is inserted into the CD Drive or when you click on the Setup file in the folder where you extracted the downloaded .ZIP file. If Autorun is disabled on your machine or the setup program does not begin automatically, then you will need to run setup.exe from the Shoot-N-Print CD created in the download instructions or from the folder where you extracted the .ZIP file. If any prerequisite software needs to be installed you may see one or more of the Microsoft EULA (End User License Agreement) and must accept them to continue with the install of the Shoot-N-Print software. You will then see the Application Install – Security Warning dialog as shown below. The dialog will show that the Publisher cannot be verified, since Shoot-N-Print has not applied to the relevant certification authorities to obtain the digital signature required to not show the warning. You will need to select Install to continue the install of the Shoot-N-Print software. Page 8 of 28 printed 9/8/2015 Shoot-N- Print - Copyright © 2011-2015 by Shoot-N-Print.com All rights reserved. Using the Shoot-N-Print Software When you start the Shoot-N-Print software you will see the following splash screen for a few seconds while the application is loading. Shoot-N-Print Splash Screen If you have previously registered the software you can continue to the next page of this document. If you are running the Demo version or have not yet registered the software, you will see the prompt that a Valid Shoot-N-Print License Key was Not Found – click Yes to enter a License Key (MUST be connected to internet to register License Key) or No to continue in Demo mode. If you selected “Yes”, you will then be prompted to enter the License Key provided when you purchased the software or you can click Cancel if you want to run the Demo version of the software. The Demo version is a full featured demo but prints a Shoot-N-Print watermark on any print that is printed. This watermark does not show up on legally licensed and registered copies. After you enter the License Key you will be taken to the Main Screen and can continue on the next page of this document. Page 9 of 28 printed 9/8/2015 Shoot-N- Print - Copyright © 2011-2015 by Shoot-N-Print.com All rights reserved. If you selected “No” above or are running the Demo version you will see the following dialog and can click OK to continue to the Main Screen and the next page of this document. Note about License Keys: Once a License Key is registered on a computer, the computer will no longer need to be connected to the internet (ie. when on site at an event) to use Shoot-N-Print. The computer will only need to be connected to the internet to Register or Un-Register a License Key. A License Key can be Un-registered from one computer and then Registered on another computer. This can be done as many times as necessary but a single License Key will only be able to be registered on one (1) computer at a time and the computer MUST be connected to the internet to Register or Un-Register a License Key. When a License Key is Unregistered Shoot-N-Print will run in Demo mode until the computer is Registered with a License Key again. Page 10 of 28 printed 9/8/2015 Shoot-N- Print - Copyright © 2011-2015 by Shoot-N-Print.com All rights reserved. Shortly after the above splash screen (if you have previously registered the software) you will see the following Main Screen. Shoot-N-Print Main Screen – Default Preview Mode Setup before Processing Before you start processing images you will need to set the following options. Select Folder to Monitor: Click on the “Select Folder to Monitor” link to bring up the windows folder browser. Navigate to the folder that you want Shoot-N-Print to monitor for images to print. If you are using your camera rd manufacturers or other 3 party capture software to capture photos, select the appropriate destination folder that you set up in the respective software. The same is true for wireless transmitters or wireless memory cards. Select Printer: This dropdown will show a list of all available printers on your computer. Initially your default Windows printer will be selected as the default in the dropdown list. Select the printer that you intend to use to print photos to as shown in the example below. Select Printer Dropdown Example Select Paper Size from Printer’s Available Sizes: This dropdown will show a list of paper sizes available for the printer you selected in the step above. Initially, the default paper size (if applicable) will be selected as the default in the dropdown list. Select the paper size of the photos you want to print with Shoot-N-Print. Page 11 of 28 printed 9/8/2015 Shoot-N- Print - Copyright © 2011-2015 by Shoot-N-Print.com All rights reserved. Select Paper Size Dropdown Example Number of Copies of each image: This option gives you the ability to print multiple copies of the same photo in situations where you need more than 1 copy of each photo. This option can be changed when using the Preview Mode in case you want to change the number of copies for specific photos (but remember to change it back to 1 or your desired preference, if you are only printing a different number of copies for select images). The Number of Copies allows a maximum of 5 Copies without having to manually answer a prompt for quantities greater than 5. This is designed to prevent “accidentally” setting a large number of copies and having to waste a lot of prints on high speed dye-sub printers (before you have time to stop printing). If you try to select a value greater than 5 you will see a prompt like the following. Select Yes to set a Number of Copies greater than 5 or select No to set the number of copies to 5. Select Yes to allow more than 5 copies to be printed. When you exit Shoot-N-Print with a number of Copies greater than 5 you will also be prompted with the following. Select Yes to save the Number of Copies greater than 5 as the default on the next startup of Shoot-N-Print. When starting Shoot-N-Print after Exiting and Saving a Number of Copies greater than 5 you will be prompted on startup with a prompt like below (again to prevent accidentally printing too many copies on fast printers). Page 12 of 28 printed 9/8/2015 Shoot-N- Print - Copyright © 2011-2015 by Shoot-N-Print.com All rights reserved. Select Yes to leave the number of Copies set at the value above 5 indicated (last saved Number of Copies). DS40 Perf Media: Shoot-N-Print Version 3 has the ability to DNP’s DS40 Perforated 4x6 Media (DS404x6PM). See the Section “DNP DS40 Perforated Media Options” on page 26 below on how to utilize the Perf Media using Shoot-N-Print. Print Photo As: With this option you can choose to print the image as a full color photo (default) or as a Greyscale/Black & White photo or as Sepia toned photo. This option can be changed when using the Preview Mode in case you want to change the type of photo to print for specific photos (but remember to change it back to your preference as necessary). Page 13 of 28 printed 9/8/2015 Shoot-N- Print - Copyright © 2011-2015 by Shoot-N-Print.com All rights reserved. Start Processing Start Processing: Click the “Start Processing” button to have the Shoot-N-Print software do its thing. The Shoot-N-Print software will monitor the selected folder and either 1 [Automatic Mode]) automatically print the specified number of copies of photos on the selected printer using the selected paper size for every JPG image in the selected folder or 2 [Preview Mode]) show a preview for each image in the selected folder and allow the user to decide whether to “Print” the image with or without cropping or “Skip” printing of the image shown. Processing using Automatic Mode (no Preview of images) Main Screen – Automatic Mode Page 14 of 28 printed 9/8/2015 Shoot-N- Print - Copyright © 2011-2015 by Shoot-N-Print.com All rights reserved. Processing with Automatic Printing will continue to monitor Selected Folder and continue to print photos on the Selected Printer until there are no more images to print or until the “Stop Processing” or “Abort Printing” button is selected. After each photo is printed the original image file will be moved to the Printed sub-folder of the Selected Folder after it has been automatically printed by the Shoot-N-Print software, so that the photographer will know which images have been printed if the “Stop Processing” or “Abort Processing” or “Exit” button is selected. WARNING: If there are lot of images in the Selected Folder and a fast printer is being used, a LOT of photo paper can be used very fast, so make sure you have the selected the correct “Selected Folder to Monitor” to and that you do intend to print all of the images in the folder BEFORE you press the “Start Processing” button. Abort Printing: Select this option to force Shoot-N-Print to stop processing images in the Selected Folder while it is in the middle of processing. Some photos may continue to print since some of the photos may already be in the Printer’s print queue ready for printing. Use the specified printer’s Window’s Print Job dialog (see sample below) to cancel individual or all print jobs remaining in the print queue or to Pause the printer). The Abort Printing button will stop printing photos and will stop monitoring the Selected Folder until the Start Processing button is pressed again. Selected Printer’s Window’s Print Job Dialog (go here to cancel any individual or all print jobs remaining in the print queue after “Abort Processing” button is pressed). Page 15 of 28 printed 9/8/2015 Shoot-N- Print - Copyright © 2011-2015 by Shoot-N-Print.com All rights reserved. Processing using Preview Mode Select Mode before Starting Processing: When you check the Preview Mode (default Mode) or upon startup of Shoot-N-Print, the Main Screen will show a full screen maximized window so there is room to show the image on the right hand side of the screen (see below). Checking Automatic Mode will show a narrower version of the Main Screen (see above) since showing each image is not needed or used for Automatic Printing Mode (see above section of User Manual). Shoot-N-Print Main Screen in Preview Mode After selecting “Start Processing” when using the Preview Mode, Shoot-N-Print will monitor the Selected Folder and show each image, one at a time, in the extended panel to the right and give the user 1) the ability to crop the image before Printing or Previewing the finished photo, 2) see a full screen Preview of the image with any Custom Template/Border/Logo and Custom Text automatically applied and 3) the ability to “Print” the full image (when crop box is not showing) or “Print” only the cropped part of the image (if Crop Box is showing) or “Skip” any image with the Custom Template/Border/Logo and Custom Text automatically applied. Cropping: Draw Crop Box: To crop the image, simply click and drag the mouse in the preview area to draw a crop box. The crop box will automatically size to match the aspect ratio of the selected Paper Size to make it quick and easy to crop the proper area/size. Move Crop Box: Click inside the crop box to move the crop box around. Resize Crop Box: Click on the bottom right hand corner of the crop box (handle) and drag to resize the crop box. Rotate Crop Box Orientation: Click the Rotate Button (see screen shot below) to rotate the orientation of the crop between Portrait and Landscape orientation. The crop box will automatically size to match the aspect ratio of the selected Paper Size to make it quick and easy to crop the proper area/size. Button to Rotate Crop Box between Portrait and Landscape Orientation Page 16 of 28 printed 9/8/2015 Shoot-N- Print - Copyright © 2011-2015 by Shoot-N-Print.com All rights reserved. Remove Crop Box: Click outside of the crop box to remove the crop box. “Show Preview of Final Print” button: Clicking this button will show a full screen Preview of the Final Version of the Photo with any selected Custom Border/Template/Logos and Custom Text automatically applied before actually printing the photo. This allows the user to make any necessary changes, adjust cropping, etc. “Print” button: This makes it quick and easy to print the entire image or just the cropped area just by leaving the Crop Box in place or by removing it (click outside of the crop box to remove the crop box). If a crop box is showing and the “Print” button is clicked, only the crop box area will be printed. If the crop box is Not Showing then the entire image will be printed. When the “Print” button is clicked, the entire image or cropped area of the image will be printed on the Selected Printer using the Selected Paper size. The image will automatically be rotated, resized, and center-cropped to match the Selected Paper size. After the photo is printed the original image file will be moved to the Printed sub-folder (see below) in the Selected Folder To Monitor, after it has been printed by the Shoot-N-Print software. This allows the photographer to know which images have been printed if the “Stop Processing” or “Exit” button is selected. Skip: If the “Skip” button is selected the original image file will be moved to the Skipped sub-folder (see below) in the Selected Folder to Monitor so that the photographer will know which images were skipped during processing. After choosing “Print” or “Skip”, the next image in the Selected Folder to Monitor will be shown in the right side of the screen until all images have been processed. If new images appear in the Selected Folder, they will then be shown in the right side of the screen. This will continue until “Stop Processing” or “Exit” is selected. Sample View of “Selected Folder to Monitor” with Printed and Skipped sub-folders Prev-Next buttons in Preview Mode: When in Preview Mode (not available in Automatic Mode), you can go back to Preview, Crop, Print or Skip the last 5 previously processed image(s) by clicking the Prev and/or Next buttons to the right of the Print and Skip buttons. The Next button will only show up after you have gone back to at least 1 previously processed image th using the Prev button. The Previous button will become disabled once you are on the 5 previously processed images. Go Back and Preview, Crop, Print or Skip Previously Processed Images in Preview Mode Page 17 of 28 printed 9/8/2015 Shoot-N- Print - Copyright © 2011-2015 by Shoot-N-Print.com All rights reserved. Stop Processing Stop Processing: Selecting the “Stop Processing” button will cause the Shoot-N-Print application to stop printing photos and stop looking for images to print in the Selected Folder. To resume printing and processing images again, just select the “Start Processing” button. NOTE: Some photos may continue to print since some of the photos may already be in the Printer’s print queue ready for printing. Use the specified printer’s Window’s Print Job dialog (see sample above) to cancel individual or all print jobs remaining in the print queue or to Pause the printer). Select Single Image to Print Select Single Image to Print: This option will open up a Windows file dialog showing the .JPG images in the Selected Folder. Any JPG image (either in the default folder or anywhere in the computer’s file system) can be selected and printed automatically to the Selected Printer using the Selected Paper Size and other selected options. Page 18 of 28 printed 9/8/2015 Shoot-N- Print - Copyright © 2011-2015 by Shoot-N-Print.com All rights reserved. Advanced Options Advanced Options: Clicking this link opens the following Advanced Options dialog to allow specific options to be turned on/off or to change certain settings. Shoot-N-Print Advanced Options Screen Select Landscape Border/Template Layer to Print: Click on this link to open a Windows file dialog to navigate to a landscape (horizontal) oriented transparent .PNG border, template or logo to be applied to each image printed. Any image processed with a landscape orientation will have the border/template/logo image automatically applied to it. Make sure that the border or template image is a .PNG file with a transparent area that allows the photo to show through. For best results, the borders/template/logo files should 1) have the same aspect ratio as the Selected Paper Size, 2) be the same size as the Selected Paper Size and 3) have a resolution of 150-300 pixels per inch (ppi), if possible. Click on the Clear link to the right of the text box to remove the path to the border/template/logo file and to NOT apply any border/template/logo to the Landscape images. Page 19 of 28 printed 9/8/2015 Shoot-N- Print - Copyright © 2011-2015 by Shoot-N-Print.com All rights reserved. Sample 5x7 Landscape Border/Template/Logo Select Portrait Border/Template Layer to Print: Same as Landscape Border/Template/Logo above but select a Portrait (Vertical) oriented border/template/logo PNG image to be automatically applied to Portrait images. Technical Note: Since some printers (especially dye-sub roll printers) may actually print in a different orientation than you would expect, you should always have a Landscape and Portrait border/template selected for any event you plan to print with custom borders/templates. For example, you may only plan to shoot in a Landscape orientation with your camera but if you are printing on 5x7 paper, the printer may actually consider the print to be a Portrait print (depending on how the paper comes out of the printer) even though it is “printing” your Landscape shot on a 5x7 piece of paper. You may also need to change your Printer’s printer driver default preference of paper Orientation from Portrait to Landscape or vice versa if your prints from Shoot-N-Print are not oriented correctly or have large white areas on the side (due to incorrect orientation settings in Printer Driver Preferences). Ganged Photo Option - 1, 2, 4 or 8 Photo(s) Per Page: This option allows the photographer to choose whether to print 1, 2, 4 or 8 photos on each printed page. The ganged photos per page can be printed either with or without a custom template/border. Shoot-N-Print allows you to select to print either 1 photo per page, 2 photos per page, 4 photos per page or 8 photos per page. Shoot-N-Print will automatically rotate, center crop, and orient the photos/prints based upon the number per page (see samples below) Sample Ganged Photo Options with Custom Border/Template NOTE: THE FOLLOWING ADDED TEXT OPTIONS ARE ONLY AVAILABLE WHEN SETTING THE GANGED PHOTO OPTION (Photos per page) TO 1 PHOTO PER PAGE. Page 20 of 28 printed 9/8/2015 Shoot-N- Print - Copyright © 2011-2015 by Shoot-N-Print.com All rights reserved. Added Text Options: This option gives the photographer the ability to add a custom text overlay to the bottom of each print such as photographer's name, web site URL, event name, etc. plus with the built in "Text Builder" (see below) you can have the text automatically include the image file name, the last 4 sequential numbers of the image file name, the date and/or time the photo was taken and/or the date and/or time the photo was printed. The added text can be printed with any custom color selected with or without a custom color background. Note: When you select a Custom Font, the font size you select is IGNORED. The font size of any Custom Added Text is automatically calculated by Shoot-N-Print depending on the length of the text and the width of the bottom of the selected paper size (depending on orientation of print). Text Builder: This option allows you to customize your Added Text and include dynamic values such as the Image Filename, the Last 4 Digits (Sequence #) of the Image Filename, the Date Photo was Taken, the Time Photo was Taken, the Date the Photo was Printed and/or the Time the Photo was Printed. To build your custom Added Text string with the Shoot-N-Print Text Builder just type in the static text you’d like (ie. Contact Information such as photographer’s name, website address, phone #, tag line for event or anything else you’d like to have automatically appear on the bottom of each 1 per page print. Click “Save” to use the selected Added Text or “Cancel” to leave as it was previously set. Click the Clear link while in the Text Builder to erase all of the text in the textbox and start over. Shoot-N-Print Text Builder for building custom Added Text with Dynamic Values Select Custom Font for Added Text: Click this button to select any Font on your system to be the font used for the Custom Added Text. When you select a Custom Font, the font size you select is IGNORED. The font size of any Custom Added Text is automatically calculated by Shoot-N-Print depending on the length of the text and the width of the bottom of the selected paper size (depending on orientation of print). Select Font Color: Click this button to select the color of the Custom Added Text. Select Background Color: Click this button to select the color of the background behind the Custom Added Text. Make sure the Font Color and Background Color contrast each other enough to be able to read the text. Show Background Behind Added Text: Check this box to show the Selected Background Color behind the Custom Added Text. If this box is unchecked the Custom Added Text will be shown on the photo using the custom Font Color selected without any background – make sure this is a color that will show up on all photos regardless of the background of the image or it may be difficult to read. Page 21 of 28 printed 9/8/2015 Shoot-N- Print - Copyright © 2011-2015 by Shoot-N-Print.com All rights reserved. When you change the Added Text Font Options (Font Style, Font Color, Font Background Color & Show Background Behind Added Text), a sample of the selected options will appear as shown below. Sample of Selected Custom Font Options Multiple Printers Use Multiple Printers: Check this box if you want to use Shoot-N-Print to print to multiple printers. The standard version of Shoot-N-Print allows you to print to 2 different printers. It will print the selected Quantities of prints to Printer 1 then print the selected number of prints to Printer 2 and then back to printer 1 and will repeat this process until you Stop Processing. This option allows photographers to print more photos faster then what a single printer may be able to handle since it is possible to take pictures faster than a printer can print out the prints. This is a cost saving feature since it allows the photographer to use 2 less expensive (and slower) printers versus buying 1 faster and more expensive printer PLUS gives them an extra printer onsite in case 1 printer fails at the event. It is HIGHLY recommended that both Printer 1 and Printer 2 be the same model and the same paper size selected so that all prints produced will have similar look/finish. Quantities to Print Before Switching Printers: Select the desired number of prints to print to each of the 2 printers. Printer 1: Select the number of prints to send to Printer 1 before Switching to Printer 2. Printer 2: Select the number of prints to send to Printer 2 before Switching back to Printer 1. nd Select 2 Printer: Use this drop down to select the printer to use for Printer 2. The printer selected on the Main Shoot-N-Print screen will be used for Printer 1. Select Paper Size from Printer 2 Available Sizes: Select the desired Paper Size for Printer 2. ________________________________________________________________________________________ Save Final Printed Images in “As Printed” Folder: Check this option to have Shoot-N-Print save the final version of the print to a .JPG file in the “As Printed” folder. This final version will have any Custom Border/Template/Logo and Custom Added Text automatically added to the image processed. This option is great for being able to quickly do reprints of any images printed onsite and being able to email or publish these JPGs online or for social media purposes. See the “Disable Actual Printing to Printer” option below to ONLY save final images in the “As Printed” folder and not actually send any images to a printer. Page 22 of 28 printed 9/8/2015 Shoot-N- Print - Copyright © 2011-2015 by Shoot-N-Print.com All rights reserved. Also Show Full Sized Preview Image on Secondary Monitor: This option can be selected to allow the customer, photographer or table tech to view the images full screen as they are shown in the Shoot-N-Print Preview window when in Preview Mode. This can be used if you want the customer to approve or disapprove of printing the image. This option can ONLY be selected when a secondary monitor has been properly setup and configured in Windows. If the option is selected and a secondary monitor is not found you will see the following message: Showing a full sized preview image on the secondary monitor only applies when Shoot-N-Print is used in Preview mode (not available in Automatic Mode). Preview Print Only: This option can be selected to test the Shoot-N-Print application without actually printing photos on a printer. When this option is selected the images will be displayed in a Windows Print Preview dialog and not actually sent to a printer. This option will work in either the Automatic Printing Mode or the Preview Mode. The Print Preview dialog for each photo must be closed in order to allow the next photo to be shown. NOTE: You can also test the application by turning off your printer and just letting the photos to be printed go in the respective Printer’s Print Queue. From there you can cancel all of the print jobs by using the specified printer’s Window’s Print Job dialog before you turn the printer back on (if you don’t cancel the print jobs in the queue they’ll all begin printing out when you turn the printer on). Disable Actual Printing to Printer – Save Final Images as .JPG File in “As Printed” Folder: Checking this option saves the Final Images as JPG images in the “As Printed” folder without having to actually send images to a printer. The final version will have any Custom Border/Template/Logo and Custom Added Text automatically added to the image processed. This option is great for being able to email or publish JPGs online or for social media purposes. Wait Timeout: This option controls how often the Shoot-N-Print software goes back and checks the Selected Folder for new images after it has finished printing all of the images it found the last time it checked. This option is preset to 5 seconds and should NOT be changed unless directed to do so by Shoot-N-Print tech support. Save/Recall Configuration Settings Save/Recall Configuration Settings: This option will allow a photographer to name and save the configuration options and settings of up to 10 different setups or events and be able to recall any of the saved configuration options and settings with the click of a button. Saved Configuration/Setting options include path of Select Folder to Monitor (hot folder), the selected printer, the size of print, # of copies, the location of landscape/portrait templates, the ganged photos per page, any custom added text, color of text and background, and whether to preview the print only (vs actually printing photos) and whether to also show the image on a secondary monitor). Saving the configuration/settings allow photographer to give the settings a custom name such as "Sony 5x7 Christmas as Mall", "Kodak 8x10 Christmas as Church", "DNP 5x7 2-up Prom at Greenboro HS", etc. Page 23 of 28 printed 9/8/2015 Shoot-N- Print - Copyright © 2011-2015 by Shoot-N-Print.com All rights reserved. Save/Recall Screen for Saving/Recalling Configuration/Settings Save Current Configuration/Settings: This option will prompt the user for a custom name/description up to 40 characters in length (i.e Corporate Party Dec 2015 5x7, Mall Santa Pictures 5x7, etc.) to save the Current configuration and settings under. Enter the desired custom name in the following dialog box and click “OK” to save the configuration/settings using the custom Name/Description. The custom name will then appear in the list to the left. Enter Name and/or Description of Current Configurations/Settings to be Saved Under Recall/Load Configuration/Settings: Select a Name/Description of a previously saved configuration/setting from the list of Named Configuration/Settings on the left and click the “Recall/LOAD Previous Configuration/Settings” button. This will replace any current settings with the previously saved settings. Delete Selected Configuration/Settings: When you no longer need a previously saved configuration/setting or when you reach the maximum of 10 and need to add/save newer configuration/settings, highlight the Name/Description of a previously saved configuration/setting from the list on the left and click the “DELETE Selected Configuration/Setting” button. You will see a confirmation dialog to make sure you want to DELETE the selected Named Configuration/Settings. Once a Named Configuration/Setting is DELETED it can no longer be recalled. It must be re-created and resaved. NOTE: Shoot-N-Print will automatically save the current configuration/setting options when you exit Shoot-NPrint. The last configuration/settings will be automatically set when Shoot-N-Print is started back up on the same computer. Page 24 of 28 printed 9/8/2015 Shoot-N- Print - Copyright © 2011-2015 by Shoot-N-Print.com All rights reserved. Unregister License Key Unregister: If the Shoot-N-Print has been registered with a valid License Key, this button will show and you can Un-register the License Key and reuse the License Key on another computer. Computers MUST be connected to the internet to be able to Register or Un-Register a License Key. Page 25 of 28 printed 9/8/2015 Shoot-N- Print - Copyright © 2011-2015 by Shoot-N-Print.com All rights reserved. DNP DS40 Perforated Media Options Shoot-N-Print has the ability to use DNP’s DS40 Perforated Media (DS404x6PM). Below is a summary of how to utilize the Perf Media using Shoot-N-Print. The “DS40 Perf Media” checkbox will only become available to be checked when a DNP DS40 printer is selected and the paper size is set to 4x6 (6x4). To have the perforation on the media you MUST be using the DS404x6PM media. Shoot-N-Print DS40 Perf Media Selected To use the DNP DS40 Perf Media, make sure of the following: 1. Make sure the Paper Size selected is “[PaperSize (6x4) Kind=Custom Height=413 Width=615]”. 2. Make sure the DS40 Perf Media checkbox is ENABLED – Step 1 MUST be in place before the checkbox will appear. 3. Check the DS40 Perf Media checkbox to use the Perf/Perforated Media. NOTE: Printing on the Perforated Media in Shoot-N-Print only works when the “Ganged Photo Option” (Photos per page) is set to 1 Photo Per Page. With the DS40 Perf Media checkbox checked, the crop tool and the printed image will now be Square to match the Perf Media 4”x4” print area, rather than the standard 4x6 rectangle. Page 26 of 28 printed 9/8/2015 Shoot-N- Print - Copyright © 2011-2015 by Shoot-N-Print.com All rights reserved. DS40 Perf Media Option Selected – Crop Box and Print now Square to match Perf Media 4x4 Main Print area. Adding Custom Text with Perf Media If you add custom text with the “DS40 Perf Media” checkbox checked on the Main Screen then the Custom Text will be printed on the 2” stub of the Perf Media as shown in the example below. Samplet 4x6 Print using DNP DS40 Perf Print Media using Custom Text Option in Shoot-N-Print Custom Text is printed in 2” Perf Media “stub” area. Page 27 of 28 printed 9/8/2015 Shoot-N- Print - Copyright © 2011-2015 by Shoot-N-Print.com All rights reserved. Exit Shoot-N-Print Exit: Click the “Exit” button to exit the Shoot-N-Print application. All processing and printing will stop once the “Exit” button is clicked and “Yes” is selected from the following confirmation dialog. Shoot-N-Print Exit Confirmation Dialog NOTE: Shoot-N-Print will automatically save the current configuration/setting options when you exit Shoot-NPrint. The last configuration/settings will be automatically reset when Shoot-N-Print is started back up on the same computer. END OF USER MANUAL – SHOOT-N-PRINT Version 3 – August 2015 Page 28 of 28 printed 9/8/2015 Shoot-N- Print - Copyright © 2011-2015 by Shoot-N-Print.com All rights reserved.