1
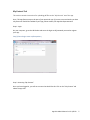
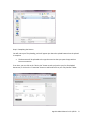
Introduction
Welcome to the mobile world of App-Kits, the system that allows you to carry everything you need
to demonstrate the features and benefits of your product or service in a package the size of an iPad.
The purpose of this manual is to provide you with a resource for understanding how your
distribution is set up, how you manage content in App-Kits, and what to do when users are added or
change. In addition, the Appendix contains helpful information on converting various types of files
for use in your app.
This document will be updated as necessary, to ensure that you are always in the know regarding
the latest improvements in the App-Kits world.
You will want to become as familiar as possible with the information in this manual so that you can
answer questions from your users quickly and easily. If you have any questions about the
information contained here, please do not hesitate to contact us:
App-Kits LLC
Distribution of your new app
Once your new iOS app is complete, you will distribute it in one of two ways:
Apple iTunes: Distribution through iTunes means that your app is available to the general public.
Enterprise License: Distribution through an Enterprise License means that your app is available only
to employees of your company.
Before going any farther, you must decide on the form of distribution you are using for your app.
Once the distribution method is established, users can proceed to downloading the app.
Downloading Tips
Strong Wi-Fi
It is always best to use a good Wi-Fi connection to download the app, especially if your app is over 1
Gig in size. This will save time and avoid frustration. Corporate, shared Wi-Fi networks get a lot of
traffic and may often be slow. You may want to suggest that people use their home Wi-Fi if they are
having trouble downloading at work.
Average Time
App-Kits Admin Manual v1.2: 4/2013
1
If your app is over 1 Gig in size, you may want to do some testing with people on your iPad team to
determine an average download time. Doing this on several different Wi-Fi networks will give you
some ideas of a range of time that you can tell users to expect when downloading the app.
Login Details
Be sure to tell your users to write down the email and password information they use for logging in
to the app in a safe place when they register. If they have to delete the app at any point and then reinstall, they will have to login with the same email and password that they used to register.
Content Repository Details
Once your App has been completed by App-Kits, you will be given a login and a password, for use by
your chosen administrator (or you), to gain access the content repository.
The administrator of your new iOS app will have full access to the content repository website. There,
it is possible to manage content, manage users, and run reports about usage on your app.
The content repository website features four primary tabs or areas that you will have available for
app administration. These are titled: Users, Content, Reports and Catalog. Your administrator will
want to read through this document thoroughly before starting to distribute apps to users, in order
to be prepared for user questions on the tabs and other functional aspects of the app.
Users Tab
When you click on the Users tab, you will be shown all of the current users for your app, listed by
email address.
To the right of each email address are two icons: a pencil for editing the user information, and a key
for authorizing and de-authorizing users (if your app has the registration security feature).
Adding New Users
Adding via registration security
If you have registration security, a user is added to the list through the process of registering for the
app. See the Registration Administration section for more information.
Adding manually
Note: This feature should only be used for apps without the registration feature (“NonRegistration” apps).
1. In the User tab, click on the “Create New” button on the right side of the screen.
2. Enter the User’s Email address, First Name, Last Name, Phone #, Company, and password.
App-Kits Admin Manual v1.2: 4/2013
2
3. Choose a role for the user. The options are Account Manager, Content Manager, or Normal.
• Account Manager – This role gives the user access to the Content, Users, and Catalog tabs.
• Content Manager – This role gives the user access to the Catalog and Content tabs.
• Normal – This role gives the user access only to the Catalog tab to download the app.
4. Once all of the information is entered, click the “Create” button to create the new user.
After you have created the user in the system, you will need to send an email to the new user with
the URL for the repository, their email address as entered in the system, and password information
required to download the app.
Content Tab
This is the section where you can add, delete and edit your app content. Each app is organized
slightly differently, depending on your specific app content structure.
On your computer, click on the content tab. You will see that the content of the app is organized in
three categories:
•
•
•
Main categories are listed in blue
Sub categories are listed in pink
Content files are listed in white
Within this tab are a number of features you can use to manage content. The features are described
here, and some can be seen later in the My Content Tab section of this manual.
Features
Create New: Allows the user to add a new piece of content to the app
Edit Pencil Button: Allows the user to modify a piece of content or its metadata
Remove button (Round Red button with minus sign): Allows the user to delete a piece of content
Filter Field: Entering text in this field allows the user to filter or sort the list of content, to find items
more quickly
Content Sort button (Three cascading blue pages): Takes the user to a screen where it is possible to
sort the order of the content that appears in the app itself
Adding New Content
To add new content, you will need to click on the “Create New” button on the upper right side of
the screen. This will open up a new screen titled “Create Content,” which contains various fields:
Name Field: Enter the name of the file to be uploaded, as it should appear in the app
Share Content Field: This field is reserved for future functionality
URL Field: If a link to a website is to serve as content, enter its URL in this field
•
The URL must start with http:// and include the rest of the URL after that
App-Kits Admin Manual v1.2: 4/2013
3
•
If a URL is entered here, do not upload a file
In the app, when the user clicks on the name of this content, it will open a browser on the iPad and
take them to this website.
Tags Field: These are the primary, secondary, and sometimes tertiary category levels in the app. If
the same piece of content will appear in multiple categories, it only needs to be added once. But all
of the appropriate categories in which the content file will appear must be highlighted. Doing this
will save space on the app.
1. Click on the” Primary Category.”
If multiple primary categories are needed, hold down on the “Control” key on a PC or the
“Command” key on an Apple Computer while clicking on other categories.
2. Choose the secondary and/or tertiary categories in the same manner.
3. Once you have chosen the necessary categories, click on the “Create” button at the bottom of
the page to continue.
Uploading the File
File types that can be uploaded include:
•
•
PDF file
MP4 formatted video file
If your app is set up to do so, you may also be able to add other types of files (.m4v, .doc, .ppt, or .xls)
that will open with other apps that can read them. Check with your project manager to verify if you
have this ability.
1. Scroll to the bottom of the page and click on the “Upload” button. This will open a window on
your computer so you can navigate to the content you would like to upload.
2. Click on the file you wish to upload.
3. Click the “Open” button. At this point, you will be back on the “Edit Content” screen and you will
be able to see the content uploading. You can view the progress of the upload by observing the
blue bar next to the file name at the bottom of the screen. When the blue bar disappears, the
content is uploaded.
Updating to New Content
Following content uploads, the next time anyone opens the app and has an internet connection, the
app will recognize that there has been additional content added.
1. The user will receive a message that says, “Update Ready. Do you wish to perform the content
update?” (”Yes” or “No”)
2. The user should click “Yes.”
3. The app will download the newly added content, and it will become available for use on the app.
Updates and changes can be made at any time, but it is easier and less confusing for your users to
group your updates together. That way, users don’t constantly receive numerous, small updates.
App-Kits Admin Manual v1.2: 4/2013
4
My Content Tab
This section contains instructions for uploading pdf files to the “My Content” are of the app.
Note: This app feature may not be part of your particular app. If you are not sure whether you have
this feature or would like it added to your app, please contact your App-Kits Representative.
Step 1. Login
On your computer, go to the URL below and enter the login email/password you used to register
your app.
http://client.design-center.us/dcrepository
Step 2. Accessing “My Content”
Once you have logged in, you will see a screen that looks like this. Click on the "My Content" tab
above the app icon.
App-Kits Admin Manual v1.2: 4/2013
5
Step 3. Create New Content
This is the “My Content” area of the Repository, where users can add pdf documents. Click on the
“Create New” button (on the right side, green with a white + sign) to begin the process.
Step 4. Name the Content
On this page, you enter the name of the pdf document, as it should appear on the app, by typing a
name in the “Name” field. Then press the “Create” button.
App-Kits Admin Manual v1.2: 4/2013
6
As covered earlier, you can also make a link to a particular website instead of attaching a file. Enter a
working URL that starts with http:// in the URL field, then press “Create,” and your URL will be
published to the app.
Step 5. Upload the File
Now that the name of the content has been set, you can upload your file to the repository. Click on
the “Browse” button.
Navigate to the location on your computer where your pdf document is stored, click “Open” and
then click “Upload” when you are back in the app’s content area.
App-Kits Admin Manual v1.2: 4/2013
7
Step 6. Completing the Process
You will notice your file uploading, and it will appear just above the upload button when the upload
is complete.
•
The document will be uploaded to the app the next time that you open the app with an
internet connection
From here, you can click on the “Back to List” button to take you back to your list of uploaded
documents, or click on the “Create New” button to add another file to your “My Content” folder.
App-Kits Admin Manual v1.2: 4/2013
8
iOS Enterprise License Requirements/Needs for Re-downloading Apps
Re-download Situations
There are times when an app may need to be re-downloaded from a link. These include:
•
•
The app code has changed due to an addition of features or bug fix
The app has moved from one Enterprise License to another
You will need to delete the existing app and download a completely new version. If you
have registration on your app, you will need to login with your email and password that you
first used to register.
•
The iOS Enterprise Provisional License has expired
This happens every year, and the license will need to be renewed. App-Kits will need to
rebuild the app to include the new updated Enterprise License information.
Updating Enterprise License Information
Apple requires that all Enterprise Licenses be updated yearly. If you are running your app on an
Enterprise License owned by your company, you will need to:
•
•
•
Look at your license to determine when it is due for renewal
Schedule a time to renew your license ahead of time so App-Kits can rebuild your app
before the expiration
Notify your app users, via email, that they will need to re-download the app before the
Enterprise License renewal date
Once App-Kits has rebuilt the app with the new Enterprise license information we will give you a link
to download the app. It will be the same link you had when you first downloaded the app. You will
then send this link along with information that their app will no longer be accessible as of XX/XX
date, unless they re-download the updated app over the existing app.
Instructions for Using the New Download Link
1. DO NOT Delete your existing app before you start this download process, as doing so will
just add more time to your download. You will then also need to log into the app with your
email and password that you used to register the app initially.
2. Either click on the link provided from your email client on the iPad, or type the URL into
Safari on your iPad.
3. At this point Safari will take you to a page with the icon for your app at the top left corner of
the screen.
4. Tap on the icon to start downloading the app.
App-Kits Admin Manual v1.2: 4/2013
9
5. You should now see a pop up that asks if you would like to install the app. Tap on the install
button to continue.
6. Once you have tapped on the install button, you will see the icon for the app start to install
the app. There will be a blue bar that shows the progress of the app download and
installation.
Tip: Be sure you have a good Wi-Fi connection before you start your download. Some apps are large
and may require longer download times. Download times may vary depending on the traffic on your
Wi-Fi network.
What if a user deletes the app?
Users can still download the app. The overall process will just take longer, as the user will now have
to download all of the content again. Follow these instructions to re-download an app you have
already downloaded and registered for:
1. Repeat steps 2 through 6 above.
2. Once you open the app, instead of tapping the “Register” button, you will need to tap on
the “Login” button and enter the same email and password that you used to register with
when you first downloaded the app.
3. If you have forgotten your password, contact your app manager and request a new
password be emailed to you.
Directions for Issuing a New Password to a User
If a user has forgotten a password, you can use this process below to have the system generate a
new password:
1. Go into the Content Repository and find the user’s email address.
2. Log out of the content repository and go to the login screen as if you were going to login
again.
3. In the email field, enter the email address for the user who needs a new password and click
on the link to the right of the password field that says, “Forgot Your Password?”
4. Once this link is clicked, the system will email the user a new password that they can then
use to log into the app.
Registration Administration
Registration Goals
Registration serves several purposes, including:
•
Keeping your information in the hands of the people you intend to use it
App-Kits Admin Manual v1.2: 4/2013
10
•
•
Allowing you to see which devices or users are using the app and how often
Allowing you to see how often particular pieces of content are being accessed
The iPad or iOS device itself is what is being registered to a particular user. Permission to download
particular apps is then given to that user. A particular device may only be registered once with a
particular user, but a user has the ability to register multiple devices.
Registration Process
Authorizing Users
The Administrator has the ability to authorize (or de-authorize: see below) any user at any time.
Auto Authorization
The Administrator is responsible for initiating this process. The steps are as follows:
1. The Administrator sends an email to prospective users, one which contains a link that allows
them to download your app.
2. The user taps on the link via their iPad email, or types the link into their iPad browser.
3. The user taps on the icon, and the app shell will download to their iPad.
4. When the user opens the app, a pop-up will appear that asks them to Login or Register. If
they are a new user they will need to click on the “Register” button.
Note: If the user has registered previously, has deleted the app, and is now re-downloading the app
to their iPad, they will need to click on the “Login” button and enter their email and password that
they used to register with previously.
5. Once the user has tapped on the “Register” button, the user will be prompted to enter their
first name, last name, email address, and a password of their choosing.
6. The User will then tap on the “Send” button.
7. At this point, the user will be automatically authorized to download the content and will be
prompted to do so.
Pre-approved Authorization
The Administrator is responsible for initiating this process. The steps are as follows:
1. The Administrator sends an email to prospective users, one which contains a link that allows
them to download your app.
2. The user taps on the link via their iPad email, or types the link into their iPad browser.
3. The user taps on the icon, and the app shell will download to their iPad.
4. When the user opens the app, a pop-up will appear that asks them to Login or Register. If
they are a new user they will need to click on the “Register” button.
App-Kits Admin Manual v1.2: 4/2013
11
Note: If the user has registered previously, has deleted the app, and is now re-downloading the app
to their iPad, they will need to click on the “Login” button and enter their email and password that
they used to register with previously.
5. Once the user has tapped on the “Register” button, the user will be prompted to enter their
first name, last name, email address, and a password of their choosing.
6. The User will then tap on the “Send” button.
7. At this point, the user will be sent an email message that indicates that their registration has
been submitted. The email will say “The User was created successfully.”
8. The Administrator will receive an email stating “A new user has registered <First Name>
<Last Name> <Email>. To authorize, click here.”
9. Clicking on this link will take the Administrator (you) to the Repository, where you can
authorize the user. (See Authorizing a User, below.)
Authorizing a User
1. Navigate to the Content Repository on your computer: http://client.designcenter.us/dcrepository.
2. Login with your email and password.
3. Click on the “Users” tab to access individual users.
Note: If your Registration is set up so that the user needs to get pre-approval from the
Administrator—before they can be authorized to download content for the app—below is the
process that will happen.
4. You will be asked “Are you sure you want to authorize this user?”
5. Click “Yes” to continue to authorize.
6. The user will now receive an email stating that they have been authorized to download
content for the app. The email will say…. “This email is to notify that you have been
authorized within Dispatch Mobile. If you have any problems, please contact your account
representative.”
De-authorizing Users
You, the Administrator, can change a user’s authorization status at any point. Sometimes, it may be
necessary to de-authorize a user. This is accomplished as follows:
1. Navigate to the Content repository on your computer: http://client.designcenter.us/dcrepository
2. Login with your email and password.
3. Click on the “Users” tab to access individual users.
App-Kits Admin Manual v1.2: 4/2013
12
4. If your Registration is set up to automatically authorize users upon login, you will now see a
key with a minus sign to the right of the user’s email address.
5. To de-authorize a given user, click on the appropriate key.
6. You will be asked “Are you sure you want to de-authorize this user?”
7. Click “Yes” to continue to de-authorize.
You can change the authorization status at any point.
When a user has been de-authorized, the next time they open the app and have internet
connectivity, the app will tell them that they are not authorized to view this content.
Device Management
Changing/Re-assigning iPads Among Users
As the Administrator, you have the ability to easily remove a device from a user’s profile, thus
allowing the device to be registered by another user.
Note: Be sure to have the new user of the device register the app as soon as you have removed the
device from the previous owner’s profile, to prevent future access to the app from that user.
The App-Kits Registration system uses your unique device ID, paired with your registration
information, to keep your company’s app information secure and under your control. Staff changes
may make it necessary to move device assignments around, but unless these pieces of information
match, the app cannot be accessed.
Example A: A user has just left your company, you have de-authorized that user, and the user will no
longer be able to download the app. You have a new user of that iPad who needs to install the app
on the device. Until you re-assign the device, however, that user will be unable to install the app, as
that device will still be paired with the previous user’s login. (This can be changed by you, the
Administrator.)
Example B: You have two salespeople, Salesperson A and Salesperson B. Salesperson A has left the
company and turned in their iPad, and Salesperson B is a new hire. Salesperson A has gone to work
for the competition and wants to show your app to someone. “A” still has a login, but because he no
longer has the paired device, “A” will not be able to download the app.
This security feature also means that Salesperson B will not be able to register the app on
Salesperson A’s old iPad, as the iPad was paired with his registration information, until the device
has been re-assigned.
The previous owner of the iPad must have the device ID removed from their profile to avoid this
conflict. (See Removing Device from User Profile, below.)
App-Kits Admin Manual v1.2: 4/2013
13
Removing a Device from User Profile
1.
2.
3.
4.
5.
6.
Log into the Content Repository.
Click on the “Users” Tab
Navigate to the details of the previous user’s profile.
Scroll to the bottom of the screen.
The last line of the page will show a line labeled “Nick Name” and “Identifier.”
Click on the “Minus” button at the right side of this line.
The device that was paired with the previous user is now free to be associated with a new registered
user of your app.
Appendix
FAQs
(under development)
iOS App Content Conversion Specifications
Quick Overview
Your iOS App is set up to automatically show PDF files or an .mp4 formatted video file. (If your app is
set up to do so, you may also be able to add other types of files that will open with other apps that
can read them. Check with your project manager to verify if you have this ability.)
•
•
•
•
•
Pdfs – converted to proper format of pdf
Images in various formats – converted to pdf
MS PowerPoint files – converted to pdf
MS Word files – converted to pdf
Videos – converted to .m4v format
Video Conversion Specifications
Videos are required to be converted to .m4v format. There are options for doing this:
•
•
•
Download inexpensive video conversion software from http://www.avs4you.com/AVSVideo-Converter.aspx
Check with your IT staff to see if they have a video conversion software that they already
use in-house
Search for other video conversion software programs
App-Kits Admin Manual v1.2: 4/2013
14
PDF Conversion Specifications
Scenario 1: PDF is unsecured and created from an InDesign, Illustrator, Quark, or other page layout
program
There are two things to keep in mind with files in this category:
•
•
Pdfs export as "Screen Resolution" with Adobe Acrobat; make sure all other additions are
turned off
Saving the files with the compatibility turned off to save space is preferred
Conversion Instructions
1.
2.
3.
4.
5.
Open document in Acrobat Professional
In the tools palette under "Edit Page Design" select "Background > Add Background"
Do not select any options in the pop-up, all default values are correct
Close/Confirm pop-up
Save document
Scenario 2: Pdf is unsecured and created from a PowerPoint presentation.
Note: Backgrounds cannot be added to documents prepared from PPT since the PPT template is
already occupying that space in the pdf. In this scenario, the pdf needs to be placed into an InDesign
document with a white background.
Conversion Instructions
1. Determine size of pdf by opening in Acrobat Professional (hover curser in the lower left
corner)
2. Create new InDesign document in the dimension of the pdf
3. On the master page, create a white box that covers the entire page
4. Use the "Place Multipage PDF" script (located in the Scripts Palette) to import the pdf into
the document, starting on page 1
5. Export document as a new pdf file (do not replace existing file as this will result in a bad pdf)
Scenario 3: PDF is secured
Note: Secured PDFs can be unlocked (if password is known) by changing the security information in
Acrobat. If known, the previous workflows can be used. If unknown, the following process needs to
be used.
Conversion Instructions
1. Open document in Acrobat Professional
2. “Save As” image (jpg)—creates individual jpgs for each page
3. Create new InDesign document in the dimension of the pdf
App-Kits Admin Manual v1.2: 4/2013
15
4. On the master page, create a white image box that covers the entire page
5. Place each jpg from the document into the InDesign document in the appropriate page
6. Export document as a pdf file (you can replace existing file)
App-Kits Admin Manual v1.2: 4/2013
16