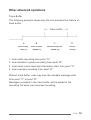
1
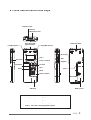
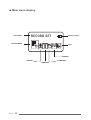
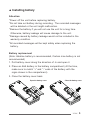
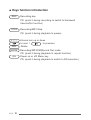
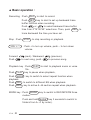
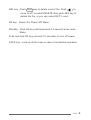
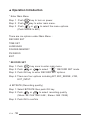
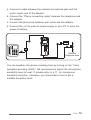
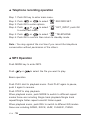
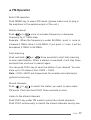
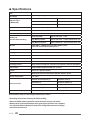
Model NO. : VT-50 User Manual Digital Voice Recorder & Digital Audio Player www.denpa.com.tw ▲ Features 2 ▲ Parts identification and keys 3 ▲ Main menu display 4 ▲ Installing battery 5 ▲ Keys function introduction 6 ▲ Basic operation 8 ▲ Operation Introduction 10 ▲ Recording function operation 14 ▲ Telephone recording operation 16 ▲ FM Operation 17 ▲ FAQ 24 ▲ Specifications 28 VT-50| 1 English Contents ▲ Features 1. Digital voice recorder + MP3 player + FM radio + Removable disk. 2. Full digital design for crystal clear sound quality. 3. Five equalizer (NOMO,ROCK,JAZZ,CLASS, PIANO). 4. USB interface for quick up load or download. 5. Automatic power off (APO) function to save battery power. 6. Super slim handy portable design. 7. Wireless microphone enlarge recording range(Option). 8. LED back light for night time operation. 9. Recording format is MP3, you can select Bitrates from 8/16/32/64K (Mono) and 96/128K (Stereo). 10. Built-in digital FM radio and FM recording available. 11. Voice operated recording (VOR). 12. Telephone recording. 13. Backward trace buffer (0, 15, 30, 60 seconds) available. 14. Microphone sensitivity adjustable (4 levels). 15. Single song, A->B section, all songs repeat function. 16. Rechargeable battery (When the rechargeable battery’s full, it’s only 1.4V). 17. Important message locking function to avoid messages erased accidentally. 18. Menu operation. 19. Key lock function. 20. Built-in real time clock, to display the time of recorded message. 21. Date and time display. VT-50| 2 ▲ Parts identification and keys Earphone Jack External Microphone Jack Left Microphone Recording LED light indication Hand strap Hold Right Microphone Recording Key Lock VOL + Stop Power / Confirm Playback Forward Backward VOL – Erase Push Mode Built in speaker USB plug 【OK】 Battery cover PS: push it during playback to switch to select EQ 【MODE】 PS: push it during playback to select repeat mode 【REC】 PS: push it during recording to search backward 【PLAY】 PS: push it during playback to pause VT-50| 3 ▲ Main menu display Current Mode RECORD SET Battery capacity RECORD MODE EXIT FM FM RADIO File-MEMORY TIME SET LANGUAGE VT-50| 4 ▲ Installing battery Attention: *Power off the unit before replacing battery. *Do not take out battery during recording. The recorded messages will be deleted or the unit might malfunction. *Remove the battery if you will not use the unit for a long time. Otherwise, battery leakage will cause damage to the unit. *Damage caused by battery leakage would not be included in the warranty condition. *All recorded messages will be kept safely when replacing the battery. Battery replacement (Note: Alkaline battery is recommended, Carbon zine battery is not recommended) 1. Pull battery cover along the direction of and open it. 2. Place an AAA battery in the battery compartment (At the time, make sure to match “+” and “-“ ends of the battery with the signs shown in the compartment). 3. Close the battery cover back. Open the battery cover Close the battery cover VT-50| 5 ▲ Keys function introduction REC Recording key PS: (push it during recording to switch to backward trace buffer function) STOP Recording/MP3 Stop PS: (push it during playback to pause) +/- Volume turn up or down to next / to previous Delete Recording/MP3/FM(Record file) mode PS: (push it during playback to repeat function). Power on or off/ Menu key PS: (push it during playback to switch to EQ selection). DEL MODE OK VT-50| 6 MAIN MENU→RECORD SET, TIME SET, LANGUAGE, FM RADIO, EXIT *RECORD SET →BITRATE (Recording quality) →8K→16K→32K→64K (mono) →96K→128K (stereo) →MIC_SENSE (Microphone sensibility) →Sense 1 →Sense 2 →Sense 3 →Sense 4 →Auto Sense →VOR (Voice operation) →VOR OFF →VOR ON →EXT_INPUT (External input) →MIC INPUT (External microphone) →LINE INPUT (Audio input) →TELEPHONE (Telephone input) *TIME SET→Year--month--day--hour—minute--second *LANGUAGE →English →Simple Chinese →Traditional Chinese →Japanese *FILE-MEMORY *FM RADIO →FOLDER →A →B →C →D →E →F →Unlock / Lock →MEMORY →Total capacity →Used capacity →Free capacity →SPEAKER →SPEAKER OFF →SPEAKER ON →FREQUENCY →87.5-108MHz (Europe) →76-96MHz (Japan) *EXIT VT-50| 7 ▲ Basic operation : Recording : Push REC to start to record. Push REC key to start to set up backward trace buffer function when recording. Push or to select backward trace buffer time from 0”15”30”60” selections. Then, push REC trace backward the time you have set. Stop : Push VOL + / - Forward Push STOP to stop recording or playback. : Push + to turn up volume, push – to turn down volume. (next) / Backward to next song, push (previous). to previous song. Playback key : Push PLAY to start to playback music or voice file. Push PLAY key to pause when playback, Push MODE key to switch to select repeat function when playback. Push DEL to switch to different EQ when playback. Push REC key to active A→B section repeat when playback. MODE key : Push MODE key to switch to REC/MP3/FM three modes. Push and hold MODE key 3 seconds to switch to folders from A→F by order). VT-50| 8 to DEL key : Push DEL key to delete current file. Push to move to left to select DELETE then push DEL key to delete the file, or you can select EXIT to exit. OK key : Power On/ Power Off/ Menu. Standby : Push OK key shortly(around 0.5 second) enter main Menu. Push and hold OK key (around 2.5 seconds) to turn off power. HOLD key : Lock up all the keys in case of accidental operation. VT-50| 9 ▲ Operation Introduction * Enter Main Menu Step 1 : Push OK key to turn on power. Step 2 : Push OK key to enter main menu. Step 3 : Push or to select the menu options. (Push MODE to exit) There are six options under Main Menu : RECORD SET TIME SET LANGUAGE FOLDER-MEMORY FM RADIO EXIT * RECORD SET Step 1: Push OK key once to enter main menu. Step 2: Push or to select “ “ RECORD SET mode. Step 3: Push OK key to enter RECORD SET options. Step 4: There are four options including BIT, MIC_SENSE, VOR, EXT_INPUT. BITRATE (Recording quality) Step 1: Select BITRATE then push OK key Step 2: Push or to select recording quality (Mono: 8K /16K /32K /64K ; Stereo: 96K /128K) Step 3: Push OK to confirm VT-50| 10 MIC_SENSE (Microphone sensibility) Step 1: Select MIC_SENSE then push OK key. Step 2: Push or to select 1/2/3/4/AUTO Step 3: Push OK to confirm VOR (Voice Operation Recording) Step 1: Select “ “ VOR then push OK key. Step 2: Push or to select VOR OFF or VOR ON Step 3: Push OK to confirm PS : You can only adjust the sensibility of the microphone during recording after you turn on VOR. Push or to turn up or down the sensibility from level 1 to level 21. Level 1 is the lowest sensibility level and level 21 is the highest sensibility level.) EXT_INPUT (External Input) Step 1: Select “ “ EXT_INPUT then push OK key. Step 2: Push or to select “MIC INPUT”, “LINE INPUT” or “TELEPHONE “ Step 3: Push OK to confirm. * TIME SET Step 1: Push OK key to enter main menu Step 2: Push or to select “TIME SET” then push OK key. Step 3: Push PLAY key to enter time setting. It will start from "Year" Step 4: Push " + " or " – " key to increase or decrease. Push or to switch to Month / Day / Hour / Minute / Second adjustment Step 5: Push OK key return to standby mode. VT-50| 11 * LANGUAGE Step 1: Push OK key to enter main menu. Step 2: Push or to select “ “ LANGUAGE to enter options. Step 3: Push or to select your desire language “ “, push OK key to confirm then return to main menu. * FOLDER-MEMORY Step 1: Push OK key to enter main menu. Step 2: Push or to select “ “, push OK key to enter options. Step 3: There are three options including FOLDER/LOCK/MEMORY FOLDER Step 1: Push or to select “ “ FOLDER under FOLDERMEMORY option. Step 2: Push OK key to enter the option. Step 3: There are six folders from A~F Step 4: Push or to select your desire folder. LOCK Step 1: Push or to select “ “ LOCK under FOLDERMEMORY option. Step 2: Push OK key to enter the option. Step 3: Push or to select Lock or Unlock Step 4: Push OK key to lock or unlock the current file then return to current file. VT-50| 12 MEMORY Step 1: Push or to select “ “ MEMORY under FOLDER-MEMORY option. Step 2: Push OK key to enter Step 3: It shows the total memory size, used memory and free memory. * FM Step Step Step RADIO 1: Push OK key to enter main menu. 2: Push or to select “ FM “ FM RADIO options. 3: There are two options “SPEAKER” and “FREQUENCY”. SPEAKER Step 1: Push or to select “ “ SPEAKER under FM RADIO option. Step 2: Push OK key to enter the option. Step 3: Push or to select “SPEAKER OFF” or “ SPEAKER ON” Step 4: Push OK to confirm then return to standby mode. FREQUENCY Step 1: Push or to select “ “ FREQUENCY under FM RADIO option. Step 2: Push OK key to enter the option. Step 3: Push or to select “87.5-108MHZ” or “76-90MHZ” Step 4: Push OK to confirm then return to standby mode. * EXIT Push or to select “ return to standby mode. “ EXIT to exit main menu and VT-50| 13 ▲ Recording function operation * Enter recording Push MODE key to enter recording mode. * Basic operation Push REC start recording, push REC again to pause, push it again to resume. Push STOP to stop recording. (Push REC when recording to active Backward Trace Buffer function. Push or to select backward trace time : 0 / 15 / 30 /60 second.) * Playback voice file Push or under recording mode to select voice file. Push PLAY to start to playback, push PLAY again to pause, push it again to resume. Push STOP to stop playback. Push VOL – or VOL + to adjust volume. * Telephone recording This unit is provided with accessories for phone recording. 1. 2. 3. 4. Phone connecting cable. Adaptor for phone recording. Cable for connecting external MIC device. Optional external power supply. Please follow the figure below for proper connections. VT-50| 14 a. Connect a cable between the external microphone jack and the audio output jack of the adaptor. b. Connect the “Phone connecting cable” between the telephone and the adaptor. c. Connect the phone line between wall outlet and the adaptor. d. Connect the unit to external power supply or your PC to save the power of battery. a d c b Wall side Telephone outlet You can lengthen the phone recording time by turning on the “Voice operated recording (VOR)”. We recommend to adjust the microphone sensibility level to level 11 (please refer to p.11 for microphone sensibility selection.) However, you should take a test to get a suitable sensibility level. VT-50| 15 ▲ Telephone recording operation Step Step Step Step 1: 2: 3: 4: Push OK key to enter main menu. Push or to select “ Push OK to enter options. Push or to select “ to enter next menu. Step 5: Push or to select “ Step 6: Push OK to confirm then return to “ RECORD SET. “ EXT_INPUT, push OK “ TELEPHONE. standby mode. Note : You may against the civil law if you record the telephone conversation without permission of the others. ▲ MP3 Operation Push MODE key to enter MP3. Push or to select the file you want to play. Basic operation Push PLAY start to playback music. Push PLAY again to pause, push it again to resume. Push STOP to stop playback. When playback music, push MODE to switch to different repeat modes those are including Single track playback/Single track repeat/Single folder repeat once/All folder repeat. When playback music, push DEL to switch to different EQ modes those are including NOMO, ROCK, JAZZ, CLASSIC, PIANO. VT-50| 16 ▲ FM Operation Enter FM operation Push MODE key to select FM mode. (please make sure to plug in the earphone to the earphone jack of the unit.) Station channel Push or once to increase frequency or decrease frequency by 0.1 MHz step. Example : When the frequency is under 96.2MHz, push >> once to increase 0.1MHz. Now it is 96.3MHz. If you push << once, it will be decreased 0.1MHz to 96.2MHz. Fast scanning Push and hold or three seconds to start fast scanning to scan valid stations. When a station is searched, it will stay three seconds then continue to search again. You can push PLAY key to save the station if you desired. You can store up to 18 stations from CH03 ~ CH20. Note : CH01~CH02 are frequencies for wireless microphone(an optional accessory) Stored channels Push or to select the station you want to save under FM mode. Push and hold PLAY three seconds to store. Listen to the stored channels Push PLAY key under FM mode to select the stored channels. Push PLAY continuously to switch the stored channels one by one. VT-50| 17 * FM recording 1. Tune to the station (frequency) you want to record. 2. Push REC key to start FM recording. 3. Push STOP key to stop FM recording. How to use wireless microphone (WM-1) (optional device) Operations or main unit Push PLAY key to select CH01 or CH02 under FM mode. This function must use our optional device : Wireless microphone (WM-1). Operations of wireless microphone (WM-1): 1. Install an “AAA” type of battery to WM-1. 2. Power On/Off: Push and hold “PWR” key for 2 seconds. CH1 LED will be lighted on when the unit is powered on. Both LED (CH1 & CH2) will light off when the unit is powered off. 3. Select channel for wireless microphone: Press and hold “CH” key for 1 second to toggle between CH1 and CH2. Note: Assure the channel number of the main unit is same as the channel of the wireless microphone. VT-50| 18 Other advanced operations Trace Buffer The following example shows why the unit provides the feature of trace buffer. |<-- Trace buffer -->| | | |--------------------------|--------------------------|----------| ----------------| A B C D Start recording "REC" key 1. 2. 3. 4. User User User User Pause recording Valuable message start Resume "PAUSE" key "PAUSE" key recording starts recording from point "A". decides to pause recording from point "B". hears some important information start from point "C". resumes recording from point "D". Without trace buffer, user may lose the valuable message start from point "C" to point "D". Messages recorded in the trace buffer will be added to the recording file when user resumes recording. VT-50| 19 To set the time of trace buffer You can select the buffer in Recording mode “00”: "15": "30": "60": No backward trace. Backward trace for 15 seconds Backward trace for 30 seconds Backward trace for 60 seconds Note: You must turn off VOR function when you use backward trace buffer function. Removable mass storage disk The unit support "USB Mass Storage" function (Removable disk). It is not necessary to install any software driver if your OS is Windows Me, Windows 2000 or Windows XP. However, you should install driver for Windows 98. Enter removable disk mode of operation Step1: Connect USB plug between the unit and your PC. Step2: LCD screen of the unit will show USB connection picture Step3: During uploading/downloading data, the red lamp of the unit will flicker, and please do not take off USB Connector at the time or PC will freeze or the data will miss. You need to wait until the red lamp stop flickering. Note: When huge files are copied, Windows will show the completion message. Do not disconnect USB plug right away. Wait for several seconds until the red lamp stop flickering. VT-50| 20 File management 1. There are six folders under ROOT. You should put voice files only in these folders. 2. MP3 files should be put under ROOT. The playback order of the MP3 files are according to the date of the file was copied into the unit. 3.Open folder and file Step 1: Open [My computer] Step 2: Open [Removable Disk] Step 3: Double click the file or folder you want to open. 4. Build up new folder Step 1: Open [My computer] Step 2: Open [Removable Disk] Step 3: Select the path for new folder. Step 4: Click right button of the mouse then select “ADD””Folder”. Step 5: Input the name of the folder then push enter key of the keyboard. 5. Copy folder or file Step 1: Open [My computer]. Step 2: Select the folder or file you want to copy. Step 3: Click right button of the mouse then select “COPY”. Step 4: Select the disk you want to place the copied folder or file. Step 5: Click right button of the mouse then select “PASTE”. VT-50| 21 6. Change folder or file name Step 1: Open [My computer]. Step 2: Open [Removable Disk]. Step 3: Click the folder or file you want to rename. Step 4: Input the name of the folder then push enter key of the keyboard. Notes : You can input maximum 255 characters including spaces for file or folder name. The characters cannot include \/:*?”<> However, we don’t recommend to give a long file name. Most of software cannot read the file with a long name. Click the right button of the mouse then select “RENAME” to rename the folder or file name. 7. Delete folder or file Step 1: Open [My computer]. Step 2: Open [Removable Disk]. Step 3: Click the folder or file you want to delete. Step 4: Click the right button of the mouse then select “DELETE” to delete the folder or file. VT-50| 22 Notes: 1. The red LED of the unit also works as an indicator that indicates the status of USB communication. Red LED lights on or flash: A read/write operation is in progress. Do not disconnect USB plug at this moment, it may damage the file system of the unit. Red LED lights off: No read/write operation, it is safe to disconnect USB plug. 2. You can format the unit by PC. 3. When huge files are copied to unit, Windows will show the completion message that does not mean the copy is really completed. Do not disconnect USB plug right away. Wait several seconds until the red LED lights off. VT-50| 23 ▲ FAQ Q&A 1. No Power ! Check whether the battery power is too low. It is necessary to replace battery when the battery power indication is less then half. 2. Cannot record ! Check whether the battery power is too low. It is necessary to replace battery when the battery power indication is less then half. Check whether the memory capacity full, erase unnecessary files to release memory spaces. Push Menu key to select “Memory Size” to check memory size and free space. 3. Cannot playback voice file ! Check whether the voice file has been recorded. Check whether the battery power is too low, replace new battery if necessary. 4. No sound output when playback ! Check whether the volume at the lowest level, you can check it from LCD display. Please adjust to the optional sound level. If using earphone, please confirm earphone plug in snugly. If using speaker, please confirm no earphone plug in. 5. Bad receipt of FM radio ! Earphone is working as an antenna to receive FM signal, therefore, please confirm if it plugs in snugly. VT-50| 24 6. Cannot link with PC ! Check whether the operation system is Windows 98. If your operation system is Windows 98, please install the provided CD driver. 7. No operation when push keys ! Check whether the key lock enabled. 8. Cannot record telephone conversation ! Firstly, please confirm all the connections are well-connected, please refer the instruction manual p.15 for the detailed connections. Secondly, ensure the Voice Operate Recording (VOR) function enabled. Telephone recording is designed to be using for home use telephone, it is not applied to office PBX system. 9. Cannot erase recording file ! Check whether the recording file has been locked. There is a “ “ displays on the locked message. 10. Recording time less than specifications list ! All the recording times list on the specifications are based on the standard of the lowest quality(Q1:8K). If you choose higher recording quality (Q2~Q5:16 /32 /64 /96 /128K), recording times will be shorter accordingly. 11. Battery operation time less than specifications list ! The battery operation time lists on specifications is base on the testing by AAA Alkaline battery with volume level 20 (+/- 10% tolerance). VT-50| 25 If you are using rechargeable battery, the operation time would be less then Alkaline battery. It is because rechargeable battery’s current can only reach up to 1.4V after fully charged. On the other hands, a new Alkaline battery’s current is 1.5V. Troubleshooting ■ No Power 1. Please check the battery. Replace the battery 2. Make sure the battery match “+”, “-“ ends of the battery with the diagram Install the battery correctly inside the battery compartment. ■ Cannot record 1. Please check if the memory capacity are full. Erase unnecessary messages 2. Please check the battery. Replace the battery ■ Cannot playback 1. Please check if the messages were saved Check the file or folder 2. Please check if the battery is weak. Replace the battery ■ No sound output from the speaker 1. Please check if the volume set to 0. Increase the volume VT-50| 26 2. Please check if the earphone is plugged Unplug the earphone plugged . ■ No sound output from the earphone 1. Please check if the volume set to 0. Increase the volume 2. Please check if the earphone is plugged snugly. Plug the earphone to JACK snugly. Precautions 1. Alkaline battery is recommended to be applied to this recorder. 2. Do not repair, disassemble or modify the recorder by yourself. 3. Avoid putting magnetic cards(such as credit cards) or tapes near the speaker. 4. When the unit is not used for time, please remove the battery. 5. Do not apply excessive force to LCD window. It may cause breakdown or malfunction. 6. Do not put the recorder in high temperature/humidity/dust place. 7. Do not use the recorder in airplanes or areas restricting the use of electronic device. 8. Do not dispose of batteries in a fire! 9. Be understood that our company does not reimburse you for any loss from the use of the unit and that our company does not take responsibility for any memory loss by reasons of breakdown, repair, and others. VT-50| 27 ▲ Specifications Size W x L x H 39×96×12(mm) Net weight Approx. 37g ± 0.5g (no battery) * Record Time (Bitrate 8K) 256MB 70 hours (± 10%) 512MB 141 hours (± 10%) 1GB 283 hours (± 10%) Power source Alkaline batteries (AAA type) Record format MP3 File format MP3, WMA * Battery life (Test with Alkaline battery) Recording (64K) Approx. 360 mins ± 10% Play MP3 by speaker Approx. 240 mins ± 10% at volume level : 20 Play MP3 by earphone Approx. 840 mins ± 10% at volume level : 20 FM radio FM 87.5Mhz ~ 108Mhz (Europe)or FM76~96Mhz (Japan) (ch01 and ch02 for Wireless Microphone) Memory Built-in in Flash Memory (256MB / 512MB / 1GB) Language Traditional Chinese, Simplex Chinese, English, Japanese File number 6 Voice folders, each folder contents 99 files USB port USB1.1 Max output power 90mW at THD 10% 8Ω (1.5V to -3V) Recording sources Built-in stereo microphone, external line microphone, wireless microphone Sound output Earphone(Mini Plug/stereo) IMP over 16 ohms Speaker 18mm 16Ω dynamic speaker OS Windows 98 (need to install driver), 2000, XP ; Mac 9.2, X 10.3 Operate Temperature 0˚C ~ 40˚C Basic accessories Optional Accessories External line microphone (1) Telephone cord (1) Hand strap (1) Telephone adapter (1) Audio cable 2.5mm ~ 3.5mm (1) Earphone (1) User’s manual (1) AAA battery (1) Wireless microphone, AC adapter Specifications subject to be changed without prior notice. * Recording time will be varied by the bitrate setting * Actual available memory would be varied from the memory size listed. * Battery times in the specifications were given by the test from our company. You may find different battery life time when using different brand of battery, music and volume level. VT-50| 28