1
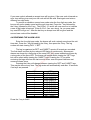
In
te
llig
en
tS
ec
ur
ity
&
Fi
re
Lt
d
SECURIT 700L
USER MANUAL
C & K Systems Ltd
6/12/95
Securit 700L User instructions
This manual will give you all the information you need to operate and control the
Securit 700L Control Panel. This manual will NOT tell you how to program or
configure the control panel, for that see the engineering instructions.
1.0 SETTING
1.1 FULL SET
( Used when leaving premises )
To start the exit procedure ensure all alarmed zones are clear. Now enter
your four digit user code, the buzzer will emit a steady sound and the exit time start.
Leave the building by the approved exit route and close the final exit door. Wait
outside the door until the buzzer has stopped to indicate that the panel has armed.
llig
en
tS
ec
ur
ity
&
Fi
re
Lt
d
If any zones are in fault the buzzer will pulse and the LED for that zone will be
lit. Return to the panel and press the "#" key or enter the user code to abort the exit
procedure. Investigate the fault and correct if possible, then start the exit procedure
again. If you are unable to correct the fault contact your alarm Installation company.
If you do not complete the exit procedure before the exit time runs out the internal
sounder will start. Enter your user code to stop the sounder. See section 3.3 to reset
the control.
In
te
1.2 PART GUARD ( Used when going to bed )
Start the exit procedure as for full set as above. Then press the "*" key
followed by the "0" key. The buzzer will change tone to a lower, deeper sound and
the LED's for any zones programmed to be isolated in part guard will flash. The
programmed part guard exit time will be selected and the exit procedure will
continue. If when performing this procedure you delay for more than 3 seconds
between the "*" and the "0" then an error tone will be heard. Restart the exit
procedure followed by "*" then "0" and continue with your exit procedure.
1.3 MANUAL ISOLATION ( Used to switch off various zones )
Start the exit procedure as for full or part set as given above. Then press the
"*" key followed by the number of a zone you require to isolate. If the zone is
accepted is will now isolate and the LED for that zone will flash and the exit
procedure will continue. If you require any further zone to be isolated then again
press "*" followed by a zone number. Again the time between "*" and a zone number
must not exceed 3 seconds or it will be classed as an error or mis-key and it will be
rejected. You must then re-enter the "*" if needed. If option 7 5 has been enabled by
your installer you can also manually isolate the entry exit zone in part set.
2.0 UNSETTING
( Used to dis-arm the control panel )
Enter by the specified route, the buzzer will sound, do not stop go directly to
the control panel. Enter your four digit code, the buzzer will stop and the control
panel will return to the 'DAY' mode. If the exit time has less than 10 seconds
remaining the buzzer will emit a quick pulsing sound to indicate "HURRY UP". If this
happens continue on to the control panel and enter your 4 digit code as stated.
3.0 TAMPER FAULTS DURING AN UNSET CONDITION
Lt
d
A tamper fault during an unset condition ( ie daytime) is indicated by the
internal sounder and the tamper LED. Enter the four digit user code to stop the
sounder, the sounder will now change to a low level two tone alternating sound to
indicate that there is a "RESET REQUIRED". Press the # key to reset the control
panel.
Fi
re
3.1 ALARMS DURING THE SET PERIOD
llig
en
tS
ec
ur
ity
&
Alarms during a set period ( ie night time ) will be indicated by the internal
AND external sounders going into alarm and also the strobe unit (if fitted) will begin
to flash. Enter your four digit user code to unset the system. The LED display will
indicate which zone caused the alarm. See section 3.3 to reset the control panel.
In
te
3.2 PERSONAL ATTACK ALARMS
When a personal attack alarm is triggered it is usually triggered from a button.
You should go firsts to the control panel and enter your four digit code and follow it
with the "#" key. you should then look to see if the PA light is still flashing. If it is then
it is denoting the PA circuit is still open. Check each PA button visually to see if it is
still triggered and if it is, reset it using the appropriate key provided with that button.
For further information on resetting an alarm condition of any kind see the below
section.
3.3 RESETTING THE SYSTEM
To reset the control panel enter the user code the sounder will emit a low
level two tone alternating sound to indicate that there is a "RESET REQUIRED".
Press the # key to reset the control panel. An accept tone will be given, the LEDs for
the zones in alarm will go out, and the control panel will return to the 'DAY' mode.
4.0 USER OPTIONS
4.1 CHANGING ZONES ON CHIME
"CHIME" is a facility to make particular zones chime when triggered. For
example, you could have a front door chime when opened or a room with valuables
in chime when entered. Chime is only active when the panel is UNSET. To configure
any zones to chime you must first have chime enabled in the extended options (this
needs to be set up by the installer on installation). If it is enabled press the * key.
The display will show any zones currently set to chime. Press the key number of the
zone you wish to enable/disable. If the control panel does not have the chime option
programmed an error tone will be given. Press the * key to finish.
4.2 AUTO TEST
( Should be performed at least once a month )
ur
ity
&
Fi
re
Lt
d
Enter your four digit user code, the buzzer will emit a steady sound and the
exit time will start. Press the * key followed by the 9 key. The exit buzzer will stop
and all the LEDs will light. After the 10 seconds all the LED's will extinguish and the
panel will then test the internal sounder, bell and strobe. Each will operate for 5
seconds then the control panel will then emit an accept tone and revert to the 'DAY'
mode. You may end the test at any time by pressing the "*" key.
en
tS
ec
4.3 CHANGING THE USER CODE
In
te
llig
There are two separate user codes available to the customer. A main
MASTER code and a secondary user code which can be enabled or disabled by the
user. By default the second user code will be disabled.
1) Master user
2) Second user
There are no differences to the usage of these codes. They both perform the
same tasks and neither has an advantage over the other. The second code can be
used for example when neighbours are looking after the premises and you don't
want to give them your code, you can simply enable the second code for them and
then when you return from your holiday disable that code again. This means they no
longer have access via that code.
To change a user code simply enter the four digit user code, the buzzer will
emit a steady sound and the exit time will start. Press the * key followed by the 9 key,
followed by the key of the user to be altered for example if you were changing user
code 1 then you would press 1, the same applies for user code 2. Once you have
pressed a user key then the LEDs 1 2 3 and 4 will now come on to indicate a new 4
digit code is required. Enter your new code. As you press each key one LED will go
out.
If your new code is allowed an accept tone will be given. If the new code is barred an
error tone will be given and your old code will still be valid. Start again and enter a
different four digit code.
To remove or disable a second user code enter the four digit user code, the
buzzer will emit a steady sound and the exit time start. Press the * key followed by
the 9 key, followed by the 2 key. The LEDs 1 2 3 and 4 will now come on to indicate
a new 4 digit code is required. Enter 0-0-0-0 (four zero keys). As you press each
key one LED will go out. After the last key an accept tone will be given and the
second user code will be disabled.
4.4 REVIEWING THE ALARM LOGS
Enter the four digit user code, the buzzer will emit a steady sound and the exit
time start. Press the * key followed by the 9 key, then press the 3 key. The log
routine will start viewing 'DAY' 1 'SET'
In
te
llig
en
tS
ec
ur
ity
&
Fi
re
Lt
d
The log is organised as 'SET' and 'UNSET' events. All events are recorded.
The first alarm is shown by the relevant LED being lit continuously. Subsequent
alarms are shown by a fast pulse of the zone LED. Any zones isolated are shown by
a slow pulse of the zone LED. The buzzer will sound whilst viewing the 'SET' logs
but will be silent whilst viewing the 'UNSET' logs. Pressing the "0" key while
reviewing the logs will show the last event to occur even the panel has been set
numerous times since.
Pressing the # key will change between viewing the 'SET' and 'UNSET' logs.
This may be done at any time. The log review will automatically end after 15 seconds
if no keys are pressed.
KEY
0
1
2
3
4
5
6
7
8
9
#
Press the * key to finish.
VIEW
LAST ALARM
LOG EVENT 1
LOG EVENT 2
LOG EVENT 3
LOG EVENT 4
LOG EVENT 5
LOG EVENT 6
LOG EVENT 7
LOG EVENT 8
LOG EVENT 9
SET / UNSET
4.5 WALK TEST
( Should be performed at least once a month )
You should test your system at regular intervals, to aid this, a walk test mode
is provided. You are allowed to test all ALARM devices. DO NOT TEST ANY
PERSONAL ATTACK BUTTONS.
Enter the four digit user code, the buzzer will emit a steady sound and the exit
time start. Press the * key followed by the 9 key, then press the 4 key. The buzzer
will emit a low level steady tone.
As you test each device the internal sounder will give a loud pulsing tone to
indicate the correct operation of that device. The zone number LED will light. When
the device tested clears the sounder will stop and the zone LED will go out. The
buzzer will emit a low level steady tone as before.
Report any faults to your alarm installation company.
Lt
d
Press the * key to finish.
ur
te
llig
en
tS
ec
DESCRIPTION
In
ZONE NUMBER
1 ENTRY / EXIT
2
3
4
5
6
7 PA
ity
&
Fi
re
The following is given so a record of your zone configurations can be made.
simply fill in where each zone is located in your premises.
THE FOLLOWING IS PROVIDED TO GIVE QUICK ACCESS TO VARIOUS
PEOPLE IF A PROBLEM OCCURS
INSTALLER DAY TEL NO.
INSTALLER MOBILE NO.
INSTALLER NIGHT NO.
KEY HOLDER 1 TEL NO.
KEY HOLDER 2 TEL NO.
INSTALLER NAME
ity
ur
ec
tS
en
llig
te
In
&
re
Fi
d
Lt