1
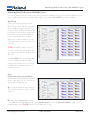
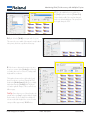
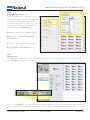
Roland VersaWorks
Maximizing Print/Cut Accuracy with Multiple Copies
Print a row, cut a row workflow
Maximizing Print/Cut Accuracy with Multiple Copies
Maximizing Print/Cut Accuracy with Multiple Copies
It is no mystery that the longer a print and cut job is, the less accurate the cut alignment becomes. Here’s a little VersaWorks tip to help
improve workflow and cut accuracy on jobs that call for multiple copies, using the CustomCUT feature within VersaWorks.
Typical Setup
First let’s look at a typical job setup in VersaWorks. The figure on the right shows a standard
job in VersaWorks. This job contains 30 copies
of a specific object. All 30 decals will be printed
first and then cut automatically in a single routine.
In the case of some materials, this will drive the
printer to travel a long distance, resulting in
displacement or a slight mismatch between the
printed object and its cut contour over the course
of the job.
Tech Tip: VersaWorks sends the cut portion of
the job to the printer upon “end of page”. In this
case the page contains all of the decals requested,
30 copies.
The CustomCUT feature in VersaWorks allows
the user to subdivide the page into multiple
segments, instructing the printer to print and cut
in smaller segments resulting in great print cut
registration accuracy.
Step 1
Choosing how many rows to print and cut
With this workflow, VersaWorks will subdivide the
job into multiple pages to process. Here are the
steps to create a smaller page size.
A. First, make all the desired settings for the job.
This would include number of copies, size, quality
settings, etc.
B. Navigate back to [Layout] and record the
current width of the material in the printer. This is in the [Media Settings] area. Select the [Get Media Width] to get the current
media width and record it. (Tech Tip: Right click on the width and select copy).
Roland Support Document
Date: 01/13/09
Revision 3.0
Maximizing Print/Cut Accuracy with Multiple Copies
C. Once the width has been recorded, select
the [Size] drop down and select [Custom Cut].
Notice that the width of the setup has changed
back to the default width (max of the printer) and
the height changed to 104”.
D. Right click in the [Width] area again and select paste.
This enters the correct width of the material currently loaded
in the printer, which was copied from the last step.
E. Now it’s time to determine how many rows are to
be process at a time. In the [Scaling] area of the layout window, there are four selections. Scaling, width,
height and fit to media size.
The height in this area refers to the height of each
decal, or in this case, each row. Change the 104”
height in the [Media Settings] field to be just slightly
larger than that in the [Scaling] field. The job preview at the right will change to reflect each row as a
different page.
Tech Tip: If more than one row of decals needs to be
printed and cut per “page”, simply multiply the height
by the number of rows needed. In this example, if 2
rows are needed, the height of the custom cut media
setting would be approximately 12.20 inches.
Roland Support Document
Date: 01/13/09
Revision 3.0
Maximizing Print/Cut Accuracy with Multiple Copies
Step 2
Changing the page spacing
Because VersaWorks is processing multiple pages, the
page spacing will apply to each row. Most Roland print/
cut devices have a default page space of 40mm.
Leaving this setting in place is acceptable, however, it
results in the use of extra unnecessary material. Use
these steps to change the [Page Space].
A. Navigate in the job settings to [Printer Controls].
B. Place a check in the [Use Custom Settings] box in
the [General] area.
C. Change the page spacing to the desired value.
D. Select [OK] for the [Job Settings] window.
Step 3
Printing your job
Once all the parameters have been set for the Job, apply the Settings and process the Job. Simply select the Job in the Job List and
select the [Print] button at the bottom of the Queue.
The use of the CustomCUT feature will result in increased printing and cutting accuracy of objects over the run of long jobs, especially
in the case of small decals. For additional information about this feature, please refer to the Roland VersaWorks User’s Manual.
Roland Support Document
Date: 01/13/09
Revision 3.0