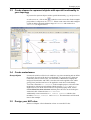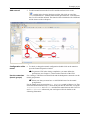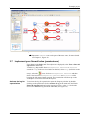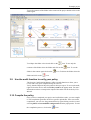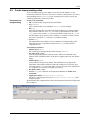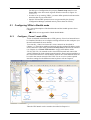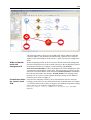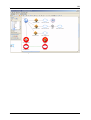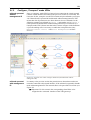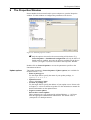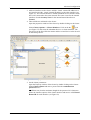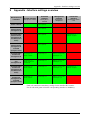
1
Innominate Security
Configuration Manager
Quick Installation Guide /
Working with
Innominate mGuard
ISCM Release 3.x.x
Document Rev. 1.7
Innominate Security Technologies AG
Albert-Einstein-Straße 14
12489 Berlin, Germany
Tel.: +49 (0)30-6392 3300
[email protected]
http://www.innominate.com
Innominate Security Technologies AG
October 2005
"Innominate” and "mGuard” are registered trade names of Innominate Security
Technologies AG. The mGuard technology is protected by Patent No. 10138865,
which was granted by the German Patent Office. Additional patents are pending.
This document may not be copied or transferred in whole or in part without prior
written approval.
Innominate AG reserves the right to modify this document at any time without
notice. Innominate provides no warranty for the contents of this document. This
disclaimer shall also apply to any implicit warranty of marketability or suitability
for a specific purpose.
Furthermore, Innominate assumes no liability for errors in this manual or for
accidental or consequential damages in connection with the delivery,
performance or utilization of this document.
This manual may not be photocopied, duplicated or translated into another
language in whole or in part without the prior written approval of Innominate
Security Technologies AG.
The Solsoft product described in this document is protected by French patent
number FR97/13254 and may be protected by other US patents, foreign patents
or pending applications.
Solsoft™, Solsoft NP™ and Network Policy Engine™ are trademarks of Solsoft.
Cisco, Cisco Systems, PIX are trademarks of Cisco Systems.
SSH®, SSH Secure Shell™ are trademarks of SSH Communications Security.
Windows®, Windows NT®,and Windows Server™ are trademarks of Microsoft
® Corporation.
All other products mentioned in this manual are trademarks of the respective
owners.
Innominate Document Number: 581709-162
Contents
1
Introduction ........................................................................................................................ 5
2
Installation ......................................................................................................................... 6
2.1 Requirements ..................................................................................................................... 6
2.2 Installation of the Innominate Security Configuration Manager ....................................... 6
2.3 Install or update the Innominate technology package ....................................................... 7
2.4 Migrate from previous versions of the Security Configuration Manager (ISCM enterprise
only) 8
2.5 Start or stop the policy server (ISCM enterprise only) ...................................................... 9
2.6 Set the adminstrator password (ISCM enterprise only) ..................................................... 9
2.7 Configure the Security Designer (ISCM enterprise only) ............................................... 11
2.8 Configure the devices ...................................................................................................... 11
3
Example project ............................................................................................................... 12
3.1 Create a new project ........................................................................................................ 13
3.2 Draw the topology of your network ................................................................................. 13
3.3 Create classes to represent objects with special functionality in your topology ............. 17
3.4 Create metaclasses ........................................................................................................... 17
3.5 Design your NAT rules .................................................................................................... 17
3.6 Design your VPNs ........................................................................................................... 18
3.7 Implement your firewall rules (permissions) ................................................................... 20
3.8 Options for large scale networks ..................................................................................... 25
3.9 Use the audit function to verify your policy .................................................................... 26
3.10 Compile the policy ........................................................................................................... 26
3.11 Deploy the rules / Rollback ............................................................................................. 27
4
NAT ................................................................................................................................. 28
4.1 Overview .......................................................................................................................... 28
4.2 Create masquerading rules ............................................................................................... 30
4.3 Create port forwarding rules ............................................................................................ 31
4.4 Create 1:1 NAT rules ....................................................................................................... 35
5
VPN ................................................................................................................................. 38
5.1 Configuring VPNs in Stealth mode ................................................................................. 40
5.1.1 Configure „Tunnel“ mode VPNs ..................................................................................... 40
5.1.2 Configure „Transport“ mode VPNs ................................................................................. 43
5.2 Using certificates for authentication ................................................................................ 44
6
The Properties Window ................................................................................................... 48
6.1 Stealth mode configuration .............................................................................................. 53
7
Generic PEP Actions ....................................................................................................... 57
7.1 Device Update .................................................................................................................. 57
7.2 Roll Out support ............................................................................................................... 57
7.3 Check Device connectivity .............................................................................................. 58
8
Advanced configuration ................................................................................................... 60
8.1 Configure application servers (NTP, DNS and Syslog) .................................................. 60
8.2 Define remote access rules through a tunnel ................................................................... 62
8.3 Configure VLANs ............................................................................................................ 63
8.4 Learning mode ................................................................................................................. 64
8.5 Router redundancy ........................................................................................................... 67
8.5.1 Configure redundant devices operated in Router Mode .................................................. 67
8.5.2 Configure redundant devices operated in Stealth Mode .................................................. 70
9
Appendix - Interface settings overview ........................................................................... 72
3 from 77
10
10.1
10.2
10.3
Appendix - Restrictions / Known problems .................................................................... 73
VPN ................................................................................................................................. 73
NAT ................................................................................................................................. 75
Network Modes ................................................................................................................ 76
4 from 77
Introduction
1
Introduction
Thank your for choosing Innominate Security Configuration Manager 3.x.x
Please read this document for information on
• the installation process
• an overview of how to implement your security policies
• the procedures specific to the Innominate mGuard security appliances.
For detailed information about the usage of the Security Configuration Manager
please refer to the documents listed below ("Related documentation").
Overview
The Innominate Security Configuration Manager enables the convenient
network-wide configuration of security settings for mid-sized and large networks
in which Innominate mGuard security appliances are integrated. The tool offers
state-of-the-art management of security policies via a graphical interface based
on Solsoft technology. Using Innominate Security Configuration Manager
VPN connections between Innominate mGuard appliances and VPN gateways
from other major manufacturers (e.g. Cisco, Netscreen, etc.) can be configured
and managed.
With a click of your mouse you can generate the desired firewall rules, VPN
configurations, NAT settings, etc. and upload the generated rule set to the
devices in the network, deploying in an instant your desired security policies.
Supported devices
ISCM 3.0 supports all Innominate mGuards Release >= 2.0.
Supported features
of the mGuard
The current version of the Innominate Security Configuration Manager supports
the following features of the mGuard:
• Router mode / Stealth mode / PPPoE mode
• Stealth modes: automatic, static and multi
• VPN (tunnel and transport mode)
• Support of X.509 certificates
• VLAN configuration
• Firewall rules with connection tracking for ftp, irc and pptp
• NAT: Masquerading, Port forwarding and 1:1 NAT
• Router redundancy (cluster)
• Server configuration: Syslog, NTP and DNS
• Roll-out support
Related
documentation
Detailed information on the Security Configuration Manager and the Innominate
mGuard can be found in the following documents:
• Solsoft Release Notes
• Solsoft Getting Started Guide (ISCM enterprise only)
• Solsoft Policy Server User Guide (ISCM enterprise only)
• Solsoft Policy Server Reference Manual (ISCM enterprise only)
• Solsoft Policy Server Working with VPNs (ISCM enterprise only)
• Solsoft Policy Server Administration Guide (ISCM enterprise only)
• Solsoft Firewall Manager User Guide (ISCM professional only)
• Solsoft Firewall Manager Quick Start Guide (ISCM professional only)
• Innominate mGuard manual
• Application notes „Roll-out support“ and „Learning mode“
Version Info
ISCM 3.x.x is based on
• Solsoft Policy Server 7.x and Solsoft Firewall Manager 1.x respectively
• Innominate technology package 3.x.x
5 of 77
Installation
2
2.1
Installation
Requirements
Hardware
• A minimum of 512 MB RAM
• 4 GB free hard disk space
• Monitor displaying 32K colors at 1024 x 768 resolution minimum
Software
• Windows 2000 SP 2 (or higher) / Windows XP
• For the ISCM enterprise version you need to install the Solsoft Policy Server
(sps-7.1-suite-windows.exe or sps-7.1-clients-windows.exe)
For the ISCM professional version you need to install the Solsoft Firewall
Manager (sfm-1.0.1-windows.exe).
• The Innominate technology package
(sps-ddk-7.1-Innominate-mGuard-3.x.x-windows.jar)
• Valid license file (license.dat)
Download
Please contact the Innominate Sales Department ([email protected]) to
obtain information how to download the software packages and the license file.
2.2
Installation of the Innominate Security Configuration Manager
This section describes the installation of the Innominate Security Configuration
Manager.
Migration from
previous versions
In case you have previous versions of the Security Configuration Manager
installed, do not uninstall these versions prior to the new installation! First install
the new version, then migrate your projects from the old version to the new
version (see Chapter 2.4) and after the migration you might uninstall any old
version.
Installation process ISCM is installed in 2 steps:
1. Installation of the Solsoft Policy Server (ISCM enterprise edition) or the
Solsoft Firewall Manager (ISCM professional edition)
(Depending on your license you can install either the Standard version or the
Enterprise version of the Solsoft Policy Server. The Enterprise version
additionally contains the Web Services - SDK and you are able to choose a
different Java Virtual Machine). Please refer to the corresponding manuals to
get installation instructions.
2. Installation of the Innominate technology package (Chapter 2.3)
)
For the next steps "<ISCMRoot>" is used as a placeholder for the
installation directory of the Security Configuration Server
(e.g. "C:\Program Files\Solsoft\PolicyServer7.1\”).
6 of 77
Installation
Installation of the
license
Please install your license file which you received from Innominate:
1. Copy the file license.dat to the directory "<ISCMRoot>\FlexLM\"
)
Please note that if the server is installed on the Windows OS it will not
start, in case the server is not connected to a network. If Windows does
not detect an active network connection it does not return a MAC
address to the FlexLM manager. Therefore ISCM can not be started. To
circumvent this, please follow these steps:
- Edit the registry entry
"HKEY_LOCAL_MACHINE\System\CurrentControlSet\Services\
Tcpip\Parameters"
- Add the following entry:
Name: DisableDHCPMediaSense
Type: REG_DWORD
Value: 1
2.3
Install or update the Innominate technology package
To install or update the Innominate specific components please follow the steps
below:
1. Make certain the Policy Server is not running (see Chapter 2.4 for more
information on how to stop the server).
2. Copy the technology package file to a directory of your choice (e.g.
C:\temp)
3. Open a Windows command window
(All Programs->Accessories->Command Prompt) and change to the
directory "<ISCMRoot>\bin“ by using the cd-command.
4. Run the device packaging tool:
„DevicePackaging.exe -upgrade=C:\temp\<device package name.jar>“
When running the tool, substitute <device package name.jar> in the
command above with the real name of the package file, e.g.
sps-ddk-7.1-Innominate-mGuard-3.0.0-windows.jar
It is also possible to rollback to a previous version of the technology package, in
case there are problems with the new version. For detailed information on how
to use the device packaging tool, please refer to Chapter „Managing Devices“ of
the Solsoft Administration Guide.
7 of 77
Installation
2.4
Migrate from previous versions of the Security Configuration
Manager (ISCM enterprise only)
To migrate your data from old installations, use the command-line tool
ServerVersionUpdate.exe that is located in the <ISCMRoot>\bin directory of
the new server. This tool copies and adapts all the previous server data to the new
server. The old server data will not be deleted. Before migrating please make sure
you have enough disk space to replicate the Solsoft Policy Server database.
Procedure
1. Make certain the Policy Server is not running (see Chapter 2.4 for more
information on how to stop the server).
2. Open a Windows command window
(All Programs->Accessories->Command Prompt) and change to the
directory "<ISCMRoot>\bin“ using the cd-command.
3. The syntax of the command is:
ServerVersionUpdate [[-help] [-list] [-path]] source_path [target_path]
[project_name_list]
Without any option, the command takes as single parameter the old server
installation path to migrate all projects, e.g.:
ServerVersionUpdate.exe "C:\Program Files\Solsoft\<OldVersion>“
The tool will prompt you to acknowledge the transfer.
Depending on the amount of data, the transfer can take a while. The tool will
transfer all the data but will maintain the new administrator password that was
set up during the new installation.
)
Log File
When the script is finished a complete migration log file can be found in the
<ISCMRoot>/log directory. The file name is xxxxx_migration.log
Check this file for potential error messages. In general warning messages can be
ignored. In case an error message was produced, please contact the Innominate
support and report the message.
)
Reset the License
Allocation
The log file will be only generated if you do not specify the -path or -list
options.
Use the command line interface to reset the license allocation:
ServerVersionUpdate -resetLicense <ISCMRoot>
e.g.: ServerVersionUpdate -resetLicense "C:\ProgramFiles\Solsoft\PolicyServer7.1“
)
Test the Migration
Attention: The migration tool will erase all data in the new installation
and replace the data by those imported from the old installation.
The next server startup may take more time than usual, since the server
will re-allocate the license for all migrated projects. Once this is done,
the new server can be restarted again.
Start the server (see Chapter 2.5). Open the client as an administrator and check
whether the Solsoft Policy Server projects and the configuration are as expected.
Verify that the changes introduced by the migration process are correct.
Finish the Migration When all the previous steps have been successfully finished, you can start to
remove all the components of the previous Innominate Policy Server version.
8 of 77
Installation
2.5
Start or stop the policy server (ISCM enterprise only)
The Solsoft Server will start automatically during the start-up of MS Windows.
After installation you can either reboot, stop or start the server manually by
following the steps below:
1. To start the Solsoft Policy Server Launcher select
Start->All Programs->Solsoft ->PolicyServer7.1->Solsoft Policy Server
Launcher in the Windows Start menu.
Remark: Depending on the current version of ISCM or your specific settings
the path above may differ.
2. Choose the action (e.g. Start the Server, Restart the Server or Stop the
Server) from the drop-down list
Figure 1: Policy Server Launcher
3. Press Go
2.6
Set the adminstrator password (ISCM enterprise only)
In case you did not set the administrator password during the installation we
recommend to set the password immediately after the installation using the web
interface.
1. To open the web interface open a browser of your choice. Enter the URL
http://localhost
Login to the interface.
2. Select the tab User Management
3. Click on the user admin
4. Click on the button Change password on the bottom of the page
5. Enter the password and click on the button Change password.
9 of 77
Installation
Figure 2: Web interface for the server configuration
6. Click on the link Logout at the top of the page.
10 of 77
Installation
2.7
Configure the Security Designer (ISCM enterprise only)
Starting the
Security Designer
The Security Designer is the graphical user interface used to design your security
policies and to start the compilation and deployment process.
After installation the Security Designer has to be configured to use the server:
1. To start the Security Designer select
Start->All Programs->Solsoft->SecurityDesigner7.1->Solsoft Security
Designer
in the Windows Start Menu.
Remark: Depending on the current version of ISCM or your specific settings
the path above may differ.
2. Click on the
-symbol to configure the server parameters:
Server: The name or IP-address of the computer running the server
Port: Please insert the port number of the server (the standard port
number is: 14001)
3. Click on OK. The Innominate Security Configuration Manager has now
been successfully installed.
2.8
Configure the devices
Please follow the steps described in the device manual for starting up and
configuring the device (IP-addresses of the interfaces etc.).
Enable SSH access
The configuration file containing the firewall rules and the NAT and VPN
configuration is copied from the Security Configuration Manager to the mGuards
using SSH. Therefore SSH traffic has to be permitted first on the mGuard if
ISCM is using the external (untursted) interface to upload the configuration.
Select Access->SSH in the menu of the Web user interface and enable SSH
remote access. For more detailed information on SSH remote access please
consult the user manual.
In case you are using devices from other vendors in your network, please refer to
the respective user manual to set up your devices appropriately.
11 of 77
Example project
3
Example project
Example project
This chapter presents an example project which is used throughout the remaining
chapters. The example project is shown in the figure below:
Figure 3: Example project
The example project consists of a headquarters network connected to 3 branch
office networks via the Internet. The branch offices are secured using Innominate
mGuard security appliances. The headquarters network is connected to the
Internet using a Cisco PIX. All networks use the private address range
192.168.0.0.
The following chapters provide an overview on how to
• create a project
• draw the topology
• setup NAT rules
• setup VPNs
• setup the permissions (firewall rules)
• compile your project and finally
• deploy your policy
12 of 77
Example project
General procedure
for implementing
security policies
When implementing security policies with the Security Configuration Manager
you should perform the following steps:
1. Create a new project
2. Draw the topology of your network
3. Create classes to represent objects with special functionality in your
topology
4. Create metaclasses
5. Design your NAT rules
6. Design your VPNs
7. Implement your permissions (firewall rules)
8. Optional: Structure your project into folders
9. Use the audit function to verify your policy
10.Compile the policy
11.Deploy the rules
For a more detailed description on how to perform the following steps, please
refer to the Solsoft User Guide.
)
3.1
To perform the following steps, you must first install the Security
Configuration Manager (including the license-file) as described in
Chapter 2.
Create a new project
• To start the Security Designer (ISCM enterprise edition) select
Start-> All Programs->Solsoft->SecurityDesigner7.1->Solsoft Security
Designer from the Windows Start menu.
To start the Firewall Manager (ISCM professional edition) select
Start-> All Programs->Solsoft->FirewallManager1.0->Solsoft Firewall
manager from the Windows Start menu.
• Click on the
-symbol in the project manager to create a new project.
• Name the project, e.g. "Example project", click on OK to open the project
with an empty workspace.
3.2
Draw the topology of your network
Create the objects
• Select the Topology tab and place the objects of your network on the
workspace as shown in Figure 4:
Create networks
• To create a network on your workspace, click on the
and click on an empty place in the workspace
Create managed
devices
• To create a device, click on the
symbol, select the device type
(e.g. Innominate mGuard) and click on an empty place in the
workspace
Create a
representation of
the Internet
• To create a representation of the Internet, click on the
and click on an empty place in the workspace.
- symbol
symbol
13 of 77
Example project
Create unmanaged
devices
• To create a device which is not managed by the Security
Configuration Manager (e.g. a router), click on the Nexus
symbol and click on an empty place in the workspace.
-
Figure 4: "Empty" objects placed on the workspace
Name and
configure the
objects
• Name the objects, set the address range of the networks and add interfaces to
the devices:
• To name an object on the workspace, click on it once and place the
cursor on the name to edit it
• To add an address range to a network, double-click on the network
symbol, click on Add and specify the address range of the network.
To get help on the address-syntax, simply click on Help. Please
specify the address ranges of the networks as shown in Figure 3.
• To add interfaces to the devices double-click on the device, click on
the
-symbol. Place the cursor on the name of the interface and
change it. It is recommended to use consistent interface names for all
devices, e.g. internal for the internal interface and external
for the external interface.
• Configure the address of your Security Manager Server and Client:
Select View->Show all Objects in the main menu to show the
representation of the server and client on your workspace. In the
example project the client and the server are part of
Headquarters Network. Please double-click on the client and
the server and add proper addresses to include them in
Headquarters Network.
14 of 77
Example project
Configure the
interfaces
• Add an address to the interface in the window on the right side by
clicking on the
-symbol. The address must be contained in the
address range of the network to be connected. Please specify also the
network mask of the attached network in the interface address, e.g.
„192.168.1.1/24“.
For the mGuards, set the interface property Security Zone of the
internal interface to Trusted
Figure 5: Interface properties for mGuard
For the Cisco PIX, the property Security Level must be set to inside for the
internal interface:
Figure 6: Interface properties for Cisco PIX
Before uploading your policy to the devices you have to specify which of the
interfaces is to be used as the upload target. Depending on the configuration
of your network this could be either an external or internal interface. In the
15 of 77
Example project
example project the upload target of the Cisco Pix is the internal interface
since the Security Configuration Manager is part of the Headquarters
Network. The upload target of the Innominate mGuards, which are securing
the remote networks, is the external interface. To access the property Upload
Target, select Interface->Options in the property window of the device. Set
this property to the proper value for each interface in the network.
Add connections
• Connect the objects by using the Connected To option in the properties
window (upper right, see below)
Figure 7: Connection option of the interfaces
or by right-clicking on a device to open its popup menu and then selecting
Auto-Connect. The Auto-Connect feature can only be used in cases where
the assignment of the interface to the network is unambiguous.
Specify the Default
Gateway
To specify the Default Gateway of a network, double-click on a network in the
workspace and then click on Gateway in the menu of the left side of the window.
In the right window select the Default Gateway and click on OK.
After connecting the objects, your workspace should look similar to Figure 3.
16 of 77
Example project
3.3
Create classes to represent objects with special functionality in
your topology
If you need to represent objects with a special functionality, e.g. an ftp-server or
an web-server etc., click on the
-symbol to create a new class. In the example
project there is a ftp-server in Subnet3. Please create a new class and configure
it with an address from the address range of Subnet3 and connect it to
Subnet3 (see Figure below).
Figure 8: Classes as representation of objects with a special functionality
3.4
Create metaclasses
Group objects
3.5
In networks with lots of devices it could be a very time-consuming task to define
the policies for each of the devices individually. To group devices, which are
treated the same in certain cases, use metaclasses. Metaclasses simplify the
design of firewall rules and VPNs, since the rule can be applied to the whole
group [class] and does not have to be applied to each device individually.
To create a metaclass All mGuards in the example project, select all of the
mGuards by clicking on each mGuard while pressing <Ctrl> and <Alt>.
Right-click on one of the selected devices to open the popup menu, choose
Create MetaClass from selection and then place the class on the workspace
with a left-click. Name the class All mGuards.
Additionally create a metaclass All remote subnets with the class
members Subnet1, Subnet2 and Subnet3. The metaclasses will be used
later in the example.
Design your NAT rules
Please see Chapter 4 for information on how to create NAT rules.
17 of 77
Example project
3.6
Design your VPNs
Tunnel / Transport
mode
In the following example the VPN-“tunnel” mode is explained. Please refer to
Chapter 5 to learn more about the VPN-“transport” mode and about restrictions
on the VPN management with ISCM.
The trust zone
First select the VPN tab to design your VPNs. If no objects are displayed, select
View->Show all objects from the menu.
To configure VPNs, you must define a trust zone for all objects (networks,
objects and devices) using the VPN. By definition, all communication between
two objects within a trust zone takes place via a path which remains inside this
zone, i.e. traffic between two objects in the trust zone will never leave the zone.
In the example project, we will define a VPN between
Headquarters Network and Subnet1. First let us put all of the objects
that are supposed to be part of the VPN in a trust zone:
Create a trust zone
1. To open the Zone Editor select Tools->Zone Editor in the main menu of the
Security Designer.
2. Click on the
-symbol to create a new zone. With the Zone Editor you
can change the colour of the zone or the type of the zone (there are also
"limited path zones"). Please leave the configuration unchanged and click on
OK.
3. Now select the objects that are going to be part of the zone: Hold the
<Ctrl> -and <Alt>-keys while clicking on each object. In our example
the objects Headquarters Network, Cisco Pix Headquarters,
mGuard branch office1 and Subnet1 must be selected.
Add objects to the
trust zone
4. To add the objects to the zone right-click on one of the selected objects and
choose Zones->Zone 1 in the popup menu. After adding the objects to the
zone, the workspace will look like this:
Figure 9: Trust Zone
18 of 77
Example project
Add a tunnel
5. To add a tunnel between the Cisco Pix and the mGuard click on the
-symbol in the Security Designer tool bar, left-click on one of the
devices and then draw - with the mouse button pressed down - a line between
the Cisco Pix and the mGuard. The tunnel will be initialized with a PSK and
will be shown on the workspace:
Figure 10: Tunnel added and initialized
Configuration of the 6. To check or change the tunnel configuration double-click on the tunnel to
tunnel
open the Tunnel Properties window.
)
Use the metaclass
(tunnel groups)
To generate VPN rules during compilation, you must define the
permissions (see Chapter 3.7) between the networks of the VPN.
For creating a VPN between all mGuards and the headquarters network use the
tunnel goup feature.
)
Please note that you must have a valid ISCM license for the tunnel
group feature.
For the tunnel group use metaclass All mGuards created in Chapter 3.4. First
delete the tunnel created in step 7, insert all objects into the trust zone, except for
Internet, Router and Subnet4 and draw the tunnel between the Cisco Pix
and All mGuards. Afterwards your workspace will look similar to the
following illustration:
19 of 77
Example project
Figure 11: Create multiple tunnels using metaclasses
)
3.7
Important: Subnet4 can not be part of the trust zone, for more details
see Chapter 5, Figure 30.
Implement your firewall rules (permissions)
First change to the Policy tab. If no objects are displayed, select View->Show all
objects from the menu.
To allow e.g. http-traffic from Headquarters Network to Internet
search for http in the service window on the left, select http (left click on the
entry), select the
-icon, click on Headquarters Network and then
draw a line between Headquarters Network and Internet while
keeping the left mouse button pressed. The permission will show up on the
workspace as an arrow between the objects.
Activate the log for
a permission
To activate the log for a permission open the Property window by doubleclicking on the permission. Select Actions->Log in the menu tree and check
Enter the logging level and set the logging level to a value != 0. Select the
devices for which the log should be activated (see Figure 12).
20 of 77
Example project
Figure 12: Avtivate the log for permissions
Set deny rules
To switch from a permit-rule to a deny-rule open the permissions Property
Window by double clicking on the permission. Select Global Properties in the
menu-tree on the left and set the parameter Action to Deny.
)
Deny permissions are not allowed insed a tunnel.
Figure 13: Permissions Property Window - Set deny rules
Set the order of the
permissions
To influence the order in which the permissions are generated, set the priority for
a permission. Open the permissions Property Window by double clicking on the
permission (see Figure 13), check Priority and enter a priority value: -9999 is the
highest priority and +9999 corresponds to the lowest priority.
Permissions with
’Ignore tunnel’
option
In certain configurations it is necessary that a flow that is usually routed through
a tunnel, has to be routed outside of the tunnel. In this case open the Permission
Property window, by double-clicking on the permission. Select Zone&VPNs in
the menu on the left. Enable the option Ignore all VPNs for the permission.
21 of 77
Example project
Use the metaclass
To allow http-traffic from all remote networks to Internet use the metaclass
All remote networks (see Chapter 3.4). Draw a permission from
All remote networks to Internet. Also allow internal traffic (e.g. ftp)
between the remote networks and Headquarters Network by drawing the
permission between All remote networks and
Headquarters network. Your workspace should look similar to the
following figure (the security designer displays only the relevant objects unless
you select View->Show all objects from the menu):
Figure 14: Creating multiple permissions using metaclasses
)
The mGuard supports „connection tracking“ for certain protocols
(services). Please refer to Chapter 6 for more information on this
feature.
22 of 77
Example project
Stealth mode
For a detailed description of the Stealth mode and the Stealth options see
Chapter 6.1.
In stealth mode without management IP the permissions are drawn directly to /
from the mGuard. See the device mGuard Stealth in the following figure:
Figure 15: Firewall rules and Stealth mode
All permissions except for the administrative permissions (SSH, HTTPS,
SNMP) are automatically recognized as permissions to/from the client.
Administrative permissions (SSH , HTTPS, SNMP) from the remote network to
the mGuard are applied as remote access rules to the mGuard. Therefore it is not
possible to access the client using these protocols in the standard configuration.
See Chapter 6 on how to change the remote access rules for the mGuard, in case
you would like to access the client via SSH, HTTPS or SNMP.
23 of 77
Example project
Allow remote
configuration via
HTTPS
The rules for SSH access are generated without explicitly specifying a
permission for SSH (an implicit rule for SSH access is predefined in the Security
Configuration Manager). To allow remote HTTPS configuration you must add a
permission for HTTPS from the originating network to the mGuard (not to the
network connected to the interal interface of the mGuard) as shown in the next
illustration.
Figure 16: Permission for HTTPS remote configuration
)
)
Permissions originating on the mGuard are ignored, since traffic
originating on the mGuard can not be restricted.
In Router or PPPoE mode all permissions to the mGuard itself will be
ignored, except for SSH, SNMP, HTTPS and depending on the ICMP
settings (see Chapter 6) the ICMP permissions.
24 of 77
Example project
3.8
Options for large scale networks
In large scale networks with many devices you can structure your projects in
hierarchical folders and subfolders to gain a better overview.
To put the networks and devices of Branch Office 1 in one folder select all
objects that belong to branch office 1. Then click on the
-icon (make sure
that the Topology tab is active) to put all objects in one folder. You can rename
the folder to branch office 1 (see Figure 17).
Figure 17: Structuring the project using hierarchical folders
25 of 77
Example project
To see the contents of the folder in the context of the project double-click on the
folder again:
Figure 18: Structuring the project using folders
To collapse the folder select it and click on the
-icon. To see only the
contents of the folder select the folder and click on the
folder in the context again click on the
folder and click on the
3.9
-icon. To see the
-icon. To delete the folder select the
-icon.
Use the audit function to verify your policy
The Security Configuration Manager offers an audit function to allow you to
review and verify your completed setup for a device.
Verify, that the output of the policy audit is what you expect. To access the audit,
right-click on the device and select Policy Audit in the popup menu. For more
information on how to interpret the output of the audit refer to the Solsoft User
Manual.
3.10 Compile the policy
Once you have completed your project and verified the results, you can compile
it. The compilation generates the device specific upload files. After successful
compilation, you can view the generated files by right-clicking on a device and
selecting Show->Generated PEP configuration from the popup menu. To start
the compilation process, click on the
-icon.
26 of 77
Example project
3.11 Deploy the rules / Rollback
After successfully compiling your project and setting the parameters for
deployment, you can deploy your policy.
Deployment
parameters
The Security Configuration Manager copies the configuration file to the mGuard
using SSH. Therefore you have to specify the admin login and password for each
device to enable the Security Configuration Manager to login to the devices.
Open the properties window by double-clicking on a device, select
Upload Configuration->Authentication and enter the login and the password
for admin (this is mandatory).
)
For mGuard version 2.0 and 2.1 you have to specify the root login!
To be able to deploy the policy set the project status to Approved for
deployment. Select File->Save in the Security Designer menu, enter a comment
in the dialog box (this is mandatory) and then click on OK. Open the Project
Manager by selecting File->Projects. If it is not already selected, select your
project with a left-click. The versions of your projects are shown in the lower
window of the Project Manager. A new version is created each time the project
is saved. Right-click on the latest version and select Set version status. Set the
version status to Approved for deployment. Close the Project Manager. The
-icon will now be accessible in the Security Designer. Click on this symbol
to deploy your policy.
)
Please note that the
-icon will be deactived as soon as a class on the
workspace is selected. To activate the icon again, deselect the class by
clicking on an empty place on your workspace.
Save the original
configuration
Before uploading the very first time, the configuration of the mGuard is saved by
default in a file on the server. To disable this feature uncheck the box in the menu
Upload Configuration->Advanced Configuration->Save Original
Configuration at first upload.
You can save the current configuration of the mGuard any time as „original
configuration“ by opening the context menu with a right click on the device and
by selecting Get Original Configuration.
Rollback to original
configuration
To rollback to the original configuration open the context menu by right-clicking
on a device and select Rollback->To original configuration. This option is only
available after a „original configuration“ was saved.
Rollback to
previous
configuration
To rollback to the previous configuration open the context menu by rightclicking on a device and select Rollback->To previous configuration.
27 of 77
NAT
4
NAT
Supported NATmethods
The Innominate mGuard supports the following network address translation
(NAT) methods:
• Masquerading
• Port forwarding
• 1:1 NAT
Please refer to the device manual for a detailed description of these features.
The Security Configuration Manager provides a convenient graphical user
interface for handling the administration of NAT rules for your network.
)
Enable NAT-view
4.1
In Stealth mode the NAT feature can not be used.
Before designing your NAT rules, please make certain that NAT-view is enabled
in the Security Designer: Select the NAT tab in the workspace.
Overview
To create NAT rules, you have two options: You can either use the NAT Editor
or draw the NAT rule directly in your network map. The following overview
describes the usage of the NAT Editor.
To open the NAT Editor please choose Tools->NAT Editor in the Security
Designer main menu. The following window will open:
Figure 19: NAT Editor
Create new NAT
rules
To create a new NAT rule, click on the
-symbol, select the service (protocol,
port) to be translated and the source and destination of your NAT rule.
)
The source and destination objects must already be part of your network
map.
After specifying those parameters, the NAT rule will be displayed in the NAT
Editor:
Figure 20: Nat Editor - Incomplete NAT rule
The NAT Editor will still show an error, since the parameters have not yet been
completed. Information on how to complete the NAT rule can be found in
Chapter 4.2 and Chapter 4.3.
28 of 77
NAT
Parameters of a
NAT rule
A NAT rule contains the following information:
Traffic to be translated
• ID (internal use only)
• Src:
Source of the traffic to be translated (e.g. a network or a single computer)
• Dst:
Destination of the traffic to be translated (e.g. a network or a single
computer)
• Service:
The service (protocol, port) to be translated (e.g. "any" or "ftp")
Translation Parameters
• Method (Src)
The translation method to be used on the source address.
• Src After NAT
The source address after the NAT rule has been applied.
• Method (Dst)
The translation method to be used on the destination address.
• Dst Before NAT
The destination address, before the NAT rule has been applied.
• Service
The service (port, protocol) after translation (if desired).
• Application Point
The device where the NAT rule is to be applied.
If no translation is desired, you can specify the value same (see Figure 20) for
any of the translation methods (src, dst, service).
The NAT Editor supports the specification of destination and source translation
parameters in one rule, as shown in Figure 20. For the Innominate mGuard, only
one translation method per rule is supported - either source or destination
translation. For masquerading, the source address is translated. For port
forwarding, the service (port) or the destination address or both will be translated.
Since all of the networks in the example project (see Chapter 3) use private
addressing, address masquerading is needed to connect the networks to the
Internet. In Chapter 4.2 you can find a description of how to configure the correct
masquerading rules for the example network. Information on how to create a port
forwarding rule to access a ftp-server in Subnet3 of our example project can be
found in Chapter 4.3.
No permission ->
no NAT rules
)
Please keep in mind that no NAT rules are generated, even if they are
defined, as long as no permissions (firewall rules) have been defined.
29 of 77
NAT
4.2
Create masquerading rules
In our example project private addresses are used for the subnets, i.e. the
mGuards (and the Cisco) have to use NAT to connect to the Internet. To create a
masquerading rule for Subnet1 of our example project, please specify the
following parameters in the NAT Editor:
Parameters for
masquerading
Traffic to be translated
• ID: is automatically assigned by the NAT Editor
• Src: Subnet1
Source of the traffic to be translated: subnet1 in our example
• Dst: Any
Since the mGuard does not support destination addresses in masquerading,
this parameter must be set to any. To create a representation of the value
any, create a class, name it Any and set the address of the class to *, i.e. to
the full address range (please refer to Chapter 3.3 on how to create classes).
Any other value than any will cause a compiler warning.
• Service: any
The mGuard does not support service translations in masquerading rules.
Therefore the service parameter must be set to any or there will be a
compilation error.
Translation Parameters
• Method (Src): Masq
We would like to masquerade the traffic leaving Subnet1.
• Src After NAT: empty
Since masquerading implies, that the source address is translated to the
address of the external interface of the device applying this rule, this field is
empty.
• Method (Dst): same
As described in the previous chapter, the mGuard does not support the
translation of destination addresses and source addresses in one rule. Any
value other than same will cause either an error message in the NAT Editor
or a compiler error, when you compile your policy.
• Dst Before NAT: empty
• Service: any (see comments to the parameter Service in Traffic to be
translated)
• Application Point: mGuard branch office1
The device applying the NAT rule is mGuard branch office1 in the
example project.
When finished the completed NAT rule will be displayed in the NAT Editor and
the workspace:
Figure 21: Completed NAT rule in NAT Editor
30 of 77
NAT
Figure 22: Completed NAT rule in workspace
4.3
Create port forwarding rules
The class symbol in Subnet3 of our example project represents an ftp-server.
Since the server has a private IP-address, you must create a port forwarding rule
to make the server accessible from the Internet.
mGuard Parameters The mGuard needs the following parameters for a port forwarding rule:
for port forwarding
• Protocol: tcp, icmp, udp
• Incoming address: the IP-address to which requests are sent by the
"outside" world (this address must be one of the addresses of the external
interface of the mGuard)
• Incoming port number: the port the requests are sent to by the "outside"
world (not used for icmp)
• Outgoing address: the internal address of the server receiving the request
• Outgoing port: the internal port on which the server accepts requests (not
used for icmp)
31 of 77
NAT
Services
The Security Configuration Manager uses "services" as a high level abstraction
for protocols and ports. If the Policy tab is selected, a list of the available services
is shown in the left window:
Figure 23: List of services (left window)
A service contains the specification of a protocol, the flows of the data and the
source and destination ports.
Service Editor
To view the definition of a service, please open the Service Editor. Select
Tools->Service Editor. To view the definition of a service, double-click on its
name in the left window. The figure below shows the definition of the service
"ftp":
Figure 24: Service Editor - service "ftp"
32 of 77
NAT
The service "ftp" contains two flows:
• The initiating request (master flow)
with the following parameters: tcp, source port numbers: 1024-65535,
destination port: 21
• The data flowing back in response to the request
with the following parameters (not shown in the figure above): tcp, source
port numbers: 1024-65535, destination port 20
) In the current version of the Security Configuration Manager, the port
forwarding rules only support services with a single flow!
) The mGuard supports „connection tracking“ for certain protocols.
Please refer to Chapter 6 for more information on this feature.
To create a port forwarding rule for ftp, you must, therefore, first create a service
which only contains single flows.
Create a new
service
Begin by selecting Tools->Service Editor to open the Service Editor. In the
Service Editor click on the
- symbol to create a new service. Choose IPService from the menu. Name the service, e.g. ftp-incoming. Some
protocols like ftp contain IP-data in the payload (e.g. address information). To
make the Security Configuration Manager aware of this, select the tab Advanced
and set Contains IP-data in payload to Yes. This information is needed by the
Security Configuration Manager when performing checks on your projects.
When creating a new service one default protocol is already created for the
service. Now configure this protocol, set the parameters to the following values:
• IP-protocol: TCP
• Src port: UNP(1024-65535)
• Dst port: 21
• Direction:
(flows with an arrow pointing to the left are back-flows)
• Master: leave Master unchecked, since there is only one flow in the service.
Services with more than one flow need a "master" flow, indicating the
initiating flow.
After creating the new service, you can specify the port forwarding rule.
The internal ftp-server in our example accepts ftp-requests on port number 21,
i.e. you can also use the new service ftp-incoming to specify the flow from
the mGuard, which is applying the port forwarding rule, to the internal ftp-server.
If the internal server accepts ftp-requests on another port you must create another
service, e.g. ftp-outgoing with the corresponding port number.
)
When creating a new service one default protocol is already created for
the service. In case you need to add additional protocols to the service
click on the
Parameters for port
forwarding rules
-icon.
The parameters of the port forwarding rule for ftp are:
Traffic to be translated
• ID: is assigned by the NAT Editor
• Src: Any
ISCM currently does not support this parameter, the value must be any or a
warning will be shown during compilation. To create a representation of the
value any, create a class, name it Any and set the address of the class to *,
i.e. to the full address range (refer to Chapter 3.3 on how to create classes).
• Dst: Server1
The traffic is terminated by the ftp-Server in Subnet3, this parameter
corresponds to the mGuard parameter outgoing address
33 of 77
NAT
• Service: ftp-incoming
Select the new service you just created with the Service Editor, this
parameter corresponds to the mGuard parameter incoming port.
Please keep in mind: The current version only supports services with one
single protocol!
Translation Parameters
• Method (Src): same
No translation of the source address is desired. Any value other than same
will result in an error message from the NAT Editor or an error message
during compilation.
• Src After NAT: empty
Source addresses are not translated
• Method (Dst): Static ->
The only translation method for destination addresses supported by the
Innominate mGuard is "Unistatic". Any other value will result in an error
message from the NAT Editor.
• Dst Before NAT: address of the external interface of
mGuard branch office3
This value must be one of the (public) external addresses of the device
applying the rule, in this case mGuard branch office3. This
parameter corresponds to the mGuard parameter incoming address. If the
address specified in the rule does not match one of the external addresses, the
compilation will stop with an error message. If dynamic addresses are used,
the Security Configuration Manager will use %extern as a value for the
address, no matter what you specified in the port forwarding rule.
• Service: ftp-incoming
In our example incoming port has the same value as outgoing port. If the
internal server accepts requests on another port, you must create a new
service with the corresponding port, if it is not already in the service list.
Please keep in mind: The current version only supports services with single
flows.
• Application Point: mGuard branch office3
This is the device applying the port forwarding rule.
After the port forwarding rule is completed, it will be displayed in the NAT
Editor and in the workspace:
Figure 25: Completed port forwarding rule in the editor
34 of 77
NAT
Figure 26: Completed port forwarding rule in the workspace
Enable the log for
port forwarding
4.4
Please refer to Chapter 6 to get information on how to enable the log for port
forwarding rules. A log for single rules is not supported. The Security
Configuration Manager can either enable the log or disable it for all port
forwarding rules.
Create 1:1 NAT rules
The class symbol in Subnet3 of our example project represents an ftp-server.
Since the server has a private IP-address, you must create either a port
forwarding rule to make the server accessible from the Internet or as alternative
a 1:1 NAT rule. The nat rule can either be configured for Subnet3 or only for
the ftp-server.
Parameters for port
forwarding rules
The parameters of the port forwarding rule for ftp are:
Traffic to be translated
• ID: is automatically assigned by the NAT Editor
• Src: Server 1
Source of the traffic to be translated: Server 1 in our example. It is also
possible to create a 1:1 NAT rule for the whole Subnet3. In this case all
traffic coming from Subnet3 will be natted.
• Dst: Any
Since the Innominate mGuard does not support destination addresses for 1:1
NAT rules, this parameter must be set to any. To create a representation of
the value any, create a class, name it Any and set the address of the class to
*, i.e. to the full address range (please refer to Chapter 3.3 on how to create
classes). Any other value than any will cause a compiler warning.
35 of 77
NAT
• Service: any
The mGuard does not support service translations in 1:1 NAT rules.
Therefore the service parameter must be set to any or there will be a
compilation error.
Translation Parameters
• Method (Src): Static <->
We would like to create a 1:1 NAT Rule (static bidirectional NAT) for
Server 1.
• Src After NAT: the public address for Server 1
It is important that the netmask of this adress is identical to the netmask
specified as Src in Traffic to be translated. In our example Server 1 has
a single IP-Address. In case you configure a rule for Subnet3 then the
netmask of Subnet3 and the netmask of the address for Src After NAT
have to match.
• Method (Dst): same
As described in the previous chapter, the mGuard does not support the
translation of destination addresses and source addresses in one rule. Any
value other than same will cause either an error message in the NAT Editor
or a compiler error, when you compile your policy.
• Dst Before NAT: empty
• Service: any (see comments to the parameter Service in Traffic to be
translated)
• Application Point: mGuard branch office3
The device applying the NAT rule is mGuard branch office3 in the
example project.
After the 1:1 NAT rule is completed, it will be displayed in the NAT Editor and
in the workspace:
Figure 27: Completed 1:1 NAT rule in the editor
36 of 77
NAT
Figure 28: Completed 1:1 NAT rule in the workspace
37 of 77
VPN
5
VPN
VPN Transport
mode
How to use VPN-tunnel mode is explained in Chapter 3.6. When creating a
tunnel, the tunnel is set to “tunnel”mode by default. To enable transport mode
open the Tunnel properties window (see Figure 29) by double-clicking on an
existing tunnel. Double-click on Primary Tunnel and select one of the VPN
gateways in the submenu. Then select Transport for the parameter VPN mode.
Configure the other VPN gateway in the same manner. For „transport“ mode
VPNs please bear the following restrictions in mind:
)
)
)
Transport mode is supported only for the Innominate mGuard. Other
devices can not be used as hosts in transport mode VPNs.
Both mGuards have to use „transport“ mode
There is no reasonable topology when combining „router“ mode with
„transport“ mode VPNs since a „transport“ mode is a host-to-host
connection and not a network-to-network connection. When using
„transport“ mode VPNs the devices have to be switched to Stealth
mode.
For more information refer to Chapter 5.1.
Enabling VPN view
Please make certain that the VPN view is enabled: Select the VPN tab in the
workspace.
General remarks
To configure VPNs with ISCM you should take a few things into account (see
also Chapter 10):
• NAT and VPN:
NAT has to be disabled for flows entering a VPN tunnel. Double click on the
tunnel and use the menu options Disable NAT in tunnel and Disable NAT
for to configure the use of NAT in the VPN. For the mGuard all NAT has to
be disabled for VPN flows, because NAT in a tunnel is not supported by the
mGuard.
38 of 77
VPN
• Tunnel Scope:
The property Tunnel Scope may only take the value Trust Zone or by IPAddress. To access the property Tunnel Scope, double-click on an existing
tunnel and select Primary Tunnel->Tunnel Options in the Tunnel
Properties window.
Figure 29: Tunnel Properties window
• When using by IP-Address as the value for Tunnel Scope, the tunnel
permissions must not originate from two different objects in a single
network, as shown in the following figure:
Figure 30: VPN configuration with an error
39 of 77
VPN
For this type of configuration, the property Tunnel Scope must be set to
Trust Zone or the flows must originate from the network (in Figure 30:
Subnet1).
• In order to set up working VPN's, you must define permissions between the
networks that are part of the VPN.
• Implicit ESP and IKE permissions are not generated by the Security
Configuration Manager (mGuard natively allows them for VPNs).
5.1
Configuring VPNs in Stealth mode
For a general description of the Stealth mode and the Stealth options refer to
Chapter 6.1.
)
5.1.1
VPNs are not supported in ’Multi Stealth Mode’.
Configure „Tunnel“ mode VPNs
To use an mGuard in Stealth mode as VPN-gateway, first a local network has to
be simulated, that does not overlap the existing networks on the workspace (see
the mGuard manual for more details).
To create this „virtual“ local network, create a network as described in
Chapter 3.2. Then add an additional network interface without IP-address to the
device and set the value of the parameter Security Zone of this network interface
(see Chapter 6) to Virtual VPN interface. Assign an IP address with a
255.255.255.255 (/32) netmask to the virtual VPN network and connect the
virtual VPN network to the virtual network interface. Do not assign an address to
the virtual VPN interface. The IP-address used for the virtual network must not
be used in the remote network of the VPN. For an overview on the required
interfaces settings for the different scenarios please refer to Chapter 9.
Figure 31: Virtual VPN network for Stealth configuration
Then the VPN tunnel can be created as described in Chapter 3.6:
40 of 77
VPN
Figure 32: VPN and Stealth mode
The client protected by the device in Stealth mode will be addressed with the
virtual IP-address. The mGuard will automatically „translate“ this virtual IPaddress to the real IP-address of the client, i.e. there is no need to configure the
client.
VPNs and Stealth
mode with
management IP
When configuring tunnels for devices that use Stealth mode with management
interface one thing has to be kept in mind: Contrary to the configuration without
management interface (see Chapter 6.1) the interface with Security
Zone=Untrusted Stealth must have an IP address for VPN configurations, that
corresponds to the IP-address of the client. This will result in a warning by the
Solsoft server that the address of the interface Untrusted Stealth is contained in
the network connected to the interface Trusted Stealth. This warning can be
ignored. For an overview on the required interfaces settings for the different
scenarios please refer to Chapter 9.
Firewall rules within Firewall rules within the VPN have to be drawn between the two networks
belonging to the VPN. For non-VPN firewall rules in Stealth mode see Chapter
the „tunnel“ mode
3.7. (Please not that in the scenario in Figure 33 the definition of port forwarding
VPN
rules is necessary to enable the SAP-permission since
mGuard branch office 1 and Cisco Headquartes are NATdevices).
41 of 77
VPN
Figure 33: Firewall rules within tunnel mode VPN in Stealth mode
42 of 77
VPN
5.1.2
Configure „Transport“ mode VPNs
mGuard operated
without
management IP
Since a „transport“ mode VPN is a host-to-host connection the virtual network
(and the virtual interface) described in the previous sections is not needed. The
trust zone for the „transport“ mode VPN contains only the mGuards (see Figure
34) if the mGuard is operated in Stealth mode without management IP. That
means that also all permissions are drawn between the two mGuards. In the
following example one mGuard in Subnet 1 and another one in Subnet 2
(both operated in Stealth mode without management IP) are connected via a
transport mode VPN. (Please note that in the scenario in Figure 34 the definition
of port forwarding rules is necessary to enable the SAP-permission since
mGuard branch office 1 and Cisco Headquartes are NATdevices)
Figure 34: Firewall rules within transport mode VPN (Stealth mode without
management IP)
mGuard operated
with management
IP
In contrary to the previous section the permission are drawn between the two
networks connected to the trusted interface, if the mGuard is operated in Stealth
mode with management IP. The networks have to be part of the Trust Zone (see
Figure 35).
)
Important: For this scenario the corresponding client IP has to be
assigned to the ’untrusted’ interface of the VPN gateways!
43 of 77
VPN
Figure 35: Firewall rules within transport mode VPN (Stealth mode with management
IP)
5.2
Using certificates for authentication
To use certificates for authentication a PKI has to be defined on your workspace.
This is required by the Solsoft server, although the Innominate mGuard will not
need or use the PKI-information (CA-server, CRL-Distribution-Server etc.). For
detailed information on how to configure the PKI in ISCM please refer to the
Solsoft document Working with VPNs.
Create and store
the certificates
ISCM will not create certificates, the certificates have to be exported by the CA
and placed in a user defined directory on the ISCM server. Since the Innominate
mGuard does not support a PKI (CRL, CA-online-enrollment, CA root
certificates) the devices have to be manually enrolled at the CA to
subsequentially export the certificates. Please refer to the manual of the
respective CA how to enroll devices and export certificates. Examples for using
a CA can be found in the document Interoperability Guide, Setting up a VPN
connection between mGuard and Cisco VPN 3000 Series Concentrator on the
Innominate web site.
For the Innominate mGuard two files are required:
1. The certificate with the public key of the mGuard, signed and exported by
the CA as PEM export: <deviceName.crt>
2. The private key as PEM export (without password protection), containing
the corresponding private key: <deviceName.pem>
The private key can also be imported in the device during rollout, in this case
please disable the import in ISCM (see below).
All exported certificates (also the PEM-certificates of the non-Innominate
devices) have to be placed in a user-defined directory on the ISCM-server.
)
Important: The names of the certificate-files for the respective device
have to be identical to the name of the device on the ISCM-workspace!
44 of 77
VPN
Otherwise ISCM is not able to find the corresponding certificates.
Enroll the nonInnominate devices
In case you are using a CA and devices that support enrollment via SCEP, please
refer to the manual of the devices and the CA respectively or to the Solsoft
document Working with VPNs.
Solsoft supports the use of certificates for the following non-Innominate devices:
• FW1
• Cisco VPNSM
• Netfilter
• Cisco PIX
• Cisco VPN 3000
Add a CA-server to
your project
First add an CA-server to your project. How to configure servers is explained in
Chapter 8.1. There are 3 CA-server types available:
• SCEP
• Offline
• TFTP
If you use Innominate mGuard together with other non-Innominate devices, then
choose the CA required for the non-Innominate devices. If you have only
Innominate mGuards in your project, then use an ’Offline’ CA server. In this case
you have to create an additional CRL-Distribution point to your project and
assign this CRL-Distribution point to your CA-server (please refer to the Solsoft
document Working with VPNs).
)
)
Assign the CAserver to the
devices
The parameters required to configure these objects (relative path, IPaddresses etc.) will not be used by the mGuard, since they do not
support PKI. The Solsoft server requires the definition of a PKI for the
use of certificates.
Please note that the Solsoft server will create implicit permissions (e.g.
an HTTP-permission to the CRL-distribution point) that will be
included in the mGuard firewall rules!
After creating the CA server you have to configure your devices to use the CAserver. To do this open the Property Window of the device by double-clicking on
the device. Select the Application Servers -> Certificate/Registration
Authority Servers entry and click on the the
-icon (in the upper menu of the
Property Window), select the CA-server and leave the dialog-box with OK.
45 of 77
VPN
Figure 36: Assign a CA-server to a device
Configure your
devices
Depending on the device type it might be necessary to configure the device
(please refer to the documentation of the device or the Solsoft documentation).
To configure the Innominate mGuard open the Property Window (if it is not
already open) and select VPN Options - > Certificate options.
Figure 37: Configure the certificate options
Please enter the full path of the directory where you placed the certificates and
private keys (*.crt and *.pem files).
)
Please do not forget the trailing slash ’\’ in the path, in case you do not
use the default path!
If you wish ISCM to import the machine certificates into the devices then enable
the option Import machine certificates. By default this option is disabled and
the machine certificates have to be imported manually or during roll-out.
46 of 77
VPN
Add and configure
the tunnel
After configuring the devices, define your tunnels (see Chapter 3.6).
To configure the tunnel to use certificates for authentication, open the Tunnel
Property Window by double clicking on the tunnel, click on Primary Tunnel ->
Tunnel Policy -> Select, select IPSec/RSA-Sig-Default and close both windows
by clicking on OK.
Figure 38: Select a tunnel with certificate authentication
Now you are ready to compile. When compiling ISCM will create the
configuration for the use of certificates.
47 of 77
The Properties Window
6
The Properties Window
Please double-click on an mGuard in your workspace to open the Properties
window. Use this window to configure the parameters of an device:
Figure 39: mGuard properties window
)
Only the options relevant for the current setting will be shown. E.g.
General Options -> Stealth mode configuration will only be shown if
Stealth mode is enabled. Also only the features available for the device
version (see Figure 39) will be accessible in the Properties Window.
Double-click on General Options to access the parameters specific to the
Innominate mGuard:
Update options
The update parameters (General Options->Update options) are available for
mGuard version >= 2.1.
• Name of package set:
Use this input field to specify the name of your update package, i.e.
update-2.0.0-2.0.2
• Update Protocol:
Choose either http or https.
• Location of package set:
Use this input field to specify the address of your update server. Please refer
to Chapter 7.1 on how to initiate an update or to the mGuard user manual for
detailed information on the update feature.
• Login for remote update:
Password for remote update:
These parameters are only supported by mGuard Release >= 3.0. Please
enter the appropriate authentication information. The default value is
„anonymous“ for both parameters.
48 of 77
The Properties Window
Configuration pull
options
These settings (General Options->Configuration pull options) are available
for mGuard Release >= 3.0.
• Pull intervall:
Choose the intervall in which the mGuard should check for a new
configuration.
• Server:
Enter the URL of the configuration server.
• Login for remote update:
Password for remote update:
Please enter the appropriate authentication information. The default value is
„anonymous“ for both parameters.
• Load server certificate from Policy Server:
You can store the certificate of the HTTPS-configuration server in a
directory on the Policy Server. If you enable this option it will be imported in
the configuration.
• Location of certificate:
Please specify the location (full filename) where you stored the certificate of
the configuration server.
Hostname
ISCM offers you to use the name of the device in the workspace as hostname for
the device (this is the default setting). Optionally you can specify a custom
hostname or you can use the hostname in the FQDN (only available if FQDN is
enabled, seel below section ’FQDN’). In this case ISCM extracts the hostname
from the the FQDN (e.g. mGuard1 from the FQDN
mGuard1.innominate.com)
)
Network mode /
Security zone
Only the characters ’A-Z’, ’a-z, ’0-9’ or ’-’ are allowed in the hostname!
ISCM supports the configuration of the 3 different network modes for the
Innominate mGuard. In the PEP menu this parameter can be configured via
General options -> Network mode.
Please consult the device user manual for a detailed description of these modes.
For an overview on the required interfaces settings for the different scenarios
please refer to Chapter 9.
)
When switching between the network modes or mGuard versions all
interfaces will be reset to their default configuration
(Security Zone=Untrusted) and therefore have to be reconfigured
again.
There are special configuration options for each of the modes:
Router mode
Security Zone
For the proper generation of firewall rules and VPN rules, the parameter
Security Zone must be initialized for each of the mGuard interfaces. Set
Security Zone for the internal interface to Trusted and for the external interface
to Untrusted. Double-click on an interface (if existing) in the properties window
and select Options to access the parameter Security Zone.
PPPoE mode
PPPoE configuration
Please enter your user name and your password in General options -> PPPoE
configuration to enable the PPPoE access.
Security Zone
For the proper generation of firewall rules and VPN rules, the parameter
Security Zone must be initialized for each of the mGuard interfaces. Set
Security Zone for the internal interface to Trusted and for the external interface
49 of 77
The Properties Window
to Untrusted. Double-click on an interface (if existing) in the properties window
and select Options to access the parameter Security Zone.
Stealth mode
The handling of VPN and firewall rules is different in „Stealth“-mode. Please
refer to Chapter 5.1 for information on how to use VPN with Stealth mode and
to Chapter 3.7 for the definition of firewall rules.
Chapter 6.1 contains a detailed description of the different Stealth modes.
Log for port
forwarding
Check the box Activate log for port forwarding to enable the logging of port
forwarding rules. A log cannot be activated for a single rule.
Configure remote
access
Click on the entry General Options->Administration services to access the
options for remote access (HTTPS, SNMP). The configuration for SSH remote
access can be found in the menu Upload configuration->Connection Options>SSH flow to be used. By default the Innominate mGuard will use the standard
ports for the remote access via HTTPS, SNMP and SSH. For certain
configurations it might be necessary to use other ports than the standard ports,
e.g. when enabling SSH-access to a client computer protected by a mGuard in
Stealth mode without management interface. In this case please create a service
with the desired port (see Chapter 4.3 for information on how to create services)
and select this service by clicking on the appropriate button (Service for HTTPS
remote access, Service for SNMP remote access, SSH flow to be used). To
enable the remote access for the desired protocol check the appropriate box.
)
SNMP remote access is a licensed feature, i.e. if no license is installed
on the device (e.g. mGuard professional) then an upload of the policy
fails, if the SNMP access is enabled in ISCM.
Roll out options
The roll out options are only visible, when the parameter Upload method
(Upload Configuration -> Connection options) is set to localhost. See Chapter
7.2 for more information on the Roll-out.
• Directory to export rollout DB: Use this input field to specify the directory
for the configuration data export, e.g. C:\temp\ISCM_roll_out. Make
certain, that the directory exists before initating the roll out.
• Serial number: Use this field to specify a serial number. The serial number
should contain only characters that are allowed in Windows-filenames.
Connection
Tracking
Click on the entry General Options->Conntrack Options to access the
connection tracking options for firewall rules and NAT.
If e.g. an outgoing ftp connection is setup to download data, the server will
callback the calling system to establish an additional connection for the transfer
of data. In this case, Connection Tracking for ftp must be set to Yes so that the
mGuard will accept this additional connection without an explicit firewall rule.
The same is true for the protocols irc and pptp.
Please check the appropriate box to enable connection tracking for ftp, irc, or
pptp. Since more than one service could be affected by the connection tracking
(e.g. active ftp, passive ftp), please specify the services, that are involved.
50 of 77
The Properties Window
Dynamic Addresses To use dynamic interface addresses set the Use Dynamic Address option in the
interface properties to Yes:
Figure 40: Dynamic addresses
If the interface with the dynamic address is an upload interface then the ISCM
server has to knwo the address when uploading. Therefore you can set the
parameter Resolve IP-address using to Prompt for IP-address, if you would
like to enter the IP-address manually when uploading or set it to PEP FQDN if
you have FQDN enabled (see below). PEP FQDN will only be available if
FQDN is enabled. The parameter Dynamic addresses from specifies the address
range of the dynamic addresses (e.g. user defined pool, Any, Network). If the
device is connected to the Internet only the value Any is allowed.
51 of 77
The Properties Window
FQDN
To configure the FQDN of the device, set FQDN mode in the menu Application
Servers->DNS to Yes and enter the FQDN:
Figure 41: Configure the FQDN
Please refer to the Solsoft User Guide for detailed information on the other
parameters in the properties window not explained in this section.
ICMP Handling
This feature allows to accept or drop ICMP messages to the device. This feature
will be available beginning with mGuard version 2.1 / Eagle Hirschmann 2.0 in
the node
General Options->Security Profile->Common Security Parameters. There
are 3 options:
Drop all
All ICMP Messages to the mGuard will be dropped. In case you created
permissions for ICMP messages to the device there will be a warning message
during compilation.
Only Ping Allowed
Ping messages (ICMP message type 8) will be allowed. In case you created
permissions for ICMP messages to the device other than „Ping“ there will be a
warning message during compilation.
Allow all
All ICMP messages to the device are allowed.
Enable log for
default rules
You are able to activate/deactivate the log for the default rules in the menu
Interfaces->Options in the Property window menu.
Enable VPN
In ase you are using dynamic addresses for a VPN gateway and you have
DynDNS monitoring specified a FQDN you can enable the VPN DynDNS monitoring in the menu
VPN options->DynDNS Monitoring .
52 of 77
The Properties Window
ACA support
ISCM supports the automatic configuration of an Automatic Configuration
Adapter (ACA). This option is only available for the mGuard Industrial. In the
menu Upload configuration->Advanced configuration -> ACA options you
are able to set Load configuration to ACA. If this option is enabled ISCM will
first upload the configuration to the device and then write the configuration to an
ACA that has to be connected to the mGuard. If no ACA is connected or the
device is not an mGuard Industrial the upload will terminate with an error.
To write the configuration to an ACA the root password has to be specified. If
you enable Use the default root password the default password will be used, if
you disable this option you can specify a custom root password that has to match
the current root password of the device. Otherwise the write process terminates
with an error.
)
6.1
The ACA support requires root permissions, i.e. in Upload
configuration->Authentication you have to enter the root login
parameters.
Stealth mode configuration
When enabling the network mode Stealth in General Options -> Network
mode the additional menu General options->Stealth mode configuration will
appear. This menu allows you to select one of the 3 Stealth Modes and set the
parameters for the manual Stealth configuration. For an overview on the required
interfaces settings for the different scenarios please refer to Chapter 9.
The following Stealth Modes are available for the Innominate mGuard (please
refer to the user manual for a more detailed description):
• Automatic Stealth Mode with or without management-IP (only one client
can be connected to the internal/trusted interface)
• Static Stealth Mode with or without management-IP (only one client can be
connected to the internal/trusted interface)
• Multi Stealth Mode (more than one client can be connected to the trusted
interface)
) The Multi Client Mode and the modes with management IP are only
available for mGuard Releases >= 3.0.
Stealth Mode
without
management IP
When using the Stealth Mode without management IP the device is completely
transparent to the environment.The device does not have its own IP-address and
uses the IP-address of the client. Therefore only one client can be connected to
the device. Two modes can be used: ’Automatic’ or ’Static’ mode . In Automatic
mode the mGuard configures itself automatically without any user action. In
Static Mode the user has to specify some additional parameters (see below).
To configure a device using Stealth Mode without management IP in ISCM,
create and configure only one interface that has the IP-address of the client. The
parameter Security Zone (see previous chapter) of the interface has to be set to
Untrusted Stealth. All permissions start/end on the device and will be treated as
permissions to the client (except for the remote access permissions SNMP,
HTTPS and SSH).
53 of 77
The Properties Window
Figure 42: Stealth mode without management interface
Stealth mode with
management IP
In Stealth Mode with management IP the device is also transparent to the
environment but has a management IP address that is accessible from both sides
(trusted/untrusted) of the device. In this mode also only one client can be
connected to the trusted interface. A device using Stealth Mode with
management interface must have at least 3 interfaces:
• One interface without IP-address (exception: VPNs, see Chapter 5.1) and the
parameter Security Zone set to Untrusted Stealth. Please deactivate the
option Upload target for this interface.
• One interface without IP-address and the parameter Security Zone set to
Trusted Stealth. There must be a network with the IP-address of the client
(netmask: /32) connected to this interface. Please deactivate the option
Upload target for this interface.
• One interface with the management IP address and the parameter Security
Zone set to Management. There must not be a network connected to this
interface. Please activate the option Upload target for this interface, i.e. this
IP-address is used to upload the configuration to the device.
54 of 77
The Properties Window
Figure 43: Stealth Mode with management interface
55 of 77
The Properties Window
Multi Stealth Mode
The configuration is exactly the same as described for the Stealth Mode with
management interface in the previous section, except that the network
representing the client does not have to be a single IP-address, but is identical to
the network on the external/untrusted side (see Figure 44), since Multi Stealth
mode allows to connect several clients to the trusted interface. VPN’s are not
supported in Multi Stealth Mode.
Figure 44: Multi Stealth Mode
Automatic/
Static Stealth
Modes
When using Static Mode make sure that the Default Gateway for the attached
network is specified (see Chapter 3.2). Additionaly the MAC address of the client
has to be specified in the input field that appears in the menu
General options->Stealth mode configuration when enabling the Static Mode.
56 of 77
Generic PEP Actions
7
Generic PEP Actions
The Generic PEP Actions can be activated by opening the context menu (right
click on a device) and selecting PEP action.
The available PEP actions for the Innominate mGuard are described in the
following chapters.
7.1
Device Update
Specifiying the
update parameters
Before initiating an update the parameters have to be set. Please refer to
Chapter 6 on how to set the update parameters. To initiate an update the Security
Configuration Manager logs in to the device using SSH. Therefore you have to
specify the admin login and password for each device. Open the properties
window by double-clicking on a device, select
Upload Configuration->Authentication and enter the login and the password
for admin (this is mandatory).
Initiating an update
To initiate an update of the device, right-click on any Innominate mGuard in
your workspace. Select PEP actions->Device Update in the popup menu to
open the following window after the project has been successfully compiled:
Figure 45: PEP-Action window - Initiating an update
Select the devices to be updated or select Generic Action for all PEPs to update
all of the Innominate mGuards in the project. Then press Generic Action to
initiate the update process. A window will open - for each device - showing the
update progress and the results of the update.
)
)
7.2
The update feature will not work with mGuard Version 2.0.
Up to mGuard Release 2.1.6 an update with reboot can only be initiated
by root. Beginning with Release 2.2 also ’admin’ can initiate the reboot.
Roll Out support
Specifying the
parameters
To support large rollout scenarios, ISCM supports a rollout function. It enables
the administrator to export the configuration data of some or all Innominate
mGuards of a project to a user-defined directory on the ISCM host.
In the properties menu of the mGuard in General options->Rollout options (see
Chapter 6), the directory for the configuration data and a device specific serial
57 of 77
Generic PEP Actions
number can be entered. The rollout function will generate a configuration file in
the specified directory for each of the selected devices.
)
The directory must be created in advance by the administrator.
The name of the export files will be <serial_number>.atv. If no serial number is
specified the name of the mGuard will be used for the filename.
)
Initiate the export
To use the roll out function the parameter
Upload configuration->Connection Options->Upload method in the
mGuard properties menu has to be set to Localhost. Otherwise the roll
out function is not visible in the context menu.
To initiate an export of the configuration data, right-click on any Innominate
mGuard in your workspace. Select PEP Actions->Create Rollout DB in the
popup menu to open the following window after the project has been successfully
compiled:
Figure 46: PEP-Action window - Initiating an update
Select individual devices or select Generic Action for all PEPs to export data
for all of the devices in the project. Then press Generic Action to initiate the
export process. A window will open - for each device - showing the progress and
the results of the export.
7.3
Check Device connectivity
This PEP action tests, whether the device is reachable via SSH. To initiate a
check the Security Configuration Manager logs in to the device using SSH.
Therefore you have to specify the admin login and password for each device.
Open the properties window by double-clicking on a device, select
Upload Configuration->Authentication and enter the login and the password
for admin (this is mandatory)
Initiate the
connectivity check
To initiate the connectivity check, right-click on any Innominate mGuard in your
workspace. Select PEP Actions->Check device connectivity in the popup menu
58 of 77
Generic PEP Actions
to open the following window after the project has been successfully compiled:
Figure 47: PEP-Action window - Initiating an update
Select individual devices or select Generic Action for all PEPs to check the
connectivity of all of the devices in the project. Then press Generic Action to
initiate the check. A window will open - for each device - showing the results of
the check.
59 of 77
Advanced configuration
8
8.1
Advanced configuration
Configure application servers (NTP, DNS and Syslog)
The steps below show you how to configure a NTP-server as an example. To
configure an DNS or Syslog (or CA) server please follow the steps likewise.
Please refer to the Innominate mGuard manual for a detailed description of the
mGuards DNS, Syslog and NTP capabilities.
• First create the NTP server: Create a class with the
-icon as described in
Chapter 3.3 and name the class e.g. NTP Server 1.
• Configure a single IP-address for the class (open the Class Property window
by double-clicking on the class and add an address)
• Click on the Add Server
-icon, add the address of the NTP server and
select Time Server->NTP Time Server from the menu. Name the server
e.g. NTP1. The Class property window should look as shown in the
following figure.
Figure 48: Class property window
)
The settings for the NTP server (MD5 authentication etc.) are ignored
by the Innominate mGuard.
60 of 77
Advanced configuration
• Close the Class Property window by clicking on OK. The NTP server will
now show up on your workspace as shown in the following figure.
Figure 49: NTP server
• Now we have to configure the device to use the NTP server:
Open the Property window of one of the Innominate mGuards by double
clicking on the device and open the menu
Application server->NTP server->NTP server list.
Figure 50: Configure the NTP server in the mGuard property window
61 of 77
Advanced configuration
• Click on the
-icon to open a window, which allows you to select server
NTP1 as NTP server for the mGuard.
• To configure the time zone please click on Application server->NTP server
and enter the time zone as a string.
• Leave the mGuard Property window by clicking on OK.
Remarks/
Restrictions
)
)
)
)
8.2
The permissions for DNS, Syslog and NTP are implicitely created, i.e.
they do not have to be created by the user.
Remote logging is a licensed feature, i.e. if no license is installed on the
device (e.g. mGuard professional) then an upload of the policy fails, if
remote logging is enabled in ISCM.
When using NTP in Stealth mode the following restrictions apply:
Up to mGuard release 2.1 only the two first NTP servers are used by the
mGuard software. Starting with mGuard release 2.2 all NTP-servers in
the server list are used.
When using DNS in Stealth mode the following restrictions apply:
Up to mGuard release 2.1 only the two first DNS servers are used by the
mGuard software and only User defined is available as option. Starting
with mGuard release 2.2 all DNS-servers in the server list are used and
Root DNS server and User defined are available as option.
Define remote access rules through a tunnel
In Chapter 6 the configuration of Remote access rules is explained. In some cases
it might be helpful to configure a remote access through a tunnel (e.g. when
accessing mGuards „behind“ a NAT-device). In this case the permission has to
end on the internal interface of the tunnel gateway. See the following figure how
this can be configured.
62 of 77
Advanced configuration
Figure 51: Remote access through tunnel
For the representation of the internal interface of mGuard 1_1 a class with the
address of the internal interface has to be created. The HTTPS permission has to
be drawn to that class.
HTTPS and SNMP
only!
8.3
Please note that this can only be accomplished with HTTPS and SNMP
permissions! Since the configuration is uploaded with SSH to the devices a SSH
permission can not end on the internal interface of a tunnel gateway, since this
interface is only available when the tunnel is up. Please note that in the example
in Figure 51 a port forwarding rule for SSH would have to be defined for
mGuard branch office 1, to make mGuard 1_1 accessible from
Headquarters Network.
Configure VLANs
The mGuard supports the tagging of VLAN packets and the definition of (virtual)
VLAN interfaces. Please refer to the mGuard manual for detailed information on
mGuard VLAN support.
)
Physical interfaces
VLANs support is available for mGuard Release >= 3.0 only
A VLAN tag can be attached to the physical interfaces (trusted/untrusted
interface) of the mGuard. To configure a VLAN tag please open the Properties
window of the device by double-clicking on the device. Open the interface
properties for the respective interface and enable the option Has VLAN tag.
Then enter a value between 0 and 255 for the VLAN tag (see Figure 52).
)
This option will be available for the trusted and untrusted interface in
Router Mode and the management interface in Stealth Mode.
Figure 52: Attaching a VLAN tag to a physical interface
Virtual VLAN
interfaces
It is possible to add (virtual) VLAN interfaces either on the trusted or the
untrusted side of the device. Please refer to Chapter 3.2 on how to add an
interface. Choose either VLAN interface (trusted) or VLAN interface
(untrusted) as Security Zone depending on which side of the device you would
like to add the interface. Then enter the VLAN tag in the field that appears in the
63 of 77
Advanced configuration
interface options (see Figure 53).
)
It is only possible to add VLAN interfaces in Router Mode.
Figure 53: Adding a VLAN interface
8.4
Learning mode
In environments with unknown network traffic it is nearly impossible to use a
firewall, since any traffic that is required for the proper operation but not known
to the administrator will be blocked by the firewall.
In these environments the „Learning mode“ can be used to analyse the network
traffic and to import rules in ISCM based on the analyse result. To use Learning
Mode you have to setup a Syslog server.
)
Please note that you must have a valid ISCM license for import to use
learning mode.
Activate learning
mode
To enable Learning Mode for an mGuard open the Properties window of the
device by double clicking on the device and select Policy Learning Mode in the
menu tree on the left. Set Enable Policy Learning mode to Yes.
If Learning Mode is activated the rule „permit all“ with activated log will be
appended to the ruleset when compiling the project. The log for any explicit
permission will be set to No, i.e. any unknown traffic will be logged and all
known traffic will not be logged. No traffic will be blocked by a device with
activated Learning Mode.
Analyse the log
The log can be used as input for the concentrator tool, that will convert the
contents of the log to an import file (*.xci) for ISCM. (Please refer to the
application note „Learning Mode“ for more detailed information on Learning
Mode and the concentrator tool).
Import the rules
To import the rules right click on any mGuard on your workspace and select
Import->Device configuration. Select Solsoft Import File (.xci) and browse
for the xci file (use the
(see below).
-icon). Set Try to Map Unmapped Objects to Yes
64 of 77
Advanced configuration
Figure 54: Selecting the xci-file for rule import
Click on the button Next. ISCM will now import the xci-file and show the rules
to be imported in a window. For all network addresses that can be matched to
objects on the workspace ISCM will replace the address with the appropriate
object. The same is true for services (protocols) that can be matched to existing
services.
65 of 77
Advanced configuration
Figure 55: Select the rules to be imported
If the rule contains addresses and services that can not be matched to an existing
object, the user has to decide whether a new class or service should be created or
another object on the workspace or an existing service should be used. E.g. the
rule f5 in the import list contains an unmapped service (tcp_UNP_5230) and
an unmapped address range (10.3.0.1.1/16). To map the service click on
the value tcp_UNP_5230 an choose the action: either choose an existing
service from the list or create a new service. Proceed likewise with unmapped
address ranges. If you choose Create, then a Class with this address range is
created.
In rule f1 is the unmapped source address ANY. Map this either to Internet or to
a Class ’Any’.
To exclude a rule from the import select the rule and click on the
-icon.
As soon as a rule is completed (all addresses and services are matched or created)
it can be imported in the project with the Import button. Also multiple rules can
be selected for import. After importing all desired rules into the project the policy
has to be deployed, i.e. the project has to be compiled and the configuration has
to be uploaded to the device.
The sequence logging, analysing, importing and deploying can be repeated until
no rules will be logged any more. If the learning phase is completed, Learning
mode can be deactivated for the device. Then the default rule „permit all“ will be
removed from the ruleset and the device operates in ’normal’ firewall mode.
66 of 77
Advanced configuration
8.5
Router redundancy
For high availability two mGuards can be configured as redundant devices.
During operation the firewall state tables will be synchronized between the two
redundant mGuards. As soon as the master device fails the backup device will
continue operation. Redundany is supported for firewall only (not for VPNs).
Please refer to the mGuard manual for further information on router redundancy.
)
)
Router redundancy is supported for mGuard Release >= 3.0 only.
You must have a valid license for cluster support to configure redundant
devices in Router Mode with ISCM (the license is not required if you
configure redundant devices in Stealth Mode).
Router redundancy is supported in Router Mode and in Stealth Mode (Static
Stealth mode and Multi Stealth Mode only). The way to configure redundancy
with ISCM differs completely between Stealth Mode and Router Mode.
Therefore please refer to the corresponding chapters.
8.5.1
Configure redundant devices operated in Router Mode
We will now replace Router1 in our example project (Chapter 3) with two
redundant mGuards in Router Mode. Please follow these steps:
1. First place both devices parallel to each other between Subnet 2 and Subnet 4
(first delete Router 1). Set the version of the devices to 3.0. Add and
configure the interfaces and connect the mGuards to the networks (see
Figure 56). Refer to Chapter 3.2 for detailed information about the
configuration of devices and interfaces.
Figure 56: Router redundancy
2. Add a cluster parallel to the devices with the
-icon (please make sure
that the Topology tab is active). The cluster is a virtual device that represents
the two redundant mGuards.
67 of 77
Advanced configuration
3. Add two interfaces to the cluster. Add the ’virtual’ external IP addresses to
one interface and the ’virtual’ internal IP address to the other interface (see
Figure 57). The external interfaces of both redundant devices and the cluster
have to be connected to the same network! The same is true for the internal
interfaces. Set the Security Zone for the internal/trusted interfaces to
Trusted.
4. Then add the two mGuards to the cluster:
Open the properties window of the cluster by double-clicking on the cluster.
Select Cluster Options -> Cluster Members. Click on the the
-icon
(see Figure 57) and select the redundant devices as cluster members. The
first device in the list will be the master and the second device in the list will
be the backup device.
Figure 57: Cluster properties
5. Set the cluster parameters:
Open the Property window of the cluster by double clicking on the cluster.
Select Cluster options and enter a password in the Authentication
password field.
)
Please note, that the maximum length for the password is 8 characters.
Select the interface options of the cluster interface and enter a valid Virtual
Router ID for each interface (see Figure 58).
68 of 77
Advanced configuration
Figure 58: Cluster interface parameters
6. Set the cluster parameters for the devices:
If a device is a cluster member, the parameter Router Redundancy Priority
appears in the menu General Options.
Open the Property Windows of each of the redundant mGuards. Select
General Options and set Router Redundancy Priority to the desired
value. The default value is 100.
7. Set optional cluster parameters:
To configure external or internal tracking hosts click in the cluster Property
Window on Cluster Options and enable the option Enable ICMP checks.
Then you are able to select tracking hosts in the menu Cluster Options ->
Internal tracking hosts or Cluster Options -> External tracking hosts
(see Figure 58). Add your tracking hosts to the list. If the desired tracking
hosts do not exist yet on the workspace you can add several tracking hosts by
creating a class (see Chapter 3.3) with the IPs of the tracking hosts and
connect this class to the appropriate network. Then the class is available to
be added to the tracking host list. Finally you have to add a ping-permission
from the cluster to the tracking hosts to enable the generation of the proper
configuration.
)
The ping permission will cause some warnings during compilation,
which you can ignore.
8. The cluster is ready to be used. If a permission is created it will be
automatically added to the configuration of both devices. NAT is also
supported in this mode: use the cluster as NAT-device. The NAT
configuration will be added to both of the redundant devices.
69 of 77
Advanced configuration
8.5.2
Configure redundant devices operated in Stealth Mode
Redundancy is either supported in Multi Stealth Mode or in Static Stealth Mode
with management IP. Let’s assume, we would like to protect some workstations
in Subnet 1 of our example project with two redundant mGuards in Multi
Stealth Mode. Follow these steps:
1. First create a copy of Subnet 1 (Edit->Copy/Edit->Paste or <Ctrl>-C/
<Ctrl>-V).
2. Then create a class (see Chapter 3.3) that contains the IP-addresses of the
workstations. Connect the class to the copy of Subnet 1.
3. Create two mGuards (e.g. mGuardPrimary and mGuardBackup). Set the
version of the devices to 3.0. Configure the mGuard and the interfaces in
Multi Stealth Mode (one untrusted stealth interface without IP connected to
Subnet 1, one trusted stealth interface without IP connected to the copy of
Subnet 1, one management interface with IP, e.g. ’192.168.1.111’ and
’192.168.1.112’.
Figure 59: Cluster with members operating in Stealth Mode
4. Create a Limited Path Zone (see Chapter 3.6, „Create a trust zone) and add
both redundant devices to the Limited Path Zone (see Figure 59).
5. Configure the cluster:
Open the Property Window of the mGuards by double-clicking on the
devices and set the parameter General Options->This device is member of
stealth cluster for both mGuards to Yes. This will enable the menu
GeneralOptions->Cluster configuration for Stealth Mode in the Property
Window. Set the Redundancy Start State for mGuardPrimary to Master
and for mGuardBackup to Backup. Select mGuardPrimary as peer
device for mGuardBackup and vice versa. Set the remaining cluster
parameters (see Figure 60)
)
To prevent misconfiguration the parameters Authentication password
70 of 77
Advanced configuration
and the Virtual Router ID can be configured only in the Property
Window of the master device.
) Please note, that the maximum length for the password is 8 characters.
6. Set optional cluster parameters:
To configure external or internal tracking hosts click in the Property Window
of each device on GeneralOptions->Cluster configuration for Stealth
Mode and enable the option Enable ICMP checks. Then you are able to
select tracking hosts in the menu GeneralOptions->Cluster configuration
for Stealth Mode -> Internal tracking hosts or GeneralOptions->Cluster
configuration for Stealth Mode -> External tracking hosts (see Figure
58). Add your tracking hosts to the list. If the desired tracking hosts do not
exist yet on the workspace you can add several tracking hosts by creating a
class (see Chapter 3.3) with the IPs of the tracking hosts and connect this
class to the appropriate network. Then the class is available to be added to
the tracking host list. Finally you have to add a ping-permission from each
device to the tracking hosts to enable the generation of the proper
configuration.
)
The ping permission will cause some warnings during compilation,
which you can ignore.
7. The cluster can be used now. Draw your permissions between the class
representing the workstations and the desired networks. The permissions will
be created on both redundant devices.
Figure 60: Cluster parameters for Stealth Mode
71 of 77
Appendix - Interface settings overview
9
Appendix - Interface settings overview
Untrusted
interface
Security Zone = trusted
Management
interface
Virtual VPN
interface
Security Zone =
untrusted
Security Zone =
Management
Security Zone = Virtual
VPN
Router / PPPoE
Interface IP has to be valid
Interface IP has to be valid
(can be dynamic)
Not allowed
Not allowed
Automatic/static
Stealth without
management IP
Not allowed
Interface IP = client IP
(can be dynamic)
Not allowed
Not allowed
Automatic/static
Stealth without
management IP
and VPN (tunnel
mode)
Not allowed
Interface IP = client IP
(can be dynamic)
Not allowed
Interface IP = not assigned
Upload target = no
Network = singleton
Automatic/static
Stealth without
management IP
and VPN
(transport mode)
Not allowed
Interface IP = client IP
(can be dynamic)
Not allowed
Not allowed
Automatic/static
Stealth with
management IP
Interface IP = not assigned
Upload target = no
Network = client IP
Interface IP = not assigned
Upload target = no
Interface IP != 0.0.0.0
Network = not connected
Upload target = yes
Not allowed
Multi Stealth
with
management IP
Interface IP = not assigned
Upload target = no
Network = same as on
untrusted side
Interface IP = not assigned
Upload target = no
Interface IP != 0.0.0.0
Network = not connected
Upload target = yes
Not allowed
Automatic/static
Stealth with
management IP
and VPN (tunnel
mode)
Interface IP = not assigned
Upload target = no
Network = client IP
Interface IP = client IP
Upload target = no
Interface IP != 0.0.0.0
Network = not connected
Upload target = yes
Interface IP = not assigned
Upload target = no
Network = singleton
Automatic/static
Stealth with
management IP
and VPN
(transport mode)
Interface IP = not assigned
Upload target = no
Network = client IP
Interface IP = client IP
Upload target = no
Interface IP != 0.0.0.0
Network = not connected
Upload target = yes
Not allowed
Network mode
/ Scenario
Trusted interface
Each cell contains the mandatory settings for the interface/the scenario.
For all cells with green colour the corresponding interface is mandatory.
72 of 77
Appendix - Restrictions / Known problems
10 Appendix - Restrictions / Known problems
10.1 VPN
Miscelleneaous
• Non-contiguous address ranges in a VPN:
There is no support for two networks with noncontiguous address ranges on
one side of the VPN, even if the Tunnel Scope is set to Trust Zone!
Therefore it is not possible - in the setup of Figure 11 - to add Subnet4 to
the trust zone, since the address ranges of Subnet2 and Subnet4 are not
contiguous!
• Permissions with Ignore VPN option are not allowed inside a VPN.
• Deny-Permissions are not allowed inside a VPN.
• VPN peers with dynamic addresses:
• For VPN configurations to several peers with dynamic addresses, an
error will occur (different PSK but the same IP address) if the tunnel
group option (Chapter 3.6) is not used. In this case please use
certificates (Chapter 5.2) for VPN configurations with multiple peers
with dynamic addresses.
• An FQDN has to be specified for the VPN gateways with dynamic
addresses.
• All mGuard releases up to 2.1.x route packets based on the destination
address only. Therefore mGuard branchoffice 2 tries to route packets
coming from Subnet4 through the tunnel in Figure 61, although Subnet4
does not belong to the VPN. Because Subnet4 does not belong to the VPN
the sap permissions will be generated by ISCM outside of the tunnel (not
inside the tunnel) and therefore the traffic coming from Subnet4 is blocked
by mGuard branchoffice 2. Therefore this configuration will result
in an error message of the compiler. This behaviour is fixed in mGuard
release 2.2
Figure 61: Routing problem when mixing VPN and non-VPN traffic
73 of 77
Appendix - Restrictions / Known problems
VPN and Stealth
Mode
• If the ISCM server is part of the VPN (see Figure 62), it is not possible to
configure a remote mGuard in the following cases :
• The remote mGuard is operated in Router Mode and the mGuard
Release is older than 2.2.
• The remote mGuard is operated in Stealth Mode and the mGuard
Release is older than 3.1.
Figure 62: Problem when managing remote mGuards with VPN
)
The problem does not occur if mGuard Headquarters in Figure 62
is natting the traffic coming from Headquarters network.
• Problem when operating an mGuard in Stealth mode with management IP as
VPN gateway: If a remote access permission is drawn to the mGuard (see
Figure 63, in this example an https-permission from 192.168.1.0/24 to
mGuardStealth), then two rules are generated: one rule with the
management IP as destination address (which is correct) and another rule
with the client IP 192.168.0.100/32 as destination address (which is
not correct). This rule is suppressed on mGuardStealth, but can not
suppressed on mGuard0 and mGuard1. i.e. https-traffic to the client
192.168.0.100/32 will pass mGuard1 and mGuard0, but will be
blocked on mGuardStealth.
74 of 77
Appendix - Restrictions / Known problems
Figure 63: Problem when operating an mGuard in Stealth mode without management IP
as VPN gateway
VPN with
certificates
• The use of certificates require the definition of a CA server and a CRL
Distribution Point (CDP). Depending on the type of server or CDP, ISCM
creates implicit permissions for the mGuard to access the servers. Since the
mGuard does not support CA-servers or CDPs these rule are useless but can
not suppressed.
10.2 NAT
Port forwarding
• The mGuard supports the definition of a source address/port in the port
forwarding rule (beginning with Release 2.3). This is not supported by
ISCM. The source address/port for port forwarding rules in ISCM has to be
’Any’.
• To ’activate’ the port forwarding rule a permission has to be created that
matches the port forwarding rule. This permissions will also be part of the
mGuard configuration, although it is not required by the mGuard. The
mGuard created already an implicit firewall rule for the port forwarding rule.
75 of 77
Appendix - Restrictions / Known problems
10.3 Network Modes
Stealth Mode
• It is not possible to manage an mGuard operated in Stealth Mode without
management IP, if ISCM is connected to the internal/trusted interface of the
mGuard (since the mGuard can be accessed only with the interface address
’1.1.1.1’.)
Switching between
modes
• A reconfiguration with ISCM between router mode and Stealth Mode with
management interface and between Stealth Mode with and without
management IP is only possible, if the IP-address of the upload target (the
interface used to upload the configuration with SSH) does not change!
The upload target in Stealth Mode with management interface is the
management interface, i.e. the IP-address of the management interface
should be the same as the IP-address of the upload target of the modes that
should be switched to or from.
• A switch from or to Static Stealth Mode requires a reboot of the device. This
has to be done manually on the device (web interface or reset button).
76 of 77
77 from 77