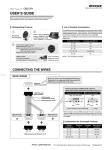
1
hydra cluster
IASI-CNR
The Hydra documentation project (thdp)
27th July 2006
enrico mastrostefano
c
Copyright 2006
enrico mastrostefano. Permission is granted to
copy, distribute and/or modify this document under the terms of
the GNU Free Documentation License, Version 1.2 or any later
version published by the Free Software Foundation; with no Invariant Sections, with one Front-Cover Texts:”The Hydra documentation project (thdp) by enrico mastrostefano, IASI-CNR
Roma” and no Back-Cover Texts. A copy of the license is included in the section entitled ”GNU Free Documentation License”
(chapter 6).
1
Contents
Preface . . . . . . . . . . . . . . . . . . . . . . . . . . . . . . .
Introduction
1 The
1.1
1.2
1.3
hydra cluster
Topology . . . . .
Operating System
Short overview on
1.3.1 Migration
1.3.2 openMosix
1.3.3 openMosix
6
7
. . . . . . . . . . . .
. . . . . . . . . . . .
openMosix . . . . .
. . . . . . . . . . . .
usage . . . . . . . .
and Hyperthreading
.
.
.
.
.
.
.
.
.
.
.
.
.
.
.
.
.
.
.
.
.
.
.
.
.
.
.
.
.
.
.
.
.
.
.
.
.
.
.
.
.
.
.
.
.
.
.
.
.
.
.
.
.
.
.
.
.
.
.
.
.
.
.
.
.
.
.
.
.
.
.
.
8
. 9
. 9
. 9
. 11
. 11
. 12
2 Operating System
13
2.1 Architecture of the Cluster . . . . . . . . . . . . . . . . . . . . 13
2.2 Basic Operating System . . . . . . . . . . . . . . . . . . . . . 14
2.3 Operating System of the master nodes . . . . . . . . . . . . . 14
3 Openmosix on Debian
3.1 Kernel compilation . . . .
3.2 Openmosix tools . . . . .
3.3 Editing Configuration files
3.4 Start openMosix . . . . .
3.5 Openmosixview . . . . . .
4 hydra scripts
4.1 One file bash script . . . .
4.2 hydra-queue . . . . . . . .
4.3 Ups and power failure . .
4.3.1 apcupsd . . . . . .
4.3.2 Apcupsd on hydra
4.4 chpox . . . . . . . . . . .
4.4.1 Basic Usage . . . .
.
.
.
.
.
.
.
.
.
.
.
.
.
.
.
.
.
.
.
.
.
.
.
.
2
.
.
.
.
.
.
.
.
.
.
.
.
.
.
.
.
.
.
.
.
.
.
.
.
.
.
.
.
.
.
.
.
.
.
.
.
.
.
.
.
.
.
.
.
.
.
.
.
.
.
.
.
.
.
.
.
.
.
.
.
.
.
.
.
.
.
.
.
.
.
.
.
.
.
.
.
.
.
.
.
.
.
.
.
.
.
.
.
.
.
.
.
.
.
.
.
.
.
.
.
.
.
.
.
.
.
.
.
.
.
.
.
.
.
.
.
.
.
.
.
.
.
.
.
.
.
.
.
.
.
.
.
.
.
.
.
.
.
.
.
.
.
.
.
.
.
.
.
.
.
.
.
.
.
.
.
.
.
.
.
.
.
.
.
.
.
.
.
.
.
.
.
.
.
.
.
.
.
.
.
.
.
.
.
.
.
.
.
.
.
.
.
.
.
.
.
.
.
.
.
.
.
.
.
.
.
.
.
.
17
17
19
19
20
20
.
.
.
.
.
.
.
22
22
24
25
26
26
28
30
4.4.2
hchpox . . . . . . . . . . . . . . . . . . . . . . . . . . . 30
5 Debian Bootcd
5.1 Set up an hydra’s node .
5.2 Compiling the Kernel . .
5.3 Bootcd scripts . . . . . .
5.3.1 bootcdwrite.conf
5.3.2 bootcd2disk.conf
5.4 Floppy support . . . . .
5.5 hydracd2disk . . . . . .
5.6 I burn . . . . . . . . . .
5.6.1 Summary . . . .
.
.
.
.
.
.
.
.
.
.
.
.
.
.
.
.
.
.
.
.
.
.
.
.
.
.
.
.
.
.
.
.
.
.
.
.
.
.
.
.
.
.
.
.
.
.
.
.
.
.
.
.
.
.
32
32
33
34
35
35
37
37
38
39
6 GNU Free Documentation License
1. APPLICABILITY AND DEFINITIONS . . . . . . . . .
2. VERBATIM COPYING . . . . . . . . . . . . . . . . .
3. COPYING IN QUANTITY . . . . . . . . . . . . . . . .
4. MODIFICATIONS . . . . . . . . . . . . . . . . . . . .
5. COMBINING DOCUMENTS . . . . . . . . . . . . . .
6. COLLECTIONS OF DOCUMENTS . . . . . . . . . . .
7. AGGREGATION WITH INDEPENDENT WORKS . .
8. TRANSLATION . . . . . . . . . . . . . . . . . . . . . .
9. TERMINATION . . . . . . . . . . . . . . . . . . . . . .
10. FUTURE REVISIONS OF THIS LICENSE . . . . . .
ADDENDUM: How to use this License for your documents
.
.
.
.
.
.
.
.
.
.
.
.
.
.
.
.
.
.
.
.
.
.
.
.
.
.
.
.
.
.
.
.
.
.
.
.
.
.
.
.
.
.
.
.
.
.
.
.
.
.
.
.
.
.
.
40
41
42
43
43
45
46
46
47
47
47
48
.
.
.
.
.
.
.
.
.
.
.
.
.
.
.
.
.
.
.
.
.
.
.
.
.
.
.
.
.
.
.
.
.
.
.
.
.
.
.
.
.
.
.
.
.
.
.
.
.
.
.
.
.
.
.
.
.
.
.
.
.
.
.
.
.
.
.
.
.
.
.
.
.
.
.
.
.
.
.
.
.
.
.
.
.
.
.
.
.
.
.
.
.
.
.
.
.
.
.
.
.
.
.
.
.
.
.
.
.
.
.
.
.
.
.
.
.
.
.
.
.
.
.
.
.
.
.
.
.
.
.
.
.
.
.
BiBlio
A Debian GNU/Linux
A.1 Master nodes . . .
A.1.1 Scripts . . .
A.1.2 Needed files
A.2 Openmosixview . .
A.3 ssh passwordless . .
49
.
.
.
.
.
.
.
.
.
.
.
.
.
.
.
.
.
.
.
.
.
.
.
.
.
.
.
.
.
.
.
.
.
.
.
.
.
.
.
.
.
.
.
.
.
.
.
.
.
.
.
.
.
.
.
.
.
.
.
.
.
.
.
.
.
.
.
.
.
.
.
.
.
.
.
.
.
.
.
.
.
.
.
.
.
.
.
.
.
.
.
.
.
.
.
.
.
.
.
.
.
.
.
.
.
.
.
.
.
.
.
.
.
.
.
.
.
.
.
.
50
50
50
50
51
51
B Kernels
52
B.1 hydra and openmosix . . . . . . . . . . . . . . . . . . . . . . . 52
B.1.1 iptables . . . . . . . . . . . . . . . . . . . . . . . . . . 52
B.2 hydra bootcd . . . . . . . . . . . . . . . . . . . . . . . . . . . 54
3
C Bootcd2disk
C.1 Bootcd scripts configuration files
C.1.1 Brief intro to sfdisk . . . .
C.1.2 bootcd2disk.conf Slave . .
C.1.3 S13bootcdflop.sh . . . . .
C.2 hydracd2disk . . . . . . . . . . .
C.2.1 mk net files.sh . . . . . . .
D Script and README files
D.1 README.addMosixUser .
D.2 README.hchpox . . . . .
D.3 README.hchpoxmain . .
D.4 README.hydraqueue . .
D.5 README.quota . . . . .
D.6 Ups and apcupsd on hydra
.
.
.
.
.
.
.
.
.
.
.
.
4
.
.
.
.
.
.
.
.
.
.
.
.
.
.
.
.
.
.
.
.
.
.
.
.
.
.
.
.
.
.
.
.
.
.
.
.
.
.
.
.
.
.
.
.
.
.
.
.
.
.
.
.
.
.
.
.
.
.
.
.
.
.
.
.
.
.
.
.
.
.
.
.
.
.
.
.
.
.
.
.
.
.
.
.
.
.
.
.
.
.
.
.
.
.
.
.
.
.
.
.
.
.
.
.
.
.
.
.
.
.
.
.
.
.
.
.
.
.
.
.
.
.
.
.
.
.
.
.
.
.
.
.
.
.
.
.
.
.
.
.
.
.
.
.
.
.
.
.
.
.
.
.
.
.
.
.
.
.
.
.
.
.
.
.
.
.
.
.
.
.
.
.
.
.
.
.
.
.
.
.
.
.
.
.
.
.
.
.
.
.
.
.
.
.
.
.
.
.
55
55
55
56
61
61
62
.
.
.
.
.
.
64
64
66
66
67
71
74
Preface
#########################################################
#
#
#
HYDRA, THE MIGHTY CLUSTER
#
#
#
#
@IASI
#
#
#
#
#
#
Istituto di Analisi dei Sistemi ed Informatica
#
#
viale Manzoni 30 Roma
#
#
#
#
www.iasi.cnr.it/~hydra
#
#
#
#
#
#########################################################
#
[email protected]
#
#########################################################
Got to have Kaja now cause the rain it’s falling.
Bob Marley.
This works was born as an Internal CNR Report but we decided early
that, once finished, we have put it on the web, making it accesible for all.
With this aim this document is released under the GNU Free Documentation Licence (chapter 6) and the scripts related to this work under the GNU
General Public Licence.
The born of the hydra Cluster was possible thanks to Giovanni Rinaldi,
the IASI director, who planned the setting up of hydra. He also followed me
in the cluster structure’s design and software choosing.
Many of the ideas under the cluster are due to him or to our conversation
about some implementation problems.
The realization of hydra it’s my goal, but it was possible only with the
great help of Bruno Martino and Roberto Muzi the system administrators of
the IASI istitute. They really know everything! When I was demotivated by
the difficulties arised, they ever have the rigth way to the solution or at last
some idiot sentence that rise me up definitly.
Special tanks to Carlo Gaibisso, without him I couldn’t be there to work,
and maybe I will do nothing about computer now (just don’t sleep to install
some linux on some old machine). He also supproted me in many ways and
tolerate my presence in his room (not an easy task I assure you!). Thanks
5
to Lukasz Polansky, now working as a network admin at the CNR central
building, who starts with me the hydra installation.
Thanks to Angelika Wiegele an informatic researcher who tested the hydra cluster and helped me to debug all the hydra scripts.
Many other people were involved, sharing with me their knowledge, some
of them I will never know directly, but I read a lot of their free documentations!
Thanks to all the openMosix project, we’re enjoing it!
Thanks to ienazeta.
6
Introduction
This document describes the setting up of the hydra cluster at the IASI-CNR
institute (Istituto di Analisi dei Sistemi ed Informatica).
In the first chapter there is a short description of the cluster and an
overview on the main features of openMosix.
The second chapter deals about the kind of installation I have performed
on hydra.
The third chapter would be a short document about how to install openMosix, furthermore it contains some detailed information about the hydraopenMosix kernels.
The fourth chapter deals with the scripts I wrote: from the shortest ones
for basic adminstrative task to the longer (not to much at least) one to submit
jobs on hydra.
In the last Chapter there is a useful overview on the debian-bootcd package. I described in detail how I have created the hydra-bootcd live CDs that
allow the administrator (me!!) to set up an hydra node in a quick and safe
way.
The Appendix are mainly a collection of README files of the above cited
scripts and report some full scripts too.
As part of this documentation there are three CDs:
1. hydrabootcd: the live CD for slave nodes
2. hydrabootcd-M: the live CD for master nodes
3. thdp: the CD containing this document with all the scripts, the kernels
and anything else cited in the following.
7
Chapter 1
The hydra cluster
hydra is the openMosix cluster set at the IASI-CNR istitute. It was built
with the aim of doing high performance calculation (HPC). hydra si made up
of 16 identical nodes, connected by a 1Gigabit ethernet switch. Each node
is equipped with P4-3.6Ghz processor and 2G of Ram. Here is the result of
the command cat /proc/cpuinfo performed on hydra01, the first node of the
cluster:
processor
:
vendor_id
:
cpu family
:
model
:
model name
:
stepping
:
cpu MHz
:
cache size
:
fdiv_bug
:
hlt_bug
:
f00f_bug
:
coma_bug
:
fpu
:
fpu_exception
:
cpuid level
:
wp
:
flags
:
apic sep mtrr pge
mmx fxsr sse sse2
cid
bogomips
:
0
GenuineIntel
15
4
Intel(R) Pentium(R) 4 CPU 3.60GHz
1
3598.423
1024 KB
no
no
no
no
yes
yes
5
yes
fpu vme de pse tsc msr pae mce cx8
mca cmov pat pse36 clflush dts acpi
ss ht tm pbe pni monitor ds_cpl est
7182.74
8
And of cat /proc/meminfo
total:
used:
free: shared: buffers: cached:
Mem: 2113789952 634724352 1479065600 0 36380672 273498112
Swap: 2771877888
0 2771877888
MemTotal:
2064248 kB
MemFree:
1444400 kB
MemShared:
0 kB
Buffers:
35528 kB
Cached:
267088 kB
SwapCached:
0 kB
Active:
1412 kB
Inactive:
403168 kB
HighTotal:
1179328 kB
HighFree:
808636 kB
LowTotal:
884920 kB
LowFree:
635764 kB
SwapTotal:
2706912 kB
SwapFree:
2706912 kB
Committed_AS:
12288 kB
1.1
Topology
It’s only a joke, the following figure (1.1) shows the hydra topology :).
1.2
Operating System
We choosed to install debian GNU/Linux as the operating system for all the
clusters’s nodes. When I was setting up the cluster, the last stable debian
version was debian Sarge 3.1. Therefore hydra is equipped with Sarge 3.1 .
Chapter [2] deals with the detailed information about the installed debian
system.
1.3
Short overview on openMosix
There are many ways to turn dozens of pc into a hpc cluster and also a lot of
books dealing with this matter 1 . One of this way is openMosix, it can be a
Beouwulf cluster, as stated by Robert G. Brown [2]. But what is openMosix
1
above all I would like to cite engineering a Beowoulf Cluster ([2]).
9
1Gigabit Switch
04
05
03
02
01
16
Figure 1.1: hydra topology
and how does it work? The best way to understand openMosix features is
to read them directly from Dr.Moshe Bar, it’s main creator ([3]).
”openMosix is a kernel extension for single-system image clustering. openMosix is a tool for Unix-like kernel, such as Linux, consisting of adaptive
resource sharing algorithms. It allows multiple uniprocessor (UP) and symmetric multiprocessor (SMP) nodes running the same kernel to work in close
cooperation. The openMosix resource sharing algorithms are designed to respond on-line variations in the resource usage among nodes. This is achieved
by migrating processes from one node to another, preemptively and transparently ... . The standard runtime environment of openMoisx is a computer
cluster, in which the cluster-wide resources are available to each node.”
Therefore openMosix turns our 16 nodes into a single-system image cluster,
that is it trying to make all nodes share their resources, working as if they
were a single-system. Moreover openMosix is implemented at the kernel level,
it is a linux-kernel patch.
It is very important to underline the main difference between mosix and the
other software for hpc clustering. PVM and MPI, the mostly used software,
are both library for parallel programming, so they works only with programs
written ad-hoc. The programmer write the code in parallel mode, so that
it can be distribuited trought the cluster. More the nodes on which the
program run, less the running time, if the code is well formatted!!. Write
10
parallel codes can be quite complex, you may need many time to reorganize
your code to make it work on parallel machine, but the result can be very
powerfull. openMosix is different. It manages the processes running on a
system and it is not designed for parallel programming. ”When the requirements for resource of a given proecess exceed some threshold level, then some
processes may be migrated to other nodes to take advantage of avaliable remote resource ([3]).”. The openMosix creator assert that the inter processes
comunication (IPC) gain performance in conjuction with openMosix. This
will lead to a gain in performance using MPI/PVM library.
1.3.1
Migration
”Each process has is unique home node (UHN) where it was created. openMosix divides the migrating processes in two context: the system context,
called the deputy and the user context, called the remote. The user context
contains the program code, stack, data, memory-maps and register of the process; the remote encapsulate the process when it is running in the user level.
The system context, called the deputy, contains a description of the resources
that the process is attached to and the kernel-stack for execution of system
code on behalf of the process. The deputy encapsulates the process when it is
running in the kernel, it holds the site dependent part of the process, it must
remain in the UHN. The interfaces between the deputy and the remote is well
defined, so it is possible to intercept every interaction between these contexts
and forwarding it across the network.”
If a process overcome the resource of the node where it is actually running,
the remote and part of it’s memory pages migrats to another node. When
the remote needs to execute a system call, it tries first to execute it locally,
if it doesn’t work, contact the deputy that peforms the requested operation
in the UHN.
By now, openMosix doesn’t migrate threads, we are all waiting for this
new promised feature.
1.3.2
openMosix usage
Suppose that we have to solve one computational problems, we would like
to solve it as soon as possible. The best way to do this is to separate our
problem in N subproblems. If these subproblems are strictly dependent than
we must use the MPI-like technology, as we need intercomunication between
these N processes. Otherwise if the subprocesses are losely dependent then
we can use the fork() system call and run them indipendently. The latter
situation is perfect for openMosix: when a process fork then another process
11
is created and openMosix can manage it. Many processes are running instead
of one and openMosix takes care of load balancing them. The processes
will be spread over the nodes and many processes will run simultaneously,
reducing the runnig time. One of the most interesting features (for me) of
openMosix is that there is no master-slave relationship among nodes. It
means that each node can be simultaneously the UHN of some processes
and the remote for some other. Moreover on an openMosix cluster you can
login and run processes on each node, distributing all the load, not only the
intensive calculation but each kind of work.
1.3.3
openMosix and Hyperthreading
In order to have an HPC cluster it is necessary to disable the hypertrading
feature of the PIV. Dual core processors are not suitable for our scope. In
fact, by definition of HPC we would have CPU always running on a single
thread. We have hpc computing in the limit:
F P U time
≥1
Clock
where FPU indicate the Floating Point (Unit) register/s. With a dual core
processor, the system can switch beetween threads the control of the FPU,
this could be great for everday applications that spend many time whitout
using the CPU but would have the opposite effect in the hpc case. We would
have the maximum power on a single process, to minimize the single thread
execution time and not the overall applications time (see also [7]).
12
Chapter 2
Operating System
This Chapter focus over the operating system installation details.
2.1
Architecture of the Cluster
As we have already told, there is no master-slave relationship between openMosix nodes. Despite this, we choosed to divide our nodes in two categories:
we have four masters and twelve slaves.
To explain our choice is very simple. openMosix granularity are processes
and each processes is divided in two parts: deputy and remote; the first
resides on the UHN and the second can migrate. Consider to start a process
on node 3, the remote part will migrate on a remote node, reducing the load
but the deputy part is still running on the node, wasting cpu time. Starting
many jobs, will end with the node 3 overloaded by the deputy parts of each
job.
The context switching happens frequently, because each deputy must talk
to his remote, so it must gain the cpu control even though for little time. If too
many processes are running, each process must wait before to be scheduled,
this cause a delay in the running time and a decrease in performance.
The best way to use 16 computers with openMosix is probabily to allow
users to access directly the most free node, and run his/her jobs on that. This
will be possible but results in many works for the users, who have to keep
track of the used node. Alternatively you can use an appropriate sofware
layer that manage the accounts and the job submissing. Such a software
exists, but they are not free or not suitables for ours scopes. We found that
qsub is more complex and heavy that the solutions we took.
The idea is to allow login only to four nodes, those are the UHNs of
the cluster. In that way you have one master every four slaves; it is better
13
that have only one computer that manage all the deputy and it is easier
to distribuite the users over 4 nodes. We choosed to leave to the users
the works of keep track of their works, this simply result in a division of
the masters between the different research groups: when a user choose one
master, more often will use only this. Therefore you only have to optimize
the first distribution of the users trought the masters.
The problem then become the overload of the masters. This is overcamed
with a simple home-made queue system: hydra-queue ([4.2]), see the cited
section for detail.
Moreover in this way we have many facilities:
• We need to make visible only four nodes to LAN, this is achieved by
natting the four master via hydra01, that have two ethernet cards.
• We have to configure software only on 4 PC, the others nodes are
equipped with a basic installation.
2.2
Basic Operating System
The non-masters (slaves1 ) hydra nodes are installed with the base debian
system. This means that there are only the basic packages. When installing
debian sarge, after finishing the base installation, you will reach a screen
displaying a list of grouped packages to chose from; such as Desktop packages
or web server, database server, mail server ecc.. . You must leave this screen
with all packages deselected.
2.3
Operating System of the master nodes
Each master must have some other packages installed, than the base system
described above. I will report the script that performs the various steps
to complete the masters installation, starting from a ready slave node (i.e.
starting from a base debian system). I’ll suggest2 not to use this script in
one task, as it performs many critical operation so it’s better to divide it into
pieces or to give each command manually.
# cfdisk (see below or Master.partition)
# reboot
1
I would emphasize that the openMosix architecture does not divide the nodes in this
two category. See section [1.3]
2
Remember to see the section on bootcd, if you can install the system using the hydrabootcd you will save many time.
14
#
#
#
#
#
#
echo "make filesystem ext2 on hda2, hda3"
mkfs.ext2 /dev/hda3
mkfs.ext2 /dev/hda4
echo "make directory /hydrahome /TMP"
mkdir -p /hydrahome
mkdir -p /TMP
# echo "creating fstab"
# echo "# /etc/fstab: static file system information.
# #
# <file system><mount point><type><options><dump> <pass>
# proc
/proc
proc
defaults
0
0
# /dev/hda1
/
reiserfs notail
0
1
# /dev/hda2
none
swap
sw
0
0
# /dev/hda3
/hydrahome ext2
defaults,usrquota 1
# /dev/hda4
/TMP
ext2
defaults,usrquota 1
#" > /etc/fstab
1
1
# echo "mount all"
# mount -a
In the first two steps above we create the two partitions to store users
data. The two partition are then mounted. The /hydrahome directory stores
users home while TMP is thought for intensive I/O simulation. Next we
create the home directorys tree, as it is on our fileserver, so that the NIS
works properly, then we link them against the real partition mounted on
/hydrahome.
#
#
#
#
echo "creating home2,3,4 and linking to /hydrahome"
mkdir /home2
mkdir /home3
mkdir /home4
#
#
#
#
#
#
#
#
#
ln -s /hydrahome/ /home2/users
ln -s /hydrahome/ /home3/users
ln -s /hydrahome/ /home4/users
link also /home/users
ln -s /hydrahome/ /home/users
show it
ls -l /home/users
ls -l /home2/users
ls -l /home3/users
15
Now we performs the last step, setting up the directory tree for hydraqueue (see [4.2]).
#
#
#
#
#
#
echo "setting up hydraqueue"
groupadd hydrausers
mkdir /var/hydraQueue
mkdir /var/hydraQueue/users
mkdir /var/hydraQueue/Launched
mkdir /var/hydraQueue/Errors
By now we have completed the basic master set up. The machine is not
ready to be openmosix-hydra-master, There are few more things to do such
as:
• install openmosix and openmosix-applications
• copy all the hydra-scripts to the new master
• copy hydra-queue to the new master
• copy some other files
The installation of openmosixview on all the masters it is not really
needed, moreover all about openmosix and hydra is the matter of the chapter
3.
The files we need to copy are mainly the dsh list of machines, the XF86config
file the hosts file and so on. You will find the complete list of that operations
in the Appendix [A.1.2].
Remember to setting up the NIS application, adding the ypserver in the
/etc/yp.conf file and setting the right domain name (iasi.rm.cnr.it) on the
new node.
The set master node.sh script described in this section is in appendix A.1.
16
Chapter 3
Openmosix on Debian
In the first chapter [1.3] we have seen that openMosix is a linux-kernel
patch, therefore it is needed to compile and patch the kernel. The latest
stable version of openMosix is for the 2.4.26 kernel series, this kernel it’s
not avalaible as a debian package so you have to download it directly from
http://ww.kernel.org. Moreover we need to download the openMosix-2.4.26
patch and the latest openmosix-tools-1.5 1 from www.openmosix.org.
For further information on the installation procedure, please read the official
openMosix Howto ([4]).
3.1
Kernel compilation
In the following I briefly show how I have compiled the hydra kernel. The
kernel configuration file (.config) is in the appendix (Appendix [B.1]).
I suppose you have downloaded the kernel and already unzipped it under
/usr/src/linux-2.4.26 . Next step is to create the following links:
#cd /usr/src
#ln -s linux-2.4.26 linux
#ln -s linux-2.4.26 linux-openmosix
Then it is necessary to copy the openMosix patch (openMosix-2.4.261.bz2) in the /usr/src/linux directory, then enter the directory and patch
the kernel: 2
#bzcat openMosix-2.4.26-1.bz2 | patch -Np1
1
a set of standard tools to manage the cluster
if you haven’t bzcat installed, simply bunzip the patch and then issue the command
with ”cat” replacing ”bzcat”
2
17
Now we can start to edit the configuration file, this is done with the
ncurses interface:
#make mrproper (clean the tree, also delete .config)
#make menuconfig (this invokes the ncurses interface)
Now you are in the kernel configuration menu. I left to the default value
the openMosix features.
• Select the P4 processor in the Processor type and features menu.
• To use iptables many features have to be selected, you can find all them
in the appendix (Appendix [B.1.1]).
• Select the quota filsystem (fs support)
• Select all 3com ethernet devices (Network devices,ethernet 10-100)
• Select Marvell Youkon (Network devices,ethernet 1000) this is the Gigabit hydra device.
Those are the mandatory selections for hydra, then I tried to include many
other useful things, reading them from the 2.4.27 kernel configuration which
cames with the debian system, you can find it on all the debian installation,
under /boot/config-2.4.27.
Now save & exit.
Since we are using Debian/GNU Linux distribution, we have to compile
the kernel in the debian way with the make-kpkg tool 3 . Issue the command:
#make-kpkg clean
#make-kpkg --initrd --add-to-version="hydra" --revision="1"
kernel_image
This command will create the kernel-image-2.4.26hydra 1 .deb file in the
/usr/src directory. The ”–add-to-version” and ”–version=1” are not mandatory, but they are very useful to distinguish kernel directory and kernelmodules directory, that will be created by make-kpkg. To uderstand this
features deeper, please refer to the make-kpkg manual pages.
Now you can simply install it:
#dpkg -i kernel-image-2.4.26hydra_1_.deb
3
make-kpkg is part of the kernel-package package, you can use apt-get to install it.
18
3.2
Openmosix tools
Usually, when I install a program from the source code I usually put it under
/usr/local/src. So I suggest you to move there the openmosix-tools zipped
file, that you have previously downloaded. Then unzip the file and enter the
new created directory. It is better to read first the README and INSTALL
files and then issue the command:
#./configure
#make
#make install
This will install a set of very useful tools that I will describe later. Try
to see if the installation was succesful running a script such as mosctl.
#mosctl isup [node_number]
The answer should be no, since we haven’t yet rebooted the computer
into the new kernel. Then you can ensure that the file /eec/init.d/openmosix
exsist. You can also try to start it, you will end up with an error, it will say
that this is not (yet) an openMosix system.
3.3
Editing Configuration files
Before restarting the system with openMosix you have to edit the configuration file: /etc/openmosix.map, that must be the same on each node4 . There
are two ways to write this file, I will report only the one I used, see the
openMoisx Howto (Chapter 4, [4]) for details. My openmosix.map file look
like that:
node-id
1
2
3
..
16
IP-address
192.168.1.1
192.168.1.2
192.168.1.3
..
192.168.1.16
range
1
1
1
1
1
Make sure you have the same openmosix.map file on each node!
4
The config files must be the same on the master and slave nodes
19
3.4
Start openMosix
Reboot your computer into the new kernel. Start openmosix:
#/etc/init.d/openmosix start
or
#setpe -w -f /etc/openmosix.map
this force the reading of the configuration file
try mosmon:
#mosmon
It is a cluster load viewer, supports many options, see the man page for
details.
3.5
Openmosixview
I have found many difficulties to install this tool correctly, I’m still wondering
why. After a while, I finally got an installation method. My problem was
that: when I tried to compile it on my debian system I needed to install
many library, and those library brought with them the newest libc6, as I was
costrained to change apt-get to point on the unstable repository. This at last
caused a lot of problem and above all the impossibility to use the binary
executable on the other nodes.
I haven’t find the reason for the above behaviour, but after many different
attempt I was able to solve the problem whitout doing noting strange.
First we need to download openmosixview-1.5 from www.openmosix.org,
then move it to /usr/local/src and unzip it.
In order to install openmosixview, you must assure yourself to have the qt
library (2.0 < version < 4.0) 5 . In a debian system this means that you have
to install many differents packages plus the corresponding devel packages.
(See also Appendix [A.2]) If you have already installed the masters packages
(Appendix [A.1]) as described in chapter one (2.3) then you only need to
install the following with the apt-get install package command:
• libqt3c102-mt (4 packages will be installed)
• libqt3-mt-dev (many packages will be installed)
5
in the 4th release, the latest when I wrote this document, there are diffrente header
files.
20
• libqt3-compact-header
Then you must link them against what openmosixview’s Makefile think:
#ln -s /usr/lib/qt3 /usr/lib/qt
And you also have to export the QTDIR variable. In a bash environment
you ca do it issuing the following commands.
# export QTDIR=/usr/share/qt3
The QTDIR is the installation directory of the qt packages. You can check
it with the command: dpkg -S qt.
Once you have prepared your system, compile openmosixview is straightforward. Go to the openmosixview source directory and (after reading the
README and INSTALL files) type: ./setup. This will work (I hope)!.
If make ends with some errors, check the errors, if the compiler can’t find
some qstuff.h files then something goes wrong with the qt installation. Try
to checkout the openMosix Howto ([4]).
Of course you need to compile it only once, then you can copy directly
the executalbe files on the other masters. On hydra01 to find the executables
I issued the following command (after looking the makefile to be sure of the
destination directory of the executalbles):
hydra01:/usr/local/src/openmosixview-1.5# ls -l /usr/bin/openmosix*
-rwxr-xr-x 1 root root 5065962 2006-04-04 14:20 /usr/bin/openmosixanalyzer
-rwxr-xr-x 1 root root 419853 2006-04-04 14:20 /usr/bin/openmosixcollector
-rwxr-xr-x 1 root root 2067695 2006-04-04 14:20 /usr/bin/openmosixhistory
-rwxr-xr-x 1 root root 3081215 2006-04-04 14:20 /usr/bin/openmosixmigmon
-rwxr-xr-x 1 root root 1997025 2006-04-04 14:20 /usr/bin/openmosixpidlog
-rwxr-xr-x 1 root root 1274782 2006-04-04 14:20 /usr/bin/openmosixprocs
-rwxr-xr-x 1 root root 2460917 2006-04-04 14:20 /usr/bin/openmosixview
hydra01:/usr/local/src/openmosixview-1.5#
To assure the complete openmosixview functionalitys you must set correctly the master node where it runs:
• ssh-passwordless: the node that runs openmosixview should be access
the other nodes via ssh without typing password (see first 4 and later,
for the complete documentation, appendix A.3).
• Xserver: to import Xsession from the other nodes, make sure to disallow
the option no-listen-tcp that is the deafult for the debian system. Edit
the file /etc/X11/xinit/xserverrc and remove the –no-listen-tcp option,
else your X server does’t accept any external comunication.
21
Chapter 4
hydra scripts
During The setting up of the hydra cluster I wrote many script, some very
shorts and stupids, others longs and usefuls (to me). In this chapter I review
most of them in order to specify their utilization on the cluster. The shortes
scripts, made up of only one file are called hydra-script and are on the thdp
CD-Rom and under the OpenMosix-hydra directory on hydra01. The longer
scripts, made up of more than one file, are: hydra-queue, hydra-chpox and
hydrabootcd, the former is described in the chapter 5.
4.1
One file bash script
In order to automatize some boring operation I wrote some bash scripts.
Almost all the scripts runned without arguments gives a brief usage synopsis. Furthermore many scripts have it’s own README.scriptname file,
which is under hydra-script/doc/ directory. In Appendix [D] there were all
the readme files.
Once again the more suitable way to see the overall scripts it’s to perform
a command directly on hydra01:
ls -1 * /root/OpenMosix-hydra/hydra-script/
addMosixUser.sh
copy_to_some_node.sh
delMosixUser.sh
hydraps.sh
hydrasync.sh
iptables_hydra.sh
isup.sh
mosctl_all.sh
22
quota.sh
README
up_down_node.sh
doc:
Hydra_banner
iptables.txt.sample
README.addMosixUser
README.quota
README.sshBanner
README.sync
sources.list
install_via_repos:
install_mosix.sh
master_update.sh
Starting from the end of the output, the two scripts install mosix.sh and
master update.sh are old versions, referring on the first settings of hydra,
when there was a local debian repository on hydra01. Nevertheless master update.sh is very useful, you can run it on hydra01 in the following way:
# sh master_update.sh scp
This will copy the hydra01 RSA key to the node number you interactively
pass to the command.
This resolve definitely the problem of setting up ssh-passwordless, needed by
openmosixview (see 3.5) .
The most useful script is addMosixUser. I would like to add users simultaneously to the four masters of hydra’s cluster. So I wrote down this
simple script to accomplish the task (many difficulties arised because we
have a centralised NIS service for the accounting). addMosixUser.sh collect some infomations about the new user from standard output and then
uses dsh in conjunction with useradd, passwd and setquota. In the file
README.addMosixUser there are all the necessary informations about the
script functions and usage (Appendix [D]).
I needed to modify the default quota scripts, because of the old kernel
version I run. See the README.quota for detailed information.
One important features of hydra01, the natting of the other three masters,
is achieved via the iptables hydra.sh script. You can put it directly under
/etc/init.d and start it on boot.
23
hydraps.sh performs a ps command on the node passed as the first argument, for the program name passed as the second argument, giving also the
number of total processes running. I use this command also via web interface,
on the hydraWiki site. I’m very unhappy that this site is browsable only on
the IASI LAN, maybe in the future will be accesible to all the internet.
up down node.sh permits to ”start—stop—halt” the nodes you interactvely enter on demand.
Many of those scripts are minded to run on hydra01, with ssh configured
to works without passwords. This is why I started this section dealing with
master update.sh.
All the scripts are not executables, I prefear to run them with sh. All
the script are implemented to be stupid so read the README.scriptname
informations before run them, you can stop them typing ctrl-C but you may
loose the control on the resulting operation. In order to minimize the risk
most of them ask you to interactively input some infos and ask you for
confirmation before proceding further. Keep in mind that they are definitely
not safe!
4.2
hydra-queue
To simplify user’s life I have created a very simple queue program: hydraqueuectrl.sh. It runs in background, on each master node, controlling the processes running on the master node and starting user’s jobs.
To run a job, on the hydra mighty cluster, you must use the appropriate
command: hydrarun.sh.
# hydrarun.sh myqueue.list
hydrarun accept only one argument that is your personal queue file. In
that file you have to put a list of executable programs, one for each line. Suppose you have to run ten times a program called spremi that resides in your
home directory and you want to redirect the output to the file spremiout.txt
under the ”result” directory. So your myqueue.list file should be like this:
--begin of spremiqueue.list
~/spremi > ~/result/spremiout1.txt &
~/spremi > ~/result/spremiout2.txt &
~/spremi > ~/result/spremiout3.txt &
... ..... ......
~/spremi > ~/result/spremiout10.txt &
--eof
24
Therefore to run your spremi jobs just type:
#hydrarun.sh spremiqueue.list
Every fixed time hydraqueuectrl.sh check the number of processes running
for each user and create a list of users, starting from the one that uses less
resources. If the whole numer of processes running is less then 100 1 it
starts few processes for each user in the users list. Then stores the launched
processes in a file under the directory /var/hydraQueue. The user can view
the file using the command hyQrun.sh. Furthermore an error.hydraQueue
file is generated in the $HOME directory of the user after the submission of
his/her jobs. If error.hydraQueue is an empty file, then no errors occured,
otherwise the error given by the system are reported. Every operation done
by hydraqueuectrl.sh is logged.
There are other two commands: hyQmyqueue.sh to see the command still
in queue and hyQlog.sh, mainly for the administrator, to see the log file of
hydraqueuectrl.sh.
I was nearly to forget the most beautiful part of hydra-queue program:
myclean.sh. This amazing script kill each process that are launched without
hydrarun.sh, generating a log.Killed file.
myclean.sh can distinguish the programs launched with hydrarun.sh with
this trick: hydrarun.sh export the variable MY HYDRA RUN so that it is
visible in the environment of each process under the /proc/#PID directory.
Later on this trick has revealed very useful to ibernate he running processes
with chpox, see below section 4.4.2
The detailed description of how each script works is in Appendix [D].
4.3
Ups and power failure
One of the worst features of openMosix is that:
if the UHN dies the process die,
if the remote node die the process die.
To minimize the power failure events, hydra has been fournished with an UPS
system. One UPS is connected to hydra01 and is monitored by apcupsd, a
daemon for the APC-UPS system.
1
I choseed this number arbitrary, on the base of qualitative observation of the cluster
performance.
25
4.3.1
apcupsd
After searching for a while on the net I found this wonderful tool, completly
free and opensource. Debian have it’s own port of this program, so the
installation is quite simple:
#apt-get install apcupsd apcupsd-cgi apcupsd-doc
This will install apcupsd, the web interface for monitoring the UPS and
the full documentation. The needed packages are libsnmp4 and libsnmp-base,
apt will resolve those dependencies.
4.3.2
Apcupsd on hydra
The documentation is very extensive and exhaustive, but very long :). Try to
follow the instruction I have reported below, if something goes wrong, refer
to the user manual, installed under /usr/share/doc/apcupsd.
First connect one UPS to hydra01 via the eth-usb cable (called usb cable).
Then check if the kernel have recognized the device. The first time I have
connected hydra01 to the UPS it did not work, because my kernel haven’t
USB devices correctly configured 2 . A typical USB section of a .config file
might be:
CONFIG_USB_DEBUG=y
CONFIG_USB_DEVICEFS=y
CONFIG_USB_HIDINPUT=y
CONFIG_USB_HIDDEV=y
Once your kernel is properly configured you can issue the command:
# cat /proc/bus/usb/devices
T:
D:
P:
S:
S:
S:
C:*
I:
E:
2
Bus=02 Lev=01 Prnt=01 Port=01 Cnt=01 Dev#= 2 Spd=1.5 MxCh= 0
Ver= 1.10 Cls=00(>ifc ) Sub=00 Prot=00 MxPS= 8 #Cfgs= 1
Vendor=051d ProdID=0002 Rev= 1.06
Manufacturer=American Power Conversion
Product=Back-UPS RS 1500 FW:8.g9 .I USB FW:g9
SerialNumber=JB0526051344
#Ifs= 1 Cfg#= 1 Atr=a0 MxPwr= 24mA
If#= 0 Alt= 0 #EPs= 1 Cls=03(HID ) Sub=00 Prot=00 Driver=hid
Ad=81(I) Atr=03(Int.) MxPS=
6 Ivl=10ms
So I nedeed to compile the kernel one more time uuuhh! see Appendix [D.6]
26
There are two important things in the above output: Manufacturer should
be correctly set as APC (4-th line) and Driver must be set as hid (second-last
line, last word). If Driver is set to none, you don’t have hid driver loaded (in
the latter case see the apcupsd user manual, appendix D.6).
If you have experienced no troubles let’s go over to configure the daemon.
You have to edit the file /etc/init.d/apcupsd.conf and set the followings
variables:
• UPSCABLE usb
• UPSTYPE usb
• DEVICE /dev/usb/hiddev0 (according to the user manual you should
leave DEVICE blank; for me it doesn’t work so I explicited the device
name: /dev/usb/hiddev0. )
Now you will be able to contact your UPS. Start the daemon with
/etc/init.d/apcupsd start. If it can’t talk with the UPS it die shortly, check
the runnig process or the log files: /var/log/apcupsd.events. If it run correctly
issue the command: apcaccess. The result should be a long list of UPS
features like that:
APC
:
DATE
:
HOSTNAME :
RELEASE :
VERSION :
UPSNAME :
CABLE
:
MODEL
:
UPSMODE :
STARTTIME:
STATUS
:
LINEV
:
LOADPCT :
BCHARGE :
TIMELEFT :
MBATTCHG :
MINTIMEL :
MAXTIME :
LOTRANS :
HITRANS :
001,035,0910
Tue May 23 17:51:23 CEST 2006
hydra01
3.10.17
3.10.17 (18 March 2005) debian
hydra01
USB Cable
Back-UPS RS 1500
Stand Alone
Thu May 18 15:28:17 CEST 2006
BOOST ONLINE
204.0 Volts
75.0 Percent Load Capacity
100.0 Percent
6.1 Minutes
5 Percent
3 Minutes
0 Seconds
194.0 Volts
264.0 Volts
27
ALARMDEL :
BATTV
:
NUMXFERS :
XONBATT :
TONBATT :
CUMONBATT:
XOFFBATT :
SELFTEST :
STATFLAG :
MANDATE :
SERIALNO :
BATTDATE :
NOMBATTV :
FIRMWARE :
APCMODEL :
END APC :
Always
26.8 Volts
8
Tue May 23 07:24:12 CEST 2006
0 seconds
45 seconds
Tue May 23 07:24:18 CEST 2006
NO
0x0200000C Status Flag
2005-06-27
JB0526051344
2001-09-25
24.0
.g9 .I USB FW:g9
Back-UPS RS 1500
Tue May 23 17:51:38 CEST 2006
If the command ends with a shorter list, be aware that something is going
wrong, probabily with the DEVICE settings in the file /etc/init.d/apcupsd.conf
described above. Try changing the settings and read the full documentation.
4.4
chpox
What appens if the power failure lasts more then the UPS’s battery? A
disaster.
Thanks to Olexander Sudakov and Eugeniy Meshcheryakov we have a
program that transparently dumps the state of specified process (or process
group) into a disk file. The processes may be restarted from that file at
the point they were dumped. For now it supports: virtual memory, CPU
& FPU registers, regular files, terminal state, current directory, pipes, Unix
sockets, and multiple non-interacting processes. CHeckPOinting for linuX,
CHPOX, provides Checkpointing for openMosix. CHPOX works as kernel
module.
apcupsd is able to detect the powerfailure and, when the battery level
is under a threshold, it starts the shutdown. I have modified apcupsd.conf
to run hchpoxmain instead of the shutdown. The first modification consist
only on this: edit the file /etc/apcupsd/apcupsd.conf and change the variable
SHUTDOWN=/sbin/shutdown to the new value:
SHUTDOWN=/sbin/hchpoxmain.
In the following we will see first how to install and configure correctly chpox
and then how hchpoxmain works
28
Assuming that you have your kernel already patched with the openMosix patch, you have to install with apt-get the following two packages:
chpox 0.7.1-1 i386.deb and chpox-source 0.7.1-1 all.deb, which provides the
source for the kernel modules. The second is a source package and you
have to compile it, referring to the inside README file. Change to the
/usr/src/modules/chpox/ directory and build as the README file instructs
using ”make; make install”. This will build and install a module specific to
the system you are building on and is not under control of the packaging
system.
!!!WARNING: Compile CHPOX with the same compiler the kernel was
compiled. !!!WARNING: Recompile CHPOX after recompiling kernel 3
I decided to recompile the kernel (You may have understood that at
last I like very much to compile the damned linux kernel) but it is really
not needed. The real problem is that I have removed the linux source. I
would emphasize that this is not the correct procedure, it’s a blood but it
works, read the instruction in the README.Debian to perform the right
installation. I performed the following:
make
make
make
make
menuconfig
dep
bzImage
modules_install
the above lines installed the new module
founded, created by the compilation of chpox,
under the directory:
/lib/modules/2.4.26-om1/misc/chpox_mod.o
Then I copied it to the directory /misc under
the current kernel modules directory:
/lib/modules/2.4.26-om1hydra/misc/chpox_mod.o
I must create the misc directory.
depmod -ae
modprobe chpox_mod
Once you have the kernel module ready, you can copy it to all the masters,
in the correct location cited above and then on each master repeat the two
last command line to insert the module in the running kernel. You still have
to install the chpox-debian-package on all the master, but not the chpoxsource-package.
3
http://www.cluster.kiev.ua/tasks/chpx eng.html
29
4.4.1
Basic Usage
In this section I’ll report briefly the typical chpox usage, see also
http://www.openmosixview.com/chpox/ by Matt Rechenburg.
Suppose you have a running process called polimero-AkT-0.59. Issue the
command:
ps ax —grep polimero-AkT-0.5
Look at the PID of the process. Then to chpox the process:
chpoxctl add 32707 31 1 /tmp/proc-dump
To verify that the process is chpoxed:
cat /proc/chpox/info
But we have to add the library needed by the process, so:
ldd ./polimero-AkT-0.59
This command will produce a list of library, to add them just type:
chpoxctl addlib /lib/libm.so.6
chpoxctl addlib /lib/libc.so.6
chpoxctl addlib /lib/ld-linux.so.2
To verify the library added:
chpoxctl listlibs
Now to really dump the process we have to send a SIGHUP to the process:
kill -31 32707
Check the result with (and find the difference between this and the previuos
time we issued this command):
cat /proc/chpox/info
Now we try to kill the process and the restore it:
kill 32707
Gasp!!! Now restore it:
ld-chpox /tmp/proc-dump&
Have been restarted?
ps ax —grep polimero-AkT-0.5
4.4.2
hchpox
This script is invoked by hchpoxmain. It performs a look up of the active processes launched with hydrarun (searching in /proc directory for the processes
that have the environment variable MY HYDRA RUN set) and ibernate all
them with chpox ; after finishing the ibernation it starts the shutdown. I have
to shutdown many nodes, to do this I find more easy to write the hchpoxmain script that runs only on hydra01. It is so short that is faster to show
30
it directly:
#!/bin/bash
CHPOX="/sbin/hchpox"
MASTERS="masters" #hyra01,02,03,04
NODES="masters"
#all but hydra01
#run hchpox on the four masters
#hchpox will iberante all the runnig
#processes started with hydrarun
dsh -g $MASTERS "$CHPOX"
dsh -g $NODES "shutdown -h 5 &" #five minuts
shutdown -h 8
#we need the time to stop it
As you can see the key is that I can start all the hchpox and so all the
ibernation on each master simultaneously. Then I can shutdown all the other
nodes and finally hydra01.
The great feature of hchpox is taht only the processes started with hydrarun will be chpoxed (see Chapter 4.2). This is very nice!
31
Chapter 5
Debian Bootcd
Bootcd is a debian package, useful for create bootable cd from a running
system; the software description, from the debian site is:
Package: bootcd (2.48)
run your system from cd without need for disks
Build an image of your running Debian System with the
command bootcdwrite. You can also build a bootcd ISO image
via NFS on a remote System.
When you run your system from CD you do not need any disks.
All changes will be done in ram. To reuse this changes at
next boot time you can save them on FLOPPY with the command
bootcdflopcp. If booting from your CD-drive is not supported,
booting from FLOPPY is possible.
It is possible to install a new system from the running CD
with the command bootcd2disk.
Bootcd2disk can also find a target disk, format it and make
it bootable automatically. Bootcd also supports initrd root
fs, devfs, transparent-compression ISO 9660 fs and
syslinux/isolinux.
5.1
Set up an hydra’s node
In order to make easy the set up of an hydra node, I built a bootable cd
that can be installed on the hard disk. To accomplish this task I used debian
bootcd(2.48).
The main script of the bootcd package is bootcdwrite that performs the
creation of the cdrom starting from a running debian system.
32
My first problem was that hydra’s nodes doesn’t have any cdrom or floppy
so the bootable cdrom I will create must boot from an external usb dvdrom.
The kernel-image-om1hydra ([Chapter 1], [Appendix B.2]) that I built does
not support it statically, so it’s impossible to use it to make a bootable linux
system on an external usb device.
As I was compiling a new kernel with IDE,SCSI,USB features, static
compiled in, I decided to use the 2.4.27 stable debian kernel and not the
2.4.26 openmosix patched one. The reason is that I found it more fast and
simple, otherwise there is no reason to use the openmosix-kernel for the
bootable cd.
It seems better to me to have one kernel for the cd and one for openmosix. Thus I set up hydra04 with the base debian system, then I installed
the openmosix-kernel (Chapter [1], Appendix [B.2]) and the bootcd package.
After that i built the new kernel for the hydra-bootcd and I decided to remove the default 2.4.27 kernel that came with debian (maybe three different
kernels are to much).
In the following sections you can find the detailed description of how to
make the bootable cd with the bootcd package.
5.2
Compiling the Kernel
As stated above I needed to compile the kernel to create the hydra-live cd.
In order to boot properly from an usb-dvd device, my bootcd kernel must
had IDE, SCSI and USB features built in statically.
In the appendix you will find the complete .config (Appendix [B.2]) file
for hydra-bootcd kernel. Once that the configuration file is written, a kernel compilation is needed, for which task you must have the kernel-package
installed on your debian system. I assume that you are in the right condition, then change to the kernel source directory (/usr/src/linux) and issue
the command:
# make-kpkg --revision=1 --append-to-version="-bootcd"
--initrd kernel_image
I appended some string to the kernel name (”–revision”,”–append-to-version”),
see the manual page from make-kpkg to understand them. Furthermore I
used the ”–initrd” option, this is safer for the new kernels and the bootcd
command can manage it, with a little extra work. There is a special utility:
bootcdmkinitrd that you must run after you have installed the new bootcd
kernel. Remember to allow the RAMDISK option in your kernel if you want
to use the initrd feature. The correct order is:
33
1) install the new kernel
# dpkg -i kernel-image-2.4.27-bootcd_1_i386.deb
2) reboot your computer with the new kernel
# reboot
3) run bootcdmkinitrd:
#bootcdmkinitrd
this command will recreate the initrd for the new kernel. In order to work
properly bootcdmkinitrd needs another useful program: discover, you can
simply install it via apt-get and then run it typing discover at the prompt
(see the man page of both bootcdmkinitrd and discover for details).
5.3
Bootcd scripts
The main bootcd commands are:
• botcdmkinitrd: it is a special mkinitrd command that configure properly the initrd of the running kernel to adapt it to the bootcd writing
tools (see section above).
• bootcdwrite: performs the creation of the bootable cdrom from the
running system, you can fit it to your needs trought the configuration
file:
/etc/bootcd/bootcdwrite.conf.
• bootcd2disk: this command will perform the installation of the live
system on the hard disk, you can adjust it via the file:
/usr/share/bootcd/bootcd2disk.conf
When you run bootcdwrite it writes down the entire (but you can also
decide to omit some directorys) system on a .iso image file. Once the image
is ready is to late to make any modification. You must plan the structure of
the system before proceding. If you are interested in using the bootcd2disk
command you must modify it’s config file before 1 doing anything else.
First of all we have built the kernel and rebooted the system into the new
kernel, then we have ran the bootcdmkinitrd script to tune the initrd to the
bootcd tools.
Our next step is to modify the configuration files of bootcdwrite and
bootcd2disk.
1
On the live cdrom there are some config files that you can still edit and save, but they
are obviously saved in ram and you will have to edit them each time
34
5.3.1
bootcdwrite.conf
The configuration file of bootcdwrite is in the /etc/bootcd directory. I didn’t
need to modify it as it already fit my needs. Anyway it is simple to understand and it’s safer to take a look at it before proceding further. As an
exemplum bootcdwrite try to find your kernel as /vmlinuz.
This is the default line in the configuaration file:
# Define the kernel which is used
KERNEL=vmlinuz
This is also the default for debian systems, but you may have changed it
or you have forgot to make the link in the root directory. Therefore make
sure to check the configuation file.
5.3.2
bootcd2disk.conf
You will find this configuration file in the /usr/share/bootcd directory, with
all the bootcd scripts. This is because the bootcd2disk script is useful only
on the live cdrom. During the cdrom creation it will be automatically moved
under the /bin directory, and the configuration file will be copied to the
/etc/bootcd dir.
This configuration file is a little be tricky to modify, you need to know exactly
what you are doing.
First we have to specify the disk that will be newly partitioned:
DISK="/dev/hda"
Then we have to specify how to repartition it (see Appendix [C.1] for
understanding sfdisk syntax 2 )
# set up the first partition of 20giga and a swap of 2,8giga
SFDISK="
0,19265,L,*
,2643,S
"
I must remark that my hard disk is bigger than the part I had partitioned via
sfdisk, this is crucial, otherwise the last line of the SFDISK directive must
be like in the following exemplum:
2
I anticipate that bootcd2disk pass the -uM option to the sfdisk command, i cryed
bitter tears while burning the 100th cdrom.
35
# set up the first partition of 20giga and a swap of 2,8giga
# and a third Linux partition that fills the remaining part
SFDISK="
0,19265,L,*
,2643,S
,,L
"
As you can imagine the last line: ” L” leave sfdisk free of fill the device untill
the end.
We must create the filesystem and, if this is the case, set the use of ext3 :
EXT2FS="/dev/hda1"
....
EXT3="auto"
We need to turn on the swap, in the sfdisk command above we have set the
swap on the 2nd partition so 3 :
SWAP="/dev/hda2"
Now we have to specify the mount and umount comand for the new partition:
MOUNT="mount /dev/hda1 /mnt"
UMOUNT="umount /mnt"
And also to specify the fstab for the new system:
FSTAB="
/dev/hda1
/dev/hda2
"
/
ext3
none swap
defaults,errors=remount-ro 0
sw
0
1
0
After that there are some options for lilo that I have disabled as my system
doesn’t run lilo, it runs grub 4 instead, and then there are two not mandatory
options that I left to theri default values.
3
When you run the bootcd2disk you will prompted for an error when creating the swap,
this is only a notification of the system, but as the bootcd stops every system output, you
have to ignore it and go on.
4
and we will face it later
36
5.4
Floppy support
One feature of the bootcd tools is that allow you to store modifications on a
floppy disk, so that you can load them on next boot. Unfortunatly hydra’s
nodes doesn’t have any floppy drive, so I needed to modify another one script
that performs the floppy check on startup; as I didn’t know if in the future
may I have one floppy I didn’t remove at all this feature, I only prompt the
user for the question:
have you got a floppy? (y/n)
the default behaviour is n and so don’t check the floppy and go on. My simple
modifications to the S13bootdcflop.sh script are in the Appendix [C.1].
Now that we have configured our tools, we can thinking about burning
some cdroms, don’t we?. At last, we don’t yet.
5.5
hydracd2disk
Now the main configuration is done, but as I need the cd to install many
identical nodes, some other stuffs are required. All my nodes are identical
in hardware but they must differ in some configuration files, mainly the
networks configuration files. So I written a simple bash script that performs
automatically all the needed changes. In the Appendix you will find the
entire script (Appendix [C.2]).
First of all the script must remount the hard disk, then it install grub on the
mbr of hd0. After that another script is invoked 5 and it prompt the user for
the new node’s number. There isn’t a default behaviour, you must answer
with a number as 3 or 5 or 16, just the node number, as it is in the first
column of /etc/openmosix.map.
mk net files.sh changes the following files:
• /etc/network/interfaces
• /etc/hostname
• /etc/exim4/update-exim4.conf.conf
• /etc/mailname
• /etc/motd
Then it change the hostname and return to hydracd2disk. The last operation is to create the directory /var/tmp in order to make vi work properly; I
5
mk net files.sh
37
didn’mind why this directory disappear during the bootcd creation process,
I figured out that bootcd2disk remove all the temporany files before making
the bootcd, but why a dir?.
5.6
I burn
We are ready to burn our live cd, the first command to run is:
#bootcdwrite
this will create the iso image of the cd in the /var/spool/bootcd directory,
this may last some time. If you receive a Warning about insufficient RAM
be aware that the bootcd may not works under this condition. Ensure you
have the /root/ directory free, because it is stored in the initial RAMdisk
image together with /boot/ and so it must be very small.
After the image is ready, we have to burn it: hydra doesn’t have a cdburner (doesn’t have a cdrom at all!!) so I have copied the image on a remote
pc of the internal IASI network and I burned it with k3b, I left to you the
choice of how to burn the cdrom.
I assume you have the cdrom in your hand, put it in the external usb
device or, if you are so lucky to have one, in the cdrom device (remeber to
check the boot order in the bios). Restart your computer, if everything goes
well you will drop in a login session (otherwise if something goes wrong I
suggest you to pray a lot and retray or maybe reread all this busy article).
Login as root and give the command:
#bootcd2disk
Answer yes to the prompted question, and then it will start to dump the
live system to the hard disk. A little bit later you will prompted with a
swap error, type ignore and go on, it is only a warning but the bootcd2disk
application leave you to manage every system notification. After the process
is complete (about 15 minutes on hydra) the script ends up with something
like:
Reboot Now. Don’t mind it, first you have to run hydracd2disk to make the
hydra’s modifications:
#hydracd2disk
Answer to the prompted question with a number as 5 or 16 just the node
number, as it is in the first column of /etc/openmosix.map.
Now it’s time to reboot into your new debian clone-system.
38
5.6.1
Summary
1. as root issue the command: bootcdwrite this will create an iso image of
the running system.
2. Burn the iso image onto a cdrom and restart the computer with this
cd.
3. After the boot is completed login as root and run:
bootcd2disk.
answer ignore to the prompted question about swap. Don’t reboot yet.
4. issue the command: hydracd2disk, answer to the prompted question
with a number as 5 or 16 just the node number, as it is in the first
column of /etc/openmosix.map.
5. reboot.
6. don’t use computer, enjoy your life! : )
39
Chapter 6
GNU Free Documentation
License
Version 1.2, November 2002
c
Copyright 2000,2001,2002
Free Software Foundation, Inc.
51 Franklin St, Fifth Floor, Boston, MA 02110-1301 USA
Everyone is permitted to copy and distribute verbatim copies of this license
document, but changing it is not allowed.
Preamble
The purpose of this License is to make a manual, textbook, or other functional and useful document ”free” in the sense of freedom: to assure everyone
the effective freedom to copy and redistribute it, with or without modifying
it, either commercially or noncommercially. Secondarily, this License preserves for the author and publisher a way to get credit for their work, while
not being considered responsible for modifications made by others.
This License is a kind of ”copyleft”, which means that derivative works
of the document must themselves be free in the same sense. It complements
the GNU General Public License, which is a copyleft license designed for free
software.
We have designed this License in order to use it for manuals for free
software, because free software needs free documentation: a free program
should come with manuals providing the same freedoms that the software
does. But this License is not limited to software manuals; it can be used
for any textual work, regardless of subject matter or whether it is published
as a printed book. We recommend this License principally for works whose
purpose is instruction or reference.
40
1. APPLICABILITY AND DEFINITIONS
This License applies to any manual or other work, in any medium, that
contains a notice placed by the copyright holder saying it can be distributed
under the terms of this License. Such a notice grants a world-wide, royaltyfree license, unlimited in duration, to use that work under the conditions
stated herein. The ”Document”, below, refers to any such manual or work.
Any member of the public is a licensee, and is addressed as ”you”. You
accept the license if you copy, modify or distribute the work in a way requiring
permission under copyright law.
A ”Modified Version” of the Document means any work containing the
Document or a portion of it, either copied verbatim, or with modifications
and/or translated into another language.
A ”Secondary Section” is a named appendix or a front-matter section
of the Document that deals exclusively with the relationship of the publishers
or authors of the Document to the Document’s overall subject (or to related
matters) and contains nothing that could fall directly within that overall
subject. (Thus, if the Document is in part a textbook of mathematics, a Secondary Section may not explain any mathematics.) The relationship could
be a matter of historical connection with the subject or with related matters,
or of legal, commercial, philosophical, ethical or political position regarding
them.
The ”Invariant Sections” are certain Secondary Sections whose titles
are designated, as being those of Invariant Sections, in the notice that says
that the Document is released under this License. If a section does not fit
the above definition of Secondary then it is not allowed to be designated
as Invariant. The Document may contain zero Invariant Sections. If the
Document does not identify any Invariant Sections then there are none.
The ”Cover Texts” are certain short passages of text that are listed,
as Front-Cover Texts or Back-Cover Texts, in the notice that says that the
Document is released under this License. A Front-Cover Text may be at
most 5 words, and a Back-Cover Text may be at most 25 words.
A ”Transparent” copy of the Document means a machine-readable copy,
represented in a format whose specification is available to the general public,
that is suitable for revising the document straightforwardly with generic text
editors or (for images composed of pixels) generic paint programs or (for
drawings) some widely available drawing editor, and that is suitable for input
to text formatters or for automatic translation to a variety of formats suitable
for input to text formatters. A copy made in an otherwise Transparent file
format whose markup, or absence of markup, has been arranged to thwart or
discourage subsequent modification by readers is not Transparent. An image
41
format is not Transparent if used for any substantial amount of text. A copy
that is not ”Transparent” is called ”Opaque”.
Examples of suitable formats for Transparent copies include plain ASCII
without markup, Texinfo input format, LaTeX input format, SGML or XML
using a publicly available DTD, and standard-conforming simple HTML,
PostScript or PDF designed for human modification. Examples of transparent image formats include PNG, XCF and JPG. Opaque formats include
proprietary formats that can be read and edited only by proprietary word
processors, SGML or XML for which the DTD and/or processing tools are
not generally available, and the machine-generated HTML, PostScript or
PDF produced by some word processors for output purposes only.
The ”Title Page” means, for a printed book, the title page itself, plus
such following pages as are needed to hold, legibly, the material this License
requires to appear in the title page. For works in formats which do not have
any title page as such, ”Title Page” means the text near the most prominent
appearance of the work’s title, preceding the beginning of the body of the
text.
A section ”Entitled XYZ” means a named subunit of the Document
whose title either is precisely XYZ or contains XYZ in parentheses following text that translates XYZ in another language. (Here XYZ stands for
a specific section name mentioned below, such as ”Acknowledgements”,
”Dedications”, ”Endorsements”, or ”History”.) To ”Preserve the
Title” of such a section when you modify the Document means that it remains a section ”Entitled XYZ” according to this definition.
The Document may include Warranty Disclaimers next to the notice
which states that this License applies to the Document. These Warranty
Disclaimers are considered to be included by reference in this License, but
only as regards disclaiming warranties: any other implication that these Warranty Disclaimers may have is void and has no effect on the meaning of this
License.
2. VERBATIM COPYING
You may copy and distribute the Document in any medium, either commercially or noncommercially, provided that this License, the copyright notices, and the license notice saying this License applies to the Document are
reproduced in all copies, and that you add no other conditions whatsoever
to those of this License. You may not use technical measures to obstruct or
control the reading or further copying of the copies you make or distribute.
However, you may accept compensation in exchange for copies. If you distribute a large enough number of copies you must also follow the conditions
in section 3.
42
You may also lend copies, under the same conditions stated above, and
you may publicly display copies.
3. COPYING IN QUANTITY
If you publish printed copies (or copies in media that commonly have
printed covers) of the Document, numbering more than 100, and the Document’s license notice requires Cover Texts, you must enclose the copies in
covers that carry, clearly and legibly, all these Cover Texts: Front-Cover
Texts on the front cover, and Back-Cover Texts on the back cover. Both
covers must also clearly and legibly identify you as the publisher of these
copies. The front cover must present the full title with all words of the title
equally prominent and visible. You may add other material on the covers in
addition. Copying with changes limited to the covers, as long as they preserve the title of the Document and satisfy these conditions, can be treated
as verbatim copying in other respects.
If the required texts for either cover are too voluminous to fit legibly,
you should put the first ones listed (as many as fit reasonably) on the actual
cover, and continue the rest onto adjacent pages.
If you publish or distribute Opaque copies of the Document numbering more than 100, you must either include a machine-readable Transparent
copy along with each Opaque copy, or state in or with each Opaque copy
a computer-network location from which the general network-using public
has access to download using public-standard network protocols a complete
Transparent copy of the Document, free of added material. If you use the
latter option, you must take reasonably prudent steps, when you begin distribution of Opaque copies in quantity, to ensure that this Transparent copy
will remain thus accessible at the stated location until at least one year after
the last time you distribute an Opaque copy (directly or through your agents
or retailers) of that edition to the public.
It is requested, but not required, that you contact the authors of the
Document well before redistributing any large number of copies, to give them
a chance to provide you with an updated version of the Document.
4. MODIFICATIONS
You may copy and distribute a Modified Version of the Document under
the conditions of sections 2 and 3 above, provided that you release the Modified Version under precisely this License, with the Modified Version filling
the role of the Document, thus licensing distribution and modification of the
Modified Version to whoever possesses a copy of it. In addition, you must
do these things in the Modified Version:
43
A. Use in the Title Page (and on the covers, if any) a title distinct from that
of the Document, and from those of previous versions (which should, if
there were any, be listed in the History section of the Document). You
may use the same title as a previous version if the original publisher of
that version gives permission.
B. List on the Title Page, as authors, one or more persons or entities
responsible for authorship of the modifications in the Modified Version,
together with at least five of the principal authors of the Document (all
of its principal authors, if it has fewer than five), unless they release
you from this requirement.
C. State on the Title page the name of the publisher of the Modified
Version, as the publisher.
D. Preserve all the copyright notices of the Document.
E. Add an appropriate copyright notice for your modifications adjacent to
the other copyright notices.
F. Include, immediately after the copyright notices, a license notice giving
the public permission to use the Modified Version under the terms of
this License, in the form shown in the Addendum below.
G. Preserve in that license notice the full lists of Invariant Sections and
required Cover Texts given in the Document’s license notice.
H. Include an unaltered copy of this License.
I. Preserve the section Entitled ”History”, Preserve its Title, and add to
it an item stating at least the title, year, new authors, and publisher of
the Modified Version as given on the Title Page. If there is no section
Entitled ”History” in the Document, create one stating the title, year,
authors, and publisher of the Document as given on its Title Page, then
add an item describing the Modified Version as stated in the previous
sentence.
J. Preserve the network location, if any, given in the Document for public
access to a Transparent copy of the Document, and likewise the network
locations given in the Document for previous versions it was based on.
These may be placed in the ”History” section. You may omit a network
location for a work that was published at least four years before the
Document itself, or if the original publisher of the version it refers to
gives permission.
44
K. For any section Entitled ”Acknowledgements” or ”Dedications”, Preserve the Title of the section, and preserve in the section all the substance and tone of each of the contributor acknowledgements and/or
dedications given therein.
L. Preserve all the Invariant Sections of the Document, unaltered in their
text and in their titles. Section numbers or the equivalent are not
considered part of the section titles.
M. Delete any section Entitled ”Endorsements”. Such a section may not
be included in the Modified Version.
N. Do not retitle any existing section to be Entitled ”Endorsements” or
to conflict in title with any Invariant Section.
O. Preserve any Warranty Disclaimers.
If the Modified Version includes new front-matter sections or appendices
that qualify as Secondary Sections and contain no material copied from the
Document, you may at your option designate some or all of these sections
as invariant. To do this, add their titles to the list of Invariant Sections in
the Modified Version’s license notice. These titles must be distinct from any
other section titles.
You may add a section Entitled ”Endorsements”, provided it contains
nothing but endorsements of your Modified Version by various parties–for
example, statements of peer review or that the text has been approved by
an organization as the authoritative definition of a standard.
You may add a passage of up to five words as a Front-Cover Text, and a
passage of up to 25 words as a Back-Cover Text, to the end of the list of Cover
Texts in the Modified Version. Only one passage of Front-Cover Text and
one of Back-Cover Text may be added by (or through arrangements made
by) any one entity. If the Document already includes a cover text for the
same cover, previously added by you or by arrangement made by the same
entity you are acting on behalf of, you may not add another; but you may
replace the old one, on explicit permission from the previous publisher that
added the old one.
The author(s) and publisher(s) of the Document do not by this License
give permission to use their names for publicity for or to assert or imply
endorsement of any Modified Version.
5. COMBINING DOCUMENTS
45
You may combine the Document with other documents released under
this License, under the terms defined in section 4 above for modified versions,
provided that you include in the combination all of the Invariant Sections
of all of the original documents, unmodified, and list them all as Invariant
Sections of your combined work in its license notice, and that you preserve
all their Warranty Disclaimers.
The combined work need only contain one copy of this License, and multiple identical Invariant Sections may be replaced with a single copy. If there
are multiple Invariant Sections with the same name but different contents,
make the title of each such section unique by adding at the end of it, in
parentheses, the name of the original author or publisher of that section if
known, or else a unique number. Make the same adjustment to the section
titles in the list of Invariant Sections in the license notice of the combined
work.
In the combination, you must combine any sections Entitled ”History”
in the various original documents, forming one section Entitled ”History”;
likewise combine any sections Entitled ”Acknowledgements”, and any sections Entitled ”Dedications”. You must delete all sections Entitled ”Endorsements”.
6. COLLECTIONS OF DOCUMENTS
You may make a collection consisting of the Document and other documents released under this License, and replace the individual copies of this
License in the various documents with a single copy that is included in the
collection, provided that you follow the rules of this License for verbatim
copying of each of the documents in all other respects.
You may extract a single document from such a collection, and distribute
it individually under this License, provided you insert a copy of this License
into the extracted document, and follow this License in all other respects
regarding verbatim copying of that document.
7. AGGREGATION WITH
INDEPENDENT WORKS
A compilation of the Document or its derivatives with other separate
and independent documents or works, in or on a volume of a storage or
distribution medium, is called an ”aggregate” if the copyright resulting from
the compilation is not used to limit the legal rights of the compilation’s users
beyond what the individual works permit. When the Document is included in
an aggregate, this License does not apply to the other works in the aggregate
which are not themselves derivative works of the Document.
46
If the Cover Text requirement of section 3 is applicable to these copies
of the Document, then if the Document is less than one half of the entire
aggregate, the Document’s Cover Texts may be placed on covers that bracket
the Document within the aggregate, or the electronic equivalent of covers if
the Document is in electronic form. Otherwise they must appear on printed
covers that bracket the whole aggregate.
8. TRANSLATION
Translation is considered a kind of modification, so you may distribute
translations of the Document under the terms of section 4. Replacing Invariant Sections with translations requires special permission from their copyright holders, but you may include translations of some or all Invariant Sections in addition to the original versions of these Invariant Sections. You
may include a translation of this License, and all the license notices in the
Document, and any Warranty Disclaimers, provided that you also include
the original English version of this License and the original versions of those
notices and disclaimers. In case of a disagreement between the translation
and the original version of this License or a notice or disclaimer, the original
version will prevail.
If a section in the Document is Entitled ”Acknowledgements”, ”Dedications”, or ”History”, the requirement (section 4) to Preserve its Title (section
1) will typically require changing the actual title.
9. TERMINATION
You may not copy, modify, sublicense, or distribute the Document except
as expressly provided for under this License. Any other attempt to copy,
modify, sublicense or distribute the Document is void, and will automatically
terminate your rights under this License. However, parties who have received
copies, or rights, from you under this License will not have their licenses
terminated so long as such parties remain in full compliance.
10. FUTURE REVISIONS OF THIS
LICENSE
The Free Software Foundation may publish new, revised versions of the
GNU Free Documentation License from time to time. Such new versions will
be similar in spirit to the present version, but may differ in detail to address
new problems or concerns. See http://www.gnu.org/copyleft/.
Each version of the License is given a distinguishing version number. If
the Document specifies that a particular numbered version of this License ”or
47
any later version” applies to it, you have the option of following the terms
and conditions either of that specified version or of any later version that
has been published (not as a draft) by the Free Software Foundation. If the
Document does not specify a version number of this License, you may choose
any version ever published (not as a draft) by the Free Software Foundation.
ADDENDUM: How to use this License for
your documents
To use this License in a document you have written, include a copy of the
License in the document and put the following copyright and license notices
just after the title page:
c
Copyright YEAR
YOUR NAME. Permission is granted to copy,
distribute and/or modify this document under the terms of the
GNU Free Documentation License, Version 1.2 or any later version published by the Free Software Foundation; with no Invariant Sections, no Front-Cover Texts, and no Back-Cover Texts. A
copy of the license is included in the section entitled ”GNU Free
Documentation License”.
If you have Invariant Sections, Front-Cover Texts and Back-Cover Texts,
replace the ”with...Texts.” line with this:
with the Invariant Sections being LIST THEIR TITLES, with the
Front-Cover Texts being LIST, and with the Back-Cover Texts
being LIST.
If you have Invariant Sections without Cover Texts, or some other combination of the three, merge those two alternatives to suit the situation.
If your document contains nontrivial examples of program code, we recommend releasing these examples in parallel under your choice of free software license, such as the GNU General Public License, to permit their use
in free software.
48
Bibliography
[1] http://www.openmosix.org, the official site of the openMosix project.
[2] Engineering a Beowulf-style Compute Cluster. Robert G. Brown Duke
University Physics Department.
[3] openMosix presented by Dr.Moshe Bar.
[4] The openMosix Howto Kris Buytaert http://howto.x-tend.be/openMosixHOWTO/
[5] http://www.cluster.kiev.ua/tasks/chpx eng.html,
linux.
checkpointing
for
[6] http://www.openmosixview.com/docs/openMosixAPI.html, openMosix
API by Matt Rechenburg.
[7] openMosix vs Beowulf: a case of study, Moshe Bar, Stefano Cozzini, Maurizio Davini and Alberto Marmodoroi, Democritos INFM Trieste (Italy)
[8] Benchmarking I/O Solutions for Clusters, Stefano Cozzini and Moshe
Bari, Democritos INFM Trieste (Italy)
[9] Clustering with openMosix-M.Michels & W.Borremans
[10] Piattaforme software distribuite per il recupero di hardware obsolescente, Tesi di Laurea in Ingegneria delle Telecomunicazioni, Ruggero Russo
2004
[11] Modern Operating System 2nd edition, A.Tanenbaum, Prentice-Hall
49
Appendix A
Debian GNU/Linux
A.1
Master nodes
In this Appendix section are reported all the detailed infomation needed to
the unlucky man who have to manage with my work on hydra. I would like
to tell him to remember how hard it’s the work of writing down all you do
during the setting up of a machine. Please be patient if something is missing,
try to find it out and add it to this report, so that many guys in the future
will focus their attetion on something else.
A.1.1
Scripts
I can’t put all the script in a report, they are on the thdp cdrom and, I hope,
on the hydra web site, for free download.
The set up master.sh script is on the thdp cdrom, under the directory
appendix/A.1
A.1.2
Needed files
In order to simplify our life is better to configure only one master and then
copy the configuration files to the other. This is one of the gain in having all
identical nodes. First of all you need to set up the dsh (distribuited shell)
configuration, so that you can soon start using it. The files are:
/etc/dsh/machine.list
/etc/dsh/group/masters
/etc/dsh/group/slaves
Then it’s better to have the right /etc/openmosix.map file. Before start
the X session copy the /etc/X11/XF86config file so that the server starts
50
smootly. I suggest you to have all the machine also in each emph/etc/hosts
file, so take a copy of it on the new master. Very Important don’t forget to
copy the hydra.gif image, otherwise the cluster loose completly is calculation
power. The correct position in the filesystem is:
/usr/share/WindowMaker/Backgrounds/hydra.gif
all the above files are on the thdp cdrom, under the directory appendix/A.1
A.2
Openmosixview
A.3
ssh passwordless
There are many sites reporting this howto, you can see:
http://www.freebsdwiki.net/index.php/SSH: Passwordless authentication
51
Appendix B
Kernels
B.1
B.1.1
hydra and openmosix
iptables
CONFIG_NETFILTER=y
# CONFIG_NETFILTER_DEBUG is not set
CONFIG_FILTER=y
CONFIG_UNIX=m
CONFIG_INET=y
CONFIG_IP_MULTICAST=y
CONFIG_IP_ADVANCED_ROUTER=y
CONFIG_IP_MULTIPLE_TABLES=y
CONFIG_IP_ROUTE_FWMARK=y
CONFIG_IP_ROUTE_NAT=y
CONFIG_IP_ROUTE_MULTIPATH=y
CONFIG_IP_ROUTE_TOS=y
CONFIG_IP_ROUTE_VERBOSE=y
# CONFIG_IP_PNP is not set
CONFIG_NET_IPIP=m
CONFIG_NET_IPGRE=m
CONFIG_NET_IPGRE_BROADCAST=y
CONFIG_IP_MROUTE=y
CONFIG_IP_PIMSM_V1=y
CONFIG_IP_PIMSM_V2=y
# CONFIG_ARPD is not set
# CONFIG_INET_ECN is not set
CONFIG_SYN_COOKIES=y
52
#
#
IP: Netfilter Configuration
#
CONFIG_IP_NF_CONNTRACK=m
CONFIG_IP_NF_FTP=m
CONFIG_IP_NF_AMANDA=m
CONFIG_IP_NF_TFTP=m
CONFIG_IP_NF_IRC=m
CONFIG_IP_NF_QUEUE=m
CONFIG_IP_NF_IPTABLES=m
CONFIG_IP_NF_MATCH_LIMIT=m
CONFIG_IP_NF_MATCH_MAC=m
CONFIG_IP_NF_MATCH_PKTTYPE=m
CONFIG_IP_NF_MATCH_MARK=m
CONFIG_IP_NF_MATCH_MULTIPORT=m
CONFIG_IP_NF_MATCH_TOS=m
CONFIG_IP_NF_MATCH_RECENT=m
CONFIG_IP_NF_MATCH_ECN=m
CONFIG_IP_NF_MATCH_DSCP=m
CONFIG_IP_NF_MATCH_AH_ESP=m
CONFIG_IP_NF_MATCH_LENGTH=m
CONFIG_IP_NF_MATCH_TTL=m
CONFIG_IP_NF_MATCH_TCPMSS=m
CONFIG_IP_NF_MATCH_HELPER=m
CONFIG_IP_NF_MATCH_STATE=m
CONFIG_IP_NF_MATCH_CONNTRACK=m
CONFIG_IP_NF_MATCH_UNCLEAN=m
CONFIG_IP_NF_MATCH_OWNER=m
CONFIG_IP_NF_FILTER=m
CONFIG_IP_NF_TARGET_REJECT=m
CONFIG_IP_NF_TARGET_MIRROR=m
CONFIG_IP_NF_NAT=m
CONFIG_IP_NF_NAT_NEEDED=y
CONFIG_IP_NF_TARGET_MASQUERADE=m
CONFIG_IP_NF_TARGET_REDIRECT=m
CONFIG_IP_NF_NAT_AMANDA=m
CONFIG_IP_NF_NAT_LOCAL=y
CONFIG_IP_NF_NAT_SNMP_BASIC=m
CONFIG_IP_NF_NAT_IRC=m
CONFIG_IP_NF_NAT_FTP=m
CONFIG_IP_NF_NAT_TFTP=m
53
CONFIG_IP_NF_MANGLE=m
CONFIG_IP_NF_TARGET_TOS=m
CONFIG_IP_NF_TARGET_ECN=m
CONFIG_IP_NF_TARGET_DSCP=m
CONFIG_IP_NF_TARGET_MARK=m
CONFIG_IP_NF_TARGET_LOG=m
CONFIG_IP_NF_TARGET_ULOG=m
CONFIG_IP_NF_TARGET_TCPMSS=m
CONFIG_IP_NF_ARPTABLES=m
CONFIG_IP_NF_ARPFILTER=m
CONFIG_IP_NF_ARP_MANGLE=m
CONFIG_IP_NF_COMPAT_IPCHAINS=m
CONFIG_IP_NF_NAT_NEEDED=y
CONFIG_IP_NF_COMPAT_IPFWADM=m
CONFIG_IP_NF_NAT_NEEDED=y
#
#
IP: Virtual Server Configuration
B.2
hydra bootcd
This kernel is in the thdp CD-Rom under the appendix/B.1 directory, with
the many other kernels.
54
Appendix C
Bootcd2disk
C.1
C.1.1
Bootcd scripts configuration files
Brief intro to sfdisk
I would like to describe briefly the sfdisk syntax (from man page): ”sfdisk
reads lines of the form:
<start>, <size>, <id>, <bootable>, <c,h,s> and <c,h,s>;
where each line fills one partition descriptor.” You should omit the last two
descriptor, because sfdisk can manage them automatically (better than you
can do).
• ”start” is the starting point for writing, it may be the starting bit or
block. Should be 0 or blank.
• ”size” is the size of the partition, may be in bit or block.
• ”id” is the partition type such us Dos or Linux : it is one character, S
stands for swap and L stands for linux which is also the default if you
leave this field blank.
• ”bootable”: can be ”*” or ”-”. The first indicate to the boot loader
that the partition is bootable.
The most simple way to use sfdisk is to use it with the -uM options, that is
to force it to read the input in Megabyte. I suggest you to issue the following,
just to take confidence:
#sfdisk -l -uM [device]
55
See the output carefully.
Therefore to create two partition on /dev/hda1, one Linux (20 Giga) and a
Swap (2,8Giga) you can use a command such that:
sfdisk -l -uM /dev/hda1 << EOF
0,19265,L,*
,2643,S
EOF
The above syntax works if the device is exactly 22,8 Giga, in the most
case is safer to let sfdisk to manage the end of the disk. To do this you must
use a line like:
...
,,L
EOF
In this way sfdisk will fill your hard drive untill the end, with a linux
partition. For more infos about sfdisk simply read the man pages.
C.1.2
bootcd2disk.conf Slave
Here is the configuration file for the bootcd2disk utility that I used for the
slaves nodes.
ERRLOG=/var/log/bootcd2disk.log
#
#
#
#
#
#
#
function do_first
If you want to do some things first before doing
anythin else (e.g. load
additional modules), you can add this to this function.
function do_first() {
return
}
# To define the disk that will be newly partitioned
# before copying the cd to it
#
DISK="/dev/hda"
# If you don’t want do partition any disk
#
DISK=""
56
# If you want bootcd2disk to find a disk
# (bootcd tries to use the first disk)
#DISK="auto"
DISK="/dev/hda"
# If DISK="auto" is defined, the first disk found
# will be used. To change
# this order TRYFIRST can be defined for example
# to use SCSI Disks first:
#
TRYFIRST="/dev/sda /dev/hda"
# Most people will not need this option and will define:
#
TRYFIRST=""
TRYFIRST=""
# the option -uM is set
# If you don’t want to repartition anything use:
#
SFDISK=""
# If you want to specify yourself: see man sfdisk
#
SFDISK="
#
,50
#
,100,S
#
;
#
"
# If you want to do it automatically. There will
# be 3 partitions
# /boot, swap and /. /boot is created first to
# be sure the bios can load
# the kernel also on very large disks.
#SFDISK="auto"
# set up the first partition of 20giga and a swap of 2,8giga
SFDISK="
0,19265,L,*
,2643,S
"
# VFAT is normally only needed on ia64 for EFI files.
# Do not run mkdosfs:
#
VFAT=""
# Create partitions defined in VFATFS with mkdosfs
#
VFAT="/dev/sdb4"
57
VFAT=""
# Do not run mke2fs:
#
EXT2FS=""
# Create partitions defined in EXT2FS with mke2fs:
#
EXT2FS="/dev/hda1 /dev/hda3"
# Create partitions needed automatically:
#EXT2FS="auto"
EXT2FS="/dev/hda1"
# Use EXT3 extenstion for partitions defined by EXT2FS:
#
EXT3="yes"
# Do not Use EXT3 extenstio for partitions defined by EXT2FS:
#
EXT3="no"
# Use EXT3 automatically if it is supported by the system:
EXT3="auto"
# If you don’t want to run mkswap use:
#
SWAP=""
# If you want to specify partitions for mkswap:
#
SWAP="/dev/hda2"
# If you want to automatically use mke2fs:
#SWAP="auto"
SWAP="/dev/hda2"
# If you don’t want to mount anything, before copying
# the cd to /mnt
#
MOUNT=""
#
UMOUNT=""
# If you want to mount everything yourself:
#
MOUNT="mount /dev/hda3 /mnt; mkdir /mnt/boot;
#
mount /dev/hda1 /mnt/boot"
#
UMOUNT="umount /mnt/boot; umount /mnt"
# If you want to automatically mount:
#MOUNT="auto"
#UMOUNT="auto"
MOUNT="mount /dev/hda1 /mnt"
UMOUNT="umount /mnt"
# If you don’t want to change the /etc/fstab
# copied form cd:
58
#
FSTAB=""
# If You want to define it yourself:
#
FSTAB="
#
/dev/sda1 /boot ext2 defaults 0 1
#
/dev/sda2 none swap sw 0 0
#
/dev/sda3 /
ext2 defaults,errors=remount-ro 0 1
#
proc
/proc proc defaults 0 0
#
"
# If You want to do it automatically:
#FSTAB="auto"
FSTAB="
#<file system> <mount-point> <type><options> <dump> <pass>
proc
/proc proc defaults 0
0
/dev/hda1 /
ext3 defaults,errors=remount-ro 0
1
/dev/hda2 none
swap
sw
0
0
"
# If you don’t want to change the /etc/lilo.conf
# copied from cd:
#
LILO=""
# If you want to define it yourself:
#
LILO="
#
boot=DISK
#
delay=20
#
vga=0
#
image=/vmlinuz
#
root=DISK3
#
initrd=/initrd.img
#
label=Linux
#
read-only
#
"
# If You want to do it automatically:
LILO=""
# ELILO is only needed on ia64 systems.
# If you don’t want to run elilo:
#
ELILO=""
# If you want to define /etc/elilo.conf and run elilo.
#
ELILO="
#
install=/usr/lib/elilo/elilo.efi
59
#
boot=/dev/sdb4
#
prompt
#
timeout=50
#
default=Linux
#
append=\\\"console=ttyS0.9600n8\\\"
#
image=/vmlinuz
#
label=Linux
#
root=/dev/sdb5
#
read-only
#
"
ELILO=""
# SSHOSTKEY=yes|no
# If you are using ssh it is helpfull to have
# a unique ssh hostkey for
# each PC installed with bootcd2disk.
# This will be generated with
#
SSHHOSTKEY="yes"
SSHHOSTKEY=yes
#
#
#
#
#
#
#
function after_copy
If you want to do some things after copying
the files (e.g. remount of
directories ...), you can add this to this function.
function after_copy() {
return
}
#
# Examples:
#
# IF you only want to copy the cd to an already
# existing Partition /dev/hda2
# You can now specify:
#
DISK=""; SFDISK=""; SWAP=""; FSTAB=""; LILO=""
#
EXTFS2="/dev/hda2"
#
MOUNT="mount /dev/hda2 /mnt"
60
C.1.3
S13bootcdflop.sh
#hydra does not have floppy support so I will ask
TIMELIMIT=5
echo -n "do you have the floppy? (y/n) "
read -t $TIMELIMIT ans
if [ -z $ans ];then
ans=n
echo $ans
exit 0
elif [ $ans == "n" ];then
exit 0
fi
C.2
hydracd2disk
This is my own made script, that performs some minimal adjustments after
the installation performed with bootcd2disk. There are two versions, one for
the hydra Master’s nodes and one for the Slaves.
The following is for the slaves nodes:
#!/bin/bash
#
#mount the hard disk drive
mount /dev/hda1 /mnt
#install grub
echo "installing grub"
grub-install --root-directory=/mnt hd0
#change net files
echo "changing net files"
/usr/bootcd_varie/mk_net_files.sh /mnt
#don’t know why but i must create this dir
#in order to make vi work properly
mkdir -p /var/tmp/
umount /mnt
61
echo "please reboot to update changes"
C.2.1
mk net files.sh
This is the script invoked by hydracd2disk. It performs net files modifications.
#!/bin/bash
#
# this script modify all the net-files.
# It is invoked after the bootcd2disk debian command.
# I use n as the node number, I also need
# N for the hostname: hydra01-09
n=""
N=""
ROOT="192.168.1"
DEFAULT_IP="192.168.1.55"
DEFAULT_NAME="hydra55"
ROOT_NAME="hydra"
PREFIX="$1" #where /dev/hda is mounted
echo -n "insert the node number:"; read n
echo "my ip: $ROOT.$n"
if [ $n -ge "10" ]; then
N=$n
else
N=0$n
fi
echo "my hostname: $ROOT_NAME$N"
# /etc/network/interfaces
# ip modification --> n
echo "$DEFAULT_IP --> $ROOT.$n"
sed -i "/address/s/$DEFAULT_IP/$ROOT.$n/" \
$PREFIX/etc/network/interfaces
# /etc/hostname
# name modification --> $N
sed -i "s/$DEFAULT_NAME/$ROOT_NAME$N/" \
62
$PREFIX/etc/hostname
# /etc/exim4/update-exim4.conf.conf, /etc/mailname, \
/etc/motd
sed -i "s/$DEFAULT_NAME/$ROOT_NAME$N/" \
$PREFIX/etc/exim4/update-exim4.conf.conf
sed -i "s/$DEFAULT_NAME/$ROOT_NAME$N/" \
$PREFIX/etc/mailname
sed -i "s/$DEFAULT_NAME/$ROOT_NAME$N/" $PREFIX/etc/motd
#restart net service
hostname "$ROOT_NAME$N"
echo "please restart network"
63
Appendix D
Script and README files
This is a collection of README files wrote for the hydra-scripts. Those are
not the whole but the most relevant. All the README files are on the CD,
under the hydra-script/doc directory or under the directory of the program,
such as hydra-queue/.
D.1
README.addMosixUser
#########################################################
# #
#
HYDRA, THE MIGHTY CLUSTER #
# #
# @IASI #
# #
# #
#
Istituto di Analisi dei Sistemi ed Informatica #
#
viale Manzoni 30 Roma #
# #
#
www.iasi.cnr.it/~hydra #
#
#
# #
#########################################################
I would like to add users to the four masters
of my mighty hydra’s cluster.
I want to run useradd only one time, so i writed down
64
this simple script to accomplish this task.
[email protected]
[email protected]
This script collect some infos for the
new user and then use dsh in conjunction
whit "useradd", "passwd" and "setquota".
First of all I defined some DEFAULT values
that will be used if you leave blank all
the answers.
Then I simply call dsh -g masters "useradd -"
(so if you want to use this script
you must create the group masters)
with the options collected. The "-g" option allow me
to tell dsh the machine’s group where to perform the
actions (/etc/dsh/ see dsh man pages for details).
There are two types of users: most of the
users are nis users, so they login trought
the nis server and then are bounced to their
hydra’s home directorys, there are also some
local users that are only on hydra.
Both them will have an home directory
on /hydrahome/their_name and another one
on /TMP/their_name.
The script recognizes the two different types
of users making a simple call to the nis server:
"ypcat passwd".
For them the script creates the two home
directory with the same uid and gid as they
have on the nis server.
For the local users the script make a call
to the "useradd" and "passwd" commands.
For Both them the script uses the "setquota"
command to set the avaliable disk space
for each user.
I also needed to create the soft link
65
between hydrahome and the default nis home.
So I created:
home2/users -> /hydrahome
home3/users -> /hydrahome
home4/users -> /hydrahome
because my nis homes is under
home2/users,home3/users,home4/users.
I generate default passwd
with apg tools, that is a
random passwd generator, so
you need it to make this script
work properly.
D.2
README.hchpox
hchpox ibernate all the processes
that runs on the computer and are
launched with hydrarun.
It requires the existence of the directory
where to save the dump files:
/TMP/chpox_dump/
It is called by the hchpoxmain script.
In order to use it you must copy hchpox
under the /sbin directory of each master
node (hydra01,02,03,04). Moreover on hydra01
under the /sbin dir you must have a copy
of hchpoxmain.
see README.hchpoxmain
D.3
README.hchpoxmain
This script is invoked by
/etc/apcupsd/apccontrol instead
66
of invoking directly the shutdown
system program.
I have simply edited /etc/apcupsd/apccontrol
and modified the value of the SHUTDOWN
variable at the beginning of the file.
In this way each time apcupsd wants to call
a shutdown, it calls hchpoxmain instead.
hchpoxmain use dsh program to run hchpox script
on the masters node and then shutdown all the nodes.
see README.hchpox
D.4
README.hydraqueue
HOWTO use hydraQueue programs.
A)
B)
C)
D)
directories
hydraqueuectrl.sh
hydrarun.sh
myclean.sh
A) create the directories:
|dirs
mkdir
mkdir
mkdir
mkdir
|(and corresponding) | variables
/var/hydraQueue
---->
/var/hydraQueue/users
/var/hydraQueue/Launched
/var/hydraQueue/Errors
|
HYDRAQUEUE_DIR
QUEUE_DIR
BACKUP_FILE (in func. sedstrip())
ERROR_FILE (in func. sedstrip())
The most important is QUEUE_DIR.
This directory must contain all
the hydra’s users.
In fact I used the command ‘ls -1 QUEUE_DIR‘
to have a list of the users.
Under the QUEUE_DIR/$USER directory
there are two files:
67
myqueue.$USER
myqueue.$USER.old
1) myqueue.$USER
The first one of this two files
is the backbone of the hydraQueue
programs. It is made up of two part:
a header, that stores some infos
about the user, and a command part
(that starts after the line "# commands")
which is a list of commands the user
want to run on hydra.
es:
### myqueue.muzi ###
date: Thu Feb 9 12:30:31 CET 2006
user: muzi
host: hydra01
login name: root
home: /home2/users/muzi
queue list: myqueue.txt
current dir: /root/QueueProgs
# command
./newspremi &
./newspremi &
./newspremi &
./calcolone &
./tanticonti -3 -d &
2) myqueue.$USER.old
It’s a backup up of the first file.
It’s overridden each time that
some commands are started from
myqueue.$USER
B) hydraqueuectrl.sh
hydraqueuectrl.sh is the main script.
68
It runs in background, logging into
LOG_FILE (/var/log/log.hydraQueue).
you may start it as the following:
# hydraqueuectrl.sh
This script checks the number of
active processes on hydra.
I called this number num_tot.
Calling NUM_LIMIT the maximum number
of processes hydra can accept, then
if num_tot < NUM_LIMIT ===>
hydraqueuectrl can start other processes
else it must wait until the above
condition is satisfied.
If the above condition is stisfied
hydraqueuectrl have to start some
other processes that are in queue.
but where they are? which is the queue?
thank you for the questions.
The script hydrarun.sh attempts this
task, as you can learn later it will
create for you the file myqueue.$USER, so
each user have a personal queue file.
Hydraqueuectrl sorts the users
by running processes in such a way that
the first user in the list is the one
that have less processes running.
Then save this list in the file:
USERS_LIST_FILE (/var/hydraqueue/users_queue_list.tmp)
Now we have an ordred list
of user. Next step is to check
the myqueue file owned by the
first user in the list and starts
his commands. Furthermore hydraqueuectrl backup
the commands launched in the BACKUP_FILE
(/var/hydraQueue/Launched/launch.$USER) and
delete the commands launched
from myqueue.$USER file.
69
Then hydraqueuectrl sleeeeeep for WAIT seconds
and starts the script myclean.sh.
I’m very happy of this script.
It checks if a process owned
by hydra’s user is started by
hydrarun or not. In the first case
all it’s ok but in the second
it will kill the process.
I can distinguish the process
started with hydrarun because,
in the function sedstrip(), that
runs the commands, there is also
the line:
export MY_HYDRA_RUN=ok
This variable will be saved by the
system in /proc/PID/environ.
All this features are in
a while (( 1 )) loop.
C) hydrarun.sh
This script creates the queue.
It’s used in the following way:
# hydrarun.sh myqueue.list
myqueue.list is a simple file
conatining a list of commands.
es:
#######myqueue.list##########
./spremi &
./spremi &
./spremi &
./calcola -f -g3 &
./calcoletto --info &
#############################
hydrarun creates the file myqueue.$USER
70
if it doesn’t exist, else appends the commands
founded in myqueue.list to it (after
the line "# commands", see section A).
D) myclean.sh
Grep the /proc directories
seraching for the PID and GID
of all the running processes.
Then it selects processes by
their GID, and if:
GID=GROUP1...GROUPN (that are the
users’group GID on the local machine
default value for hydrausers group is 1111),
it checks the file /proc/PID/environ
searching for the variable:
MY_HYDRA_RUN. If the variable is not
set, this imply that the process
is not started using hydrarun
and must be killllllleeeed!.
Added a check on SHELL and program
name to avoid killing ssh session
or vi.
D.5
README.quota
I run 2.4.26-om1 kernel series,
that supports old vfs quota.
So I formatted the filesystems to ext2
and set quota whit the options:
-F vfsold, see quota.sh and addMosixUsers.sh
To set quota:
first install the package
# apt-get install quota.
71
(answer No to the question)
I have modified the /etc/init.d/quota script
as I wrote in the first lines of this document.
So take this script from the /openmosix-all/mosix-script/quota.sh
directory and copy it to /etc/init.d/quota; if you leave
unchanged the name, it will start automatically each reboot,
because apt had just configured it, else run update-rc.d
as you like :).After the installation, the old script quota
trys to set quota on but fails, because has not the
correct "-F vfsold" flag. So after installed, you have to force
it manually (be sure that your quota filesystem are already
mounted, see section below on fstab) :
# /etc/init.d/quota restart
that is the same as running the following commands:
# quotacheck -a -F vfsold
# quotaon -a -F vfsold
But, before running the above commands,
remember to set correctly your /etc/fstab,
my fstab is:
# /etc/fstab: static file system information.
#
# <file system> <mount point>
<type> <options>
proc
/proc
proc
defaults
/dev/hda1
/
reiserfs notail
/dev/hda5
none
swap
sw
/dev/hda2 /hydrahome ext2 defaults,usrquota 1 1
/dev/hda3 /TMP ext2 defaults,usrquota 1 1
/dev/scd0
/media/cdrom0
iso9660 ro,user,noauto
/dev/hdc
/media/cdrom1
iso9660 ro,user,noauto
/dev/fd0
/media/floppy0 auto
rw,user,noauto
As you can see you have to add usrquota after each
device where you want to run quota.
I also needed to create the soft link
between hydrahome and the default nis home.
So I created:
72
<dump>
0
0
0
<pass>
0
1
0
0
0
0
0
0
0
home2/users -> /hydrahome
home3/users -> /hydrahome
home4/users -> /hydrahome
because my nis homes is under
home2/users,home3/users,home4/users.
That’s all.
73
D.6
Ups and apcupsd on hydra
the complete USB options are in the file:
appendix/B.1 kernel/kernel configs/kernel config ups usb.txt in the thdp CDRom. The source of this .config is simply the apcupsd user’s manual. You
can browse it directly from:
http://www2.apcupsd.com/3.10.x-manual/manual.html#Linux-Kernel-Config
74