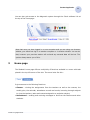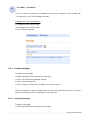
1
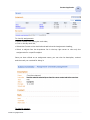
Leo LMS version 6.1
Student - User Manual
Leo LMS version 6.1 - User Manual
by Young Digital Planet
Young Digital Planet developed LMS 6.0 in direct response to the
growing market demand for a comprehensive and versatile
Internet based eLearning platform. The system allows effective
management of complex training processes and competently
manages all aspects involved in the corporate training process
from user registration, content assignments, monitoring students’
activity, storing results and presenting reports.
Contents
3
Table of Contents
I Introduction
II Technical requirements
III Student Application
1
2
5
7
9
Application
description
..............................................................................................................
9
Logging
in
.............................................................................................................. 10
4
Home
page
..............................................................................................................
11
My ..............................................................................................................
profile
12
5
Application
functions
..............................................................................................................
12
3
5.1
Classes
................................................................................................................................... 12
5.1.1
My
...................................................................................................................................
work
12
5.1.1.1 Working
.........................................................................................................................
with assignments
14
5.1.1.2 Archiving
.........................................................................................................................
assignments
15
5.1.2
Weekly
...................................................................................................................................
plan
16
5.1.3
Calendar
................................................................................................................................... 16
5.1.3.1 Adding
.........................................................................................................................
and removing events
17
5.1.4
Attendance
...................................................................................................................................
records
18
5.1.5
Marks
................................................................................................................................... 18
5.1.6
Behaviour
................................................................................................................................... 18
5.1.7
Subjects
................................................................................................................................... 19
5.2
Noticeboard
................................................................................................................................... 19
5.2.1
Sending
...................................................................................................................................
messages
19
5.2.2
Reading
...................................................................................................................................
messages
20
5.2.3
Deleting
...................................................................................................................................
messages
20
© 2006 Young Digital Planet
Part
I
Introduction
I
5
Introduction
Leo LMS 6.1 is a complete online e-Learning platform designed to fulfil a multiplicity of
educational needs. It enables the creation of a learning portal in any institution. The
Leo LMS 6.1 software allows effective management of complex learning processes.
What is more, it competently handles all aspects involved in the educational process,
from user registration, content assignments, monitoring students’ activities, storing
results to finally presenting reports.
The educational content of the Leo LMS 6.1 system is obtainable through standard
Internet browsers. That is why every user in any location (at school or at home) can
participate in a course and accomplish the basic principles of e-Learning – studying at
the time and place of their own choice.
Leo LMS 6.1 consists of 5 different roles:
· Portal Administrator who is responsible for creating schools, adding and assigning
courses to the schools and creating users – especially school administrators,
· School Administrator who creates classes, organises them and adds users
(students, teachers and parents) to the school,
· Teacher who manages the students’ educational process,
· Student who attends classes, makes assignments and sends them to the teacher,
· Parent who can monitor his/her children’s activities and attendance.
© 2006 Young Digital Planet
Part
II
Technical requirements
II
7
Technical requirements
Explanations and comments:
· Leo LMS 6.1 works in the following operating systems:
- Windows 2000 / XP SP2
- Linux - any current stable distribution
- Mac OS X.
· Flash Player must be installed as a plug-in and it must be accessible from a web
browser.
· Some courses include a speech-recording application. This application works fully only
when integrated with Internet Explorer 6.0 browser in Windows XP operating system.
Other browsers (provided that the remaining conditions are satisfactory) allow full
access to the Leo LMS 6.1 platform and course content, without the possibility of
voice recording. In fact, the Leo LMS 6.1 platform, as an independent and flexible
application, will be accessible from nearly all most popular browsers, such as Opera,
Mozilla Firefox 1.5, Safari 1.2, etc.
· The speech-recording application is installed on the client computer when the user
accesses content pages with voice-recording activity for the first time. Before
installing, a pop-up window will appear, asking for confirmation that you trust YDP
products.
· Voice is recorded in a temporary file and is not sent back to the application/database.
When the user exits the speech-recording tool, the temp file is automatically
removed.
· Regular users do not have to take any special steps to create their working
environment and begin to work with the Leo LMS 6.1 platform. They can access the
Leo LMS 6.1 platform from any computer with a web browser and a connection to the
Internet. There is no need to download or install any additional software (apart from
a speech-recording application).
· There are no strict requirements on the Internet connection speed (though at least
56k), although a broadband connection ensures real-time communication with the
server and a quick download of course material.
© 2006 Young Digital Planet
Part
III
Student Application
III
Student Application
1
Application description
9
The Student is able to perform several activities associated with the educational
process within the Leo LMS 6.1 platform. He/she is obliged to ‘participate’ in certain
interactive classes that are more attractive than the usual lessons in a classroom with a
blackboard. These virtual classes have a benefit of being much more effective than the
ordinary ones that take place in reality for a number of reasons. First, it is the student
himself/herself who is obliged to use their own brain to be able to assimilate new
information and not depend entirely upon the teacher (although online communication
with the teacher is of course advisable should there be any problems with mastering
the knowledge). This helps the student to obtain very important skills, such as
independent studying, deductive reasoning, self-discipline, etc. Second, the student is
equipped not only with a virtual student’s book but also with a number of multimedia
items (sound and full-motion video), which enables him/her to better understand the
subject. Third, the student is expected to carry out tasks of all kinds, respect deadlines
and send the tasks back to the teacher for evaluation.
Furthermore, Leo LMS 6.1 enables pupils to feel as though they are in a normal class,
giving them the possibility to contact not only the teacher but also other students.
Online contact between the attendees of a class has the advantage of mutual help
should any problems with a certain topic arise. It can result in cooperation and a sense
of support among the students.
Another aspect worth mentioning is that each student has access to reports and
statistics concerning the whole class. This means that he/she can compare their own
performance with the average class performance.
In short, this application allows for:
1. ‘attending’ classes,
2. using the course content and additional materials uploaded by the teacher (links to
websites and files),
3. making assignments given by the teacher,
4. viewing:
© 2006 Young Digital Planet
10
Leo LMS 6.1 - User Manual
· individual results,
· remarks made by the teachers,
· exercises already done by the student (archived assignments),
· the weekly plan,
· events in the calendar,
5. sending and receiving messages to and from the teachers and other students.
2
Logging in
To log in as a Student you need to type in school ID, login name and password, which
have previously been registered by the school administrator. Make sure you change
your password regularly and that it is safe.
The first time you log in, a small pop-up window will appear:
After closing it, a diagnostic system will check your software for compatibility with the
Leo LMS 6.1. The following components will be examined: browser, operating system,
JavaScript, cookies, plug-in Flash and recording:
© 2006 Young Digital Planet
Student Application
11
You can also gain access to the diagnostic system through the Check software link at
the top of the home page:
Note that once you have logged in on one computer and you are using one browser
window, you should not log in on another computer or in another window. You can do
that, however your previous session will end and any unsaved data will be lost. The
system always warns you of this.
3
Home page
The Student’s home page offers a multiplicity of functions available in a menu with tabs
placed in the top left corner of the site. The menu looks like this:
It gives access to the following functions:
· Classes – viewing the assignments from the teachers as well as the courses, the
weekly plan, the calendar, attendance records and marks, browsing through subjects
to view the teachers, tasks and content assigned to a particular subject,
· Noticeboard – sending and receiving messages to and from the teachers and other
students.
© 2006 Young Digital Planet
12
4
Leo LMS 6.1 - User Manual
My profile
My profile allows you to change your password. You can do this by clicking on the My
profile link in the top right corner of the site:
To change your password:
· Type your new password in the first gap,
· Re-type it in the second gap,
· Click on Set password.
5
Application functions
5.1
Classes
The Classes tab is the main tab for the student and allows him/her to organise their
educational process, make assignments, control their attendance, manage meetings,
communicate with the teachers and other students.
5.1.1
My work
The My work screen shows both your assignments, together with their end dates, marks
and status, and the subject they concern, as well as your courses, which you are
expected to work on apart from the assignments:
© 2006 Young Digital Planet
Student Application
13
To view My assignments:
· Select Classes from among the main tabs,
· Click on the My work link,
· Select the Current or the Archived sub-tab below the Assignments heading,
· Select a subject from the drop-down list in the top right corner to view only the
assignments for a specific subject.
Once you have clicked on an assignment name, you can view its description, content
and the mark you received for doing it:
To view My courses:
© 2006 Young Digital Planet
14
Leo LMS 6.1 - User Manual
· Select Classes from among the main tabs,
· Click on the My work link,
· Select a course name below the My courses heading,
· Select chapter(s) that you want to work on.
You can also view the results of your work and the time you spent on it both next to the
link to the course and next to each chapter you worked on.
5.1.1.1
Working with assignments
To view your current assignments:
· Select Classes from among the main tabs,
· Click on the My work link,
· Select the Current sub-tab,
· Select a subject from the drop-down list in the top right corner to view only the
assignments for a specific subject.
The Current sub-tab shows the assignments that you are working on at the moment, or
that you still have to start. Clicking on the Name enables you to view the assignment’s
description with an end date, that is, the date by which your teacher expects you to
have finished and submitted the assignment. Here, you can also view the content of the
assignment’s course elements, additional writing assignments and, if your teacher
added extra information, links to files and websites, etc.
By clicking on the content link you can start completing the assignment. While
working on the assignment remember it is necessary to click on the Save
button after you have finished an activity. This will save your results in the system.
Next to the link you will see your result and the time you spent in the content.
You can click on any additional links that have been sent to you by your teacher, to
open a website with supplementary information or to open an attached file.
Once you have finished the assignment, click on the Submit button to send the
assignment to the teacher. Note that your teacher has set a certain end date.
Assignments should always be submitted before the end date. Once you have
© 2006 Young Digital Planet
Student Application
15
submitted your assignment, you cannot change the content, so make sure you click on
the Submit button only when you are completely sure the assignment is ready.
As soon as your teacher has evaluated your assignment and given you a mark, the
status of the assignment changes to Marked. You can now view the assignment to look
for the teacher’s comments.
Any assignment that has just been sent to you and not yet viewed by you, is marked in
bold letters.
5.1.1.2
Archiving assignments
The Archived sub-tab shows the assignments that you worked on in the past. It displays
the date you finished them and the date you received a mark for them. You can still
click on the assignment to view the details for it. You cannot, however, change or redo
them in any way. You can move an assignment from your list of current assignments to
your archives only after you have received a mark for them. However, the assignments
that you are not supposed to get any mark for can be moved to the archives at any
time.
To move an assignment to the archives:
· Select Classes from among the main tabs,
· Click on the My work link,
· Click on the name of the assignment (the assignment must have a Marked status),
· Click on the Archive button in the top right corner of the screen.
When you return to the My work screen, your archived assignment will only be available
in the Archived sub-tab. The process of moving an assignment to the archives is final
and cannot be reversed.
To view your archived assignments:
· Select Classes from among the main tabs,
· Click on the My work link,
· Select the Archived sub-tab,
· Select a subject from the drop-down list in the top right corner to view only the
© 2006 Young Digital Planet
16
Leo LMS 6.1 - User Manual
assignments for a specific subject.
5.1.2
Weekly plan
To view your weekly plan:
· Select Classes from among the main tabs,
· Click on the Weekly plan link.
This function allows you to view your weekly plan. There are subjects and groups
displayed in your plan. By clicking on a subject, you will be taken to the page displaying
the subject’s details (teacher(s), assignments, content and marks).
5.1.3
Calendar
To view the Calendar:
· Select Classes from among the main tabs,
· Click on the Calendar link.
In your calendar you can:
· view your assignments (with a due date),
· add and view you own events:
© 2006 Young Digital Planet
Student Application
17
You can scroll through your calendar by year and month (located above the weekdays)
and through week numbers (located on the left). Clicking on a certain day will display
the events for that day. The days with added events are displayed in bold.
The calendar is your personal tool, so all the events that you are going to add will only
be seen by you.
5.1.3.1
Adding and removing events
To add an event to your calendar:
· Select Classes from among the main tabs,
· Click on the Calendar link,
· Click on Add new event,
· Click on the calendar icon next to the date field to select a date, and use the 24-hour
drop-down lists to select a time,
· Type in information about the event into the Description text box,
· Click on Save.
Your event information will now be stored in your calendar.
© 2006 Young Digital Planet
18
Leo LMS 6.1 - User Manual
When you add your own events to the calendar, you will see a Remove button alongside
each one of them. Use this to delete events from the calendar.
Note that you can only remove your own events from the calendar and that you are
always asked to confirm the removal before any deletion occurs.
5.1.4
Attendance records
To view your attendance records:
· Select Classes from among the main tabs,
· Click on the Attendance records link.
Here, you can see an overview of all planned and held lessons, their dates and times,
and your attendance. In the Attendance column your presence or absence is recorded.
You can view your attendance records in any month you like by clicking on Previous
month or on Next month.
The records are kept by your teacher. Should there be any questions about these
records, it is advised that you contact the teacher.
5.1.5
Marks
To view your marks:
· Select Classes from among the main tabs,
· Click on the Marks link.
In the Marks screen you can view the marks given to you by your teacher(s) for a
particular subject. In the overview you will see the mark you received, the date it was
given and the name of the assignment you were given the mark for. You are also able
to see the minimum, maximum and average marks for a particular assignment in your
class and compare it with your own mark.
5.1.6
Behaviour
To view your behaviour marks:
© 2006 Young Digital Planet
Student Application
19
· Select Classes from among the main tabs,
· Click on the Behaviour link.
On this page it is also possible for you to read any remarks given to you by your
teacher(s).
5.1.7
Subjects
To view the subjects’ description:
· Select Classes from among the main tabs,
· Click on the name of the subject below the Subjects link.
A subject’s description includes:
· Assigned teacher(s),
· Assignments
12
(divided into two tabs: Current and Archived),
· Content (to browse through the course, click on its name),
· Marks:
5.2
Noticeboard
The Noticeboard is the key to communication between users. Clicking on the
Noticeboard tab makes two sub-tabs available:
· Received messages: with an overview of messages that were sent to you,
· Sent messages: with an overview of all messages sent by you:
5.2.1
Sending messages
To send a message:
· Select Noticeboard from among the main tabs,
· Click on Send message on the right,
· Select recipients from the To: drop-down list,
· Type in a message title and the actual message,
© 2006 Young Digital Planet
20
Leo LMS 6.1 - User Manual
· Click on Send to transmit the message to the chosen recipients. The message will
now appear in your Sent messages sub-tab.
A student can send a message to:
· All students from his/her class,
· One student from his/her class,
· One of his/her teachers:
5.2.2
Reading messages
To read a new message:
· Select Noticeboard from among the main tabs,
· Click on the Received messages sub-tab,
· Click on the message title,
· Click on Reply to answer this message if you wish to do so.
Titles are displayed in bold to indicate that you have not read them yet. Once you have
read the message, the title is displayed in a normal font.
5.2.3
Deleting messages
To delete a message:
· Select Noticeboard from among the main tabs,
© 2006 Young Digital Planet
Student Application
21
· Click on the Received messages or the Sent messages sub-tab,
· Check the box next to the message title (checking the top box automatically selects
all boxes),
· Click on the Remove message button on the right,
· Confirm by clicking on OK (or click on Cancel if the messages are not to be removed).
Note that you are always asked to confirm the removal before any deletion occurs.
Note that it is absolutely essential to check the elements you want to delete.
Otherwise, no deletion will occur.
© 2006 Young Digital Planet