1
Sartorius Supermicro.
S4.
Electronic Ultramicro Balance
Installation and Operating Instructions
1
3
5
7
9
11
13
15
17
19
21
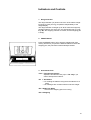
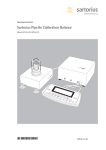
2
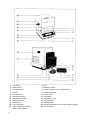
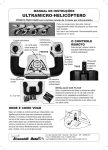
Pan stirrup
ZERO button
Arrestment knob
Interface
MOTOR switch
Socket (6-terminal)
Manufacturer´s label
Arrestment knob
Leveling foot
Front sliding door
Weight application selector
1000-mg tare weights)
2
4
6
8
10
12
14
16
18
20
22
Pan
Stability indicator
Power receptacle, fuse, voltage selector
Manual switch unit
Power switch
CAL button
Sliding door - side
Range indicator
BRAKE button
Weight application selector (1000-mg tare weights)
Level indicator
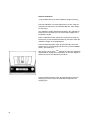
Sartorius Supermicro.
S4.
With this Sartorius Balance you have acquired a sophisticated,
top-of-the-line weighing instrument that will help ease your dally
work load.
Before you operate your new balance, please read these Installation and operating instructions carefully.
This equipment complies with the requirements in Part 15
of FCC Rules for a Class A computing device. Operation
of this equipment in a residential area may cause unacceptable interference to radio and TV reception requiring
the operator to take whatever steps are necessary to
correct the interference.
Contents.
Equipment
4
How to Handle Your Ultramicro Balance
5
Startup
7
Operation
10
Calibration
11
Indicators and Controls
13
Weighing
15
Balance Operating Program
17
Troubleshooting Guide
20
Accessories
22
Specifications
23
3
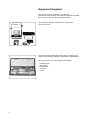
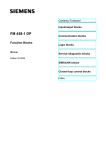
Equipment Supplied.
Do not miss out on the benefits of our warranty.
Please fill out the warranty card, indicating the date of installation, and return the card to your Sartorius dealer.
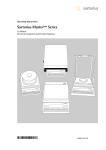
The equipment supplied comprises the components
shown on the left.
Save the packaging materials and the box for shipping your
balance to prevent any damage caused during transportation.
The accessory kit in a case contains the following:
— Weighing pan
— Pan stirrup
— Screwdriver
— Forceps
— Cloth
4
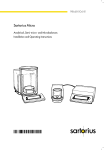
How to Handle Your
Ultramicro Balance.
General Installation Instructions
Ultramicro balances are highly precise and very sensitive
measuring instruments. Therefore, please choose a suitable
place to set up your balance. lt should not be exposed to the following:
— heat radiation
— components in the atmosphere that have a corrosive or aggressive effect
— vibrations
— drafts.
Set up your balance on a suitable balance fable or use a wall
console (see "Accessories").
Your Sartorius Balance will provide accurate readouts even
when it is exposed to unfavorable ambient conditions. You can
adapt it to your requirements simply by changing the menu
code settings in the balance operating program. For this purpose, please refer to pages 17 to 19.
5
Maintenance and Care
To ensure proper care of your electronic S 4 ultramicro balance,
all you need to do is regularly calibrate it and clean the weighing
pan.
Maintenance of your balance should be done at least once a
year by a Sartorius service technician. lf you happen to have
any trouble with your balance, please contact your nearest Sartorius service center.
Directions for Working with Ultramicros
Before you Start weighing, please observe the following:
After plugging your balance into a wall outlet, make sure to allow between 24 to 48 hours warmup (conditioning time).
Working with an ultramicro balance requires a steady hand and
a smooth, uninterrupted technique.
Use forceps or other suitable Utensils to load your sample on
the pan.
Do a few trial weighing procedures before you begin with actual
weighing of your sample.
The sliding door on the right side (14) may remain open if the
weighing chamber is conditioned, dust-free and not exposed to
drafts or turbulence. If the weighing chamber has not been
opened for a relatively long period, it may have a temperature
which is different from that of the balance's surrounding environment. Therefore, as soon as you open the weighing chamber, a change in temperature will inevitably occur and may
show up as a change in the weight readout. In this case, we
recommend that before you begin with an actual repetitive
weighing procedure you open and dose the weighing chamber
at the same rate as you will be doing during such a procedure.
Carefully place your sample on the pan and, if necessary, remove it along with the pan.
The accuracy of the resulting weight readouts will increase as
the degree of consistency is increased for successive weighing
procedures.
Important Note
Unplug your balance before you connect or disconnect peripherals.
6
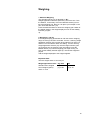
Startup.
Insert the plug of the manual switch unit (8) in the socket (11)
located on the rear panel of the balance. Secure the connection
by tightening the knurled collar.
The balance has been set to 220 volts.
How to change the voltage setting:
Adjust the voltage selector (6) to your local line voltage. The
setting on top must match your local line voltage rating. Write
the new setting on the manufacturer's label (13).
At the point of use, plug the line cord (power lead) of the balance into a properly installed electrical or wall outlet.
lf you use a wall outlet that does not have a protective grounding conductor, make sure to ground your balance.
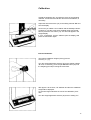
7
At the point of use, level the balance using the leveling feet (17)
such that the air bubble is centered within the circle of the level
indicator (22).
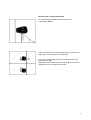
How to Hook the Weighing Pan
Press the MOTOR switch (9) to have the pan extractor arm
automatically moved outside.
Position the weighing pan (2) in the pan stirrup (1), and hook
the pan stirrup on the pan extractor arm.
Press the MOTOR switch to retract the pan.
8
Releasing the Transport Arrestment
Turn both weight application selectors (20 and 21)
to the setting "0000."
Pull out arrestment knob (15) toward the right and push it in at
setting "A." You should hear an audible dick.
lf you wish to start weighing, turn the arrestment knob to the
setting marked "W."
Briefly leave the arrestment knob in setting "B" to prevent the
weighing pan from rocking back and forth.
9
Operation.
Please leave the balance connected to line power for your convenience.
Use the power switch (10) to turn your balance on or off.
After the balance has been plugged into an electrical outlet, the
weight display will go out. All other electronic circuits of the balance will remain energized (standby state). This means the balance is immediately ready to operate without requiring warmup
the next time you switch it on.
After the power is turned on, a test of all essential electronic circuits is automatically run.
The self-test ends with the readout 0.0000 mg.
Now place your sample on the pan (2) to determine its weight
(extract and retract the pan to do so). Read off the weight in the
display (5) as soon as the stability indicator (4) lights up.
.
lf the weight display does not indicate 0.0000 mg before you
begin to weigh, press the ZERO button (3) to zero it.
10
Calibration.
Unload the weighing pan, and dose the doors of the weighing
chamber. Check the level indicator and relevel the balance, if
necessary.
Adjust the arrestment knob (15) to the setting marked "W" and
zero the display.
As soon as you obtain a zero readout and the stability indicator
(4) lights up, use the screw drive supplied along with the balance to press the CAL button (12). "C" will now appear in the
weight display.
If "CE" is displayed, tare the balance (zero the display) and
press the CAL button again.
Internal Calibration
The internal calibration weight (100 mg) has an
accuracy “± 1 µg”.
Turn the weight application selector (20) to the setting marked
"C" and, if necessary, press the pan BRAKE button (18) until
the weighing pan stops rocking back and forth.
After approx. 20 seconds, "C" will flash and then the calibration
weight will be displayed.
An acoustic Signal indicates the end of the calibration procedure.
Turn the weight application selector (20) back to setting "0.".
11
External Calibration
- only possible with an accurate calibration weight (100 mg)External calibration is recommended when you are using several balances that have to be calibrated with the same weight
for test series.
The calibration weight should be deposited in the chamber between the front and side doors to ensure that it adapts to the
temperature inside.
Call the calibration mode readout "C" (see previous page for
instructions). Press the MOTOR switch (9) and then center the
calibration weight on the weighing pan.
Press the MOTOR switch again (to automatically retract the
weighing pan). lf the weighing pan still rocks, push the BRAKE
button - pan brake (18).
After approx. 20 seconds, "C" will flash and then the calibration
weight readout will appear in the display. An acoustic Signal indicates the end of the calibration procedure.
Press the MOTOR switch again (to automatically extract the
weighing pan) and remove the calibration weight from the
weighing pan.
12
Indicators and Controls
1. Range Indicator
The range indicator (16) shows how much of the electric weighing range is used (120 mg), lt operates independently of the
weight display.
The range indicator must light up at "0 %" when the weight application selectors are set to zero, the arrestment knob is in setting "W," the weighing chamber is closed, and the weighing pan
is empty.
2. BRAKE Button
Press the BRAKE button (18) to stop the weighing pan from
rocking. Whenever you press the MOTOR switch to retract the
weighing pan, the pan brake is automatically activated.
3. Arrestment Knob
»TA« = Transport Arrestment
Adjust the arrestment knob (15) to “TA“ only if you
wish to transport the balance.
»A« = Arrestment
— For leveling the balance using the level indicator as a
guide
— For loading a tare container with an unknown weight
»B« = Brake Pan Brake
- Prevents the weighing pan from rocking
»W« = Weighing
13
4. Weight Application Selectors
Your balance has built-in weights (tare weights) which can be
used to mechanically apply a load u p to 3,900 mg.
The left weight application selector (20) applies the 1,000-mg
weights and the right weight application selector (21) the 100mg weights.
Important Note
Turn the weight application selectors to„“TA“ only if the balance to be transported.
14
Weighing.
1. Absolute Weighing
The arrestment knob (15) is adjusted to "W."
Weight application selectors (20 and 21) are set to zero. Tare
the balance, if necessary. Press the MOTOR switch (9) to extract the weighing pan. Now you can place your sample on the
pan. Close the side door (14).
Press the MOTOR switch to retract the weighing pan. Read off
the weight shown in the weight display as soon as the stability
indicator (4) lights
up.
2. Weighing > 120 mg
If the weight display (5) indicates an "H" the electric weighing
range of 120 mg has been exceeded. Turn the 1,000-mg weight
application selector (20) until the range indicator (16) goes out,
and then turn the selector back one setting. Turn the 100-mg
weight application selector (21) until the range indicator goes
out, and then turn the selector back one setting. Press the
BRAKE button (18) until the weighing pan stops rocking. As
soon as the stability indicator lights up, read off the weight displayed.
Add the weight displayed to the weights applied.
Important Note:
The tare weights have an accuracy of:
Weight application levels mg 1000
Standard set of weights
Set of weights (option)
and S 4-**VJA
µg ≤± 60
µg ≤± 20
100
µg ≤± 60
µg ≤± 10
15
3. Weighing with a Tare Container (4 g max.)
—
—
—
—
—
—
—
—
—
—
—
—
—
—
Adjust arrestment knob to "W."
Set weight application selectors to zero.
Press the ZERO button.
The weight display shows "0.0000" and the stability indicator lights up.
Press the MOTOR switch to extract the weighing pan.
Place tare container on the weighing pan.
Press the MOTOR switch and dose the side door (14)
of the weighing chamber.
"H" lights up in the weight display when ever the weight
of the tare Container exceeds the weighing range (120
mg).
Turn the 1,000-mg weight application selector (20) until
the range indicator goes out, and then turn the selector
back one setting.
Turn the 100-mg weight application selector (21) until
the range indicator goes out, and then turn the selector
back one setting.
Press the BRAKE button until the weighing pan stops
rocking.
As soon as the stability indicator lights up, press the
ZERO button;
The weight display now shows 0.0000 mg.
Weighing in (see "1. Absolute Weighing")
Important Note
lf you wish to weigh several components one after the
other in the same tare Container, you can zero the display
(tare) after weighing in each component to always weigh
starting from zero.
4. Back Weighing
Back weighing, also called reweighing, is done when the weight
of a sample has to be determined before and after a fest or experiment.
To determine the difference in weight, you must backweigh on
the same weighing pan and with the same tare Container and
the same balance you used for initial weighing.
16
Balance Operating
Program.
The balance operating program lets you adapt your balance to
various ambient conditions and weighing applications.
At the factory, we have set the codes for a Standard program,
which is protected by a locking function to prevent accidental
changes.
The "code" contains the information of the operating program.
II consists of three digits, one each for the page, the line and
the word.
How to access the menu of the balance operating program:
Turn off the balance. Hold down the ZERO button (3) and simultaneously press the power switch (10). Upon completion of the
automatic self-test, release the ZERO button as soon as "CH5"
is displayed. The Status of the balance operating program will
be indicated in the weight display: the letter "L" Stands for the
list mode. In this mode you can check the code setting, but you
cannot change it.
lf you wish to change a program code, you must first unlock the
program access function.
To do so, switch off the balance (use power switch). Plug the
menu access connector (order no. 6738-58) into the female
connector (7) of the interface. Hold down the ZERO button (3)
again and simultaneously press the power switch (10). Upon
completion of the automatic self-test, release the ZERO button
as soon as "CH5" is displayed. The display will now show "C,"
representing the change mode, which means you can now
change the setting.
17
After the balance operating program has been called, the display will show a continuous numerical sequence from 0-4, representing the "page" selection, in addition to the Status code letter "L" or "C."
When the code number you wish to check or change appears,
press the ZERO button. The "page" code number will now stop
in the display, and a series of numbers for the "lines" will begin
to cycle. Again, press the ZERO button to stop the code number
of your choice in the display. Next, the numbers for the "word"
will cycle in the display.
The ! symbol that appears above the "mg" symbol indicates
the actual setting.
To change any setting ("C" mode), press the ZERO button as
soon as the appropriate numerical code appears.
Brief display of the "o" symbol confirms your selection followed
by a return to "zero" representing the line.
How to return to the weighing program:
Press the ZERO button each time a 0 appears in the numerical
sequence (word, line, page). lf you have made code changes,
your code entry will be stored as soon as the display returns to
the weighing mode.
Relock the balance weighing program by unplugging the menu
access connector.
lf you want to be able to access the operating program at any
time, please enter the code 411.
18
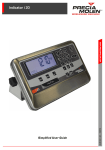
C 1 3 1
page
line
word
Menu of the Balance Operating Program
(active parameters)
Ambient Conditions
Code
1
2
3
4
Very stable
Stable
Unstable
Very unstable
1
2
3
4
5
6
7
8
9
Ambient Conditions
0,25 digit
0,5 digit
1
digit
2
digits
4
digits
8
digits
16
digits
32
digits
64
digits
C
C
C
C
C
C
C
1
2
3
4
Display Format
Last decimal ON
Last decimal OFF
Last decimal at stability
All decimals at stability
Code
C
C
C
C
1
1
1
1
1
1
1
1
Code
C
C
C
C
C
C
C
C
C
1
1
1
1
1
1
1
1
1
2
2
2
2
2
2
2
2
2
Code
C
C
C
C
1
1
1
1
3
3
3
3
Code
C 1 4 1
C 1 4 2
Code
2 1 1
2 1 2
2 1 3
2 1 4
Tare Mode
With stability
At stability
!
!
!
2
2
2
2
2
2
2
1
2
3
4
5
6
7
Baud Rate
150 Bd
300 Bd
600 Bd
1200 Bd
2400 Bd
4800 Bd
9600 Bd
Code
C 2 3
C 2 3
c 2 3
c 2 3
1
2
3
4
Parity-Bit
Mark-Parity
Space-Parity
Odd-Parity
Even-Parity
2
2
2
2
2
2
2
Special Information
Program Lock
Code
OFF
c 4 1 1
ON
c 4 1 2
c 4 1 0
c 4 0
Call program line
Call program page
C 0
End of Programming
!
!
!
!
Data Output
Ext. print command
without stability
Ext. print command
at stability
Autom./synchron. with
display without stability
Autom./synchron. with
display at stability
!
Additional parameters involve the data output format of the interface and calculation programs that can be
run external keyboard (if required, please ask for our special information). – Please refer to the “Accessories.” -
19
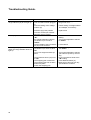
Troubleshooting Guide.
Problem ...
Causes ...
- No line voltage avaible
The weight display (5) and the
range indicator (16) do not light up. - Line cord has not been plugged
in
- Incorrect setting of the voltage
selector (6)
Remedy
- Check current supply
- Plug in line cord
- Defective (6) (If the problem
reoccurs contact your nearest
Sartorius service center)
- The arrestment knob is not set to
The display cannot be zeroed
“W”
- the weight application selector
(20 and/or 21) is not set to
»0000«
- The air bubble of the level indicator (22) is not centered
The weight display shows “L”
- The weight application selector
(20 and/or 21) is set to “T, A or
and/or the range indicator does not
TA”
light up.
- Too much weight has been applied
- replace fuse
- The arrestment knob (15) is set
to »B«
- The weighing pan is extracted
- The weighing pan has not been
hooked on place
- Check the weighing pan
20
- Check setting of voltage selector
and readjust, if necessary
- Push in arrestment knob at “W”
setting
- Turn weight application selector
to »0000«
- Level balance
- Turn weight application selector
too »0000«
- Turn weight application selector
(20 and/or 21) back by one setting
- Push in arrestment knob at the
“W” setting
- press MOTOR switch (9)
- Make sure it does not tuch any
part inside the chamber
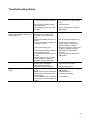
Troubleshooting Guide.
The weight display shows “H.”
- The electric weighing range
(> 120 mg) has been exceeded
- The maximum loading capacity
been exceeded
- The arrestment knob (15) is set
to “TA”
The weight readout changes constantly or the stability indicator (4)
does not light up.
The weight display shows “CE.”
The weight readout is obviously
wrong
- The balance has not been properly leveled; air bubble is not
centered in the level indicator
(22)
- Extremely unstable ambient conditions
- Too much vibration or balance is
exposed to a draft
- Check the weighing pan
- A door of the weighing camber is
not completely closed
- The arrestment knob (15) is set
to “A”
- Sample does not have a stable
weight (absorbs moisture or
moisture content evaporates)
- The CAL button (12) was not
pressed when the display
showed a zero readout
- The weighing pan is loaded
- The arrestment knob (15) is set
to “A”
- Balance has not been calibrated
- Balance has not been tared before weighing
- The air bubble of the level indicator (22) is not centered within the
circle
- Adjust weight application selectors (20 and/or 21) (see “Weighing”)
- Unload balance
- Push in arrestment knob at the
“W” setting
- Level balance
- Set up balance in another area
- Access menu to adjust the
proper code for the particular
type of ambient conditions
- Make sure it does touch any part
inside the weighing chamber
- Close doors of the weighing
chamber
- Push in arrestment knob at the
“W” setting
- Press the ZERO button (3) and
re-press the CAL button
- Unload weighing pan
- Push in arrestment knob at the
“W” setting
- Calibrate balance
- Tare before weighing
- Level balance
21
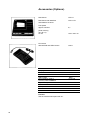
Accessories (Options).
Data Printer
YDP 01
Data Printer with date/time
and statistics functions
YDP 01-*D
Print speed
approx. lines/sec.
0,7
printer housing
(W x D x H)
on mm
150 x 138 x 38
Foot switch
with MOTOR and ZERO switch
7252 1
Menu access connector
Carrying case
balance table
Extension with 2 drawers for balance table
Wall console
Set of weights; rated to
accuracy class E2/NBS-M
Digital/analog converter
IEC converter
BCD parallel converter
RS 422 converter
Dust cover
Interface
See the Interface Description MP 8-1.
22
6738-58
6067 11
YWT 01
6802
6804
69 45149
YDA 01 Z
7253 16
7253 18
7253 19
69 6076
Specifications.
Model
S4
Electric weighing range
Max. loading capacity
Readability
Tare range (electr.)
Set of internal weights (mechanical)
Accuracy of the set of weights:
Application levels
Standard set of weights
mg
mg
µg
mg
mg
Set of weights (option) and
S 4-**VJA
Calibration weight, 100 mg
Standard deviation
Max. linearity
Stabilization time (typical)
Adaptation to environment
and application
Stability range
Ambient temperature range
Sensitivity drift
Pan size
Stirrup with/height
Balance (W x D x H)
Net weight, approx.
line voltage (mains); frquency
Allowable voltage fluctuation
Power consumption
Interface
µg
mg
µg
120
4020
0,1
120
3900
1000
≤± 60
≤± 20
100
≤± 60
≤± 10
µg
µg
µg
s
±≤ 1
±≤ 0,2
±≤ 0,3
10
4 optimized filter levels
d
C
0,25 ... 64 (menu-selectable)
o
o
+ 15 C bis +30 C
/K
mm
mm
mm
kg
±≤ 2 ∙ 10
Ø 22
25/60
203 x 380 x 326
14,5
100 V/ 120 V / 220 V 240 V 50-60 Hz
-15% ... +10%
12 (typ.)
RS 232 C-S/ V 24 – V 28 /RS 423 / V 10;
7-bit; parity: -even, -mark, -odd, -space;
transmission rates: 150 … 9600 Baud
o
VA
-6
23
Sartorius AG
B
P
T
37070 Göttingen
Weender Landstraße 94–108, 37075 Göttingen
(0551) 308-0, F (0551) 308-3289
Internet: http://www.sartorius.com
Copyright by Sartorius AG, Göttingen, Deutschland.
All rights reserved. No part of this publication may be
printed or translated in any form or by any means without
the prior written permission of Sartorius AG.
Sartorius AG reserves the right to make change to the
technology, features, specification and design of the equipment
without notice.