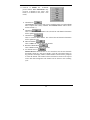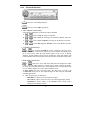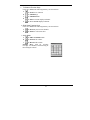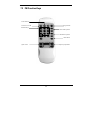
1
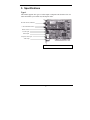
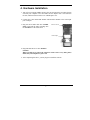
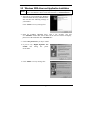
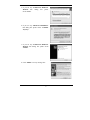
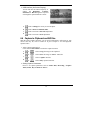
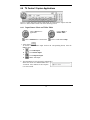
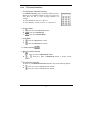
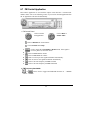
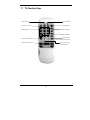
User’s Manual For Play TV MPEG2 PV-M4800 DOC NO: 54-M4700-03 02/11/29 Rev.C FCC Requirement This device has been certified to comply with the limits for a Class B computing device pursuant to Subpart J of Part 15 of the FCC Rules. See instructions if interference to radio reception is suspected. WARNING: This equipment generates and uses radio frequency energy and, if not installed or used properly, that is, in strict accordance with the manufacturer's instructions, may cause interference to radio or television reception. It has been tested and found to comply with the limits for a Class B compliant device in accordance with the specifications in Subpart J of Part 15 of FCC Rules, which are designed to provide reasonable protection against such interference in a residential installation. However, there is no guarantee that interference-will not occur in a particular installation. If this equipment does cause interference to radio or television reception, which can be determined by turning the equipment off and on, the user is encouraged to try to correct the interference by one or more of the following measures: ˙ ˙ ˙ ˙ Reorient the receiving antenna Relocate the computer away from the receiver Move the computer away from the receiver Plug the computer into a different outlet so that the computer and the receiver are on different branch circuits ˙ Ensure that the card's mounting screws, attachment connector screws, and ground wires are tightly secured ˙ Ensure that slot covers are installed in all unused slots If necessary, consult your dealer, service representative, or an experienced radio/television Technician for additional suggestions. The manufacturer is not responsible for any radio or TV interference caused by unauthorized modifications to this equipment. It is the responsibility of the user to correct such interference. The user may find the following booklet prepared by the Federal Communications Commission helpful: How to Identify and Resolve Radio-TV Interference Problems. This booklet is available from the Government Printing Office, Washington, D.C. 20402, Stock No. 004-000-00345-4. NOTE: CAUTION: You must use shielded interface cables with a ferrite bead in order to maintain compliance with the limits for a Class B device. CHANGES OR MODIFICATIONS NOT EXPRESSLY APPROVED BY THE PARTY RESPONSIBLE FOR COMPLIANCE COULD VOID THE USER'S AUTHORITY TO OPERATE THE EQUIPMENT I Notice The information in this document is subject to change in order to improve reliability, design, or function without prior notice and does not represent a commitment on the part of this company. In no event will we be liable for direct, indirect, special, incidental, or consequential damages arising out of the use or the inability to use the product or documentation, even if advised of the possibility of such damages. No part of this reference manual may be reproduced or transmitted in any form or by any means without the prior written permission of this company. 2002 Trademark Acknowledgements All brand names and trademarks are the property of their owners. Limited Warranty Our company warrants this product against defects in materials and workmanship for a period of one (1) year from the date of purchase. During the warranty period, a product determined by us to be defective in form or function will be repaired or at our option, to be replaced at no charge. This warranty does not apply if the product has been damaged by accident, abuse, misuse, or as a result of service or modification other than by us. This warranty is in lieu of any other warranty expressed or implied. In no event shall we be held liable for incidental or consequential damages, such as lost revenue or lost business opportunities arising from the purchase of a this product. II TABLE OF CONTENTS 1. FEATURE ............................................................................................................ 1 2. SYSTEM REQUIREMENTS ............................................................................. 1 3. SPECIFICATIONS.............................................................................................. 2 4. HARDWARE INSTALLATION......................................................................... 3 4.1 5. SOFTWARE INSTALLATION .......................................................................... 5 5.1 5.2 5.3 5.4 6. CAPTURE APPLICATION INSTRUCTION .......................................................... 11 SYSTEM REQUIREMENTS ............................................................................... 11 VIDEO DISPLAY WINDOWS ........................................................................... 11 CAPTURE TO CLIPBOARD AND AVI FILES ...................................................... 12 CAPTURE SETTINGS ...................................................................................... 13 TV CONTROL / CAPTURE APPLICATIONS ....................................................... 16 FM CONTROL APPLICATION.......................................................................... 24 REMOTE CONTROL ...................................................................................... 26 7.1 7.2 8. WINDOWS 98SE/ME DRIVER AND APPLICATION INSTALLATION ..................... 5 WINDOWS 2000 DRIVER AND APPLICATION INSTALLATION ............................. 7 WINDOWS XP DRIVER AND APPLICATION INSTALLATION ............................... 8 DIRECTX INSTALLATION ............................................................................... 10 CAPTURE APPLICATION.............................................................................. 11 6.1 6.2 6.3 6.4 6.5 6.6 6.7 7. CONNECTING TO OTHER AV DEVICES .............................................................. 4 TV FUNCTION KEYS ..................................................................................... 27 FM FUNCTION KEYS .................................................................................... 28 FAQ ..................................................................................................................... 29 III 1. Feature □ □ □ □ □ □ □ □ Fully PCI Rev 2.1 compliant. Supports Windows 98SE/ME/2000/XP. Supports NTSC, PAL or SECAM video formats. Full TV frequency range for CATV/VHF/UHF. FM band coverage from 87.5 to 108MHz (Only for PV-M4700w/FM). Combined S-Video & Composite Video and Audio Inputs. Supports planner YUV data format. VBI data capture for closed captioning data decoding. 2. System Requirements □ □ □ □ □ □ □ □ □ Intel Pentium 133MHz or higher, and compatible computer. Mainboard with Intel 430FX chipset or higher. PCI local bus PnP 2.1 compliant. SVGA support higher than 640x480/Hi-color. Sound Card support for audio mix functions. Cable/VHF/UHF antenna. Windows 98SE/ME/2000/XP. DirectX Ver 8.0 or higher. Minimum Hard Drive free space of 100MB. 1 3. Specifications Type1. This model supports two types of video inputs: Composite and S-Video. This TV Tuner card allows you to watch TV, and capture video. FM radio antenna (OPTION) CATV/VHF/UHF antenna Remote control S-Video input Audio output Composite video input Audio input PV-M4700 w/FM & w/o FM 2 4. Hardware Installation 1. Turn off your computer FIRST. Remove the case and insert this TV tuner/Capture card into your computer’s PCI slot. Make sure the adapter card is well seated in the slot, and then fasten it with screws. Then Replace case. 2. Connect the CATV/VHF/UHF antenna and FM radio antenna to the tuner-input port of adapter. 3. Plug one end of audio cable into ”AUDIO OUT” input and the other end plugs into the ”LINE IN” of the sound card. Remote control Audio output 4. Plug in Remote Receiver into ”Remote”. Caution: : When you plug-in or remove the connector of the receiver every time, please make sure your computer is power off. 5. After completing the above, you may begin to install the software. 3 4.1 Connecting to other AV devices This TV tuner/Capture card provides two-types of Video Input. One is Composite Video input, the other one is S-Video input, and there is another connector for audio line in. S-Video input Composite video input Audio input 4 5. Software Installation 5.1 Windows 98SE/ME driver and Application Installation Notice After hardware installation, power on your computer and then system will detect a new hardware. Please set the new hardware to “Unknown Device”. 1. After turn on your computer, the Windows 98SE/ME will detect the newly added hardware and will show the following message on your monitor. Click ”NEXT” on every message box. 2. The operating system will automatically detect the TV card as a new device and display the Add New Hardware Wizard dialog box. Click-on the ”Next” button to continue. 3. The next dialog box will ask how would you like to install the driver. Click-on ”Search for the best driver for your device. (Recommended)” option and Click-on the ”Next” button to continue. 5 4. Please DO NOT select any item, chick-on “Next”. 5. Click-on the “Finish” button. 6. Insert the AutoRun CD-ROM driver (wait a few seconds). You will see ”AutoRun” window that will be shown on the screen. If it does not display, please brow CD and double click ”AutoRun.exe”. 7. Click on the product that you buy to install. 8. Click ”NEXT” on every message box. 9. Choose ”Yes, I want to restart my computer now” and click ”Finish” to restart Windows. 6 5.2 Windows 2000 driver and Application Installation Notice After hardware installation, power on your computer and then system will detect a new hardware. Please set the new hardware to “Unknown Device”. 1 After turn on your computer, the Windows 2000 will detect the newly added hardware and will show the following message on your monitor. Click ”Cancel” on every message box. 2. Insert the AutoRun CD-ROM driver (wait a few seconds). You will see ”AutoRun” window that will be shown on the screen. If it does not display, please brow CD and double click ”AutoRun.exe”. 3. Click on the product that you buy to install. 4. If you see any ”Digital Signature Not Found” this dialog box please clicks ”Yes”. 5. Click ”NEXT” on every message box. 7 6. Choose ”Yes, I want to restart my computer now” and click ”Finish” to restart Windows. 5.3 Windows XP Driver and Application Installation Notice After hardware installation, power on your computer and then system will detect a new hardware. Please set the new hardware to “Unknown Device”. 1 After turn on your computer, the Windows XP will detect the newly added hardware and will show the following message on your monitor. Click ”Cancel” on every message box. 2. Insert the AutoRun CD-ROM driver (wait a few seconds). You will see ”AutoRun” window that will be shown on the screen. If it does not display, please brow CD and double click ”AutoRun.exe”. 3. Click on the product that you buy to install. 4. If you see any ”Found New Hardware Wizard” this dialog box please clicks ”Next”. 8 5. If you see any ”Found New Hardware Wizard“ this dialog box please clicks ”Next”. 6. If you see any ”Hardware Installation” this dialog box please clicks “Continue Anyway”. 7. If you see any “Found New Hardware Wizard” this dialog box please clicks “Finish”. 8. Click ”NEXT” on every message box. 9 9. Chose ”Yes, I want to restart my computer now” and click ”Finish” to restart Windows. 5.4 DirectX Installation 1. There is no need to reinstall DirectX, if it is already in your system. If you want to install DirectX, click-on ”DirectX”. 2. Click ”Install” to install DirectX. 3. After DirectX installation finished, Windows will restart. If you have other programs under executing, please save files and exit those programs. 10 6. Capture Application 6.1 Capture Application Instruction The application is a 3 in 1 station which includes TV, Capture, and FM radio functions. The user interface of the station is designed to resemble a consumer Car Stereo. Thereby, allowing you to access and enjoy these three applications on your PC system rather easily. 6.2 System requirements The application comes with the PV-M4700. It has been carefully and successfully designed to work well with this adapter card. Without this specific TV Tuner card, this software may not work properly. 6.3 Video Display Windows The video display window is shown initially in a 320 x 240 scalable and moveable window format. 1. Full screen display By double clicking-on the video display window, you can change it to a full screen, and double clicking again, Restores the original video window size. It may not function for some incompatible VGA cards with resolution other than 640 x 480. Please update the VGA driver or try another more compatible one. 2. Drag and drop To MOVE the video display window, just click the left mouse button and move the TV window anywhere on the screen and release the left mouse. 3. Dynamic sizing To RESIZE the video display window, just move the mouse to the corner of the display window and resize, as general windows program and the video display window will be dynamic resized. 11 4. OSD interface (On Screen Display) You can fine tune the channel frequency or change the Brightness, Contrast, Saturation or Hue through the keyboard or through the optional Remote Control. A. Click to Change the mode you want to adjust. B. Click to Reset the Default values. C. Click to Fine tune a Previous adjustment. D. Click to Fine tune a Next adjustment. 6.4 Capture to Clipboard and AVI files With the Video Capture functions, you can grab sensational PC still images or AVI movies from any TV, VCR or camera. It is just as simple to view and playback captured video. 1. Video Capture Function keys Click-on the Control Panel to invoke the capture functions A. or Click to Copy the image to the clipboard. B. or Click to Save the image as .BMP or .JPEG file. C. or Click to capture AVI files. D. or Click to Play captured AVI files. 2. Setting Capture Parameters Press To set capture parameters such as Frame Rate, Recording / Capture Times, Timer, Key or Mouse to Abort… 12 6.5 Capture Settings 1. Video Format To Set/Change the Video Image size. 2. Video Display (Optional) Video Decode to set the optional Video Proc Amp you can change the Brightness, Contrast, Saturation or Hue by using the various scroll bars and viewing the effect on your video monitor. 13 3. Capture Parameters Click-on to set Capture Parameters such as Frame Rate, Recording / Capture Times, Memory usage, Drop Rate and Exit methods. 4. Audio Format Click-on to select the .AVI audio sampling format that is installed in your system. This will reduce some of the quality, but it will allow you to save more files. Also use shorter Recording/Capture times when sending videomail to others. 5. AVI filename Click-on to set and save the filename of the captured video file. The filename will be shown in the dialog box; the Default file is: Capture .AVI. The captured .AVI file will be overwritten by the next captured .AVI file. 6. Allocate File Space Click-on to set the Captured file size, in MB. 7. Save as Click-on to save a Previous .AVI file under a different filename. 8. BMP filename Click-on to save the filename as a still image. The filename will be shown in the dialog box. The Default file is Capture.BMP. 9. BMP Auto Increment Click-on to enable the Auto Increment feature to number the files automatically after each .BMP file is captured. If this parameter is disabled, the captured .BMP file will be overwritten by the next captured .BMP file. 10. Save as JPEG Click-on to convert a .BMP file to a .JPEG file automatically as a .BMP file is being captured. The .BMP file will then be erased to save space on the hard drive. 14 11. Video Capture Device Shows the video capture devices that are installed in your system. Please use the drop down menu to select another device if more than one video capture cards are installed in the system. It will take one or two seconds to connect the capture device. 12. Slide Show Function Slide shows consists of 160 x 120 video images at 15 frames per second in a full screen display. 16 windows are shown in a screen of 640 x 480 resolution, and up to 100 windows shown in a screen of 1600 x 1280 resolution. A. There are three types of Slide Shows: • FRAMES: Are shows viewed in sequencial frames. • 160 x 120:Are shows viewed in a 160 x 120 video image display window. • CENTER:Are shows similar to the FRAMES show, except with a Enlarged Center display window. 15 6.6 TV Control / Capture Applications The TV Control and Video Capture applications are used with the capture cards that have a TV tuner module. Please refer to the following section. 6.6.1 Input Source Select and Video Mode Click to Exit the TV application. Click to Mute or Enable Audio. Click to Minimize the Control Panel. Click to enable Online Help. 1. Video Source To choose a Video Source Input click-on the corresponding button, from the Source menu. A. The Cable Input. B. The Antenna Input. C. The Composite Input. D. The S-VHS Input. 2. The Information on LCD (Liquid Crystal Display) Shows the current TV channel number and TV station. Also, indicates if the reception is in stereo sound. 16 6.6.2 TV Channel functions 1. Two-digit Channel Number Selecting For Channel selecting, please use the fast channel selector. Which are the Numbered buttons to the left of the LCD. They allow the user to select two-digit channels. For example: To select channel 38, click on "3" then "8". To select channel 7, click on "0" then "7" or click on "7". 2. Channel Select A. Click-on to return Previous channel. B. C. Click-on to Channel Up. Click-on to Channel Down. 3. Audio Mixer A. Click-on to Increase the volume. B. Click-on to Decrease the volume. 4. Favorite Channel 5. Memory Favorite channels A. Click-on to select a Memorized channel. B. ... Click-on to make a Memorized channel a favorite current channel. 6. Recall Favorite channels To switch to your Memorized Favorite channels, click on the following buttons. A. Click-on to select your First favorite channel. B. Click-on to select your Last favorite channel. 17 6.6.3 TV Channel information 1. TV Settings The TV Settings menus are advanced functions that allow you to pre-program the various TV tuner settings for your viewing pleasure. 2. TV Channel Block To Block a channel from being viewed, Please scroll through the list of TV channels. To select a channel Click-on the left mouse button. The channel name will then be copied to the Edit text box. Click-on the SET button to update the channel name. To Enable or Disable a TV channel: Please Highlight a chosen TV Channel, then double click the left mouse button. An asterisk (*) will appear, if the channel is Enabled. A Disabled channel will be skipped when the Channel Up or Down arrows are used. 3. TV channel frequency Fine Tune (Optional) This function is used to adjust the receiver frequency for better video quality. The range is from 128 to +127. Click on the ”Save as Default” button to save your current changes to the default channel table. Slide the scroll bar to the left or to the right to Increase or Decrease the channel frequency. The tracked value will be shown in the value box. Be sure to Click-on and Save the value for the next time. 18 4. TV Input source select Click-on Cable for CATV (Cable TV) or on Antenna for standard non-cable channels. The selected channel number and the fine tune number will also be shown. 5. Audio Mixer To adjust the Volume, Treble and Bass of the Audio output, please drag the scroll bars of the equalizer Up or Down. 6. OSD interface (On Screen Display) Click-on to Enable or Disable the On Screen Display functions. The TV Channel Number, Name and Configuration parameters can be displayed in the video display window. Please refer to Video Display Window for further description. 7. Remote Control Click-on to Enable/Disable the external Remote Control. 8. TV Frame Click-on to Add/Remove the TV frame feature from the video display window. Please refer to Video Display Window section for customizing the TV frame. 9. Free Scan 10. 16-Channel Preview 19 11. Click-on to Enable the 16-channel preview feature. When Unchecked it only previews 4 channels in the (640 x 480 mode) or 9 channels in the (1024 x 768 mode). A. Channel Scan Channel Scan is for a system with a newly installed capture card. Please Scan when a capture card is newly installed. The Scanned channels will be shown with an asterisk (*). B. Channel up Click to reach a Previous channel. The selected bar and channel information will be updated synchronously. C. Channel down Click to reach the Next channel. The selected bar and channel information will be updated as well. D. ADD CHANNEL Click to Add to the current displayed channels. E. DELETE CHANNELS Click to Erase current displayed channels. F. TV Channel Preview Channel Preview allows the user to view and chose some favorite channels and displays them on a full screen display. Click the right mouse button on any portion of the display window, and the channel selector will be prompted to select the channel. The channel selected will then be shown on the top left corner with white background. The channel will be shown in next scanning cycle. 20 6.6.4 Advanced functions 1. Click-on to set the TV parameters. 2. Click-on to set the Video parameters. 3. Video Capture Function keys Click-on the Control Panel to invoke the capture functions A. or Click to Copy the image to clipboard. B. or Click to Save the still images as a Windows .BMP or .JPEG file. C. or Click to Save a Sequence of images as the Microsoft .AVI file. D. or Click to Play captured .AVI files, or the choose Default .AVI file. 4. TV Channel Preview keys or By Clicking-on 16CH the viewer is allowed to Preview 16 TV Channels at a time, to select some of their TV favorite channels and display them in on a full screen. Click the right mouse button on any of the 16 display windows, and the channel selector will be prompted to select that channel. The selected channel will be then shown on the top left corner with white background. 5. Slide Show Function keys or Click-on to view a slide show. Slide shows are displayed in either a 160 x 120 video image format at 15 frames per second on a full screen display. Or shown in 16 windows from a 640 x 480 resolution screen. The last option is up to a 100 window display on a 1600 x 1280 resolution screen. To Exit, double click the left mouse button. The full screen is saved to the CLIPBOARD when you exit. The captured images are then ready for other DDE available applications. A. There are three types of slide shows: • FRAMES: Are shows viewed in sequencial frames. • 160 x 120:Are shows viewed in a 160 x 120 video image display format. • CENTER:Are shows similar to the FRAMES show, except with a Enlarged center display window. 21 6.6.5 Hot-Keys HOT KEYS are Short Cuts to various applications using either the Mouse, by pressing on the Function Keys, or by using a Remote Control to activate the various applications. See listing below: 1. Hot-Keys User's guide Click-on or Press the A. key to Enable Online Help. 2. Video Display Mode A. Click-on or Press the key to change video to the Overlay mode. B. C. D. Click-on or Preview mode. Press the Click-on or Press the Click-on or Press the key to change video the key to put a video image at the Top of the list. key to Freeze the video displays. 3. Capture Settings Function Keys Click-on or PRESS the following Hot-Keys to activate them A. To Copy the images to the clipboard for other DDE applications. B. To Save Still images as a Windows .BMP file. C. To Save Sequential Images as a Microsoft .AVI file. D. To Play Captured .AVI files. E. To Select a Video source. F. To Choose a Image display Size and format. G. To Set the Capture parameters. H. To Select a Video source. 4. OSD interface (On Screen Display) Click-on or PRESS the following Hot-Keys to activate them A. B. C. D. to To Change to another mode To Reset the Default value To Fine tune Backward To Fine tune Forward 22 5. TV Channel Function Keys Click-on or PRESS the following Hot-Keys to activate them A. To Scan the TV channels B. To Channel Up C. To Channel Down D. To Insert a current displayed channel E. To Erase current displayed channel 6. Slide Show Function Keys Click-on or PRESS the following Hot-Keys to activate them A. To Preview your favorite channels B. To Start the video slide show 7. Audio Mode A. To Mute and Enable Audio B. To Increase the volume C. To Decrease the volume Number Keys: Used for selecting two-digit TV channels, and Increasing or Decreasing the volume. 23 6.7 FM Control Application FM Control Application is used with the capture cards that have a TV/FM tuner module. Please refer to the following section. If you turn on the FM application then the TV application will turn off automatically 1. FM Control Panel Click to Exit the FM application. Click to Mute or Enable Audio. Click to Minimize the Control Panel. Click to Enable online Help. A. B. C. D. D. E. G. Click to toggle the FM STEREO / MONO status. If the signal is not clear, please use the mono status. Click on to Increase the volume. Click on to Decrease the volume. Click to seek for previous signalized channel automatically. Click to seek for next signalized channel automatically. Click to fine tune frequency 0.05MHz forward. Click to fine tune frequency 0.05MHz backward. 2. FM Frequency bandwidth or Please click to toggle FM bandwidth between 70 ~ 108MHz and 88 ~ 108MHz. 24 3. FM Frequency slider Please drag the frequency slider anywhere by the left mouse button and fine tune by clicking the frequency find tune buttons. 4. Memorize Favorite Channels Click to select memorized channel. channel as favorite. ... Click to memorize current 5. Recall Favorite Channels ... Select the memorize channel number which you want. 6. Assign Favorite Channels? Name To edit the name of the FM station, move the mouse to the memorized key and click on the right mouse button and a small window created. Keyin the name of the station and press <Enter> to save. The name will be shown on the hint LCD if the mouse is moved to the memorized key. 25 7. Remote Control If you bought our Remote Control, you’ll now be able to control your new application remotely. The Remote Control package contains the Remote Control and it’s Receiver. The receiver must be connected to the adapter for it to function properly. PLEASE install the application, FIRST, before trying out the Remote Control. 26 7.1 TV Function Keys Screen ZOOM SCAN channels Program OFF Switch to TV or FM Numbered keys VOLUME Up/Down CHANNEL Up/Down Audio MUTE Select Video SOURCE +100 Click to accept the channel Loop Click to return previous channel FUNCTION Adjustment 27 7.2 FM Function Keys SCAN channels Program OFF Switch to TV or FM Numbered keys VOLUME Up/Down CHANNEL Up/Down Audio MUTE Frequency Adjustment Quick search 28 8. FAQ Q: What VGA card could be used to run PV-M4700? A: The VGA card spec requested for PV-M4700 is as following: 1. Linear frame buffer 2. Hardware cursor 3. Graphics mode support 640x480/hi-color Q: When in the 1280x1024 graphics mode, the Video Screen does not display a Full-Screen. A: PV-M4700 needs more graphics memory at a higher resolution. The best graphics mode is 800 x 600/Hi-Color or 800 x 600/True-Color when watching TV. Q: Why the video picture motion is slowly when I capture or see at preview mode? A: That is normal, because the signal is via CPU and memory to display. Q: How to enable audio function. A: 1. Double-click ‘speaker’. 2. Click ‘properties ’ of ‘Options’. 3. Enable ‘Line-in’ of ‘Playback’. 29 Q: It does not have audio output when I turn audio format to ‘ST.’ and ‘SAP.’ The audio only output in ‘mono’. A: That’s because your card is type 1(see page2) without MTS/NICAM module and does not support ST. and SAP. audio channel. Q: Why does it have no audio when I watch TV? A: Please confirm IRQ is works properly. Make sure to connect a line between Combo card ‘audio out’ and Sound card ‘line in’. And connect your speaker to Sound card ‘line out’. Please enable ‘line in’ of speaker properties (record & advance option) in task bar. Q: The system will hang up when I launch application program on my motherboard (all in one motherboard). A: Please change the slot of capture card far away CPU slot. It caused by resource of motherboard. As we know, the resource of slot that near CPU is the same with other device that on board of motherboard. (sound card, modem, VGA...) Q: Does it have any compatibility issue with VGA card or motherboard? A: It has some compatibility issue with Trident 9750/9850/9685 and S3 Savage 4 VGA cards and SiS620 motherboard. This is because they can't support TV Overlay mode. So you can't see video in Overlay mode. Q: When I finish installing the driver to Windows 98SE/ME/2000 and run TV application program, but there is no picture and audio? A: It maybe has IRQ conflict. Check your ‘Device Manager’ whether has IRQ conflict with another devices, like SCSI card, net card or sound card. If yes, please change Play TV Pro Card to another PCI slot to try again or adjust your IRQ address manually. Q: Why the MPEG Mode in the capture image not smooth? A: PV-M4700 driver support Brooktree YUV 411 Row and Brooktree ProSwner Video(32) 2 kinds MPEG Mode。 Q: If my location have two kinds TV system,One is NTSC mode,another is PAL mode,Can I save the two kinds mode? A: Of cause,You can select the TV channel then push mouse right key in the control panel. The screen will show a setting form. Please select Format item in your setting form. If you setting completed then you want watch the channel will auto select the system in the last time setting item 。 30