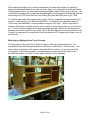
1
FOUR PIECE ENTERTAINMENT CENTER AND BOOKCASE
Dave Ronyak
(December 2008)
I recently completed, well almost..., a large wall unit/entertainment center and will share details
of its design and construction, as well as the problems I encountered along the way, how I
addressed them, and my suggestions for anyone who chooses to make a similar project. The
entertainment center comprises four separately constructed cases that are fully finished on 3
sides so they can be used together or separately or with other furniture pieces. I say "almost
completed" because doors to hide the TV when not in use are still under design considerations
and location of suitable veneer and accent wood, and I need to make and install the dividers
within the drawers that are behind the glass doors. Most of the major challenges I
encountered were due to working alone in a small overcrowded single car garage/shop.
The cases are constructed of double-sided red oak veneered plywood with solid oak edging,
most of which was attached using Festool's Domino® loose tenons. A few pocket screws
were also used. Each of the tops has xenon lamps flush mounted within. Lacewood (also
known as Australian silky oak) was used as an accent strip in the valences.
Construction involved use of several Festool® products including TS 55 and multiple MFTs
(old style), Domino® machine, OF 1400 router, RO 125 sander, ETS 125 sander, LS 130
sander, CT 22E vacuum, LR 32 Hole Drilling set, Festool Edge Stops and shop-made Side
Stops with extended range, router table, Kreg® pocket jig with shop-made dust collection hose
adapter, and Fuji HVLP spray finish equipment.
I will also try to describe in detail the finish system I used, including the problems encountered.
A combination of solvent and water-based materials were used. The final finish coats are
water-based lacquer from Target Coatings (Oxford brand).
While working on completion of this Entertainment Center, I plan to build a complementary
square-shaped coffee table with a granite top. I obtained the 3 ft x 3 ft granite piece yesterday.
I'm still thinking about various design ideas and alternatives, and how to deal with the weight of
that top and the table which will be located near the middle of a room supported by 20 ft long
clear span joists. That floor is structurally adequate, but a little “too bouncy” and I am
concerned about excessive deflection, essentially turning the floor into a large, shallow bowl.
Reinforcing that floor structure will be another major project since all the HVAC and wiring
were installed about 20 years ago.
Here are a few photographs of the completed and assembled Entertainment Center unit.
Page 1 of 81
Page 2 of 81
Page 3 of 81
Closeup view of top lighting and valence of red oak and lacewood (aka Australian silky oak).
Effect with glass insert shelves.
Page 4 of 81
Effect with solid panel shelves.
Close-up of valence surrounding tops of Bookcases and TV Cabinet.
Page 5 of 81
And what my wife to rearrange those symmetrically arranged, adjustable shelves. I guess I'll
have to go build more bookcases!
Here is another photograph under different lighting.
Page 6 of 81
Double MFT setup with MFS and bottom mounted dust collection for routing shelves for glass
inserts.
Page 7 of 81
Bottom mounted Dust Collection
Page 8 of 81
Chapter I
Construction of Console for Entertainment Center – Ripping of Sheet Stock
Inspiration for the design of this entertainment center including some of the Console features
was taken from a photograph of a system shown to my wife by a professional decorator. That
unit was only available in jatoba, only in one finish which was too dark to match the stained
oak wall and trim in the living room in which the unit was to be located. The dimensions of that
commercially available entertainment center/wall unit weren't quite right, either, for the room in
which the unit was to be installed. They were too short. Initially, my wife wanted a "cubist"
appearance when viewed straight on from the front; she wanted the shelves and partitions to
form a stacked array of nearly square boxes of nearly equal size as shown in picture of the
commercial unit which had fixed shelves of solid panels. I changed that to adjustable shelves
with glass insert panels (so that lighting from above could pass downward through the upper
shelves to lower shelves), and made a couple of extra shelves with solid panels just in case
she wanted to shift the appearance. To complement some other furniture we have, the doors
were fitted with “pebbled” glass panels. I made them so the panels can be easily replaced, if
needed or desired. You could substitute a different type or color of glass or even leaded glass,
or panels of contrasting or figured wood or metal such as one of the many decorative copper
panels that are available. Architectural supply catalogs and websites are good sources of
ideas and materials for your consideration. I only regret that I did not happen upon any of
these sources until my project was almost completed, too late to make many changes.
For stability, the sides, top, partitions and shelves of the Console are made of plain sliced, red
oak veneered plywood edged with solid oak. (This was my first project ever in which I used
veneered plywood for any exposed panels.) To add a little visual interest effect, on the outside
surfaces, the front and back edging of the sides stands 1/4 inch proud of the plywood panels.
The front edging of the side panels also stands 1/4 inch proud of the inside surface of the
plywood panels, but the back edging is flush with the plywood
The Console is designed to be used with a flat screen TV and common DVD player, and
Warner Cable (Scientific Atlanta) DVR, with storage in four drawers behind the doors for DVDs
and CDs. The Console is 52 inches wide, 19 inches deep and 24 inches high.
Page 9 of 81
To make the panels, 3/4 inch veneered plywood had to be rip cut (parallel to the 8 ft length of
the plywood sheet) and then cross cut. The widths of the ripped pieces ranged from 12 inches
to 17 inches (and for the backs of the Bookcases more than 27 inches). For many of the
needed components, multiple ripped panels were needed.
To help ensure uniformity of width of the ripped panels, I made a pair of extended range Side
Stops as shown in the photograph below (please note that the tag should read “3/4 inch
oak dowel” not 5/8”).
Page 10 of 81
As you can see, these are really nothing more than an adaptation of what Festool already
offers. The heads of these stops are the same as those supplied with Festool's Edge Stops
(Item #485758) that are marketed for use with Festool's LR 32 Hole Drilling set (Item
#583290). If you have the Hole Drilling Set you can substitute longer rods to extend their
range. Hexagonal aluminum rods having a 5/8 inch dimension across the flats would be nearly
perfect. But since I did not have access to any of these, I substituted a pair of 3/4 inch
diameter dowel rods, and ground a flat on one end of each rod to enable it to be gripped by the
top plate of the head of the stops. (After posting my wood dowel based idea, Todd, another
member of FOG posted a message that hexagonal aluminum rods can be obtained from
Online Metals.)
Although I have the Hole Drilling set, I chose to purchase additional pieces to enable use of a
pair of Festool Limit Stops (Item Number 485827) I own for my Side Stops purpose. Thus, I
don't have to recalibrate my Side Stops for use with the Euro 32mm system. Because the
bodies of the Festool Limit Stops are identical to those of the Festool Edge Stops, all that is
needed to complete conversion of a Limit Stops for use in my Side Stops is a top plate, a 6mm
machine screw and square nut. Bob Marino worked with me to obtain the correct Festool
OEM hardware plates, but suitable plates can be made easily from aluminum plate and
Page 11 of 81
Imperial screw parts.
For the adjustable End Stops (at the far end of the dowels opposite the black plastic heads that
mount on the “hat” of the Guide Rails), I simply bored a 3/4 inch hole through a couple of
blocks of hardwood (black walnut in the photographs), then bored and tapped them to receive
a 6mm machine screw (so I can easily tighten them with my "Toolie Tool" or any Phillips
screwdriver). It is important that the 3/4 inch bore through these End Stop blocks be
perpendicular to the face that will be in contact with the work piece to be cut, so use a
drill press if available. If the bore through the End Stop Block is not perpendicular to the face
to be used as a reference, the registration of the Guide Rail will vary with thickness of the
workpiece on which the Guide Rail with your shop-made Side Stops is positioned. If you have
not tried it, you may be surprised how well hardwood accepts being tapped with ordinary metal
working taps. Metric taps are available at many hardware stores. Mine are Ace brand and
were only a few dollars each. The main difference compared to tapping metal is to more
greatly undersize the bore to be tapped. A little boiled linseed, tung or other curable oil finish
on these wooden threads will serve to strengthen them, but it is not necessary. After boring
and tapping the End Stops, I used a band saw to cut through the short end of each block, then
made at least a pair of additional kerfs in the blocks beyond the main bore. These kerf cuts
allow the block to be snugged in position against the dowel rods without splitting the blocks.
These blocks could also be made from HMPE (dense plastic) block or sheet.
Page 12 of 81
To set these shop-made Side Stops for ripping wide (or narrow) strips off a sheet of plywood, I
simply mark the ends of plywood at the desired width, then set the rubber edge strip of the
Guide Rail on the mark. This enables you to position the Guide Rail close to parallel with the
reference edge of the sheet to be cut. Then I mount the Side Stops adjacent to each other at
one end of the Guide Rail and adjust both of them until the End Stops (wooden blocks) are in
contact with the reference edge of the plywood sheet. Doing so assures that both Side Stops
are set to the same width rather than relying on both pencil marks. [Side Note: If you needed
to make several tapered ripcuts, you could set the Side Stops at each end of the Guide Rail to
different lengths, but that is not needed or desired for this Entertainment Center project.] After
setting the Side Stops using only one of the pencil marks as my reference, I move one of them
to near the opposite end of the Guide Rail. Then I reset the Guide Rail on the sheet to be cut,
then make the cut. To setup for the next cut, the Side Stops are again mounted near to the
opposite ends of the Guide Rail, the Rail is positioned on the sheet using the previous cut line
as a reference. The Side Stops are then removed, and the next cut made with the TS 55 saw.
I was surprised how close to exactly the same width the ripcut panels were.
Page 13 of 81
Here is a photograph of a stack of ripped plywood panels for this Entertainment Center project,
not just those for the Console which did not require as long pieces. It turned out that I actually
needed more than these to complete this project. That was not a problem, I simply used one
of my previously cut pieces to reset my shop made Side Stops to the needed width and cut
additional strips for the shelves of the Bookcases and TV Cabinet.
Although I am focusing on construction of the Console in this section, in practice I ripped
nearly all of the plywood sheet panels that I would need at this time. Due to my small crowded
shop, I used an old workbench to store my inventory of 10 sheets of plywood. I ripped many of
those sheets right on that stack. Due to my working alone, most of the time I did not move the
sheet to be cut other than to lift it up to slip panels of foam insulation board underneath prior to
cutting. [I did shuffle some of the sheets at the beginning of the project so I could select the
best face veneer for the panels that would be exposed in the completed Entertainment
Center.] After supporting the sheet to be cut on panels of foam insulation board, the Guide
Rail was positioned on top for the cut. At first I clamped the ends of the Guide Rail, but
eventually came to trust it to stay in position which it did.
The front edges of the side panels are edged with 1 inch thick by 1 1/4 inch wide solid oak
located and fastened with Domino tenons and glue. The back edges of the side panels are
edged with 1 inch thick by 1 inch wide solid oak strips similarly attached with Domino tenons
and glue. On the insides of the side panels, the back edge strips are flush with the inner
surface of the plywood, whereas in the front, the edging overhangs the panels by 1/4 inch both
to the outside and to the inside.
My setup for this is shown in the following three photographs. It is a pair of Guide Rails joined
by Festool connectors (Item #482107), clamped onto a long board of 5/4 oak of the same
Page 14 of 81
stock to be ripped into narrow strips. In the photograph is a 3000 mm Guide Rail joined to a
1400 mm Guide Rail spanning multiple tables. Most of my 5/4 (true 1 inch thickness) oak
boards were 10 to 12 ft long. I ripped a straight edge on one of them using the TS 55 and
Guide Rail, then ripped a strip 1 inch wide and another 1 1/4 inch wide. I used pieces cut from
the 1 inch strip as a gauge block to set the "fence board" clamped underneath the Rail back
the desired 1 inch distance.
Page 15 of 81
Below is another photograph showing my TS 55 positioned near the end of the Guide Rail,
ready to rip a narrow strip from off the shorter board whose edge is abutted against the longer
board that is clamped under the Guide Rail.
One caution is in order when using this technique. As the stock board being ripped into strips
becomes narrower, it may warp due to internal tension that is released as the strips are cut.
Some of the ripped narrow strips may warp a bit, too, but those can be “coaxed” into straight
line when they are joined to the edges of the panels. Any narrow strip that more than a wee bit
warped was used for the shorter pieces of edging. When I encountered this problem, I used
my jointer to recreate a straight edge to abut underneath the Guide Rail. If you don't have a
jointer, you can set the crooked edge just barely under the Guide Rails and rip a fresh straight
edge. In this case, be sure to keep the board to be cut from moving during the ripcut since it
will not be captured under the Guide Rail.
Chapter II
Cross-Cutting of Previously Ripped Stock
After ripping the plywood sheets for the panels and ripping the 5/4 oak boards into narrow
strips, I needed to crosscut these into the various lengths needed. For this I used my MFT
1080 and TS 55 connected to my CT 22E through an Oneida Dust Deputy.
Page 16 of 81
Placement of an MFT 800 to the left of my MFT 1080 equipped with the Festool-supplied
fence and crosscut Guide Rail supports provided ample support for the longer pieces to be
crosscut. These two MFTs were connected using Festool's metal connectors (Item #484455).
Although the longest pieces for the Console were only 52 inches long, those for the Bookcases
were nearly 7 ft long. For support to the right side of the saw of the stock to be crosscut, I set
up an auxiliary table by simply laying an old flush hollow core door on a pair of sawhorses. I
got lucky because the elevation of that auxiliary table nearly matched that of the MFT top. No
shimming was necessary. Some of the strips to be crosscut were ~12 ft long and while many
of the pieces to be crosscut from them were only a little more than 1 ft.
The photograph immediately below shows some of the crowded conditions in my small shop. I
was against the overhead door when taking this photograph.
Page 17 of 81
Needless to say, this lengthy arrangement of MFTs and auxiliary table took up a lot of floor
space in my 15 ft X 25 ft garage/shop which also houses a table saw, bandsaw, Shopsmith,
cyclone dust collector, tool chests, welding equipment, spray equipment, car repair equipment
and much of my wood stock, including all used in construction of this entertainment center, and
more for later use in making substitutes for Systainer-Ports. Although I have a basic Hitachi
CMS, sometimes the shop was so crowded with stock and work in progress that I had to resort
to an ancestor of the Kapex compound mitre saw.
Page 18 of 81
As you can see in the two photographs above that showing the handsaw and the two
immediately below, to protect the top of my MFT 1080, I use a 2 ft x 4 ft piece of quarter inch
plywood, which I clamp to the top. To aid in aligning the stock to be crosscut, I clamp a piece
of scrap wood to the right of the MFT fence and in-line with it. This also seems to slightly
improve capture of the sawdust as the saw blade passes through the far end of the stock being
crosscut. I recommend using a board somewhat wider than is shown in the photographs so
the blade kerf ends within the auxiliary fence rather than spinning in free air beyond the fence.
Note also that I moved the MFT aluminum fence about an inch to the left after cutting a nice 45
degree mitre through it during an earlier project. (The picture frames came out quite well, and
the 48T blade was not harmed, I used the same blade without resharpening for this project.)
Such mitre cuts will be needed later when making the valences on the Bookcases.
Here's another view from the backside of the MFT:
Page 19 of 81
Squaring the MFT for Crosscutting
There has been much discussion on this forum about squaring up the fence to Guide Rail on
the old style MFT 1080 and MFT 800, and the nuisance of having to re-square it every time it
is removed from the MFT and replaced. My experience confirms that squareness should be
rechecked made every time the Guide Rail Supports are removed and re-installed, if true 90
degree crosscut accuracy is needed. But there is an easy, quick solution to this issue. Get or
make a large (12 inch or greater) precision square and keep it handy by the MFT. I chose an
18 inch aluminum 45-45-90 degrees triangle carpenter's square from Woodpeckers; although
pricey at about US$ 110, I have found it useful for many tasks involved in making this
Entertainment Center, and strongly recommend getting a this or an equivalent product. I found
this large square invaluable for use in my unorthodox technique for use of the LR 32 and Hole
Drilling set which will be discussed later.
Woodpecker Carpenter Triangle
These are available in 12” and 18” sizes. I chose the larger one.
To square up the MFT fence to crosscut Guide Rail, I lower the hinged end of the Guide Rail
support so that it rests on the aluminum fence, place a scrap of one-half inch plywood under
the Guide Rail to support it along its length, lower the Guide Rail and adjust the height of the
Guide Rail Support tab holder nearest the operator so the tab is fully engaged in the slot
underneath the Rail to prevent side movement of the Guide Rail. I do not setup the Stop bolts
Page 20 of 81
mounted in the side channels of the side rails of the MFT to apply any sideways tension within
the Guide Rail when the end near the operator is engaged in the tab; however, some MFT
users recommend that procedure to remove any play when the Guide Rail is down in the tab.
Then I lay the Woodpeckers precision square on the MFT with the thicker side of the square
against the Guide Rail and the thinner side against the MFT fence. I make whatever
adjustments are needed until full contact of both sides of the reference square with the MFT
fence and Guide Rail are achieved. I confirm this by slowly sliding the reference square into
the inside corner defined by the MFT fence and Guide Rail after the MFT components are
"locked" in position. Occasionally I find I have to readjust the stops in the Side Rails of the
MFT, and the Festool-supplied clamp that secures at the far end of the fence to the top of the
side rail of the MFT. I frequently find myself completely removing all of the fence hardware
from my MFT including these stops in the side rails, and I don't find it takes much time to
reinstall and reset the fence to be square to the Guide Rail. You can make pencil marks on or
within the channels of the side rails to facilitate recreating a previous setup position of the
Fence and Guide Rail if you desire, but it is not necessary. When delivered, the stops on my
MFT 1080 were not correctly preset for the Guide Rail so I got used to setting them right at the
start of my Festool experience.
For the components to be crosscut whose cut length was within the range of the MFT fence, I
used the Festool Adjustable Stop (Item #49055) supplied with the complete MFT 1080. For
components whose length exceeded that of the MFT fence, I used one of the two setups
shown in the following photographs. One setup was a scrap wood block clamped to the top of
the extra MFT 800 positioned to the left of the saw as shown in the photograph below. This is
not my preferred setup. If this setup is used, be sure to clamp the block down with a pair of
clamps; using only one clamp may result in the stop block moving when the stock to be
crosscut is slid into position. The mass of a large panel of plywood bumping even rather gently
against a Stop Block held with a single clamp may be enough to make it move, and thus a
potential source of cumulative errors. I learned this the hard way after cross-cutting some of
the plywood panels. Then I added the second clamp and had to re-cut the panels to a slightly
shorter standard length, so my drawings and my actual construction are not exactly identical.
Page 21 of 81
Here's another view of the Wooden Block as a Stop with a pair of Festool Quick Clamps (Item
#491594) holding the block to the MFT top.
The other setup, which I prefer for crosscutting long wide stock, utilizes a Squaring Arm (a
concept from Jerry Work's MFT manual) extending across the extra MFT 800 and secured to
its side rails, as shown in the photograph below. After trying this idea, I preferred it because of
the rock solid support that it provides all along the base of the (wide) stock to be crosscut. The
reference square placed with one leg against the MFT fence and the other against the
Squaring Arm can be used to make this a precision right angle setup as well as a cross-cut
stop. Because the lengthwise edges of my Squaring Arms are rounded over (one fourth inch
radius), a little sawdust trapped under the reference edge of the stop against which the stock
to be crosscut was abutted did not interfere with getting accurate, repeatable contact with the
Stop as might occur with use of a scrap of wood for a stop as in the first setup. Use of the
Page 22 of 81
Squaring Arm as a repeat crosscut stop also freed up a pair of F-style clamps, and was very
stable. Sliding a large ripped panel firmly against this stop did not change the setting of the
Squaring Arm as a stop. Note that the Squaring Arm stop can also be clamped midspan to the
top of the MFT to further secure its position setting.
Here's closer view of the Squaring Arm used stop for repeat crosscuts to exact length:
The little strip of 1/4 inch thick oak positioned under the panel on the MFT 800 is to
compensate for the use of a sheet of 1/4 inch plywood on the MFT 1080. I made several
pieces of this 1/4 oak stock initially expecting to use them as trim around the bases of the
cases of the entertainment center, but the customer (my wife) did not want that aesthetic
feature. Nevertheless, they came in very handy as shim stock for many of the tasks needed to
construct this furniture because their thickness corresponded to the amount of offset between
Page 23 of 81
the side panels of the four cases I built and the front and rear edging as viewed from the
outward sides.
Cross-cutting Long Pieces of Ripped Stock on the MFT in a Small Shop
To set the Stop to the cross cut length desired, I used an ordinary retractable steel tape
measure (Stanley brand) and placed a pencil mark at the desired length. As a precaution,
especially when cutting plywood panels, to length, I first checked the end that was about to be
positioned against the stop for squareness and a good (smooth) cut end. The factory cut end
of some of the plywood I was using was good enough that I could use the factory cut end. And
the gross dimensions of the full sheets were about 48 1/2 inches by 96 1/2 inches, which
enabled ripping four full length panels each 12 inches wide from each sheet. (This was not
true of the lower cost birch veneer plywood I purchased a year ago from HD, which came from
China.) If the factory cut end was not square or was too rough or the end of a board was
checked, I marked across the "bad" end then measured out a length slightly beyond the
needed final length.
For shorter components, all I had to do was flip the Festool Adjustable Stop up out of the way,
cut the stock a little longer than final length, flip the stock to be cut end for end keeping the
same edge against the fence and against the lowered stop, and make the second cut to final
length.
For components longer than the length of the MFT fence, after marking the stock to a length
slightly longer than the desired final length, I lifted the factory or other "bad" end over the shopmade Stop and crosscut the piece slightly longer than needed, then flipped the stock end for
end keeping the same reference edge against the fence, and pushed the previously cut end
against my Stop, and made the final cut. This was possible with longer components because
they could easily be flexed enough to hold them square against the MFT fence and down
against the top of the MFT. This avoided the need to first make a square crosscut on every
piece of long stock, then flipping each piece of long stock (some more than 12 ft long) end for
end in my small shop, then setting the Stop and making the final cut. My method meant the
maximum stock length I had to flip end for end was a little less than 7 ft long (the side panels
for the Bookcases). I did this because much of my garage/shop has only an 8 ft high ceiling,
and this low ceiling together with the Boom Arm on my CT 22 makes it a challenge to flip long
boards end for end without opening the garage door and taking the boards outside to flip them.
(I was also very thankful at this time that I paid extra to have the center section of the garage
roof built with a "cathedral" ceiling to gain a little more height.)
Chapter III
Playing with “Dominos,” making a lot of holes in my boards.
After cutting the components to width and length, I marked them using a graphite pencil where
I would later want to remove the marks, and sometimes used a permanent marker on ends
and edges that would not be seen upon assembly or installation, and began to machine the
many mortises using my Domino machine. (A gray Eberhard Faber Artgum eraser works great
for removing graphite pencil marks, much better than pink rubber erasers.) I didn't keep count
of the number of Domino tenons used in the Console but I did for the TV Cabinet that sits on
Page 24 of 81
top of the Console in which there are one hundred 5 mm size tenons. For some of the
mortises, I used the base of the Domino machine as my reference while at other times I used
the fence. Likewise, for some operations I used the bottom surface of the workpiece as a
reference while at other times I used the top surface. Frequently, I used the 1/4 inch thick oak
boards I had prepared as shims to support the workpiece or the Domino machine.
The order of construction of the Console is as follows. The photograph immediately below of
the mostly complete Console may help a reader to follow my description.
The side panels are permanently joined to the base panel and to the short shelves on the left
and right with glued 5 mm Domino tenons. In like manner, the vertical partitions that support
the adjustable / removable shelves in the center are joined to the short permanent shelves with
Domino tenons. The vertical partitions are joined to the base panel with screws, although I did
make a few Domino tenon holes before I changed my approach which you can see in the
foreground of the following photograph.
Page 25 of 81
First, I first marked the plywood panels that would become the sides, and cut the two rows of
mortises into the inside faces of each side panel. To ensure placement of the mortises at the
desired elevation and front-to-back edge registry, I made a template using a scrap of plywood.
On both side faces of that template I marked lines identifying the reference edge of the
template to be lined up with the reference edge of the side panels, e.g. the "front edge", and
lines corresponding to the centerline (widthwise) of the Domino mortises to be cut. Using my
large precision carpenter's square, I drew lines across the side panels that I used to position
the template I had made. With the template clamped in place over the panel on the MFT,
accurately locating and cutting the mortises so all the pieces would join together as intended
was relatively simple. Here is a photograph of the template in use to cut the mortises in the
side panels. In this photograph, the mortises are being cut for the base panel. Note the
orientation of the Domino machine, its base is being used as a reference against the template.
Actually this is not the true original template that I used, that template is on the right in this
photograph and the next two photographs.
Page 26 of 81
Because the base panel is made of 3/4 inch thick plywood, the mortises to be made in the
ends of the plywood base panel using this technique (referencing the mortices off the base
plate of the Domino machine) will not be located at the centerline of the thickness of the
plywood, they will be slightly above the centerline of the plywood. To correctly match the
mortises to be made in the base panel, the Domino base and bottom side of the base panel
have to be used as the reference surfaces. If these reference surfaces are not kept straight as
the work proceeds, the base panel is going to be at a different elevation than intended (in this
case higher) and the mortises to join the shelves and partitions are not going to match as
intended. This is because I did not take care to ensure that the spacing within a row of the
mortises was equidistant from the front edge and back edge and one another. There is no
need to make them so. Worse yet would be to use different reference surfaces for the left side
and the right side components of the Console, unless perhaps you're trying to make a modern
art statement.
Below is a photograph showing the orientation of the Domino machine to cut the upper row of
mortises in a side panel. The piece of 1/2 inch plywood is the actual “original” template I made
and used. These mortises will be used to join one of the two short permanent shelves to a
side panel. (I apologize for the text box within the photograph incorrectly stating this is a
partition panel.) Note that the reference surfaces are now reversed, and that fact must be kept
in mind when cutting the mortises in the corresponding short shelves.
Page 27 of 81
Lastly, in the photograph below I have inserted my "Check Block" which is nothing more than a
short piece of plywood into the edge of which I have cut a Domino mortise. The check block is
marked to indicate which would be the best face veneer of the plywood. Note this check block
can also be used to help ensure correct placement of the template and relative orientation of
the Domino machine and panels prior to cutting any of the mortises. You can also barely “kiss
cut” a mortise to a shallow depth, remove the Domino machine and use the Check Block to
confirm the mortise is where you want it before machining the mortise to its full depth. The
accuracy of the various reference markings on the Domino machine makes it easy to visually
realign the machine on a pencil mark or line.
Page 28 of 81
In the first photograph below there is shown the Check Block correctly inserted into a Domino
mortice, confirming correct elevations of the mortices and thus the top and bottom faces of the
cross panels to later be jointed. [I chose the wrong photographgraph in my original post to
FOG.]
If the Check Block was reversed face for face, there would be a gap between the face of the
Check Block and the top edge of the scrap of plywood that is clamped across the side panel.
As viewed in the photograph, the right edge of the scrap is lined up with what will be the
location of the bottom surface of the bottom panel when the Console is assembled. Note the
small gap between the top of the plywood scrap clamped across the panel and the Check
Block.
Page 29 of 81
The mortises in the edges of the base panel and the short shelves were cut with the shelves
clamped flat against the top of my MFT, with the base of the Domino machine referenced
against the MFT top. When mortising the ends of the base panel, the bottom surface of the
panel was placed in contact with the MFT top. When mortising ends of the short shelves, the
top surface of each shelf panel was placed in contact with the MFT top. Because no other
components are located immediately above or below these short shelves, the shelf pieces
could have been flipped end for end upon installation and still fit perfectly horizontal, but the
elevation would be slightly different (higher in this example) than intended and the chosen
(better appearance) veneer face of the panel will not end up where it is desired. For that
reason, I also marked each panel so I could identify each face and edge, and whether it was to
become part of the left or right side of the Console. I put the better veneer face up on these
short shelves, in turn that required the better face be placed down against the MFT top when
cutting mortises.
I used the same template used to locate the mortises in the side edges of the bottom panel
and short fixed shelf panels. At first I used the template like a story stick to mark the centerline
location of each mortise in the ends of the bottom panel and short shelves. I lined up the
reference line at the side edge of the template with the front edge of the panel and then used
the lines on it to mark on the panel whose edge was to be mortised. Then I removed the
template and drew a series of lines on the face of the panel using a small square, and used
those lines to line up my Domino machine for each mortise.
Soon I realized that that additional marking using the template was not necessary. All I had to
do was place the panel with the correct face down against the MFT top, then position the
template on top of the panel and lined up with the side edge of the panel and the front edge of
the panel chosen as a reference, clamp down the template to the MFT and cut the mortises.
Use of Domino machine to cut mortises for application of solid wood edging strips to
3/4 inch plywood panels.
Page 30 of 81
The front and back edges of the side panels have solid oak strips attached with glued 5mm
Domino tenons. The front edge strip is 1 inch thick and 1 1/4 inches wide, and joined to the
panel so that the edging overhangs both faces of the side panels by 1/4 inch. I marked the top
and bottom ends of the strips and the panels and their faces and also numbered them so I
would know later which pieces should be joined and in what orientation. I did not use the
registering dowel pins or the Cross Stop (Item #493488). I have had some problems in the
past when using these with (Chinese) plywood due to some debris hanging within a previously
cut mortise interfering with registry of the dowel pin. At about US$85 per 4 ft x 8 ft x 3/4 inch
sheet, I did not want to ruin any of that plain-sliced oak veneered plywood, or risk learning that
the veneer on later purchased plywood did not match my stock. In my prior use of the dowel
pins to register successive mortises along the workpiece, I found that I had to peer under the
Domino machine after cutting a mortise to ensure that the dowel pin was fully engaged against
the end of the mortise I had just made and not catching on some "chaff"; that seemed more
work and a risk of problems that I could easily avoid. So, instead of using the locating pins, I
used pencil marks and visually aligned the Domino machine for each mortise and had zero
problems when joining the associated components.
To facilitate marking the mortise locations for adding edging to the panels, I placed each panel
with its edge confronting with the face of the edge piece to be joined to it on the panel and
lined up so their exposed edges were flush. While holding them in this position, I drew a series
of lines along their exposed long edges corresponding to the locations of the Domino tenons,
placing one about 2 inches from each end of the strip, and about every 6 inches there
between. I also marked one end of each piece to be morticed to be the reference, so I could
cut the first mortise nearest this end of the associated pair of workpieces was cut with the
Domino machine on its narrowest mortice width setting. For the remainder of the mortises, I
either used a wider setting, or plunged using the narrowest setting, then moved the Domino
slightly to a side of the centerline and plunged again. By making the first plunge slightly to the
left of the centerline I had marked and the second plunge slightly to the right of that centerline,
I could quickly make a series of mortises that were just a little wider than the Domino tenons
yet narrower than the middle mortice width setting on the Domino machine. I don't like having
any more void area within my projects than is necessary to assemble them. Then I used a
small square to continue those marks onto the adjacent faces of the pieces to be mortised, so
the marks would be visible when using the Domino machine.
There are at least three different techniques to mortise the edging and its associated panel to
assure they line up as desired when assembled. One is to reference off the bottom surfaces of
the Domino machine and workpiece. A second technique is to reference off the top surfaces
of the workpieces and not worry about getting the mortises exactly in the middle of the
thickness of the workpieces. A third technique is similar to the second technique, but care is
taken to set the height of the Domino fence so that the mortises are very near the midpoint of
the thickness of the workpieces.
The first technique is shown in the photograph immediately following this paragraph. Although
the following photograph depicts use of the Domino machine to mortise a rear edging strip for
either the TV Cabinet or a Bookcase section of the Entertainment Center, the same technique
was used to mortise the edging for the sides of the Console. The setup shown in the
photograph will cause the front and rear edging strips to stand proud of the panel by the
thickness (1/4 inch in construction of this project) of the shim boards placed under the panel
and base of the Domino machine. If you look across upside surface of the panel (which will be
Page 31 of 81
the inside surface in the finished construction), you can see that the edging on the opposite
(which is the front) edge of the panel stands proud of the panel. The face of the panel that is
up in the photograph is the inside face and the back edge of the panel is in the foreground just
behind the edging strip. Both the Domino machine base and the panel behind the edging are
being supported on strips of 1/4 inch wood, and what will become the outside-facing face of
the edging is clamped down in contact with the MFT top as needed. It is very important to
keep correct the surfaces of the workpieces when marking and later when cutting the
mortises to ensure the components will go together as intended. The edging strip to be
marked is oriented with its face that will be joined to the panel confronting that
particular edge of the panel, and the edging strip is flipped end for end about a vertical
axis thereby keeping the same side upward for cutting the mortices with a Domino
machine. If, instead, you flip the edging strip about a horizontal axis, your mortices will likely
be cut at the wrong elevation, unless the thickness of your edging stock is exactly that required
to cause the mortices to be mid-thickness of the stock. But your prior identification of the
various surfaces and ends of each piece should help to prevent this mistake.
I used the technique shown in the above photograph for application of some of the edging
strips, but I also used a second Domino mortising technique in which the mortise elevation is
referenced off the top surface of the workpiece to be mortised. This second technique is much
preferred when you want a surface of the edging to be flush with the panel to which the edging
will be joined with Domino tenons. In this technique the fence of the Domino machine is set at
90 degrees (such that the flat face of the fence is parallel to the cutter) and is pressed down
onto the reference surface of the workpiece to be mortised. If you go to the FOG Gallery and
enter "domino" in the search box, you will find among the "hits" a photograph (IMG_7390.JPG)
by Bill Wyko that shows a mortise being made using this technique into the edge of a sheet /
panel he created. Referring to my photograph above, if the Domino machine is reset to have
its fence at 90 degrees (so face of the fence which is its registration surface defines a plane
parallel to the axis of the cutter) as shown in Bill's photograph and is pressed down by the
forward handle on the fence onto the surface defined by the top surfaces of both the edging
strip to be mortised and the panel surface behind the strip, the inside surfaces of the edging
strip and the panel will line up flush when the parts are joined. Note how the top surface of the
Page 32 of 81
edge strip being mortised is flush with the surface of the panel. This second technique is the
one I most recommend for applying edging where the joined surfaces must be very near to
flush and you don't want to have to use a flush trim router bit after joining them, and you don't
dare risk sanding through the thin face veneer of the plywood. For me, this technique
produced elevation-matched pieces that needed only some scraping and light sanding which
did mostly with my ETS 125 and LS 130 using 120 grit and higher abrasives. I made certain
that none of the shim boards shown in my photographgraph used in the first technique were
positioned under the base of the Domino machine so it could not rest on them instead of
registering only through the Domino machine fence. When using this second or the third
technique, either elevate the workpiece relative to the top of the MFT to provide clearance
under the bottom of the Domino machine or position the workpiece so it is cantilevered out
beyond the edge of the MFT so the base of the Domino machine does not contact anything
and all registration is made by the Domino fence.
I also used a third technique in some of the construction of this project. If I wanted the
mortises to be very near to the center of the thickness of both the plywood panels and the front
edging strips, I found that, too, was not hard to do. I also used this technique to cut mortises
into the side edges and ends of the edging strips to form a face frame upon assembly of some
of the front frame pieces of the Entertainment Center. I did not get to this confidence level until
construction of the TV Cabinet which I made last. I measured the actual thickness my plywood
using a digital caliper (available from Woodcraft and others for about US$40), then set the
height of the fence of the Domino machine to one half the measured amount. Perfect
centering was not needed for this operation. As I progressed through construction of this
Entertainment Center and experimenting with use of the Domino machine, I realized that I
could come very close to the center of the thickness of the plywood or wood edging strips by
simply marking the centerline of the wood piece then eyeballing the location of the Domino
pins as I adjusted the height of the Domino fence. I also noticed on my Domino machine,
when viewed at front quarter angle from either side, there is a highly visible horizontal mold
partition line in the aluminum housing adjacent the bosses into which the dowel pins are fitted
that appears to closely correspond to the centerline in elevation of the dowel pins. I don't know
if every Domino machine has these visible features, but I would expect them to. Sometimes I
used that flashing/parting line to make the fence height setting when I wanted to center the
mortises relative to the thickness of the workpiece. The dowel pins appear to be at the same
elevation as the centerline of the Domino Cutter (as they have to be for indexing successive
mortices as described in Festool's user manual), so if the dowel pins and that mold parting line
appear to be on the thickness centerline of the workpiece to be mortised, so will be the
mortise. I also found I could easily visually check the elevation setting of the Domino fence,
especially in plywood because the veneer layers serve as a guide. I drew a pencil line
corresponding the thickness centerline of the 1 inch edging strips and used this to confirm the
height setting of the Domino fence. I needed to do this several times while assembling the TV
Cabinet with its fully Domino tenoned front face frame. Checking this visual technique against
actual mortises and the thickness of the plywood and other components I was making
indicated I could usually get within 1/2 mm of center of thickness with little trial and error. That
is close enough most of the time, but probably not if working with thin veneered plywood onto
which you are trying to apply a flush edging strip.
As stated earlier, when mortising these edging strips, it is important to first position each strip
relative to the panel to which it is to be joined in the orientation you want the pieces to be
when assembled, and to make your pencil marks for the mortises while in this orientation.
Page 33 of 81
After marking the edging, flip it end for end keeping the same edge surface up, position it
against its associated panel and cut the mortises. Again, it is very helpful to mark each piece
of edging and panel so you know which pieces go together when you're ready to glue-up. I did
not glue on the edging until I completed several stages of dry fit checks and drilled the shelf pin
holes using my LR 32 Guide Rail and Hole Drilling Set (Item #583290) with my OF 1400.
For mortising the ends of the edging strips, which I did as I progressed through several dry fit
checks, I used Festool's Trim Stop (Item #493487). In contrast to my experience with the
Cross Stop (Item #493488), I had no problems using the Trim Stop. I found it very easy to
install on the Domino machine and very easy to setup to center the mortise in my 1 inch thick
by 1 1/4 inch wide front edging stock, and surprisingly accurate. [Based on this experience,
making some chairs may be in my future!] The Cross Stop was not used in construction of the
Console, but was used in construction of the Bookcases and TV Cabinet which rests on top of
the Console.
Mortising the Edging for the Top of Console
The main panel of the top of the Console is a piece of 3/4 inch veneered plywood. It is
surrounded by a mitred three-piece frame of oak stock 1 inch thick by ~2 inches wide. The
mitred frame is attached to the plywood panel with Domino tenons. As you can see in the
photographs of the finished console, the mitred frame and center panel are flush on the
exposed top surface, but offset 1/4 inch when viewed from the underside.
Page 34 of 81
Here's a view of the underside of a front corner of the Console top.
This was my first attempt at using the Domino machine for applying mitred edging, and also
my first attempt at cutting the mitre joints in the front piece to exact length. Unlike a picture
frame whose center is hollow, there is no room for error here. All of the cut edges must be
straight and clean and the elevations, lengths and angles must be exact. My approach to
these issues was to always reference the Domino machine off the top surfaces I wanted to be
flush when joined, then to machine the mortises into the edges of the plywood panel and
framing pieces to be joined. I first cut the framing stock a couple of inches longer than needed,
so I could tweak the mitres if needed. Then I cut a mitre on one of the short side frame pieces
and on one end of the front frame piece. I made the mitres on my table saw because I did not
want to clear my MFTs to do them with Festool equipment. (A Kapex or other quality mitre
saw would have been welcome at this time.) After I was satisfied with the fit of the mitred
pieces for one corner to one another and the front and one side edge of the top panel, with
them in position relative to the panel I marked out the locations of the mortises using a pencil.
I did not cut the other mitred corners until I was satisfied with the fitment of the first corner
pieces to themselves and the center panel. I did not have any extra 4/4 stock from which to
cut new framing pieces, so I proceeded cautiously, incrementally working toward the final goal.
The first photograph below shows the mortises in one of the side framing members. The
mortises adjacent the mitre were intentionally made extra wide to enable the pieces to be
rotated somewhat into final position as they are slid together. If the mortises are tight relative
to the width of the Domino tenons, the mitred pieces with their Domino tenons cannot be
assembled to both themselves and to the center panel. Note also the two tenons in the mitre
joint. To position these mortises, I simply laid a pair of 5mm Domino tenons on to of the mitred
pieces while they rested on the MFT top, and made a pencil mark corresponding to the
approximate centerline of each tenon. That visual technique also assured I would not cut
through the mitred frame pieces provided I kept the Domino machine set to plunge 15mm,
which I did. [If I had wanted to place a tenon closer to the outside edges of the mitred corner, I
could have reduced the length of a tenon and reduced the plunge depth of the Domino
machine whose least depth stop is 12mm.] Then I removed Domino tenons I had laid on top of
the pieces to be morticed and extended my pencil marks using a try square positioned against
the cut edges of the mitres. Then I cut the mortises with my Domino machine. I did several
dry fit attempts and extended the width of the mortises as needed to enable the joints to be
brought fully together and the Domino tenons to be fully seated in their mortises. I could see
where the mortises needed to be widened as rotated the framing pieces into position, and
made pencil marks to help guide my placement of the Domino machine to widen the mortises.
This was easy to do with the Domino machine, all I had to do was simply move the machine
laterally from my centerline by the amount I wanted to widen the mortise.
Page 35 of 81
Several dry fit checks were made; the mortises were widened as needed to enable full closure
of the mitre joint and contact along the full lengths of the framing members and the center
panel.
Below is a photographgraph of the final dry fit check. The glued up photographgraph looks the
same. All of the pieces came fully together. The joints have remained fully closed since the
Page 36 of 81
finished Console was brought from my garage into my house a few months ago, despite the
lower humidity in the house.
Drilling the Console Shelf Pin Holes
After cutting all the mortises on the panels, I used my LR 32 Guide Rail (Item #491621)
together with my LR 32 Hole Drilling Set (Item #583290) and OF 1400 router fitted with a
Whiteside brand 1/4 inch solid carbide double-fluted straight bit to drill a pair of rows of shelf
pin holes on the confronting faces of the vertical partition panels of the Console.
Page 37 of 81
Because I did not need to adhere to the dimensional standards for the Euro hinge system, I
held the panels together in elevational alignment (top edges and bottom edges in line when
possible) and used my large precision carpenter's square to draw a line across the inside faces
of the panels where I wanted a row of shelf pin holes to begin. Then with a pair of Festool's
Edge Stops (Item #4857580 installed on the LR 32 Hole Drilling Guide Rail, I positioned the LR
32 Hole Drilling Guide Rail on the panel to be drilled with a hole of the LR 32 Guide Rail
centered on my pencil line. This simple technique allowed me to position (in elevation) the
holes wherever I chose rather than being limited to the specific distance of a given hole in the
LR 32 Guide Rail that will result from use of the Linear Stops that are supplied with the LR 32
Hole Drilling Set (Item #583290) and installed in the end of the LR 32 Guide Rail in use which
limits position of the LR 32 rail to specific distances of 16mm and 32mm from the end of the
panel to be drilled. (Please refer to the tutorials of Brice Burrell or Overtime or Mirko for
instructions on use of the components of the LR 32 Hole Drilling Set (Item #583290) as Festool
designed them to be used.) Below is a series of three photographs that illustrate the
techniques I used to drill the holes in the Console panels and later in the bookcases. In
making the Bookcases, the rows of shelf pin holes were much longer than in the panels and I
had to "walk" my 42 1/2 inch long LR 32 Guide Rail lengthwise to continue a single row of
holes.
I “walked” my short LR 32 rail lengthwise using the OF 1400 with the ¼ inch bit installed to
confirm I had the rail properly indexed. I joined a normal Guide Rail to the end of the LR 32 to
enable clamping the LR 32 at the ends of my ~7 ft long workpiece, and clamped a straightedge
Page 38 of 81
behind the LR 32 to act as a lineal guide as I slid the LR 32 along the workpiece. If you don't
advance the LR 32 a distance more than its working length, you can slide the router back and
forth to confirm that you have perfectly indexed it for the next series of hole. With this
technique, you can create a very long row of equally spaced holes if you have a long enough
straight edge to back up the LR 32 and a way to lock it in position as you make each
successive series of holes. If the hole size you happen to be drilling matches that of the metal
dowel pins at the ends of Festool's Edge Stops, you can mount one or both of those on the LR
32 Guide Rail with the distance from the hat of the Guide Rail set to correspond to the distance
of the centerline of the LR 32 Guide Plate (Item #492340) when mounted on the LR 32 Guide
Rail and use the Edge Stops as an aid in aligning the LR 32 Guide Rail when “walking” along
the row of holes being drilled. I am thinking of making some wooden blocks similar to those I
made for my repeat rip cut Side Stops but with capability of securing rods corresponding to the
size of the holes I commonly drill with the LR 32 -- one to hold quarter inch and and to hold
5mm size rods. Drill bits or router bits could be used, or a tapered (conical shaped tip) pin.
Note particularly how the pencil line is aligned with a hole in the LR 32 Guide Rail.
Results. Holes where I wanted them.
Page 39 of 81
Assembling the Console
You might think by now that I was ready to begin assembling the Console. You'd be partially
correct, but not entirely. I glued the front and rear edging onto the side panels, the front edges
of the partitions. For the adjustable shelves, I added 3/4 inch thick edging to one long edge
and 1 inch thick edging to the other, thus enabling the adjustable shelves in the center
compartment of the Console to be installed in either orientation to give a different appearance
as shown in the following two photographs.
Page 40 of 81
The photograph immediately below shows the Console shelves with 3/4 inch thick edging in
front (corresponding to the thickness of the plywood panel of the shelf).
Page 41 of 81
The following photograph shows the Console the shelves arranged to present the 1 inch thick
edging in front.
Page 42 of 81
But those photographs just above are getting ahead of the chronological order in which I built
the Console. Due to several small interior spaces, I decided to try pre-finishing the
components of the Console before final glue-up assembly. But before that I did another dry fit
check. They are difficult to distinguish them in the photograph below, but I made four gauge
blocks from scraps of wood to the length corresponding to the width of the narrow permanent
shelves (one on the left and the other on the right in the photograph below) and set them on
top of the base panel to ensure that the vertical partitions would be correctly located. If you
look carefully in the lower left of the photograph, you will see one of the gauge blocks with a
small piece of blue tape on its top surface. With the gauge blocks and shelf and vertical
partition in place, I installed 2 inch long Spax screws into the partitions through the bottom
panel. I also used these gauge blocks for subsequent dry fit checks and for final assembly.
Spax screws are premium priced, but they can be used as self-drilling screws in wood and
similar materials, and with a pilot hole, even into concrete. (I used pilot holes to mitigate the
risk of splitting the wood which I think is more of concern when the screws are being driven
parallel to the faces of plywood, in this instance the partitions.) Their heads are very precisely
formed and a Number 2 Posi-Drive® bit fits perfectly unlike the sloppy engagement and
resulting cam out that often occurs with Phillips head and even square drive (Robertson)
screws of lesser quality. About this time I thought I was going to run out of clamps, so many
were required for the dry fit checks as additional components were added to the Console dry fit
check. (I turned this into an opportunity out of it by having my wife come to see my progress
and showed her why a woodworker can never have too many clamps! She had previously
questioned why I would ever need as many clamps as I own. Now she better understands.)
While the Console was assembled for a dry fit check, I fit the front edging that would later be
glued and secured with Domino tenons, and also the front toe-kick board (not shown in the
photograph above). If you look carefully just under the top you will see a board extending from
the left side panel to the right side panel. That board and another like it were let into notches I
cut into the vertical partitions and fastened to both side panels and both partitions with screws.
Due to the absence of 1 inch thick edging on the back edge of the top panel, I inserted ¼ inch
thick wood strips between the back cross piece and the underside of the plywood panel of the
top before inserting screws.
Page 43 of 81
Dust Collection Adapter for Kreg® Pocket Hole Jig
The toe-kick board was also drilled for installation with pocket hole screws. To make the
pocket holes, I used a Kreg jig fitted with my shop-made dust collection hose adapter. I believe
that I made the adapter from a section cut from a Carlton brand PVC electrical conduit 90
degree bend, 1 1/4 inch diameter. Festool's 27 mm tool end hose fitting (Item #487071) is too
large to fit into the blue-colored dust collector supplied with the Kreg jig, and Festool's 36mm
hose fitting (Item #487721) is too large to grip the outside of the nozzle of that collector. Below
is a photograph of my adapter in use. If you decide to make an adapter like this, note that you
will have to slightly enlarge the end that fits onto the Kreg dust collector shroud by grinding
away a little of the inside surface to the conduit. I used a small sanding drum mounted in my
drill to do this. The wall thickness of this conduit is quite thick (Schedule 80). To make it
easier to select the best size of conduit to begin with, you could remove the tool end fitting
from your Festool 27 mm hose and take it with you to HD or Lowe's, and you might something
that fits even better without need to grind. Use of a curved hose adapter reduces the stress on
the mounting of the Kreg dust collection shroud which is fairly easy to to pop loose. When the
Kreg jig with dust collection shroud is used with a CT 22 at full power, nearly all of the drilling
chips are captured at the source. Removal of the chips as they are created also reduces
stress on the special stepped drill bit used with the pocket hole jig and enables drilling the
holes using a faster feed rate. The more I use the Kreg jig, the more I like it for assembly of
components where the pocket screw holes will be hidden from view. I used the Kreg jig later
to drill pocket holes on the top and bottom panels of the Bookcases and TV Cabinet; these
helped draw the Domino tenon joints together.
I made the door frames from 5/4 oak stock (true 1 inch thick). The pieces were cut to exact
length with square ends on the MFT using the flip stop supplied with the MFT 1080. Each end
of each door frame rail and corresponding top and bottom ends of the stiles were mortised with
the Domino machine for a single 10x24x50mm Domino tenon at each joint. After glue up, I
clamped the door frames to the top of my MFT using Festool Clamping Elements (Item
Page 44 of 81
#488040 and / or F-style Quick Clamps (Item #491594) and sanded them flat using my RO
125 followed by my ETS 125 on top of my MFT. After assembly of the door frames, I made
another dry fit check of the entire Console, this time with the edging installed on the base
panel. In one of the near final dry fit checks I installed the hinges to help ensure proper
clearances before applying any finish coats. On the backside of the door frames, I routed a
rabbet using a bottom bearing bit and hand chiseled the corners to accept later installation of
the decorative glass panels, and ordered the glass. The glass was not installed until after the
Console and door frames were completely finished.
Sorry, but I could not find a photograph of the bare door frames showing the back side. There
is one later with the glass in place under the section entitled “Installation of the Glass Panels in
the Doors of the Console.”
After I finished drilling the shelf pin holes, and was satisfied with the dry fit check, I began to
assemble the Console components with glue. I glued the front and rear edging strips onto the
sides and other plywood panels and shelving. Then where needed I scraped and then sanded
the edging and panel surfaces flush, using mostly my ETS 125 and LS 130 sanders. For most
of this work I preferred the fine degree of control provided by the LS 130's linear motion, which
is much like hand sanding except much faster, and with less airborne dust. The LS 130 is
certainly not an aggressive sander compared to others in Festool's product line, but if you want
to remove material a little more aggressively all you have to do is hold the sander so its back
and forth motion is at an angle to the grain direction. Then return to sanding with the grain to
remove those cross-grain scratches. Not once did I cut through the very thin oak veneer of the
plywood. I was concerned about this as I had never before built a furniture project using
veneered plywood panels for the main surfaces; I was a traditionalist who glued up the needed
panels of solid wood boards.
An additional advantage of the LS 130 for sanding applied edging flush with the surface of a
plywood panel is that it eliminates the risk of creating deep sanding scratches across the grain
the remnants of which only show up when you apply a pigmented stain. I learned this the hard
way even after sanding with my ETS 125 through 220 grit, and had to scramble to wet sand
out such scratches while staining some of the components of this Entertainment Center. That
was a lot of extra work and a waste of sandpaper (which quickly loaded up due to the wet
stain) that I would rather avoid in the future; besides, the very thin veneer can be easily cut
through when trying to remove scratches created by a rotary or orbital sanding machine by
further use of a rotary machine with fine abrasives.
I glued the short shelves to their respective partitions before gluing these sub-assemblies to
the rest of the Console. As can be seen in the photograph below, the MFT proved very useful
for this task because I could draw the glued Domino joints together by tightening the bar
clamps the bottom jaws of which engaged the bottom edge of the side rails while keeping them
perpendicular to the partition panels. [Remember that I am working alone and don't an extra
pair of hands to help with these tasks.] Even though I sanded the 5 mm Domino tenons and
chamfered their ends, a lot of force was required to seat them fully close the joints between the
components being joined. Most of my construction used original Domino tenons sold under
Item #493296. Despite spending a lot of time sanding their faces and edges, they were still a
very tight fit. Festool has changed the dimensional specifications for their 5 mm Domino
tenons; the reduced size ones are sold under Item #494938 and are significantly easier to put
into a Domino mortise. But I did not have any of the new Item number until I was nearly
Page 45 of 81
finished with this entire Entertainment Center. I found this out when I needed more 5 mm
Domino tenons to complete this Entertainment Center. This Domino tenon fitment problem
seems to be limited to the 5 mm Domino tenons; the 10mm Domino tenons were a "tight slip
fit" during dry fit check and the joints not difficult to draw together with clamps or a mallet when
gluing up the door frames.
After completion of these sub-assemblies, and final sanding, I applied stain and finish coatings
to them, prior to final assembly of the Console. There were so many components that I cannot
show them all in a single photograph. They were strewn all over my shop to dry between
applications of additional coatings. If you continue reading through my story, you'll learn how I
somewhat changed my order of work when making the Bookcases and again when I made the
TV Cabinet that rests on top of the Console.
Page 46 of 81
Chapter IV - Finish Schedule and Notes
Finish System, Problems and Solutions
The finish schedule I followed for nearly all components of this Entertainment Center is listed
below together with some notes based on what I learned while making this Entertainment
Center. The finish system I used is a combination of solvent based and water based coating
materials, applied using a combination of brushing, wiping and spraying.
1. Sand through 220 grit. I used Festool sanders and Festool Brilliant abrasives for 180 and
220 grit, for lower grit numbers I used Rubin interchangeably with Brilliant.
2. Vacuum all surfaces to be finished using the brush attachment on the shop vacuum
machine. I also vacuumed every surface I could reach in my garage / shop to reduce
creation of airborne dust during later spray applications of coatings. If possible, I
recommend applying the finishes in a different room than was used for machining and
sanding the pieces to be finished. I did not have that option, although for some of the finish
applications on some components of the Entertainment Center, the weather permitted me
to apply the spray coatings outside. Doing that has its own set of associated problems, in
my shop setting including rain, very high humidity, insects landing in the wet finish coat,
and due to my lot having many large trees that border my driveway, leaves and pine
needles landing in the wet finish coat.
3. Wipe all surfaces to be finished with a clean, dry microfiber cloth. I used the same goldcolored cloths I had purchased from Griot's Garage a few years ago for use when hand
polishing my cars. They are reusable indefinitely provided you properly wash them to
remove accumulated dirt and dust. There are differences in quality among brands of
microfiber cloths and different fiber types, diameters, lengths and numbers of fibers per unit
Page 47 of 81
area. Do not use fabric softeners and launder them separately from other items to avoid
lint.
4. Apply wash coat of 1 lb cut alcohol base shellac. I used Zinnser's Seal Coat and diluted it
approximately 1 to1 by volume with denatured alcohol. This was applied with a brush.
5. Apply oil-based stain. I used General Finishes wiping stain, Pecan color. This product is
very slow drying even under ideal conditions of low humidity and temperatures around 75
degrees Fahrenheit. For the Console, I applied a second coat of the same stain a couple
of days after the first. There did not seem to be much effect on the depth of color, although
it did turn out slightly darker in appearance in some lighting conditions than some of the
Bookcase components on which only a single coat of stain was applied.
6. Apply wash coat of alcohol base shellac. I used the same 1 lb cut Seal Coat as above.
This is where I ran into a major problem. Do not brush this coat. As I brushed on the
shellac, the solvent apparently began to attack the binder used in the oil-base stain, and
the stain started to smear with my brush strokes, being removed in some areas and
deposited overly thick and dark in others. Eventually, after some quick removal of the
excess, and some quick restaining and touching up of the lighter areas and blending
efforts, I repaired much of the blotchiness I had created. If you look carefully in the below
photograph which shows the top surface of the bottom panel, you will see what remained of
the problem.
I entirely avoided repeating this problem with the stain when finishing other components by
spraying a light mist coat followed by a slightly wetter coat of the 1 lb cut SealCoat when
finishing the rest of the this Entertainment Center.
Page 48 of 81
7. Apply wet coat of Target Coatings' Oxford Brand Amber color water-based shellac. No
dilution was used. I simply poured it through a paint strainer into the cup of my Fuji HVLP
spray gun.
8. After the water-based shellac is dry, inspect the surface. Respray with water-based shellac
if coating appears rough or insufficient. If the first spray coat felt rough or appeared to
entrapped sanding dust or raised wood fibers, I lightly sanded the coating with 320 grit wet
or dry (black silicon carbide) sandpaper to knock down these high spots.
9. If you sanded the shellac coating, wipe it down with a microfiber cloth.
10. Apply a wet coat of Target Coatings Oxford brand vinyl sanding sealer. This material was
rather viscous as packaged by the manufacturer. Generally I slightly diluted it (<10 percent
by volume) using distilled water, or water collected by my basement dehumidifier. Tap
water is likely to contain minerals and chemicals which may chemically interact with
Oxford's water-based products. The main reason for diluting this sealer is to help avoid the
coating bridging over the pores of the red oak instead of sinking into them. I wanted to
partially fill the pores with the finishing coats. I did not want them completely filled since
other commercially manufactured oak furniture in my house does not have fully filled pores.
Let the coating fully dry. Under good conditions of moderate temperatures and 50 to 60%
humidity it will likely only take about one hour.
11. Inspect the dried coating and recoat with sanding sealer if you think it necessary. Again,
you are looking for spot with defects compared to the areas immediately surrounding them.
12. After the sanding sealer coats have fully dried and hardened (I allowed at least a couple of
hours), sand the surfaces with 320 or 400 grit wet / dry abrasive. How far this coating is
knocked down by sanding will significantly influence how much the pores appear to be filled
in the final finish. The more this seal coat is knocked down, the smoother and less open
porous the final finish will be. If you want the pores filled, apply a clear filler such as
Crystolac brand or equivalent after applying the stain. I did not use any filler when finishing
the Entertainment Center shown in the accompanying photographs.
13. Wipe with microfiber cloths.
14. Apply wet coat of Oxford brand water-based gloss lacquer and let dry. Apply another wet
coat if desired. These are relatively thin coats compared to the sanding sealer. Whether or
not additional coats of lacquer are advisable is dependent on many factors. One of the
most important factors is the technique of the spray gun operator . I have found that I can
adjust the spray gun so that I get an even thin wet coat, then hand that gun to another
person who will have problems achieving the same result due to holding the gun at a
different distance from the surface being sprayed, holding the gun at a different angle or
moving the gun at a faster or slower speed. I recommend experimenting on the underside
surfaces of a workpiece or some cardboard or a sheet of paper to get a feel for how
operator technique and spray gun settings influence the result. I use gloss lacquer for the
first of the final finish coats because it has better clarity and usually better abrasion
resistance than the semi-gloss or satin coats that may follow.
15. Inspect finish. Knock down any dust bumps with 400 grit wet or dry sandpaper if the
surface bumps can be felt with your bare hands.
16. Wipe with microfiber cloth.
17. Apply wet coat of Oxford brand water-based semi-gloss lacquer. Let dry. Inspect finish. If
clean and smooth, proceed to next step.
18. Apply second wet coat of Oxford brand water based semi-gloss lacquer. Let dry. Inspect
finish. If smooth and free of defects, you are done.
19. Let the finish continue to dry and harden. Several days are required before the finish fully
dries and cures and reaches its full hardness and resistance to physical (abrasion) and
Page 49 of 81
chemical substances (spills). I usually allow at least one full week before placing items on
the recently finished surfaces.
20. Take a well-deserved rest and admire your hard work!
Notes regarding the above listed finishing schedule and materials.
A. Red oak often contains significant amounts of tannins (tannic acid). Many of Target
Coatings water based products are highly alkaline, and potentially reactive with the tannic
acid in the oak. For this reason, Target Coatings website recommends using oil-based
stain and sealing that stain with solvent base dewaxed shellac (which SealCoat is) followed
by a coating of Target Coatings water based shellac which they consider to be a universal
sealer compatible with all of their other coating materials.
B. If you realize you have applied too much finish, you can simply wipe it away with a dry cloth
or even a paper towel, with any of these water based coatings. A run on a vertical surface
is obviously too much finish in a single coating. So is an area in which the coating appears
overly thick as evidenced by a thick wet, shiny layer that is milky in appearance. After
wiping the excess away, let the remaining finish dry, and later recoat. This is an advantage
of Target's water-based coatings (and maybe other brands as well) that does not exist with
solvent based lacquers I have used in the past. With those solvent-based lacquers you
generally had to wait for the coating to dry, or at least begin to harden (gel), then carve it
away with a small file such as those sold by auto body paint suppliers.
Installation of the Glass Panels in the Doors of the Console
The glass used in the doors was ordered from a local glass supply house, but they in turn had
to order a sheet of the specific type of glass that was chosen for the doors of the Console.
This glass has a relative smooth front face, but the back face is very bumpy due to the
presence of many small, rounded mounds of glass. It is called "Pebbled Glass" by some
vendors. Viewed from the front side from a distance, it looks similar to some seeded glass
materials. It is available with differently sized "pebbles,." and in different thicknesses. I
wanted to use tempered glass for improved safety, but the glass dealer informed me that
tempered pebbled glass was not available in the lesser thicknesses suitable for these doors; it
was available in 3/8 inch and greater thicknesses. Anyone with children or pets should use
tempered glass for improved safety.
The vendor cut the glass slightly longer than the dimensions I had specified, and by the time it
arrived I had already completely finished the door frames. To shorten the panels, I hand
ground them using a small metal disk with ~60 grit diamond bonded in nickel on it flat faces,
keeping the surfaces cool and lubricated by frequently wiping them and the diamond disk with
a sponge dipped in water. I purchased that disk at a Woodworking Show for use in touching
up some carbide masonry drill bits but have yet to use it for sharpening. But I have used it
several times to ease the edges on other pieces of cut or chipped glass. Installation was
straightforward once I finished removing about 1/16 inch from the glass panel, which took me
about 30 minutes.
Lesson learned: Always have components such as these glass panels on hand before making
the furniture components. It will save you a lot of time and frustration doing rework.
To install the glass, I simply laid the door frames down flat, inserted the glass panels, then
Page 50 of 81
applied a few short length "spot beads" of DAP's 50 year life Clear Acrylic Latex Caulking
spaced around the inside edges of the frames where they meet the glass. This caulk product
is milky when applied but turns clear within a day. I left the doors lying with their front faces
down flat for a day, then installed them on the Console. After the caulk dried, it is almost
undetectable from the outside and even the inside unless you come close and study the doors
trying to determine what is holding in the glass. The caulk spot beads hold the glass very
firmly; there is no rattling, yet the resilient bond allows relative expansion and contraction
movement between the door frame and glass. If I ever have to or want to remove the glass
panels, all I have to do is cut the spot beads with a utility knife, which can be done without
touching the finish on the insides of the rabbeted oak frames.
Below is a photograph of showing the "spot beads" of acrylic caulk serving as a glass panel
retainer. Sorry for the poor quality of these photographs! In the first photograph below, the
pieces of masking tape identify the locations of the "spot beads."
In the photograph below, the upper right corner of the text box is pointing to the "spot bead."
Page 51 of 81
They are hard to see even when viewed in person at close distance.
Chapter V
Building the Bookcases
The panels and associated edging strips were cut and mortised for 5 mm Domino tenons using
my Domino machine as described above in regard to the Console. Before gluing on the
edging strips, I drilled two rows of 1/4 inch shelf pin holes in the inside surface of each side
panel, and two rows of holes in each side of each center panel. Due to the nearly 7 ft length of
these panels, I needed to "walk" the 42 1/2" inch (1080 mm) LR 32 Hole Drilling Guide Rail
lengthwise along the panel to complete a continuous row of evenly spaced shelf pin holes.
This was fairly easy to do by attaching a non-holed Guide Rail to one or both ends of the LR
32, and using pencil marks and my router with 5 mm bit installed as a locating pin. A
significant additional design requirement of the customer (my wife) was to enable the
uppermost level of removable shelf panels to be installed such that their elevations would
exactly match that of the bottom cross piece of the TV Cabinet (yet to be built) when installed
resting on top of the Console, to provide the appearance of a horizontal row of near cubical
cubby holes for her to place art items.
The center vertical panel of each of the pair of Bookcases is shorter than the side panels. The
center panel extends vertically between top and bottom cross panels, subdividing the
Bookcase into two narrow columns to be fitted with short shelves. Getting the shelf pin holes
aligned at the proper elevation in all four panel faces presented an additional challenge to me.
A simple Bookcase comprising two upright sides with shelves extending between the sides
would have been much simpler. The actual elevation of the shelf pin holes in the assembled
Bookcase was going to depend not only on accurately measuring and cutting the lengths of the
Page 52 of 81
center and side panels, but also the actual thicknesses of the top and bottom cross panels,
and whether they were truly flat and straight. In hindsight, it would have been better to have
first built up the base panels with sub-frames, thus making them as flat-topped torsion boxes
and dry fit checked and marked the desired shelf pin holes elevation on the center panel
before drilling shelf pin holes in it. In practice, I added the reinforcing sub-frame members with
pocket screws after the Console and Bookcases were otherwise fully assembled with glue.
But what I did worked out well. My solution was to measure and layout pencil lines extending
across the panels to identify where the plywood cross panels (horizontal in the finished,
installed Bookcases) would intersect with the inside surfaces of the side panels, and where the
shelf pin holes should be drilled. If I had had the space available, I would have laid all three
panels for each one of the Bookcases side by side on a table or the floor, with the center panel
positioned at the correct elevation relative to the tops and bottoms of the side panels, and
when in that alignment marked reference pencil lines across all of them for use in getting the
shelf pin holes in the desired locations. None of the flooring in my garage is truly flat, and my
driveway is steeply sloped from the street to the house and attached garage with compound
crowned contours near the garage. The slope is great enough that a flat board placed on top
of those small plastic painter's pyramids often slide off them or pull them over. And it was now
late Fall season and the weather was seldom good for working outside. Because I did not
have a large flat floor or table space available, I stacked the panels for one Bookcase on my
MFTs and auxiliary table, marked their front edges and then transferred those marks into
pencil lines extending fully across the faces to be mortised with the Domino machine and to be
drilled with my OF 1400 and LR 32 with Hole Drilling Set using a 1/4" straight bit. I did the
same for the second Bookcase. I used my Woodpeckers precision carpenter's square to draw
the pencil lines, always referencing from the front edges of the panels. Because the distance
of the shelf pin holes from the top ends of the panels was set arbitrarily to enable adjusting the
shelves to create the appearance of a stack of cubes, the Linear Stops supplied with the LR 32
Hole Drilling Set were not used -- those stops are designed to place the LR 32 Guide Rail
exactly either 16mm or 32mm from the pin in the Linear Stop. Instead, I substituted a Guide
Rail Connector (Item #482107) and replaced one of the set screws with a 6mm machine screw
to create an Adjustable Linear Stop for the LR 32 Guide Rail that could be set wherever I
chose. This enabled me to set the holes at whatever distance I wanted them to be from the
end of the panels. I relied on these Adjustable Linear Stops to position the LR 32 Hole Drilling
Guide Rail relative to the top edges of the panels, using the pencil lines I earlier made to
confirm the locations of the holes.
Shown below is the LR 32 setup I used with my Connector made into an "Adjustable Linear
Stop." I used a small piece of blue masking tape to identify the starting and end points of my
rows of shelf pin holes relative to the top end of this central divider panel. When retouching this
photographgraph using IrfanView, I inserted added the little white square to help the reader
locate the piece of blue tape.
Page 53 of 81
I did not need to use the Edge Stops from Festool's LR 32 Hole Drilling Set (Item #583290) to
set the distance of the shelf pin holes relative to the front and back edges of the Bookcase
panels. I eyeballed the position relative to the front and back edges of the panels. However,
while doing this, I made one mistake that cost me some time after final assembly. One of the
front rows of shelf pin holes was not set back sufficiently from the front edge of the panel. At
that time I was thinking that placing the shelf pins very close to the front and back edges of the
upright panels would provide the widest pin spacing and thus best support for the shelves,
which is true and would not have created any problems if the shelves were simply flat panels
of even thickness throughout. I did not realize this oversight until after I had added the 1" thick
edging on the front of the 3/4 inch plywood panels forming the short shelves which had fit well
during a prior dry fit check. I used various widths of 1" stock scraps for this edging, glued it on,
and trimmed the back plywood edges of the shelves to make them the needed overall depth.
When I went to trial fit them again, the edging on a few of them rested on the edge of the front
shelf pin instead of the allowing the shelf pins to bear fully on the thinner portion of the bottoms
of the shelf panels. Because of some variation in setback distance of the front rows of shelf
pin holes and front to back dimension of the edging on the front edges of the short shelves,
shuffling their positions solved most of the interference problems. A little relief cut or grinding
of the spade headed shelf pins solved this problem for the rest of the problematic shelves.
Alternatively, I could have carved away a slight amount of the back edge of the offending front
edging strips, but I did not want to remove the finish, and the from shelf pins are hidden from
view when the shelves are installed.
The side panels were mortised with the Domino machine, using the same template used to
mortise the side panels of the Console. Because the Bookcase panels are 12 inches wide
(depth direction in the finished bookcases), only three mortises were cut in each front to back
row. (The side panels and partition panels of the Console each had four Domino mortises in
each row). As when making the mortises in the panels of the Console, the template was
always referenced relative to the front edges of the Bookcase panels.
Page 54 of 81
The accuracy of my method of marking the elevations of the Domino mortises and template
method was confirmed when I cut the mortises for the lowest level of short shelves which are
secured with glue and Domino tenons. I set the plunge depth on my Domino machine
shallower than normal in the hope of not cutting all the way through the center divider panel
and cut the mortises from each face of the center panel using the same template used to cut
the mortises in the upper and lower full width cross panels. But the core veneer layer partially
tore out and I could see that the mortises made from opposite faces using the marked lines on
my template were perfectly aligned! I pushed a 5mm Domino tenon through each one to
confirm that was true. If I built another case with a similar center divider panel, I would clamp a
block of scrap to one side of the panel or lay it on some scrap to support the exit side of the
mortice cut and plunge the Domino machine to cut the mortice all the way through the panel in
a single step.
Before assembly of the Bookcases, I used my Kreg jig to drill pocket holes into the top surface
of the top cross panel and into the bottom surface of the bottom panel, taking care not to place
a pocket hole where a Domino mortise was located. The main purpose of these pocket holes
was to help draw fully together the components being glued up. Because the front and rear
edging strips are offset 1/4 inch relative to the plywood panels forming the sides of the
Bookcases, and the size of these cases, it is difficult when working alone to hold all the pieces
being glued together, the long bar clamps and wooden cauls. The pocket screws, especially
those placed near the center of the width of the panels helped reduce the need for cauls.
I also tried a somewhat different order for the finishing steps relative to assembly when
building the Bookcases. Because I ran out of room in my shop to set all the pieces of the
console to dry between finish coatings, I decided to follow the finish schedule only through
application of the stain layer before assembly, then apply the rest of the finish coatings to the
assembled cases since they would take up much less shop surfaces and spaces. And I could
proceed with construction of the TV Cabinet while waiting between coatings. And the weather
had turned decidedly to winter so I needed to do everything, including all of my spraying inside
the shop, and pick up my pace if I wanted to get done before Christmas.
Assembly of the Bookcases
Due to the center standard and short shelves at at elevation 24 inches above the bottoms of
the side panels and use of Domino tenons, the Bookcases had to be assembled in stages.
Below is a photograph showing partial assembly of one of the Bookcases. Both the base
cross panel and the lower short shelf panel fitted with Domino tenons are being glued up. I
shortened the Domino tenons and inserted them first into the end of the short shelf to ensure
that both short shelves would be equally secured to the center panel. Alternatively, I could
have used a full length 5mm Domino tenons and made the mortises deeper in the edges of the
short shelves that were to be joined to the center panel. That would have been faster than
what I did. I chose not to do that because the next deeper incremental stop was 20mm, which
would have left less of the tenon projecting into the center panel than I wanted (Festool's 5mm
tenons are 28mm long). So instead, I left the Domino set at 15mm plunge depth and trimmed
the six tenons needed for each bookcase. In the interest of safety, I would have used my
bandsaw, but my shop was so cluttered at this point that my bandsaw was not very accessible
and my MFTs were in use for the glue up and assembly as well as with my Kreg jig. So I set
my Domino machine on the least depth setting and plunged a few mortises into the side of a
scrap of 3/4 inch plywood, then inserted a Domino tenon in each and trimmed them to uniform
Page 55 of 81
length on my table saw.
Note in the first photographgraph below only the short shelf is being glued up to the side panel
which is on the bottom in this photographgraph. The other Bookcase components are in
position merely to ensure that the center shelf is squared up and correctly located. I made
most of the mortises slightly wider than the width of the 5mm tenons so the pieces could be
adjusted if and as needed during assembly. Clamps were used to pull the components into
correct position as needed.
In the photographgraph immediately below, the top panel is being added and glued up to the
sub-assembly shown in the photograph just above.
Page 56 of 81
Shortly after closing the joints with the help of a mallet and the bar clamps, I inserted the
pocket screws which helped to pull the center of the side panel tight against the cross panels.
Thereafter, I added the remaining short shelf and the other side panel, closed the joints with a
mallet and the bar clamps, and inserted the remaining pocket screws. This part of the project
was very stressful because of the number of spaced Domino tenons (3 sets of 3 with nearly 7
feet between the top and bottom cross panels) to which glue had to be quickly applied, the
tenons inserted, glue applied to the protruding stub tenons and all confronting surfaces.
The edging on the front of the center panel is also mortised at both ends and joined with
Domino tenons to the edging on both the top cross panel and the bottom cross panel. Domino
Cross Stop (Item #49348) was used to cutting the mortises in the ends of the edging strips.
This accessory is quick and easy to attach to the Domino machine and also quick and easy to
adjust to fit the narrow workpiece to be mortised in its end. I did not have any reason to offset
any of the mortises in the ends of the edging strips, but that would also have been easy to do
because the Cross Stop has easy to read and use scales molded into the movable
components that contact the sides of the workpiece to align the Domino parallel to the length
of the narrow workpiece. With the Cross Stop installed and adjusted to the width of the narrow
workpiece, the workpiece is captured within three surfaces assuring good alignment for cutting
the mortise in a direction parallel to the length of the workpiece, the Domino machine cannot
jump laterally when plunging.
To facilitate installation of the edging on the center panel (which had to be installed by a
combination of rotation and lengthwise sliding movement because of tenons protruding at right
angles on the back surface and bottom end) and slipping the tenon into the mortise in the
edging of the bottom cross panel, I extended the width of the two mortises nearest the bottom
of the center panel which was already joined to the bottom cross panel. Since I had not yet
secured the top cross panel to the center panel, I could pull on it to create enough space for
insertion of the tenon joining the front edging of the top cross panel and the front edging of the
center panel. Then the second short shelf was joined to the center panel. And lastly, the other
side panel was glued on. Thus, mine was a slow, sequential method of assembly with many
dry fit checks. Lifting and positioning the second side panel and getting all nine tenons started
Page 57 of 81
into their mortises and drawing them evenly home proved somewhat of the challenge. When I
tapped one corner, another earlier started corner would pop out, and if I drove the first corner
in deeper, thus canting the panel, I couldn't get the rest of the tenons to hit their mortises. But I
finally got it together. These problems would not have existed if I had had a helper who could
have assisted in applying glue to the many Domino tenons and lifting and positioning the many
mortise and tenon joints at once, and would have been less if I had done this assembly work
on top of a solid table. I assembled this Bookcase on top of a old hollow core door laid across
a pair of sawhorses. That surface would bend and rebound as I struck the panel with a mallet,
rather than the joints being driven closed. A rigid support surface that did not bounce when
struck by a mallet would have been much better. Since I had applied glue to all confronting
surfaces and the tenons, and had to get the pieces to together quickly, I slid the assembly to
and fro along my makeshift table so my mallet strokes would be directly above one of the
sawhorses. That worked, but those were intense moments I'd rather avoid. I came very close
to ruining a lot of hard work. Now I much better understand why people like Norm Abrams
apply most of their trim using a continuous slot on the panel edge, biscuits for alignment and a
finish or pin nailer. But I don't like using nails in furniture, and don't own a pin nailer. The
backs of each piece of this Entertainment Center are attached with small screws with an
antique bronze finish in pre-drilled, countersunk pilot holes.
Lessons learned: Get someone to help when gluing up complex assemblies, especially when
the distance between the joints to be brought together is more than your arms' reach. Support
the project being assembled on a solid surface that won't bounce when you use a mallet to
drive the mortise and tenon joints fully closed. Get Domino tenons that are not too tight
fitment, particularly for application of trim pieces.
CHAPTER VI
Construction of the TV Cabinet
The design of the TV Cabinet had to be a bit different from that of the Bookcases for several
reasons. Design of the TV Cabinet presented several problems not existent in the design of
the Console or Bookcases. The TV Cabinet is 52 inches wide, so the back panel could not be
cut from a single sheet of 1/4 inch oak plywood as were the back panels of the Bookcases
while still keeping the face veneer grain running vertically. Some way of getting the electrical
cables through was needed, and ideally there would be no bottom panel or front cross piece
interfering with the appearance sight lines when the completed TV Cabinet was set on top of
the fully finished Console at final installation in the room. Another requirement was to enable
each of the four pieces comprising this Entertainment Center to be able to be used
independently of one another, if desired by myself or a future owner, e.g. someone not having
ten ft of wall space to fill. I drew up and considered several different designs before settling on
what I actually built. I purchased a few different types and sizes of grommets expecting I
would need to use some of them, including one of those wide oval-shaped grommets often
seen on computer desktops. In the end, I didn't use any of them in the TV Cabinet, and only
one in each Bookcase to facilitate installation of speaker wires. (My current speakers have
rather large molded on plugs with at least four electrical pins in each.) I think I achieved my
design goals. At the bottom of the back edge of the TV Cabinet, there is a cross member of 1
inch thick x 3 1/4 inch oak. In the final design that I actually built, it's important this bottom
cross member be resistant to bending to keep the front edges of the side panels from flexing
Page 58 of 81
out of their intended vertical planes. I would have made this cross member of thicker wood,
but the shallow depth (14 inches front to back outside dimensions) because my customer (my
wife) wanted the TV Cabinet to be as thin as possible to house the flat screen TV, and she
wants me to add doors later to hide the TV when not in use. The base of the TV is 11 1/2
inches front to back, so I did not have much room to spare. In the center portion of the lower
edge of that bottom cross member of the TV Cabinet, I cut a recess about 1 inch high by 16
inches wide with my jigsaw, then used my OF 1400 with a 1/2 inch radius quarter round bit to
round over the edges that would later be contacted by the electrical cables. The electrical
cables are routed over the back edge of the top of the Console and through this cutout region
of the bottom cross member of the TV Cabinet. Rounding over edges of the recessed area
also reduced the bend radius of the electrical cables during their installation. I also rounded
over the top inside edge of this cross member using a 3/8 inch radius bit.
The 3/4 inch thick plywood panels and edging strips were cut and mortised using my Domino
machine as described above in regard to the Console, and the Bookcases. After mortising the
side panels to join the upper (top) and lower (bottom) cross panels, the front and back edging
strips were glued to the side panels. A dry fit check was then made to enable marking the
exact locations of the pair of short vertical partitions that extend between the upper and lower
cross panels of the TV Cabinet, and the approximate lengths of the front edging strips for the
cross panels, which are shorter than the panels themselves due to the overhang of the front
edging strips towards the inside of the TV Cabinet, as in the Bookcases. I made two sets of
spacer blocks from lengths of scrap to ensure the vertical panels would be properly located
during the dry fit check and markup. The dry fit assembly was then taken apart and Domino
mortises cut into the confronting surfaces of the upper and lower cross panels for joining to the
vertical partitions. In the next dry fit check, with dry Domino tenons installed in all the mortises,
I again checked and marked the front edging pieces, re-cut them to final length and confirmed
the locations of the mortises to be cut into side faces of the front edging strips. I then cut the
mortises in the edging of the side panels in situ using my Domino machine with its fence set at
90 degrees (so the face of the fence is parallel to the bit) and resting on the front face of the
edging and another strip that I clamped flush with the edging strip to provide additional support
for the Domino fence. I was pleasantly surprised how well that simple technique worked.
Without the extra support block clamped on, registration of the Domino machine with its bit
axis truly perpendicular to the face to be mortised was not certain. I could rock the tail end of
the Domino machine up and down and not easily tell if the fence was flat on the narrow top
surface of the edge strip to be morticed. I could not use the extra fence support piece (made
of black plastic) that is supplied with the Domino machine and attaches to the bottom of the
Domino machine for these mortices because the crosswise plywood panels positioned under
the locations where I wanted to place these mortises while the cabinet was dry fit assembled
for this work. I set the depth of the Domino fence to place the mortises in the center of the 1
inch thick edging for these mortising operations.
The 1 inch x 1 inch front edging on the lower cross panel of the TV Cabinet is flush with the top
surface of the panel but overhangs the lower surface by 1/4 inch, as does the edging on the
shelves, and the bottom cross panels of the Console and Bookcases. Thus, the position of the
mortises into the side surface of the front edging on the side panels does not correspond to the
thickness centerplane of the plywood of the lower cross panel.
The front edging on the top cross panel is 1 inch thick x 1 1/4 inch wide and is centered on the
upper cross panel, as it is on the Bookcases. I centered the end mortises on the ends of the
Page 59 of 81
front edging on the top cross panel.
After trimming the edging pieces that go on the upper and lower cross panels, the edging for
the lower cross panel was glued with Domino tenons to the lower cross panel (without any
tenons in its ends) while the TV Cabinet was dry assembled to assure correct placement.
Then the Console was disassembled, the bottom panel edging sanded flush with the top
surface of the panel. The front edging on the top cross panel was similarly fitted, as were the
edging pieces on the vertical partition panels, to assure close fitting joints at the ends.
As with the Bookcases and Console, the TV Cabinet was assembled in stages with several dry
fit checks to ensure correct lengths and placement of the Domino mortises and tenons in the
correct locations. A specific sequential order of assembly was needed because each of the
confronting ends of the front edging is joined to another piece of edging with a Domino tenon.
The two following photographs show how I assembled the centered vertical ~4 inch wide x ¾
Inch thick board that divides the lower back portion of the TV Cabinet. This board extends
from the bottom of the back edge of the lower cross panel to the top of the bottom cross
member (stretcher) that joins the two side panels together. Two 5 mm Domino tenons were
used in each of these joints. To reinforce the joint of this centered back board with the back
edge of the top cross member, I glued (with Domino tenons) a strip of solid oak onto the back
edge of the lower cross panel before ripping it to final width and cutting the mortises.
In this photograph and the one just below it, the TV Cabinet is lying with its front face down on
the table, so the framework into which the five pieces of 1/4 inch plywood comprising the back
panels later will be fitted is facing up.
The photograph below shows more of the lower end of the clamp and cross member
arrangements. Note the use of some Systainers and wood block to support the bar clamp with
the red clamp head. Again, a second person to help with this assembly would have been very
welcome. To give you a sense of scale, the yellow and black bar clamps are 6 ft capacity, and
the side panel in the foreground is 54 1/2 inches long (tall). The cross member with the cutout
region for the electrical cables is at the far left in this photograph.
Page 60 of 81
Note in the photograph above that the back edges of the panels and the boards that are
clamped up are rabbeted. Five back panel inserts of 1/4" oak plywood were fitted into the
recesses. I matched the grain pattern on the front surfaces as much as possible given that
the overall width of the combined panels is greater than that of a standard 4 ft x 8 ft sheet of
plywood. The large lower panels are exactly matched. The left and right upper panels are
exactly matched to one another and the lower panels. The top center panel is not. The back
panels were attached with countersunk antique bronze screws.
To protect the top of the Console on which the TV Cabinet was to be set, the bottom edges
were covered with a layer of thin tan felt.
Making the Adjustable Glass Insert Shelves for the Bookcases
I made a total of fourteen shelves that could be used with the Bookcases, two solid panel
shelves and twelve with a 10" x 10” (square) 5 mm thick tempered glass panel inserted into a
recess the central region. After cutting the 3/4 inch plywood shelf panels of to size to fit
between the uprights of the Bookcases, I glued on 1 inch thick edging of solid oak to the fronts,
so that it was possible to arrange the shelves to give the completed Entertainment Center the
appearance of a stacked array of near equal sized cubes. I did not use Domino tenons for the
front edging, I simply glued the edging strips to the front edges of the plywood panels. That
was a design constraint/specification at the beginning of this project, although a few days after
installing the Entertainment Center, my wife decided on a different, unsymmetrical shelf
arrangement as shown in the photograph below.
Page 61 of 81
Good that I did not follow to closely the design of a Bookcase my wife had seen in a catalog
that was the initial inspiration for the general design of this project! That wall unit had
permanently fixed shelves, and the wooden strips that supported the bookcase shelves were
visible under each shelf. (I thought that was ridiculous given the >$6000 price the
manufacturer asked for it, even allowing that it was constructed of jatoba solids and veneered
panels, but no lighting or decorative glass or glass insert shelving or decorative top valence,
and straight sides on the side panels.)
Shown in the photograph below is the Paired MFT 800s Setup that I created and used for
making the shelves with the glass inserts. In reality, making these shelves was similar to
making a dozen small router table tops (I have not yet made a router table top!), except that
the recessed areas were sized 10 inches by 10 inches rather than the common 9 3/4 inches by
11 3/4 inches used by several commercial router plate manufacturers, including JoinTech
(iTools). This Paired MFT setup was easily put together done (providing both MFTs are either
old or new style) using a pair of shop-made "Squaring Arms" based on those described by
Jerry Work in his excellent MFT Manual linked on FOG. I made mine by laminating scraps of
hard maple and black walnut on to a core strip 1/2 birch plywood. My usage here is different
than the primary purpose taught by Jerry. The photograph is of two MFT 800s joined together
Page 62 of 81
by the shop-made connecting arms that are spaced significantly further apart than is possible
with Festool's metal MFT connectors (Item #484455). These shop-made connectors enabled
me to setup the exact distance required to grip the lateral edges of the small shelf blanks.
Pair of Joined MFT 800s, view from topside.
Using this Paired MFTs setup, I wedged the short shelf panels one at a time into the gap
between the edges of the tops of the MFTs and cut out the center region with a jigsaw. Then
with a 3/8 inch straight bit mounted in my OF 1400 router and a 30 mm Festool bushing
installed in its base, I routed out the center of the panel using my MFS 700 (Item #492611) as
a perimeter guiding template. Then I changed out the bushing to the PC bushing adapter
supplied with my OF 1400 router in which I had installed a much smaller bushing that would
locate the bit much closer to the profile defined by the MFS frame, reset the depth of the router
to correspond the 5mm thickness of the tempered glass inserts I had purchased, and routed a
recessed rim around the cutout area in each panel to hold a glass insert. Note that I used both
a 30mm Festool bushing aka Template Guide (Item#486033) for the full depth cuts and an
Imperial (USA standard) inch bushing threaded into Festool's PC bushing adapter. Since this
was not a laying project, there was no need to exactly match male and female cutting
diameters. All that was necessary was to create a recessed lip around the cutout region of
each panel to fit and support the associated glass insert. The combination of bushings I used
created a lip width slightly greater than 1/4 inch wide, more than adequate to support the glass.
The next photograph is what could be seen when peering down through my MFS setup into a
"Big Gulp" dust collection funnel attached under the connected pair of MFT 800s.
Page 63 of 81
If you look closely in the photograph above, you will note the absence of the numeric
graduations on the exposed top sides of the MFS. After setting the dimensions of the MFT, I
intentionally flipped it upside down to avoid wear of the graduations which are painted on the
MFS extrusions. I used the right angle brackets supplied with the MFS to aid in positioning the
MFS template reliably and repeatably onto the panels being routed.
To set the size of the MFS template, I simply placed it over one of the panels to be routed
which I had earlier marked with a pencil using one of the glass panels as my template. I
adjusted the size of the MFS until the outside edge of the router bit touched my penciled line
when the smaller diameter bushing was in contact with the inside wall of the MFS template.
After cutting one of the panels and squaring the corners with a chisel, I checked the size of the
recess with some of the glass panels. I learned they were not exactly 10 inches square as
advertised so I set the MFS a little larger and proceeded to rout all twelve of the shelf panels to
be fitted with glass inserts.
I learned that dust collection from my OF 1400 router through the topside mounted Dust Hood
(Item # 492000) with a straight bit and bushing in the bottom is not very good. My Makita
jigsaw has no provision for dust collection. I have Makita's extra cost dust collection adapter,
but it is not very effective, and is a nuisance to mount and connect to any common or standard
sized vacuum hose. (It makes you wonder what were their product designers thinking, or if
they ever tried to use the product they had designed in its real world applications.) I was able
to collect most of the wood dust by attaching a "Big Gulp" plastic dust collector funnel below
the gap between the two MFTs to catch most of the sawdust as seen in the photograph below.
Page 64 of 81
Pair of Connected MFT 800s with Dust Collector Funnel Bridging Gap between the MFTs
The “Big Gulp” rectangular funnel has a 4 inch outlet to which I attached a reducer and my
Festool 36mm AS hose which I connected to Festool's Antistatic Y-Piece Hose Connector
(Item #452898). I tried routing with a 27mm AS hose connected to my OF 1400 router and the
other port of the Y-Piece Hose Connector for some of the panels, but later abandoned the
upper 27mm hose because little debris was able to rise above the bit through the base of the
router. This extra hose on top was not doing much good, but the Big Gulp funnel with bottom
mounted hose was proving effective. I think the top hose was not very effective because the
router was fitted with a bushing with an inside diameter barely greater than the outside
diameter of the 3/8 inch bit that I used for all of this routing, which did not leave much area for
debris chips and an air stream to pass upward through the base of the router, and the straight
bit I was using had perfectly straight (axial) cutting edges and flutes.
I did not have any carbide straight bit long enough to extend through the bottom of the
workpiece when the router was positioned on the MFT sitting on the workpiece. For this MFS
guiding operation the bit needed to extend below the base of the router by at least ~5/8 inch
(approximate thickness of the MFS extrusions) plus the 3/4 inch thickness of the plywood
workpieces, i.e. a total of 1 3/8 inches. So I used an old Shopsmith brand 3/8 inch shank twoflute steel bit having an effective cutting length of about 2 inches. I changed the fully plunged
depth setting of the bit once during routing of the full depth cuts to even out wear on the bit.
The glue layers of the plywood cause a higher bit wear rate than the wood veneer layers.
Page 65 of 81
The “Big Gulp” dust collection funnel was clamped by its inlet flange to the bottom of the side
rails of one of the MFTs. A better way to hold the dust collection funnel in position would be to
insert some square nuts (or Festool's elongated nuts like those used as stops when mounting
the MFT cross cutting Guide Rail supports) into the T-slot channels formed in the bottoms of
the MFT side rails, then bolt up a pair of thin wooden arms to hold the flanges against the
bottom of the MFT side rails. This would also free up a couple of clamps for other uses.
Installation of Lamps in the tops of the Bookcases and TV Cabinet
I installed Tresco brand 12V PocKit Lamps with 20W Xenon bulbs in each compartment of the
top level of the Bookcases and TV Cabinet. These lamps are available as kits having a
transformer, wiring junction block and either two or three lamp units, and are a "plug and play"
modular design. I used a hole saw to cut the needed 2 1/8 inch holes through the top cross
panels of the cases and cabinet. After the holes were cut, I fed the wire leads for each lamp
through the holes and installed the lamp housings by simply pushing them in from below (each
lamp has small resilient fingers spaced around the housing which securely hold the lamps in
the holes). Then I twisted a Tresco-supplied decorative ring onto the flanges of each of the
lamp housings. I used a 2-lamp set for each of the Bookcases and a 3-lamp kit for the TV
Cabinet. I also installed a Tresco touch dimmer unit and plugged the transformers into the 3way outlet of the dimmer according to the Tresco instructions. Using screws, I mounted the
transformers, wiring junction blocks and dimmer unit on the top cross panels of the Bookcases
and TV Cabinet, and the touch pad for the dimmer on the back of the left (when viewed from
the front) Bookcase so it can easily be reached from the left side of the assembled
Entertainment Unit. The main power cord to the wall receptacle is also behind the left
Bookcase. The power cord of the dimmer unit includes a rotary switch. I routed that power
cord so that switch can be easily reached to de-energize the entire lamp system. The power
cords of each of the transformers also includes a similar rotary switch, but as mounted these
cords and switches are not accessible except from the top of the unit.
Based on my personal communications with Tresco's customer service engineer, Tresco
cautions that the dimmer unit I purchased may not work properly around other electronic
equipment due to lack of RF (radio frequency) shielding. And they are right, if my experience
with the first dimmer unit is typical performance. The dimmer unit worked OK for a few hours,
then seemed to develop a bit of a mind of its own, turning on or changing level when switching
on other equipment. Through correspondence with Tresco's customer service engineer, I
learned that Tresco is aware of this potential problem and that they are expecting delivery in
the near future of dimmer units with improved circuitry and resistance to external RF. He
informed me I could totally solve the errant dimmer behavior problem by connecting the Tresco
transformers to a common household solid state wall box mounted dimmer control. Rockler
sent me a replacement dimmer unit which seems to be working better, but not without some
undesired, uncommanded stepping through its four states (off, low, middle and high power)
when the remote control is used to switch on the Cable Box and TV simultaneously. I'm going
to wait and try the revised Tresco dimmer before taking other steps to address this errant
dimmer problem, if it persists. There is still an audible hum/buzz within about 2 ft, but the
sound level it generates is less noise than the Scientific Atlanta DVR supplied by Warner
Cable. But at least the touch pad can be used to adjust the brightness level or turn the lamps
completely off.
Building the Valences
Page 66 of 81
The valences which cover the tops of the fronts and sides the Bookcases and TV Cabinet were
built and finished separately. After all four pieces comprising the Entertainment Center were
installed, the valences were attached with screws inserted through a simple sub-frame made
of strips of 3/4 inch plywood attached to the tops of the Bookcases and TV Cabinet with pocket
screws. The valences were built by laminating two strips ripped from the same oak board to a
center strip ripped from a single board of quartersawn lacewood (Australian silky oak). As
much as possible, I kept together the oak pieces that were ripped from the same board so their
grain patterns would to be matched on the upper and lower edges of the center strip of
lacewood. Likewise, I selected and oriented the strips of lacewood ripped from the single
board with the goal of emphasizing the many lighter colored rays that are the key feature in
that species. Depending on how the board is cut from the tree, the rays can appear as
rounded dots, tear drops, or extending “streams” across the width of the face of the board, and
the backside of the same 3/4 inch thick board may have a very different appearance than the
front. After trying many different orientations of the lacewood strips, I settled on trying to
emphasize long “streams” of the lighter colored rays across the front faces of the boards. My
wife and son also preferred this orientation; they said this ray fleck pattern reminded them of
miniature waterfalls across the width of the faces of the strips.
To anyone planning to use lacewood for a project, I strongly recommend going to a vendor and
personally choosing the boards. The boards vary widely in face grain pattern depending
strongly on the orientation of the log when sawn, and not so much in their natural deep
subdued reddish brown color. The faces of quartersawn boards have interesting grain
patterns but the edges of such boards offer little to attract eyes. I bought my board long before
this project was conceived simply because I thought it had interesting face grain patterns and
believed it would make a nice accent with oak. (After bringing it home and comparing it
against other wood finishes in my house, I think the natural reddish brown color fits very well
color wise with the natural colors of many types of mahogany.) Note that the colors of this
lacewood do not change dramatically when wetted with solvents or finish as do many other
woods including the mahoganies in my home. When I first mentioned use of this wood as an
accent for the tops of the Bookcases and TV Cabinet and showed her my “prize” board, my
wife thought it would not go well. Now she and most others who have seen the completed
project comment that they like the accent, which complements the light Pecan stain on the oak
and picks up colors in the sofa and pillows located in the same room.
Be careful working with lacewood (and any other wood as well). Take care to avoid breathing
the dust, and when handling the boards to prevent getting splinters. The board I bought from
Rockler was S2S (surfaced on both wide sides but not the edges), and splinters were easily
raised from its edges; I wore one in the palm of my left hand for a few weeks! Lacewood is
hard, dense (noticeably more so than the red oak I used). I noticed tiny bright reflective spots
on the surfaces of the lacewood when the boards were held up to a bright source of light from
above and slowly rotated to change the angle of incidence; I suspect these bright dots may be
deposits of silica or other minerals, something I definitely you do not want to breathe. I
experienced no problems cutting lacewood with normal 48T carbide toothed saw blade
supplied with my TS, but much care is needed to plane quartersawn surfaces without tearing
out some of the grain on the surfaces prominently displaying the rays. A reduced planing
angle of about 20 degrees is recommended. After laminating the boards to be cut into the
valence components, I hand scraped and sanded the surfaces. Even so, I still created some
slight tearouts which remain in the finished valence pieces.
Page 67 of 81
I had only enough lacewood, to make all the needed valence laminated “boards” plus one
extra side piece. After trying many different possible lamination arrangements with my oak
stock, which were remnants of the strips I had cut for front edging of the Bookcases and TV
Cabinets, I marked all the pieces to be assembled and glued them up into small boards slightly
longer than needed for each piece of each valence. (I wanted to make the valences from a
single board of oak so that I could match the grain patters all the way across at least the front
boards, but did not have any single oak board in my stock that was sufficient in grain, color and
length.) Because the strips of oak were 1 inch thick and the strips of lacewood only 3/4 inch
thick, when gluing them together, I placed them into the clamps with their good faces down
against the clamp bars, and checked to confirm their front faces were very close to flush so I
would not have to do much scraping and sanding after lamination. I have found it possible
using this rather slow, sequential panel glue-up technique to make even wide panels that will
require very little planing or sanding, even if the boards being glued edge to edge are of widely
differing thicknesses (because the “good” faces of the boards are always down and against the
clamp bars). I have used this technique for many years when making table, desk, and and
other furniture from glued up panels.
After making up the laminated boards for the valences, I mitred one end of each and fitted
them together with masking tape, and dry fit them to the tops of the Bookcases and TV
Cabinet to confirm I had the lengths correct. I used my TS 55 (set to cur a 45 degree bevel)
and MFT to cut the mitres. I found that the bevel tilt stop on my saw was factory set at slightly
less than 45 degrees. After a simple adjustment of the 45 degree stop set screw, the mitred
pairs when joined formed 90 degree corners as desired. For the center pieces which appear
across the fronts of the Bookcases and TV Cabinet, after getting the angles correct, I crept up
on the correct length by repeat mitre cuts and taped up trial fittings to the tops of the
Bookcases and TV Cabinet. Because my valence pieces were slightly longer than needed at
the start of this iterative process, after I was certain of the angles, I then recut the mitres for the
purpose of matching the rays in the lacewood as best as possible as the boards wrapped
around each mitred corner. To accomplish this I recut both the front and side pieces as
needed. After the final dry fit check, marked the back ends of the side pieces, then cut off the
excess length from each. Then on my MFT tops I laid out the valence pieces for one cabinet
at a time in a line with their mitred faces down, applied blue masking tape to surfaces facing up
to join the boards into a long strip, flipped over the whole tape-joined strip, applied glue to the
open mitre cuts, closed the mitred joints, and added more tape to pull the joints tight and laid
them aside to setup. The strips of tape on the surfaces that will face outside in the finished
valence act to draw the outside corners of the mitres together as the mitres are closed to form
ninety degree corners. I checked the mitred corners after closure to ensure they were square.
Another piece of wood corresponding to the length of the front member could be used to help
ensure proper glueup, together with aluminum clamp up squares and spring clamps. Or you
can use Collins mitre clamps, but their sharp points will leave slight impressions in the front
faces of the valence boards. Or, if you're certain there is no glue squeeze out on the inside of
the mitred joints, each valence could be fitted to its respective associated case and held
against the top sub-frame members to assure proper alignment. I did not use this latter
approach.
Installation of the Top Valences
Page 68 of 81
The following photograph is of the top of the right Bookcase in the completed Entertainment
Center. The topsides of the two Xenon lamps are visible in the holes sawn through the top
crosspiece. The 12V transformer is the small white box screwed to the top cross piece of
plywood that has a pair of pocket screws joining each end to the sides in addition to the three
glued Domino tenons. The valence is secured from its inside surfaces by screws to the strips
of 3/4 inch plywood secured to the top of the case by pocket screws. I extended the sides of
the Bookcases and TV Cabinet 1/4 inch above the top cross panel of 3/4 inch plywood, thus
making it easy to locate these top perimeter framing members to which the valences are
secured. I did not secure the valences in place until the complete Entertainment Center was
installed and leveled in the room where it resides. I intentionally set the valences in position
with a slight gap to echo a similar feature in a china cabinet that can be seen when also
viewing this Entertainment Center. When I installed the valences, I realized I could have used
my Domino machine to cut some slots completely though the 3/4 inch top framing members
facilitate vertical adjustment of the gap. And, assuming there would be a gap of about 1/4 inch
between the tops of the cases and the valences, I could have pre-drilled some holes through
the side members of these top perimeter frames and inserted small bolts or lengths of 1/4 inch
threaded rods to invisibly secure the tops of the cases together without touching the valences
themselves. But by this time I did not feel like taking the valences and these perimeter framing
members off and back to the shop to drill through them. So the tops are simply clamped
together at the back below the top.
Page 69 of 81
Note that multiple pre-drilled connection holes through the side members of these top
perimeter frames could be provided to enable connection of the Bookcases to the TV Cabinet
at varying amounts of setback of the Bookcases relative to the TV Cabinet. The spacing of
these holes in the top perimeter frames of the TV Cabinet and the Bookcases could be offset
to create an effect similar to a vernier whereby a slight movement of the Bookcase toward its
back relative to the TV Cabinet would cause a second hole through the perimeter frame of the
TV Cabinet to line up with the first used hole of the Bookcase, and a further increment of
movement in the same direction would cause a second hole in the perimeter frame of the
Bookcase to line up with a the first used hole in the TV Cabinet, etc. I did not implement this
design idea.
CHAPTER VII
Final Installation and Joinder of the TV Cabinet and the Console
You may recall that one of my design goals was to enable each of the four separately built
pieces of this Entertainment Center to be used separately. That meant no visible holes
through any of the finished outside front and side surfaces when assembling the four pieces
into a single wall unit. I bought a pair of 4 inch tapered interlocking metal connectors (Item
Number 00S53.05 from Lee Valley), expecting to use them to join the (upper) TV Cabinet and
(lower) Console units together, to keep the TV Cabinet from being inadvertently pushed to the
rear off the top of the Cabinet. But after receiving them, I realized they were not suitable for
this purpose.
For use in joining together the Console and TV Cabinet, I made a pair of connector boards
from scraps of ~7/8 inch thick oak. Each connector board was about 15 inches long by about
2 inches wide. In each board, I chamfered all four edges of one surface, and drilled and
countersunk six evenly spaced holes, offsetting the holes to be about 1/2 inch from one of the
lengthwise edges, using my Shopsmith in drill press mode. (The solid oak edging strips
attached to the back edges of the side panels of the Console, Bookcases and TV Cabinet are
all 1” x 1” in cross section, thus the offset of the screw holes in the connector boards was
intended to locate the screws in the centers of the back edge strips.) After the TV Cabinet was
set in place on top of the Console with their sides and rear edges aligned, I used the connector
boards as a guide to drill pilot holes in the back edging strips, then affixed my shop-made
connector boards with screws penetrating the 1 inch by 1 inch rear edging applied to the side
panels of both the Console and TV Cabinet. I slightly offset the connector boards inward
relative to the sides of the Console and TV Cabinet so they would not interfere with positing of
the Bookcases. With this design, it is possible to set the Bookcase units further back (closer to
the wall) than are the Console and TV Cabinet. This may be desired to help hide the maze of
electrical wires and cables.
If it is desired to only align the Bookcases, Console and TV Cabinet so that their fronts and
backs are always forming a straight line (as shown in my photographs), the connector boards
could be made wider, and thereby serve also as backstops when the Bookcases are slid into
position at final arrangement in a room. I don't recommend joining the lower backs of all four
Page 70 of 81
pieces of this Entertainment Center to one another because their combined size and weight
which would make it very difficult to move as a singe unit.
List of sources of materials and hardware used.
1. Kiln-dried, red oak lumber in 4/4 (rough planed (the Amish call it "hit or skip" planed)), 5/4
fully planed and 4/4 poplar rough planed, from Keim Lumber, Charm, OH. Keim will deliver at
no extra charge within 150 miles of their location.
2. Plain-sliced red oak plywood in 3/4 inch and 1/4 inch thicknesses, from Keim Lumber,
Charm, OH. This is USA or Canadian plywood with poplar veneer core. The actual width and
length of the sheets are about 48 1/2 inches and 96 1/2 inches. The edges were close to
being true and the corners close to square, but not as smooth as is normal when cut with a
Festool TS (track saw), certainly not good enough for glue up of edging. I found I could get
four 12 inch wide by full length strips from a sheet using my TS 55, 3000mm Guide Rail and 48
T Fine Cut Blade. I used approximately 4 1/2 sheets of 3/4 inch plywood and 3 sheets of 1/4
inch plywood, plus a few small pieces of 1/2 inch birch plywood (for the drawer bottoms) in
making this Entertainment Center.
3. Ball Tip Solid brass, no-mortice hinges for the doors, Item Number 143-600 (antique bronze
finish), Woodworker's Supply, Casper, WY (formerly Albuquerque, NM).
4. Pebbled glass inserts for the doors of the Console were purchased cut to size from a local
glass dealer. This and many other types of glass can be purchased from a supplier of
architectural materials. Outwater Plastics Industries, Inc. and Architectural Products lists >50
varieties of decorative glass. Note they have minimum order requirements!
5. Tresco brand, PocKit Xenon (20W bulbs) Light Kits, from Eagle America, Chardon, OH. A
2-Lamp Kit, Item Number 475-0514 (gold trim ring), was used in each Bookcase, and a 3Lamp Kit Item Number 475-524 (gold trim ring) was used. Eagle America did not stock the
compatible Tresco solid state Dimmer Unit.
6. Hole Saw, 2 1/8 inch diameter, from Lee Valley. This item is likely to be available from
Home Depot or Lowe's or other hardware or tool supply stores. Note that a mandrel is needed
for this and other hole saws, and a drill with a 1/2 inch Jacobs style chuck.
7. Tresco brand Switch Kit (black), Item Number 475-0502, Eagle America or Rockler under
different stock number.
8. Tresco Dimmer Unit (only one is needed to operate up to three sets of Xenon PocKit Light
kits), Item Number 39912, from Rockler Woodworking and Hardware.
9. Shelf pins, 1/4 inch spade type, antique brass, Rockler Item Number 22765. (A total of 56
pins were needed.)
10. Four Drawer slides, 100 lb rated, full extension, Black, Item Number 02K36.16, from Lee
Valley. (Screws are included, but may be too long depending on thickness of door sides.)
11. Two Door Pulls, Mulholland Square Suite, AB (Antique Brass), Knob, Item Number
02A45.30 (corresponds to Amerock BP50329-R3), from Lee Valley.
12. Magnetic Door Catches (Brown), Rockler.
13. Adjustable Leveler Glides, Item Number 01S08.01, from Lee Valley and the same product
as Item Number 81239 from Rockler were installed in the bases of the Bookcases and
Console.
14. Screws for installation of the back panels, Lee Valley Item Number 01Z53.05, 2 packages
of 100 screws each. Approximately 160 were needed.
Page 71 of 81
15. Two round Grommets, 1 1/2 inch diameter, brown, Lee Valley Item Number 00U08.22.
These are not absolutely necessary if you're willing to move the Bookcases away from the wall
and loosen some of the screws holding on the back in order to fit speaker / lamp wires through.
16. Twelve pieces 5mm tempered glass, 10 inch x 10 inch square (nominal), Stock Number
K14201, from ABC Target, Brooklyn, NY. (They had no minimum order requirements when I
purchased.)
17. Plastic supports for 1/4 inch thick and 1/8 inch thick adjustable drawer divider panels were
purchased from Outwater Plastics Industries, Inc.
18. Molded plastic inserts for storage of DVDs and CDs, from Lee Valley and Rockler. Good
fitment to CD "jewel cases." None of them correctly fit DVD packaging used in USA which is
thicker than jewel cases.
19. Nylon Cable ties purchased locally.
20. Saddle Mounts (for nylon cable ties), Small size, Item Number 03K76.01, and Medium
size, Item Number 03K76.02, Lee Valley.
21. Finishing Materials: Oil Stain (wiping type), General Finishes brand, Pecan color, from
Rockler and Woodcraft
Zinnser's SealCoat dewaxed shellac
Oxford brand (Target Coatings) water based Amber Shellac, Sanding
Sealer, Gloss and Semi-Gloss Laquers, Homestead Finishes.
Wet or Dry Silicon Carbide abrasive papers, 320 grit and 400 grit in
addition to various Festool abrasives for ETS 125 and LS 130.
CHAPTER VIII
GENERAL NOTES, COMMENTS AND RECOMMENDATIONS
1. Obtain all hardware, glass panels, lighting, drawer slides and other purchased components
before finalizing the design and beginning construction. Doing so will save rework due to later
obtained components that do not fit your design and construction.
2. Build a rigid "torsion box" style base for each case unit and use these torsion boxes to
assure the bottom panel will be a flat, reliable reference from which to set other critical
dimensions, e.g. the elevations specified for any horizontal cross members, shelves and shelf
pin holes. I did not, and that made some of the subsequent measuring and marking steps
more difficult and less trustworthy. I would have saved time and less dry fit checks would have
been required had I followed this recommendation.
3. When ripping narrow strips of natural wood boards, expect some of them to warp or wind.
Rip a few extra pieces while you have this setup so you don't have to take apart some other
work setup to set up for ripping narrow strips again.
4. Pre-finish components if you can, at least through the step of applying the stain. Apply
masking tape over surfaces and mortices to be glued later. This is especially helpful where
small cubby holes will exist in the assembled because it will be difficult to apply finish coats to
the inside surfaces of these compartments, e.g in the upper compartments of the TV Cabinet
and to a lesser extent inside the Bookcases. To get a uniform overall finish and appearance,
consider leaving application of the final finish coats until after complete assembly. If applied
earlier, the final finish coats might not be uniform for a variety of reasons, of might become
Page 72 of 81
damaged during subsequent assembly steps. Don't install the backs until the finish has been
applied to the insides of the cases.
5. Make a batch of looser fitting (5mm) Domino tenons for use in dry fitment checks by sanding
away a little from their sides and edges, and chamfering their ends until they can be inserted
and removed with little force. This will save a lot of time when making dry fit assembly checks
because you will be able to insert and remove those looser tenons easily. The 5mm tenons
originally supplied with my Domino machine me could not be pushed in by hand, and even
after light sanding of all their surfaces often required Vice Grip pliers to remove. Some even
broke while trying to remove them with a pair of Vice Grips when nothing else would budge
them. I keep these looser-fitting tenons in a separate bag within the same Systainer in which
my Domino Assortment (Item #493301) came. I needed nearly 100 of them for dry fitment
checks of the Console and TV Cabinet.
6. The cost of materials, especially plywood, could be slightly reduced if the bookcases were
resized / redesigned to enable use of the full width of the pieces cut from a sheet. The
Bookcases I built are 28 1/2 inches wide which means I needed a full sheet of 1/4 inch
plywood for the back. Alternatively, four bookcases, each using 1/2 sheet of plywood for its
back (24 inches wide) could be built to maximize use of the materials that I purchased. but
more solid wood and more 3/4 inch plywood would be needed. The design I built did make
fairly efficient use of the ¾ inch thick plywood sheets.
Possible Design Changes for the Entertainment Center
Although I and my family are quite satisfied with the Entertainment Center described above
that I built, I would consider the following changes if I built another.
1. Increasing the width (vertical dimension in the finished cases) of the top edging strips (the
horizontal strips just below the valences) of the Bookcases and TV Cabinet. The primary
reason I would do so is to decrease the sight lines to the lamps in the top cross panels.
Increasing the vertical dimension of these top crosswise edging members would enable
insertion of two Domino tenons joining each end to the edging of its associated Bookcase and
TV Cabinet, which would significantly increase their resistance to racking deflection upon side
loading, especially when the back panel is not inserted into the recesses in the back sides of
the Bookcases and TV Cabinet. Note there have been no problems upon lifting and moving
the designs of the Bookcases, Console and TV Cabinet that I built; but as an engineer, I tend
to over design items.
2. Increasing the width of all edging used on the vertical panels, especially the sides of the
Bookcases and TV Cabinet. This would increase the bending stiffness of the edged panels
and help keep them straight. (Resistance to bending deflection of a simple beam is
proportional to the cube of its depth; i.e., a 2 inch wide (deep) board has 8 times the resistance
to bending as a 1” wide board if all other dimensions and properties are equal.) If you look
very closely at the contiguous vertical edges where the Bookcases abut the TV Cabinet, you
may be able to see a very slight gap along portions of those ~5 ft long edges. Unlike a kitchen
cabinet installation, I do not want to drill any holes through these side panels for installation of
screws or other panel connecting bolts, but would like these slight gaps to not exist.
3. Locating the lamps closer to the front edges of the Bookcases and TV Cabinet. This would
decrease the sight lines to the lamps in the top cross panels. This is simply a matter of
preference. If your eyes are able to see the lamp themselves while sitting to watch TV, the
Page 73 of 81
bright sources of light can be distracting to your eyes. I would have chosen to totally hide the
lamps behind the front horizontal edging strips, but did not find a source of possibly suitable
lamps until I had finalized the design I built including the PocKit lamps. Outwater Plastics
Industries, Inc. and Architectural Products lists many lighting products in their large catalog,
some of which might enable achievement of the hidden lamp effect I would have preferred
without using much wider (greater vertical dimension when installed) boards for the top edging
which would have not fit the aesthetic goals of the design. Others considering a similar project
can look forward for the lighting industry to continue to introduce more LED products, including
lamps that can be dimmed. I could not locate any such products when I had to make my
lighting choices, and did not know of sources like Outwater too late for my project.
4. Increasing the front to back dimension of the sides of the Console relative to the front to
back dimension of the shelves to provide greater overhang of the sides to facilitate hiding the
wires and cables from view from either side of the unit. With an increase in these overhangs,
the entire unit could be positioned closer to a wall without having to force the cables to be bent
to as small a radius as would happen if the currently built design was positioned with its side
edges nearly touching the wall. Due to use of very stiff "Monster" brand coaxial cables on my
electronic equipment, my Entertainment Center is positioned about 2 1/2 inches out from the
wall. My wife would prefer those cables not able to be seen at all from any angle.
5. Offsetting the drawers more toward the center of the Console. In the Console as built, the
doors must be fully opened (180 degrees) to enable the drawers to be opened without hitting
the door frames. This slight design change would allow the drawers to be pulled out without
any interference with the doors opened at least 90 degrees. Of course, this design change
would necessitate revision of the dimensions of several other components of the Bookcases
and TV Cabinet if the "Stack of Cubes" visual effect was to be retained.
6.
Possibly replacing the fixed upper shelves behind the doors of the Console with a third
drawer, for increased storage capability of CDs and DVDs. The overall height of the
Console might have to be increased beyond its present 24 inches to accommodate this
change.
CHAPTER IX
Cutting Lists
Following are cutting lists based on my handwritten lists used in making the Entertainment
Center. I would have liked to include copies of my labeled drawings as well, but have not been
able to scan them. The graphite pencil lines are apparently to light for the scanner to capture
them.
Page 74 of 81
CUT LIST
for
CONSOLE of Entertainment Center
by
Dave Ronyak
©December 2008
Letter
ID
Description
Quantity Dimensions
Th x W x L
(inches)
Material Type
Notes
A
L/R Edging of Top
2
1 x 2 x 19
Red oak
Allow extra L for mitres,
extended width mortices
to enable assembly
B
Front Edging of Top
1
1 x 2 x 52
Red oak
Allow extra L for mitres
C
Center Panel of Top
1
¾ x 17 x 48
Red oak plywood
Drill pocket holes on top
surface to aid clamping
D
Front Edging on Side
Frame Panels J
2
1 x 1 ¼ x 23
Red oak
Join to J with tenons,
center on edge of J
E
Front & Rear Top Frame
Stretchers
2
¾ x 3 x 50
Red oak
Front edge is exposed.
Pocket Screw Holes
Rear needs 1/4” shim
F
Front Edging on Bottom
Panel
1
1 x 1 x 49 1/2 Red oak
Join to D with tenons,
flush with top surface
G
Vertical Partition Panels
2
¾ x 17 x 19¼ Red oak plywood
plus ¼”
“plus ¼” for reduced
thickness of top panel C
or add ¼ shims when
installing top
H
Front Edging on G
2
¾ x 1 x 191/4 Red oak
Optional Domino tenons
to G
I
RESERVED
J
L/R Side Panels
2
¾ x 17 x 23
Red oak plywood
Apply D and K with
tenons
K
Rear Edging on Side
Frame Panels J
2
1 x 1 x 23
Red oak
Join to J with tenons
L
Front Toe-Kick
1
¾ x 3 x 49 1/2 Red oak
Cut slightly long, adjust
to fit during dry fit after
applying edging to J,
Recess ¼” from front,
attach with pocket hole
screws
M
L/R Fixed Shelves
2
¾ x 17 x 12¾ Red oak plywood
Inset 1 1/8' from front
Cutout back edge for
cables as needed
N
Front Edging on M
2
¾ x 1 x 12 ¾
Page 75 of 81
Red oak
Trim glued up M + N to
17 7/8 minus thickness
of back panel if any
Letter
ID
Description
Quantity Dimensions
Th x W x L
(inches)
Material Type
Notes
O
Top Outside Filler Strip
2
¼ x 2+ x 17
Red oak
Use is optional, for
appearance only, match
width to door rails
P
Bottom Outside Filler Strip
2
¼ x 3 x 17
Red oak
Use is optional, for
appearance only, match
width to Toe-Kick
Q
Door Stiles
4
1 x 2 x 19
Red oak
Adjust overall door
height after construction
for clearance between
Top B and Bottom F
edges of panels
R
Door Rails
4
1x2x9¼*
Red oak
*Length can vary
depending on amount of
overhang desired of
partitions G
S
Pebbled Glass Panels
2
As required
Glass
Size to fit door frames
T
Adjustable Shelves (fit into
center opening of Console,
can be reversed to present
different front edge
appearance)
2
¾ x 16 x 23
Red oak plywood
Adjust length to fit shelf
pins, adjust panel width
according to edging
width for overall Console
depth and front setback
desired
U
Edging on front of T
2
¾ x 1 x 23
Red oak
See notes for T
U'
Edging on rear of T
2
1 x 1 x 23
Red oak
See notes for T
V
Bottom Panel
1
¾ x 17 x 50
Red oak plywood
Optional pocket holes
on bottom surface to aid
drawing M&T joints
closed during clamping
W
Front Edging on V
1
1 x 1 49 1/2
Red oak
Join to V with tenons,
adjust length at dry fit,
flush with upper surface
of V
X
Sub-frame pieces under V
5
¾ x 3 x ??
Oak or other
hardwood
Join to V, J and one
another with pocket
screws, make recessed
area in center of back
for power outlets strip
Y
Filler Strip on panels J
2
1/4* x 2* x 17
Solid or plywood,
stain to match
interior
For clearance of drawer
slides. Increase
thickness for greater
clearance of drawer
slides to door hinges
Letter
ID
Description
Quantity Dimensions
Th x W x L
(inches)
Page 76 of 81
Material Type
Notes
Letter
ID
Description
Quantity Dimensions
Th x W x L
(inches)
Material Type
Notes
AA
Drawer Sides
8
½ to 5/8 th x 6 Builder's choice.
x 16 ¼ L
Poplar used in
original.
Thickness choice
interrelated to other
drawer dimensions, type
of joints used, and slides
choice
BB
Drawer Fronts and Rears
8
½ to 5/8 th x 6 Builder's choice.
x 16 ¼ L
Poplar used in
original.
Thickness choice
interrelated to other
drawer dimensions, type
of joints used, and slides
choice. Fronts stained.
CC
Drawer Bottom
4
¼ to ½ th x W
xL
Thickness choice and
drawer construction will
affect effective drawer
interior depth. Bottom
panels of original
Console set flush with
bottoms of sides by
rabbeting edges of
panels and dados in
drawer sides, fronts and
rears. Interior surfaces
of sides, fronts and
backs dadoed for panel
divider supports.
Page 77 of 81
Original used ½
birch plywood
CUT LIST
for
TV CABINET of Entertainment Center
by
Dave Ronyak
©December 2008
Letter
ID
Description
Quantity Dimensions
LxWxH
(inches)
Material Type
Notes
A
L/R Front Edging on B
2
1 x 1 ¼ x 54
Red oak
Center on thickness of
B, attach with tenons
B
L/R Side Panels
2
¾ x 12 x 54
Oak plywood
Put best face outside if
cabinet may be used
without Bookcase
C
L/R Rear Edging on B
2
1 x 1 x 54
Red oak
Offset to outside of B,
attach with tenons
D
Lower Cross Panel
1
¾ x 12 x 50
Oak plywood
Attach to Side Panels B
with tenons after joinder
to Vertical Dividers and
Top Cross Panel
E
Front Edging on D
1
1 x 1 x 49 ½ *
Red oak
Cut long, adjust length
at dry fit, mortices in
ends, attach with tenons
flush to top surface of D
F
Top Cross Panel
1
¾ x 12 x 50
Oak plywood
Attach to Side Panels B
with tenons after joinder
to Vertical Dividers and
Bottom Cross Panel
G
Front Edging on F
1
1 x 1 ¼ x 49
½*
Red oak
Cut long, adjust length
at dry fit, mortices in
ends, attach with tenons
centered on edge of F
H
Vertical Dividers
2
¾ x 12 x 13
1/8*
Oak plywood
Attach to Top and
Bottom Cross Panels
with tenons, attach 1 ¼
front edging with tenons
I
Front Edging on Divider H
2
1 x 1 ¼ x 13
1/8
Red oak
Adjust length at dry fit,
mortice ends, attach
with tenons, center on
edge of H
J
Reserved
K
Back X-Member
connecting C at bottom
(Stretcher)
1
7/8 to 1 x 4 x
50
Red oak
Cutout region at
midspan for cables,
radius edges, tenons to
sides and Back Center
Page 78 of 81
Vertical Brace
Letter
ID
Description
Quantity Dimensions
Th x W x L
(inches)
Material Type
Notes
L
Back Center Vertical
Brace
1
¾ x 4 x ~36 ½ Red oak
*
Tenon joints to both top
edge of K and bottom of
D, exact length
dependent on actual
width of K
M
Lower Back Panels
2
¼ x 23 5/8 W* Oak plywood
x 36 7/16 H*
Approx. Dimensions. Fit
at assembly, recessed
into back of frame
members
N
L/R Upper Back Panels
2
¼ x 13 ½ W x
13 ½ H*
Oak plywood
Approx. Dimensions. Fit
at assembly, recessed
into back of frame
members
O
Center Upper Back Panel
1
¼ x 23 5/8 W
x 13 ½ H
Oak plywood
Approx. Dimensions. Fit
at assembly, recessed
into back of frame
members
Page 79 of 81
CUT LIST
for
BOOKCASE of Entertainment Center
by
Dave Ronyak
©December 2008
Letter
ID
Description
Quantity Dimensions
Th x W x L
(inches)
Material Type
Notes
A
Valence Front
1
1 x 4 x 28 1/2 Red oak &
Lacewood
Laminated woods, allow
extra length for mitres
A'
Valence Sides
2
1 x 4 x 14
Red oak &
Lacewood
Laminated woods, allow
extra length for mitres
B
Bottom Front Toe-Kick
1
¾ x 3 x 26
Red oak
Recess ¼” from front,
attach with pocket hole
screws
C
Front Edging on Side
Panel F
2
1 x 1 ¼ x 78
Red oak
Center 1¼ dimension on
edge of F, tenons
D
Front Edging on Top
Cross Panel
1
1 x 1 ¼ x 26*
Red oak
Cut long and trim at dry
fit, tenons to C and top
cross panel, center on
edge of J top panel
E
Fixed Shelf Partitions
2
¾ x 11 3/4* x
12 7/8*
Oak plywood
Add 1” Th oak front
edging, adjust
dimensions at dry fit
F
L/R Side Panels
2
¾ x 12 x 78
Oak plywood
Alignment of shelf pin
holes with those in H
and bottom cross panel
of TV Cabinet
G
Back Panel
1
¼ x 27 ¼* x
75*
Oak plywood
Adjust dimensions at dry
fit, length can be longer
if desired
H
Center Divider Panel
1
¾ x 12 ¾ x 73 Oak plywood
Alignment of shelf pin
holes with those in F
I
Front Edging on H
1
1 x 1 ¼ x 73
Cut long and trim at dry
fit, tenons to edging on
bottom and and top
cross panels
J
Top Cross Panel
1
¾ x 12 x 26 ½ Oak plywood
Fit 11/4” front edging at
dry fit
J'
Bottom Cross Panel
1
¾ x 12 x 26 ½ Oak plywood
Fit 1” front edging at dry
fit
K
Front Edging on J' (bottom
panel)
1
1 x 1 x 26
Red oak
Trim length at dry fit,
mortice ends and to J'
L
Adjustable Shelf
6
¾ x 11 3/4* x
12 ¾ *
Oak plywood
Add 1” Th oak front
edging, adjust
Page 80 of 81
Red oak
dimensions at dry fit and
to shelf pins, optionally
rout for glass insert
Letter
ID
Description
Quantity Dimensions
Th x W x L
(inches)
Material Type
Notes
M
Valence sub-frame Front
1
¾ x 3 x 26 ½
Plywood
Pocket screw holes
N
Valence sub-frame Side
2
¾ x 3 x 12 ¼
Plywood
Pocket screw holes
Subframe pieces under J
3
¾ x 3 x ??
Oak or other
hardwood
Back X-piece joined to
Side Panels, and two
short pieces joined to
back X-piece and to
Toe-Kick with pocket
screws
O
P
I hope my story above has been informative to least some members of FOG who may be
interested in how I used my Festool products, and how I addressed design and construction
issues working alone in my small shop. I tried to add enough detail to aid those who are not
professional woodworkers or otherwise well experienced. I am deeply ingratiated to several
members who offered and provided assistance in posting photographs, and for creating a
consolidated draft PDF document of the entire project based on my many posts in this thread.
Best wishes to anyone who decides to build an entertainment center.
Dave Ronyak
December 25, 2008
Page 81 of 81