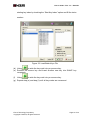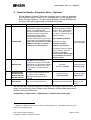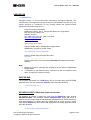
1
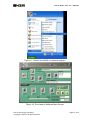
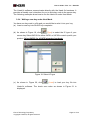
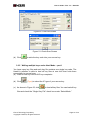
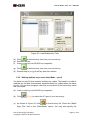
User’s Guide – Rev. 1.3 – Hawk-IIc User’s Guide Rev. 1.3 – Hawk-IIc Enova Hawk-IIc Key Management Platform Enova Technology Corporation Table of Content Copyright Notice ..............................................................................................2 1. Introduction ...............................................................................................3 2. Accessories ..............................................................................................3 3. Modes of Operation ..................................................................................3 3.1 Stand Alone Mode Operation.............................................................4 3.1.1..........................................................................................................4 Functional Description - Stand Alone Mode ..............................................4 3.1.2 Example 1: To duplicate a key under Stand Alone Mode............7 3.2 Host Mode Operation ........................................................................8 3.2.1 Install Host PC Software.............................................................8 3.2.2 Install Hawk-IIc USB Device Driver .......................................... 11 3.2.3 Host PC Software Menu ...........................................................13 3.2.4 Writing a new key under Host Mode.........................................15 3.2.5 Writing multiple keys under Host Mode – part 1 .......................16 3.2.6 Writing multiple keys under Host Mode – part 2 .......................17 4. Random Number Generator Suite -- Optional.........................................19 5. Hawk-IIc Specifications...........................................................................22 Enova Technology Proprietary Copyright © 2008-9, All rights reserved. Page 1 of 22 User’s Guide – Rev. 1.3 – Hawk-IIc Information contained in this manual is subject to change without notice and does not represent a commitment on the part of Enova Technology. The software and hardware described in this document as part of the Enova’s Key Management Platform is provided under a license agreement or nondisclosure agreement. It is unlawful for any person, persons, organization or entity to copy, reproduce, or transmit (electronically, in print, or any other way) the document, any part of the program, or any information contained in the Enova Key Management Platform package without the written authorization of Enova Technology. Copyright Notice Copyright ©2008-9. Enova Technology Corporation. All Rights Reserved. This manual may not be reproduced (in part or whole) or transmitted in any form or by any means, electronic or mechanical, including photocopying, scanning and recording, for any purpose without the express written permission of: Enova Technology Corporation 1st Floor, #11, Research & Development 2nd Road Science-based Industrial Park, Hsin-Chu City Taiwan 300, Republic of China P +886 3 577 2767 F +886 3 577 2770 http://www.enovatech.net [email protected] Enova Technology 8130 Remmet Ave. Canoga Park, CA 91304 P +1 510.825.7900 http://www.enovatech.com [email protected] Trademarks Enova and X-Wall are registered trademarks of Enova Technology. Pentium is a trademark of Intel Corporation. Windows 95/98/NT/2000/Me/XP are registered trademarks of Microsoft Corporation. All other products mentioned in this User’s Guide are the respective trademarks of their registered owners and are hereby acknowledged. Enova Technology Proprietary Copyright © 2008-9, All rights reserved. Page 2 of 22 User’s Guide – Rev. 1.3 – Hawk-IIc 1. Introduction The Enova Hawk-IIc Key Management Platform (hereafter as “Hawk-IIc Platform”) is a compact version of Hawk-II. While Hawk-II is designed to facilitate manufacturing level of key token programming, the Hawk-IIc is a compact model that has equipped with features of light weight, small form factor, and portability. The Hawk-IIc Platform is engineered specifically for our end customers including corporate IT management to easily manage distribution of all X-Wall Secure Keys (key tokens). It provides functions such as Read, Blank Check, Program, Verify, and Erase to facilitate key token programming and verification process. The Hawk-IIc Platform consists two main parts: the Enova Random Number Generator suite (optional) and the Enova Hawk-IIc hardware key programmer. You may use this Hawk-IIc Platform to create new keys, duplicate existing keys, erase old keys, and verify keys for error. The Hawk-IIc hardware key programmer comes standard with either two (2) 1394 firewire or two (2) mini-USB ports which allow one to one duplication and/or programming one (1) key token at a time for easy service. The 1394 firewire type key token comes with a built-in 93C46 SEEPROM which is normally seen over using X-Wall LX and XO series IDE (PATA) cryptographic processor whereas the mini-USB type key fob comes with a built-in 24C02 SEEPROM which is normally seen over using X-Wall MX and FX series (SATA) cryptographic processor. While conducting programming, please ensure that you have selected the correct SEEPROM type for proper programming. More programming modes are available. The Hawk-IIc Platform can be operated independently or connected through a host PC through USB interface. 2. Accessories Software Installation CD ROM Hawk-IIc hardware programmer unit USB Cable Power cord This User’s Guide Enova specific key token (empty) Enova Random Number Generator Suite 1 1 1 1 1 10 (Optional) 1 (Optional) 3. Modes of Operation The Hawk-IIc can work in two different modes, the “Stand Alone Mode” and the “Host Mode”. Stand Alone Mode: In Stand Alone mode you can easily duplicate a key without connecting the Hawk-IIc to your Host PC. Host Mode: In Host Mode you will need to connect Hawk-IIc to your Host PC via the USB connection. The Host Mode provides three different programming modes. Enova Technology Proprietary Copyright © 2008-9, All rights reserved. Page 3 of 22 User’s Guide – Rev. 1.3 – Hawk-IIc 3.1 Stand Alone Mode Operation 1 Figure 1. Hawk-IIc Hardware Key Programmer Layout As shown in Figure 1, the Hawk-IIc hardware key programmer has a LCD display, two secure key receptacles and five function buttons. The LCD displays status and messages to the user. The two secure key receptacles, for which one is denoted as MASTER and the other one is denoted as SLAVE, allow user to quickly program and/or duplicate keys. The function buttons are used to select different operations and maneuver among various functions from the main menu, such as IC type, read, program, verify and erase. 3.1.1 Functional Description - Stand Alone Mode Powering up the Hawk-IIc hardware key programmer without firstly connecting 1 In the Stand-Alone mode, the MASTER key receptacle is READ only while the SLAVE key receptacle can perform both READ and WRITE function. Enova Technology Proprietary Copyright © 2008-9, All rights reserved. Page 4 of 22 User’s Guide – Rev. 1.3 – Hawk-IIc to your Host PC will enter the Stand Alone Mode of operation. The main menu is shown in Figure 2. The Hawk-IIc comes with 5 (five) function buttons, which are described below. Button Description FUNC. TYPE BLANK CHECK VER/ COPY Select device data types and key programming procedures Select IC device types Check blank about SLAVE Verify IC check sum value between MASTER and SLAVE Copy key value from MASTER to SLAVE LCD Display Button IC Type Check Sum 93C46 E+C+P+V 1F30 5.00V Description FUNC Switch to select IC device and burning procedure TYPE Select IC Type (93C46/24CXX series) BLANK Blank check for slave CHECK Burning process Burning voltage VER / Verify sum values between master and slave COPY Copy key value from master to Slave Figure 2. Main Menu FUNC The FUNC allows you to select device data types and key programming procedures. There are 2 sub-menus, “Select Device” and “Select Procedure.” Î Select Device You can select from 93C-16bit / 93C-8bit / 24CXX by pressing the “TYPE” button then pressing “VER/ ” button to confirm. For 1394 firewire like key token, select 93C46. For mini-USB like key token, select 24C01 or 24C02. Note however, that for X-Wall MX 2 application, particularly the AES 128/192/256-bit operation, select 24C02. See below for various type of IC that Hawk-IIc supports. Î Select Procedure you can select from P+V / C+P+V / E+C / E+C+P+V by pressing the “TYPE” button then pressing “VER/ ” button to confirm. P+V: C+P+V: E+C: 2 Programming + Verification Check blank + Programming + Verification Erase original contents + Check blank For all AES operations, select 24C02 type SEEPROM. Enova Technology Proprietary Copyright © 2008-9, All rights reserved. Page 5 of 22 User’s Guide – Rev. 1.3 – Hawk-IIc E+C+P+V: Erase original contents + Check blank + Programming + Verification TYPE This function allows you to select IC device types according to your specified device data types in “FUNC” menu. The following IC device type can be selected by pressing “TYPE” button in the main menu. For 93C-16bit: For 93C-8bit: For 24CXX: 93C46/93C56/93LC46/93LC56/ 93C46-9V/93C56-9V/93LC46-9V/93LC56-9V 93C46/93C56/93LC46/93LC56/ 93C46-9V/93C56-9V/93LC46-9V/93LC56-9V 24C01/24C02/24LC01/24LC02/ 24C01-9V/24C02-9V/24LC01-9V/24LC02-9V BLANK CHECK As shown in Figure 3, the BLANK CHECK function allows you to check if the content of the key on the Slave receptacle is blank. The screen will display PASS if the value of the check sum value displays either 7F80 3 or 0000, which indicates a blank key. Or the screen displays FAIL otherwise. LCD Display IC device Last Sum 93C46 Checking > 24B9 Checking LCD Display IC device Slave Sum 93C46 Checking 7F80 PASS Checking Result Figure 3. Blank Check 3 VER/ As shown in Figure 4, the VER/ function allow you to verify and compare the sum values of both MASTER and SLAVE after programming. The screen displays PASS if the results are the same. The screen displays FAIL otherwise. The 24C02 should display FF00 with function of “BLANK CHECK.” Enova Technology Proprietary Copyright © 2008-9, All rights reserved. Page 6 of 22 User’s Guide – Rev. 1.3 – Hawk-IIc LCD Display IC device Last Sum 93C46 Ver > 0C35 24B9 Verifying Last Sum LCD Display IC device Master Sum 93C46 0234 Ver PASS 0234 Result Verifying Slave Sum Figure 4. VERIFY Function LCD Display IC device Last Sum 93C46 COPY Ver > 0C35 24B9 LCD Display IC device Master Sum 93C46 1F30 COPY PASS 1F30 Pass Procedure Last Sum Procedure Slave Sum Figure 5. COPY Function COPY As shown in Figure 5, the COPY function allows you to copy key content from the MASTER to the SLAVE receptacle. 3.1.2 Example 1: To duplicate a key under Stand Alone Mode (a) (b) (c) (d) (e) (f) Insert a new key (to be copied to) into SLAVE key receptacle; Press “FUNC” and select “Select Device”; Press “TYPE” to select your IC type “24CXX”; Press “FUNC” to select “Select Procedure” to “E+C+P+V”; Press “VER/” to confirm your selections and return to main menu; Press “TYPE” to select 24C02 for all AES integrated products; Otherwise, select either 24C01 or 93C46; (g) Press “BLANK CHECK” to verify the key on the SLAVE receptacle. (h) Insert the key (to be copied from) into the MASTER key receptacle. (i) Press “COPY” to start coping. When the programming process is Enova Technology Proprietary Copyright © 2008-9, All rights reserved. Page 7 of 22 User’s Guide – Rev. 1.3 – Hawk-IIc (j) 3.2 completed, a beep will sound and a status screen will be displayed. Press “VER/” to verify the content of both keys. Host Mode Operation 4 3.2.1 Install Host PC Software Step 1: Insert the installation CD to the Host PC and run the SETUP.EXE in the CD. As shown in Figure 6, click “Next” to start Hawk-IIc software installation. Note: If the “Auto Run” feature has been enabled, the installation screen will automatically appear once the new CD is detected. Figure 6. Installation screen Step 2: As shown in Figure 7, click “Next” on the welcome screen to continue. 4 The Master key receptacle is disabled under the Host Mode operation. All operations are performed to the SLAVE key receptacle only. Enova Technology Proprietary Copyright © 2008-9, All rights reserved. Page 8 of 22 User’s Guide – Rev. 1.3 – Hawk-IIc Figure 7. Welcome Screen Step 3: As shown in Figure 8, please choose the destination location to be installed. Click “Next” if you are fine with the default location C:\Program Files\Hawk-IIc. Otherwise, click “Browse” to choose the new location. Figure 8. Choose Destination Location Step 4: As shown in Figure 9, please select program folder to be created on your Host PC. Click “Next” if you are fine with the default program folder Hawk-IIc. Otherwise, type directly to the blank spaces provided under Program Folders. Enova Technology Proprietary Copyright © 2008-9, All rights reserved. Page 9 of 22 User’s Guide – Rev. 1.3 – Hawk-IIc Figure 9. Select program folder Step 5: As shown in Figure 10, please click “Next” to start copying files to your hard disk. Figure 10. Start Copying Files Step 6: As shown in Figure 11, please click “Finish” to complete the software installation. Note: The USB device driver for the Hawk-IIc has not been installed till this point. As such, launching the Hawk-IIc software from this screen is not available. To install the correct Hawk-IIc USB device driver, go to section 3.2.2 Install Hawk-IIc USB Device Driver below. Enova Technology Proprietary Copyright © 2008-9, All rights reserved. Page 10 of 22 User’s Guide – Rev. 1.3 – Hawk-IIc Figure 11. Complete software installation 3.2.2 Install Hawk-IIc USB Device Driver Step 1: Connect your Host PC and Hawk-IIc through the provided USB cable. Power on the Hawk-IIc. As shown in Figure 12, Windows will find a new hardware and will work you through the device driver installation. Figure 12. Windows finds the Hawk-IIc Step 2: As shown in Figure 13, the Found New Hardware Wizard will walk you through the driver installation. Choose “Install the software automatically (Recommended)” option then click “Next” to continue. Note 1: Please make sure you have the Hawk-IIc installation CD in your CD-ROM drive. Note 2: In Windows 2000 you might need to specify how to locate the device driver. You should specify the “Driver” folder in the Hawk-IIc software CD. Enova Technology Proprietary Copyright © 2008-9, All rights reserved. Page 11 of 22 User’s Guide – Rev. 1.3 – Hawk-IIc Figure 13. Window hardware wizard Step 3: As shown in Figure 14, the Found New Hardware Wizard will automatically find the device driver but will prompt you a warning message. The device driver you are installing dedicates to work with the Hawk-IIc under the USB environment and nothing else. It isn’t harmful to your Host PC at all. Click “Continue Anyway” to continue the driver installation. Figure 14. Warning message from Windows XP Enova Technology Proprietary Copyright © 2008-9, All rights reserved. Page 12 of 22 User’s Guide – Rev. 1.3 – Hawk-IIc Step 4: As shown in Figure 15, the Found New Hardware Wizard has finished installing the USB device driver for the Hawk-IIc. Click “Finish” to complete the driver installation. Fig. 15 Complete the hardware wizard Step 5: As shown in Figure 16, Windows will inform that your new hardware is installed and ready to use. Figure 16. Ready to use the HAWK-IIc 3.2.3 Host PC Software Menu As shown in Figure 17, you can launch the Hawk-IIc software program by following procedure: Start->Program->HAWK-IIc->HAWK-IIc The Hawk-IIc software main screen is shown in Figure 18. Note: (a) Before the software launch, make sure the Hawk-IIc is properly connected to your Host PC USB port through the provided USB cable. (b) Make sure Hawk-IIc power is on. (c) The Master key receptacle is disabled under the Host PC Mode. All operations are performed to the SLAVE key receptacle only. Enova Technology Proprietary Copyright © 2008-9, All rights reserved. Page 13 of 22 User’s Guide – Rev. 1.3 – Hawk-IIc Figure 17. Launch the HAWK-IIc software program Figure 18. The Hawk-IIc Software Main Screen Enova Technology Proprietary Copyright © 2008-9, All rights reserved. Page 14 of 22 User’s Guide – Rev. 1.3 – Hawk-IIc The Hawk-IIc software communicates directly with the Hawk-IIc hardware. It provides a friendly user’s interface for you to write key code to the secure key. The following examples show how to use the Hawk-IIc under Host Mode. 3.2.4 Writing a new key under Host Mode You have one key code in a file and you would like to write it into your key. (a) Insert a new key into SLAVE key receptacle. (b) As shown in Figure 19, click (Type) to select the IC type of your secure key. Select 24CXX for either 24C01 or 24C02 to match up with your product. Select 24C02 for all AES integrated products. Figure 19. Select IC type (c) As shown in Figure 20, click (Load) to load your key file into Hawk-IIc software. The check sum value as shown in Figure 21 is displayed. Enova Technology Proprietary Copyright © 2008-9, All rights reserved. Page 15 of 22 User’s Guide – Rev. 1.3 – Hawk-IIc Figure 20. Load File Screen Figure 21. Check Sum Screen (d) Click to write the key code into your secure key. 3.2.5 Writing multiple keys under Host Mode – part 1 You have many key files and each key file contains one single key code. The Hawk-IIc software is able to load all key files at one click then write them sequentially to secure keys. (a) Insert a new key into SLAVE key receptacle. (b) Click (Type) to select the IC type of your secure key. (c) As shown in Figure 22, click to load all key files. You can load all key files and check the “Single Key File” check box under “SelectMode.” Enova Technology Proprietary Copyright © 2008-9, All rights reserved. Page 16 of 22 User’s Guide – Rev. 1.3 – Hawk-IIc Figure 22. Load Multiple Key Files (d) Click to write the key code into your secure key. (e) Remove the key. (f) Insert a new key into SLAVE key receptacle. (g) Click to write the key code into your secure key. (h) Repeat step (e) to (g) till all key files were written. 3.2.6 Writing multiple keys under Host Mode – part 2 You have one key file that contains multiple key codes. The Hawk-IIc is able to load the key file and automatically separate those key codes within the same key file. You can then program new keys by sequence till the entire key codes are consumed. (a) Insert a new key into SLAVE key receptacle. (b) Click (Type) to select the IC type of your secure key. (c) As shown in Figure 23, click to load the key file. Check the “Batch Keys File” item in the “SelectMode” option. You may also specify the Enova Technology Proprietary Copyright © 2008-9, All rights reserved. Page 17 of 22 User’s Guide – Rev. 1.3 – Hawk-IIc starting key index by checking the “Start Key Index” option and fill the index number. Figure 23. Load Batch Keys File (d) Using to write the key code into your secure key. (e) Remove the secure key and Insert another new key into SLAVE key receptacle. (f) Using to write the key code into your secure key. (g) Repeat step (e) and step (f) until all key codes are consumed. Enova Technology Proprietary Copyright © 2008-9, All rights reserved. Page 18 of 22 User’s Guide – Rev. 1.3 – Hawk-IIc 4. Random Number Generator Suite -- Optional Enova Random Number Generator software suite is used to generate the required random codes to be programmed into the physical key token through Hawk-IIc. The procedure describes below exhibits how the key codes will be generated, formatted and tested. Item File name 1 XGENSE.EXE 2 3 4 PARTSE.EXE 5 KEYGEN40.EXE KEYGEN64.EXE KEYGEN128.EXE KEYGEN192.EXE FIPS140.EXE Functional Description Input data Output data To generate the 32 bits binary file for 1. User must enter 4 (four) PARTSE.EXE (Partition program) to independent integers ranging partition. The XGENSE.EXE from 0 to 10^8, separated by combines hardware RNG simulation comma “,” as random seeds. For instance, you may input the data with numerical computation following integers: software RNG. This program generates 2048K Bytes for the minimum required size to go through 5993,11490563,32,967509 formal FIPS 140-2 randomness tests. 32 bits binary file Please note, you must have at least as the random seeds. name: data.DAT (Maximum 8 number 50MB free disk space in specific characters are allowed) directory for normal operation. To format the output binary file (data.DAT) to fit the Hawk-II programmer. The Hawk II® E2PROM Programmer is engineered to load the maximum of 512×1Kbit binary data into its buffers. The output format is .ROM. To convert dat00000.ROM binary file into 93C46 serial EEPROM format, i.e., the key code as .KEY file. DES/TDES weak keys are also screened. FIPS 140-2 randomness tests 2. You MUST name the output file. For instance, name the output file as data.DAT. (4 characters for the filename and 3 characters for the file extension name) 32 bits binary file 32 bits binary file Example: Input file: data.DAT Output file name: dat00000.ROM 32 bits binary file: dat00000.ROM Output file name: dat00000.KEY The test results Randomness test of data.DAT display on the screen. The following steps must be performed according to their numeric orders to ensure the quality of the random key codes. Please note, however, all files listed below must reside in the same directory. XGENSE.EXE --> FIPS140.EXE --> PARTSE.EXE --> KEYGEN40/64/128/192.EXE 5 Numbers of different key length codes are 20/30/60/96 for 192/128/64/40-bit key with one-time generated key file. Enova Technology Proprietary Copyright © 2008-9, All rights reserved. Page 19 of 22 User’s Guide – Rev. 1.3 – Hawk-IIc XGENSE.EXE C:\>XGENSE Copyright ©2003 – 4. Enova Technology Corporation. All Rights Reserved. This software may not be reproduced (in part or whole) or transmitted in any form or by any means, electronic or mechanical, for any purpose without the express license agreement and written permission of: Enova Technology Corporation Building 53, #195-57, Sec. 4, Chung-Hsing Road, Chu-Tung District, Hsin-chu County, Taiwan 310 Republic of China Tel.: +886 3 591 0197 Fax: +886 3 591 0204 http://www.enovatech.net [email protected] Press ‘enter’ when ready Prompt: Please input 4 independent integer seeds separated by a common, press “Enter.” 333, 34567890, 21234, 45566655 Prompt: Please input the output file name Data.dat ……………………………… Prompt: Great Job!!! You can find one data.dat file located at the same directory. Note: a. Maximum 8 number characters are allowed for each of these 4 independent integer seeds. b. 4 characters for the filename and 3 characters for the file extension name when you specify the output file name. PARTSE.EXE The program generates one .ROM binary file to be used along with KEYGEN programs next. You can locate the .ROM file under the same directory. C:\PARTSE data.dat KEYGEN128.EXE (128-bit key code conversion) For instance, to convert a 128-bit key code from the .ROM binary files, choose KEYGEN128.EXE. This process creates data00000.KEY binary file which is ready to be sent to the Hawk-IIc hardware key programmer for TDES 128-bit key code programming. To convert other key codes such as 40-bit, 64-bit or 192-bit from above .ROM binary files, choose the appropriate converting programs under the same directory. C:\>KEYGEN128 dat00000.ROM Enova Technology Proprietary Copyright © 2008-9, All rights reserved. Page 20 of 22 User’s Guide – Rev. 1.3 – Hawk-IIc C:\>dir dat00000.KEY dat00000.ROM The dat00000.key is ready for downloading to the Hawk-IIc. FIPS140.EXE This program tests the randomness of the original random data bit from data.DAT according to the FIPS 140-2 standard. C:\>FIPS140 data.DAT 9801 ones Sample pass monobit test: 9801 ones Sample pass poker test: parameter X = 26.2656 Sample pass LONG-RUN TEST: NO LONG-RUN. 2441 runs of 1 0s 2565 runs of 1 1s 1194 runs of 2 0s 1171 runs of 2 1s 677 runs of 3 0s 625 runs of 3 1s 335 runs of 4 0s 320 runs of 4 1s 162 runs of 5 0s 154 runs of 5 1s 166 runs of 6 0s 141 runs of 6 1s Enova Technology Proprietary Copyright © 2008-9, All rights reserved. Page 21 of 22 User’s Guide – Rev. 1.3 – Hawk-IIc 5. Hawk-IIc Specifications Key Receptacle Serial EEPROM supported Three-wires Serial EEPROMs Two-wires (I2C) Serial EEPROMs Dimensions Net Weight Operation Voltage Power Adapter Input Voltage Input Frequency Ranges Output Voltage Maximum Output Current Environmental Specification Operation Temperature Operation Humidity Safety Standard Hawk-IIc hardware programmer unit Power Adapter Package Dimensions Total Weight Enova Technology Proprietary Copyright © 2008-9, All rights reserved. Standard 1394a receptacle 93C46, 93LC46, 93C56, 93LC56 24C01, 24LC01, 24C02, 24LC02 160mm(L) x 110mm(W) x 65mm(H) 500 grams +12V DC 120V AC 60Hz +12V DC 500mA +5 oC ~ +45 oC up to 90% non-condensing CE Certification UL Certification 310mm(L) x 270mm(W) x 90mm(H) 1.0 Kg Page 22 of 22