1
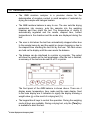
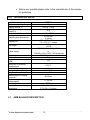
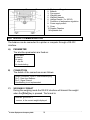
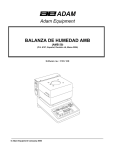
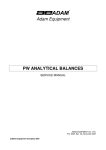
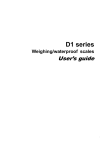
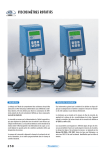
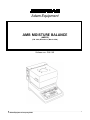
Adam Equipment
AMB MOISTURE BALANCE
(AMB 50)
(P.N. 3346, Revision L6, March 2006)
Software rev.: PAS 16E
© Adam Equipment Company 2006
© Adam Equipment Company 2006
CONTENTS
1.0
INTRODUCTION.........................................................................................................................3
2.0
UNPACKING AND SETTING UP................................................................................................4
3.0
OPERATION ...............................................................................................................................5
3.1
TURN ON CYCLE ...................................................................................................................5
3.2
CALIBRATION ........................................................................................................................5
3.3
DRYING PARAMETERS.........................................................................................................7
3.3.1
“SubSt” Subtance Temperature Correction .................................................................7
3.3.2
“modE” Mode Select ......................................................................................................7
3.3.3
“IntEr” Maximum Time ...................................................................................................8
3.3.4
“tEmP” Drying Temperature..........................................................................................8
3.3.5
“StrobE” Strobe Interval Time........................................................................................8
3.4
PROCEDURE TO SET PARAMETERS ..................................................................................9
3.4.1
Substance Temperature Selection...............................................................................9
3.4.2
Mode .............................................................................................................................10
3.4.3
Maximum Time Limit ...................................................................................................10
3.4.4
Temperature.................................................................................................................10
3.4.5
Strobe Interval Time ....................................................................................................10
3.4.6
Temperature Calibration .............................................................................................11
4.0
4.1
4.2
5.0
5.1
6.0
DRYING PROCEDURE ............................................................................................................12
PROCEDURE .......................................................................................................................12
FOR BEST ACCURACY........................................................................................................13
TECHNICAL DATA ...................................................................................................................15
AMB BALANCE DESCRIPTION............................................................................................15
RS-232 COMMUNICATION ......................................................................................................16
APPENDIX A ........................................................................................................................................18
PROCEDURE ...................................................................................................................................18
APPENDIX B ........................................................................................................................................20
WARNING.........................................................................................................................................20
AMB MOISTURE BALANCE EXAMPLES.........................................................................................21
7.0
TROUBLESHOOTING ..............................................................................................................22
8.0
REPLACEMENT PARTS AND ACCESSORIES .......................................................................23
9.0
SERVICE INFORMATION ........................................................................................................23
© Adam Equipment Company 2006
© Adam Equipment Company 2006
2
1.0 INTRODUCTION
• The AMB moisture analyser is a precision device for the
determination of moisture content in small samples of materials by
drying the sample with halogen heaters.
• The AMB moisture balance is easy to use. The user sets the drying
parameters into memory, puts the samples into the weighing
chamber and then starts the test. The temperature of drying is
automatically regulated and the results, elapsed time, current
temperature in the chamber and the mode are displayed during the
test.
• The user is told when the test has automatically stopped either due
to the sample being dry and the weight no longer changing or due to
the elapsed time reaching the limit set by the user. The final values
are held on the display until the user resets the balance.
• The balance can be interfaced to a printer or computer. The output
will show the results as the test progresses. After the test is finished,
a summary of the test can be sent to a PC or printer.
The front panel of the AMB balance is shown above. There are 4
display areas: temperature, time, mode and the main display. Next
to the main display are 2 indicators to signify the display showing a
weight value (g) or the result of a drying test (%).
• The keypad has 6 keys to control the operation. During the weighing
mode all keys are available. During a drying test, only the [Tare] key
is available to abort the test.
© Adam Equipment Company 2006
3
KEY DESCRIPTION
[→]
[←]
[Func]
[Print]
[Tare]
[Start]
When setting parameters, it selects the digit to modify.
When setting parameters, it increments the selected digit.
Function key selects the parameter to view or modify.
It is used to send the weight to the RS-232 output. After a test has been completed,
pressing this key will send a summary of the test to the RS-232 output.
Pressing this key will set the display to zero when weighing. During the drying
procedure pressing [Tare] will abort the test.
Use of this key, initiates the drying procedure.
2.0 UNPACKING AND SETTING UP
• Unpack the moisture analyser carefully. The carton contains:
An AMB Moisture Balance
Weighing Chamber Lining
Weighing Pan Support
Weighing Pans, pack of 10
AC Power Cord and
User manual
(For description, see 5.1)
• Place the moisture analyser on a stable weighing table.
• Do not install the balance near warm and cold sources, such as
windows, radiators or air conditioners.
• Protect the balance from vibrations, temperature and dust.
• Turn the adjustable feet (14) until the balance (2) is level. Check the
spirit level on the rear of balance.
• Install the weighing chamber liner on the 4 supports so that the
edges turn upwards.
• Install the pan support (3) by placing the weighing pan (4) into the
receptacle in the weighing chamber. Be careful not to press on the
pan as this may damage the balance.
• Place an aluminium sample pan on the pan support. The balance
may lock-up if this sample pan is not used.
© Adam Equipment Company 2006
4
• Attach the power cord to the AC power. Verify the AMB power
requirements match your service. The AMB balance will use
approximately 200 watts during normal operation.
3.0 OPERATION
3.1
TURN ON CYCLE
• IMPORTANT: Place an aluminium sample pan on the pan support
before turning on the balance. If the balance is started without the
sample pan in place it may lock-up during the initial warm-up period.
• Plug the device into an earthed socket. Verify the voltage to the
balance is correct. Press power supply switch (8) to turn the balance
on.
• The software revision (in this case PAS 16E) will be displayed first,
followed by “-tEst-“. Then it will display “tEmp”.
• Pressing [Start] will begin a 3-minute warm-up time for the balance.
The time display will begin counting up. The heating lamps will cycle
during this time and the main display will continue to show “tEmp”.
The temperature display will indicate the temperature in ºC.
• After the warm-up time the balance will run a self-test by displaying
all the digits in the main display and finally show “0.000”. The balance
is now ready for setting the drying parameters.
• If you desire to by-pass the warm-up period, press [Tare] to abort
the test and start the weighing mode. It is advisable not to abort the
test when performing moisture analysis.
3.2
CALIBRATION
• If the balance is to be used for weighing, calibration is necessary.
Follow the procedure given in the calibration section.
• If the balance is to be used only for moisture determination it is not
necessary to calibrate the balance because all the results are based
upon relative weights.
© Adam Equipment Company 2006
5
Calibration Procedure
• Allow the balance to warm up for the initial warm-up period before
calibrating.
• Have a suitable calibration weight ready. It is suggested it should
be Class F2 or better.
•
The balances use the suggested calibration weight which is 50g.
• Press the [Tare] key. The display will show:
-------• Press the [Func] key while the bars are displayed. The display will
show the following messages:
noCAL
• Press [Tare] to skip calibration or wait for calibration to proceed.
Calibration of zero point - the weighing pan must be empty.
-LoAd-
50
• Place the calibration weight (50g as requested on the display).
Calibration is being executed (please wait).
noCAL
rELOAd
• Remove the calibration weight.
-------0.00
• This completes the calibration. Place the calibration weight on the
pan to verify. If the displayed value is not correct then repeat the
calibration procedure.
© Adam Equipment Company 2006
6
3.3
DRYING PARAMETERS
• Parameters for the drying procedure are set using the front panel
keys.
• Press the [Func] key when in the weighing mode to scroll through
and set the parameters.
• The parameters must be adjusted using data from the manufacturer
of the sample to give the best results.
• The parameters are set in the following order. To advance from one
to the next press the [Func] key.
3.3.1 “SubSt” Subtance Temperature Correction
• This correction allows the user to account for the difference between
the temperature measured at the temperature sensor and the
temperature of the sample.
• The balance allows 9 correction factors, each up to a value of 0.99
to be entered into memory in order to match the sample temperature
to the set point temperature.
• For most tests, the scale will not use this parameter and the arrow
keys can be used to select SubSt=0.
• SubSt 1 to 9 are corrections for up to 9 different types of material.
• To determine the correction factor see Appendix A.
• Unless values have been calculated, select SubSt=0. This will
automatically disable the function.
3.3.2 “modE” Mode Select
Select one of 7 modes of operation. The modes are listed below:
Mode 1 Percent Moisture determination with respect to initial weight
%moisture = (Weight loss/Initial weight) x 100%
Stop drying when results are same for 3 consecutive strobe
intervals.
© Adam Equipment Company 2006
7
Mode 2 Percent solids
%Solids = (Current weight/Initial weight) x 100%
Stop drying when results are same for 3 consecutive strobe
intervals.
Mode 3 Percent Moisture with respect to solids
%Moisture = (Weight loss/Final weight) x 100%.
Stop drying when results are same for 3 consecutive strobe
intervals.
Mode 4 Percent Moisture determination with respect to initial weight
%moisture = (Weight loss/Initial weight) x 100%
Stop drying when results are the same for 3 consecutive strobe
intervals or the maximum time limit has expired.
Mode 5 Percent solids
%Solids = (Current weight/Initial weight) x 100%
Stop drying when results are the same for 3 consecutive strobe
intervals or the maximum time limit has expired.
Mode 6 Percent moisture with respect to solids
%Moisture = (Weight loss/Final weight) x 100%
Stop drying when results are the same for 3 consecutive strobe
intervals or the maximum time limit has expired.
Mode 7 Percent moisture determination with respect to initial weight
%moisture = (Weight loss/Initial weight) x 100%
Stop drying when the maximum time limit has expired.
3.3.3 “IntEr” Maximum Time
When Modes 4, 5, 6 or 7 are selected, the maximum time is set. The time can
be in the range 1 minute to 9 hours 50 minutes.
3.3.4 “tEmP” Drying Temperature
The temperature can be set in the range 50ºC to 160ºC.
3.3.5 “StrobE” Strobe Interval Time
© Adam Equipment Company 2006
8
• The STROBE INTERVAL time is the time between one set of results
and the next set of results.
• The interval time indicates how often the current results are output to
the RS-232 interface.
• When using Mode 1, 2 or 3 the test will stop when 3 results are the
same, indicating that there is no more moisture to be taken from the
sample.
3.4
PROCEDURE TO SET PARAMETERS
The parameters can only be set when the balance is in the weighing mode.
3.4.1 Substance Temperature Selection
•
•
•
•
•
•
•
•
•
•
Press the [Func] key to display the first parameter, SubSt.
The modE display will show the current value for SubSt.
Select a value from 0 to 9 using the [Ï] key.
When SubSt=0 is selected, press the [Func] key to step to the Mode
function or if one of the other 9 values for SubSt is selected, press
the [Func] key to step to the next function, “SubCoF” selecting a
value for the correction.
The values may have been previously selected and stored as
described in appendix A. You can choose to use the values stored or
enter a new value.
To use the stored value as shown in the tEmP Display window, press
the [Func] key to step to the modE parameter.
To change the number press the [Ï] key to increment the flashing
digit.
Press the [Î] key to change the flashing digit to the next digit to the
right.
When the correction value has been set, press the [Func] key.
If in doubt about a value to set, select SubSt = 0, or set the value of
SubCoF= 0.00. The display will show FALSE if a value larger than 0.99
is entered. The tEmP display will flash the digits again so a correct
value can be entered.
© Adam Equipment Company 2006
9
3.4.2 Mode
• The Mode display will show the current mode number.
• To change the number, press the [Ï] key.
• Press the [Func] key to step to the next parameter when ready.
3.4.3 Maximum Time Limit
•
•
•
•
If Modes 4,5,6 or 7 has been selected the maximum time can be set.
The time can be set in the range of 1 minute to 9 hours 50 minutes.
The Time display will show the current maximum time limit.
To change the number press the [Ï] key to increment the flashing
digit.
• Press the [Î] key to change the flashing digit to the next digit to the
right.
• When the time has been set, press the [Func] key.
• If a time outside the range is entered the display will show “FALSE”
and allow you to reset the time to an acceptable value.
3.4.4 Temperature
• The temperature can be set in the range of 50ºC to 160ºC.
• The temperature display will show the current drying temperature.
• To change the number press the [Ï] key to increment the flashing
digit.
• Press the [Î] key to change the flashing digit to the next digit to the
right. When the temperature has been set, press the [Func] key.
• If a temperature outside the range is entered the display will show
“FALSE” and allow you to reset the temperature to an acceptable
value.
• Press the [Func] key to step to the next parameter.
3.4.5 Strobe Interval Time
© Adam Equipment Company 2006
10
• The strobe interval time is also displayed in the time display. The
strobe interval time can be set in the range of 1 to 59 seconds.
• The time display will show the current strobe interval time. To
change the number press the [Ï] key to increment the flashing digit.
• Press the [Î] key to change the flashing digit to the next digit to the
right. When the time has been set, press the [Func] key.
• If a time outside the range is entered the display will show “FALSE”
and allow you to reset the time to an acceptable value.
• Press the [Func] key to step to the next parameter.
3.4.6 Temperature Calibration
• The temperature can be calibrated, when the balance is in the
normal weighing mode.
• Through the circular opening on the top, insert the temperature
sensor close to the weighing pan.
• Press [Tare], followed by pressing [Print] and the [Tare] key
simultaneously.
• On the display, a request for “codE” will be seen.
• Enter the correct code (“2003“) by using the arrow keys. Use [Ï] for
numerical entry from 0 to 9 and use [Î] for changing the display
point.
• Press [Func] key for setting the programme. “St_tE” will be
displayed.
• To check the temperature inside the weighing region, press [Func]
again. The arrow keys should be used to change the temp. if it is not
correct.
• Press the [Func] key again. If 20 degree C is entered, a number
close to 4000 will appear on the screen.
• The [Func] key is pressed again to start the Temperature
Calibration. The balance will now heat up to 50% of its total power.
• Note: For stable result, the balance should not be moved for about
15 minutes.
• The temp. will be close to 80 degree C in the weighing region.
• Press [Func] key. On the screen “opEn” will be displayed.
• The thermometer can be removed now.
© Adam Equipment Company 2006
11
• 2 degree must be added to every temperature value. For instance, if
the thermometer shows 79 degree, another 2 degree should be
added to enter a value of 81 degree C.
• The temperature calibration process is completed now.
4.0 DRYING PROCEDURE
• The procedure for drying a sample can only be carried out after the
parameters are set. The sample must be prepared for the drying
procedure. The method of preparation is dependent upon the type of
sample to be tested.
• In general it is desirable to have the sample of uniform consistency.
This may involve a mechanical preparation or a method of spreading
the sample over the sample pan evenly.
• Details of these procedures are not covered here as every sample
will be different.
NOTE: The sample should be spread evenly over the sample pan.
Do not allow the sample to exceed 10mm in height above the pan.
4.1
PROCEDURE
• Place the sample pan with any inert material that may be required on
the pan support.
• Press the [Tare] key to zero the display.
• Place the sample to be tested on the sample pan, as evenly as
possible.
© Adam Equipment Company 2006
12
• Close the weighing chamber.
• Press the [Start] key to initiate the test.
• The displays will show the current mode, drying temperature and
interval time. If these are not correct then reset the parameters as
described in section 3.1.
• Press [Start] again to begin the test.
• The balance will begin the test displaying results as the test
progresses.
• The current temperature, elapsed time and computed %moisture (or
%solid) will be displayed.
• The test will stop as described for the modes in section 3.3.2.
For Modes 1-3:
• The test will stop if the results do not change for 3 consecutive
strobe interval time periods.
For Modes 4-6:
• The test will stop if the results do not change for 3 consecutive
strobe interval time periods or the maximum time is reached.
• If three consecutive strobe intervals are equal then the temperature
will be increased to temp2 settings and then the maximum time limit
is re-started.
For Mode 7:
• The test only stops when the maximum time is expired.
• At any time it is possible to stop the test by pressing the [Tare] key.
The balance will return to normal weighing immediately.
• When the test stops automatically the final results are on the display.
• The results can be printed at this time by pressing the [Print] key.
• See Section 6.0 RS-232 Interface, for more details.
4.2
FOR BEST ACCURACY
• If the sample mass is bigger, the moisture measurements can be
more accurate, but the measurement time will be longer. The sample
must not be so deep that the lower part is not heated thoroughly.
© Adam Equipment Company 2006
13
• To minimise the time and ensure best heating, place the sample
thinly and uniformly on the pan.
• Crumble or powder any coarse-grained or dense materials.
• Some samples may form a protective skin that will prevent moisture
from being released and may need special preparation such as
being sandwiched between silicon pads or mixed with dry sand.
• Do not test samples that are too light. Errors may appear because of
the material’s small weight with reference to sensitivity of the
balance.
• If you want to assure that the time interval between two strobe
measurements was selected properly, additional measurements
must be performed with new samples and longer time Intervals.
• If there is a difference of moisture values then you should extend the
time interval.
• In particular, the strobe time interval must be set higher when there
are small samples or samples with low moisture content.
• Also samples that release moisture slowly may end the test
prematurely so a higher strobe time or set time limit may be used.
• Errors may be caused by the disturbances of the power supply, if
you notice any errors of the measuring cycle, repeat the
measurement.
• In the case of samples that dry up very quickly, you should first
establish the parameters of desiccation (temperature, time interval),
tare the balance with the sample pan and then place the sample on
the pan. Be certain the sample pan is tared so that only the sample
weight is used to calculate the percent moisture.
• The temperature should be set as high as possible to ensure that all
the moisture is released but not excessively high.
• If the temperature is too high the sample may burn off other product
giving a higher than normal moisture content.
© Adam Equipment Company 2006
14
• Where ever possible please refer to the manufacturer of the sample,
for guidelines.
5.0 TECHNICAL DATA
Maximum capacity Max
Display interval d
Calibration weight
(class F2)
Environmental temperature
Weighing pan dimensions
Dimensions
Net weight
Power supply
Output signal
Maximum sample mass
Suggested minimum sample
mass
Resolution of moisture
measurement
Number of working modes
Drying temperature range
Sampling interval time
Maximum time of drying,
modes 4-7
Typical time of
measurement
Power of heaters
Internal Chamber
dimensions
5.1
AMB 50
50g
0.001g (1 mg)
50 g
+ 15 / + 35°C
Φ 100 mm
4 inches
200 x 270 x 195 mm
7.9 x 10.6 x 7.7 inches
5.6 kg
12.3 lb
230VAC(+10%/-15%) 110VA
or
115VAC (+10%/-15%) 110VA optional
RS-232 bi-directional
50 g
2g
0.01%
7
50-160°C
1s - 59s
9h 50min
2 - 20 min
200W
145 x 111 x 20 mm
5.7 x 4.4 x .8 inches
AMB BALANCE DESCRIPTION
© Adam Equipment Company 2006
15
1. Display and Keypad
2. Balance
3. Pan support
4. Weighing pan
5. Weighing sample
6. Halogen heater ( 2 x 200 W)
7. Protection of temperature regulation
8. Power supply switch
9. Cover
10. Sample Chamber
14.Adjustable feet
6.0 RS-232 COMMUNICATION
The balance can be connected to a printer or computer through a RS-232
interface.
A)
PARAMETER
The interface parameters are fixed as:
4800 Baud
8 data bit
No parity
1 stop bit
No handshaking
B)
CONNECTION
The details of the connectors are as follows:
Output Connector: 9 pin D- Sub-miniature plug
Pin 3, Data from Balance
Pin 5, Signal Ground
Handshaking is not implemented.
C)
WEIGHING FORMAT
During the weighing mode the RS-232 interface will transmit the weight
when the [Print] key is pressed. The format is:
+xxx.xxx g<CR><LF>
xxx.xxx is the current weight displayed
© Adam Equipment Company 2006
16
D)
TEST FORMAT
During the test the RS-232 interface will transmit the computed results at
the time intervals set by the strobe interval parameter. The format is:
xxx.xx
%<CR><LF>
xxx.xx
is the current results as displayed
For example:
0.00%
2.03%
5.00%
7.39%
10.82%
15.43%
21.17%
26.21%
29.91%
30.86%
30.86%
31.65%
31.65%
31.65%
E)
FINAL RESULTS FORMAT
This format will print the final results summary at the conclusion of the
moisture test when the [Print] key is pressed. During the test the [Print]
key is not active. The format is fixed as follows:MODE
MASS DECREMENT
INITIAL MASS
FINAL MASS
TEMPERATURE
DRYING TIME hh:mm:ss
FREQUENCY OF READOUT
1 .
31,65 %
33.44 g
10.52 g
106 º C .
0:04:20 .
20 s .
Mode Number
Percent Moisture
Temperature Set
Total Time of Test
Interval Set
After the test is complete and the results are on the display, press the
[Print] key to output the results as shown above. This can be repeated as
necessary as long as the results are still on the display.
© Adam Equipment Company 2006
17
APPENDIX A
• The SubSt parameter is a correction between the measured
temperature within a sample and the set temperature (where the
measured temperature is greater). This difference can exist because
some materials will absorb more heat than others and different
textures will heat more efficiently thus becoming hotter than the
indicated temperature.
• The balance allows you to store 9 correction factors. The factors are
stored in permanent memory.
• To set the corrections factors it will be necessary to dry a sample of
the material and measure the temperature on the inside of the
sample during the drying process. A small thermocouple sensor is
suggested for this purpose.
PROCEDURE
1> With the balance in normal weighing mode, place a sample of material on
the sample pan. Attach a thermocouple sensor to the sample pan with the
active part of the sensor buried in the sample.
2> Set the following drying parameters:
SubSt= 0
modE= 7
IntEr= 30:00 minutes or longer
tEmp= a typical value for the sample, for this example assume 110ºC
StrobE= 20 seconds
3> Press the [Start] key to display the parameters. Press [Start] a second
time to begin the test.
4> After the test has run for some time and the temperature in the sample has
stabilised, compute the correction factor from the following:
Tmeasured - Tset
Correction = -------------------Tset
© Adam Equipment Company 2006
18
• For example, if the measured temperature is 121ºC and the set
temperature is 110º, the correction is 0.10.
• Record the correction factor.
• Stop the test by pressing the [Tare] key.
• Then enter the SubSt parameter menu.
• Select the SubSt value to enter this correction factor by using the
[Func] key then the [Ï] key to increment the flashing digit.
• Press the [Func] key to display the current value for the
parameter in the “tEmP” display.
• Enter the new value into the window,
• The display will show the current value. To change the number
press the [Ï] key to increment the flashing digit.
• Press the [Î] key to change the flashing digit to the next digit to
the right. When the value has been set, press the [Func] key as
necessary to return to normal weighing.
• The scale will display “FALSE” if a value greater than 0.99 is
entered.
• The “tEmP” display will show again to allow you to change the
value.
Typical values that have been measured are:
Material
Flour
Coal Dust
Damp Tea
Leaves
Dry Tea Leaves
Cement
Set Temperature Measured
Temperature
100 ºC
103.7ºC
100 ºC
122.2ºC
100 ºC
120.5ºC
Correction
Factor
0.04
0.22
0.20
100 ºC
100 ºC
0.08
0.21
© Adam Equipment Company 2006
108.5ºC
121ºC
19
APPENDIX B
WARNING
• Avoid touching the parts of the balance such as the ventilation grill,
which can become very hot during the operation.
• The balance should not be used to analyse highly inflammable
samples or the sample materials which may produce corrosive
vapours such as acids.
• The balance should not be used in hazardous locations.
• User should not leave a permanent load on the weighing pan which
may cause damage to the measuring equipment.
• Any structural alterations may lead to incorrect weighing results and
also concerning safety regulations.
• The balances should only be used in compliance with the guidelines
described in this Operator’s Manual.
• The following guide notes are offered as examples of temperature,
display update time and expected results when drying various
substances.
• The preparation, distribution and amount of product can all
significantly affect the results.
• It is important to find suitable procedures to process the material,
usually by trial and error.
• In general it is recommended that a temperature of 100ºC, a time
interval of 10 seconds and a sample sized 2-5g be selected for initial
test.
• After a number of tests with these conditions this will provide a basis
for comparing other times, temperatures or sample preparations.
© Adam Equipment Company 2006
20
The items in the following table are taken from actual test results. The user of
the AMB balance will need to determine the best procedures for their samples.
AMB MOISTURE BALANCE EXAMPLES
MATERIAL
SAMPLE
MASS
(g)
5-8
DRY APPLE
PULP
WET APPLE
5-8
BUTTER
2-5
MUSTARD
2-3
GROUND
2-3
COFFEE
CORNFLAKES 2-4
YOGHURT
2-3
COFFEE
2-3
CREAMER
POWDER
COCOA
2-3
POWDER
POTATO
3-4
FLAKES
MARGARINE
3-4
MAYONNAISE 1-2
MILK
2-4
POWDER
MILK
2-5
CHOCOLATE
RED WINE
3-5
CHOCOLATE
2-4
POWDER
SUNFLOWER 10-14
OIL
POWDERED
2-3
SOUP
SUGAR
4-5
MILK
2-3
FLOUR
8-10
CEMENT
8-12
PAPER
2-4
SLIME
11-12
POLYAMIDE
2-5
DUST
5-10
CHARCOAL
8-10
WHITE GLUE
2-5
DRYING
TEMP.(º
C)
100
STROBE
TIME(s)
STANDARD
DEVIATION
DRYING
TIME(min)
10
AVERAGE
WATER
CONTENT
76.5
0.1
10-15
100
138
130
106
10
15
20
5
7.5
16.3
76.4
2.8
0
0.1
0.7
0.1
5-10
4.5
10
4
120
110
130
15
15
15
9.7
86.5
78.5
0
0
0.1
5-7
4.5-6.5
6-8
106
20
0.1
0.1
2
106
15
6.9
0.1
7.5
138
138
90
20
20
15
16
56.5
5
0.1
0.4
0.2
10
10
6
106
15
1.3
0.1
3.5
100
100
15
5
97.4
1.9
0.1
0.1
15-20
4
138
20
0.1
0
2
80
15
3
0.2
4.5-7
138
120
130
138
106
130
138
104
120
136
15
15
10
15
20
15
20
10
10
15
11.9
88
12.5
0.8
6.4
80
2
7.3
3.8
54.3
0.1
0.2
0.1
0.1
0.1
0.2
0.3
0.1
0.1
10
6-8
4-5
4-5
10
90
75
8-15
8-10
6-8
This list will be extended as information becomes available. If you wish to furnish any
information that may help others, please contact Adam Equipment or your dealer.
© Adam Equipment Company 2006
21
7.0 TROUBLESHOOTING
1
2
3
Problems
Unit does not turn on
Unit turns on but stays
on all 888888
Unit does not zero after
lamp test
4
Balance weighs but is
unstable
5
Balance shows –null- or
Low after power on
Balance shows wrong
weight
6
7
Balance works OK but
drying is not correct
8
Temperature of
Chamber incorrect
Chamber much too hot
9
10
11
Heating lamps will not
turn on at any time
Lamps will not turn off
Suggestions
Check power supply.
Check fuse in plug.
Check fuse in balance.
Check whether the Pan is installed properly.
Check if the mains power supply has been
interrupted.
Check whether the display was set to zero initially.
Check whether the surface on which the balance is
kept, is stable.
Check if the location is unsuitable due to the
fluctuations in temperature or interference with any
electromagnetic field.
Check whether the Pan is installed properly.
Check the Calibration.
Check whether the Pan is installed correctly.
Check whether the balance was set up properly.
Check if the location is unsuitable due to the
fluctuations in temperature or interference with any
electromagnetic field.
Check whether the display was set to zero initially.
Check parameters and mode selected.
Check samples are not hitting the temp. sensor.
Check temperature of chamber.
Check Lamps.
Check if product is suitable for this type of balance.
Check the temperature sensor calibration.
Check the temperature sensor calibration.
Check whether the lamp is working.
Check the temperature sensor calibration.
© Adam Equipment Company 2006
22
8.0 REPLACEMENT PARTS AND ACCESSORIES
If you need to order any spare parts and accessories, contact your supplier or
Adam Equipment. A partial list of such items is as follows• Main Power cord
• Stainless Steel Pan
• Replacement sample pans
• Printer, etc.
9.0 SERVICE INFORMATION
This manual covers the details of operation. If you have a problem with the
scale that is not directly addressed by this manual then contact your supplier for
assistance. In order to provide further assistance, the supplier will need the
following information which should be kept ready:
A. Details of your company
-Name of your company:
-Contact person’s name:
-Contact telephone, e-mail,
fax or any other methods:
B. Details of the unit purchased
(This part of information should always be available for any future correspondence.
We suggest you to fill in this form as soon as the unit is received and keep a printout in your record for ready reference.)
AMB 50
Model name of the scale:
Serial number of the unit:
Software revision number
(Displayed when power is first turned on):
Date of Purchase:
Name of the supplier and place:
C. Brief description of the problem
Include any recent history of the unit. For example:
-Has it been working since it’s delivered
-Has it been in contact with water
-Damaged from a fire
-Electrical Storms in the area
-Dropped on the floor, etc.
© Adam Equipment Company 2006
23
WARRANTY INFORMATION
Adam Equipment offers Limited Warranty (Parts and Labour) for the
components failed due to defects in materials or workmanship. Warranty
starts from the date of delivery.
During the warranty period, should any repairs be necessary, the purchaser
must inform its supplier or Adam Equipment Company. The company or its
authorised Technician reserves the right to repair or replace the
components at the purchaser’s site or any of its workshops depending on
the severity of the problems at no additional cost. However, any freight
involved in sending the faulty units or parts to the service centre should be
borne by the purchaser.
The warranty will cease to operate if the equipment is not returned in the
original packaging and with correct documentation for a claim to be
processed. All claims are at the sole discretion of Adam Equipment.
This warranty does not cover equipment where defects or poor performance
is due to misuse, accidental damage, exposure to radioactive or corrosive
materials, negligence, faulty installation, unauthorised modifications or
attempted repair or failure to observe the requirements and
recommendations as given in this User Manual.
Repairs carried out under the warranty does not extend the warranty period.
Components removed during the warranty repairs become the company
property.
The statutory right of the purchaser is not affected by this warranty. The
terms of this warranty is governed by the UK law. For complete details on
Warranty Information, see the terms and conditions of sale available on our
web-site.
© Adam Equipment Company 2006
24
Manufacturer’s Declaration of Conformity
This product has been manufactured in accordance with the harmonised European standards,
following the provisions of the below stated directives:
Electro Magnetic Compatibility Directive 89/336/EEC
Low Voltage Directive 73/23/EEC
Adam Equipment Co. Ltd.
Bond Avenue
Denbigh East Estate
Milton Keynes, MK1 1SW
United Kingdom
FCC COMPLIANCE
This equipment has been tested and found to comply with the limits for a Class A digital device,
pursuant to Part 15 of the FCC Rules. These limits are designed to provide reasonable protection
against harmful interference when the equipment is operated in a commercial environment. The
equipment generates, uses, and can radiate radio frequency energy and, if not installed and used in
accordance with the instruction manual, may cause harmful interference to radio communications.
Operation of this equipment in a residential area is likely to cause harmful interference in which case
the user will be required to correct the interference at own expense.
Shielded interconnect cables must be employed with this equipment to insure compliance with the
pertinent RF emission limits governing this device.
Changes or modifications not expressly approved by Adam Equipment could void the user’s authority
to operate the equipment.
© Adam Equipment Company 2006
ADAM EQUIPMENT is an ISO 9001:2000 certified global organisation with more than 30
years experience in the production and sale of electronic weighing equipments. Products are
sold through a world wide distributor network -supported from our company locations in the
UK, USA, SOUTH AFRICA and CHINA. The company and their distributors offer a full range
of Technical Services such as on site and workshop repair, preventative maintenance and
calibration facilities.
ADAM’s products are predominantly designed for the Laboratory, Educational, Medical and
Industrial Segments. The product range can be classified as follows:
−
−
−
−
−
Analytical and Precision Laboratory Balances
Top Loading Balances for Educational establishments
Counting Scales for Industrial and Warehouse applications
Digital Weighing/Check-weighing Scales
High performance Platform Scales with extensive software
features including parts counting, percent weighing etc.
− Digital Electronic Scales for Medical use
− Retail Scales for price computing
Adam Equipment Co. Ltd.
Bond Avenue
Milton Keynes
MK1 1SW
UK
Adam Equipment Inc.
26, Commerce Drive
Danbury, CT
06810
USA
Phone:+44 (0)1908 274545
Fax: +44 (0)1908 641339
Phone: +1 203 790 4774
Fax: +1 203 792 3406
e-mail:
[email protected]
e-mail:
[email protected]
Adam Equipment S.A. (Pty)
Ltd.
P.O. Box 1422
Kempton Park 1620
Johannesburg
Republic of South Africa
Phone +27 (0)11 974 9745
Fax: +27 (0)11 392 2587
e-mail:
[email protected]
© Copyright by Adam Equipment Co. Ltd. All rights reserved. No part of this publication may
be reprinted or translated in any form or by any means without the prior permission of Adam
Equipment.
Adam Equipment reserves the right to make changes to the technology, features,
specifications and design of the equipment without notice.
All information contained within this publication was to the best of our knowledge timely,
complete and accurate when issued. However, we are not responsible for misimpressions
which may result form the reading of this material.
The latest version of this publication can be found on our Website.
Visit us at www.adamequipment.com
© Adam Equipment Company 2006