1
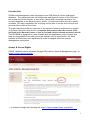
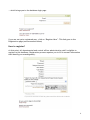
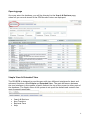
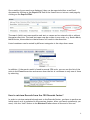
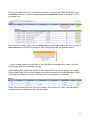
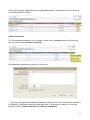
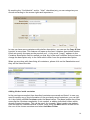
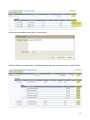
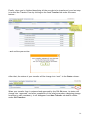
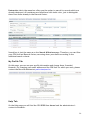
CENTRAL EUROPEAN UNIVERSITY Records Center Database USER MANUAL Budapest 2012 Table of Content Introduction 3 Access & Rights 3 How to register? 4 How to log in? 5 Opening page 6 Simple View & Extended View 6 Browsing records 7 Searching records 8 How to retrieve Records from the CEU Records Center? 9 Retrieval Form Tab How to transfer material to the CEU Records Center? 10 12 New Transfer Tab 12 A step-by-step guide for transferring records 12 Adding containers 13 Adding folders inside container 14 Bad Examples and Some Suggestions for Container Descriptions 17 Old Transfers Tab 19 Destruction Tab 19 My Profile Tab 20 Help Tab 20 2 Introduction OSA Records Management team developed a new CEU Records Center web-based database. The system provides full intellectual and physical control of the CEU semiactive and non-active records. It also offers careful and controlled tracking of the records deposited in the Records center (Nador 11) and ensures that they are readily available. CEU staff responsible for archiving will be able to locate their records and retrieve them within a short time. This User Manual provides an overview of the system’s features and intents to explain its different functions such as how to transfer and properly describe records to be archived in the Records Center or how to find and retrieve already archived records. The CEU-RCDB is designed in a user-friendly and self-explanatory way; however this step-by-step guideline will help you to get familiar with it more closely. All these features and functions were developed in order to support effective records management procedures. Access & Access Rights CEU-RC database can be accessed through CEU website, Records Management page, at https://www.ceu.hu/records … or directly through the following link http://ceurcd.osaarchivum.org/office/ 3 … which brings you to the database login page If you are not yet a registered user, click on “Register Here”. This link goes to the Registration page (see screenshot below) How to register? At this point, all departmental and central offices administrative staff is eligible to register to the database. Registration process requires you to fill in several information that identify you unambiguously. 4 Please fill out the fields on the Registration page. All fields marked with an asterisk are mandatory fields. When you are done, select CEU Unit where you are working and then type the security code into the field you see in the image below. The letters are not case-sensitive. In case you cannot figure out the code, change it by clicking on “Get another image”. If you work for more than one CEU Unit, please contact the CEU Records Assistant Milos Pavlovic at [email protected]. After submitting your registration you will receive an automatic confirmation once your account is activated. How to log in? For logging in, please enter your email address and password. In case you forgot your password click on “New Password” and fill out the field. Your password will be sent in an email to you, which you can later change on the My Profile page. 5 Opening page Once you enter the database, you will be directed to the Search & Retrieve page, where all you records stored in the CEU Records Center are displayed: Simple View & Extended View The CEU-RCDB is designed to provide users with two different interfaces for basic and advanced functions called Simple and Extended View. The main difference between the two interfaces is the number of quick links at the top of the screen to other parts of the database. The Simple View of the system is set up as the default and contains four most frequently used tabs: Search & Retrieve New Transfers Retrieval Form Help 6 The Extended View contains three additional links: Search & Retrieve New Transfers Old Transfer Retrieval Form Destruction My Profile Help Browsing records Database opening page displays a list of active (not destroyed) records sorted by containers and folders and in a way they were described during the transfer. If Container (box or binder) description is too long, you can see the entire description by clicking on the link [more]. Sometime a container has several folders in it. To see which one, in the Folders column you can click on the blue link showing the number of the folders (e.g. “6 folders”) and all folders will be listed as in the screen shot below. 7 Searching records Besides by browsing records page by page, a particular container you are looking for may be found by entering search criteria in the Search box. Search can be narrowed down by selecting your CEU Unit and the Records Series. After that please enter your search term and/or document creation year. By default, search will go through description fields and active (not destructed) records only. You may want to tick/un-tick some other checkbox to expand or further narrow down your search. That way one can search by a Records Series name, the person who transferred records to the Records center (Contact Person) or among confidential / vital records only. 8 Once results of your search are displayed, they can be exported either as an Excel document by clicking on the Export CSV link in the Search box or into as a web page by clicking on the Export HTML. The search field is not case-sensitive and text or names can be entered with or without Hungarian diacritics. First and last name may be written in any order: e.g. Kovács Mária, Mária Kovács, Kovacs Maria or Maria Kovacs will result in the same hits. Listed containers can be sorted by different categories in the drop-down menu. In addition, if the search result is found in several CEU units, you can see the list of the units in the Found in section and narrow down the list of containers to only one of them by selecting. How to retrieve Records from the CEU Records Center? In order to retrieve material already sent to the Records Center, you have to perform an initial search as it is explained in the previous chapter. After you found container(s) you need, click the “Add” button in the Retrieval Form column at the end of the row. 9 After you successfully added the item, you will see a green pop-up window with a message which confirms the procedure. However, in case the item was already added to the Retrieval Form or retrieved by you or another user, a yellow pop-up message will alert you. Retrieval Form Tab Once all containers you need are selected, they will appear on the Retrieval Form tab. The latest added form is on the top of the list. 10 Check once again the list of containers you want to retrieve by clicking the link in the Containers column. It can be modified by pressing Remove button at the end of each container row. Once the list is ready, right click the Menu button at the right end of the row and select Send retrieval from the pop-up menu. After confirming with the popup window… … your retrieval request will be sent to the OSA Records management team, who will provide you with the requested records. After sending the request the status of your Retrieval Form will be changed into sent, which means that your retrieval request was sent via email to the administrators. After containers are delivered to you, the status will be changed to “retrieved”. When your retrieval period is over (two weeks), the system will notify you via email if records were not returned to the records center. 11 How to transfer material? New Transfer Tab Inactive or semi-active records that are not frequently used are good candidates for transfer to the Records Center, so the precious office space is not wasted. These records are transferred and kept in the Records Center according to the CEU Records Management Policy and the Records Retention Schedule. In order to meet the requirements and easy retrieve records later, it is essential to pay attention to filling out the Transfer Form correctly. Precisely described records are important for effective storage and retrieval activities, they help in a systematic and controlled disposal process, and lower risk and exposure to litigation. To find more on records management in general and existing CEU procedures see CEU website: https://www.ceu.hu/records The New Transfer page is usually empty when you start with a new transfer. However, it is possible that at the New Transfer page you see previously started transfers which are still under process. Under the Menu button you will find the functions you will need to navigate your transfer though the process. A step-by-step guide for transferring records As a first step, click on the Add New Transfer button and select your CEU Unit, for which you would like to transfer the records. By default, only the CEU unit(s) you are working for will be listed. 12 After selecting your department by pressing Save button, new transfer form will show up listed among the others. Adding Containers To list containers scheduled for a transfer, hover over the Menu button and from the pop-up menu select Add New Container And describe containers one by one in the form… ,,, by selecting appropriate Records Series and filling in all other information necessary to indentify a container during transfer and later if you need to retrieve it from the Records Center. Please note that all fields are mandatory. 13 By marking the “Confidential” and/or “Vital” check box(es), you can categorize your records according to the access rights and importance. In case you have more containers with similar description, you can use the Copy & Save function to save time. This feature will open up the next container description window filled out exactly the same as the previous one. A tiny word “[copy]” appears in the Container Description field to remind you that this is the next container and you have to change the description only in the fields which differ from the previous description. When you are done with describing all containers, please click on the Save button and they will be listed like this: Adding folders inside container In the previous screenshot thee described containers are saved and listed. In case you need to modify any of the information of the previously saved containers, you can still do it by clicking on Edit Container under the Menu button. The Menu button also offers removing the container completely if not needed, or adding individual folders within already created container. This can be used, for example, when transferring student files and one box contains several of them. Hove rover the Menu button at the end of the row of the chosen container and select Add New Folder 14 In the pop-up window enter title of the folder: After all folders are described, click Save button and you can see the list of all of them. 15 Finally, when you’ve finished describing all the records to be transferred, your last step is to send the Transfer Form by clicking on the Send Transfer link under the menu button… …and confirm your action. After that, the status of your transfer will be change into “sent” in the Status column. When your transfer form is reviewed and approved by the OSA RM team, its status will change into “approved” and after completion of the whole procedure (assigning storage locations to each container), it will disappear from New Transfer tab and be visible under Old Transfers. 16 Bad Examples and Some Suggestions for Container Descriptions It is of crucial importance to describe records and containers properly since wrong or unclear descriptions can make search and retrieval difficult, in extreme cases even impossible. In case of auditing or litigation, finding records with delay or not finding them at all can harm your institution a lot. Be always sure that your container and folder descriptions are informative, clear, and comprehensible not only for you but for other colleagues or possible successors as well. The descriptions should not be too general or too short. Avoid using acronyms and abbreviations or use them after you spell out the whole term; in case of grant numbers or other numbering systems, you should list all the numbers, not only e.g. “from 3001 to 3015” or e.g. “3001 through 3015”, included in a container in order to assist effective search and retrieval. Bad example 1 In this example the Records Series is “Correspondence - Partnering Organization” and the Container Description says “Correspondence”. This description is too general and redundant since you know from the Records Series already that the container contains correspondence. You should specify in the description the name of the partnering organization and the topic of the correspondence if possible. 17 Bad example 2 In this example is not enough to say “petty cash HUF” as description. It only clarifies the currency of the petty cash records; however, you need to describe the content more precisely. Usually, you have more binders from the year 2000 which contain petty cash HUF. Specify in the description the exact date range of the content of the particular binder and in addition the binder number if you think it is helpful. Bad example 3 The following example contains more mistakes. It is advisable not to use abbreviations in the description because some colleagues might not know what does it stand for, but also because users usually search for whole words and not for possible abbreviations. In 18 this case GI might stand for Grant ID, but also the term Grant Number is commonly used. Let’s assume that a user might want to retrieve Grant Number 3010. The easiest would be to put into the search field the number 3010 after you selected the CEU Unit for which you search for the given grant file. Obviously, it is not possible to find the particular grant file since the number was not written into the description field. Because of records management practices, we ask the users not to pack into archival boxes records from a very wide date range. If the retention period of the above mentioned grant files is ten years, the first records from the box could be destroyed in 2009. However, since also records from 2004 are this box, the content of the box can only be destroyed in 2015. We might waste money and time by keeping the box for an additional six years. Try to pack records into archival boxes from a narrow date range, for instance from 1998 to 2000 only. In case of folder description, do not write the same description into the Container and Folder description field. For instance, putting all grantee names into the container description and then again into folder description is redundant. Put a general description into the Container Description field and a detailed specific description into the Folder Description field. In case of binders or folders, write first the exact description of the binder or folder into the description field and then if you think that it is needed or useful and helpful write additional information after. Old Transfers Tab The Old Transfers page offers you the option to review all previous transfers, sorted by date or contact person. Destruction Tab CEU Records must be retained in a particular location (offices, records center) and form during the period of time which is set in the Records Retention Schedule. When the retention period expires, records should be destroyed or, if they have historical value, transferred to the Open Society Archives Records to be destroyed will be selected by the Records Management Team according to the Retention Schedule. The Records Destruction Authorization Form will be prepared, listing all the containers with detailed description (records series name, container and folder description, and years). Responsible person at the administrative office or department have to check the container list and authorize the destruction. Only after the authorization is the Records Management team entitled to carry out the records destruction. 19 Destruction tab in the menu bar offers you the option to search for records which are already destroyed. All containers are listed here with violet color, just to distinguish them from those already in the Records Center. Search box is just the same as on the Search & Retrieve page. Therefore, you can filter your CEU Unit and Records Series, narrowing down your search according to the additional search criteria. My Profile Tab On this page, you can see your profile information and change them if needed. However, for changing your email address and the CEU Unit for which you work, please contact the Records Assistant at [email protected]. Help Tab On the Help page you will find the CEU RCDB User Manual and the administrator’s contact information. 20