1
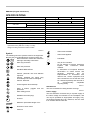
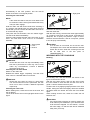
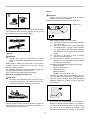
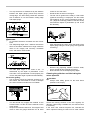
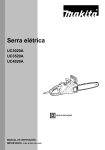
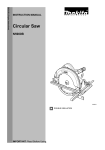
ENGLISH (Original instructions)
INSTRUCTION MANUAL
Chain Saw
UC3020A
UC3520A
UC4020A
006906
DOUBLE INSULATION
IMPORTANT: Read Before Using.
1
ENGLISH (Original instructions)
SPECIFICATIONS
Model
UC3020A
Max. chain speed (m/s)
UC4020A
13.3
Cutting length
300 mm
Type
Saw chain
UC3520A
350 mm
400 mm
90SG
Pitch
3/8"
Oil pump
Automatic
Oil tank capacity (l)
0.20
Power transmission
Direct
Chain brake
Manual
Run-down brake
Mechanical
Overall length (without guide bar)
436 mm
Net weight
4.3 kg
4.4 kg
DIN 57282/HO 7RN -F L=30 m max.,3x1.5 mm2
Extension cable (optional)
• Due to our continuing program of research and development, the specifications herein are subject to change without notice.
• Specifications may differ from country to country.
• Weight according to EPTA-Procedure 01/2003
END218-5
Chain brake released
Symbol
Chain brake applied
The following show the symbols used for the equipment.
Be sure that you understand their meaning before use.
Read instruction manual and follow the
warnings and safety instructions.
Wear eye protection.
Prohibited!
Only for EU countries
Do not dispose of electric equipment
together
with
household
waste
material!
In observance of European Directive
2012/19/EU on waste electric and
electronic
equipment
and
its
implementation in accordance with
national law, electric equipment that
have reached the end of their life must
be collected separately and returned to
an
environmentally
compatible
recycling facility.
Wear ear protection.
DOUBLE INSULATION
Caution: particular care and attention
required!
Caution: withdraw the mains plug
immediately if the cable is damaged!
Caution: kickback!
Protect against rain and damp!
ENE031-1
Intended use
The tool is intended for cutting lumbers and logs.
Wear a helmet, goggles and ear
protection!
Wear safety gloves!
ENF002-2
Power supply
The tool should be connected only to a power supply of
the same voltage as indicated on the nameplate, and
can only be operated on single-phase AC supply. They
are double-insulated and can, therefore, also be used
from sockets without earth wire.
Withdraw the mains plug!
First aid
Maximum permissible length of cut
Direction of chain travel
Chain oil
2
ENF100-1
ENH026-6
For European countries only
For public low-voltage distribution systems of
between 220 V and 250 V.
Switching operations of electric apparatus cause
voltage fluctuations. The operation of this device under
unfavorable mains conditions can have adverse effects
to the operation of other equipment. With a mains
impedance equal or less than 0.35 Ohms it can be
presumed that there will be no negative effects. The
mains socket used for this device must be protected
with a fuse or protective circuit breaker having slow
tripping characteristics.
EC Declaration of Conformity
We Makita Corporation as the responsible
manufacturer declare that the following Makita
machine(s):
Designation of Machine:
Chain Saw
Model No./ Type: UC3020A, UC3520A, UC4020A
Specifications: see "SPECIFICATIONS" table.
are of series production and
Conforms to the following European Directives:
2000/14/EC, 2006/42/EC
And are manufactured in accordance with the following
standards or standardised documents:
EN60745
The EC-Type Examination Certificate No.M6A 12 10
26932 045
The EC-Type Examination per 98/37/EC and
2006/42/EC was performed by:
TÜV SÜD Product Service GmbH,
Ridlerstraße 65, 80339 MÜNCHEN, Germany
Identification No. 0123
The technical documentation is kept by:
Makita International Europe Ltd.
Technical Department,
Michigan Drive, Tongwell,
Milton Keynes, Bucks MK15 8JD, England
ENG905-1
Noise
The typical A-weighted
according to EN60745:
noise
level
determined
Sound pressure level (LpA) : 89 dB(A)
Sound power level (LWA) : 100 dB(A)
Uncertainty (K) : 1 dB(A)
Wear ear protection
ENG900-1
Vibration
The vibration total value (tri-axial
determined according to EN60745:
vector
sum)
Work mode : cutting wood
Vibration emission (ah) : 3.8 m/s2
Uncertainty (K) : 1.5 m/s2
ENG901-1
•
•
•
•
The conformity assessment procedure required by
Directive 2000/14/EC was in Accordance with annex V.
Measured Sound Power Level: 100.0dB (A)
Guaranteed Sound Power Level: 101.0dB (A)
The declared vibration emission value has been
measured in accordance with the standard test
method and may be used for comparing one tool
with another.
The declared vibration emission value may also be
used in a preliminary assessment of exposure.
7.11.2012
WARNING:
The vibration emission during actual use of the
power tool can differ from the declared emission
value depending on the ways in which the tool is
used.
Be sure to identify safety measures to protect the
operator that are based on an estimation of
exposure in the actual conditions of use (taking
account of all parts of the operating cycle such as
the times when the tool is switched off and when it
is running idle in addition to the trigger time).
000230
Tomoyasu Kato
Director
Makita Corporation
3-11-8, Sumiyoshi-cho,
Anjo, Aichi, 446-8502, JAPAN
GEA005-3
General Power Tool Safety
Warnings
WARNING Read all safety warnings and all
instructions. Failure to follow the warnings and
instructions may result in electric shock, fire and/or
serious injury.
3
12.
Use personal protective equipment. Always
wear eye protection. Protective equipment such
as dust mask, non-skid safety shoes, hard hat, or
hearing protection used for appropriate conditions
will reduce personal injuries.
13. Prevent unintentional starting. Ensure the
switch is in the off-position before connecting
to power source and/or battery pack, picking
up or carrying the tool. Carrying power tools
with your finger on the switch or energising power
tools that have the switch on invites accidents.
14. Remove any adjusting key or wrench before
turning the power tool on. A wrench or a key
left attached to a rotating part of the power tool
may result in personal injury.
15. Do not overreach. Keep proper footing and
balance at all times. This enables better control
of the power tool in unexpected situations.
16. Dress properly. Do not wear loose clothing or
jewellery. Keep your hair, clothing, and gloves
away from moving parts. Loose clothes, jewellery
or long hair can be caught in moving parts.
17. If devices are provided for the connection of
dust extraction and collection facilities,
ensure these are connected and properly
used. Use of dust collection can reduce dustrelated hazards.
Power tool use and care
18. Do not force the power tool. Use the correct
power tool for your application. The correct
power tool will do the job better and safer at the
rate for which it was designed.
19. Do not use the power tool if the switch does
not turn it on and off. Any power tool that
cannot be controlled with the switch is dangerous
and must be repaired.
20. Disconnect the plug from the power source
and/or the battery pack from the power tool
before making any adjustments, changing
accessories, or storing power tools. Such
preventive safety measures reduce the risk of
starting the power tool accidentally.
21. Store idle power tools out of the reach of
children and do not allow persons unfamiliar
with the power tool or these instructions to
operate the power tool. Power tools are
dangerous in the hands of untrained users.
22. Maintain power tools. Check for misalignment
or binding of moving parts, breakage of parts
and any other condition that may affect the
power tool’s operation. If damaged, have the
power tool repaired before use. Many
accidents are caused by poorly maintained power
tools.
Save all warnings and
instructions for future reference.
The term "power tool" in the warnings refers to your
mains-operated (corded) power tool or battery-operated
(cordless) power tool.
Work area safety
1.
Keep work area clean and well lit. Cluttered or
dark areas invite accidents.
2.
Do not operate power tools in explosive
atmospheres, such as in the presence of
flammable liquids, gases or dust. Power tools
create sparks which may ignite the dust or fumes.
3.
Keep children and bystanders away while
operating a power tool. Distractions can cause
you to lose control.
Electrical safety
4.
Power tool plugs must match the outlet. Never
modify the plug in any way. Do not use any
adapter plugs with earthed (grounded) power
tools. Unmodified plugs and matching outlets will
reduce risk of electric shock.
5.
Avoid body contact with earthed or grounded
surfaces such as pipes, radiators, ranges and
refrigerators. There is an increased risk of
electric shock if your body is earthed or grounded.
6.
Do not expose power tools to rain or wet
conditions. Water entering a power tool will
increase the risk of electric shock.
7.
Do not abuse the cord. Never use the cord for
carrying, pulling or unplugging the power tool.
Keep cord away from heat, oil, sharp edges or
moving parts. Damaged or entangled cords
increase the risk of electric shock.
8.
When operating a power tool outdoors, use an
extension cord suitable for outdoor use. Use
of a cord suitable for outdoor use reduces the risk
of electric shock.
9.
If operating a power tool in a damp location is
unavoidable, use a residual current device
(RCD) protected supply. Use of an RCD
reduces the risk of electric shock.
10. Use of power supply via a RCD with a rated
residual current of 30mA or less is always
recommended.
Personal safety
11. Stay alert, watch what you are doing and use
common sense when operating a power tool.
Do not use a power tool while you are tired or
under the influence of drugs, alcohol or
medication. A moment of inattention while
operating power tools may result in serious
personal injury.
4
23.
Keep cutting tools sharp and clean. Properly
maintained cutting tools with sharp cutting edges
are less likely to bind and are easier to control.
24. Use the power tool, accessories and tool bits
etc. in accordance with these instructions,
taking into account the working conditions
and the work to be performed. Use of the
power tool for operations different from those
intended could result in a hazardous situation.
Service
25. Have your power tool serviced by a qualified
repair
person
using
only
identical
replacement parts. This will ensure that the
safety of the power tool is maintained.
26. Follow instruction for lubricating and
changing accessories.
27. Keep handles dry, clean and free from oil and
grease.
8.
9.
10.
GEB037-6
11.
Keep all parts of the body away from the saw
chain when the chain saw is operating. Before
you start the chain saw, make sure the saw
chain is not contacting anything. A moment of
inattention while operating chain saws may cause
entanglement of your clothing or body with the
saw chain.
Always hold the chain saw with your right
hand on the rear handle and your left hand on
the front handle. Holding the chain saw with a
reversed hand configuration increases the risk of
personal injury and should never be done.
Hold the power tool by insulated gripping
surfaces only, because the saw chain may
contact hidden wiring or its own cord. Saw
chains contacting a "live" wire may make
exposed metal parts of the power tool "live" and
could give the operator an electric shock.
Wear safety glasses and hearing protection.
Further protective equipment for head, hands,
legs and feet is recommended. Adequate
protective clothing will reduce personal injury by
flying debris or accidental contact with the saw
chain.
Do not operate a chain saw in a tree. Operation
of a chain saw while up in a tree may result in
personal injury.
Always keep proper footing and operate the
chain saw only when standing on fixed,
secure and level surface. Slippery or unstable
surfaces such as ladders may cause a loss of
balance or control of the chain saw.
When cutting a limb that is under tension be
alert for spring back. When the tension in the
12.
Chain saw safety warnings
1.
2.
3.
4.
5.
6.
7.
13.
5
wood fibres is released the spring loaded limb
may strike the operator and/or throw the chain
saw out of control.
Use extreme caution when cutting brush and
saplings. The slender material may catch the
saw chain and be whipped toward you or pull you
off balance.
Carry the chain saw by the front handle with
the chain saw switched off and away from
your body. When transporting or storing the
chain saw always fit the guide bar cover.
Proper handling of the chain saw will reduce the
likelihood of accidental contact with the moving
saw chain.
Follow instructions for lubricating, chain
tensioning
and
changing
accessories.
Improperly tensioned or lubricated chain may
either break or increase the chance for kickback.
Keep handles dry, clean, and free from oil and
grease. Greasy, oily handles are slippery causing
loss of control.
Cut wood only. Do not use chain saw for
purposes not intended. For example: do not
use chain saw for cutting plastic, masonry or
non-wood building materials. Use of the chain
saw for operations different than intended could
result in a hazardous situation.
Causes and operator prevention of kickback:
Kickback may occur when the nose or tip of the
guide bar touches an object, or when the wood
closes in and pinches the saw chain in the cut.
Tip contact in some cases may cause a sudden
reverse reaction, kicking the guide bar up and
back towards the operator.
Pinching the saw chain along the top of the guide
bar may push the guide bar rapidly back towards
the operator.
Either of these reactions may cause you to lose
control of the saw which could result in serious
personal injury. Do not rely exclusively upon the
safety devices built into your saw. As a chain saw
user, you should take several steps to keep your
cutting jobs free from accident or injury.
Kickback is the result of tool misuse and/or
incorrect operating procedures or conditions and
can be avoided by taking proper precautions as
given below:
Maintain a firm grip, with thumbs and
fingers encircling the chain saw handles,
with both hands on the saw and position
your body and arm to allow you to resist
kickback forces. Kickback forces can be
controlled by the operator, if proper
precautions are taken. Do not let go of the
chain saw.
4.
5.
The chain saw is not intended for commercial use.
Do not overload the chain saw.
Personal protective equipment
1.
2.
006908
Do not overreach and do not cut above
shoulder height. This helps prevent
unintended tip contact and enables better
control of the chain saw in unexpected
situations.
Only use replacement bars and chains
specified by the manufacturer. Incorrect
replacement bars and chains may cause
chain breakage and/or kickback.
Follow the manufacturer’s sharpening
and maintenance instructions for the saw
chain. Decreasing the depth gauge height
can lead to increased kickback.
Protection against electric shock
ADDITIONAL SAFETY RULES
1.
2.
3.
4.
5.
Read the instruction manual in order to familiarize
yourself with operation of the chain saw.
Before using the chain saw for the first time,
arrange to have instruction in its operation. If this
is not possible, at least practice cutting round
timber on a trestle before beginning work.
The chain saw must not be used by children or
young persons under 18 years of age. Young
persons over 16 years of age may be exempted
from this restriction if they are undergoing training
under the supervision of an expert.
Working with the chain saw requires a high level
of concentration. Do not work with the saw if you
are not feeling fit and well. Carry out all work
calmly and carefully.
Never work under the influence of alcohol, drugs
or medication.
1.
2.
3.
The chain saw must not be used in wet
weather or damp environments, as the
electric motor is not waterproof.
Only plug the saw into sockets in tested electrical
circuits. Check that the system voltage matches
that on the rating plate. Ensure that a 16 A line
fuse is fitted. Saws used in the open air must be
connected to a residual current-operated circuitbreaker with an operating current no higher than
30 mA.
Should the connecting cable be
damaged, withdraw the mains plug
immediately.
Safe working practices
1.
Before starting work, check that the chain saw is
in proper working order and that its condition
complies with the safety regulations. Check in
particular that:
•
The chain brake is working properly;
•
The run-down brake is working properly;
•
The bar and the sprocket cover are fitted
correctly;
•
The chain has been sharpened and tensioned
in accordance with the regulations;
•
The mains cable and mains plug are
undamaged;
Refer to the "CHECKS " section.
2.
Always ensure in particular that the extension
cable used is of adequate cross-section (see
"SPECIFICATIONS"). When using a cable reel,
wind the cable completely off the reel. When
Proper use
1.
Clothing must be close-fitting, but must not
obstruct mobility.
Wear the following protective clothing during
work:
•
A tested safety helmet, if a hazard is
presented by falling branches or similar;
•
A face mask or goggles;
•
Suitable ear protection (ear muffs, custom or
mouldable ear plugs). Octave brand analysis
upon request.
•
Firm leather safety gloves;
•
Long trousers manufactured from strong
fabric;
•
Protective dungarees of cut-resistant fabric;
•
Safety shoes or boots with non-slip soles,
steel toes, and cut-resistant fabric lining;
•
A breathing mask, when carrying out work
which produces dust (e.g. sawing dry wood).
The chain saw is intended solely for cutting wood.
Do not use it for example to cut plastic or porous
concrete.
Only use the chain saw for operations described
in this instruction manual. Do not, for example,
use it to trim hedges or for similar purposes.
The chain saw must not be used for forestry work,
i.e. for felling and limbing standing timber. The
chain saw cable does not provide the operator
with the mobility and safety required for such
work.
6
3.
4.
5.
6.
7.
8.
using the saw in the open air, ensure that the
cable employed is intended for open-air use and
is rated accordingly.
Keep the cord away from the cutting area and to
position cord so that it will not be caught on
branches, and the like, during cutting.
Do not operate the chain saw in the vicinity of
flammable dust or gases, as the motor generates
sparks and presents a risk of explosion.
Work only on firm ground and with a good footing.
Pay particular attention to obstacles (e.g. the
cable) in the working area. Take particular care
where moisture, ice, snow, freshly cut wood or
bark may make surfaces slippery. Do not stand
on ladders or trees when using the saw.
Take particular care when working on sloping
ground; rolling trunks and branches pose a
potential hazard.
Never cut above shoulder height.
Hold the chain saw with both hands when
switching it on and using it. Hold the rear
handle with your right hand and the front handle
with your left. Hold the handles firmly with your
thumbs. The bar and the chain must not be in
contact with any objects when the saw is
switched on.
006909
17. When moving around between sawing operations,
apply the chain brake in order to prevent the
chain from being operated unintentionally. Hold
the chain saw by the front handle when carrying it,
and do not keep your finger on the switch.
Withdraw the mains plug when taking breaks or
leaving the chain saw unattended. Leave the
chain saw where it cannot present a hazard.
18. Withdraw the mains plug when taking breaks or
leaving the chain saw unattended. Leave the
chain saw where it cannot present a hazard.
Kickback
1.
Hazardous kickback may arise during work with
the chain saw. Kickback arises when the tip of the
bar (in particular the upper quarter) comes into
contact with wood or another solid object. This
causes the chainsaw to be deflected in the
direction of the operator.
006908
9.
10.
11.
12.
13.
14.
15.
16.
Clean the area to be cut of foreign objects such
as sand, stones, nails, wire, etc. Foreign objects
damage the bar and chain, and can lead to
dangerous kickback.
Take particular care when cutting in the vicinity of
wire fences. Do nut cut into the fence, as the saw
may kick back.
Do not cut into the ground.
Cut pieces of wood singly, not in bunches or stacks.
Avoid using the saw to cut thin branches and
roots, as these can become entangled in the
chain saw. Loss of balance presents a hazard.
Use a secure support (trestle) when cutting sawn
timber.
Do not use the chain saw to prise off or brush
away pieces of wood and other objects.
Guide the chain saw such that no part of your
body is within the extended path of the saw chain
(see figure).
006919
2.
In order to avoid kickback, observe the following:
Never begin the cut with the tip of the bar.
•
Never use the tip of the bar for cutting. Take
particular care when resuming cuts which
have already been started.
•
Start the cut with the chain running.
•
Always sharpen the chain correctly. In
particular, set the depth gauge to the correct
height (refer to "Sharpening the chain " for
details).
•
Never saw through several branches at a time.
•
When limbing, take care to prevent the bar
from coming into contact with other branches.
•
When bucking, keep clear of adjacent trunks.
Always observe the bar tip.
•
Use a trestle.
•
7
4.
Safety features
1.
Always check that that the safety features are in
working order before starting work. Do not use
the chain saw if the safety features are not
working properly.
Chain brake:
The chain saw is fitted with a chain brake which
brings the saw chain to a standstill within a fraction
of a second. It is activated when the hand guard is
pushed forwards. The saw chain then stops within
0.15 s, and the power supply to the motor is
interrupted.
2
1
5.
6.
7.
8.
9.
1. Chain brake
applied
2. Chain brake
released
Have any damage to the plastic housing repaired
properly and immediately.
Do not use the saw if the switch trigger is not
working properly. Have it properly repaired.
Under no circumstances should any modifications
be made to the chain saw. Your safety is at risk.
Do not carry out maintenance or repair work other
than that described in this instruction manual. Any
other work must be carried out by MAKITA
Service.
Only use original MAKITA replacement parts and
accessories intended for your model of saw. The
use of other parts increases the risk of accident.
MAKITA accepts no responsibility for accidents or
damage should non-approved bars, saw chains
or other replacement parts or accessories be
used. Refer to the "Extract from the spare parts
list " for approved saw bars and chains.
First aid
1.
006920
Run-down brake:
The chain saw is equipped with an run down brake
which brings the saw chain to an immediate stop
when the ON/OFF switch is released. This
prevents the saw chain from running on when
switched off, and thus presenting a hazard.
The front and rear hand guards protect the
user against injury from pieces of wood
which may be thrown backwards, or a
broken saw chain.
The trigger lockout prevents the chain saw
from being switched on accidentally.
The chain catcher protects the user against
injury should the chain jump or break.
2.
NOTE:
Individuals with poor circulation who are exposed to
excessive vibration may experience injury to blood
vessels or the nervous system.
Vibration may cause the following symptoms to occur in
the fingers, hands or wrists: "Falling asleep
"(numbness), tingling, pain, stabbing sensation,
alteration of skin colour or of the skin.
If any of these symptoms occur, see a physician!
Transport and storage
1.
2.
When the chain saw is not in use or is
being transported, withdraw the mains
plug and fit the scabbard supplied with
the saw. Never carry or transport the
saw with the saw chain running.
Carry the chain saw by the front handle only, with
the bar pointing backwards.
Keep the chain saw in a secure, dry and locked
room out of the reach of children. Do not store the
chain saw outdoors.
SAVE THESE INSTRUCTIONS.
WARNING:
DO NOT let comfort or familiarity with product
(gained from repeated use) replace strict adherence
to safety rules for the subject product. MISUSE or
failure to follow the safety rules stated in this
instruction manual may cause serious personal
injury.
Maintenance
1.
2.
3.
Do not work alone. Always work within
shouting distance of a second person.
Always keep a first-aid box to hand. Replace any
items taken from it immediately.
Should you request assistance in the event of an
accident, state the following:
•
Where did the accident happen?
•
What happened?
•
How many persons are injured?
•
What injuries do they have?
•
Who is reporting the accident?
Withdraw the plug from the socket before carrying
out any adjustments or maintenance.
Check the power cable regularly for damage to
the insulation.
Clean the chain saw regularly.
8
Parts supplied
4
5
3
7
6
2
1
11
9
8
10
12
15
14
006907
1
Rear handle
2
Switch trigger
10
Oil level sight
3
Oil filter cap
11
Rear hand guard
4
Front handle
12
Serrated rail
(claw stop)
5
Front hand guard
13
Lock-off button
6
Guide bar
14
Chain catcher
7
Saw chain
15
Scabbard
8
Lever
9
Sprocket cover
006996
9
13
ASSEMBLY
FUNCTIONAL DESCRIPTION
•
CAUTION:
Always be sure that the tool is switched off and
unplugged before adjusting or checking function
on the tool.
•
Switch action
CAUTION:
Always be sure that the tool is switched off and
unplugged before carrying out any work on the
tool.
Installing or removing saw chain
1
2
CAUTION:
Always be sure that the tool is switched off and
unplugged before installing or removing the saw
chain.
•
Always wear gloves when installing or removing
the saw chain.
1.
To remove the saw chain, move the lever in the
upright position.
1. Lock-off button
2. Switch trigger
•
006910
•
3
CAUTION:
Before plugging in the tool, always check to see
that the switch trigger actuates properly and
returns to the "OFF" position when released.
1. Press in
2. Loosen
3. Sprocket cover
4. Adjusting dial
1
2
4
010567
2.
3.
010373
NOTE:
•
Do not turn on and off too often within a short time
(five seconds or less). The temperature inside the
tool will rise and may cause the tool damage. The
time varies by atmosphere temperature and other
conditions.
To prevent the switch trigger from being accidentally
pulled, a lock-off button is provided.
To start the tool, depress the lock-off button and pull the
switch trigger. Release the switch trigger to stop.
4.
5.
6.
Press the lever and with the lever pressed in, turn
it counterclockwise to loosen the nut until
sprocket cover comes off. (Pressing in the lever
leads to the fitting of lever into the nut.)
Turn the adjusting dial counterclockwise to
release the saw chain tension.
Remove the sprocket cover.
Remove the saw chain and guide bar from the
chain saw.
To install the saw chain, fit in one end of the saw
chain on the top of the guide bar and the other
end of it around the sprocket.
1. Sprocket
1
006939
At this time, fit the saw chain as shown in the figure
because it rotates in the direction of arrow.
7.
Rest the guide bar in place on the chain saw
8.
Turn the adjusting dial counterclockwise to slide
the adjusting pin in the direction of arrow.
10
lightly. (Pressing in the lever leads to the fitting of lever
into the nut.)
1. Adjusting pin
1. Press in.
2. Loosen
1
2
1
006940
9.
Place the sprocket cover on the chain saw so that
the hook at its back cover is inserted into a hole
in the chain saw and the adjusting pin is
positioned in a small hole in the guide bar.
006934
Turn the adjusting dial to adjust saw chain tension.
Grasp the saw chain in the middle of the guide bar and
lift up. The gap between the guide bar and the tie strap
of the saw chain should be approx. 2 - 4 mm. If the gap
is not approx. 2 - 4 mm, slightly turn the adjusting dial
which secures the guide bar. At this time, adjust with the
tip of guide bar slightly pointing up.
1. Hook
2. Hole
3. Small hole
1
3
2-4mm
2
006941
10.
Press in the lever and with the lever depressed
turn it fully clockwise to tighten the nut. Then
make it about a quarter turn counterclockwise to
loosen the nut lightly.
1
5
2
3
1. Low
2. High
3. Adjusting dial
4. Guide bar
5. Saw chain
4
006935
1. Press in
2. Tighten
3. Loosen
1
2
With the lever depressed, turn it fully clockwise to
tighten the nut firmly.
1
3
1. Press in
2. Tighten
2
006942
Adjusting saw chain tension
1
006936
1. Lever
Return the lever to its original position.
006933
The saw chain may become loose after many hours of
use. From time to time check the saw chain tension
before use.
Move the lever in the upright position.
Press in the lever. With the lever depressed, make a
quarter turn on it counterclockwise to loosen the nut
006937
•
11
CAUTION:
Excessively high tension of saw chain may cause
breakage of saw chain, wear of the guide bar
and breakage of the adjusting dial.
Installing or removing saw chain should be carried
out in a clean place free from sawdust and the like.
•
Unscrew the oil filler cap and add oil up to the lower
edge of the filler neck.
Screw the oil filler cap firmly back in place.
Wipe away any spilt chain oil carefully.
When the chain saw is used for the first time, it may
take up to two minutes for the saw chain oil to begin its
lubricating effect upon the saw mechanism. Run the
saw without load until it does so (see "CHECKS ").
OPERATION
Lubrication
CHECKS
Before starting work, carry out the following checks:
Checking the chain tension
Reclaimend
oil
2-4mm
006921
CAUTION:
Always be sure that the tool is switched off and
unplugged before lubricating the saw chain.
Lubricate the saw chain and bar using a biologically
degradable saw chain oil with an adhesion agent. The
adhesion agent in the saw chain oil prevents the oil from
being thrown off the saw excessively quickly. Mineral
oils must not be used, as they are harmful to the
environment.
1
•
3
4
006935
WARNING:
Always withdraw the mains plug before checking
the chain tension, and wear safety gloves.
The saw chain is correctly tensioned when it is in
contact with the underside of the bar and can be raised
approximately 2 - 4 mm from the bar by light finger
pressure.
Check the chain tension frequently, as new chains are
subject to elongation. A chain which is too slack can
jump off the bar, and therefore presents an accident risk.
If the chain is too slack: Refer to the section titled "
Adjusting saw chain tension " and adjust the saw chain
tension again.
Checking the switch action
•
CAUTION:
Prevent the oil from coming into contact with the
skin and eyes. Contact with the eyes causes
irritation. In the event of eye contact, flush the
affected eye immediately with clear water, then
consult a doctor at once.
•
Never use waste oil. Waste oil contains
carcinogenic substances. The contaminants in
waste oil cause accelerated wear of the oil pump,
the bar and the chain. Waste oil is harmful to the
environment.
•
When filling the chain saw with chain oil for the
first time, or refilling the tank after it has been
completely emptied, add oil up to the bottom edge
of the filler neck. The oil delivery may otherwise be
impaired.
Clean the area around the oil filler cap shown in the figure
thoroughly to prevent any dirt from entering the oil tank.
•
1
5
2
1. Low
2. High
3. Adjusting dial
4. Guide bar
5. Saw chain
CAUTION:
Always unplug the tool before testing the switch trigger.
Locking the switch trigger in the ON position is
prohibited.
1
2
1. Lock-off button
2. Switch trigger
1. Oil filler cap
006910
It must not be possible to depress the switch trigger
unless the lock-off button is first depressed.
The switch trigger must not jam in the depressed
position. When released, the switch trigger must return
006922
12
automatically to the OFF position, and the lock-off
button must return to its original position.
Checking the chain brake
1. Sight glass
NOTE:
•
If the chain saw fails to start, the chain brake must
be released. Pull the hand guard backwards firmly
until you feel it engage.
Hold the chain saw with both hands when switching it
on. Hold the rear handle with your right hand, the front
handle with your left. The bar and the chain must not be
in contact with any object.
First press the lock-off button, then the switch trigger.
The saw chain starts immediately.
Press the hand guard forwards using the back of your
hand. The saw chain must come to an immediate
standstill.
2
3
1
1
006912
Check the oil delivery as follows:
Start the chain saw.
With the saw running, hold the saw chain approximately
15 cm above a tree trunk or the ground. If lubrication is
adequate, the oil spray will produce a light oil trace.
Observe the wind direction, and do not expose yourself
to the oil spray unnecessarily.
1. Hand guard
2. Lock
3. Unlock
•
CAUTION:
If an oil trace is not formed, do not use the saw.
The lifespan of the chain will otherwise be reduced.
Check the oil level. Clean the oil feed groove and
the oil feed hole in the bar (refer to
"MAINTENANCE ").
WORKING WITH THE CHAIN SAW
Bucking
006911
CAUTION:
Should the saw chain not stop immediately when
this test is performed, the saw may not be used
under any circumstances. Consult a MAKITA
specialist repair shop.
Checking the run-down brake
Switch on the chain saw.
Release the switch trigger completely. The saw chain
must come to a standstill within one second.
006913
CAUTION:
•
Should the saw chain not come to a stop within
one second when this test is performed, the saw
must not be used. Consult a MAKITA specialist
repair shop.
Checking the chain oiler
Before starting work, check the oil level in the tank, and
the oil delivery.
The oil level can be seen in the sight glass shown in the
figure.
For bucking cuts, rest the serrated rail shown in the
figure on the wood to be cut.
With the saw chain running, saw into the wood, using
the rear handle to raise the saw and the front one to
guide it. Use the serrated rail as a pivot.
Continue the cut by applying slight pressure to the front
handle, easing the saw back slightly. Move the serrated
rail further down the timber and raise the front handle
again.
When making several cuts, switch the chain saw off
between cuts.
1. Serrated rail
•
1
•
13
CAUTION:
If the upper edge of the bar is used for cutting, the
chain saw may be deflected in your direction if the
chain becomes trapped. For this reason, cut with
the lower edge, so that the saw will be deflected
away from your body.
Felling
CAUTION:
Felling work may only be performed by trained
persons. The work is hazardous.
Observe local regulations if you wish to fell a tree.
•
45o
1. Felling area
006914
Cut wood under tension on the pressure side (A )first.
Then make the final cut on the tension side (B ). This
prevents the bar from becoming trapped.
2 1/2
45o
1
A
B
006917
Before starting felling work, ensure that:
(1) Only persons involved in the felling operation
are in the vicinity;
(2) Any person involved has an unhindered path
of retreat through a range of approximately
45 ° either side of the felling axis. Consider
the additional risk of tripping over electrical
cables;
(3) The base of the trunk is free of foreign
objects, roots and ranches;
(4) No persons or objects are present over a
distance of 2 1/2 tree lengths in the direction
in which the tree will fall.
Consider the following with respect to each tree:
•
Direction of lean;
•
Loose or dry branches;
•
Height of the tree;
•
Natural overhang;
•
Whether or not the tree is rotten.
Consider the wind speed and direction. Do not
carry out felling work if the wind is gusting strongly.
Trimming of root swellings: Begin with the largest
swellings. Make the vertical cut first, then the
horizontal cut.
B
A
006915
Limbing
CAUTION:
Limbing may only be performed by trained
persons. A hazard is presented by the risk of kickback.
When limbing, support the chain saw on the trunk if
possible. Do not cut with the tip of the bar, as this
presents a risk of kickback.
Pay particular attention to branches under tension. Do
not cut unsupported branches from below.
Do not stand on the felled trunk when limbing.
Burrowing and parallel-to-grain cuts
•
•
CAUTION:
Burrowing and parallel-to-grain cuts may only be
carried out by persons with special training. The
possibility of kickback presents a risk of injury.
006918
Cut a scarf: The scarf determines the direction in
which the tree will fall, and guides it. It is made on
the side towards which the tree is to fall. Cut the
scarf as close to the ground as possible. First
make the horizontal cut to a depth of 1/5 -1/3 of
006916
Perform parallel-to-grain cuts at as shallow an angle as
possible. Carry out the cut as carefully as possible, as
the serrated rail cannot be used.
14
the trunk diameter. Do not make the scarf too
large. Then make the diagonal cut.
Cut any corrections to the scarf across its entire
width.
Carry out the maintenance work described below at
regular intervals. Warranty claims will be accepted only
if these operations have been performed regularly and
properly.
Only maintenance work described in this instruction
manual may be performed by the user. Any other work
must be carried out by a MAKITA specialist repair shop.
Cleaning the chain saw
Clean the saw regularly with a clean rag. The handles,
in particular, must be kept free of oil.
Checking the plastic housing
Carry out regular visual inspections of all parts of the
housing. Should any parts be damaged, have them
repaired immediately and properly in a MAKITA
specialist repair shop.
006923
Make the back cut a little higher than the base cut
of the scarf. The back cut must be exactly
horizontal. Leave approximately 1/10 of the trunk
diameter between the back cut and the scarf.
The wood fibers in the uncut trunk portion act as a
hinge. Do not cut right through the fibers under
any circumstances, as the tree will otherwise fall
unchecked. Insert wedges into the back cut in time.
Only plastic or aluminum wedges may be used to
keep the back cut open. The use of iron wedges is
prohibited.
Stand to the side of the falling tree. Keep an area
clear to the rear of the falling tree up to an angle of
45 ° either side of the tree axis (refer to the "
felling area " figure). Pay attention to falling
branches.
An escape path should be planned and cleared as
necessary before cuts are started. The escape
path should extend back and diagonally to the rear
of the expected line of fall as illustrated in figure.
1
•
Sharpen the saw chain when:
Mealy sawdust is produced when damp wood is
cut;
The chain penetrates the wood with difficulty, even
when heavy pressure is applied;
The cutting edge is obviously damaged;
The saw pulls to the left or right in the wood. The
reason for this behaviour is uneven sharpening of
the saw chain, or damage to one side only.
Sharpen the saw chain frequently, but remove only
a little material each time.
Two or three strokes with a file are usually sufficient for
routine resharpening. When the saw chain has been
resharpened several times, have it sharpened in a
MAKITA specialist repair shop.
Sharpening criteria:
All cutters must be of equal length (dimension a).
Cutters of differing length prevent the chain from
running smoothly, and may cause the chain to
break.
Do not sharpen the chain once a minimum cutter
length of 3 mm has been reached. A new chain
must then be fitted.
3
2
009202
MAINTENANCE
•
•
•
CAUTION:
Always withdraw the mains plug and wear safety
gloves when performing work on the saw chain.
006924
1. Felling direction
2. Danger zone
3. Escape route
2
3
Sharpening the saw chain
CAUTION:
Always be sure that the tool is switched off and
unplugged before attempting to perform inspection
or maintenance.
Always wear gloves when performing any
inspection or maintenance.
Never use gasoline, benzine, thinner, alcohol or the
like. Discoloration, deformation or cracks may result.
15
The chip thickness is determined by the distance
between the depth gauge (round nose) and the
cutting edge. The best cutting results are obtained
with a distance of 0.5 mm between cutting edge
and depth gauge.
0.5 mm
0.5 mm
a
a
min.
3 mm
cutters on the saw chain.
Guide the file as shown in the figure.
The file can be guided more easily if a file holder
(optional accessory) is employed. The file holder
has markings for the correct sharpening angle of
30 ° (align the markings parallel to the saw chain)
and limits the depth of penetration (to 4/5 of the
file diameter).
a
30
006925
•
WARNING:
An excessive distance increases the risk of kickback.
The sharpening angle of 30 ° distance must be the
same on all cutters. Differences in angle cause the
chain to run roughly and unevenly, accelerate
wear, and lead to chain breaks.
80
006928
After sharpening the chain, check the height of the
depth gauge using the chain gauge tool (optional
accessory).
80
006929
Remove any projecting material, however small,
with a special flat file (optional accessory).
Round off the front of the depth gauge again.
006926
The side plate angle of the cutter of 80 ° is
determined by the depth of penetration of the
round file. If the specified file is used properly, the
correct side plate angle is produced automatically.
File and file guiding
Use a special round file (optional accessory) for
saw chains, with a diameter of 4.5 mm, to sharpen
the chain. Normal round files are not suitable.
Cleaning the guide bar and lubricating the
return sprocket
•
CAUTION:
Always wear safety gloves for this task. Burrs
present a risk of injury.
006930
006927
Check the running surfaces of the bar regularly for
damage. Clean using a suitable tool, and remove burrs
if necessary.
If the chain saw receives frequent use, lubricate the
return sprocket bearing at least once a week. Before
The file should only engage the material on the
forward stroke. Lift the file off the material on the
return stroke.
Sharpen the shortest cutter first. The length of this
cutter is then the gauge dimension for all other
16
adding new fresh grease, carefully clean the 2 mm hole
on the tip of the guide bar, then force a small quantity of
multi-purpose grease (optional accessory) into the hole.
biological oils begin to acquire an adhesive quality, and
cause damage to the oil pump and components in the
lubricating system.
Before taking the chain saw out of service for a
longer period, empty the oil tank and fill it with a
small quantity of engine oil (SAE 30).
Run the chain saw briefly to flush all residue of the
biological oil out of the tank, lubricating system
and saw mechanism.
When the chain saw is taken out of service, small
quantities of chain oil will leak from it for some time
afterwards. This is normal, and is not a sign of a
fault.
Store the chain saw on a suitable surface.
Before returning the chain saw to service, fill up with
fresh BIOTOP saw chain oil.
To maintain product SAFETY and RELIABILITY, repairs,
any other maintenance or adjustment should be
performed by Makita Authorized Service Centers,
always using Makita replacement parts.
Cleaning the oil guide
1
1. Oil guide
groove
2. Oil feed hole
2
006931
Clean the oil guide groove and the oil feed hole in
the bar at regular intervals.
New saw chains
Use two or three saw chains alternately, so that the saw
chain, sprocket and running surfaces of the bar wear
evenly.
Turn the bar over when changing the chain so that the
bar groove wears evenly.
OPTIONAL ACCESSORIES
Maintaining the chain and run-down brakes
CAUTION:
These
accessories
or
attachments
are
recommended for use with your Makita tool
specified in this manual. The use of any other
accessories or attachments might present a risk of
injury to persons. Only use accessory or
attachment for its stated purpose.
If you need any assistance for more details regarding
these accessories, ask your local Makita Service Center.
Makita Service Center can be found on the Internet
at:www:makita.co.jp/global/index .html
•
Saw chain
•
Scabbard
•
Guide bar complete
•
Chain gauge
•
Round file 4.5 mm
•
Flat file
•
File holder with 4.5 mm file
•
File handle
•
1 I BIOTOP chainsaw oil
•
5 I BIOTOP chainsaw oil
•
Multi-purpose grease
•
Grease gun
The braking systems are very important safety features.
Like any other component of the chain saw, they are
subject to a certain degree of wear. They must be
inspected regularly by a MAKITA specialist repair shop.
This measure is for your own safety.
NOTE:
•
Some items in the list may be included in the tool
package as standard accessories. They may differ
from country to country.
•
CAUTION:
Only use chains and bars which are approved for
this model of saw (refer to " SPECIFICATIONS ").
•
1. Sprocket
1
006932
Before fitting a new saw chain, check the condition of
the sprocket.
CAUTION:
A worn sprocket will damage a new saw chain.
Have the sprocket replaced in this case.
Always fit a new locking ring when replacing the
sprocket.
•
Storing tool
Biologically degradable saw chain oil can only be kept
for a limited period. Beyond two years after manufacture,
17
18
19
Makita Corporation
Anjo, Aichi, Japan
884647G222
20
www.makita.com